
H3 Continuum EZ Studio
Hybrid Timeline Studio with the original H3 Continuum continuation core
日本語 · v0.13.5 release · ZIP · FastH3 OmniRef JSON · REF2VA JSON
H3 Continuum EZ Studio
An interactive ComfyUI timeline powered by the H3 Continuum continuation engine. Arrange media, edit each shot, and export a video with audio. The engine splits long shots into internal parts and carries the scene across them.
Get started
- Extract the release ZIP and place
ComfyUI-H3-Continuum-EZinComfyUI/custom_nodes/. For a Git install, rungit clone https://github.com/ukr8b3g-cmyk/ComfyUI-H3-Continuum-EZ.gitfromcustom_nodes. Update a Git install withgit pull --ff-only. Restart ComfyUI and refresh the browser after installing or updating. - Download the FastH3 OmniRef workflow JSON and drag it into ComfyUI. To save it directly, right-click the link and choose Save link as…. Keep the
.jsonextension. - Install the models below and check their file selections on the subgraph. Open Timeline Studio on the H3 Continuum EZ Timeline node. The template starts with a 10-second singing shot at 1:1 and 0.5 MP. For an image reference, add your own image or ComfyUI's
example.pngif available.
Studio walkthrough
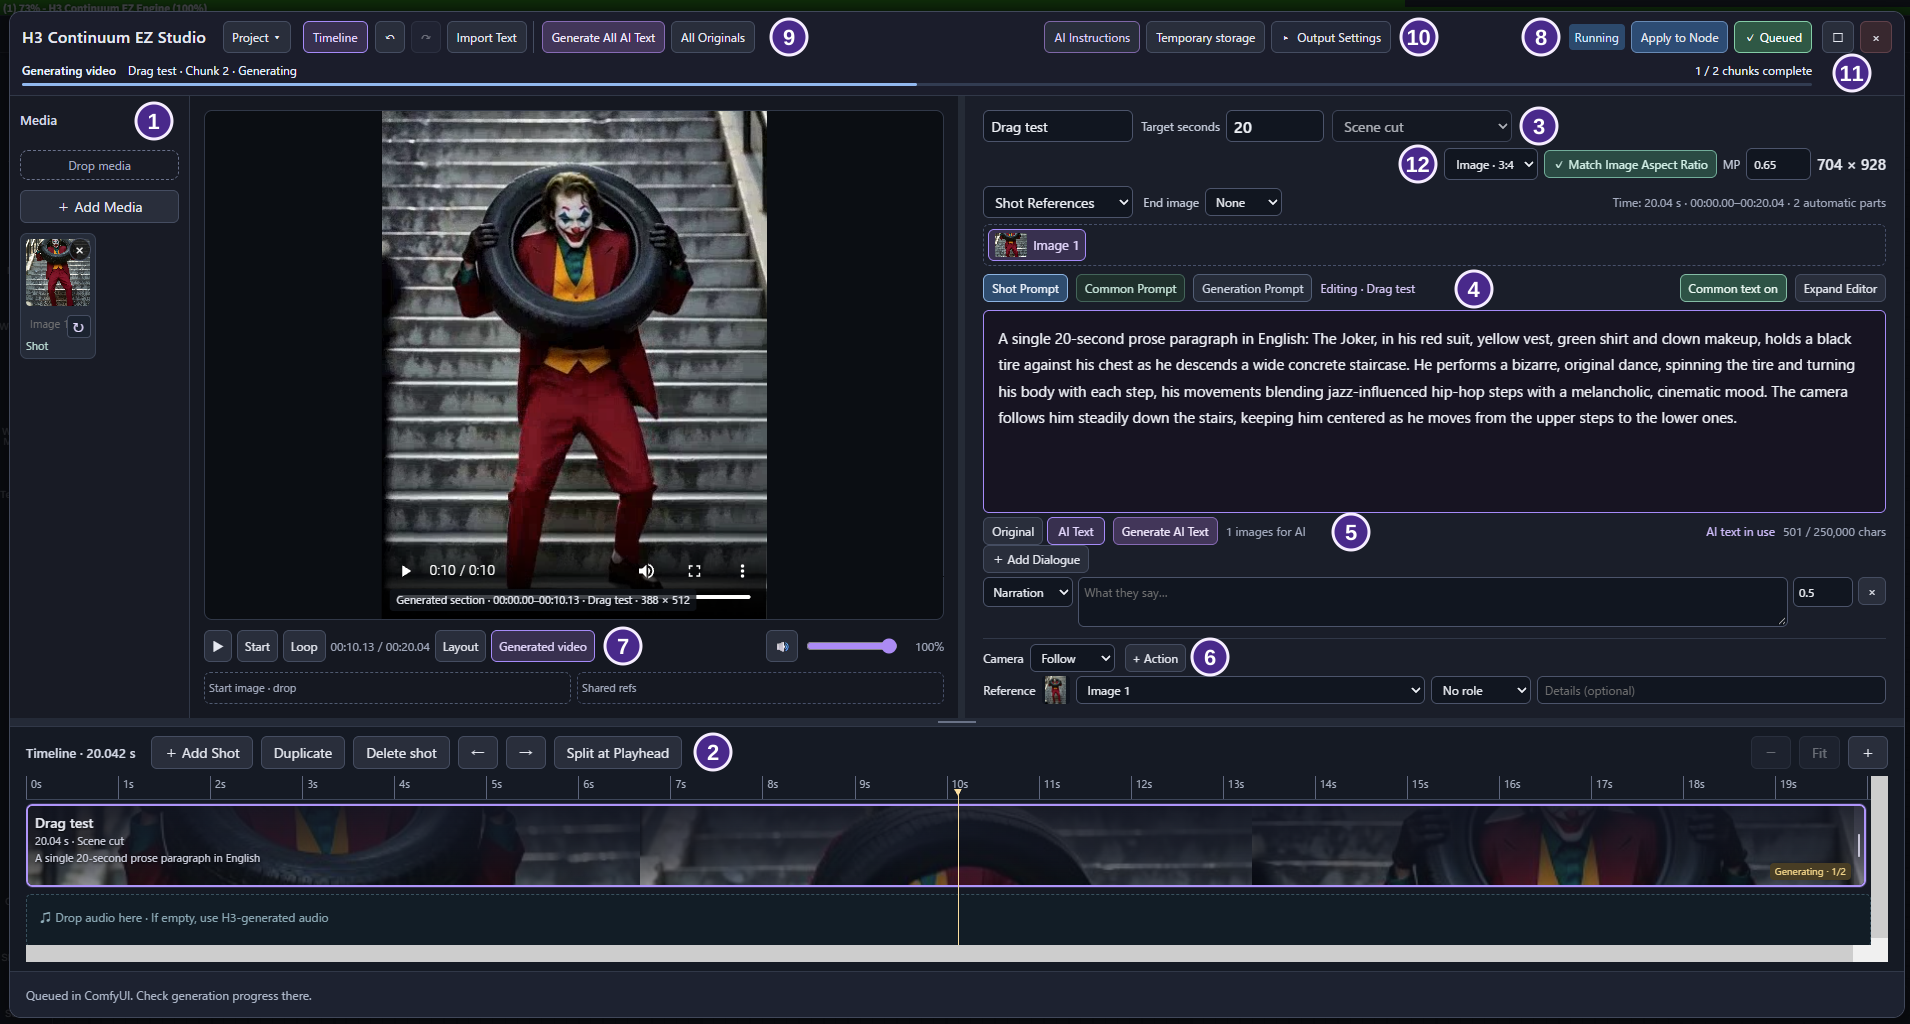
| No. | What to do |
| --- | --- |
| ① Media | Use Add Media or drop images and audio into the library. Click images in the shot's reference row to use them. |
| ② Timeline and audio | Add, duplicate, delete, reorder or split shots. Drag a shot edge to adjust its duration. Use Fit to see the whole timeline. Drop audio on the lower track, then select a clip to move, trim or change its volume. |
| ③ Shot and references | Set Target seconds and Scene cut / Continue. Choose shared or shot references and an optional End image. Time shows the H3-aligned duration and automatic part count. |
| ④ Prompts | Write the selected scene in Shot Prompt and reusable details in Common Prompt. Common text on/off controls their combination. Check the text sent to the model in Generation Prompt, or use Expand Editor for more writing space. |
| ⑤ AI text | Use Generate AI Text below the field. Choose Original / AI Text for video generation. Generate All AI Text processes shot text and All Originals switches back to originals. |
| ⑥ Dialogue and direction | Add Dialogue sets the speaker, words and optional start time. Use Camera, + Action and Reference to describe how the shot should look and move. |
| ⑦ Preview | Layout shows the editing preview. As soon as a generated chunk is available, Studio switches to Generated video and you can play that chunk. Use Start, Loop, and the preview volume controls. Set the optional Start image and Shared refs below the player. |
| ⑧ Apply and queue | Apply to Node copies the draft to the workflow. Apply and Queue also submits the video job, and ✓ Queued confirms submission. Save the workflow in ComfyUI to keep the applied edits. |
| ⑨ Project and editing | Use Project to create, open, or save a .h3ez.json project. Save Project lets you choose a file name and folder in supported browsers. Import Text loads a script into the shot prompts. |
| ⑩ Settings | AI Instructions sets the guidance for new AI text. Temporary storage manages the server's working storage. Output Settings sets the output mode and automatic splitting. |
| ⑪ Render progress | The progress bar shows the active shot and chunk and how many chunks are complete. The timeline shows thumbnails for generated sections. |
| ⑫ Output size | Choose a ratio or select Match Image Aspect Ratio to use an image's proportions. MP controls resolution independently. The resulting pixel dimensions appear on the right. |
The P-H3 prompt upsampler is optional. Without it, keep Original selected and generate video with the existing wiring. Generate AI creates and selects AI text; it does not start a video job. You can edit the AI text or switch back to Original before generating video.
Shot AI automatically receives the shot’s active reference images, start/end images, duration and output aspect ratio. Common text stays separate; its AI action receives only common text and shared references. The reference count beside Generate AI shows the images sent, with details on hover. No image selector or additional setup is needed. Images are reduced to a bounded total size for AI analysis; original assets are unchanged. Changing shot duration or output size keeps saved AI text and its Original / AI Text selection. If the original text or relevant image or direction changes, Studio uses the original and retains the previous AI text.
AI instructions
Use AI Instructions in the Studio toolbar to edit the system instructions for future Generate AI requests. The video default is ready to use; Reset to Default restores it. Save stores the Studio instruction in the project without rewriting existing AI text or originals. Project save/open also retains it.
If the library has images and the prompt has none assigned, Generate AI Text asks whether to add a reference or continue with text only. Saved AI text remains selected when you change the Studio aspect ratio or MP.
An optional Engine → ai_instruction STRING connection takes priority over the Studio instruction. Its upstream text nodes run only when you explicitly generate AI text; the dialog identifies the active external source and retains the local instruction. An empty external value uses the video default. The ordinary video queue does not evaluate this connection, so Original generation remains independent of the AI model and instruction nodes. No template model connections or seed settings need changing.
Shot AI uses the common prompt as read-only context when Common text on is selected; it rewrites only the shot field. Common-prompt AI never rewrites shot text. H3 reference numbers and segment formatting remain deterministic EZ processing. Custom system instructions steer the image-oriented P-H3 upsampler; they do not turn it into a video-trained model.
Template models
Start with FastH3 OmniRef, eight steps. Download H3_Continuum_EZ_Studio_FastH3_OmniRef.json. Model weights and reference media are not bundled.
For REF2VA + Pika Flex, download H3_Continuum_EZ_Studio_REF2VA.json. This workflow needs minimax_h3_ref2va_pruned_int8_convrot.safetensors in models/diffusion_models/ and pika_h3_flex_ref2va_v1_bf16.safetensors in models/loras/. It shares the H3 text encoder, video/audio VAEs and optional AI text model listed below. The Pika LoRA is for REF2VA.
Requirements
| Component | Requirement / verified configuration |
| --- | --- |
| ComfyUI | v0.44.0 or newer recommended for this complete subgraph; verified on v0.44.0. Baked-PDD model loading first shipped in v0.42.0. Earlier releases cannot load this checkpoint correctly. |
| Frontend | Use the version supplied with ComfyUI. This workflow was saved and checked with 1.57.6. |
| Python | 3.13 recommended, verified with 3.13.12. Python 3.13 is not a checkpoint-specific minimum; other Python environments have not been validated for this template. |
| NVIDIA PyTorch | Use a CUDA 13.0 or newer build (cu130+). Verified with 2.14.1+cu130. A CUDA Toolkit installation alone does not upgrade PyTorch's runtime. |
| Comfy Kitchen | Install ComfyUI's pinned dependencies; verified with 0.2.40. Its prebuilt CUDA wheels require CUDA runtime 13.0+ and NVIDIA driver r580+. |
| Default text encoder | The supplied NVFP4 AWQ encoder is not Blackwell-only, as clarified by Comfy-Org. Native NVFP4 acceleration depends on compatible hardware and kernels. Optional alternatives are BF16 or INT8 ConvRot text encoders, selected on the subgraph. |
| Video/audio output | PyAV from ComfyUI's dependencies, 17+; verified with 19.0.2. |
The loader boundary comes from PDD support in ComfyUI v0.42.0. CUDA/Python requirements are documented by ComfyUI and Comfy Kitchen; model components and NVFP4 hardware support are documented in the FastH3 model card. The older versions and alternative GPUs have not been validated by this project.
| Purpose | Subgraph field | Download | Under ComfyUI/models/ |
| --- | --- | --- | --- |
| FastH3 OmniRef diffusion model | unet_name | fasth3_omniref_8step_pruned_int8_convrot.safetensors | diffusion_models/ |
| H3 text encoder | clip_name | qwen3vl_32b_minimax_h3_nvfp4_awq.safetensors | text_encoders/ |
| P-H3 prompt upsampler | clip_name_1 | p-h3-image_prompt_upsampler_w4a8.safetensors | text_encoders/ |
| Video VAE | vae_name | minimax_h3_video_vae_int8_convrot.safetensors | vae/ |
| Audio VAE | vae_name_1 | minimax_h3_audio_vae_fp32.safetensors | vae/ |
If you use a shared model library or a subfolder such as minimax/, select the installed filenames on the subgraph. The FastH3 template uses Euler / simple / 8 steps, video shift 12 / audio shift 3, Comfy Kitchen attention, and VSA 10% over the full interval. Both templates start at 1:1 and 0.5 MP (704 × 704). The clip_name_1 model powers the optional AI text controls.
Use Output Settings to tune long-shot splitting or switch to progressive video export for lower memory use. Imported audio is used as the soundtrack when present. For chunk regeneration, resume or Second Pass, use H3 Continuum.
Output choices are Automatic / Save Video / Video + Images. Video exports include audio; workflows that need image data receive it automatically, without connection changes. Automatic splitting defaults to 7.5 seconds, so a 15-second shot uses two parts. The entered value is retained while actual durations follow H3's frame grid.
Set aspect ratio and MP in Studio to see the output dimensions. If the workflow supplies width and height through its nodes, use ComfyUI Settings → H3 Continuum EZ → Output Settings → Output size source. The default, Use workflow setting, keeps existing workflows as saved. After changing the preference, reopen Studio and apply the plan.
Use Match Image Aspect Ratio to take only the aspect ratio from an image. Choose an image if several are in Media. Your MP setting stays editable, and Studio shows the resulting width × height rounded to multiples of 32 pixels. A check mark indicates that the image's ratio is in use. Choose a preset to switch ratios.
After submission, ✓ Queued confirms acceptance. While the video job is running, a thin progress bar at the top shows the current stage and the number of completed chunks.
Projects
- Choose Project → New Project to start an empty timeline.
- Choose Project → Save Project and select a file name and folder.
- Choose Project → Open Project… to restore a saved plan, then Apply to Node or Apply and Queue to use it.
Use Project on the Studio toolbar for New Project, Open Project… and Save Project. If the browser cannot show the save dialog, Studio uses the browser's download settings. A .h3ez.json file retains shots, original/AI text, media references, audio edits and Studio output settings. Opening a project or creating a new one asks before replacing unsaved edits; Undo restores the previous plan. Media files remain in the ComfyUI input folder and are not embedded. Model connections, external STRING nodes and generated videos belong to the workflow/server rather than this project file. After opening, use Apply to Node or Apply and Queue. See the project guide for details.
When closing Studio with unapplied edits, choose Save Draft and Close, Discard and Close, or Cancel. The draft reopens with the same Timeline in the same browser; it does not replace the node or download a project file.
Continuation boundaries
Continuation boundaries use automatic, conservative CPU correction based on Continuum's seam metrics and color guard. Only two previous frames and five current frames are inspected. An isolated brightness pulse in the first new frame can be corrected when the surrounding frames support it and all safety checks improve. Scene cuts, frame counts, seeds and audio positions stay intact; unsafe candidates retain the original frames. Long-video output does not allocate a full-length RGB buffer for this correction.
Audio editing
Drop an audio file on the audio track, or drag it there from the media library. Studio places the full clip at 0 seconds if it fits, or in the first gap that can hold it. Video files can also be imported for their audio only. The source video is not placed on the picture track.
Select an audio clip to move it, set its length, split it at the playhead, duplicate it, or delete it. Trim to Video shortens the selected clip to the end of the video only when clicked. Delete (or Delete/Backspace) removes the placement. The source stays in the library, and Undo restores the edit. Shot durations determine the video length; export uses audio within that range.
The player mute and volume control affect preview playback only. The selected clip's volume controls its guide audio and exported soundtrack. This version supports one non-overlapping audio track.
See the prompt guide for more examples. AI text is an experimental adaptation for video prompts. Review the result before generating.
Verification
v0.13.4 makes queue actions visible inside Studio: the button changes while checking/submitting, shows a red Not submitted result on rejection, and a green check after acceptance. Specific input errors appear near the button, independently of the running/completed/stopped job status. A missed terminal event can be recovered from matching queue history. Real mouse input in the usual ComfyUI confirmed acceptance, the green check and Running; the user then intentionally stopped the tests. This verifies queue acceptance and execution start, not a finished render. No further live UI checks or GPU runs were performed for publication. v0.13.5 validation.
Previous v0.13.3 checks:
v0.13.3 fixes Apply and Queue becoming unavailable on input errors. The action stays clickable to show the reason; invalid input still fails validation before submission. Check inputs and a tooltip explain the issue. Upload/apply/submit operations temporarily lock the action, with recovery in the shared completion/error path. Isolated Chrome checks covered invalid split intervals, audio longer than video, apply/queue/preflight failures, pending operations and AI-busy recovery. The usual ComfyUI showed the updated enabled button; further live checks were stopped at the user’s request. Native upload selection testing remains incomplete. No new GPU generation was performed for this fix. v0.13.3 validation.
Previous v0.13.2 checks:
v0.13.2 reduces motion discontinuities at continuation boundaries using Continuum's unchanged cosine blend and Auto safety checks. Only an accepted maximum of two leading frames is blended, using a fixed previous-2/next-5-frame window; no full-video RGB buffer is added. In a real FastH3 two-chunk GPU comparison with unchanged model wiring and seeds, the five-frame boundary-change peak fell by 28.8%. All 379 frames, presentation times and 682 original-audio AAC packets were preserved. Localized blend softness remains; this is one model/seed/input-audio case, not an artifact-free guarantee. Python 346 and JavaScript 99 tests passed. Diagnostics remain off by default. Implementation and limits · v0.13.2 validation.
Previous v0.13.1 checks:
v0.13.1 adds continuity diagnostics, off by default. Python 340 and JavaScript 99 tests passed. A real Windows ComfyUI FastH3 two-chunk run verified Context 39f, video 12 slots, audio 65 ticks, and 8 actual model-wrapper validations with zero failures. Model wiring, seeds, all 379 frames and original audio packet contents/timestamps were preserved. This verifies the context execution path, not perceptual quality. v0.13.1 validation.
Previous v0.13.0 checks:
An opt-in continuity-context diagnostic is documented in the developer notes (Japanese). It defaults to off and adds no normal workflow controls. A real two-chunk FastH3 GPU run verified 8 actual wrapper validations with zero failures; see the diagnostic notes for scope and limits.
The v0.13.0 code passes 309 Python and 99 JavaScript tests. On the usual Windows ComfyUI, two real AI text jobs verified editable instructions, common/shot separation, MP retention and Original/AI selection. A matched two-chunk FastH3 GPU render reduced the boundary brightness pulse from +16.449% to −0.261%, keeping all 379 frames and identical encoded audio and timestamps. Long-video output did not allocate the full 1.69 GiB RGB buffer. See the dated verification record and limits; these checks do not establish quality or peak memory for every model and duration.