
ComfyUI-ImageViewer
The bEpic image viewer by sebastianzilius is a professional floating image viewer for ComfyUI - multi-tab, history snapshots, side-by-side comparison, playback timeline, exposure/channel controls, and a live parameter panel.
Nodes (4)
Draw a mask like it's Nuke, get a MASK tensor out
Click points, drag boxes, feed SAM 3 — without ever leaving the viewer
Stop prompting camera moves — block the shot in 3D and render it back into the graph
Get a real review panel for ComfyUI
ComfyUI Image Viewer — bEpic Viewer
An advanced image viewer panel for ComfyUI with inspection tools, playback controls, image comparison, its own parameters panel — and a 3D previz tool for laying out, animating and rendering shots.
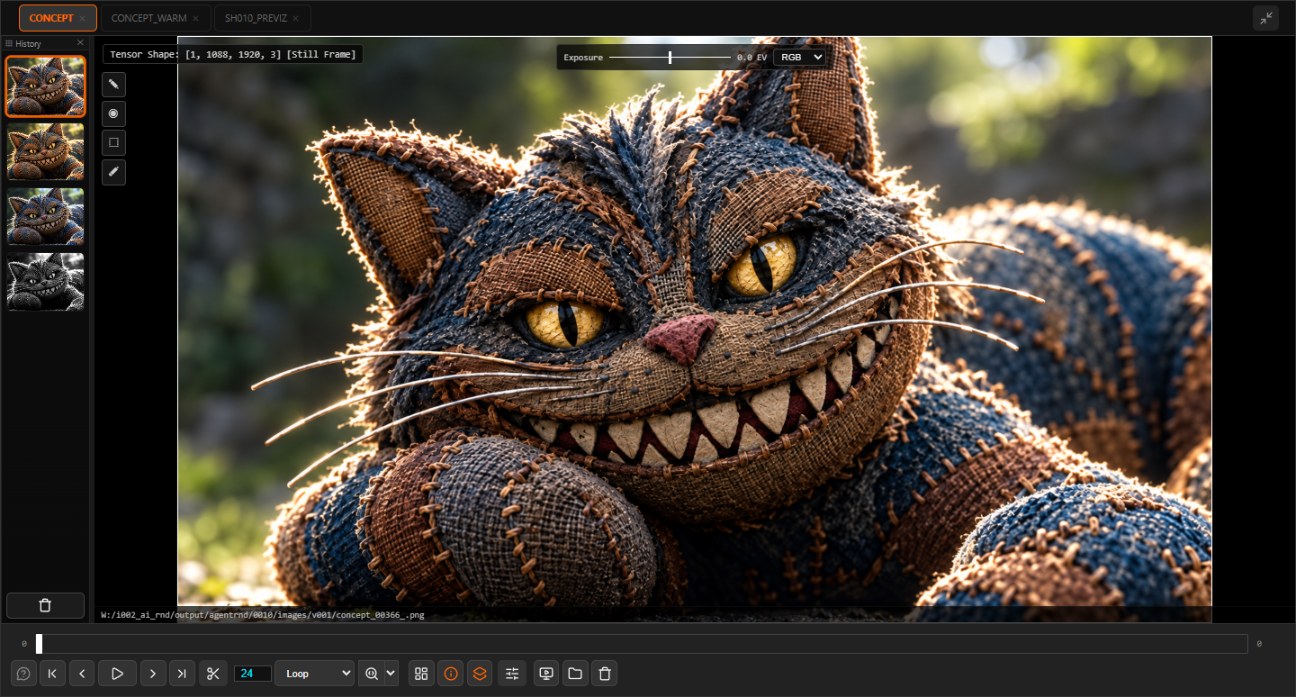
Core Features
Viewing
- send any image, mask, video or 3D model to the viewer with the bEpic Send To Image Viewer node — or right-click any node and choose Send to Image Viewer
- view the outputs of several nodes at once, each in its own tab
- zoom and pan; undock the viewer into its own browser window for a second monitor
- each tab keeps a history of up to 20 snapshots automatically
- play image sequences and videos with configurable FPS, and loop a sub-range of the timeline
- split-screen comparison with a draggable divider — shift-click two tabs or two history items to compare them
- real-time exposure (−4 EV to +4 EV) and isolation of the Red, Green or Blue channel
Left: a wipe between two tabs. Right: the red channel on its own, +0.7 EV.
Working with the graph
- a parameters panel shows the widgets of the node selected in the graph — lock it to one node, or change a value on every selected node at once
- save to output from the send node: PNG, EXR, TIFF, JPG, DPX, MP4, MOV, WebM, with frame-numbered image sequences (
shot.1001.png) for a VFX pipeline - what the node writes is reported to ComfyUI like a save node's output, so it shows up in the queue history, the Assets panel, and to scripts and agents reading them
- drag a history thumbnail, a file or the frame on screen onto the graph to get a loader node holding it
- Roto and SAM3 tools draw mattes and point / box prompts right in the viewer, onto nodes that feed them to the workflow
Motion graphics
- the Motion panel (bar: ComfyUI > Motion, or double-click a
*.mgscene.jsonin the file browser) edits the motion graphics an agent writes as a scene file: a layer list, a preview, a timeline with keyframes (move, copy, paste, delete), a properties panel, a curve for the selected key and on-canvas move / scale / rotate / anchor handles; Render hands the saved scene to agentY's Remotion renderer. The preview and the render share one module, so what you see is what comes out. Each rendered video also gets a poster.pngthat carries the scene: right-click it in the file browser and pick Edit in Motion (or drag it onto the panel) to edit the motion graphic from the PNG alone - see docs/motion_graphics_editor.md - the Dataset panel (bar: ComfyUI > Dataset; opens when an agent shows a LoRA dataset's
manifest.json) reviews a LoRA training dataset: thumbnails with editable captions, include / remove / restore, bulk find-replace, trigger word, crop boxes, then Approve & train / Ask the agent / Cancel; its Training tab shows the run (progress, loss curve, sample strip, events) and can stop it - see docs/lora_dataset_panel.md
The interface
- dockable panels — history, file browser, parameters, and the 3D panels — on either side of the picture or along the bottom, stacked and resized with splitters, arrangement remembered
- a file browser over ComfyUI's folders (and any you allow): every file listed, wildcard and kind filters, previews
- Settings → bEpic Viewer: the folders the viewer may open (add, browse, remove — no restart), and its defaults for playback, compare, history, the file browser, annotation, 3D and previz. These settings are kept per user (
~/.bepic_viewer/settings.json, or the file named byBEPIC_VIEWER_SETTINGS), so they follow you across projects even when a launcher gives each project its own ComfyUI user directory - every function has a hotkey command you can rebind in Settings → Keybinding
3D Models and Previz
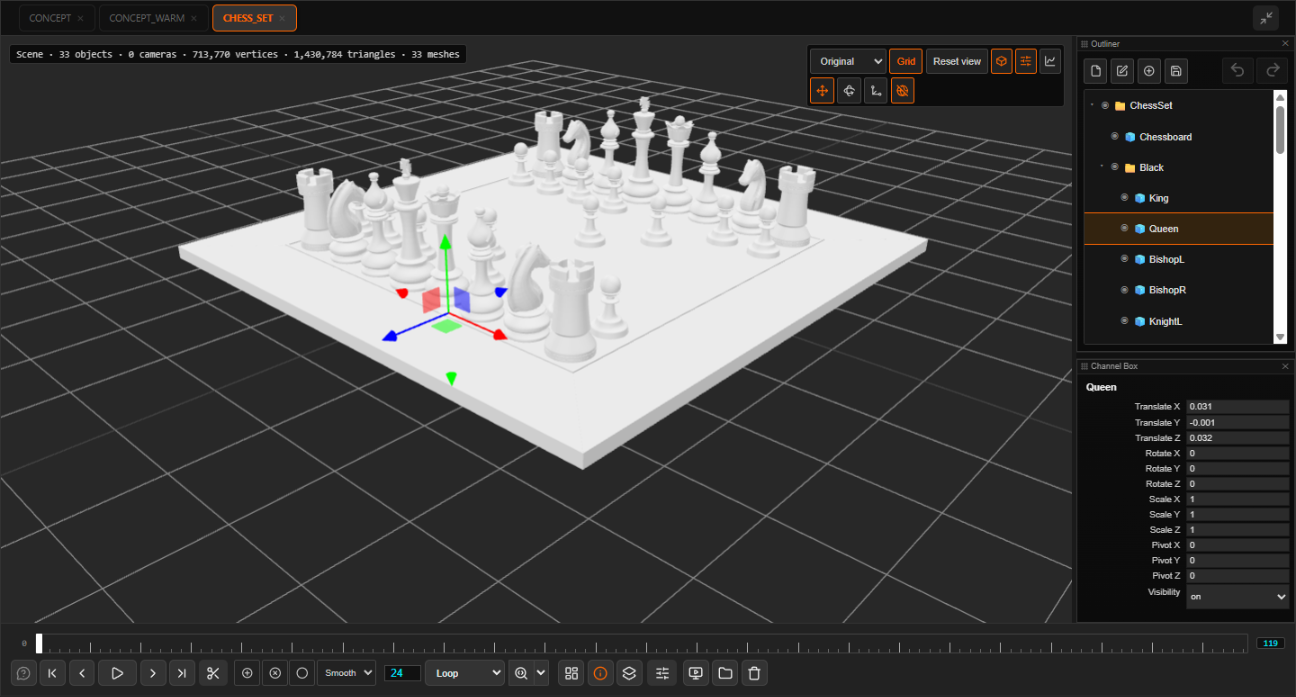
The chess set is the Open Chess Set, CC BY 4.0 by the Academy Software Foundation — imported here straight from its USD stage.
- view GLB, glTF, FBX, OBJ, STL, PLY, USD and Alembic (
.abc) files, and save meshes the way ComfyUI's Save 3D Model does — an Alembic cache is read frame by frame, so a deforming cache plays in the viewer - every 3D tab is a previz scene: models, primitive shapes, groups and cameras, laid out in a Maya-style Outliner (drag to reorder and reparent — items keep their place in the world — double-click to rename) and edited in a Channel Box
- move, rotate and scale with a gizmo, around a pivot you can move; Freeze Transformations; tumble around the object under the cursor, Maya-style (<kbd>Alt</kbd> + mouse)
- stand image planes in the scene — a plate to match, a reference, a camera backplate that travels with the shot
- keyframe everything on the viewer's timeline and shape the motion in a curve editor with tangents
- cameras have a resolution and show a resolution gate when you look through them
- render the shot back into the workflow from a render dialog — any camera, frame range and size, MP4 / MOV / WebM / PNG, shading, transparent backgrounds, supersampled anti-aliasing — and it lands on the graph as a loader node
- exchange whole shots as USD stages with other applications
Left: looking through a camera, its 2.39 gate over the shot. Right: the render dialog.
Full documentation: docs/index.md — every panel, tool, node and hotkey.
Installation
Method 1 — ComfyUI Manager (recommended)
- Open the ComfyUI Manager panel inside ComfyUI.
- Search for ComfyUI-ImageViewer and click Install.
- Restart ComfyUI.
Method 2 — Manual installation
- Navigate to your ComfyUI custom nodes folder:
ComfyUI/custom_nodes/ - Clone or copy this repository into that folder:
git clone https://github.com/szprivate/ComfyUI-ImageViewer.git - Install Python dependencies (Pillow, numpy, and
usd-corefor the USD support):pip install -r ComfyUI-ImageViewer/requirements.txt - Restart ComfyUI.
After installation a "Toggle bEpic Image Viewer" button appears in the ComfyUI action bar. Click it to show or hide the viewer panel.
Video encoding (MP4 / MOV / WebM saving and previz renders) needs imageio-ffmpeg — VideoHelperSuite installs it; otherwise pip install imageio-ffmpeg.
Usage
- Add bEpic Send To Image Viewer node to your workflow.
- Connect image outputs to it.
- Click "Toggle bEpic Image Viewer" in the top bar to open the panel.
- Run the workflow — generated images appear in the viewer automatically.
- Hover the viewer and press <kbd>?</kbd> for the hotkeys.
For 3D: open a model from the file browser or drop one onto the viewer — or add a bEpic 3D Scene (Previz) node and press Open in Image Viewer on it to build a shot and render it back into the workflow. See 3D Models & Previz.
License, contributing
Copyright © 2026 bEpic GmbH / Sebastian Zilius
Free for personal and non-commercial use.
-
✅ Personal projects, research, education, and non-commercial creative work
-
✅ Feel free to create your own fork and make updates - this is OpenSource, happy to include your Pull Requests if they're good!
-
❌ Commercial use of any kind is prohibited without explicit written permission from the author
Redistribution, modification, and use in source and binary forms are permitted for non-commercial purposes only, provided that this copyright notice is retained in all copies or substantial portions of the software.
For commercial licensing enquiries, contact the repository owner.
THIS SOFTWARE IS PROVIDED "AS IS", WITHOUT WARRANTY OF ANY KIND, EXPRESS OR IMPLIED.