
ComfyUI Extension
comfyui-sg-text-encode-reference-images
Advanced Text Encode node for ComfyUI with dynamic multi-image reference support.
sebagallo/comfyui-sg-text-encode-reference-images
Nodes1
On cloudLocal install
Categoryconditioning
Stars0
Updated8 months ago
Readme
ComfyUI Text Encode Reference Images
An advanced text encoding node for ComfyUI that supports a dynamic number of reference images.
Mainly for usage with Qwen Image / Flux 2 / Z-Image models.
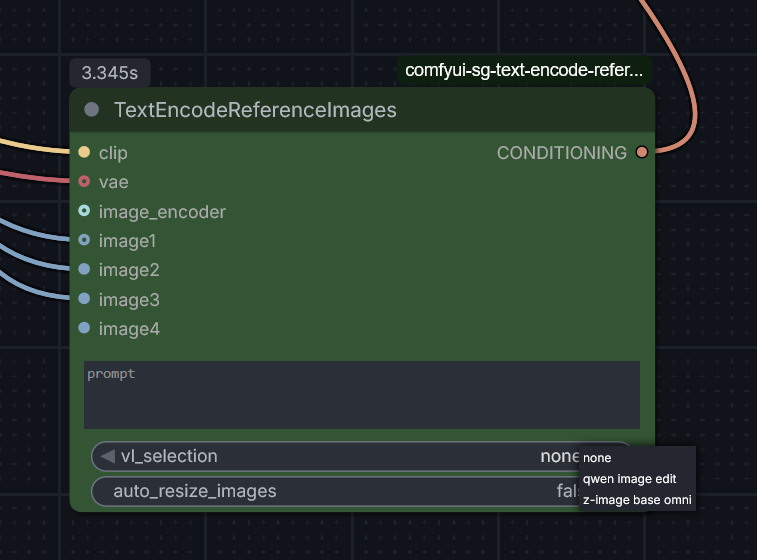
Nodes
Text Encode Reference Images (v3.0.0)
This node allows you to provide a prompt along with reference images. It supports multiple Vision-Language (VL) encoding strategies, CLIP Vision encoding, and reference latents.
- Category:
conditioning - Features:
- Native Batch Support: Supports image batches directly. To use multiple images, use the native ComfyUI Batch Images node to combine them.
- Selectable VL Strategies:
none: Standard text encoding without vision-language tokens.qwen image edit: Uses hardcoded system templates for Qwen-style image editing.z-image base omni: Rebase logic fromTextEncodeZImageOmnifor advanced vision token handling.
- CLIP Vision: Encodes images using an optional
image_encoder(CLIP Vision) for all strategies. - Auto-Resize: Scalable image processing that resizes images to ~1MP (~1024x1024) before VAE encoding to maintain efficiency.
- Reference Latents: Optionally encodes input images using a VAE and appends them as
reference_latentsto the conditioning data.
- Inputs:
clip: The CLIP model to use for encoding.prompt: The text instruction/prompt.vl_selection: Choice of VL strategy (none,qwen image edit,z-image base omni).auto_resize_images: (BOOLEAN) If enabled, resizes images to ~1MP for VAE encoding.vae(Optional): VAE for encoding reference latents.image_encoder(Optional): CLIP Vision model for image encoding.images(Optional): Reference image(s). Use Batch Images to provide multiple.
- Output:
CONDITIONING: The encoded conditioning data.
Installation
- Place this folder in your ComfyUI
custom_nodesdirectory. - Restart ComfyUI.
- The node will appear in the
conditioningcategory.