
Photoshoot
Build a person once, then shoot a whole series: framing, pose, placement, expression and aspect ratio vary while the person stays the same.
Nodes (20)
Photoshoot Bausteine wählen
Photoshoot Expression
Stop retyping the good lighting — load it from a dropdown
Don't leave Photoshoot Save Lighting on
30 curated setups, and one seed to roll them
Your 'black and white' still has a hint of colour — Photoshoot Monochrome is the fix
The Photoshoot Person node
Photoshoot Person laden
Photoshoot Person speichern
The Photoshoot Series node
Photoshoot Pose
The glue node that turns Photoshoot fragments into one prompt
Photoshoot Prompt laden
Photoshoot Prompt speichern
Photoshoot Stil laden
Photoshoot Stil speichern
Stop typing 'black and white' — Photoshoot Style builds the whole photographic look from dropdowns
Photoshoot Szene laden
Photoshoot Szene speichern
Photoshoot's Wardrobe Explainer
Photoshoot





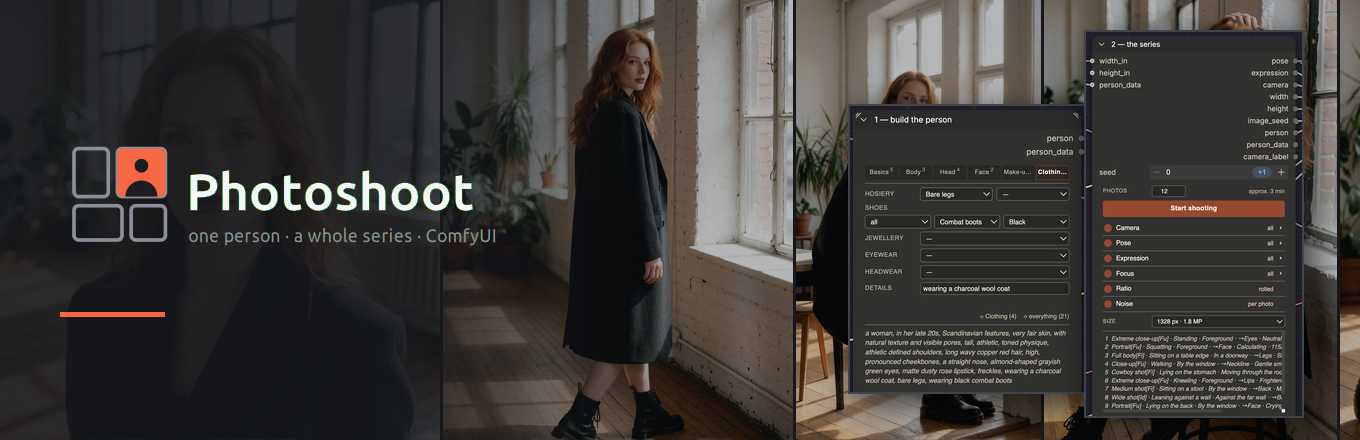
[!IMPORTANT] Top 5 Changes in Release 2.6.0:
- Costume changes in one series: the new Wardrobe node holds a shoot's outfits as tabs — the Series changes through them while the person stays the same, each outfit shot wide to close, with a mannequin preview and its colour marked in the contact sheet.
- See it before you pick it: long lists are searchable, and clothes, shoes and hats show a picture on a neutral mannequin — shoes from the side so the heel shows; favourites and your last picks sit on top.
- Add your own entries: a hat, a cut, a light setup — one line of JSON each. Or let any chat LLM write the file: open
/krea2/custom/llm_prompton your ComfyUI and say what you want.- More to wear: tops & blouses, bikinis, sixteen hats, ruffled skirts and seven bangs cuts — every wording render-tested against the bare word, with new reference posters.
- Portraits stay portraits: close framings leave out everything below the chest, so a pencil skirt no longer pulls a headshot to full length.
New here? The example workflow now reads left to right in seven steps — models, who, look, the shoot, prompt, render, output — each with a short note on what it does. The Quickstart gets you from install to your first series in six steps.
You built a person. Now shoot 40 photos of her.
[!NOTE] These nodes write text. Every node here produces an English prompt string — person, pose, expression, lighting, style, framing — and hands it to your sampler. What the picture finally looks like is decided by your model, checkpoint, LoRAs, resolution and sampler settings. The posters and measurements in this repository were rendered with Krea 2 Turbo (fp8) and Qwen-VL at 8 steps, CFG 1.0, no LoRA (the tops and bottoms sheets add the refinement pass of the example workflows); another model will read the same words differently. The one node that touches pixels is Photoshoot – Monochrome.
Photoshoot is a set of ComfyUI nodes in two halves. The Person Builder describes someone across 37 fields — body, face, hair, make-up — and saves them under a name; the Wardrobe dresses her, one outfit per tab. The Photoshoot turns that person into a whole series: every photo a different framing, pose, placement, expression and aspect ratio, while the person stays the same. Set the count, press the button, and the node queues all 40 runs itself.
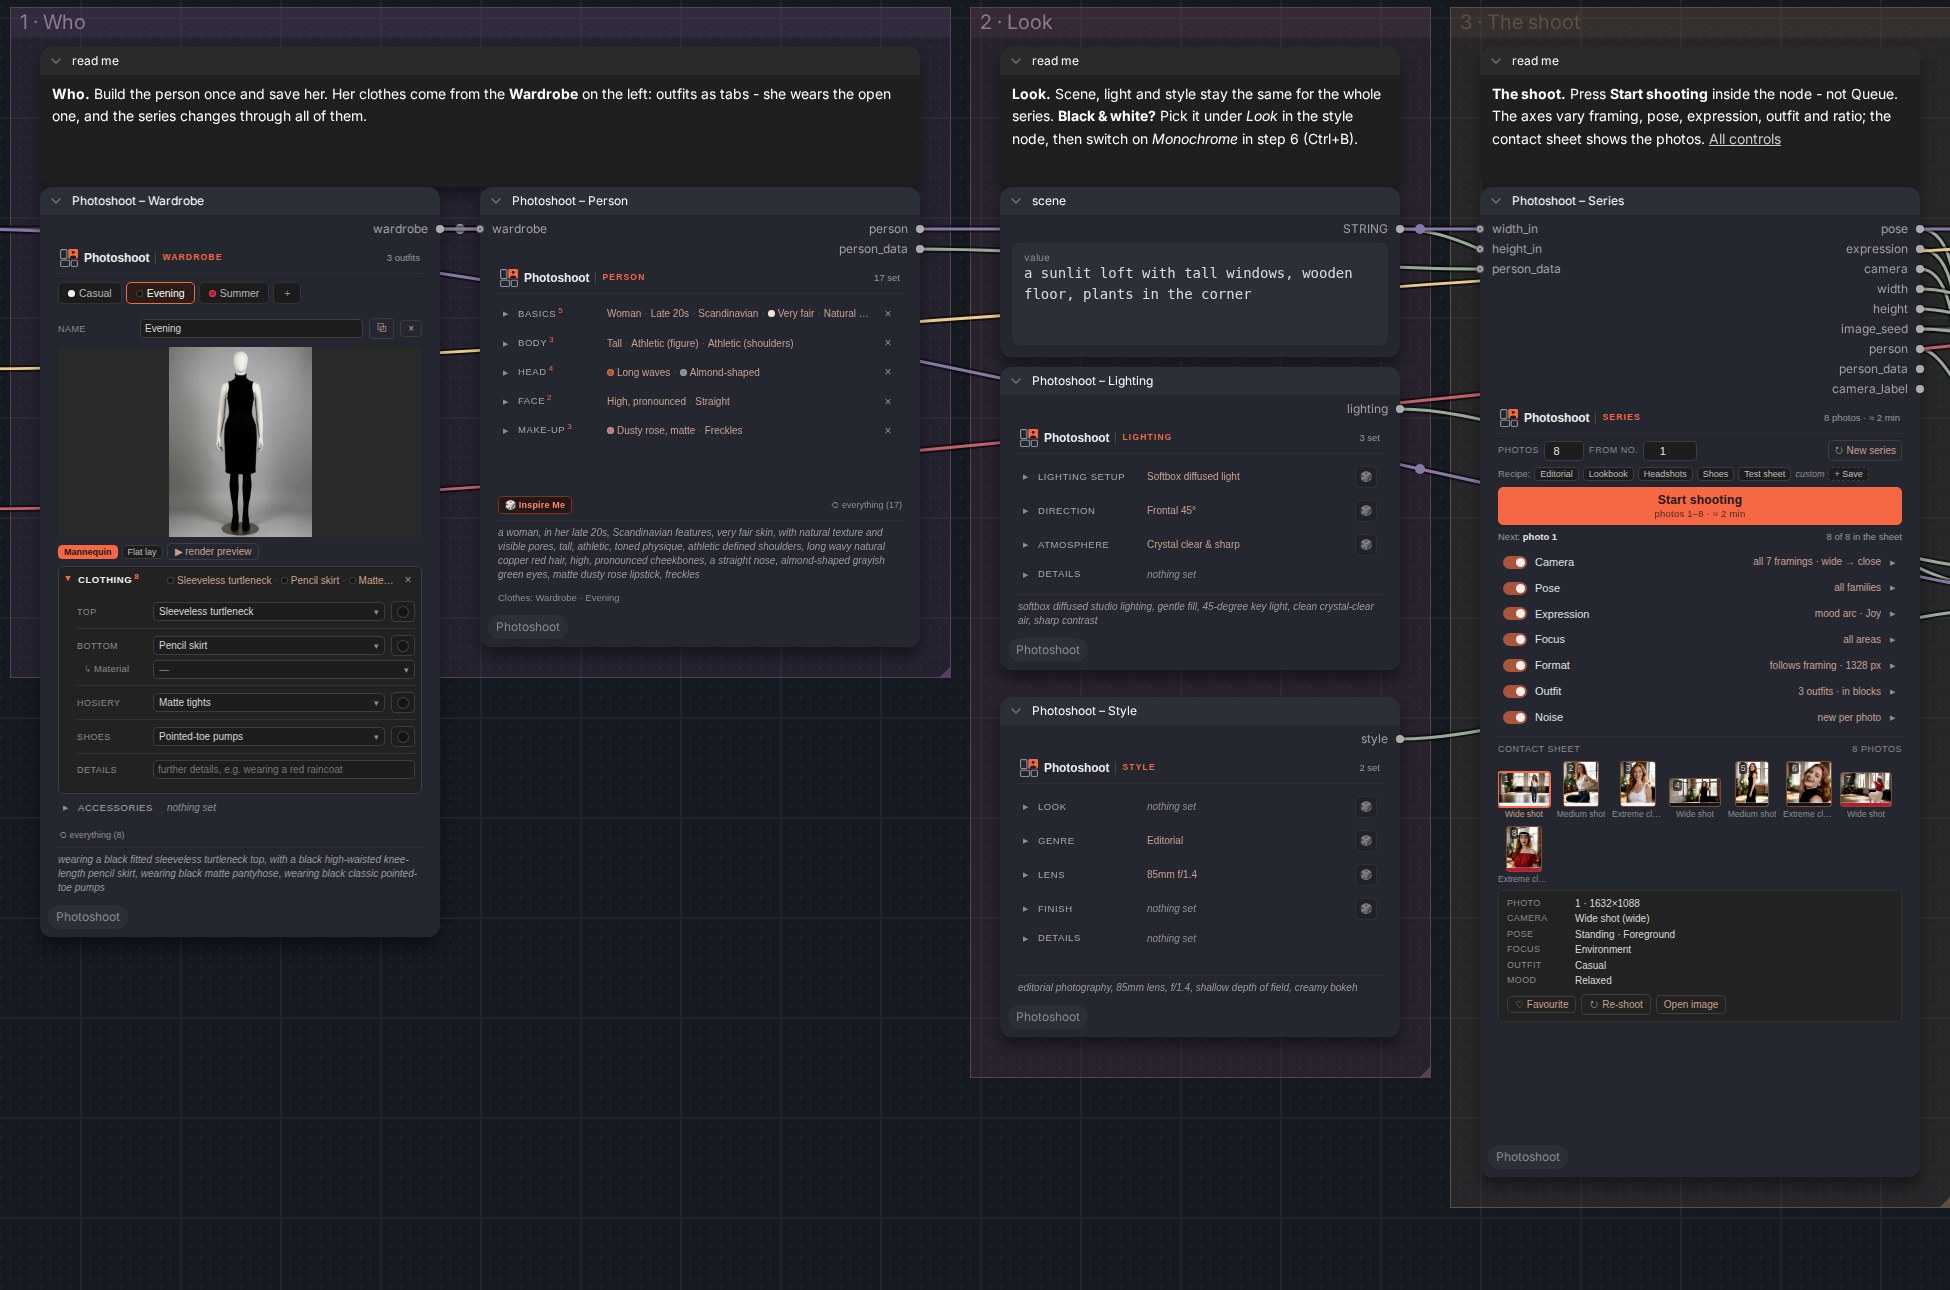
The example workflow (example_workflows/photoshoot-series.json): dress and
build the person on the left, set scene, light and style in the middle, and the
Series node on the right plans, queues and shows the whole shoot - here eight
photos in three outfits.
Building a person
37 fields in five collapsible sections. You pick labels; the node writes English. Related fields share a row — hair and its colour, eye shape and eye colour, lips and finish — because they are merged into one phrase and you need to see both while setting either. A long list opens under its row instead of as a dropdown: type to filter it, by German or English name or by the prompt text, star your favourites, and the ones you used last sit on top. For clothes, shoes, hairstyles and headwear the list shows a picture of the entry under the pointer, so you can tell a milkmaid top from a Bardot top before you pick one: clothes, shoes and hats alone on the Wardrobe's neutral mannequin (shoes close up from the side, so the heel shows), hairstyles on the README person.
<img src="docs/search.png" alt="The Wardrobe's top list open: a search field, the milkmaid top under the pointer with its picture and prompt, and the tops and blouses below" width="420">
With a character LoRA, put its trigger into LoRA trigger under Basics: the face, hair and make-up then come from the LoRA, and the person only adds age, body and the outfit — a short person block, which is also what lets moods show (see the photoshoot's mood arcs).
A person with seventeen fields set, in a Wardrobe with one outfit:
Basics    Woman · Late 20s · Scandinavian · Very fair · Natural pores
Body      Tall · Athletic · Athletic shoulders
Head      Long waves + Copper red · Almond-shaped + Greyish green
Face      High, pronounced cheekbones · Straight nose
Make-up   Dusty rose + Matte · Freckles

Wardrobe  Coat: Bare legs · Combat boots + Black · wearing a charcoal wool coat
That produces one string, and the eye shape and colour have become a single phrase rather than two competing ones:
a woman, in her late 20s, Scandinavian features, very fair skin, with natural
texture and visible pores, tall, athletic, toned physique, athletic defined
shoulders, long wavy copper red hair, high, pronounced cheekbones, a straight
nose, almond-shaped grayish green eyes, matte dusty rose lipstick, freckles,
wearing a charcoal wool coat, bare legs, wearing black combat boots
The same person seen from further away — this is what the Photoshoot sends for a full-body shot, and for a wide one:
[figure]    … long wavy copper red hair, almond-shaped grayish green eyes,
            freckles, wearing a charcoal wool coat, bare legs, black combat boots
            (cheekbones, nose and lipstick dropped — 303 chars instead of 376)

[identity]  … long wavy copper red hair, grayish green eyes, freckles,
            wearing a charcoal wool coat, bare legs, black combat boots
            (eye shape and shoulders dropped too — 261 chars)
Nothing is lost: the builders keep every field and still show them. Only what gets sent shrinks with distance, because tokens the camera cannot resolve still pull the composition onto the head.
Dressing her: the Wardrobe
Clothes are not part of the person. The Wardrobe holds the outfits of a
shoot as tabs — top, bottom and material, hosiery, shoes, jewellery, glasses,
headwear, each colour a button next to its field — and goes into the Person
Builder's wardrobe input. The person wears the open tab; in a series she
changes through all of them (see the Outfit axis). Render preview shows an
outfit on its own, on a faceless mannequin or as a flat lay.
<img src="docs/wardrobe.png" alt="The Wardrobe node: outfit tabs, the name, a rendered mannequin preview, and the Clothing section open with colour buttons" width="520">
A Wardrobe with three outfits as tabs, the open one's mannequin preview, and its Clothing section with the colour buttons. The composed English sentence sits at the bottom and updates as you click.
<details> <summary><b>View Visual Footwear & Shoe Matrix (72 Models Poster)</b></summary> <br>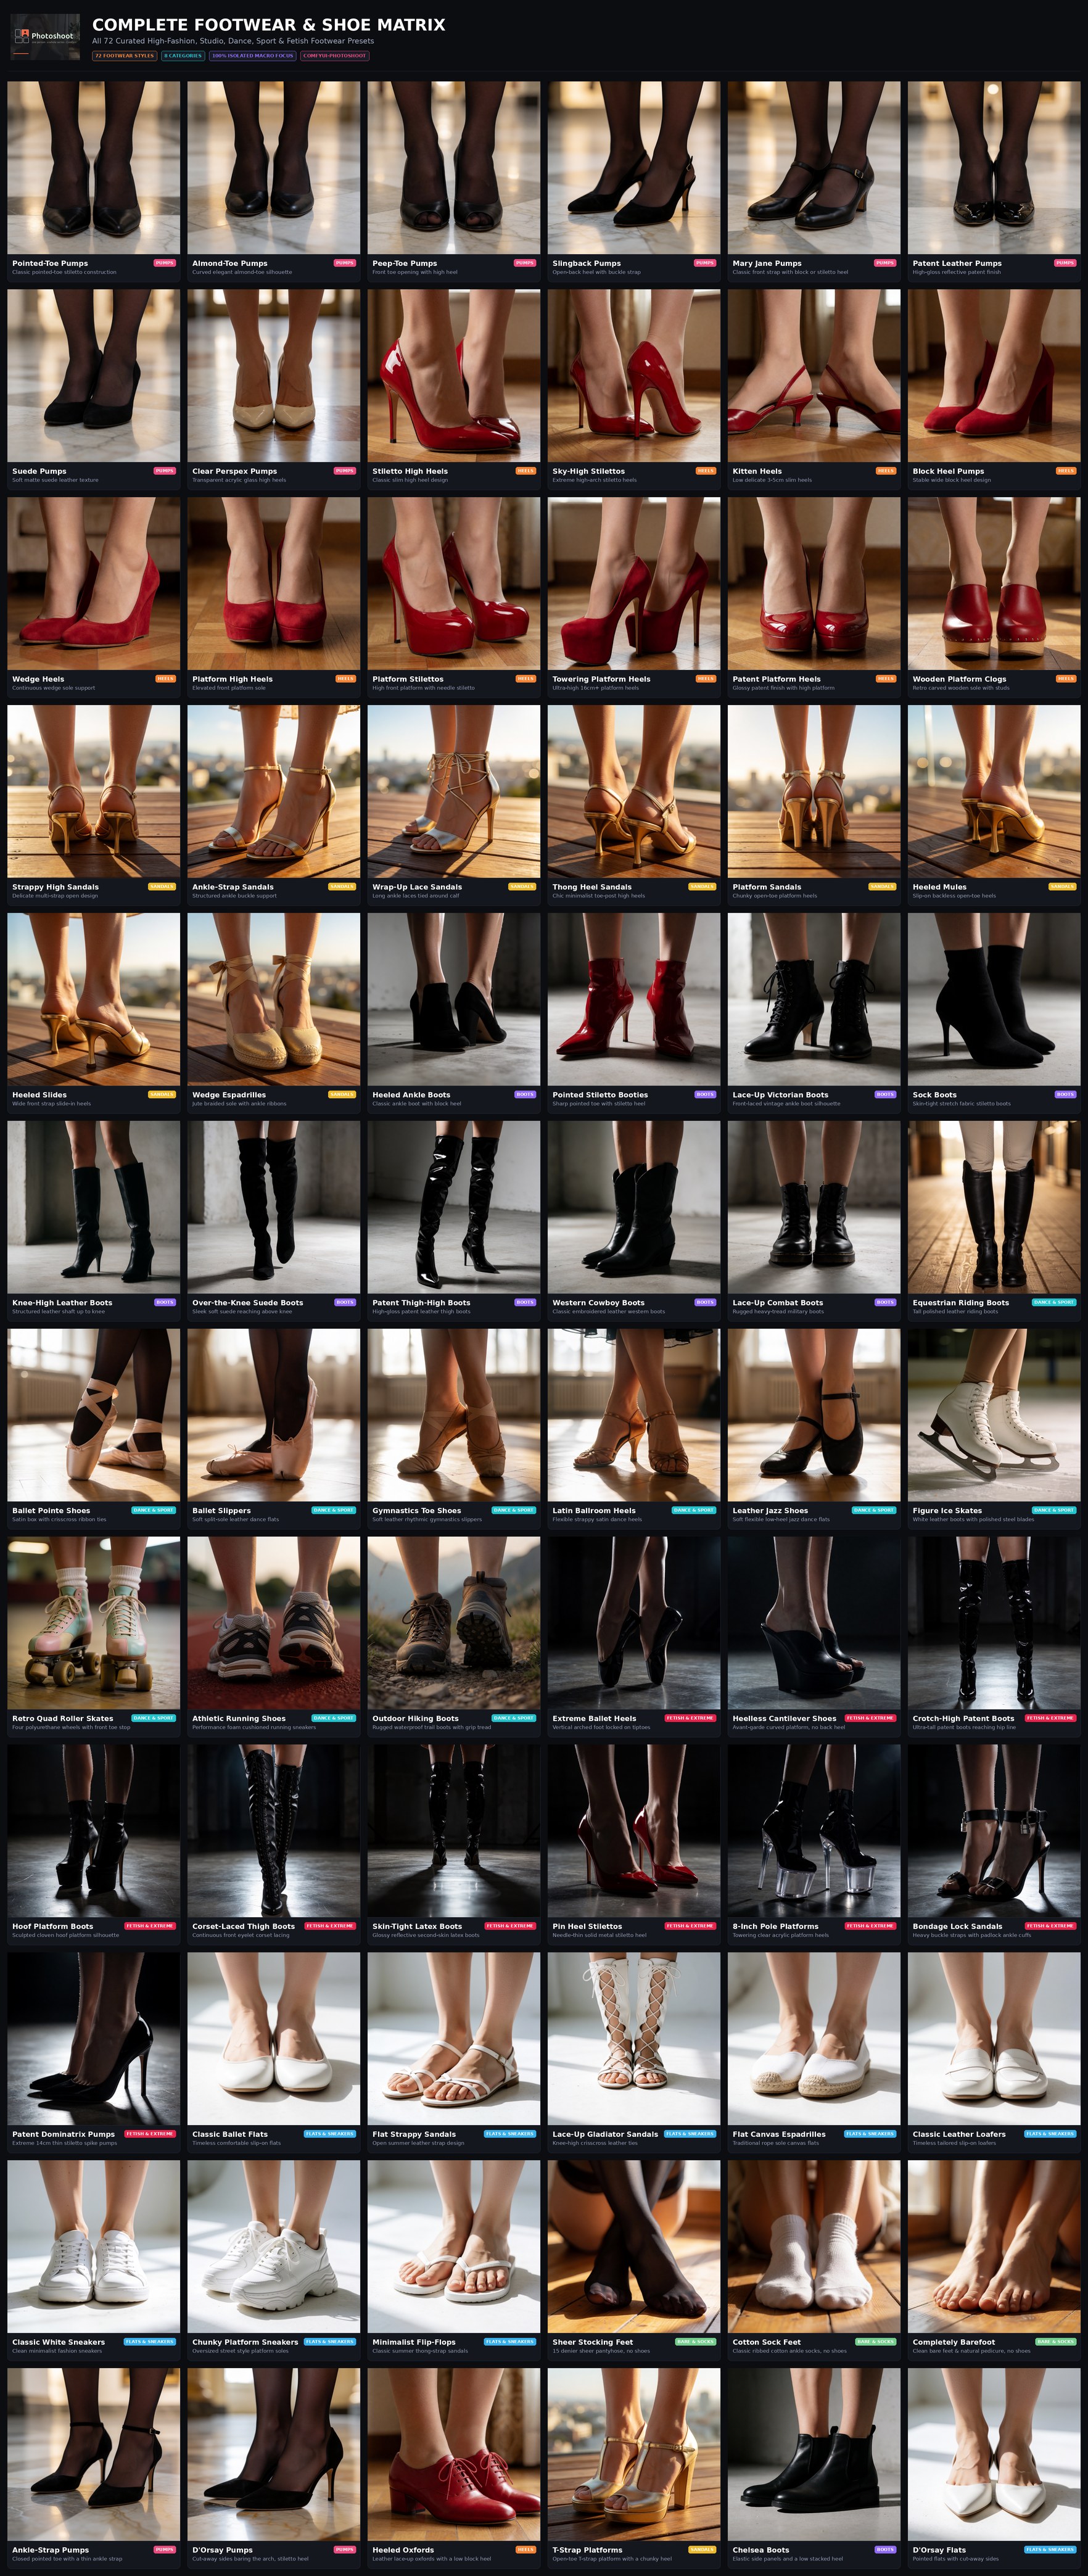
Click image or visit the Visual Reference Posters Catalogue for full-resolution sheets & all categories.
<br> </details> <details> <summary><b>View Tops, Bottoms, Bikini & Headwear Matrices (27 Tops, 34 Skirts, Shorts & Trousers, 18 Bikinis, 29 Headwear)</b></summary> <br>[!NOTE] ComfyUI-Photoshoot builds precision prompt tokens and framing instructions. Visual output depends on your diffusion model and checkpoint (rendered above with Krea2 Turbo fp8 + Qwen-VL, 8 steps, 0 LoRAs).
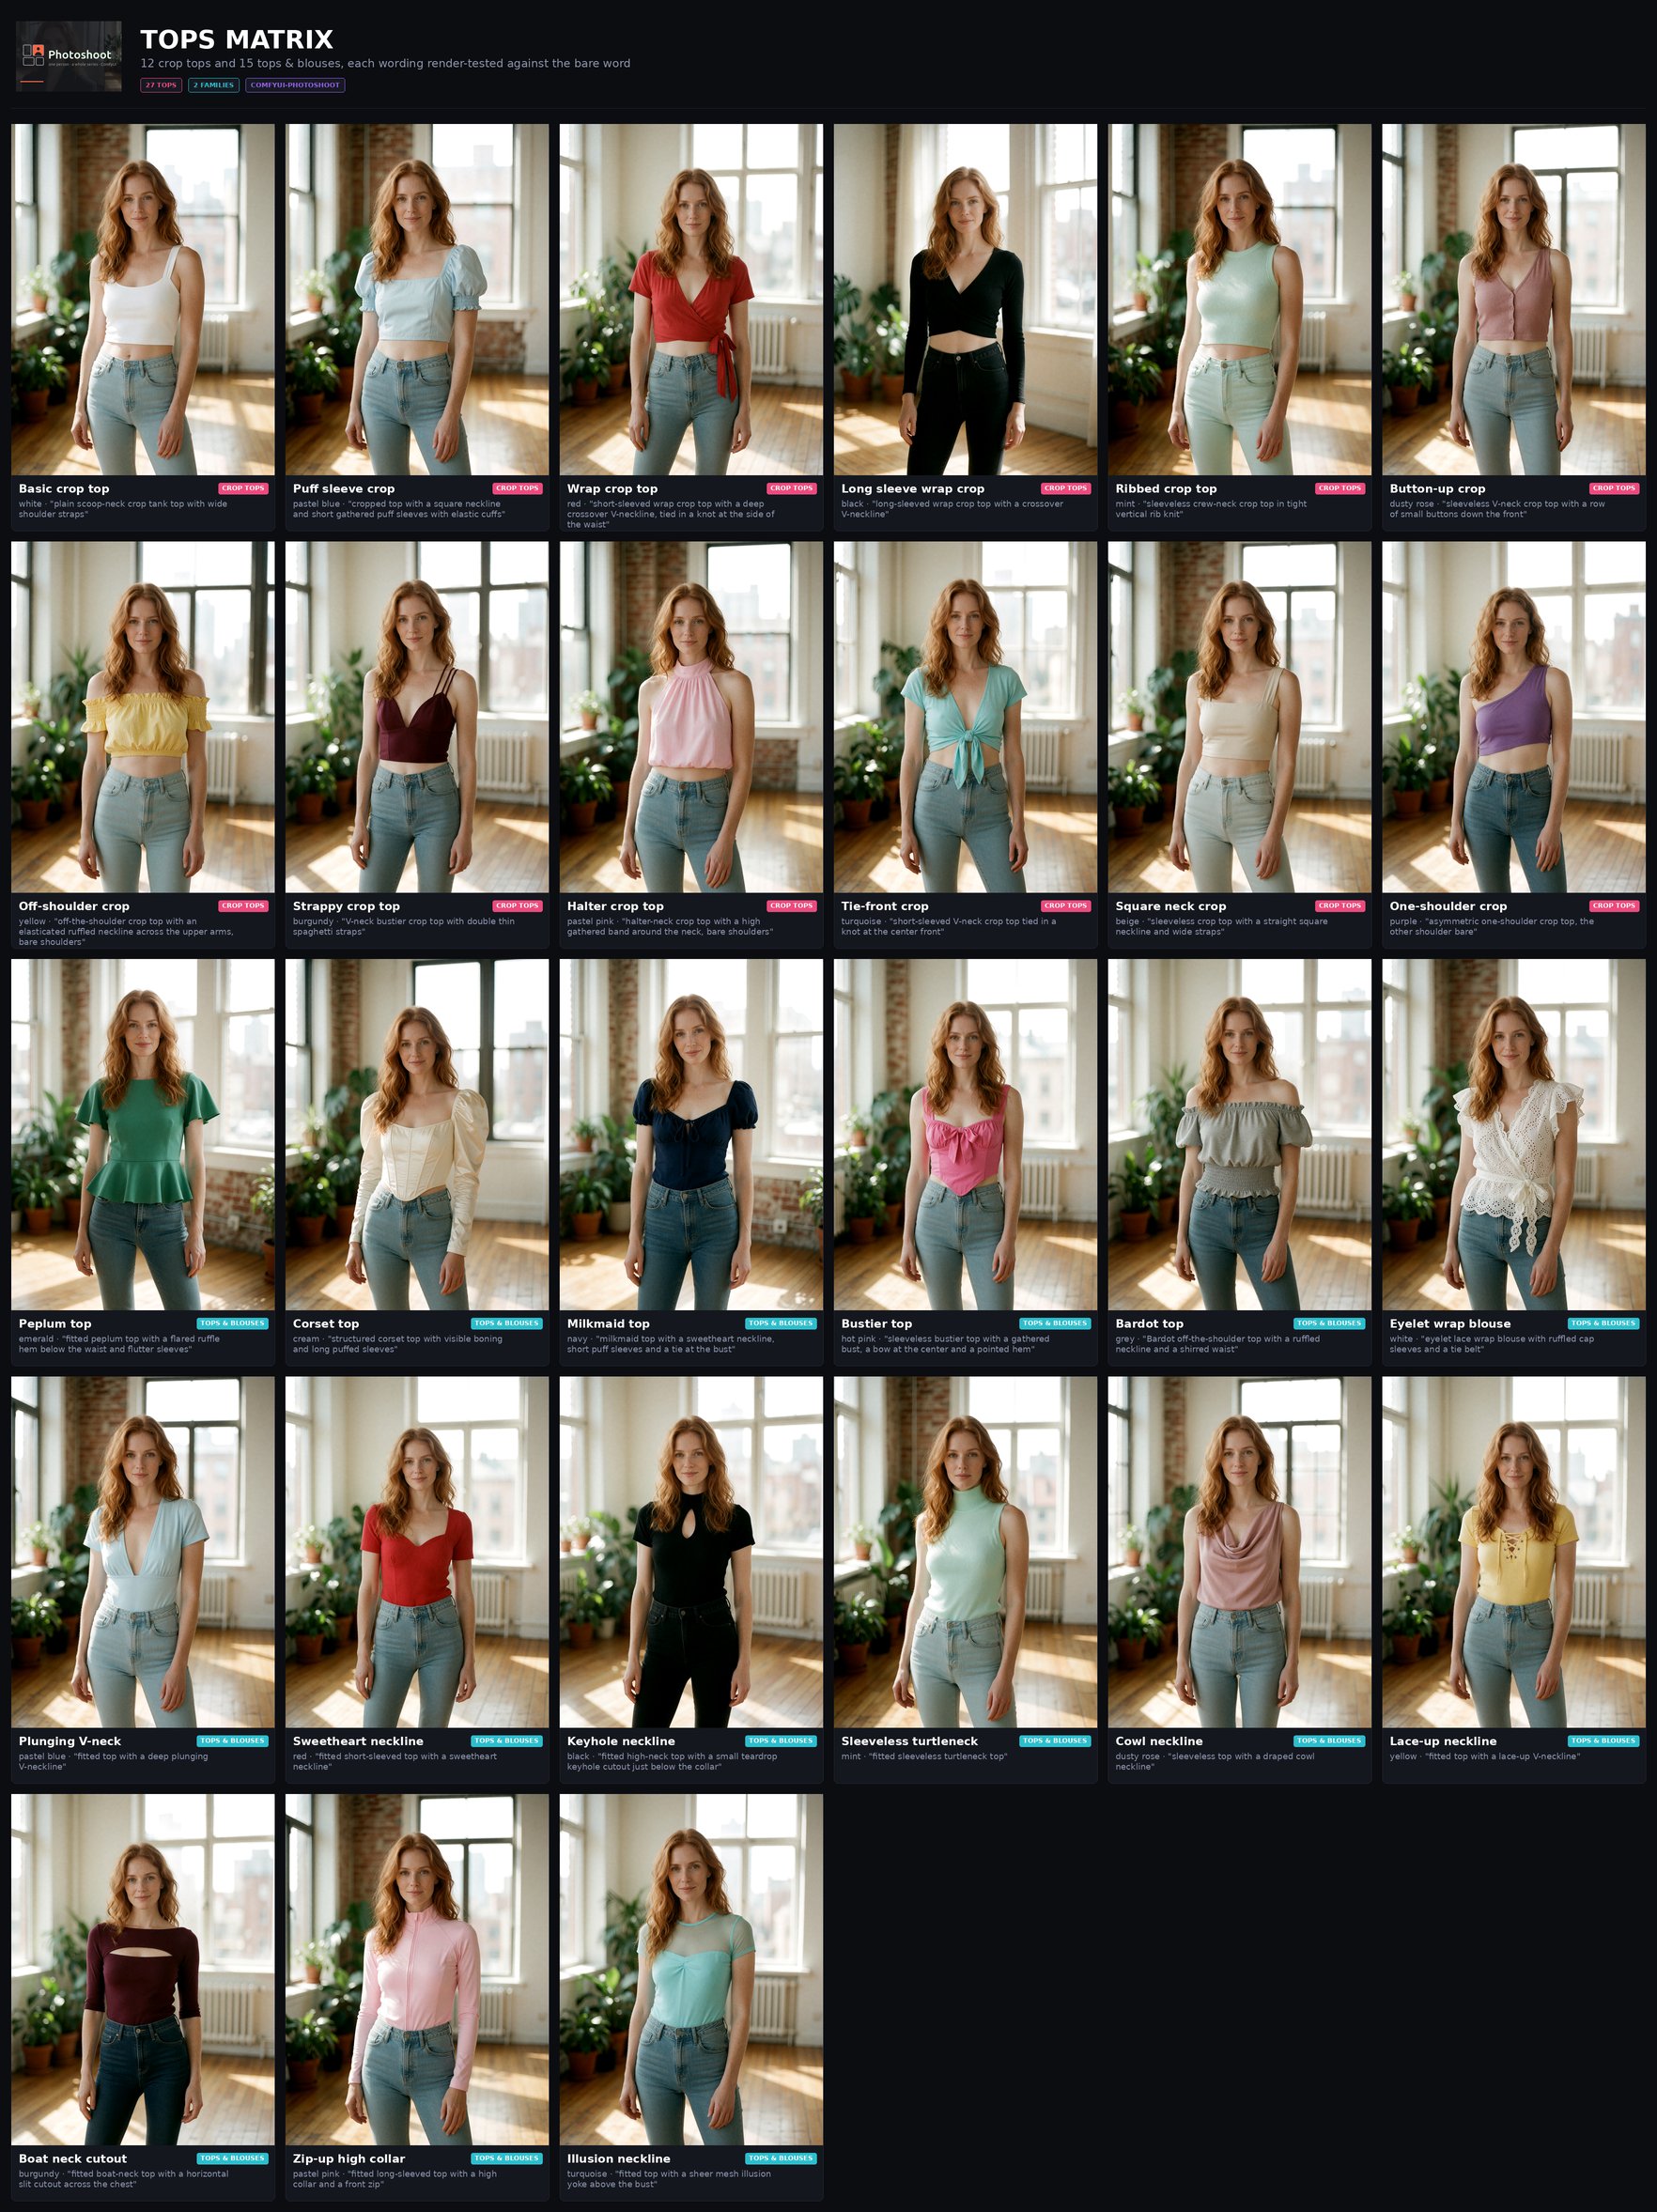
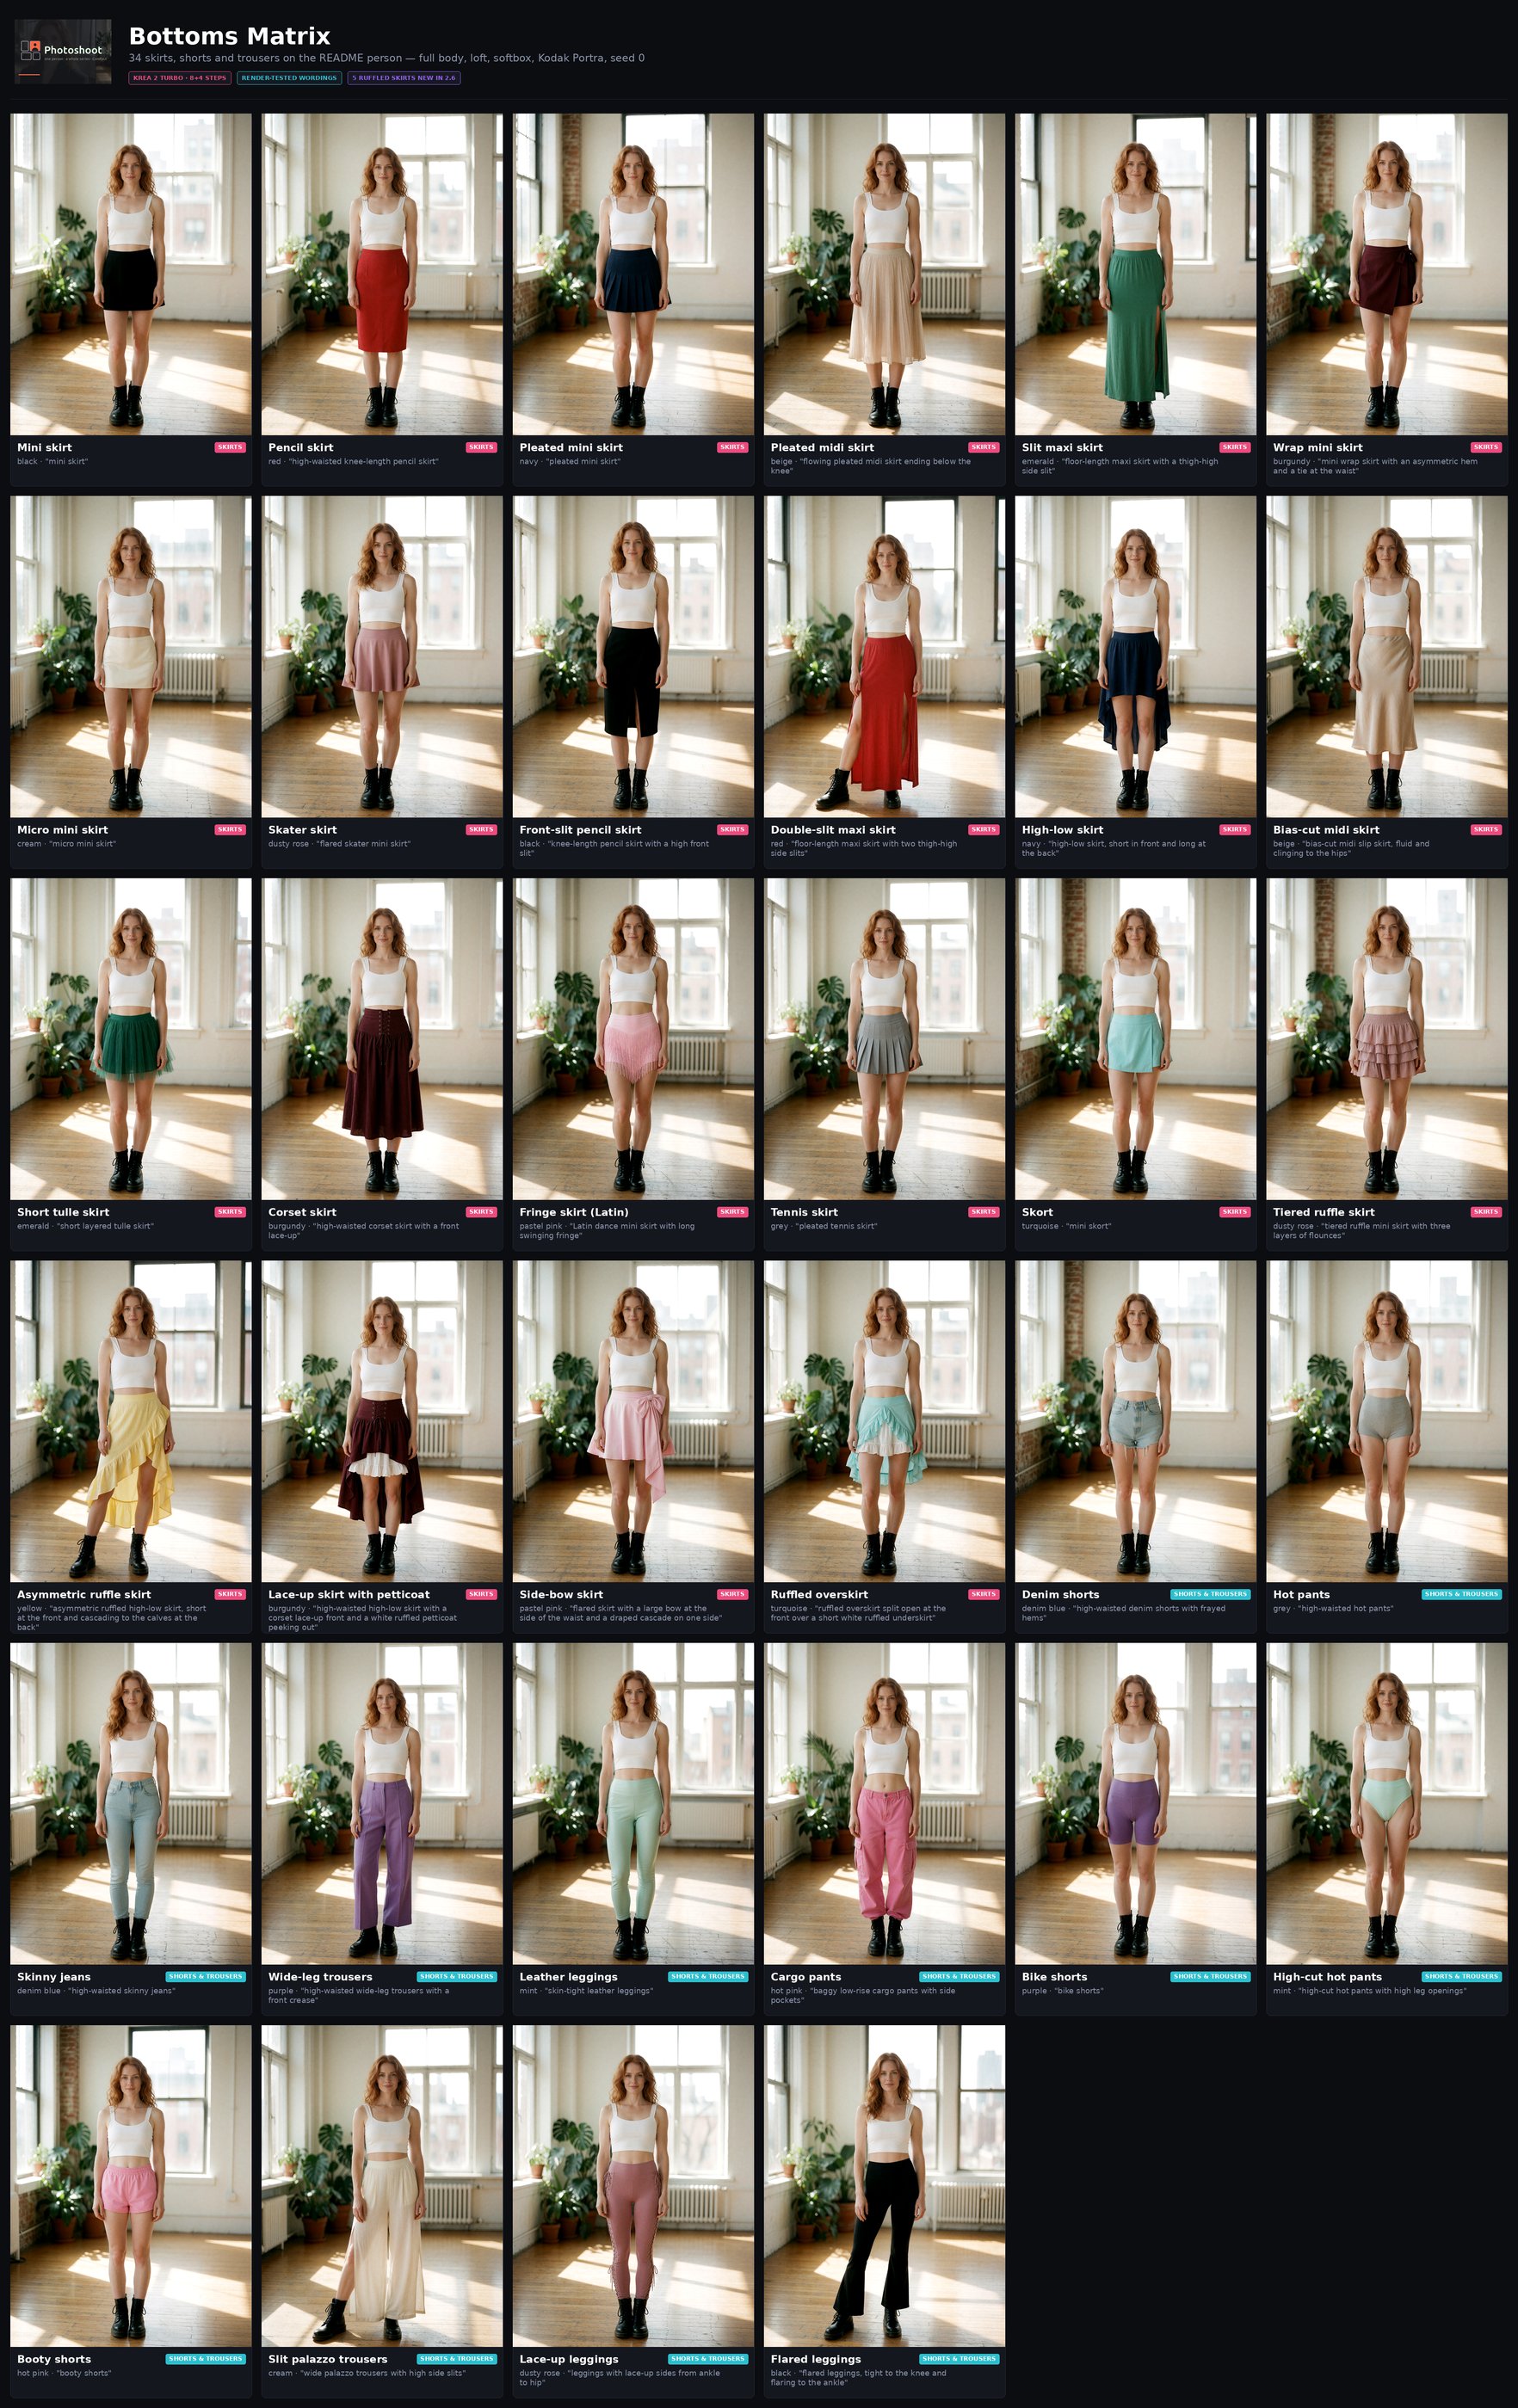
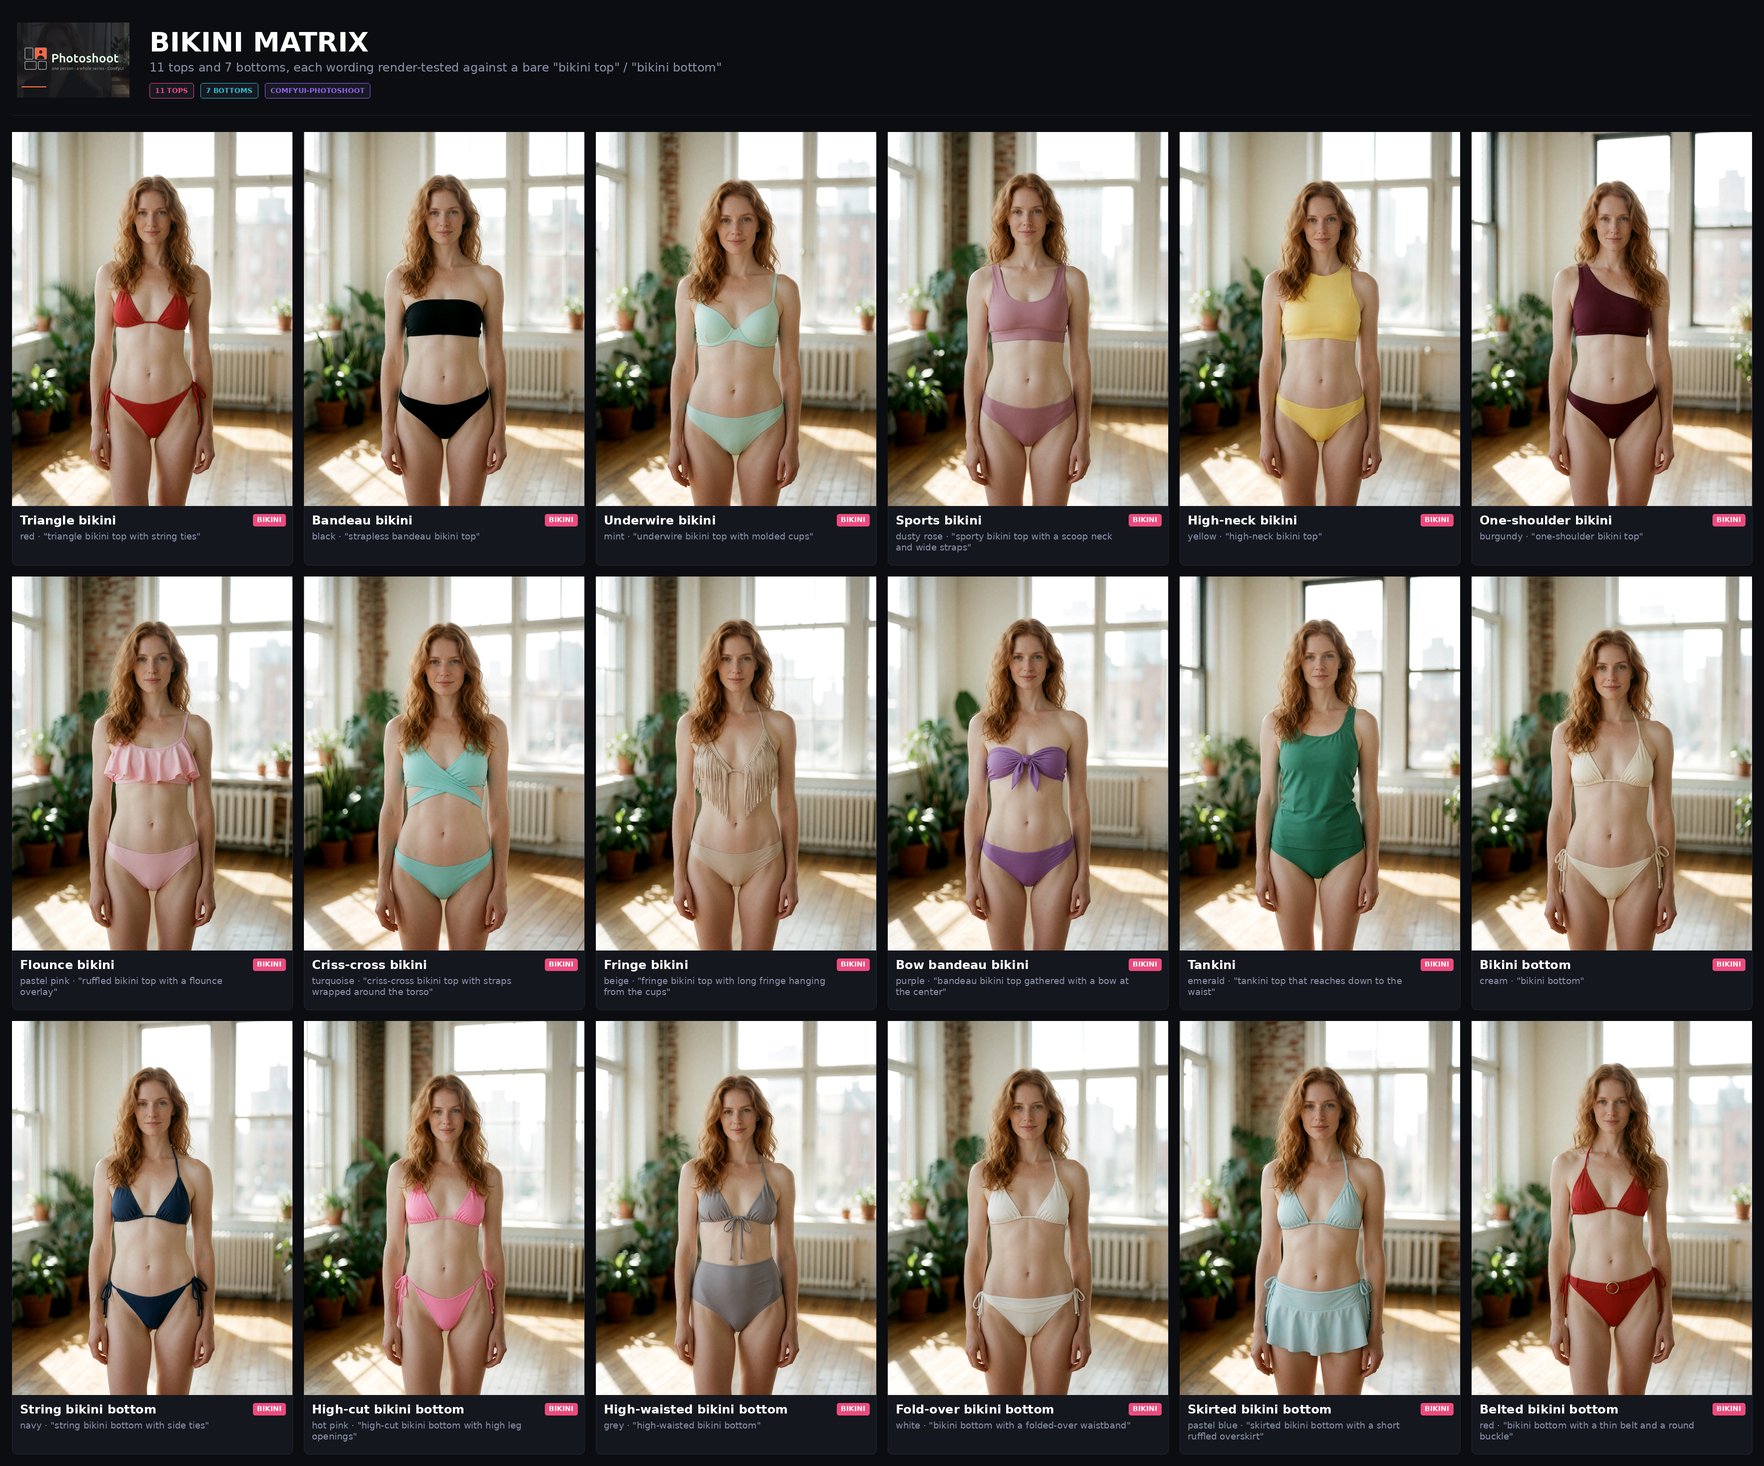
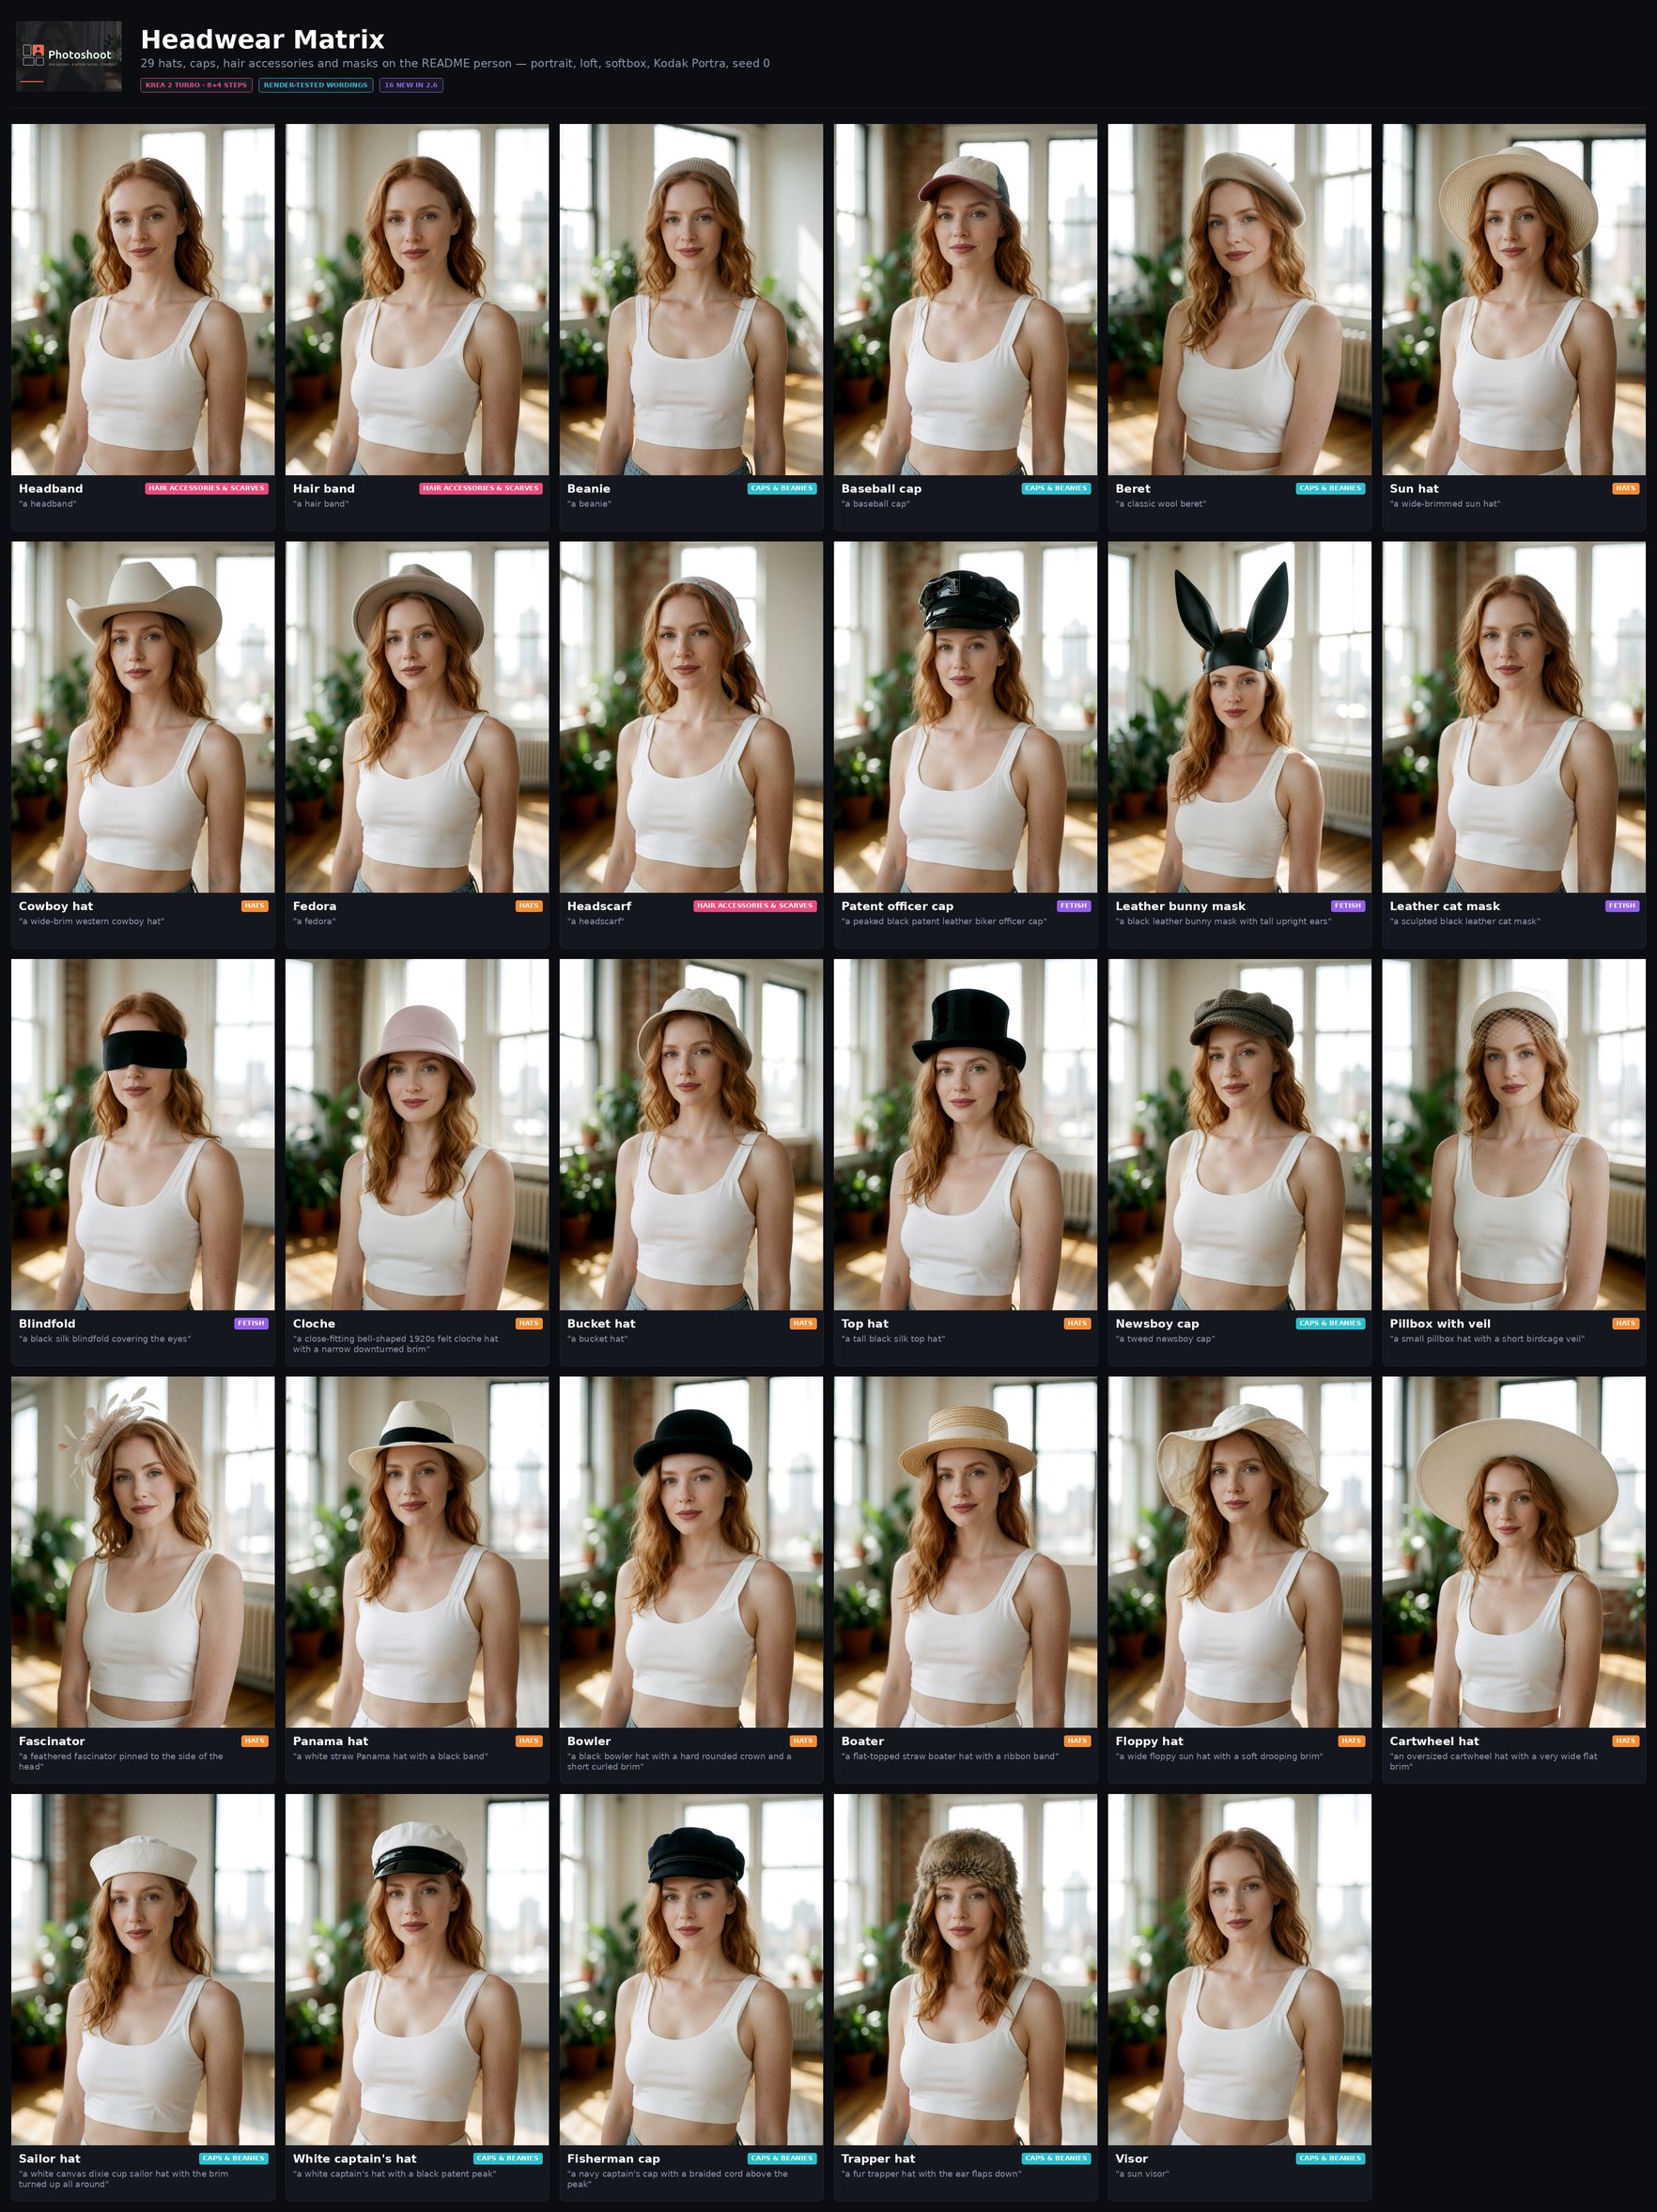
The person from this README, photo 1 of the series, the same loft and light every time; only the garment and its colour change. Krea2 Turbo fp8 + Qwen-VL, two-pass, 0 LoRAs.
<br> </details> <details> <summary><b>View Visual Lighting & Atmosphere Matrix (30 Setups Poster)</b></summary> <br>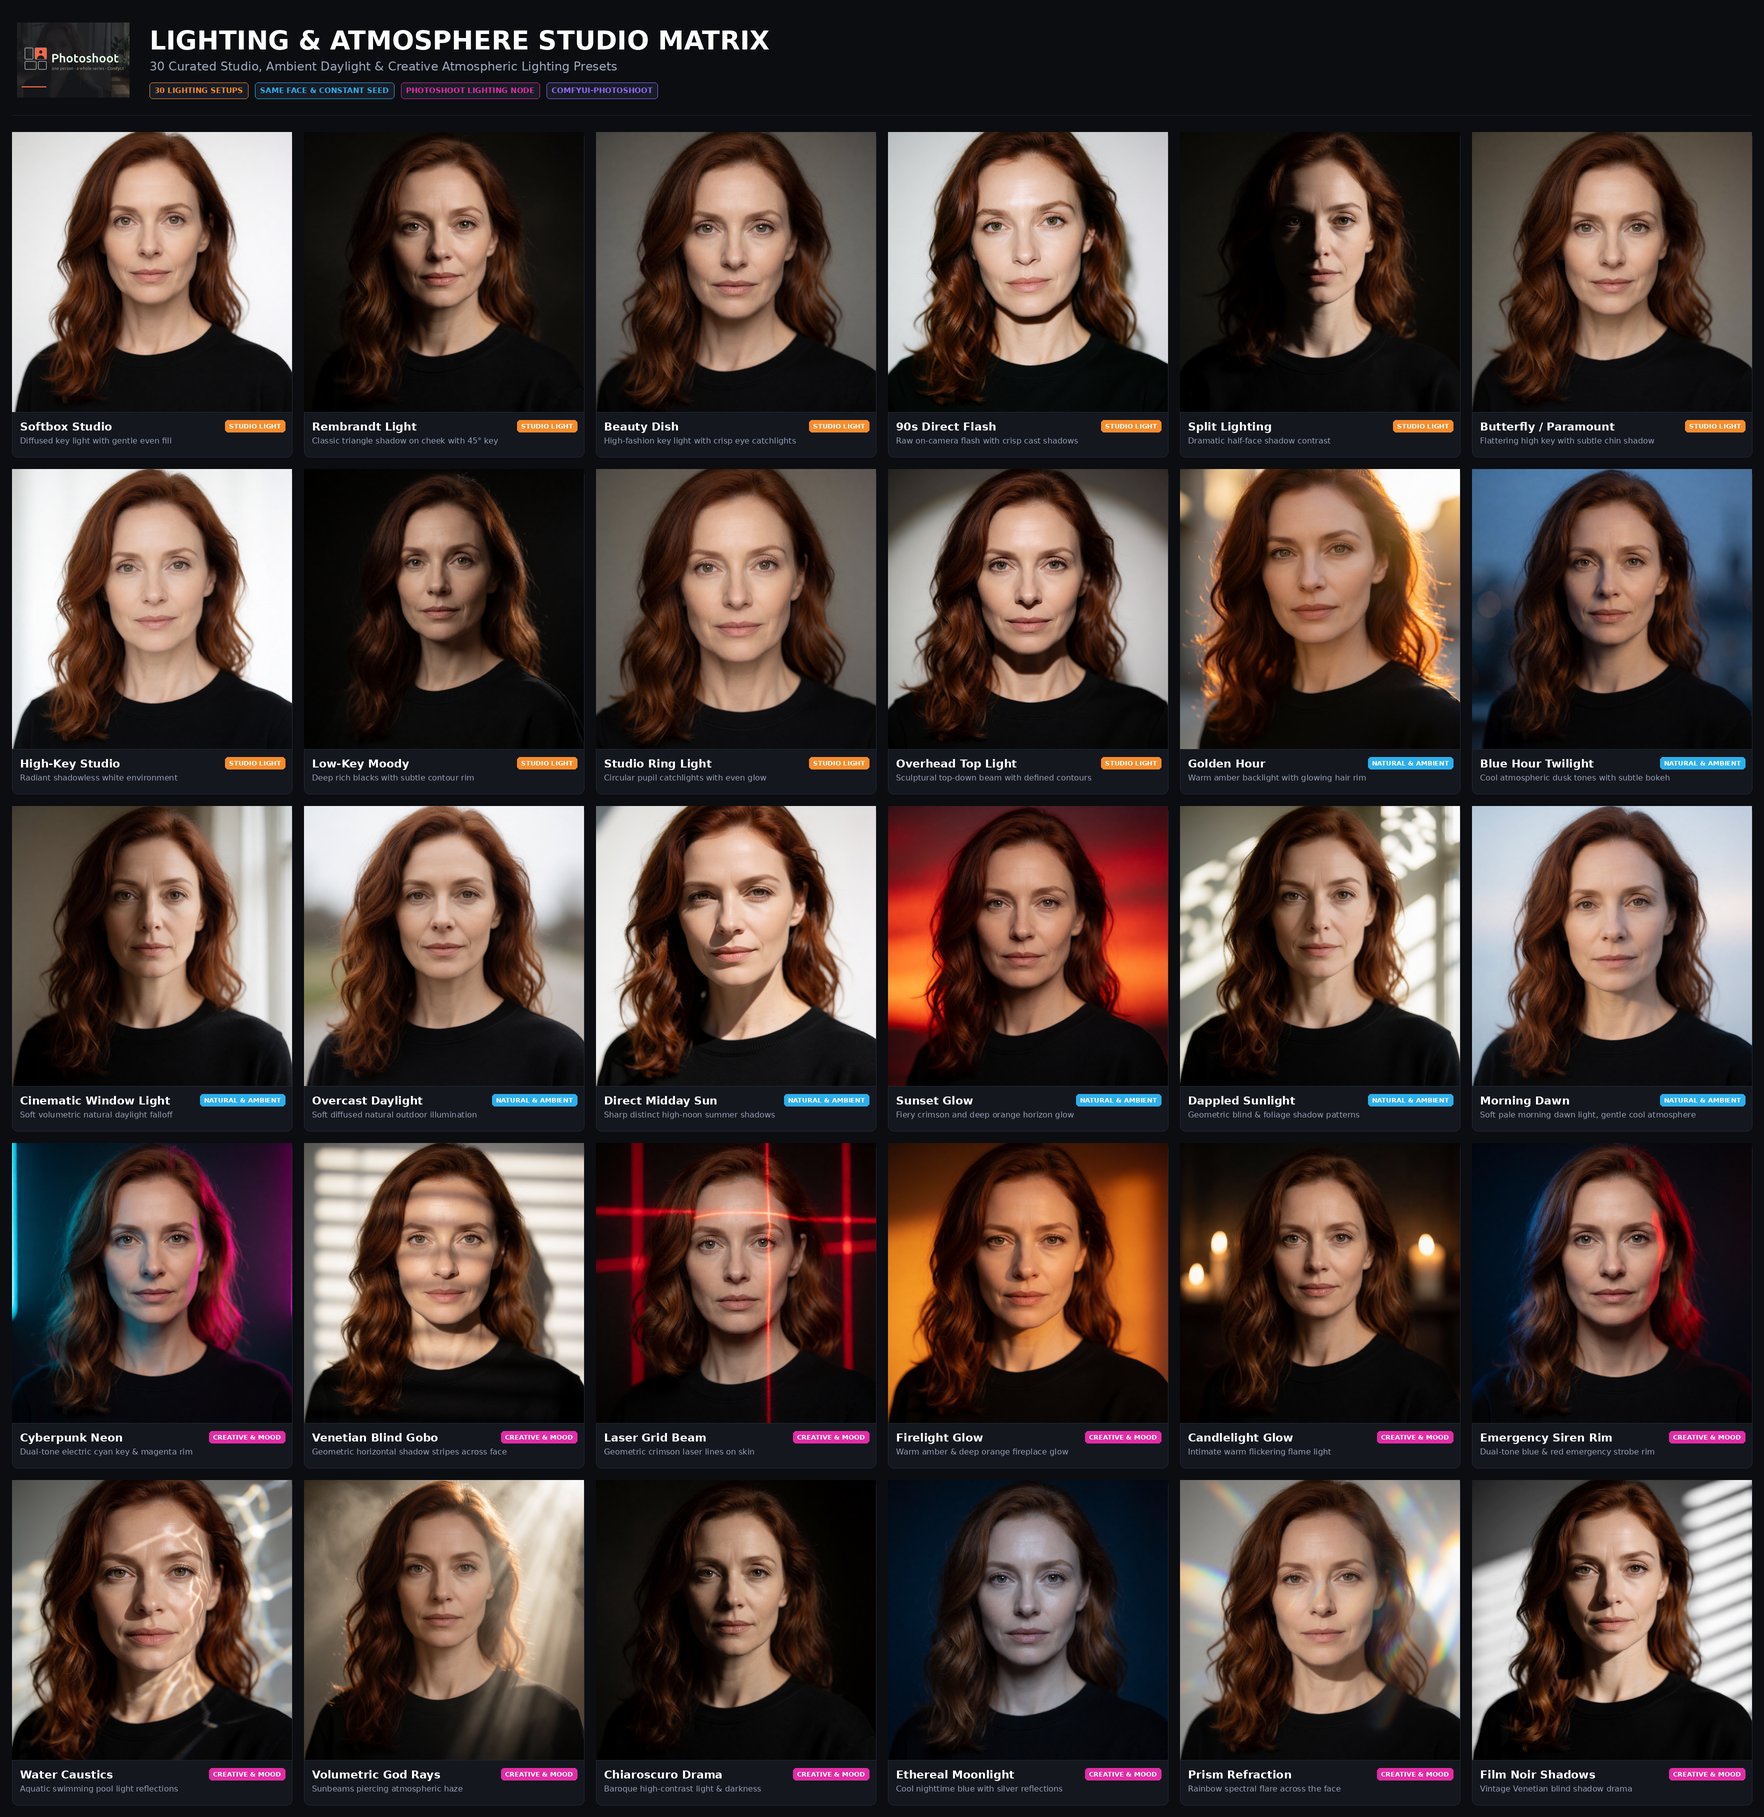
Click image or visit the Visual Reference Posters Catalogue for full-resolution sheets & all categories.
<br> </details> <details> <summary><b>View Visual Style Looks Matrices (10 Black & White + 7 Colour Posters)</b></summary> <br>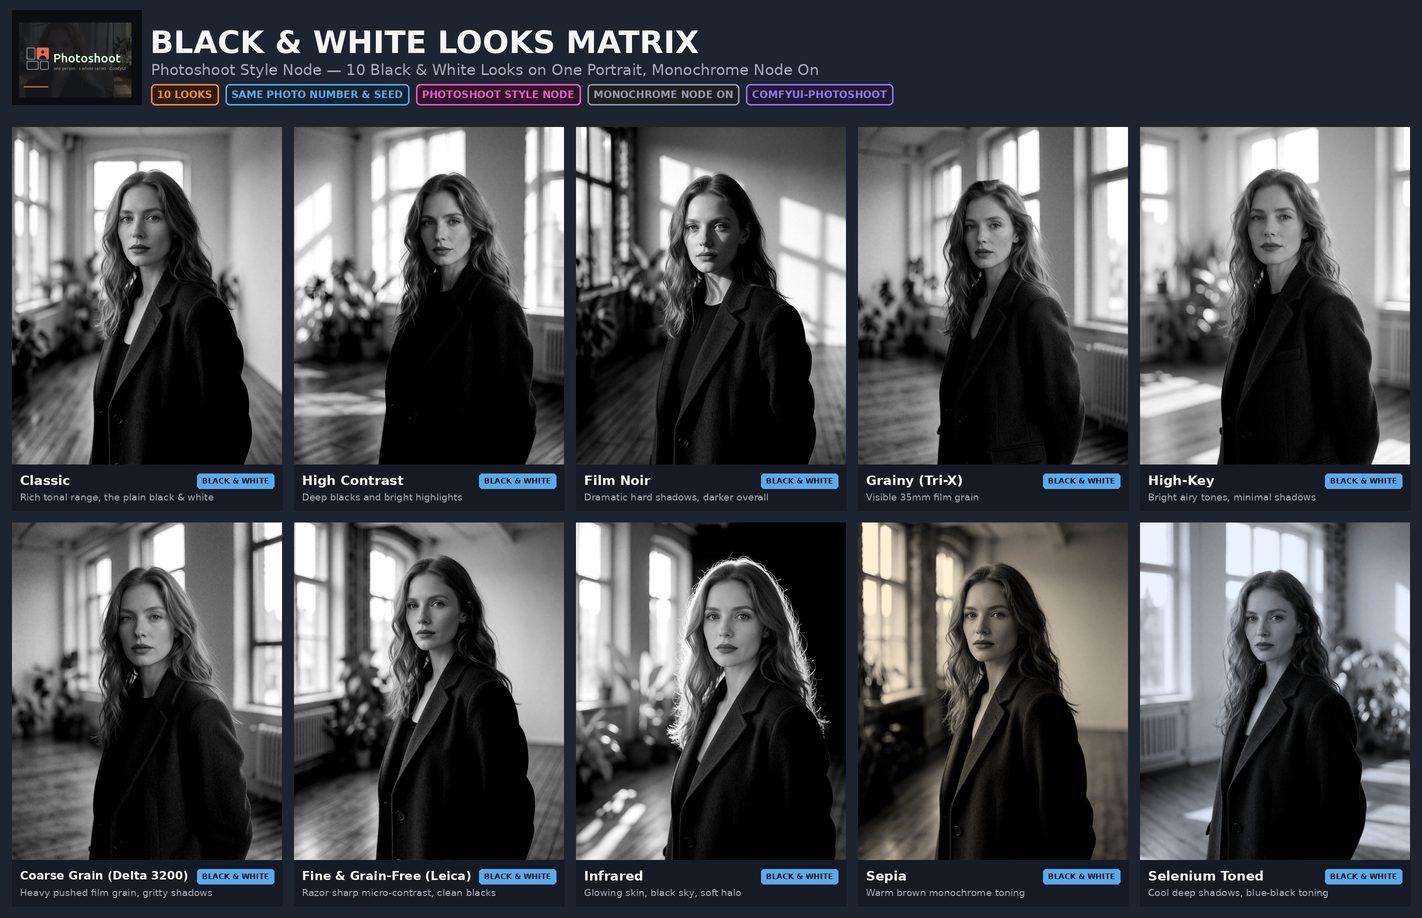
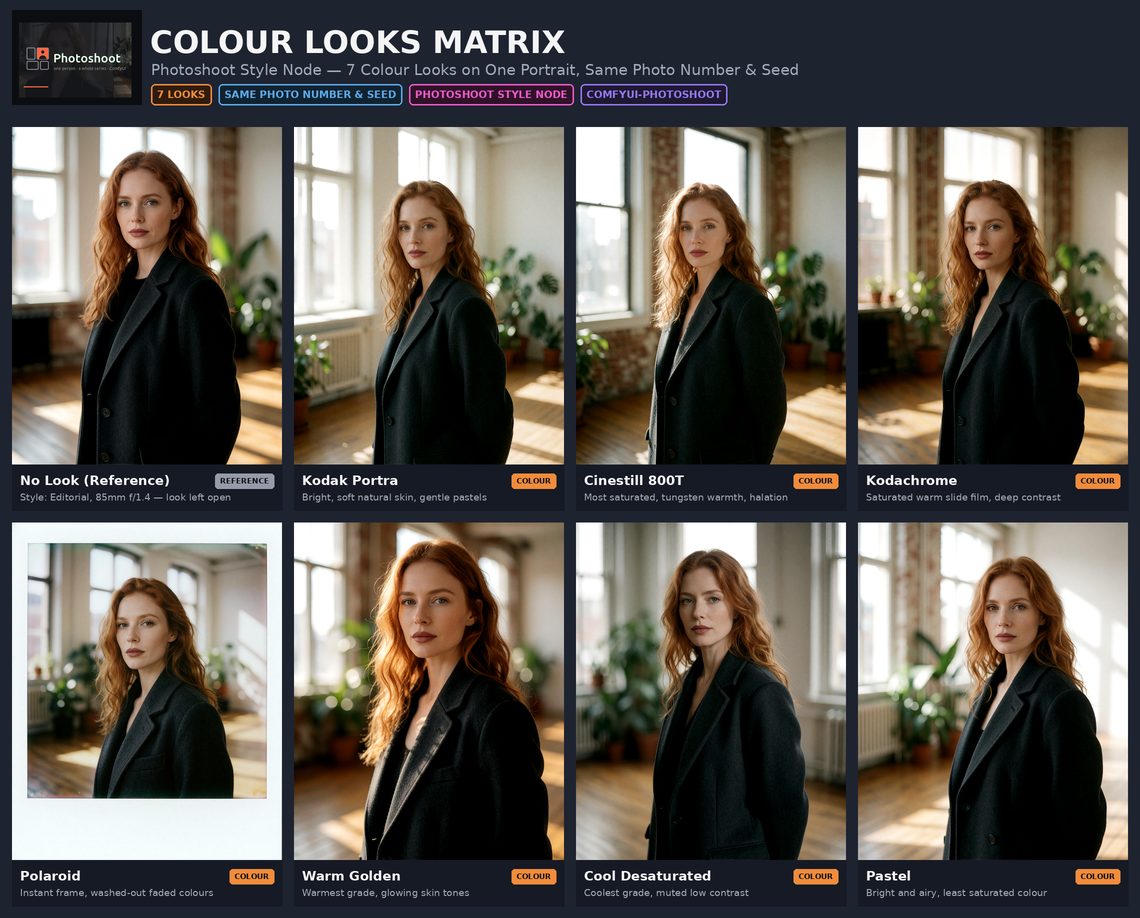
Click image or visit the Visual Reference Posters Catalogue for full-resolution sheets & all categories.
<br> </details> <details> <summary><b>View Visual Hairstyles & Bangs Matrices (20 Presets, 9 Bangs)</b></summary> <br>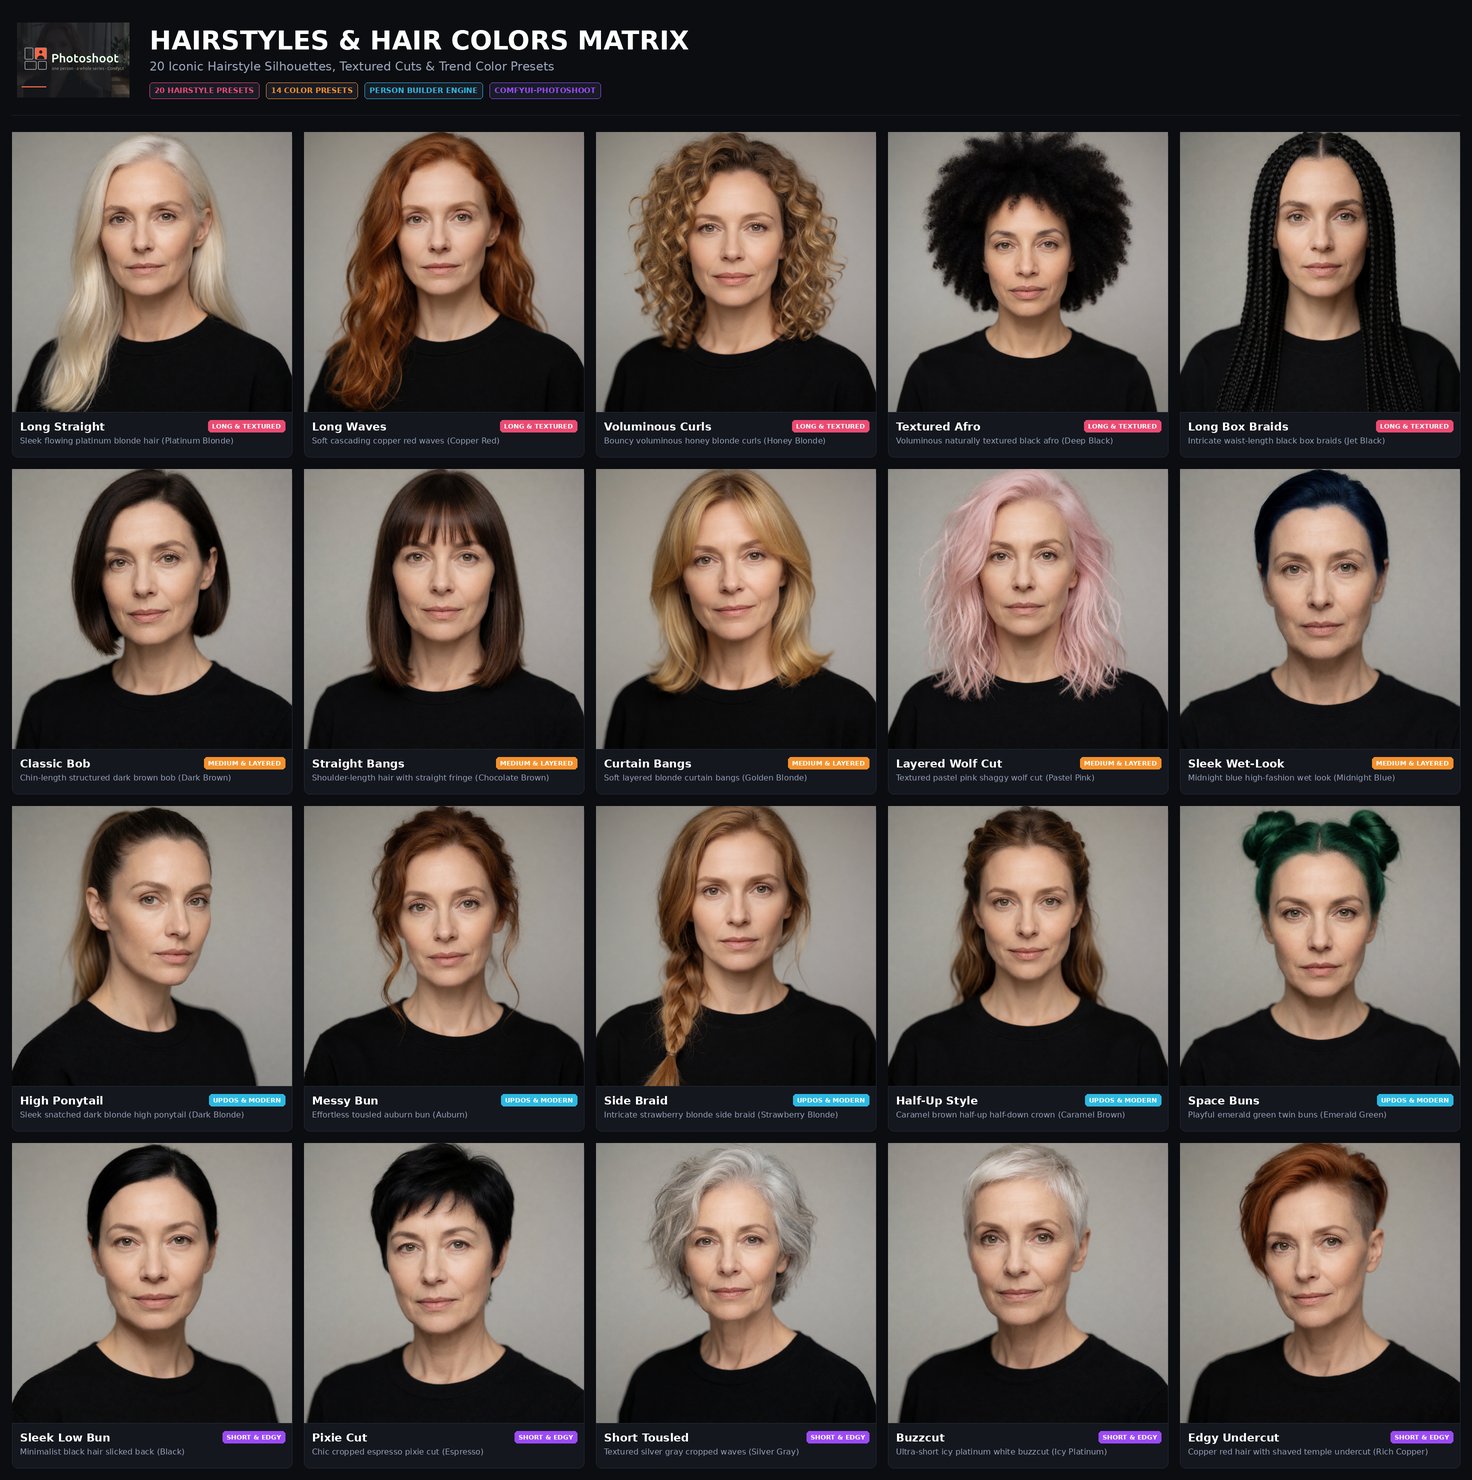
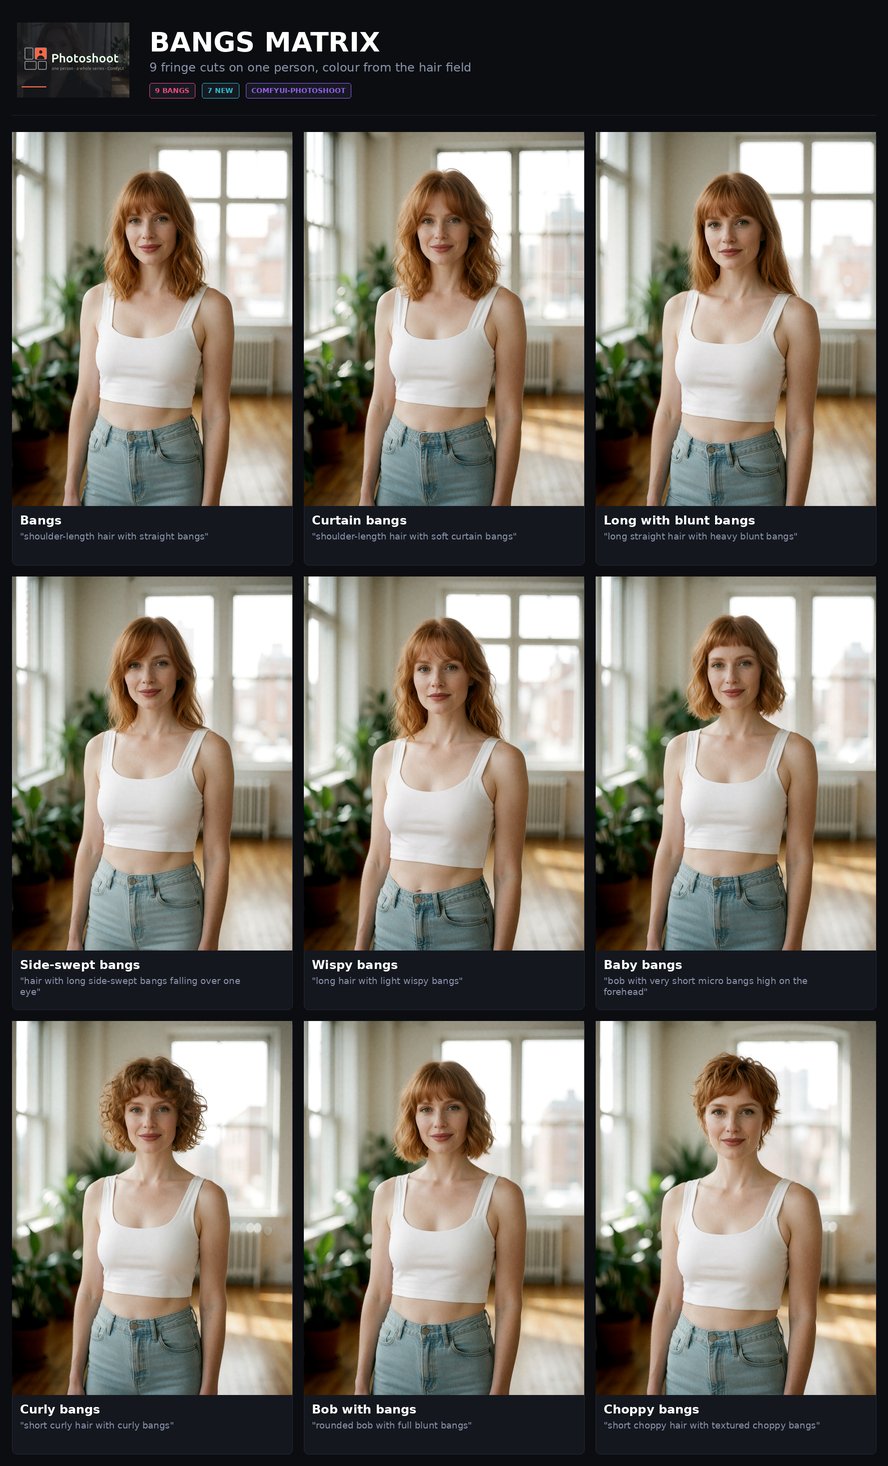
Click image or visit the Visual Reference Posters Catalogue for full-resolution sheets & all categories.
<br> </details> <details> <summary><b>View Visual Poses & Postures Reference Guide (18 Postures Poster)</b></summary> <br>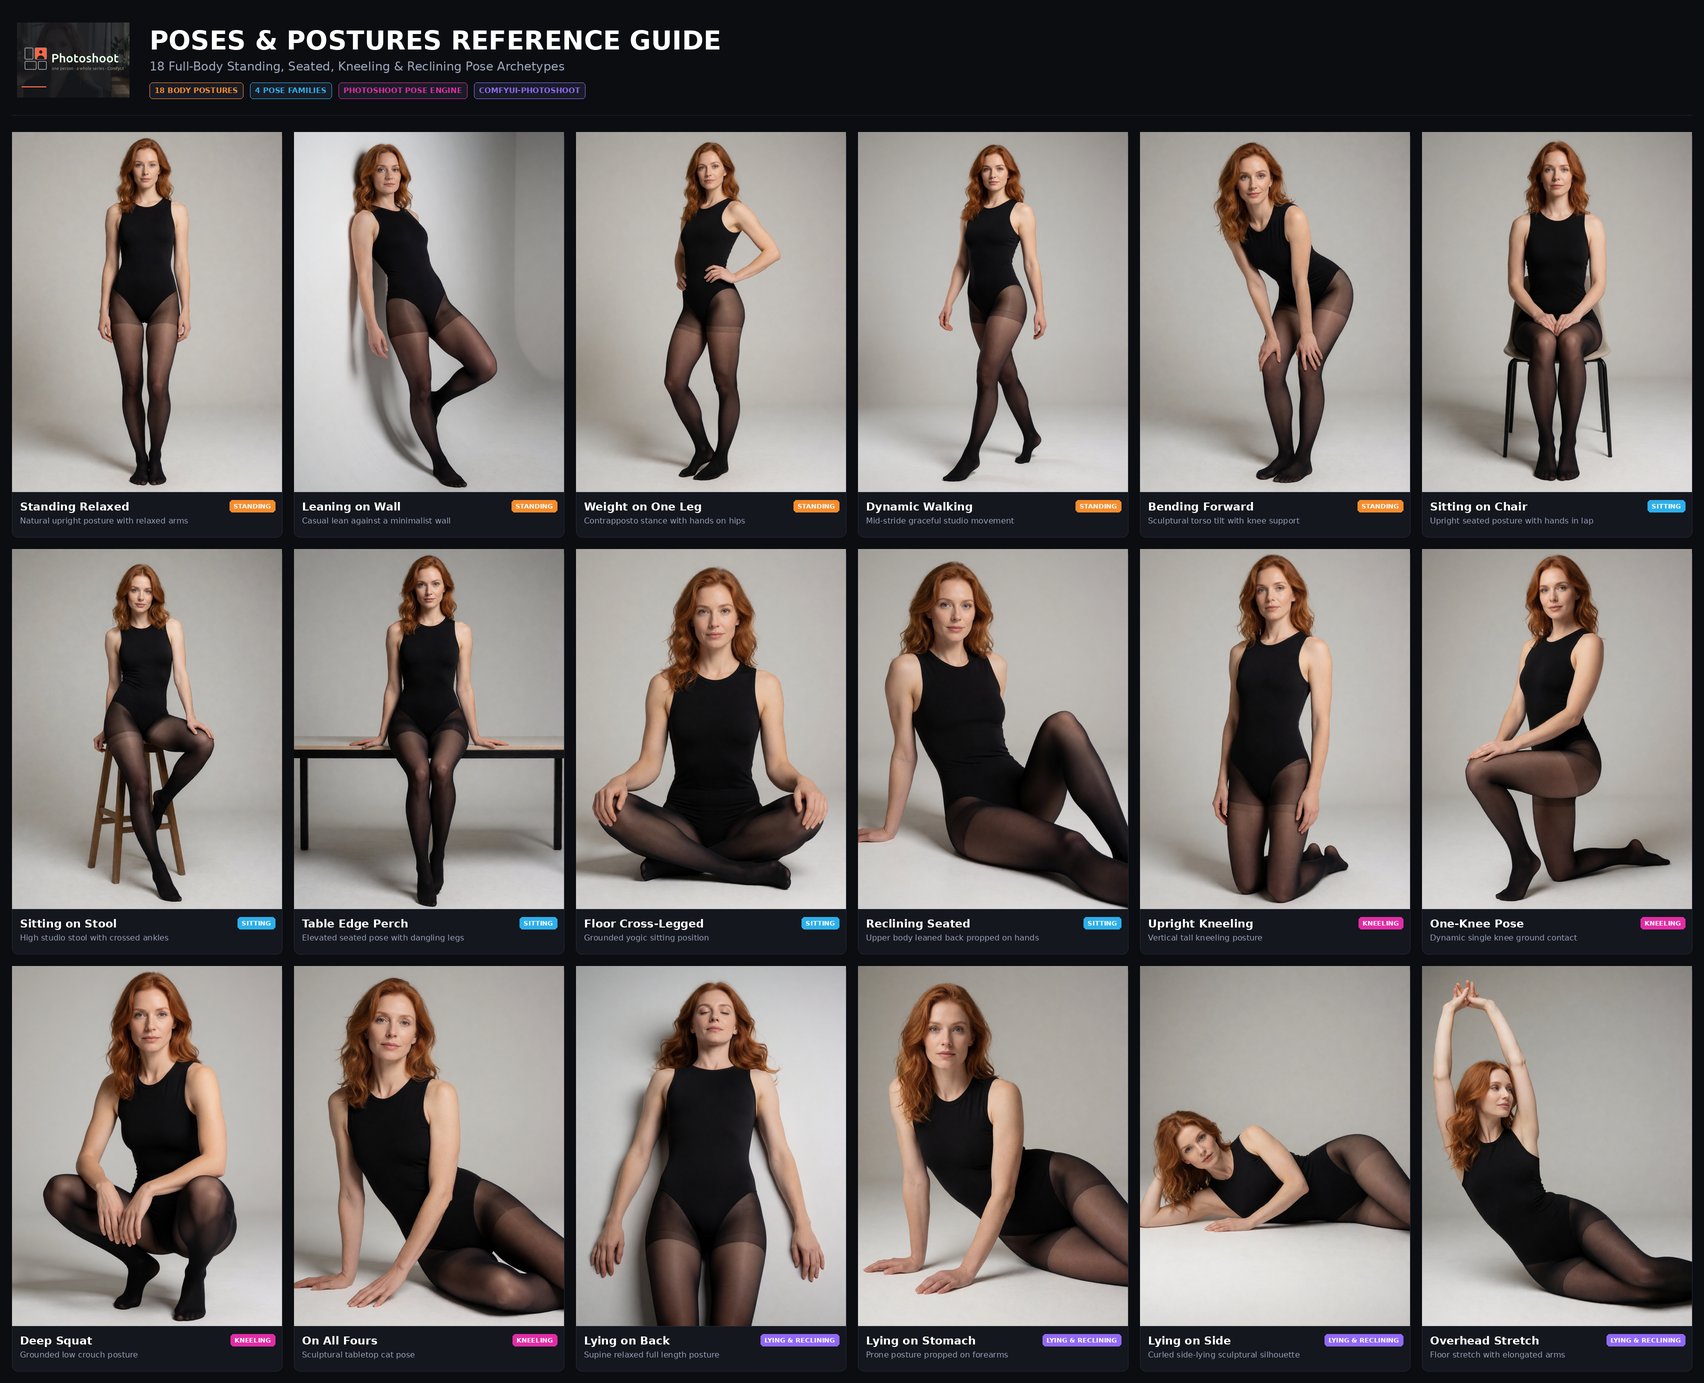
Click image or visit the Visual Reference Posters Catalogue for full-resolution sheets & all categories.
<br> </details> <details> <summary><b> View Visual Expressions & Emotion Spectrum (12 Moods Poster)</b></summary> <br>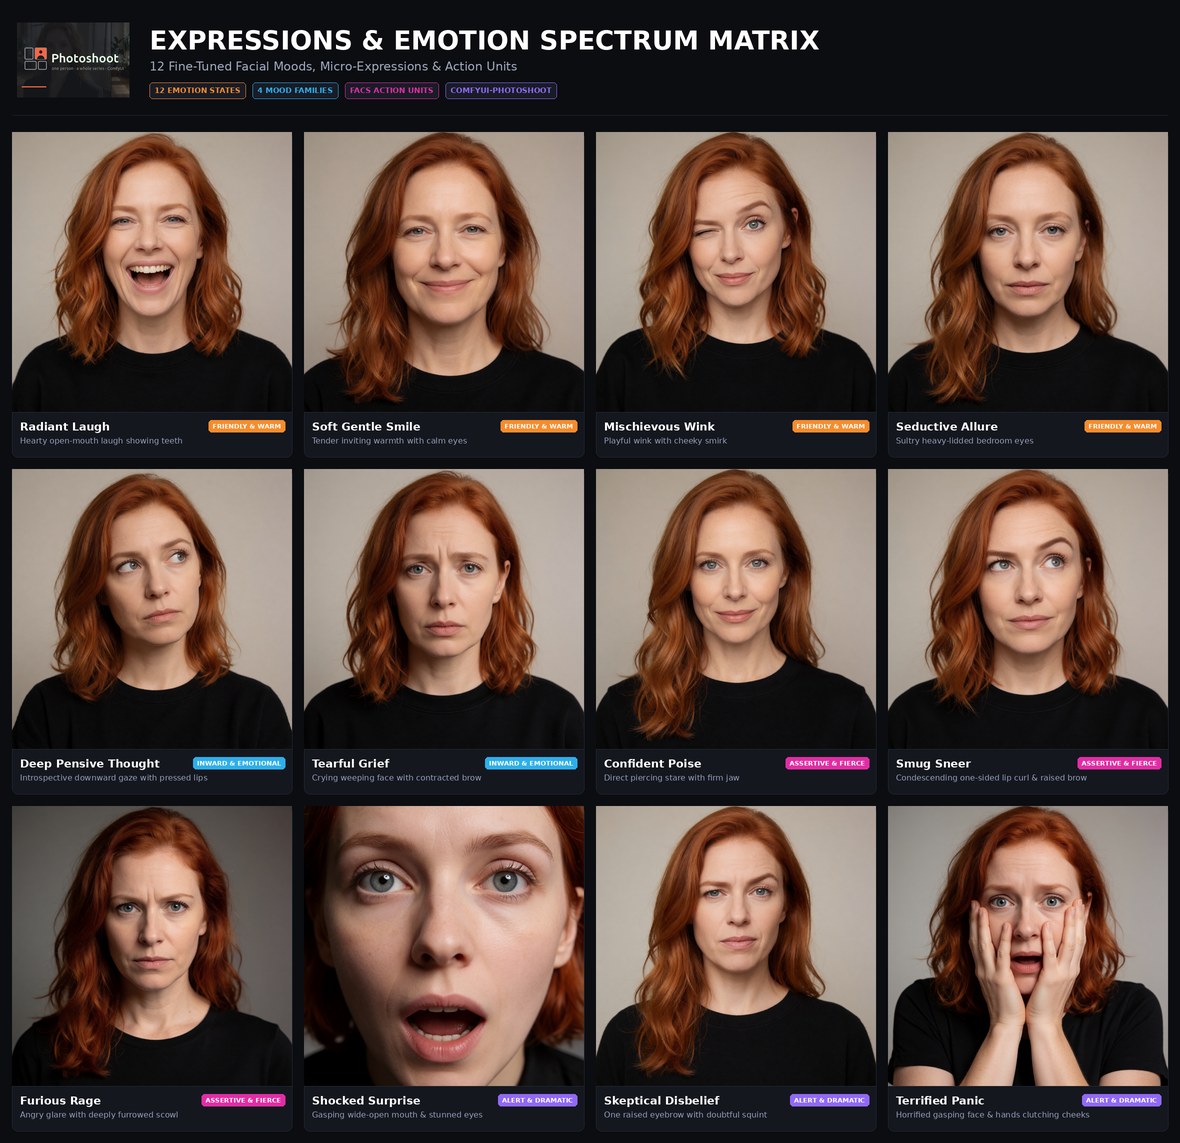
Click image or visit the Visual Reference Posters Catalogue for full-resolution sheets & all categories.
<br> </details>The photoshoot
Seven axes. Each can be switched off — then it holds still — or restricted to a family: only standing poses, only calm moods, only close-ups.
| Axis | What varies | |---|---| | Camera | 7 framings, extreme close-up through wide shot | | Pose | 18 postures in 4 families, plus placement in the room, orientation, arms, legs, tension — placement is coupled to the framing and tension to the posture, so no photo asks for a figure that is leaning against a wall and curled up at once | | Expression | 90 moods in 9 families, plus eyes, gaze, mouth, brows, head tilt | | Focus | 12 focal points, face to feet — coupled to the framing, since a wide shot does not focus on the lips | | Format | 9 aspect ratios at a constant pixel count, coupled to the framing so a full-body shot never lands in 16:9 landscape — plus the size, from 1024 to 2560 px | | Outfit | costume changes from the person's Wardrobe, in blocks or mixed — in blocks, each outfit is shot wide to close | | Noise | a fresh seed per photo, or one seed for the whole series to keep the setting recognisable |
<img src="docs/photoshoot.png" alt="The Photoshoot node: count and start number, the start button, seven axis switches and a contact sheet with the rendered photos" width="400" align="right">
Recipes set all axes for a kind of shoot in one click — Editorial, Lookbook, Headshots, Shoes and a seven-photo Test sheet with every framing exactly once. Under Camera, wide → close turns the series into a shoot that opens wide and ends in the detail; under Expression, a mood arc (Joy, Dominance, Drama) lets the mood develop from photo to photo instead of jumping — Joy shows without a LoRA, the darker two want a character LoRA (why). + Save keeps your own settings next to them — the exact series, start number included, to load again later.
The node ends in a contact sheet: every photo as a frame in its real aspect ratio, filled with the picture once it is rendered. Click a frame for its framing, pose, focus and mood, mark it as a favourite, or mark it for a re-shoot — the same plan with new noise, as many takes as you like, while the rest of the series stays as it is. With takes per photo every shot is rendered two to four times from the start, and you pick the take per photo. The sheet remembers its pictures in the workflow, so it survives a restart of ComfyUI.
Two things make this a series rather than 40 random images.
It counts, it does not roll dice. Run 7 always produces the same photo, so a series is reproducible and you can extend it later. Counting uses a Kronecker sequence — each field steps by the fractional part of a different square root — because plain integer factors made fields with related list lengths march in lockstep: the same body turn kept arriving with the same mouth.
The person shrinks with distance. The prompt for a wide shot drops lipstick, eyeliner and brow shape and keeps the silhouette. Those tokens are invisible at that range but still pull the composition back onto the head. More on that.
What a series looks like
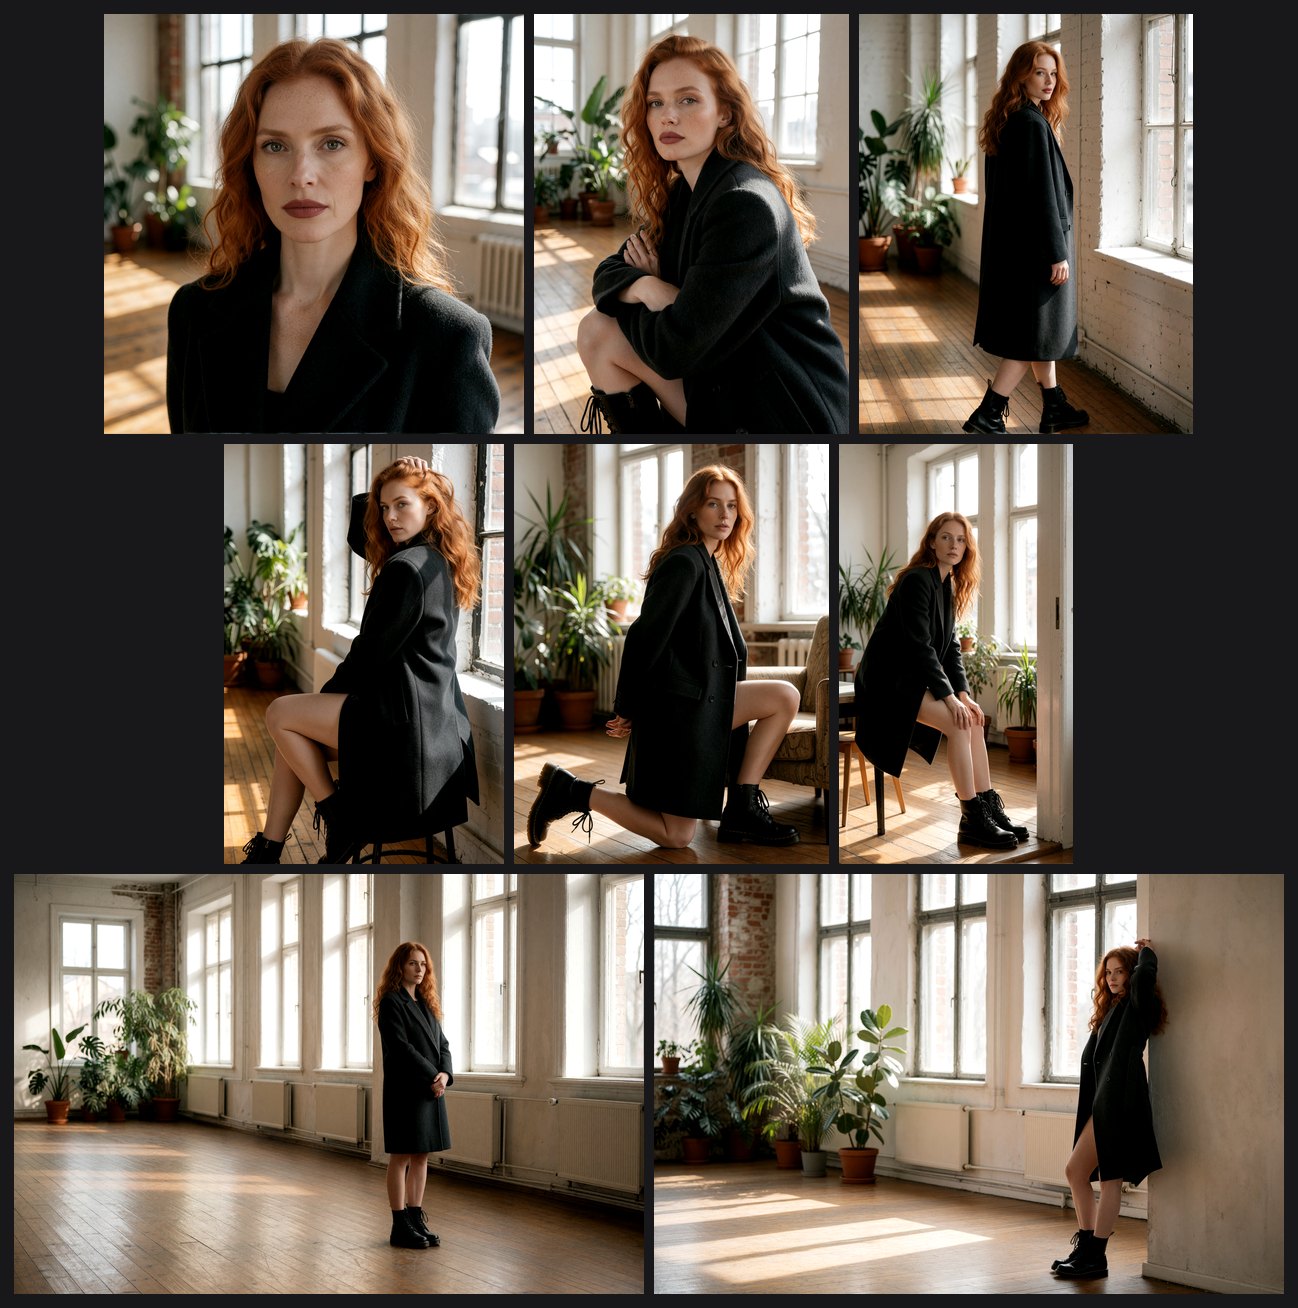
Eight photos of one series, unretouched: wide → close under Camera, the Joy arc under Expression, everything else drawn. Same person throughout — the hair, the freckles, the charcoal coat and the black boots come from the Person Builder and do not drift. The camera moves in from the wide shot to the extreme close-up while the mood goes from relaxed to triumphant; the pose, the place in the room and the aspect ratio change with every photo.
The plan behind it, as the contact sheet shows it:
 1  Wide shot        → Environment   Relaxed       1632×1088 [identity]
 2  Full body        → Whole figure  Relaxed        992×1776 [figure]
 3  Cowboy shot      → Upper body    Warm smile    1152×1536 [figure]
 4  Medium shot      → Environment   Gentle smile  1152×1536 [figure]
 5  Medium shot      → Upper body    Beaming       1152×1536 [figure]
 6  Portrait         → Eyes          Laughing      1184×1488 [full]
 7  Close-up         → Lips          Triumphant    1328×1328 [full]
 8  Extreme close-up → Lips          Triumphant    1184×1488 [full]
Every photo is a plain prompt. With the example template
{style}, {expression}, {camera}, {scene}, {lighting}, {person}, {pose},
photo 8 comes out as:
editorial photography, 85mm lens, f/1.4, shallow depth of field, creamy bokeh,
an ecstatic triumphant woman shouting in victory, mouth wide open, eyes shining
with joy, extreme close-up macro shot of the lips and mouth, a sunlit loft with
tall windows, wooden floor, plants in the corner, softbox diffused studio
lighting, …, in her late 20s, Scandinavian features, very fair skin, … long
wavy natural copper red hair, high, pronounced cheekbones, a straight nose,
almond-shaped grayish green eyes, matte dusty rose lipstick, freckles, wearing
a charcoal wool coat, bare legs, wearing black combat boots
The mood is the subject — "an ecstatic triumphant woman" — and the person joins
it without a second "a woman". Photo 7 cheers "with both fists raised in the
air"; in the macro the fists are left out, because a gesture outside the frame
pulled the extreme close-up back to a full figure. The [full] / [figure] /
[identity] tag is the detail level: photo 1 is so far away that cheekbones,
nose, eye shape and lipstick are left out, photo 8 carries all of them.
[!NOTE] Which arc works without a LoRA. With the person described in full, as here, Krea 2 renders smiles, laughter and cheering reliably — Joy comes through. The darker arcs do not: in the same series with Drama the gestures showed (a hand over the mouth, hands in the hair) but the faces stayed calm, and "crying" came out without a tear. With a character LoRA, whose trigger replaces the face description, the person block is short and frightened, panicked and desperate faces came through in the tests; tears did not, with or without.
Wiring
Wardrobe ──► Person Builder ──person_data──► Photoshoot ──┬── person   ─┐
 outfits     37 fields, saved once          the series  ├── pose      │
                                                        ├── expression├──► Build Prompt ──► your sampler
                                                        ├── camera    │
Scene / Style ──────────────────────────────────────────┴── width/height/seed
- Build a person. 37 fields in five sections, and a Wardrobe with her
outfits on its
wardrobeinput. Save under a name and reuse across sessions — the point is that the same person comes back. - Send them to a photoshoot. Set the count, restrict the axes you care about, then press Start shooting in the node's own panel — that button, not the Queue button above the canvas. Queue renders one run, the photo the panel calls next; Start shooting sets the counter to the start number and queues the whole series. A new start number is a new series with the same settings — ↻ New series draws one.
- Assemble the prompt. Placeholders (
{camera},{person},{pose}…) drop the parts into your own text, or the node appends them in a sensible order if you have none.
Pose and expression also work as standalone nodes when you do not want a series.
Already have your character?
Then leave step 1 out. The Person Builder is optional — unwire it and the
{person} placeholder simply drops from the prompt, no stray commas, and the
Photoshoot node varies framing, pose, placement, expression and aspect ratio
around whoever your character already is:
close-up shot, with the focus on the neckline, walking, near a window, torso
turned away, looking back over the shoulder, arms wrapped around the knees,
knees together, feet apart, back arched, a soft gentle smile, eyes closed,
looking past the camera, furrowed brows, pursed lips, head tilted slightly
That is a whole series' worth of direction with no description of a person in
it. Whatever holds your character — a LoRA and its trigger word, an IPAdapter
reference, an identity-preserving edit model — supplies the who, and these
nodes supply everything else. Put the trigger word in the {extra} placeholder
if you need it first in the prompt.
Two things help there. Describing the face on top of a reference or a LoRA gives the model two sources for one thing, so leave those fields empty. And a reference photo shows no body below the shoulders, so the body section is worth filling in even when the face comes from elsewhere — otherwise every image invents a different build.
You do need one of those mechanisms, though. Plain img2img is not a substitute: the latent carries the source image's geometry, so framing and aspect ratio cannot move, and with the description gone nothing holds the identity either. Measured at three denoise levels — at 0.45 the framing never changed and the face already had, at 0.85 the direction won and the person was someone else.
Need a character to use elsewhere?
The other direction: a handful of consistent images of one person, to feed a reference input, a LoRA training set, or the next shot of a video.
Switch the noise axis off before you go looking, not after. This is the one place where the obvious order is the wrong one. With noise on, every run reinvents everything the description leaves open, so no two runs share a face. Switching the axis off replaces that with a single series seed and puts a seed field with a die next to it — roll it until you like who turns up, and from then on she is fixed. Camera, pose and expression keep varying, because those come from the prompt rather than from the noise.
Doing it the other way round is the trap: find someone you like at photo 8,
switch the axis off, and you get a stranger, because the seed changed from
(8 − 1) × 2654435761 mod 2³¹ to whatever the series seed says. If you do want
to keep a particular photo, that formula is the answer — photo 8 is seed
1401181143, typed into the field.
Then restrict the camera axis to the framings you need, set the count, and press Start shooting. Which framings depends on what has to stay fixed: a close-up carries the face and nothing below the shoulders, a full-body shot carries the clothes and the build but no facial detail. Keep both and pick per use.
A character LoRA fits in here too, if you have one. The workflow below already
carries the loader, wired between the UNETLoader and both samplers and shipped
bypassed, so it runs untouched as it is: pick your file, press Ctrl+B, and
the model flows through it instead of around it. You do not need one, though.
The noise seed alone holds a person still.
example_workflows/photoshoot-anchor-set.json
is all of that already set up: same graph as the series workflow, but with the
noise axis off and a seed in place, the ratio fixed, the mood held to one
family and the count at six. Load it, press Start shooting, and you have
your anchor set — without having to know about the trap above first. Images go
to photoshoot/anchor so they do not mix with a series.
Example workflow
example_workflows/photoshoot-series.json
is the whole thing wired up — drag it onto the ComfyUI canvas, or open it from
ComfyUI's template browser under ComfyUI-Photoshoot, where both workflows
show a thumbnail.
It contains the Person Builder with a Wardrobe, the Photoshoot, the Lighting and Style nodes, a scene field, and a two-pass sampler: 8 steps at full denoise, a 1.5× latent upscale, then 4 steps at denoise 0.44. Keeping the upscale but dropping the refinement is the one combination to avoid — that takes 11.4 s instead of 24.8 s and comes out unusably soft, because latent upscaling invents no detail, it only pulls things apart. Dropping both is a different thing — see "Draft before you shoot" below.
width and height come from the Photoshoot node, so the aspect ratio follows
the framing. bildseed feeds both samplers, which is what makes a run
reproducible. Between VAE Decode and Save Image sits Photoshoot – Monochrome,
shipped bypassed: with a black and white look in the style, select it and press
Ctrl+B, and the last trace of colour goes too.
Draft before you shoot
Before shooting a series you usually want to see the first five or six runs: is the person right, the scene, the style, the axes you restricted? Rendering those at full quality is a waste, because you are going to change something and shoot them again.
Select LatentUpscaleBy and the second KSampler, press Ctrl+B. That is
bypass, not mute: both nodes take a LATENT and hand back a LATENT, so the latent
passes straight through them and the decode reads the first sampler instead of
the second. Measured here against local Krea 2 weights, that is 10.2 s per
image instead of 21.5 s, at the base resolution rather than 1.5×. Sharp, just
smaller. Press Ctrl+B again and you are back at full quality with every
setting untouched — which is the point of doing it this way rather than in a
second file: the person, the scene and the axis restrictions live in the nodes,
and moving them across workflows is work.
Because the series counts through combinations rather than drawing at random, runs 1 to 6 in the draft are runs 1 to 6 in the finished series. You are previewing the real thing, not a stand-in. Six calibration images cost 61 s instead of 129 s, and you rarely go round only once.
If you would rather keep the drafts out of the finished set, change the
SaveImage prefix while the two nodes are bypassed.
Drafting a whole series works too, and there it depends on how many you keep, since everything renders twice: forty full runs cost 860 s, forty drafts plus k re-renders cost 408 + 21.5·k, even at k ≈ 21.
The three loaders name the files Comfy-Org publishes for Krea
2 — krea2_turbo_fp8_scaled,
qwen3vl_4b_fp8_scaled as CLIP type krea2, and qwen_image_vae — so the
example matches what you already have if you followed the official ComfyUI
tutorial. If yours are named differently, ComfyUI flags the loader nodes on load
and you pick your own; the rest of the graph is unaffected.
The text encoder is the one part that is not interchangeable. Krea 2 taps twelve layers of Qwen3-VL-4B at a hidden size of 2560, so plain Qwen3-4B (no vision tower) and the 32B build (wrong width) will not load.
After changing anything under js/, bump the version in pyproject.toml and
run python3 tools/setze_js_version.py. ComfyUI serves the .mjs files without
a Cache-Control header, so without a fresh ?v= in the import a browser can sit
on the old interface for a day or more.
The workflow is generated by tools/baue_workflow.py, which checks every node
type, input name, output index and required input against a running ComfyUI. It
was verified by actually executing it, not just by loading it.
Which models does this work with?
Any of them, in principle. The nodes emit text — the person, the pose, the expression, the camera phrasing — plus width, height and a seed. Nothing here touches a model, so whatever consumes a prompt can consume these.
Nothing goes in, either. These nodes take no image and no reference — you state the person, so nothing is guessed. That is the difference to a workflow driven by one portrait photo: such a photo holds no body below the shoulders, so the model fills the gap from its own prior. The two combine well, though. Since all that leaves here is a string, an IPAdapter can carry the face while these fields say what the photo cannot show.
What differs is how much of it survives:
- Models with a T5 or LLM text encoder — Flux, SD 3.5, Qwen-Image, Krea 2 — are the good case. A finished prompt here runs 760 to 1000 characters, median around 840, roughly 190–250 tokens, and these read all of it as connected language. The whole design assumes this: that "arms behind the back, hands clasped together" lands as a sentence rather than as loose keywords.
- CLIP-only models — SD 1.5, SDXL — cap out at 77 tokens per chunk. The prompt still works, but it gets split, and details near the end lose weight. Set fewer fields, and use the detail levels: a wide shot already sends a much shorter person block.
- Edge lengths run 1024 to 1536, sized for current models. For SD 1.5 at 512 they are too large; the ratio coupling still helps, the pixel counts do not.
Krea 2 is what the measurements were taken against and what the example workflow loads — that is the extent of the tie.
Installation
No dependencies beyond ComfyUI itself.
Through ComfyUI Manager: search for Photoshoot and install. Or by hand:
cd ComfyUI/custom_nodes
git clone https://github.com/ralksta/ComfyUI-Photoshoot
Restart ComfyUI afterwards; the nodes appear under the Photoshoot category. New to it? The quickstart takes you from the example workflow to a finished series in six steps.
What changed between versions is in the changelog, and every version is tagged as a release — watch the repository for releases only if you want to hear about new ones.
The interface follows ComfyUI's language setting: German if ComfyUI is set to German, English otherwise. Note that ComfyUI defaults to your browser language when you have never picked one, so a German browser gives you a German interface without you setting anything. Pick a language explicitly under Settings → Comfy → Locale. The prompt is identical either way — see Language.
The nodes
| Node | What it does |
|---|---|
| Photoshoot – Person | 37 fields in five sections; wears the open tab of a wired Wardrobe; outputs the person as text and as JSON |
| Photoshoot – Series | the series: seven axes, queues the runs itself, contact sheet with favourites and re-shoots |
| Photoshoot – Pose | posture, placement, orientation, arms, legs, tension |
| Photoshoot – Expression | 90 moods in nine families, plus eyes, gaze, mouth, brows, head |
| Photoshoot – Lighting | 30 studio, daylight and creative lighting setups, plus direction and atmosphere |
| Photoshoot – Style | the look: ten black and white and seven colour looks, each measured to differ, plus genre, lens, finish |
| Photoshoot – Wardrobe | the outfits of a shoot as tabs, into the Person node; the Series changes through them |
| Photoshoot – Monochrome | makes the image truly black and white, between VAE Decode and Save Image |
| Photoshoot – Build Prompt | drops the parts into your prompt text |
| Save / Load | persons, scenes, styles and prompts under ComfyUI/user/krea2_* |
| Photoshoot – Pick Blocks | four dropdowns, four outputs in one node |
Full reference → — every control, and why the awkward ones are the way they are: how focus is coupled to framing, why the person block shrinks with distance, how the series counts without repeating itself.
FAQ
Why does the photo number count up instead of being random? Because it is the photo number, not the seed. Photo 1, photo 2, photo 3 — each number is turned into its own noise seed behind the scenes, and consecutive numbers land far apart, so the photos differ as much as they would with random seeds. What counting buys you is that photo 8 can be rendered again later and comes out the same, and that a series can be extended without repeating anything.
How do I get a completely new series with the same settings? Change the start number next to the photo count, or click ↻ New series beside it, and press Start shooting. Photos 500 to 511 are a different series from photos 1 to 12, and just as reproducible.
One photo of the series is wrong. Do I have to render the whole series again? No: click it in the contact sheet, ↻ Re-shoot, and Re-shoot 1 photo. It keeps its framing, pose and expression and gets new noise; the contact sheet shows the new take.
How do I get black and white? Wire a Photoshoot – Style node into the
style input of Build Prompt and pick a look from the black & white family,
or type black and white photograph, monochrome into the style text yourself.
Then make sure {style} stands at the front of the prompt text — the
example workflow has it there since 2.3.0. That position is the whole trick:
at the end of the prompt the same words still produced a colour image,
however strongly worded; at the front the image went monochrome, and a wide
shot stayed a wide shot (measured). The negative
prompt is no help; at CFG 1 it is ignored.
That gets you the look — but not quite grey: lipstick keeps a hint of brown,
and no wording talks the model out of it. For an image that is actually black
and white, hang Photoshoot – Monochrome between VAE Decode and Save Image.
The example workflows already carry it there, bypassed — select it and press
Ctrl+B. The prompt still matters, it decides the tonality; the node only
removes the colour that is left.
My images look nothing like the posters. Then you are on a different model, checkpoint or LoRA, or a different step count and CFG. The nodes only write the prompt; everything in the posters was rendered on Krea 2 Turbo at 8 steps and CFG 1, the tops and bottoms with the refinement pass on top. Every measurement in docs/measurements.md says which setup it was taken on, and a distilled model at CFG 1 in particular reads a prompt differently from a model with a working negative prompt.
The Lighting node has a Film Noir preset. Is that not black and white? It says so in its wording, and it often is. But it is a lighting description, and the person block outweighs it. The Style node's look is the reliable switch.
More
- Quickstart — from the example workflow to a finished series in six steps
- How-To & Prompt Engineering Guide — empirical learnings, FACS Action Units, token order, avoiding neutralizers, and turbo vs standard models
- Internals — layout, translation, tests, which ComfyUI versions this was built against
- Measurements — what actually got measured, including a conclusion that turned out to be wrong
- Changelog
Your own entries
Missing a hat, a cut, a light setup? Add it yourself: a JSON file in
ComfyUI/user/krea2_presets/ with one line per entry — the field, a label, the
English prompt text — and it appears in the lists next to the built-in ones.
The folder starts out with a commented example (example.json.txt).
The quick way is an LLM: open /krea2/custom/llm_prompt on your ComfyUI
(for example http://127.0.0.1:8188/krea2/custom/llm_prompt), paste it into
any chat model, say what you want — "12 hats from the 1920s" — and save the
answer as a .json file there. The prompt lists every field, the names already
taken and what the render tests found about wording. Render a test image of
each entry before relying on it: a plausible wording does not always hold.
Details in the node reference.
Saved blocks
The stores live under ComfyUI/user/krea2_* and are not part of this
repository — that is where personal content ends up, your own entries in
krea2_presets included. If you want them backed up, copy those folders
deliberately.
Scope
Photoshoot describes adult subjects. The age presets start at the early 20s, and the exact-age field has a floor of 18 — type a lower number and both the preview and the prompt say 18.
That floor is a guardrail against the accident, not a content filter. These nodes only emit text, and text can be typed into any node.
Feedback & ideas
Missing a garment, a pose, a series feature? Tell me in What should Photoshoot do next? — one idea per comment, and 👍 the ones you want too. The votes decide what comes next.
License
MIT — see LICENSE.