ComfyUI Extension: ComfyUI-OneAPI
Run ComfyUI workflows without the setup
No installs, no CUDA version roulette, no GPU sitting idle on your bill. Bring a workflow and run it in the browser.
Simple REST API interfaces for ComfyUI with dynamic parameter replacement and output management
Looking for a different extension?
Custom Nodes (0)
README
ComfyUI-OneAPI ✨
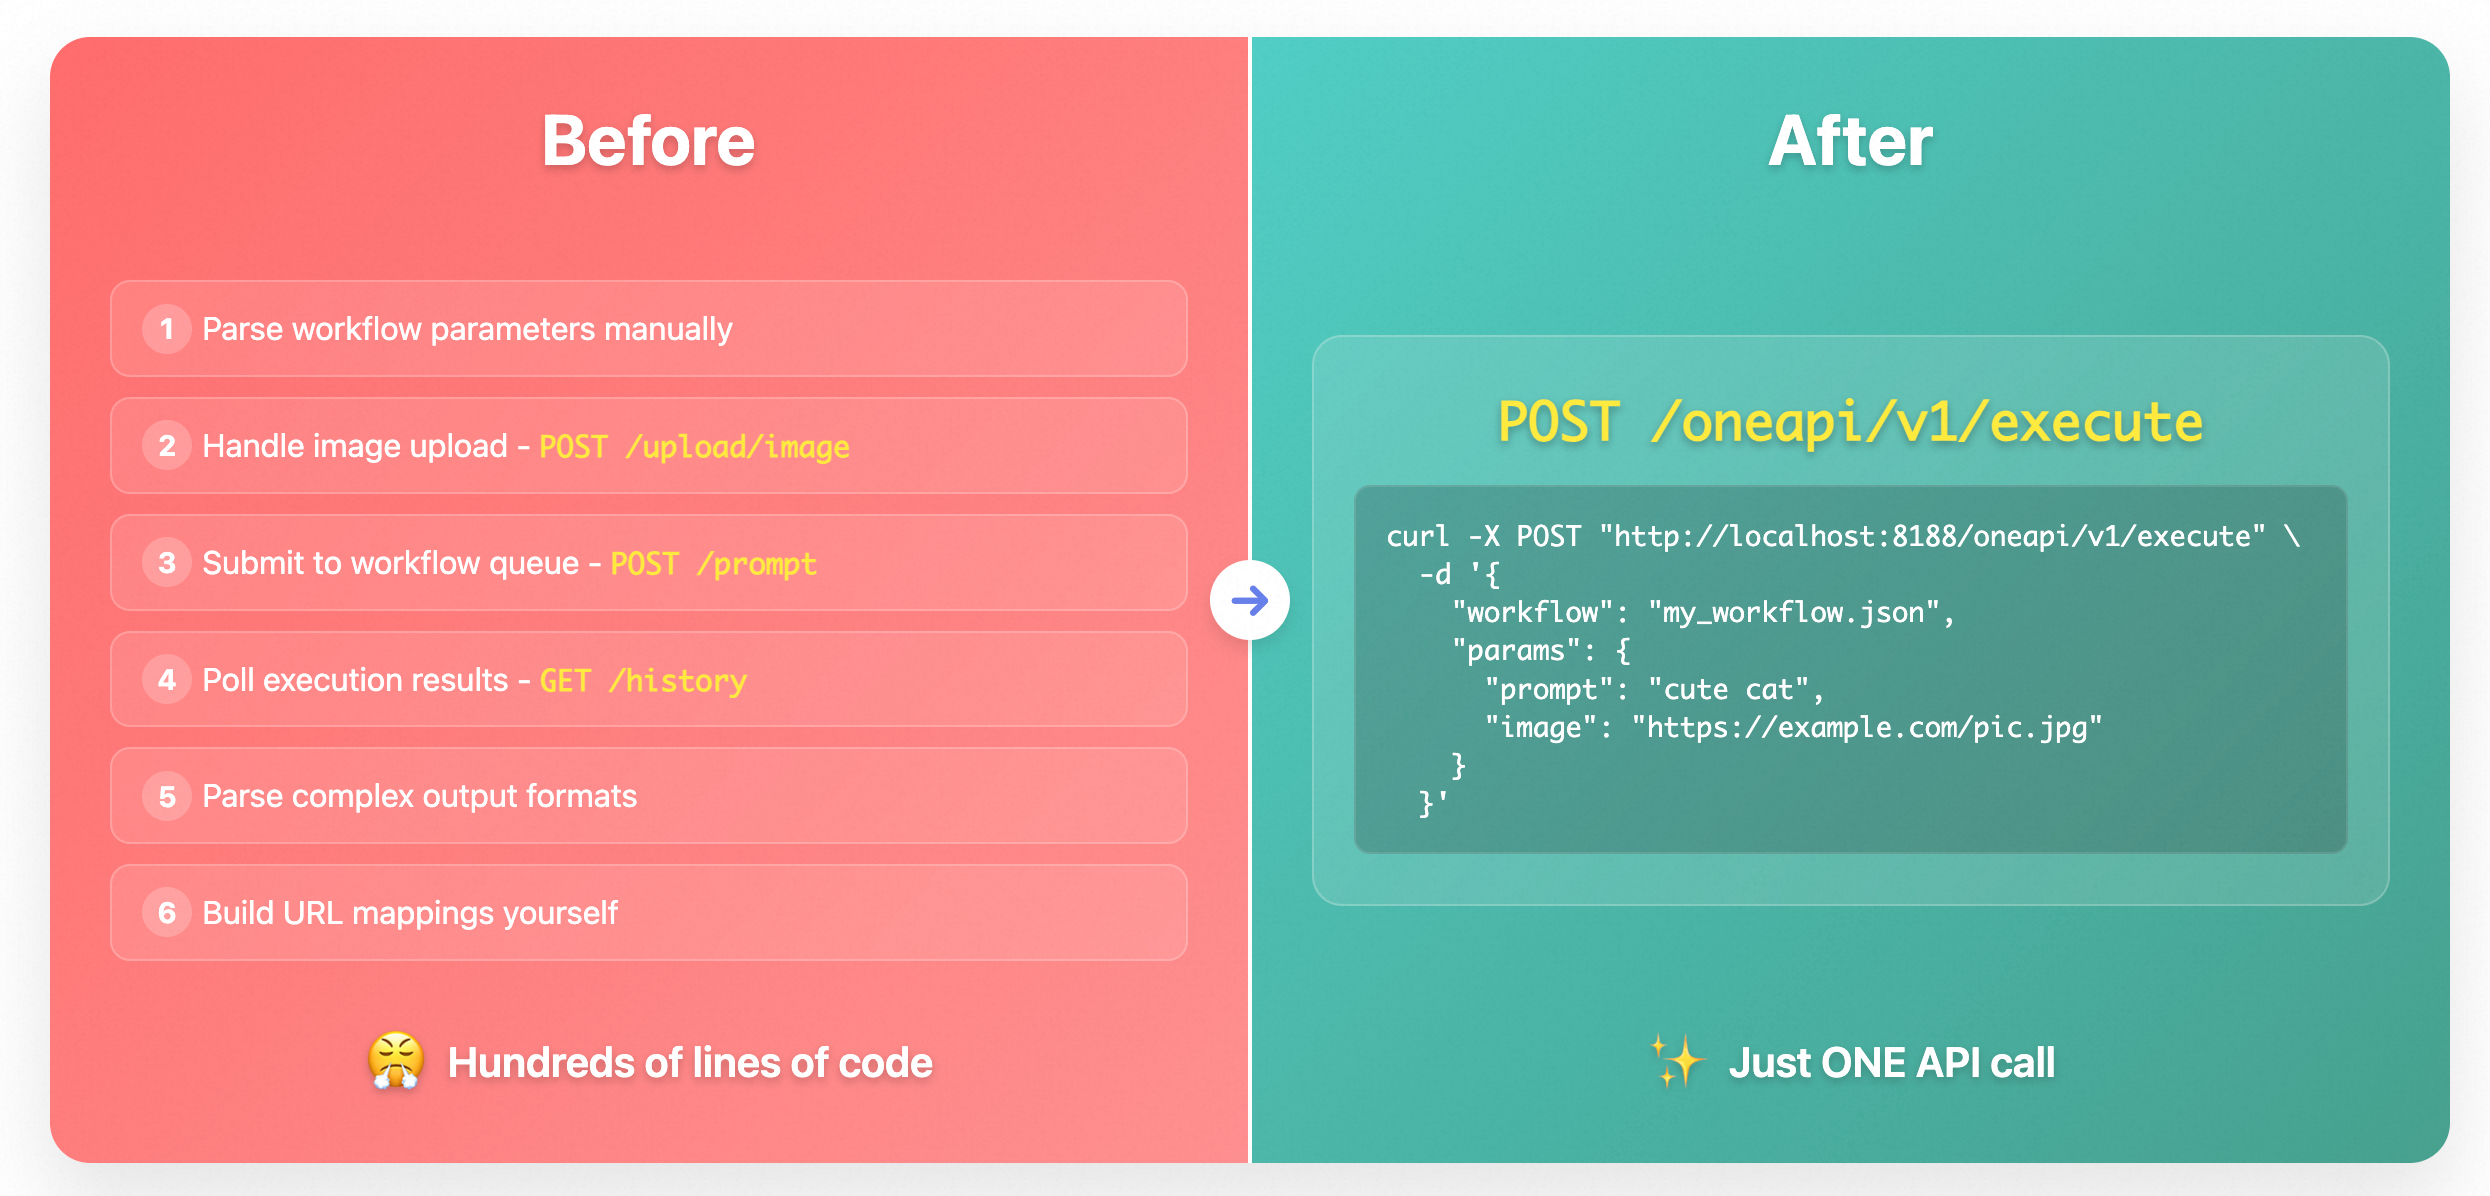
ComfyUI-OneAPI is a plugin that provides simple REST API interfaces for ComfyUI, allowing you to execute complex ComfyUI workflows through a single API request.
🎯 Why ComfyUI-OneAPI?
✨ Core Features
- Extreme Simplicity - Execute complex ComfyUI workflows with just ONE API request
- Dynamic Parameters - Replace workflow parameters dynamically through node title markers
- Multi-Source Support - Support JSON objects, local files, and URLs as workflow inputs
- Smart Output Management - Automatically categorize and organize multiple output nodes
- UI Integration - Built-in right-click menus for workflow saving and parameter setting
- Flexible Marking System - Support input markers (
$param.field) and output markers ($output.name)
🚀 Core Advantages
- 95% Code Reduction - From hundreds of lines of complex logic to a single API call
- Unified Error Handling - Built-in comprehensive exception handling and error recovery
- Parameterized Workflows - Dynamic parameter replacement through node title markers
- Intelligent File Processing - Auto-handle image uploads, URL downloads, temp file management
- Auto-categorized Results - Smart classification of different output types
- Zero Learning Curve - Keep ComfyUI workflows unchanged, just add simple markers
⚡️ Quick Start
📦 Installation
- Open terminal/command line
- Navigate to ComfyUI's custom_nodes directory:
cd ComfyUI/custom_nodes - Clone this repository:
git clone https://github.com/puke3615/ComfyUI-OneAPI.git - Restart ComfyUI
🚀 Execute Workflow with Just One Request
curl -X POST "http://localhost:8188/oneapi/v1/execute" \
  -H "Content-Type: application/json" \
  -d '{
    "workflow": {...}  # Supports JSON object, local filename, or URL
  }'
📝 Simplest Request Format
{
  "workflow": {...}  # Supports JSON object, local filename, or URL
}
📤 Common Response Format
{
  "status": "completed",
  "images": ["http://server/image1.png", "http://server/image2.png"]
}
🔥 Advanced Usage
1️⃣ Dynamic Parameter Replacement - No More Workflow Edits 🔄
Add markers in node titles to easily replace parameters:
// Request
{
  "workflow": {...},
  "params": {
    "prompt": "cute cat",
    "input_image": "https://example.com/image.jpg"
  }
}
✨ How to Mark Nodes:
- 📝 Text Prompt: Add
$prompt.textto CLIPTextEncode node title - 🖼️ Input Image: Add
$input_imageto LoadImage node title
2️⃣ Distinguish Multiple Outputs - Handle Complex Workflows 🧩
When your workflow has multiple SaveImage nodes, easily distinguish different outputs:
// Response
{
  "status": "completed",
  "images": ["http://server/image1.png", "http://server/image2.png"],
  "images_by_var": {
    "background": ["http://server/image1.png"],
    "character": ["http://server/image2.png"]
  }
}
✨ How to Mark Output Nodes:
- 💾 Add
$output.backgroundor$output.characterto SaveImage node titles
📋 Advanced Features
🖥️ UI Features
This plugin adds convenient UI features to ComfyUI's interface:
📝 Save Workflow as API
How to use:
- Right-click on the canvas (empty area)
- Select "🚀 Save Workflow as API"
- Enter a workflow name in the dialog
- Choose whether to overwrite if the file exists
- Click "Save"
The workflow will be saved to user/default/api_workflows/ directory as a JSON file that can be used with the API.
🏷️ Set Node Input Parameters
How to use:
- Select a single node in the workflow
- Right-click on the node
- Select "🚀 Set Node Input"
- Choose which field you want to parameterize from the list
- Enter a variable name for the parameter
- The node's title will be automatically updated with the parameter marker
Example:
- Select a CLIPTextEncode node
- Choose "text" field
- Enter "prompt" as variable name
- Node title will be updated to include
$prompt.text
This feature makes it easy to mark nodes for parameter replacement without manually editing node titles.
🔌 API Parameters
POST /oneapi/v1/execute

Request Body:
{
    "workflow": {...},               // Supports JSON object, local filename, or URL
    "params": {...},                 // Optional: Parameter mapping
    "wait_for_result": true/false,   // Optional: Wait for results (default true)
    "timeout": 300                   // Optional: Timeout in seconds
}
🏷️ Node Title Marker Rules
⬇️ Input Parameter Markers
- 🖼️ LoadImage node: Use
$image_paramformat - 🔄 Other nodes: Use
$param.field_nameformat
Examples:
$input_image- LoadImage node uses params.input_image as the image$prompt.text- Replaces text field with params.prompt
⬆️ Output Markers
Add markers to SaveImage node titles:
- Format:
$output.name(e.g.,$output.background) - Without markers, node ID is used as the variable name
🔍 Examples
📝 Text-to-Image Example
curl -X POST "http://localhost:8188/oneapi/v1/execute" \
  -H "Content-Type: application/json" \
  -d '{
    "workflow": "$(cat workflows/example_workflow.json)",  # Supports JSON object, local filename, or URL
    "params": {
        "prompt": "a cute dog with a red hat"
    }
  }'
🖼️ Image-to-Image Example
curl -X POST "http://localhost:8188/oneapi/v1/execute" \
  -H "Content-Type: application/json" \
  -d '{
    "workflow": "$(cat workflows/example_img2img_workflow.json)",  # Supports JSON object, local filename, or URL
    "params": {
        "prompt": "a cute dog with a red hat",
        "image": "https://example.com/input.jpg"
    }
  }'
⚠️ Notes
- 🔄 This plugin uses HTTP polling to get results, does not provide WebSocket real-time progress
- ⏱️ Long-running workflows may cause request timeouts, consider setting appropriate timeout values
- 🏷️ Parameter mapping and output marking depend on special markers in node titles
/oneapi/v1/execute API - workflow parameter supports three forms
Supported forms for the workflow parameter
-
- Pass workflow as a JSON object (original logic).
-
- Pass a local workflow filename (e.g.
1.json), which will be loaded fromuser/default/api_workflows/1.json.
- Pass a local workflow filename (e.g.
-
- Pass a workflow URL (e.g.
http://xxx/1.json), which will be downloaded and parsed automatically.
- Pass a workflow URL (e.g.
How to distinguish:
- If workflow is a dict, use it directly.
- If workflow is a string starting with
http://orhttps://, treat as URL and download. - Otherwise, treat as a local filename and load from
user/default/workflowsdirectory.
Examples:
// 1. Pass JSON directly
{"workflow": {"node1": {...}, ...}}

// 2. Pass local filename
// 1.json corresponds to <ComfyUI root>/user/default/api_workflows/1.json
{"workflow": "1.json"}

// 3. Pass URL
{"workflow": "https://example.com/1.json"}
Run ComfyUI workflows without the setup
No installs, no CUDA version roulette, no GPU sitting idle on your bill. Bring a workflow and run it in the browser.