
Camera Path
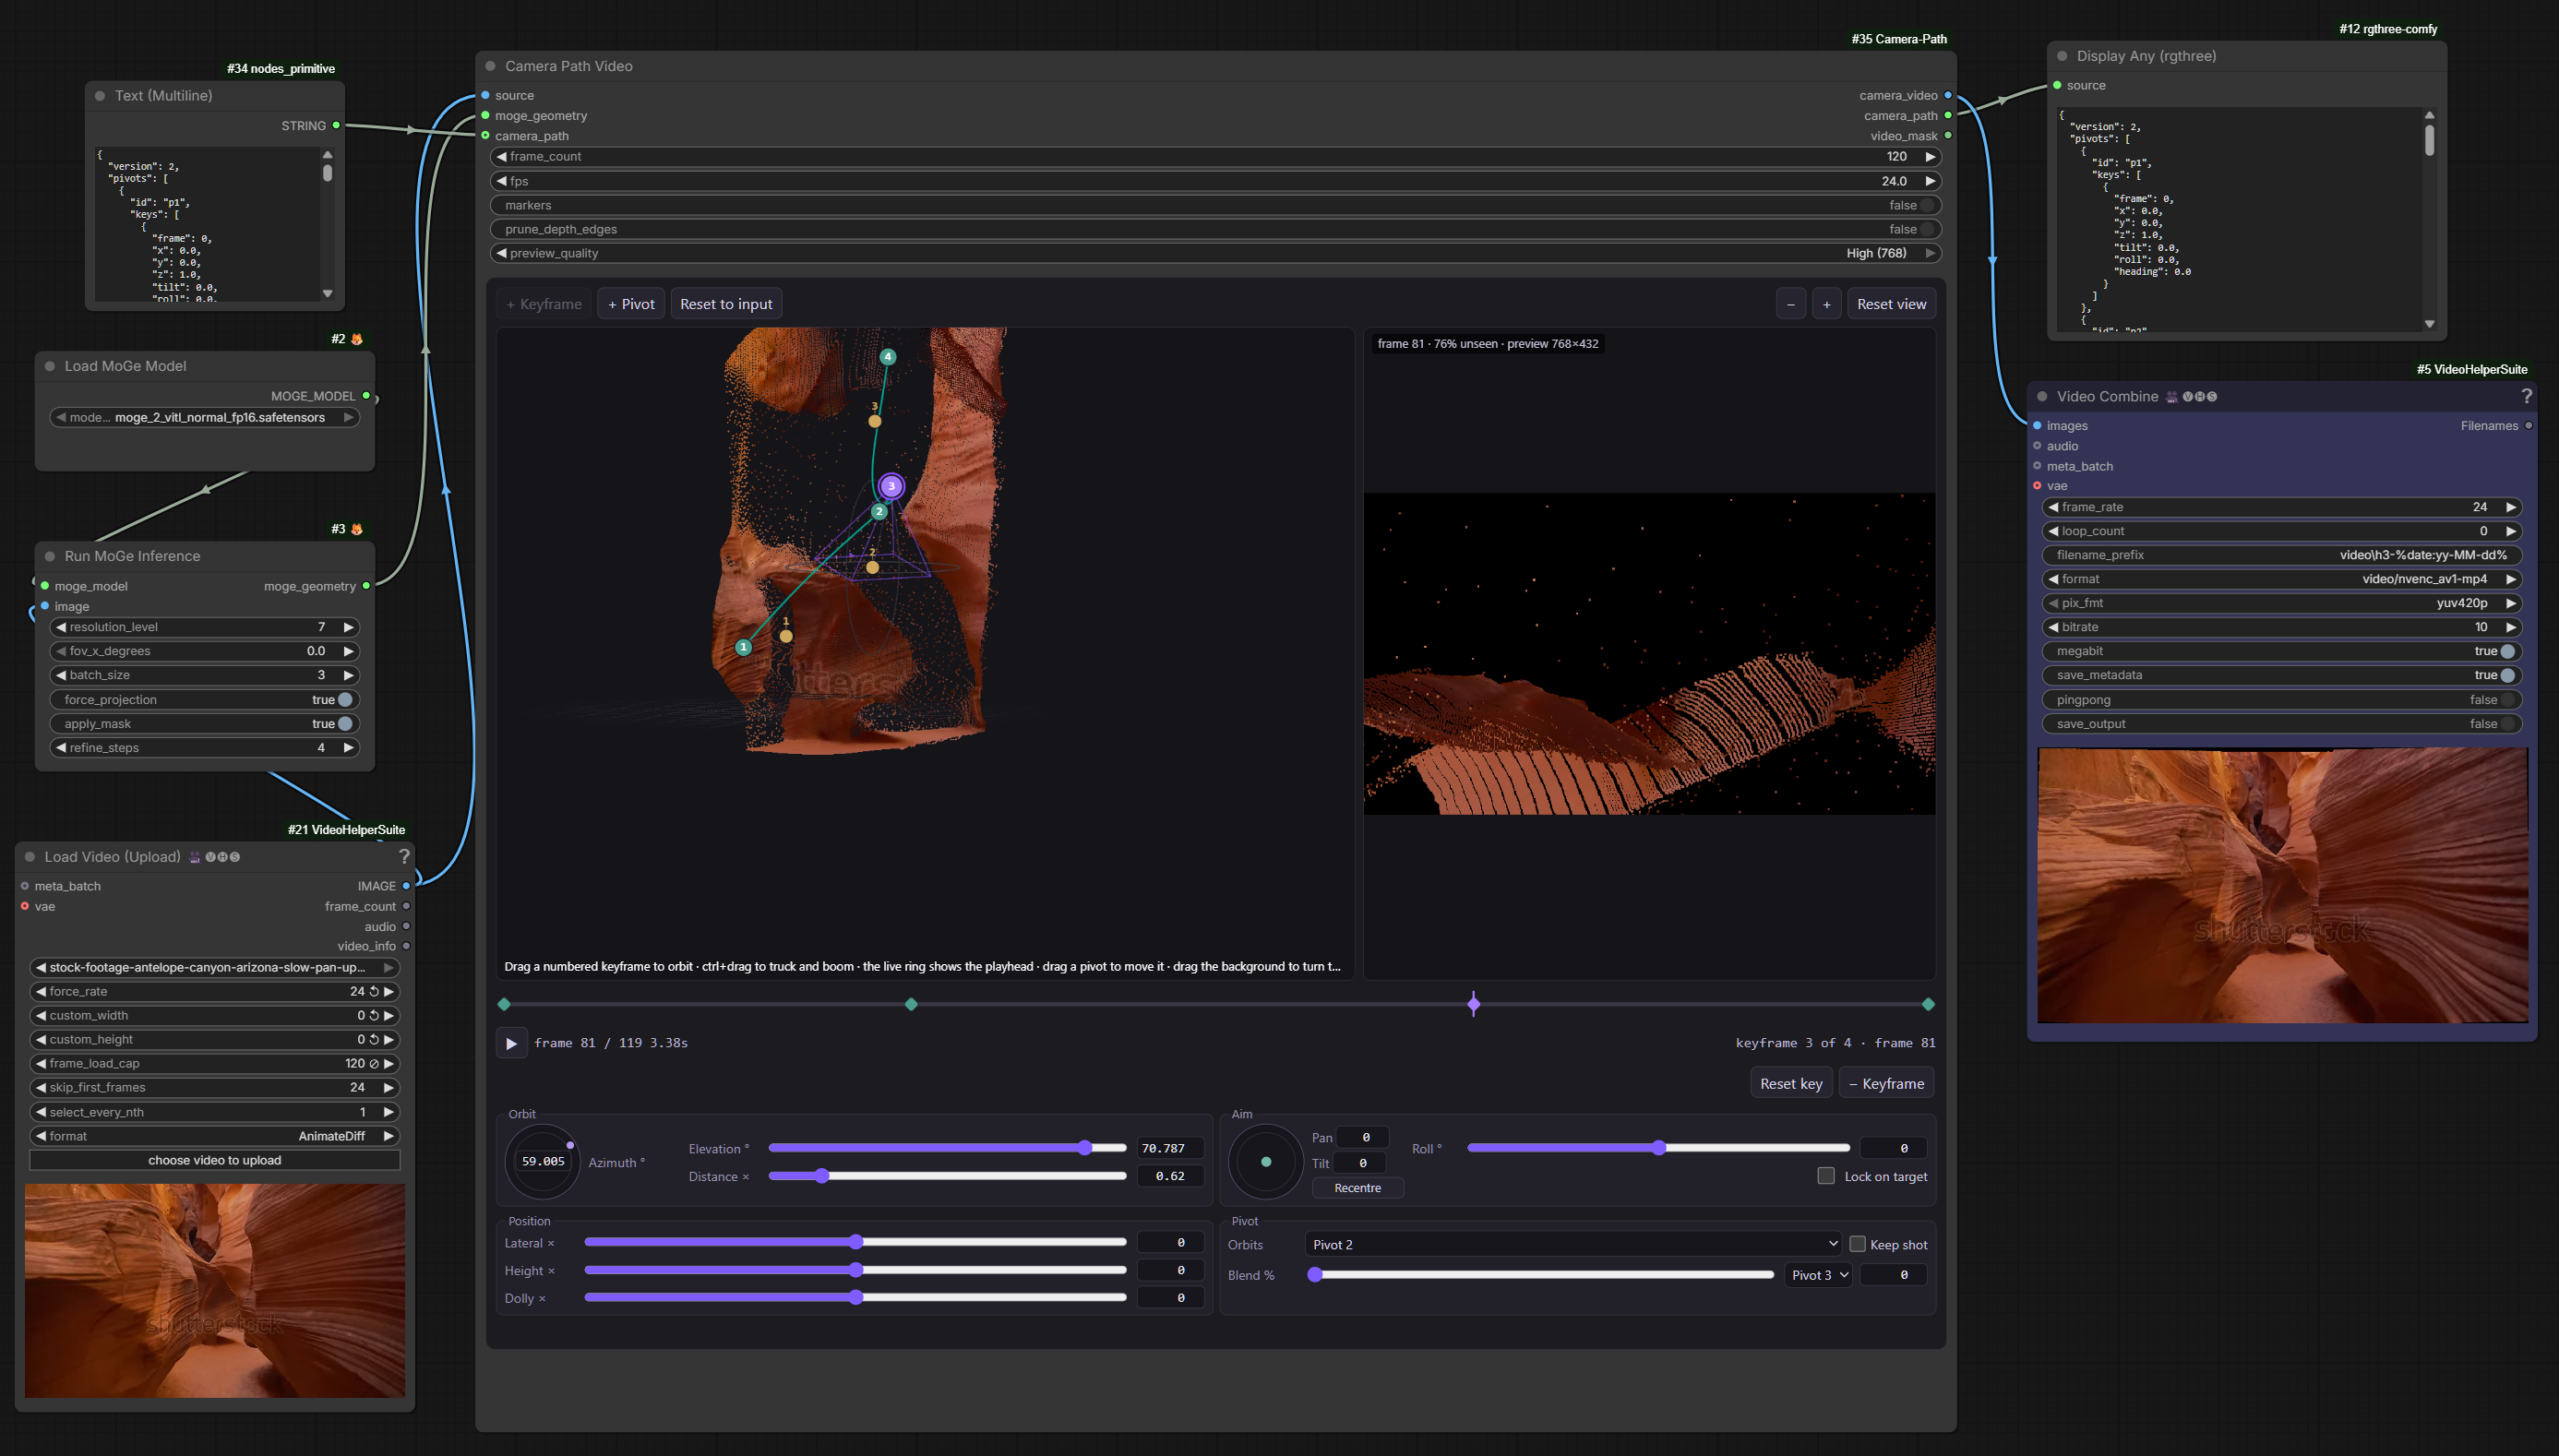
Reproject an image or clip through its MoGe geometry along a camera path authored in an interactive 3D editor.
ComfyUI-Camera-Path
Creates a reference video following a camera path based on MoGe.
One node, Camera Path Video. Give it an image (or a batch of frames) plus the
matching geometry from ComfyUI's built-in Run MoGe Inference, draw a camera move
in the node's 3D editor, and it renders the scene from those virtual camera
positions. The result is a plain IMAGE batch, so it drops into any workflow that
takes a control or reference video.
https://github.com/user-attachments/assets/3792370a-19e8-481f-996f-c322da0f1f85
<video src="media/CameraPathDemo.mp4" controls muted loop width="100%"></video>
Watch the demo if the player above does not load.
Install
Clone into ComfyUI/custom_nodes/ and restart ComfyUI. There are no extra
dependencies; it uses the torch, numpy and Pillow that ComfyUI already ships.
MoGe geometry comes from the native nodes in image/geometry estimation:
Load MoGe Model -> Run MoGe Inference.
Inputs
| input | type | notes |
| --- | --- | --- |
| source | IMAGE | One image or a batch of frames. Sets the output resolution. |
| moge_geometry | MOGE_GEOMETRY | From Run MoGe Inference on the same image or frames. |
| frame_count | INT | Number of output frames. Defaults to 120. |
| fps | FLOAT | Rate the editor's timeline and playback run at. Defaults to 24 and does not change what is rendered. |
| markers | BOOLEAN | Burn a lattice of small coloured spheres into the video. Off by default. |
| background | COLOR | Colour of the holes, the pixels no point reached. Black by default. Match what your downstream model was trained on: CrossViewWarp-style warp videos use magenta, #ff00ff. The editor's render pane follows it immediately. |
| prune_depth_edges | BOOLEAN | Remove points crossing depth discontinuities. On by default; trades streaks for holes. Preview updates immediately; rerun to update the output video. |
| preview_quality | COMBO | Low (384), Medium (512, default), High (768): displayed preview long side, capped by source size. Updates immediately. Output resolution is unchanged. |
| keyframes | STRING | Keyframes as JSON. The editor writes it, and it is hidden from the node body — the camera_path output carries the same JSON. |
| camera_path | STRING | Optional, connection only. A path from another node. |
camera_path seeds the editor, it does not override it. If you have not authored
anything yet the editor adopts the connected path on the next run; otherwise a
Use input button appears and the path is only loaded when you ask. Running
the workflow can never overwrite keyframes you have placed. Clear path always goes
back to the source camera, connected input or not. A cleared path counts as nothing
authored, though, so the next run adopts the connected path again.
Frame i of the output uses source frame i and its geometry. Once the source
runs out, its last frame and last geometry frame are reused, so one still image
plus frame_count = 120 is the same scene seen from 120 camera positions. The
input batch is never interpolated in time.
markers adds a regular grid of small spheres to the scene, hanging in the air
around the subject. They are real points in the same space as the geometry — the
subject hides the ones behind it, the near ones pass in front, and each keeps its
own colour through the move — so a downstream video model gets an unambiguous read
on the parallax. The editor shows them in both views while the box is ticked.
Higher preview quality retains more points in the path view, at the cost of slower CPU redraws. Path-view points grow with zoom, capped at a 3 CSS-pixel radius to avoid chunky blocks. This does not change the video renderer's splat size. Pruning is computed before preview downsampling, so every quality level uses the same source-resolution validity mask.
Each run caches unpruned samples at High quality, plus their pruning masks: every fifth distinct source frame, at least ten, and never more than 120. MoGe solves each frame on its own, so a clip's geometry shifts slightly from frame to frame; sampling it this densely means the preview steps through that the way the video does, instead of holding one reconstruction for a second at a time and looking smoother than the result. A single source image has one reconstruction, so its preview is exact. Changing pruning or quality rebuilds the displayed cloud locally, without another run or download. Low still reduces redraw work, but no longer reduces the cache size. After upgrading from the older, pruned-only cache, run the node once to enable live comparisons.
Outputs
| output | type | notes |
| --- | --- | --- |
| camera_video | IMAGE | [frame_count, height, width, 3], matching the source resolution. |
| camera_path | STRING | The keyframes that were rendered; route it on, or into another node's camera_path. |
| video_mask | MASK | 1 wherever no point was reprojected, including holes left by depth-edge pruning. |
Camera path format
A JSON object with the pivots the camera can orbit and the camera keyframes, placed on output frames, not seconds:
{
  "version": 2,
  "pivots": [
    { "id": "p1", "keys": [{ "frame": 0, "x": 0, "y": 0, "z": 1, "tilt": 0, "roll": 0 }] }
  ],
  "camera": [
    { "frame": 0,  "pivot": "p1", "azimuth": 0,  "elevation": 0, "distance": 1 },
    { "frame": 30, "pivot": "p1", "azimuth": 20, "elevation": 5, "distance": 1.1 },
    { "frame": 60, "pivot": "p1", "azimuth": 45, "elevation": 0, "distance": 1.2, "lateral": 0.1, "lock": 1 }
  ]
}
A bare array of camera keyframes is the older format and still loads.
Pivots
A pivot is the point the camera circles, and the frame it circles it in. Its position
is in units of the pivot depth the node finds by itself, so (0, 0, 1) is the subject
in the middle of the frame and a path drops onto other footage without rescaling. Add
one per subject and pick which pivot each keyframe orbits; a keyframe that switches
pivot eases the camera across to the new one instead of jumping.
The Pivot group holds both: the pivot the camera orbits, and a Blend % row whose
dropdown picks the pivot it blends towards. At 0% it uses its primary
pivot; at 100% it uses the destination pivot's position and orientation. The target
is stored explicitly, so adding another camera does not silently retarget an existing
blend. A missing target is initially inferred from the next distinct camera pivot.
Changing the primary pivot starts an unblended attachment. It leaves the camera where its
new pivot puts it unless Keep shot is ticked, in which case the axes are solved to hold
the camera still: truck, boom and dolly fold into the orbit, lock is released, and the
status line reports estimated, or approximate if an axis limit stopped it landing
exactly. Only that keyframe is held — the frames around it interpolate around the new
pivot, so the motion through it still changes. The tick is a tool setting, not part of the
path, and starts clear each session.
Add keyframe captures the current camera settings and two-pivot blend, keeping the preceding camera's primary pivot. Repeated insertion within that handoff preserves the shot at the inserted frame, within saved numeric precision. Automatic curve slopes are recalculated, so the surrounding motion can still change. Compatible keys share one PCHIP blend curve rather than stopping the pivot handoff at every inserted key.
A span running from an A/B blend straight into a B/C blend needs three pivots to
describe its middle, which a keyframe cannot store. Adding a camera there still works:
it is attached to the pivot the previous camera was blending towards, and its orbit and
aim are solved to reproduce the shot on show rather than copied. Truck, boom and
dolly come back as zero, so the numbers look different even when the camera does not.
The status line says so for ten seconds, and says approximate instead of estimated
when an axis limit stopped it landing exactly. Such a camera changes the motion around
it more than an ordinary insertion does.
tilt and roll on a pivot straighten the orbit when the shot was pitched or rolled:
without them, circling a subject in a photo taken looking down comes out tilted.
Select the pivot and adjust until the scene stands upright in the viewport.
heading sets where camera azimuth zero starts, turning all attached cameras around
the pivot's corrected up axis. Positive heading turns the same way as positive
azimuth; each camera keeps its own azimuth offset. It does not rotate the overview
or change the floor's orientation. The pivot's forward tick shows the heading.
Snap to auto resets heading to zero along with the other pivot settings.
Camera
azimuth/elevation— degrees around the pivot. Positive azimuth swings the camera right, positive elevation raises it. The pivot stays centred until truck, boom or aim shifts the framing.distance— orbit radius in automatic-depth units.1is the same distance from every pivot, regardless of where that pivot sits.lateral/height— truck and boom. They slide the camera sideways and up in units of the pivot depth without re-aiming it, so the subject travels across the frame instead of staying centred.lock—1keeps the camera pointed at the pivot while trucking and booming,0lets it drift out of frame. It is a number rather than a flag so that a keyframe turning it on eases into it instead of snapping.pan/tilt/roll— degrees, turning the camera about its own axes on top of all of the above. Positive aims right, aims up and rolls clockwise.
All axes are optional and default to a camera one unit behind its pivot, inheriting the pivot's tilt and roll. Snap to auto on the pivot plus Reset key on the camera reproduces the input camera alignment (with pruning off, the input image). Moving or straightening the pivot moves its cameras too: keep the starting pivot at auto and add another for an offset destination if the first frame should stay unchanged. Between keyframes each axis is interpolated with a monotone cubic (PCHIP) curve: keyframes are hit exactly and nothing overshoots. Only the camera is interpolated; source frames and geometry never are.
The automatic pivot depth is the lower quartile of the depth across the middle of the frame, which lands on the subject rather than the backdrop, and the lens comes from MoGe's intrinsics.
Editor
The node carries a 3D editor:
- a scene viewport with the orbit sphere, the camera path, numbered keyframes, the pivots, a floor grid and a frustum showing where the lens actually points — drag a numbered keyframe to orbit, ctrl+drag to truck and boom, drag a pivot to move it, drag the background to turn the view, shift+drag or middle-drag to pan, double-click the background to recentre, wheel to zoom, alt+wheel for distance. The view turns about whichever pivot is selected or in use, so a subject off to one side stays put while you look around it
- a timeline with the keyframes on it, scrubbing and playback at the
fpsinput's rate - the camera's controls in four groups — Orbit (azimuth dial, elevation, distance), Aim (pan/tilt puck, roll, lock on target), Position (lateral, height, dolly) and Pivot (which pivot it orbits, and the blend towards another). Each group keeps its puck beside its sliders while there is room and stacks them when there is not; selecting a pivot shows its position, tilt/roll and heading sliders instead
- a camera view that reprojects the real scene
Drag the node taller and the two views grow with it; make it wide and they sit side by side. Reset key resets the selected camera relative to its pivot, Snap to auto puts a pivot back on the subject the node found, and Clear path clears everything after confirming.
Deleting a camera clears its selection without seeking to another key or recentering the overview. The shot at the current time may still change because the path changed. The purple ring marks the live camera at the playhead: between keys it is informational, not a shortcut to the selected key elsewhere. At the selected key's own time it can still be dragged to edit that camera. Reset key also clears the pivot blend to 0%.
Drag clockwise around the azimuth dial to increase the orbit angle. It accumulates across full turns within the existing -720 to +720 degree range. Its centre value is editable; double-click it to zero azimuth. Drag the aim puck right/up for positive pan/tilt, or edit the numbers beside it. The puck covers a quarter turn each way; the numbers reach a half turn, so an aim can be sent behind the camera by typing it. Past the puck's range the mark parks on the rim, and dragging it again pulls the value back inside. Recentre zeros pan/tilt only, leaving camera roll unchanged. Both circles are 68px across.
Dolly moves straight along the camera's final viewing direction, after pan/tilt, without changing its orientation. Positive moves forward; negative moves backward. The slider spans -3 to +3 in the shared distance unit and defaults to zero. Unlike Distance, which changes the orbit radius, Dolly follows where the lens is pointing. Animate only Dolly for a straight push-in or pull-back; changing aim at the same time changes the direction of that offset too. This is camera movement, not lens zoom.
Before the node has run, the editor shows a placeholder — a square frame with a
figure standing in it — so a move can be blocked out with nothing wired up. After
the node has run once it keeps a downscaled copy of the point cloud in the
camera_path subfolder of ComfyUI's temp folder, out of the way of your own outputs.
The editor loads it, shows it in both views and reprojects it live as
you drag the path, so previewing a different move costs nothing and does not
re-run MoGe. Changing the source or the geometry needs another run.
Notes
- Rendering is a z-buffered point splat on whichever device ComfyUI is using. Around 6 ms per 720p frame on a GPU, around 140 ms on CPU.
- Regions the source camera never saw come back in the
backgroundcolour and flagged invideo_mask. Past roughly 40 degrees of orbit most of a single still is holes; feed the mask to an inpainting or video model if you need them filled. js/interpolate.jsandjs/geometry.jsre-implementcamera_path/trajectory.pyandcamera_path/render.pyso the preview matches the render.tests/test_parity.pyruns both and compares them.
Tests
python -m unittest discover -s tests -t .
The suite covers the keyframe format, the camera math, the renderer, a full node run and Python/JavaScript parity. Some parts skip themselves when their tools are missing:
| Test | Needs |
| --- | --- |
| test_node.py | A ComfyUI checkout — automatic when installed in custom_nodes/, otherwise set COMFYUI_PATH |
| test_parity.py | node on the path |
| test_editor.py | node plus a local npm install jsdom |
Credits
The orbit and look-at construction is adapted from ComfyUI-CrossViewWarp (Apache-2.0), by way of the Camera H3 depth warp, which also inspired the cached point-cloud preview.