ComfyUI Extension: ComfyUI_PHRenderFormerWrapper
Run ComfyUI workflows without the setup
No installs, no CUDA version roulette, no GPU sitting idle on your bill. Bring a workflow and run it in the browser.
A Wrapper and a set of Custom Nodes for using RenderFormer as a 3d Environment in ComfyUI.
Looking for a different extension?
Custom Nodes (0)
README
🧊 ComfyUI-PHRenderFormerWrapper 🧊
Author: paulh4x

This repository contains a set of custom nodes for ComfyUI that provide a wrapper for Microsoft's RenderFormer model. It allows you to render complex 3D scenes (see Limits) with physically-based materials and global illumination directly within the ComfyUI interface.
[!WARNING] WORK IN PROGRESS & HELLO WORLD: This project is my first "hello world" in contributing code of any kind and is currently under active development. It should be considered experimental. The model is in a very early stage and may be further developed later. I do not take responsibility if this breaks anything and do not plan to provide official support for it. PLEASE BE AWARE THAT EVERYTHING HERE IS ENTIRELY VIBECODED.
🏆 Sponsorship
-
Please consider sponsoring me if you find the results of my work useful. A good way to keep code development open and free is through sponsorship.
-
.
.

🚀 Features
- 🎨 End-to-End Rendering: Load 3D models, define materials, set up cameras, and render—all within ComfyUI.
- ⚙️ Modular Node-Based Workflow: Each step of the rendering pipeline is a separate node, allowing for flexible and complex setups.
- 🎥 Animation & Video: Create camera and light animations by interpolating between keyframes. The nodes output image batches compatible with ComfyUI's native video-saving nodes.
- 🔧 Advanced Mesh Processing: Includes nodes for loading, combining, remeshing, and applying simple color randomization to your 3D assets.
- 💡 Lighting and Material Control: Easily add and combine multiple light sources and control PBR material properties like diffuse, specular, roughness, and emission.
- ↔️ Full Transformation Control: Apply translation, rotation, and scaling to any object or light in the scene.
🛠️ Installation
Prerequisites
- Git: Required for cloning the repository and installing certain dependencies.
- Python: A Python version compatible with ComfyUI and PyTorch 2.0+.
- PyTorch: A compatible version of PyTorch must be installed for your hardware (NVIDIA CUDA or Apple Metal). This wrapper is tested with PyTorch 2.7.1 and CUDA 12.6.
- ComfyUI: A working installation of ComfyUI.
Installation Steps
- Navigate to your ComfyUI
custom_nodesdirectory:cd ComfyUI/custom_nodes/ - Clone this repository:
git clone https://github.com/paulh4x/ComfyUI_PHRenderFormerWrapper.git - Navigate into the newly cloned directory:
cd ComfyUI_PHRenderFormerWrapper - Clone the official Microsoft RenderFormer repository into this directory. It must be named
renderformer:git clone https://github.com/microsoft/renderformer.git renderformer - Install the required Python packages for this wrapper:
pip install -r requirements.txt - RenderFormer requires an additional plugin for handling HDR image formats. Run the following command to download it:
python -c "import imageio; imageio.plugins.freeimage.download()" - Restart ComfyUI.
[!NOTE] For NVIDIA GPU users, the underlying RenderFormer library can optionally use Flash Attention for better performance. If you have it installed in your PyTorch environment, it should be used automatically.
💡 Usage
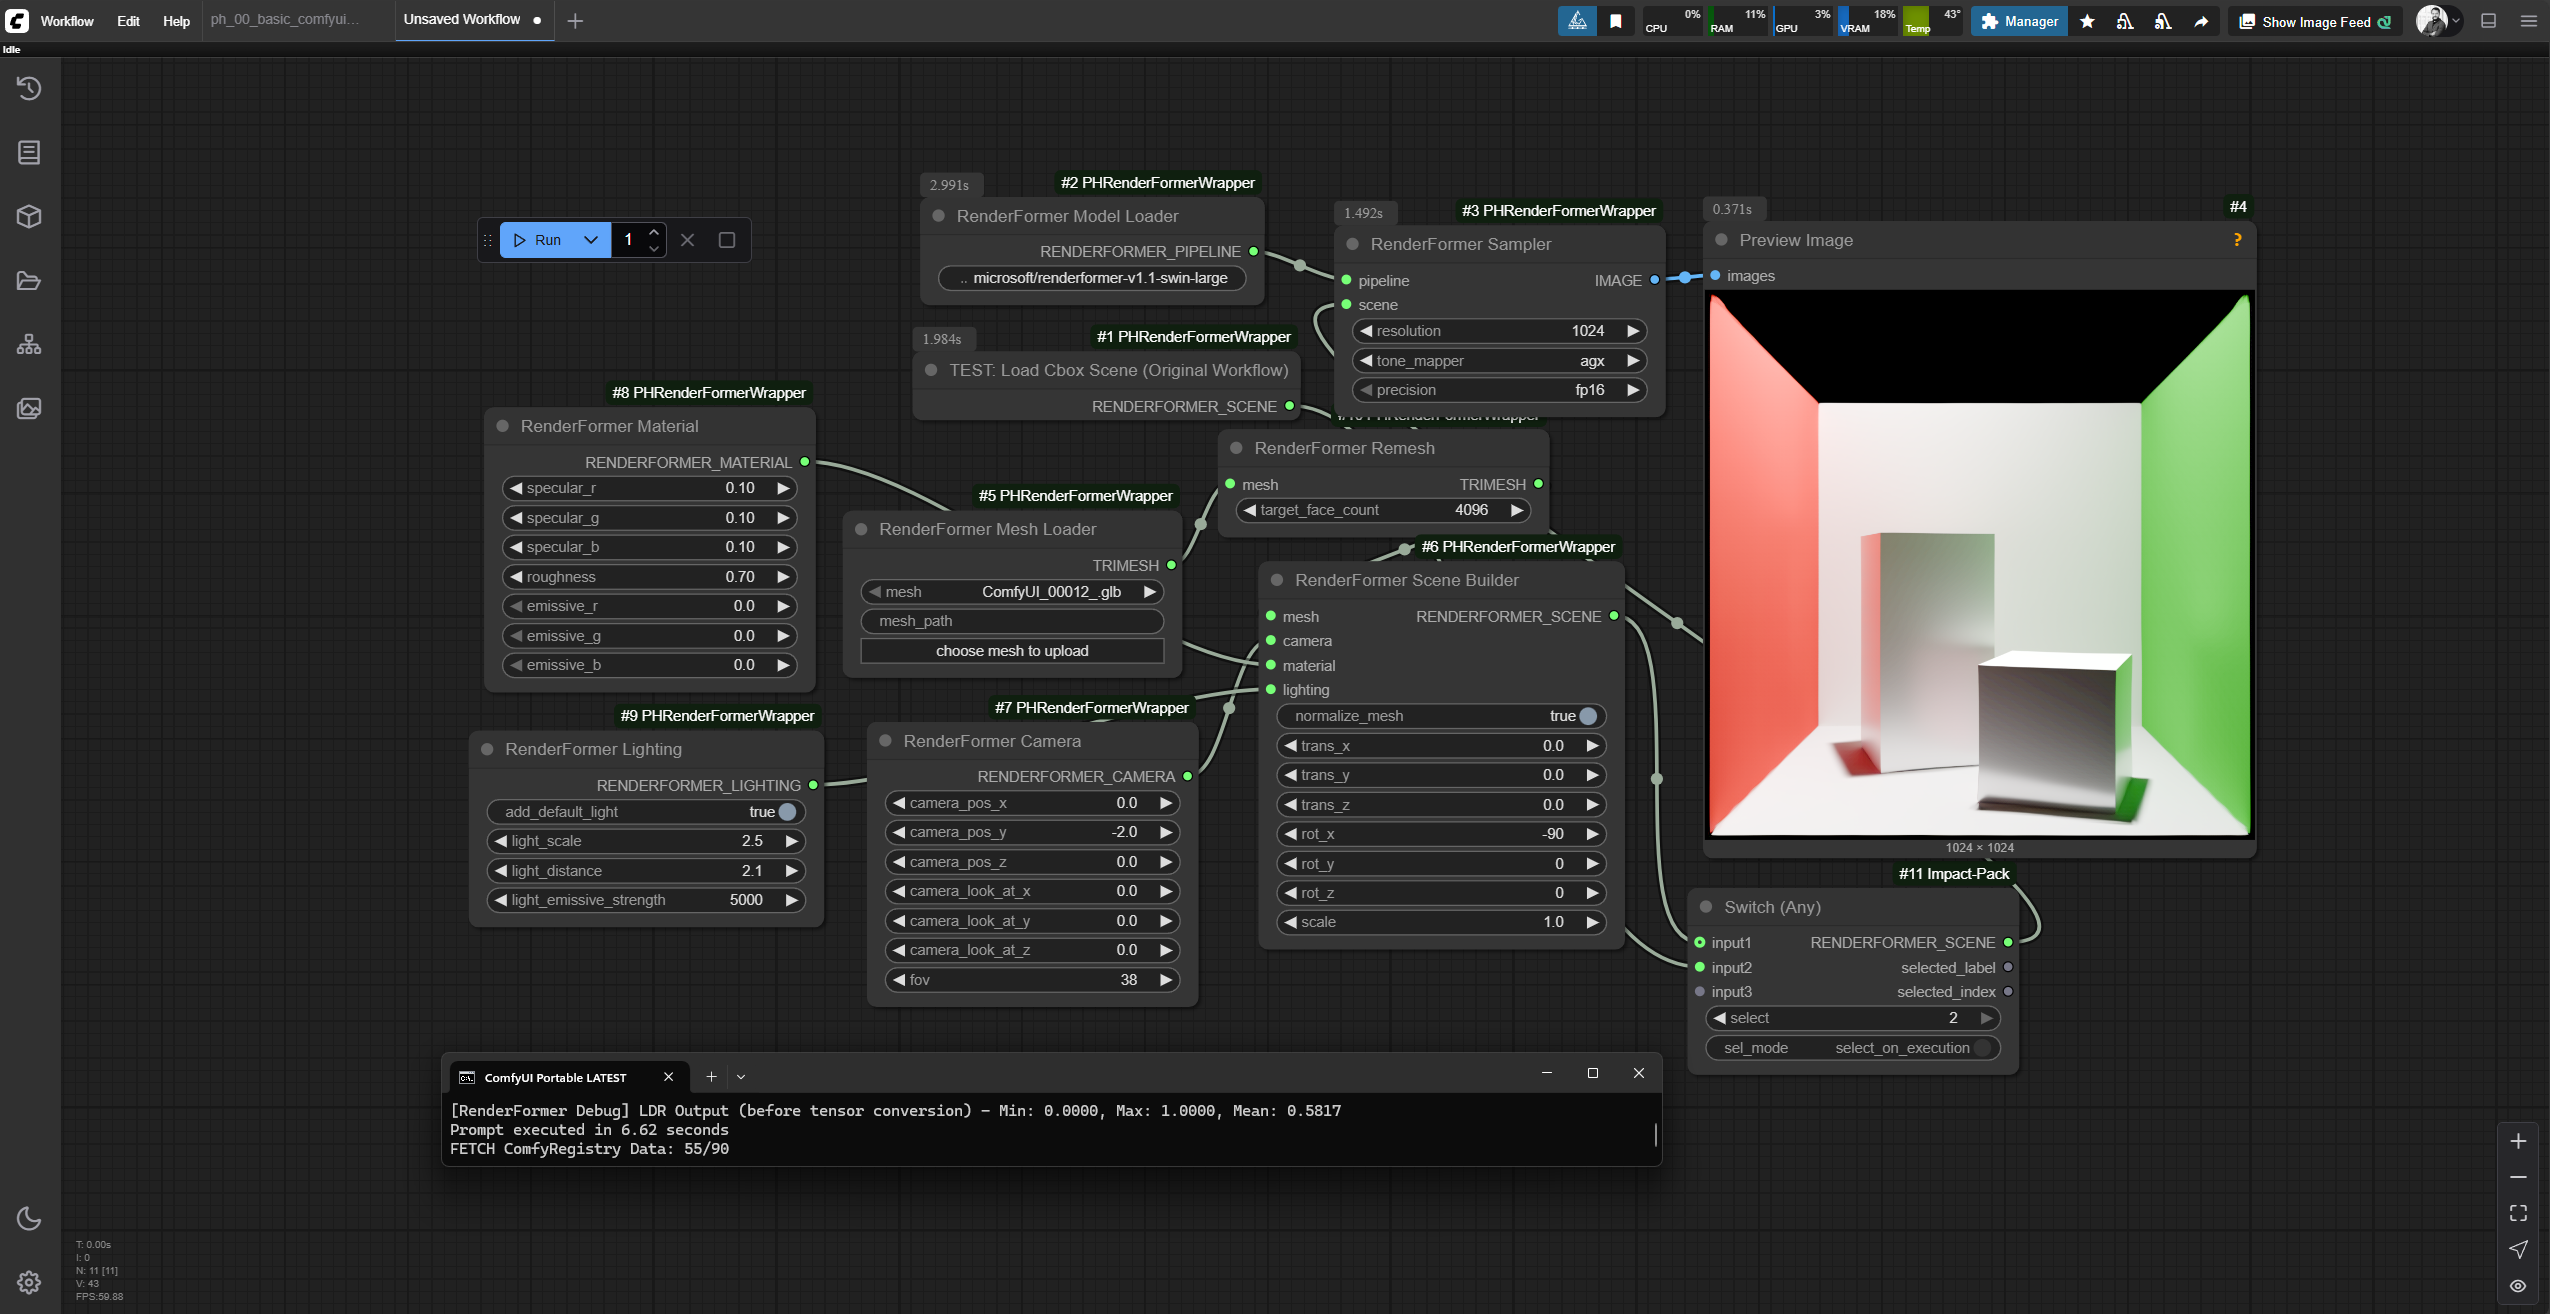
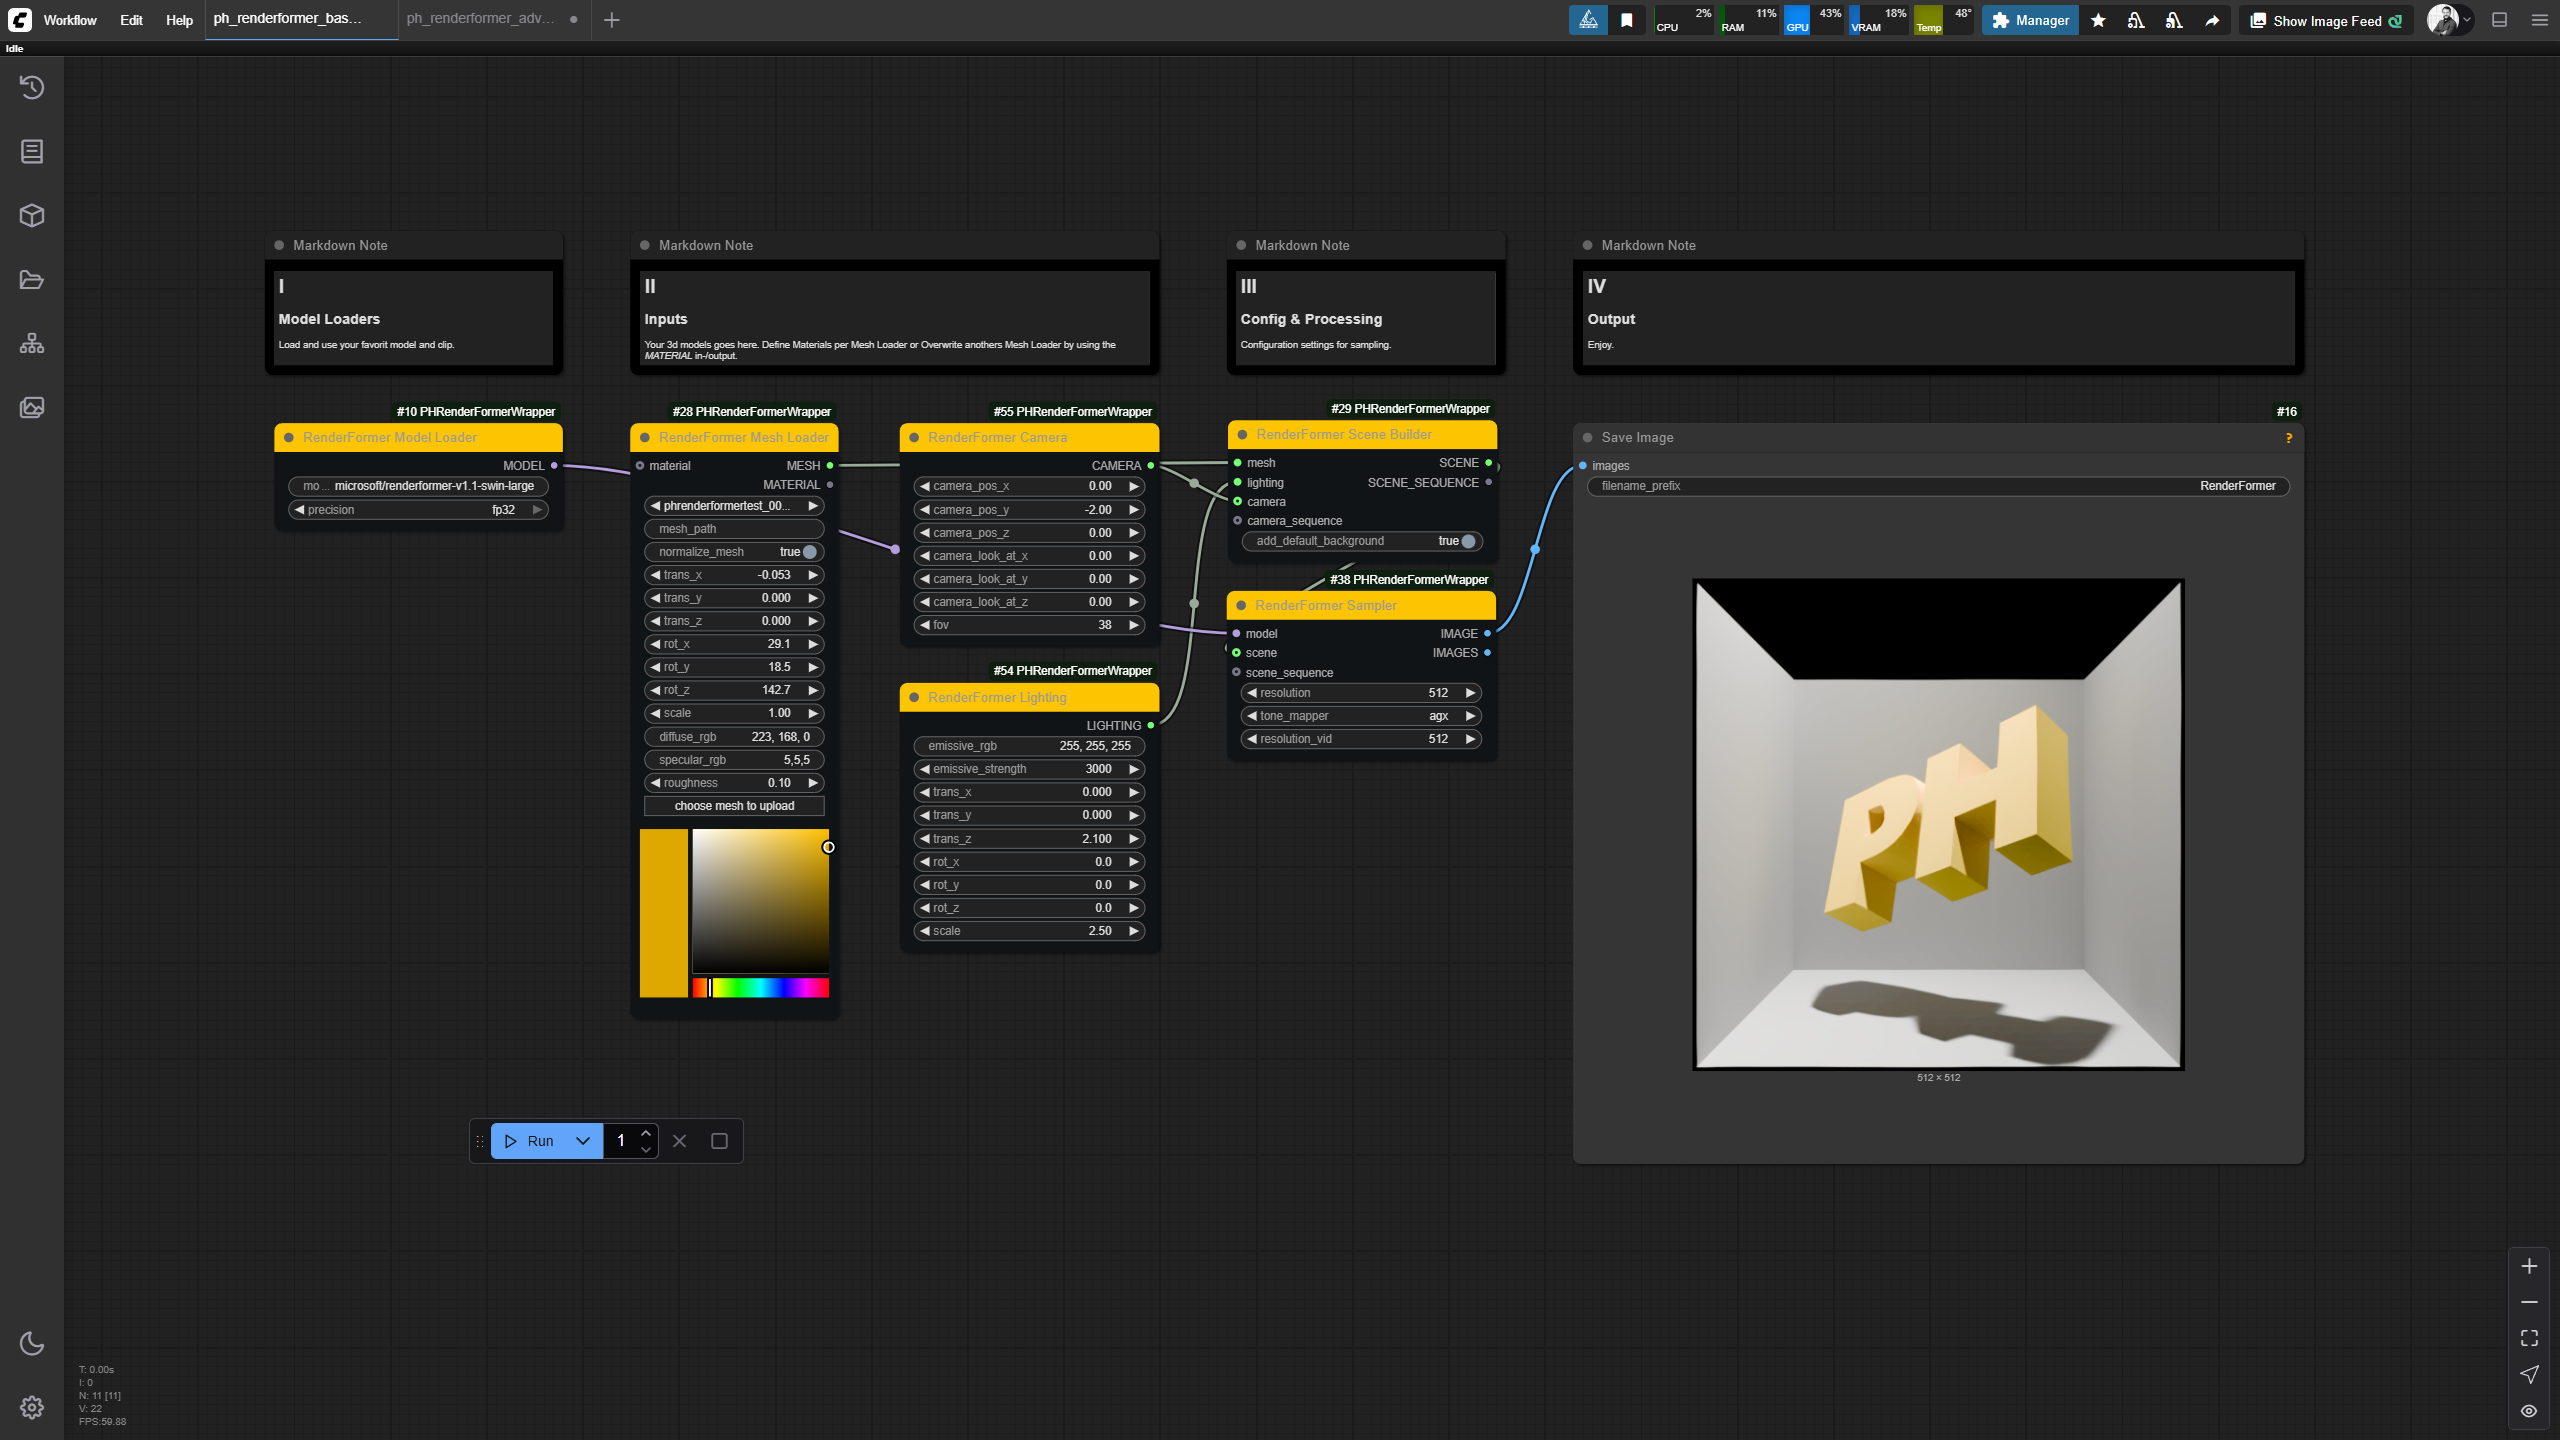
This node pack follows a standard 3D rendering pipeline. The basic workflow, as seen in the ph_renderformer_basic_01.json example, can be broken down into the following steps:
graph TD
    subgraph "Step 1: Load Model"
        A["RenderFormer Model Loader"]
    end

    subgraph "Step 2: Define Scene Elements"
        B["RenderFormer Mesh Loader"] --> C["RenderFormer Random Colors"]
        D["RenderFormer Camera"]
        E["RenderFormer Lighting"]
    end

    subgraph "Step 3: Build Scene"
        C --> F["RenderFormer Scene Builder"]
        D --> F
        E --> F
    end

    subgraph "Step 4: Render (Sample)"
        A --> G["RenderFormer Sampler"]
        F --> G
    end

    subgraph "Step 5: Save Output"
        G --> H["Save Image"]
    end

    style A fill:#FDC501,stroke:#111417,stroke-width:2px,color:#111417
    style B fill:#FDC501,stroke:#111417,stroke-width:2px,color:#111417
    style C fill:#FDC501,stroke:#111417,stroke-width:2px,color:#111417
    style D fill:#FDC501,stroke:#111417,stroke-width:2px,color:#111417
    style E fill:#FDC501,stroke:#111417,stroke-width:2px,color:#111417
    style F fill:#FDC501,stroke:#111417,stroke-width:2px,color:#111417
    style G fill:#FDC501,stroke:#111417,stroke-width:2px,color:#111417
    style H fill:#a0a0a0,stroke:#111417,stroke-width:2px,color:#111417
- Load Model: Start by loading the
RenderFormer Model Loader. This node downloads the specified model from Hugging Face and prepares it for the pipeline. - Define Scene Elements:
- Mesh: Use the
RenderFormer Mesh Loaderto load your 3D model (e.g., an.objfile). Here, you can also set its transformation (translation, rotation, scale) and define its core material properties. In the example, the output is passed toRenderFormer Random Colorsfor a creative effect. - Camera: Add a
RenderFormer Camerato define the viewpoint, target, and field of view. - Lighting: Use the
RenderFormer Lightingnode to create one or more light sources. You can combine multiple lights with theRenderFormer Lighting Combinenode.
- Mesh: Use the
- Build Scene: Connect the
MESH,CAMERA, andLIGHTINGoutputs into theRenderFormer Scene Builder. This node collects all the components and assembles the final scene data that the model will render. You can also choose to add a default background plane and walls here. - Render (Sample): The
RenderFormer Samplertakes theMODELand theSCENEas input. It performs the actual rendering operation and outputs the final image. - Save Output: Connect the
IMAGEoutput from the sampler to aSave Imagenode to save the result.
For video, the workflow is similar. You would use a RenderFormer Camera Target to create a CAMERA_SEQUENCE, which then goes into the RenderFormer Scene Builder. The RenderFormer Sampler will automatically detect the sequence and output an image batch (IMAGES) ready for a video-saving node.
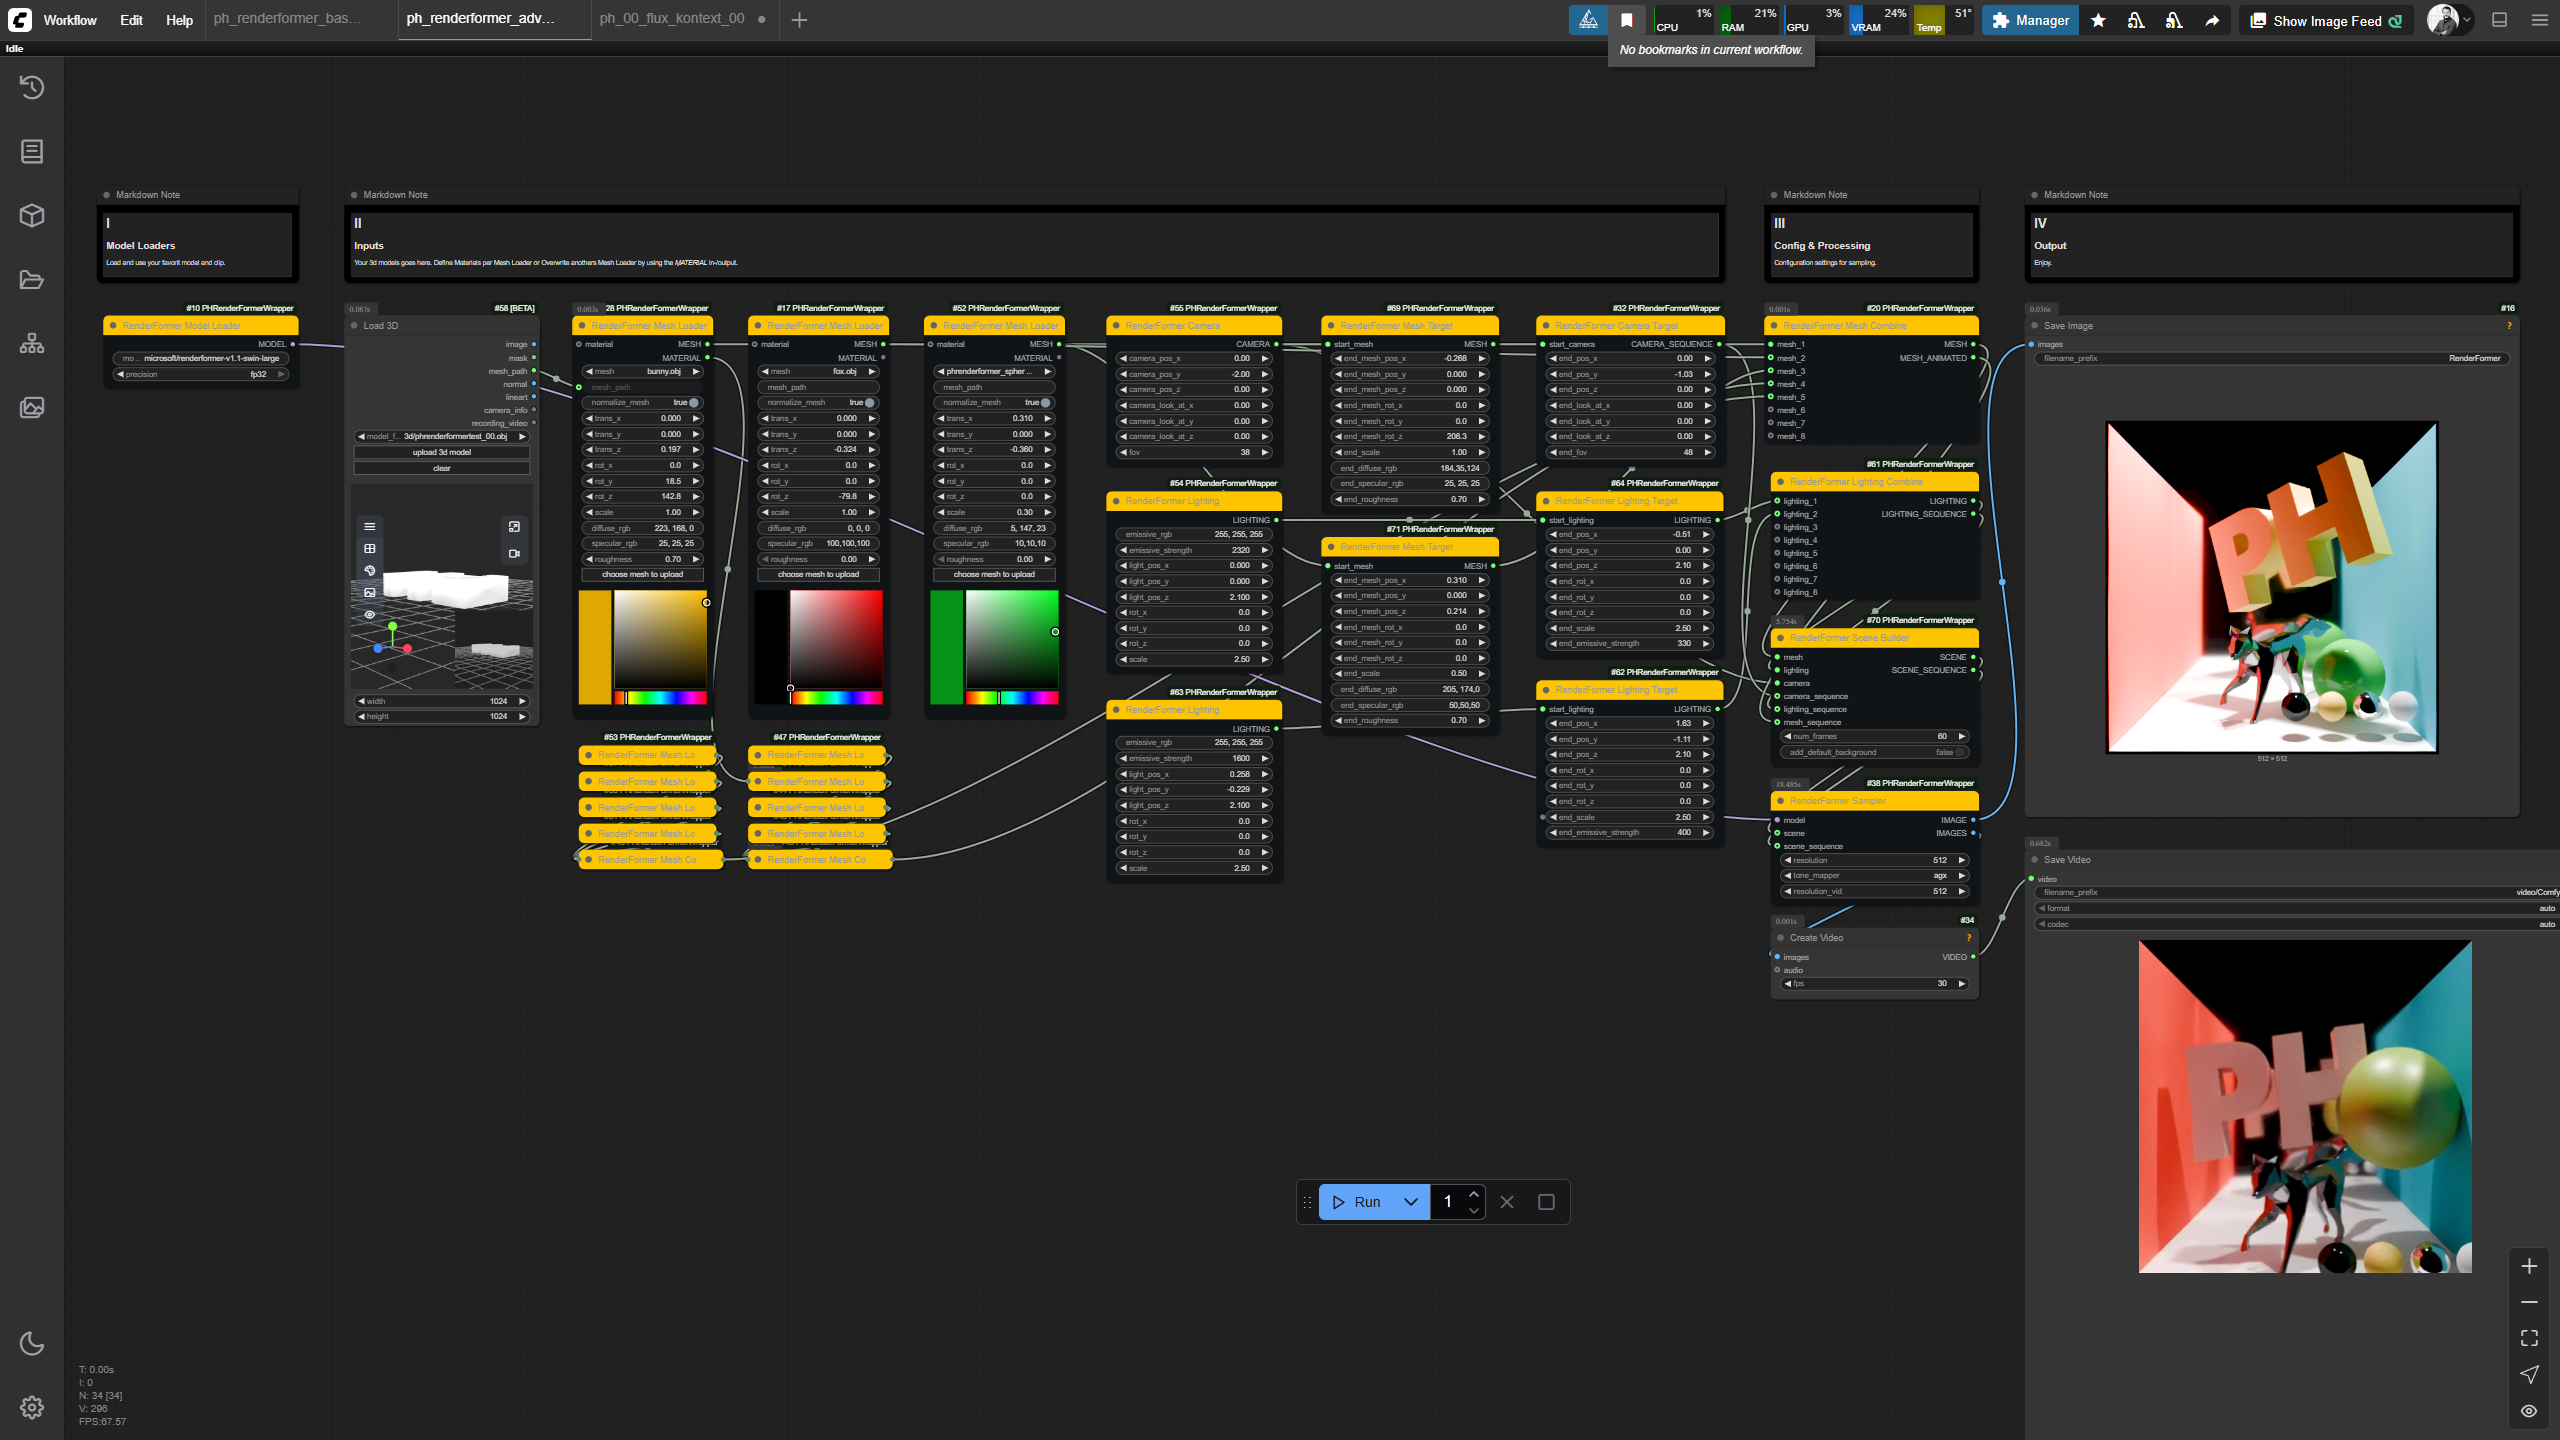
🚀 Advanced Usage: Building Complex Scenes & Animations
The ph_renderformer_advanced_01.json workflow is a powerful example that demonstrates how to build a complex scene with multiple, independent objects and generate both a static image and an animated video from a single, unified pipeline.
graph TD
    subgraph "I. Model"
        ModelLoader["RenderFormer Model Loader"]
    end

    subgraph "II. Scene Inputs"
        subgraph "A. Meshes"
            Mesh1["LoadMesh (Processed)"] --> Remesh["Remesh / Randomize"] --> Combine["RenderFormerMeshCombine"]
            Mesh2["LoadMesh (Direct)"] --> Combine
        end

        subgraph "B. Camera"
            CamStart["RenderFormerCamera (Start)"] --> CamEnd["PHRenderFormerCameraTarget (End)"]
        end

        subgraph "C. Lighting"
            LightStart["RenderFormerLighting (Start)"] --> LightEnd["RenderFormerLightingTarget (End)"]
        end
    end

    subgraph "III. Scene Assembly"
        Combine --> SceneBuilder["RenderFormerSceneBuilder"]
        CamStart --> SceneBuilder
        CamEnd -- CAM_SEQUENCE --> SceneBuilder
        LightStart --> SceneBuilder
        LightEnd -- LIGHT_SEQUENCE --> SceneBuilder
    end

    subgraph "IV. Rendering & Output"
        Sampler["PHRenderFormerVideoSampler"]
        ModelLoader --> Sampler
        SceneBuilder -- SCENE_SEQUENCE --> Sampler
        Sampler -- IMAGES --> SaveImg["Save Image"]
        Sampler -- IMAGES --> CreateVid["Create Video"] --> SaveVid["Save Video"]
    end

    style ModelLoader fill:#FDC501,stroke:#111417,stroke-width:2px,color:#111417
    style Mesh1 fill:#FDC501,stroke:#111417,stroke-width:2px,color:#111417
    style Mesh2 fill:#FDC501,stroke:#111417,stroke-width:2px,color:#111417
    style Remesh fill:#FDC501,stroke:#111417,stroke-width:2px,color:#111417
    style Combine fill:#FDC501,stroke:#111417,stroke-width:2px,color:#111417
    style CamStart fill:#FDC501,stroke:#111417,stroke-width:2px,color:#111417
    style CamEnd fill:#FDC501,stroke:#111417,stroke-width:2px,color:#111417
    style LightStart fill:#FDC501,stroke:#111417,stroke-width:2px,color:#111417
    style LightEnd fill:#FDC501,stroke:#111417,stroke-width:2px,color:#111417
    style SceneBuilder fill:#FDC501,stroke:#111417,stroke-width:2px,color:#111417
    style Sampler fill:#FDC501,stroke:#111417,stroke-width:2px,color:#111417
    style SaveImg fill:#a0a0a0,stroke:#111417,stroke-width:2px,color:#111417
    style CreateVid fill:#a0a0a0,stroke:#111417,stroke-width:2px,color:#111417
    style SaveVid fill:#a0a0a0,stroke:#111417,stroke-width:2px,color:#111417
This workflow is designed for maximum flexibility and showcases several key features of the node pack:
- Model Loading: The process begins on the left with the
RenderFormer Model Loader, which prepares the core AI model for rendering. - Complex Asset Pipeline:
- Multiple Mesh Inputs: The scene is composed of multiple
LoadMeshnodes. This allows you to import various objects, characters, and background elements independently. - Processing Chains: Some meshes go through additional processing steps. For example, a main object might be passed through
Remeshto optimize its geometry orRandomizeColorsto apply procedural materials. Other meshes might be loaded directly without modification. - Combining Meshes: All individual mesh pipelines converge into a
RenderFormerMeshCombinenode. This powerful utility merges all separate objects into a single, organized list that the renderer can understand.
- Multiple Mesh Inputs: The scene is composed of multiple
- Static and Animated Components:
- Camera: A
RenderFormerCameradefines the starting position and angle. This is then fed into aPHRenderFormerCameraTargetto create a smooth animation sequence from a start to an end state. - Lighting: Similarly, a
RenderFormerLightingnode sets the initial light properties, which are then animated over time by aRenderFormerLightingTargetnode.
- Camera: A
- Unified Scene Building: The
RenderFormerSceneBuilderacts as the central assembly point. It is designed to be highly flexible and accepts all the core scene components:- It takes the combined
MESHlist. - It takes the static
CAMERAandLIGHTINGto define the scene's state at frame zero. - It takes the
CAM_SEQUENCEandLIGHT_SEQUENCEoutputs from the target nodes to understand how the scene should evolve over time. - It intelligently processes these inputs to generate a complete
SCENE_SEQUENCE, which is a frame-by-frame description of the entire animation.
- It takes the combined
- Rendering and Unified Output:
- The
PHRenderFormerVideoSamplertakes theMODELand theSCENE_SEQUENCEand renders every frame of the animation. - Crucially, it outputs a single
IMAGESbatch. This batch can be used for multiple purposes simultaneously: you can save individual frames from the animation using aSave Imagenode, and also pass the entire batch to aCreate Videonode to produce the final movie file.
- The
📦 Nodes
This wrapper provides a comprehensive set of nodes to build 3D scenes.
Core Pipeline
- RenderFormer Model Loader: Loads a specified RenderFormer model from Hugging Face or a local path.
- RenderFormer Scene Builder: Assembles a scene from meshes, lighting, and camera inputs. It can handle both single camera inputs for static images and camera sequences for creating animations.
- RenderFormer Sampler: Executes the RenderFormer pipeline on a scene or a sequence of scenes. It intelligently handles both single images and image batches for video, producing the final rendered output.
Scene Components
- RenderFormer Mesh Loader: Loads a 3D mesh file (e.g.,
.obj,.glb). This node is also used to define an object's material properties and transformations. - RenderFormer Camera: Defines the camera's position, look-at target, and field of view (FOV).
- RenderFormer Lighting: Creates a configurable emissive light source.
Animation
- RenderFormer Camera Target: Creates a camera animation sequence by defining a start and end camera state (position, look-at, FOV).
- RenderFormer Lighting Target: Creates a light animation sequence by defining a start and end light state (position, rotation, scale, and emission).
- RenderFormer Mesh Target: Creates a mesh animation sequence by defining a start and end state for a mesh's transformation (position, rotation, scale) and material properties (diffuse color, specular color, roughness).
Utilities
- RenderFormer Mesh Combine: Combines multiple
MESHoutputs into a single object list. - RenderFormer Lighting Combine: A powerful node that enables multi-light animation. It accepts any combination of static lights (
LIGHTING) and animated lights (LIGHTING_SEQUENCE), and outputs a single, unifiedLIGHTING_SEQUENCEready for the Scene Builder. It also outputs thestart_frame_lightingseparately for a direct, convenient connection. - RenderFormer Remesh: Simplifies the geometry of a mesh to a target face count using
pymeshlab. - RenderFormer Random Colors: Applies random colors to a mesh. It offers three modes:
per-object(one color for the whole object),per-shading(uses the RenderFormer backend to color based on shading groups), andper-triangle(assigns a unique color to every face).
Advanced & Experimental
- RenderFormer From JSON: Loads a scene from a JSON definition, allowing for more complex and customized setups based on the original RenderFormer format.
- RenderFormer Example Scene: A test node to quickly load one of the official RenderFormer example scenes.
🧱 Model Limits
- Meshes: RenderFormer can handle meshes of up to 8192 polygons.
- Lights: Up to 8 lightsources can be combined for lighting, emission color is for now limited to rgb 255, 255, 255 (white).
- Resolution: Best tested resolutions for now are between 512 x 512 to 1024 x 1024 pixels. The model can produce resolutions up to 2048 x 2048 pixel, quality of outputs decrease with higher resolutions (see comparison img).
- Animations: Due to slightly varying precision in each frame rendered, camera animations for now contain some flickering, especially with high reflective materials.
📝 Progress & To-Do
This project is under active development. Here is a summary of the progress so far and the features planned for the future.
✅ Done
- [x] Core Rendering Pipeline: All essential nodes for building and rendering a static 3D scene are implemented.
- [x] In-Memory Processing: The entire scene preparation pipeline, from loading meshes to generating the final HDF5 data, is now handled in-memory. This significantly improves performance by avoiding slow disk I/O.
- [x] Video Rendering: A complete, dedicated workflow for video rendering is in place.
- [x] Light Animation: Full animation support for lights, including position, rotation, scale, and emission.
- [x] Advanced Utilities: Nodes for mesh combination, remeshing, and JSON-based scene loading are functional.
- [x] Custom UI Elements: The nodes feature custom colors for better visual organization, and progress bars are implemented for long-running operations.
- [x] Bug Fixes: Addressed various bugs related to file handling, data types, and temporary file management.
- [x] Proper RGB Values for diffuse Color: Colorpicker support for white-values for more variety of colors including.
- [x] Randomize Color Fix: The
RandomizeColorsnode now correctly applies colors in all modes. The originalper-trianglemode was renamed toper-shadingfor clarity, and a newper-trianglemode was added for true per-face coloring. - [x] Mesh Animation: Implemented animation capabilities for
MESHproperties (translation, rotation, scale) and materials (diffuse, specular, roughness). - [x] Mesh Animation: Add multi mesh animation for complex movement
- [x] Public Release: Prepare for a more stable, public release with better documentation and examples.
📋 To Do
- [ ] Animation Flickering: Investigate and fix flickering in animations, especially for objects with highly reflective materials.
- [ ] Mesh Format Support: Add support for loading
.glband.fbxfiles, including their materials and textures. - [ ] Camera Adoption: Integrate with the
Load 3Dcore node to adopt its camera transformations. - [ ] Material Presets: Create a system for saving and loading material presets.
- [ ] Overall Animation: Implement multiple keyframes and different interpolation options (bezier?) for complexer animations
📜 Version History
Version 0.5.0 - Multi Mesh Animation & Public Release
- Feature: Mesh & Material Animation: Multi object support for animations now integrated.
Version 0.4.0 - Mesh Animation
- Feature: Mesh & Material Animation: A complete animation workflow for meshes has been implemented.
- New Node:
RenderFormerMeshTarget: This new node allows you to define an animation for a mesh by specifying its end-state transformation (position, rotation, scale) and material properties (diffuse color, specular color, roughness). - Enhancement:
RenderFormerMeshCombine: This node has been upgraded to intelligently handle both static meshes and the new animated mesh sequences, allowing you to combine multiple animated and static objects in a scene. - Enhancement:
RenderFormerSceneBuilder: The scene builder now correctly processes the new mesh animation sequence, enabling it to generate interpolated frames for mesh animations just as it does for cameras and lights.
Version 0.3.35 - Bug Fixes & Stability
- Fix: Resolved a critical
WrongTypeErrorin theRenderFormerRandomizeColorsnode. Therandom_diffuse_typewas being set to an incorrect string value ("per triangle"), which has now been corrected to the valid literal ("per-triangle"). - Fix: The
per-shadingmode in theRenderFormerRandomizeColorsnode has been updated to use the correct literal"per-shading-group"for consistency with the scene configuration, ensuring it functions as expected. - Change: The
seedinput on theRenderFormerRandomizeColorsnode is now correctly limited to a 10-digit integer.
Version 0.3.3 - Workflow Optimization
- Workflow: The animation workflow has been significantly simplified and made more robust. The
RenderFormerSceneBuildernow has a requiredlightinginput that explicitly defines the start-frame lighting. - Workflow: The
end_lightinginput on theScene Builderhas been removed. All lighting animation is now handled by the optionallighting_sequenceinput, which provides the end-frame state. - Data Flow: The
RenderFormerLightingTargetandRenderFormerLightingCombinenodes have been updated to output a standardizedLIGHTING_SEQUENCEdictionary ({ "start_lights": [...], "end_lights": [...] }), ensuring consistent data flow. - Convenience: The
RenderFormerLightingCombinenode now provides a separatestart_frame_lightingoutput for a direct connection to theScene Builder's requiredlightinginput, preserving a clean and logical graph.
Version 0.3.0 - Animation Overhaul and Performance Boost
- Feature: Full Light Animation: The
RenderFormerLightingTargetnode now supports animating a light's position, rotation, scale, and emissive strength, enabling complex dynamic lighting effects. - Fix: Animation Transformation: Reworked the animation pipeline to correctly interpolate object and light transformations, ensuring smooth movement, rotation, and scaling.
- Performance: In-Memory Scene Generation: The entire scene-building process now runs in-memory, dramatically reducing processing time by avoiding disk I/O for intermediate files.
- Workflow: The
RenderFormer SamplerandScene Buildernodes now handle both static scenes and animation sequences more robustly.
Version 0.2.5 - Node Consolidation and Workflow Simplification
- Workflow: Merged the
RenderFormerVideoSamplerBatchedinto the mainRenderFormerGenerator(nowRenderFormer Sampler). The sampler now intelligently handles both single images and video sequences, with an optionalIMAGESoutput. - Workflow: Merged the
RenderFormerVideoSceneBuilderinto the mainRenderFormerSceneBuilder. The node now accepts both a singleCAMERAand aCAMERA_SEQUENCE, with optionalSCENEandSCENE_SEQUENCEoutputs. - Fix: Resolved a critical
AttributeErrorin theRenderFormerSceneBuildercaused by a missing helper method after the node merge. - Fix: Removed hardcoded material properties for background meshes in the
RenderFormerLoadMeshnode, ensuring that materials are always controlled by the node's inputs. - UI/UX: Added a colored startup message with an ASCII logo to provide clear feedback on whether the nodes loaded successfully.
- UI/UX: Fixed a
SyntaxWarningrelated to escape sequences in the startup message.
Version 0.2.21 Beta Test - UI/UX and Workflow Enhancements
- Examples: added example workflows for ComfyUI.
- UI/UX: All nodes now have custom colors for better visual organization in the graph. The header is yellow (
#FDC501) and the body is anthracite (#111417). - UI/UX: Added progress bars to all long-running nodes (
SceneBuilder,VideoSceneBuilder,Sampler,VideoSampler,Remesh) to provide real-time feedback. - Workflow: The
Remeshnode now processes all meshes in a list, not just the first one. - Workflow: The
SceneBuildernodes will no longer add the default background if a background mesh has already been loaded manually, preventing duplicates. - Input Precision: The
emissive_strengthinput on theLightingnode now has a smaller step value for finer control.
Version 0.1.9 - Video Rendering and Stability
- Feature: Added a complete, dedicated workflow for video rendering (
Camera Target,Video Scene Builder,Video Sampler). - Fix: Resolved a
dacite.exceptions.MissingValueErrorin the video scene builder. - Fix: Addressed
TypeErrorandFileNotFoundErrorbugs related to temporary file handling in the video pipeline. - Change: Separated single-image and video workflows for improved stability and clarity.
Version 0.1.5 - Refinements and Fixes
- Feature: The
LoadMeshnode now has aRENDERFORMER_MATERIALoutput, allowing material properties to be shared. - Feature: Added default transformations for specific background meshes from the official examples.
- Change: Increased input precision for rotation and scale transformations.
Version 0.1.0 - Initial Development
- Feature: Established the core rendering pipeline and all essential nodes for building and rendering a static 3D scene.
- Feature: Implemented in-memory scene processing to patch
trimeshandh5py, avoiding slow disk I/O. - Feature: Added advanced utility nodes like
RemeshMesh,RandomizeColors, andFromJSON. - UI/UX: Integrated a file uploader and a custom canvas-based color picker for a better user experience.
💖 Contact
- 🌐 Web: https://www.paulhansen.de
- 📸 Instagram: https://www.instagram.com/paulhansen.design/
- 🎥 YouTube: https://www.youtube.com/@Paul_Hansen
- 💼 LinkedIn: https://www.linkedin.com/in/paul-hansen-410695b6/
- 💬 Discord: https://discord.gg/QarZjskQmM
🌱 My Journey
This project represents my first steps into coding and open-source contribution. It was born out of a desire to learn and create. What started as a simple experiment has been a journey of discovery, and I'm excited to see where it goes. I would love to develop this project further with the help of the community and welcome any contributions or feedback.
🙏 Acknowledgements
This project would not be possible without the foundational work of others.
-
RenderFormer This project is a wrapper for the incredible RenderFormer model. All credit for the underlying rendering technology goes to the original authors: Chong Zeng, Yue Dong, Pieter Peers, Hongzhi Wu, and Xin Tong.
-
comfyui-hunyuan3dwrapper Special thanks to kijai for his work on the
comfyui-hunyan3dwrapper, which served as an invaluable reference and starting point for this project during its development invibecoding. -
ComfyUI_Fill-Example-Nodes A huge thank you to filliptm for creating the
ComfyUI_Fill-Example-Nodesrepository. The advanced color picker in this project was implemented by adapting the excellent example code provided in that repo. It was an essential learning resource for understanding how to build custom UI elements in ComfyUI. -
Awesome people from the Internet Special thanks to m4d, rem431, Mel and hicho for pointing me directions, providing tips and feedback.
⚖️ License
- <a href="https://github.com/paulh4x/ComfyUI_PHRenderFormerWrapper">ComfyUI_PHRenderFormerWrapper</a> © 2025 by <a href="https://www.linkedin.com/in/paul-hansen-410695b6/">Paul Hansen</a> is licensed under <a href="https://creativecommons.org/licenses/by-sa/4.0/">CC BY-SA 4.0</a>
Run ComfyUI workflows without the setup
No installs, no CUDA version roulette, no GPU sitting idle on your bill. Bring a workflow and run it in the browser.