
noEmbryo nodes
PromptTermList (1-6): are some nodes that help with the creation of Prompts inside ComfyUI. Resolution Scale outputs image dimensions using a scale factor. Regex Text Chopper outputs the chopped parts of a text using RegEx.
Nodes (22)
Your workflow is one bad save away from gone — Auto Save Workflow fixes that
A divider line for the one place you can't draw groups
Turn a real video into an H3 context clip — audio included
Your H3 clips get grainier every join — here's the fix that stays in latent space
The one-wire adapter that makes saved MiniMax H3 clips re-runnable
Purge those clip archives before they eat your SSD
Don't Hand-Stitch Your H3 Clips — Let This Node Do It
Pack a sheet without leaving ComfyUI
Type the text, don't generate it
RCAS in ComfyUI
Your prompt library as a JSON file, editable from inside the graph
The Load Image that doesn't care where your file lives
Your reusable prompt terms, one dropdown away
A second, independent dropdown for your prompt terms
Another term library slot, same dropdown magic
A fourth dropdown for the prompt terms you keep retyping
The fifth slot in the pack's six term-library dropdowns
The last of the six — and the one that proves the pattern
Slice a prompt into parts without a dozen string nodes
The math node for latent upscaling that stays a multiple of 4
String to Combo
String to Int
noEmbryo Nodes


A diverse set of nodes for ComfyUI.
You can access them through "Add node > noEmbryo" submenu.
Image nodes
Load Image (from path)
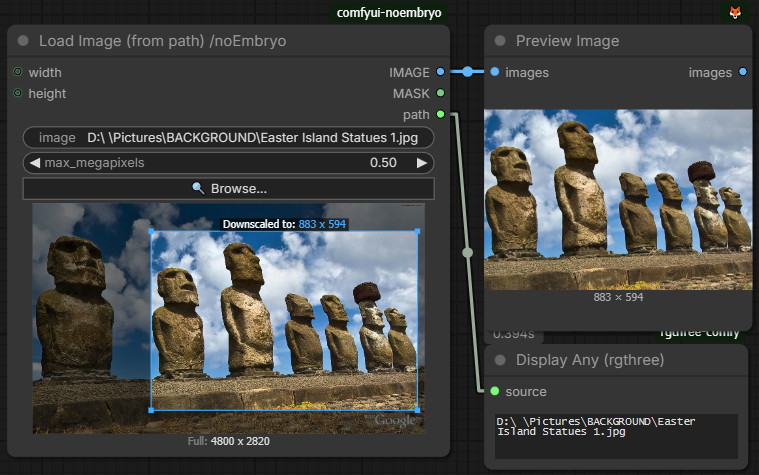
Load an image from any path on your computer or a URL. Paste an absolute path or a link to an image, use an annotated path (input/file.png), or click the Browse dialog to pick a file from your drives.
The file is read from its original location; it is not copied into ComfyUI’s input folder.
Use a selection rectangle at the preview to crop it.
Limit (downscale) the output's size in megapixels or pixels.
Click the ↻ button (top-right, mouse over the preview), to rotate the image 90° clockwise.
Interactive crop
The node shows a live preview. You can crop directly on it:
- Drag on the image to draw a crop rectangle
- Drag inside the selection to move the crop rectangle
- Drag a corner to resize it
- Click (without dragging) outside the rectangle to clear it
With no crop drawn, the full image is output. The crop is stored in the workflow as normalized coordinates, so it survives save/reload. Changing the path clears the crop.
The output (cropped or full) will be downscaled only (not upscaled), by the value in the max_megapixels field.
Outputs match the stock Load Image node: IMAGE, MASK (from the alpha channel when present), plus the original path string.
-
Controls
- image: Paste an absolute path, (or a relative one with a prefix input/), or a URL to an image file.
- max_megapixels: Cap the output (crop, or full image if uncropped) to this many megapixels, downscaling only if it's bigger. Smaller images are left untouched. 1.0 = 1024x1024 px. 0 disables the cap.
- Browse...: to open an image file from your drives.
-
Inputs/Outputs
- Width/Height inputs: Force the output width in px (upscale or downscale), center-cropping first if the aspect ratio differs.
Leave disconnected (None) to keep natural width.
Only applies if BOTH width and height are connected, and when set (not 0). It overrides the
max_megapixelsvalue. - IMAGE/MASK: The final, processed image/mask.
- path: A string with the image's path.
- Width/Height inputs: Force the output width in px (upscale or downscale), center-cropping first if the aspect ratio differs.
Leave disconnected (None) to keep natural width.
Only applies if BOTH width and height are connected, and when set (not 0). It overrides the
Credits:
Built as a much more enhanced version of Load Image From Path (Enhanced) from ComfyUI_Ib_CustomNodes, with parts of the interactive crop UI inspired from Load Image & Crop in comfyui-obvpm.
Image Composer

Compose several images into ONE image.
Images keep their order and relative pixel sizes (natural sizing, never enlarged) and are packed as tightly as possible; rows are chosen automatically.
The preview refreshes instantly when an upstream image, crop, rotation or megapixel cap changes; no workflow run needed.
The inputs are automatically increase, every time you connect a new image loader.
Image from String
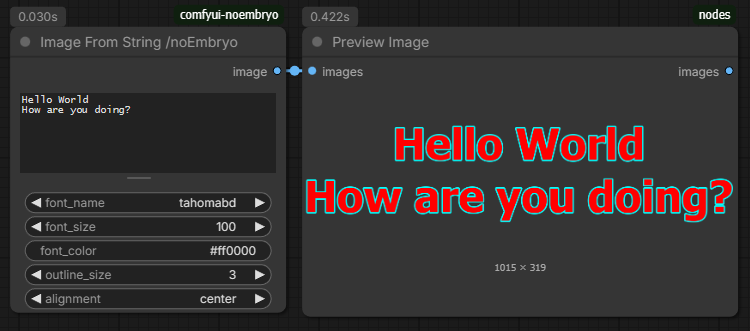
Create an image from a text string.
Renders multiline text onto a transparent-background RGBA image whose canvas size matches the text extent.
- Controls
- font_name - Font to use for rendering.
- font_size - Font size in pixels.
- font_color - Font color as a hex value (e.g. #FFFFFF or #FFF).
- outline_size - Outline thickness in pixels (0 = no outline). Outline color is the inverted font color.
- alignment - Horizontal text alignment.
Image Sharpener
GPU-accelerated image sharpening with RCAS, AMD's Robust Contrast-Adaptive Sharpening (from FSR).
Single 5-tap cross filter that adapts to local contrast.
Minimal artifacts, good for general use with little tuning.
Resolution Scale
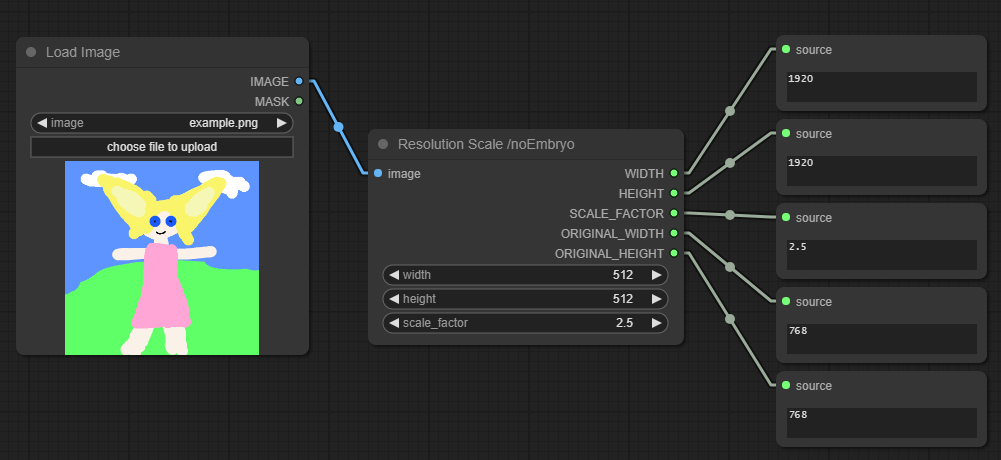
A simple node that outputs the resolution of an image using the dimensions of an input image or some custom user-defined dimensions, using a Scale Factor.
If there is an input image connected, setting either width or height to 0 will use the other dimension to scale the image (but always multiple of 4).
MiniMax H3
H3 Motion Context Clip Stitcher
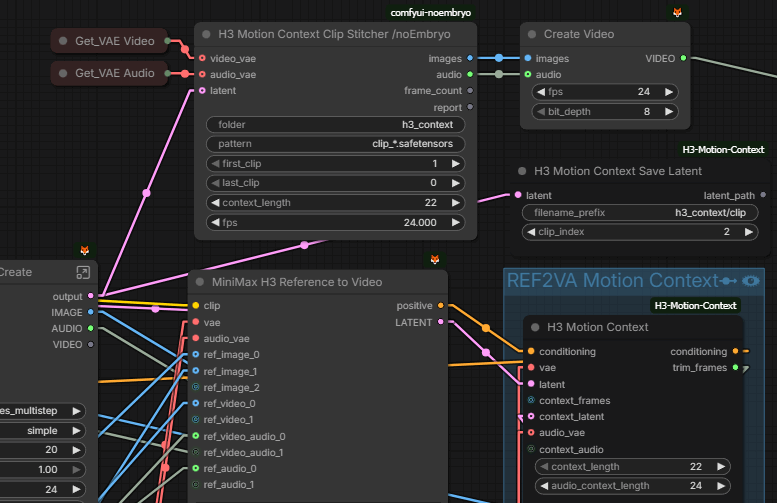
Final assembly for NikoDemon80's H3 Motion Context AV clip archives.
It loads numbered h3_motion_context_av_v1 files (clip_xx.safetensors), decodes one clip at a time to avoid memory peaks, dissolves the overlap between adjacent clips (video + synchronized audio), and concatenates them to a final video and audio stream. No quality loss, like when trying to concatenate encoded videos.
-
Inputs
- Video VAE
- Audio VAE
- (Optional), the current generated AV latent to be added as the last part of the stitching
-
Controls
- folder is the folder containing clip_00001.safetensors, clip_00002.safetensors, etc. Absolute paths and paths relative to ComfyUI/output are accepted.
- pattern is the filename glob. The final five-digit number is treated as the clip index.
- first_clipis the first approved clip to include.
- last_clip is the last clip to include. 0 = every clip from first_clip onward.
- context_length is the number of decoded frames to crossfade at each clip boundary. Keep the same number here as in the H3 Motion Context nodes. The normal setting is 22 frames. This is the overlap length that is dissolved between adjacent clips. 5, 22, 39 or 56 are the lengths that are a whole number of latent steps, which is why other numbers aren't offered.
- fps is the H3 native output rate. Keep this at 24 unless your workflow deliberately changes it.
-
Outputs
- images: The final stitched image stream to be saved
- audio: The final audio stream to be saved
- frame_count: The total number of frames
- report: Logging of some of the node's actions
H3 Clip Refiner

Inline style-drift corrector and optional refine-resample for H3 Motion Context clips.
Place this node BETWEEN the sampler (SamplerCustomAdvanced) and the H3 Motion Context Save Latent node.
It works on the LATENT level and attacks the accumulated degradation with two halves:
-
Statistical (always on). A per-channel affine (matches mean + std) plus a high-band gain match. This fixes the drift(luminance, contrast, color/saturation and the "texture ratchet") but, being pure arithmetic, it cannot put back the micro-detail the chain has lost.
-
Generative (optional). Connect
model+positive/negative, and the node runs a short low-denoise refine resample, then transfers only its high band (detail) onto the original low band (structure).
Keeping the original low band is what stops the background shift / dissolve that a whole-latent blend suffers from; the refine becomes a detail donor, not a replacement. -
Inputs
- latent gets the generated AV latent from your H3 sampler (SamplerCustomAdvanced output).
- reference_latent is optional. It gets the reference latent (e.g., first clip) to measure the target statistics from it automatically. If connected, all target statistics are measured from this latent and the input latent is corrected to match it.
- model + positive / negative are optional. Connect them (same prompt you sampled with), to enable the refine resample that regenerates lost detail. Leave
modeldisconnected for the pure statistical corrector.
-
Outputs
- latent is the refined latent.
- report: shows the report of the latent analysis.
-
Controls
- strength is how much the statistical correction is applied.
- 0 = None (measure only, pass through)
- 1.0 = Full match to the reference statistics
- > 1.0 = Overshoot (pushes past the reference). Safe to use (e.g. 1.5 or 2.0) when the drift keeps accumulating: the correction only touches the body and the overlap frames stay raw, so overshoot cannot reintroduce a seam flash.
- context_length is the number of frames at the head/tail that are the Motion Context overlap regions.
These frames are left completely raw to preserve crossfade consistency; the correction ramps in just inside the body.
Must match the
context_lengthin the H3 Motion Context node and the Clip Stitcher. 5, 22, 39 or 56 are the lengths that are a whole number of latent steps. - refine_denoise (default 0.4) — denoise for the refine resample. ~0.3–0.5 restores detail while keeping the structure; higher changes content more.
- refine_steps (default 3) — sampler steps for the refine. 2–4 is plenty.
- refine_cfg (default 1.0) — CFG for the refine; match your main sampler.
- sampler_name / scheduler / seed — the refine's sampler, scheduler and noise seed.
- detail_strength (default 1.0) — how much of the refined high band (detail) to transfer over the original. 0 = statistical only, 1 = full refined detail. The low band is always kept from the original, so the background never shifts.
- strength is how much the statistical correction is applied.
- Usage:
- Run the FIRST clip through with
reference_latentunconnected. The node measures and reports its statistics but passes the latent through unchanged. - Feed that first clip's latent into
reference_latentfor all subsequent clips. The node matches every later clip's body to the first clip's body. - Set
context_lengthto match your H3 Motion Context setting (default 22). - (Optional) connect
model+positive/negativeto also regenerate lost detail; tunerefine_denoise(~0.3–0.5) anddetail_strength. - Adjust
strengthif needed: 1.0 = full match, >1.0 = stronger.
- Run the FIRST clip through with
H3 Motion Context Clip Purge
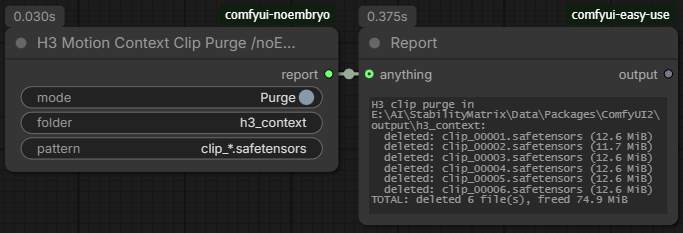
Deletes the numbered h3_motion_context_av_v1 clip archive files at the root of a folder (default: h3_context).
Only files matching the pattern are removed; sub-folders and everything inside them are left untouched.
- Controls
- mode: Purge (Enabled): delete the matching files.
Preview (dry run, Disabled): delete nothing; the report just lists the files that would be deleted. - folder is the folder whose root-level clip archives will be deleted.
Absolute paths and paths relative to ComfyUI/output are accepted. - pattern is the filename glob. Only root-level FILES matching this pattern are deleted.
Sub-folders are never touched.
- mode: Purge (Enabled): delete the matching files.
- Outputs
- report: Shows the actions of the node.
H3 AV Latent from Video

Encodes a whole video (IMAGE frames + AUDIO) with the MiniMax H3 VAEs into an AV latent that can be saved with H3 Motion Context Save Latent and stitched into later generations.
-
Inputs
- video_vae for encoding the video.
- audio_vae for encoding the audio
- images The whole video as frames (e.g. from VHS Load Video).
Leave un-connected when using the latent input. - latent (optional) alternative to images.
Accepts either a nested AV latent fromLTXVConcatAVLatent(its audio stream is used directly), or an already-encoded H3 video LATENT from VAE Encode.
A standard [B,C,H,W] latent is wrapped as a one-frame H3 video stream
Connect AUDIO separately when it has no audio stream. - audio (optional) The video's audio (e.g. from VHS Load Video).
Leave un-connected for a silent clip.
Ignored when latent already contains an audio stream.
-
Outputs
- latent is the
H3 Motion ContextAV latent
- latent is the
-
Controls
- source_fps The frame rate of the loaded video.
Frames are resampled to H3's native 24 fps by time-based frame picking, so audio stays in sync at any source rate.
- source_fps The frame rate of the loaded video.
H3 Context Latent Converter
A utility node that converts an H3 Motion Context archive latent (as loaded by MiniMaxH3MotionContextLoadLatent, whose 'samples' is a plain list) into the AV latent form that comfy-core's LTXVSeparateAVLatent expects (av_latent["samples"].unbind() -> (video, audio)).
Utilities
Regex Text Chopper
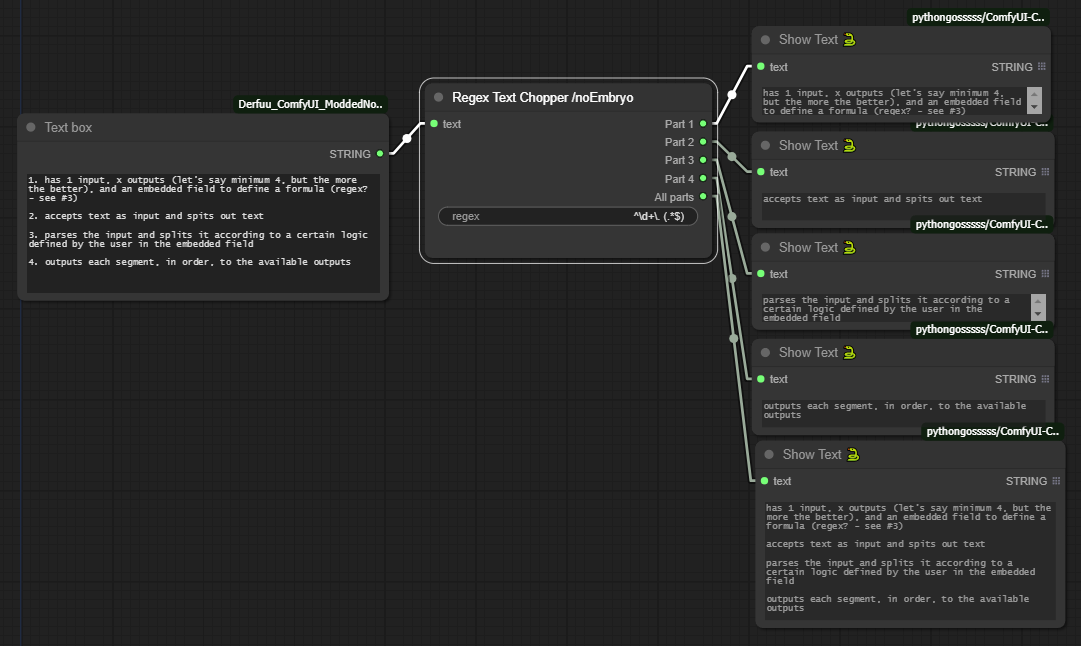
A node that "chops" a text using a regular expression and outputs the chopped parts of the text.
Auto Save Workflow
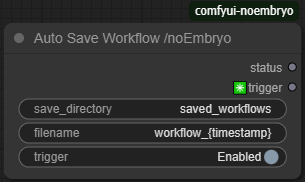
This node can save the current workflow to a .json file, every time a generation job is run.
- Controls
- save_directory is the directory where the
.jsonfile will be saved.
It can be a relative path inside the ComfyUI's output directory, or an absolute path of your hard drive. - filename is the name of the
.jsonfile.
It can contain the{timestamp}placeholder, which will be replaced with the current timestamp (for unique filenames). - trigger switch will enable (or not) the saving of the workflow.
- save_directory is the directory where the
- Outputs
- status outputs a text with the status of the saving process (the path of the saved file, or an error message).
- ✳️trigger is a dummy output that's used to trigger the saving process, even if nothing is connected to the node.
String to Combo
A simple node to convert a (comma-separated or not) string to combo selection (first item).
Useful for converting the output of a Custom Combo (string) to actual combo value.
String to INT
Another simple conversion of number in text format to an int.
Embellishment
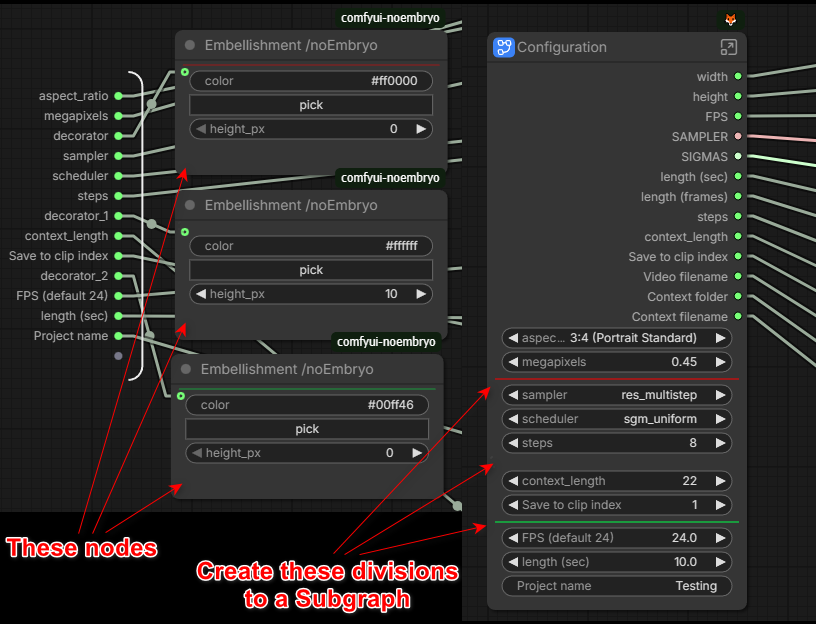
Combines a Divider and a Spacer functionality in one node.
When height_px is 0, the node acts as a Divider between a Subgraph's widgets.
When height_px > 0, the node acts as Spacer.
- Controls
- color - Divider's color in hex (e.g. #ffffff). Only used when
height_pxis 0. - pick button - Opens up a color selector dialog to select the divider's color.
- height_px - Height of the Spacer in pixels. When it is 0, the node acts as a Divider, and when it is >0 the node acts as a Spacer.
- color - Divider's color in hex (e.g. #ffffff). Only used when
Prompts
Json Prompt Loader
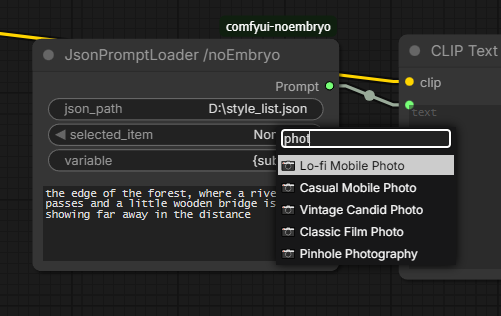
A node that can load a .json file with item:prompt pairs and outputs the selected item's prompt, while combining it with a custom prompt.
It can load .json files from any directory, not just the node's directory.
For the custom text integration, there is a variable (can be specified by the user), that can be used in the item's prompt text to insert the custom text anywhere in the body of the prompt.
-
Controls
- json_path is the path to the
.jsonfile.
It can be an absolute path of your hard drive, or a relative path to the ComfyUI's installation directory. - selected_item selects one of the
.jsonfile's items (prompts). - variable is the variable that will be used to insert the custom text into the item's prompt text.
- custom_text is the custom text that will be inserted into the item's prompt text.
- json_path is the path to the
-
Advanced Usage
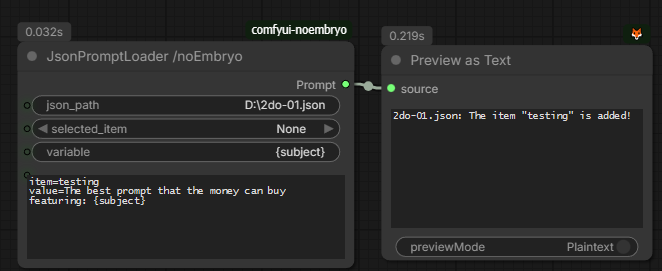
- Adding new items
To add a new item, we have to write it in thecustom_textinput, using the following format:item=The prompt's title/keyword value=The prompt's text, including our variable - Updating items
To update an item, we use the same method, just write the specific item we want to update.item=An existing title/keyword value=The new prompt's text, including our variable - Deleting items
To delete an item, we use the same format, but we just leave thevalueempty.
All of these methods will update theitem=An existing title/keyword value=.jsonfile, and the node will output a message about the success or failure of the operation.
We can also load an empty.jsonfile and use this method to populate it.
- Adding new items
<u>After changing the .json file, we must reload the ComfyUI page, so the node can reload the updated file.</u>
PromptTermList 1-6
<u>The PromptTermList nodes are now obsolete, and can mostly be replaced by the Json Prompt Loader node.
I won't remove them for compatibility reasons, but I would recommend using the JsonPromptLoader node instead.</u>
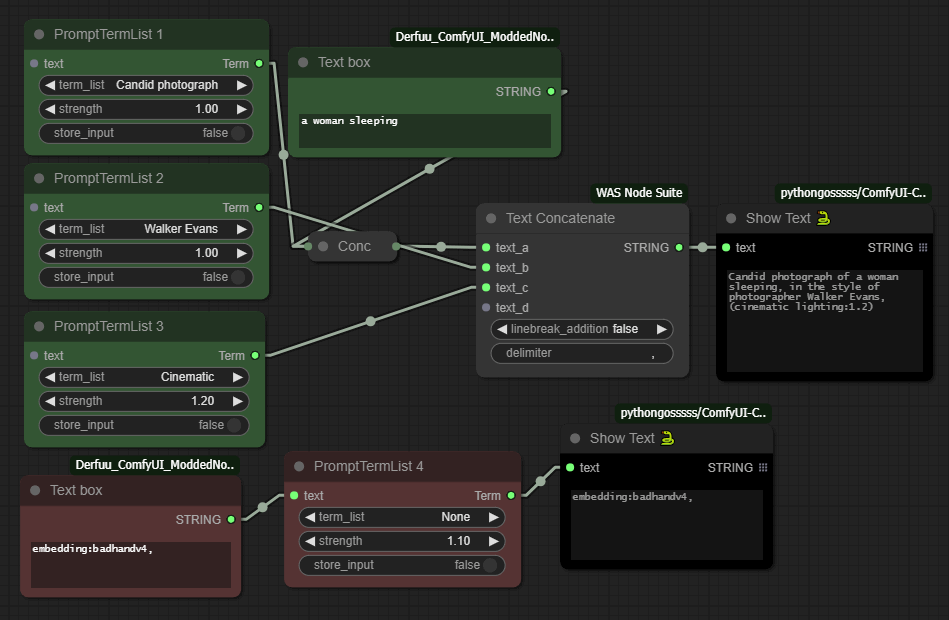
These are some nodes that help with the creation of Prompts inside ComfyUI.
Usage
Every one of these 6 nodes have a different json file that stores its Prompt Terms in "label"/"value" pairs.
The "label" part is what we see at the node's dropdown menu, and the "value" part is what it produces at its Term output when we run a generation job.
These json files are located inside the TermLists directory, in the node's folder.
There are two ways to add a new term.
-
From within ComfyUI:
- Connect a text box to the node's
textinput. - Write the "label"/"value" part in the box using the following format:
label=Descriptive text value=masterpiece, artful and cozy- Enable the
store_inputswitch. - Run a generation job.
- Refresh the page.
- Connect a text box to the node's
-
Manually:
- Just open the
jsonfile and add/remove/change entries.
Ofcourse we must be very careful with this, to keep the
jsonformat of labels/values (with the appropriate commas), otherwise the file will not be parsed. - Just open the
This text input is also useful if we want to manually add something after our term, or as the only term if we select the None label of the dropdown.
The strength value is changing the impact of the term by using the parenthesis format like this: (a great term:1.3)
We can delete a term by sending an empty value to the text input like this:
label=The label to be deleted
value=
Extensions
Save/Load Menu Extension
ComfyUI's "new menu > Top" setting removes the legacy sidebar Save/Load buttons that pythongosssss comfyui-custom-scripts extended with dropdown menus (saved workflows, save options).
This extension restores that functionality by injecting a Save and a Load button, with dropdowns into ComfyUI's bottom corner (left or right).
It can be used for any custom folder the users wants to save/load their workflows to/from.
By default, the extension is disabled.
Features
- 💾 Save button dropdown:
Save As...— downloads the current workflow as a.jsonfileSave to Workflows— saves the workflow to the configured workflows directory
- 📂 Load button dropdown:
Load from File— opens a file picker to load a.jsonworkflowSaved Workflows— lists workflows from the configured directory and loads the selected one (with folder navigation)
- Settings: Configured via ComfyUI's Settings panel:
- Enable Save/Load Menu buttons — toggle on/off
- Workflows Directory — path to the directory containing saved workflows
- Button Position — choose "Bottom Right" or "Bottom Left"
- Corner placement: the buttons are placed flush in the selected bottom corner. ComfyUI's own
toolbars are moved out of the way to make room for them:
- Bottom Left — the vertical toolbox on the left edge is nudged up (and shortened if needed), so the buttons can sit underneath it.
- Bottom Right — the horizontal action bar (zoom, fit, select…) is shifted to the left by exactly as much as needed, so the buttons can sit next to it in the corner with a small gap.
- The original layout is restored automatically when the extension is switched off or the position is changed.
- Safe: defaults to OFF, wraps all DOM access in try/catch, never modifies existing elements, and cleans up on disable. The graph canvas and the node widget overlays are never moved.
Configuring the Workflows Directory
By default, the extension looks for saved workflows in ComfyUI's user/default directory. To use a different directory:
- Open ComfyUI Settings → find the "noEmbryo" section
- Enable the extension by switching the "Enable Save/Load Menu buttons" ON.
- Enter the directory path you want to use in the "Workflows Directory" field
- Select at what side the save/load buttons should be placed.
Installation
- Use the ComfyUI Manager
- Or manually
- cd to
ComfyUI\custom_nodes - git clone https://github.com/noembryo/ComfyUI-noEmbryo.git
- Restart ComfyUI
- cd to