ComfyUI Extension: SeedVR2 Tiling Upscaler
Run ComfyUI workflows without the setup
No installs, no CUDA version roulette, no GPU sitting idle on your bill. Bring a workflow and run it in the browser.
Memory-efficient image upscaling using SeedVR2 models with advanced tiling and detail-preserving stitching. Supports both stable and nightly SeedVR2 builds (3B/7B, FP16/FP8, GGUF models). Requires ComfyUI-SeedVR2_VideoUpscaler to be installed.
README
SeedVR2 Tiling Upscaler (for single images)
A ComfyUI custom node for memory-efficient image upscaling using SeedVR2 models with advanced tiling and detail-preserving stitching.
WARNING: This is not magic - although it sometimes may seem that way. It will alter details and it might even change things you don't like. But in my testing the outputs are more convincing than any other detailer / upscaler process I tested so far. Personally, I use it to refine Flux / ... outputs and enhance skin detail (or any detail) for further, more natural looking training datasets. Upscaling for print use is also one way to use this.
Recommended settings: For best results, if you have enough VRAM, use tile_width & tile_height of "1024" with a padding of "32" / "64". Set anti_aliasing_strength to 0.0-0.2 for optimal sharpness.
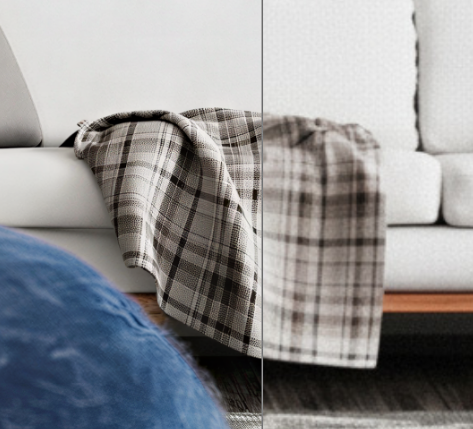
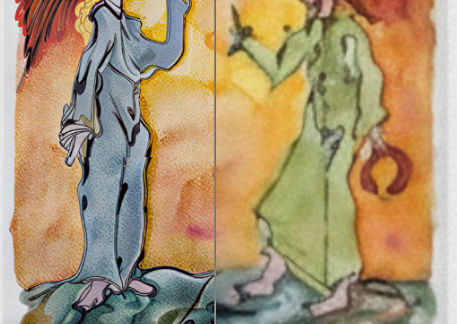
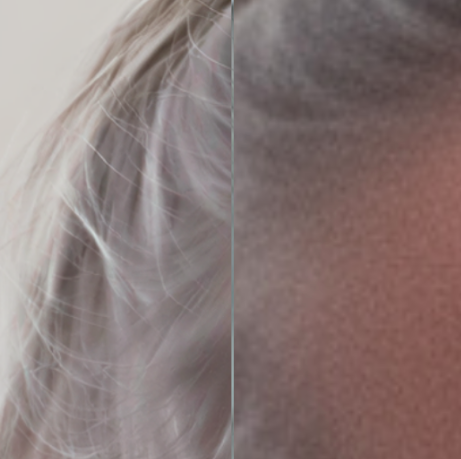
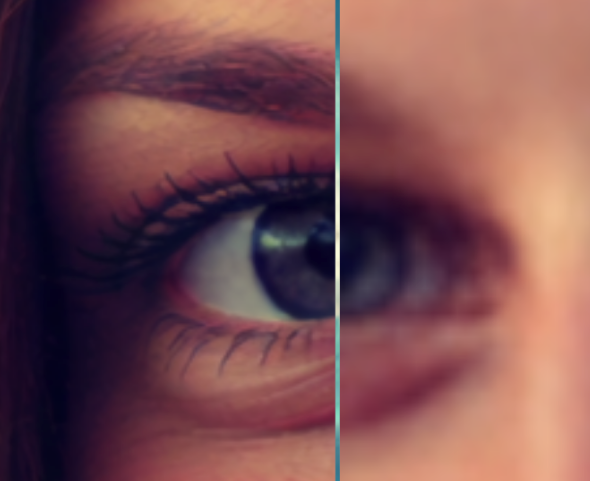
Example upscales
Features
- Multiple Blending Algorithms: Choose from advanced stitching methods
- Memory Optimized: Prevents OOM errors using configurable tile-based upscaling
- SeedVR2 Integration: Works with SeedVR2 stable releases and nightly builds (3B/7B, FP16/FP8, sharp, GGUF)
- Advanced Tiling: Linear and Chess tiling strategies with configurable overlap
Compatibility & Model Discovery
Based on SeedVR2 Nightly Build: This node is designed to work with the latest nightly version of the SeedVR2 node pack and supports all its advanced features.
- Dynamic model list: Available models are pulled from seedvr2 node when the nightly package is installed. Main (stable) version keeps the predefined models list.
- GGUF support: SeedVR2 nightly supports GGUF models, these are now selectable in the dropdown once they are downloaded or discovered on disk.
- Extra Args support: Connect the
SeedVR2ExtraArgsnode (from nightly) for advanced options likepreserve_vram,tiled_vae,cache_model,enable_debug, and device selection.
How It Works
- Input image is divided into overlapping tiles
- Each tile is upscaled using SeedVR2 to a fixed resolution
- Upscaled tiles are resized to their final target dimensions
- Advanced Multi-Band Stitching - Multiple blending algorithms available:
- Multi-band (Laplacian Pyramid): True frequency-separated blending using 4-level Laplacian pyramid decomposition. Blends each frequency band independently for seamless results while preserving fine details.
- Bilateral Filtering: Edge-preserving smoothing using OpenCV's bilateral filter (falls back to edge-aware Gaussian if OpenCV unavailable). Reduces artifacts without destroying texture details.
- Content-Aware (Structure Tensor): Structure-adaptive blending using eigenvalue analysis of gradient matrices. Adapts blending weights based on local edge strength and coherence - prefers sharper tiles at edges, smooth blending in flat regions.
- Linear Alpha Blending: Traditional gradient-based alpha compositing with configurable blur radius.
- Simple Averaging: Pixel-perfect weighted averaging for maximum detail preservation.
A personal suggestion
I also included example workflows (in the 'workflows' directory). Use the the advanced workflow for even better outputs. This one will do a first pass with the regular SeedVR2 node and then pass that output to a second pass, which does the tiled upscaling. The advanced workflow uses one of my other nodes from the "moonpack" (ProportionalDimension, https://github.com/moonwhaler/comfyui-moonpack).
How is this working exactly? And why should I care for the advanced workflow?
A little "trick" is to downscale the image (yes, we degrade quality at first) and add static noise (which provides variance when upscaling). After that the upscale is able to "create" finer details. The downside is that the original image is altered more. You can play around with this using the provided "switches" in the advanced workflow (less downscale, less new details, but more true to the original image - add more noise to get more variance in finer parts of the image). If you have text in an image and want to preserve it, you should go for a very low downscale factor!
In my tests the results were sometimes exceptional, sometimes "meh", depending on what I wanted to get (illustrations, portraits etc.). This also depends on the seed. I suggest using a random one to get slightly altered outputs - or a fixed one to compare changes.
Installation
Prerequisites
- ComfyUI installed and working
- SeedVR2 models and nodes from https://github.com/numz/ComfyUI-SeedVR2_VideoUpscaler installed in ComfyUI
- If you want to use the advanced workflow, you might need to install KJNodes, too. (https://github.com/kijai/ComfyUI-KJNodes)
Install the Node (ComfyUI-Manager)
If you're using the ComfyUI-Manager extension, you can also install this node there.
Install the Node (manually)
- Clone this repository to your ComfyUI custom nodes directory:
cd ComfyUI/custom_nodes/
git clone https://github.com/moonwhaler/comfyui-seedvr2-tilingupscaler.git
- Install dependencies (outside of ComfyUI):
IMPORTANT: The requirements must be installed in the same Python environment that ComfyUI uses. This is typically a virtual environment (venv) or conda environment.
For venv users:
# Activate your ComfyUI virtual environment first
source /path/to/your/comfyui/venv/bin/activate  # Linux/Mac
# OR
/path/to/your/comfyui/venv/Scripts/activate  # Windows

# Then install requirements
cd UltimateResupscaler
pip install -r requirements.txt
For conda users:
# Activate your ComfyUI conda environment first
conda activate your-comfyui-environment

# Then install requirements
cd UltimateResupscaler
pip install -r requirements.txt
For portable ComfyUI installations:
# Use the Python executable from your ComfyUI installation
cd UltimateResupscaler
/path/to/ComfyUI/python_embeded/python.exe -m pip install -r requirements.txt  # Windows
# OR
/path/to/ComfyUI/python/bin/python -m pip install -r requirements.txt  # Linux/Mac
Note: Do NOT install these requirements in your system Python or a different environment, as ComfyUI will not be able to find them.
- Restart ComfyUI
The node will appear in the image/upscaling category as "SeedVR2 Tiling Upscaler".
Requirements
System Requirements
- Python 3.10+
- CUDA-capable GPU (recommended)
- Sufficient RAM/VRAM for chosen tile upscale resolution
Dependencies
- torch>=1.9.0
- numpy>=1.21.0
- Pillow>=8.0.0
- scipy>=1.7.0
- opencv-python>=4.5.0 (for optimal bilateral filtering; falls back to scipy-based edge-aware smoothing if unavailable)
- SeedVR2 node (installed separately via https://github.com/numz/ComfyUI-SeedVR2_VideoUpscaler)
Usage
Basic Usage
- Add the "SeedVR2 Tiling Upscaler" node to your ComfyUI workflow
- Connect your input image
- Select your desired SeedVR2 model
- Configure parameters
- Run the workflow
Advanced Usage with Extra Args (Nightly)
For access to advanced memory management and processing options:
- Add the
SeedVR2ExtraArgsnode (from the nightly SeedVR2 node pack) - Configure advanced options like
preserve_vram,tiled_vae,cache_model, etc. - Connect the output of
SeedVR2ExtraArgsto theextra_argsinput of the Tiling Upscaler - Optionally add
SeedVR2 BlockSwap Configand connect toblock_swap_configfor additional VRAM management
This modular approach allows you to use the basic node without any extra configuration, or connect additional nodes for fine-grained control.
Parameters
Core Settings
- model: SeedVR2 model to use for upscaling
- seed: Random seed for reproducible results
- new_resolution: Target resolution for the longest side of the output image
Optional Inputs
- block_swap_config: Connect the
SeedVR2 BlockSwap Confignode for advanced VRAM management - extra_args: Connect the
SeedVR2ExtraArgsnode (from nightly) for advanced options:preserve_vram: Enable VRAM optimization by offloading models between stepstiled_vae: Enable tiled VAE processing for extreme memory savingsvae_tile_size/vae_tile_overlap: Control VAE tiling behaviorcache_model: Keep models in RAM between runs for faster batch processingenable_debug: Show detailed memory usage and timing informationdevice: Select which GPU to use for processing
Memory Management
- tile_upscale_resolution: Maximum resolution for individual tile upscaling
- Lower values = less memory usage, faster processing
- Higher values = better quality, more memory usage
- Recommended: 1024-2048 depending on VRAM
Tiling Configuration
- tile_width/height: Size of each tile in pixels (default: 512x512)
- tile_padding: Overlap between tiles in pixels (default: 32)
- tiling_strategy:
- Linear: Process tiles row by row
- Chess: Process tiles in checkerboard pattern for better blending
Blending Configuration
-
blending_method: Algorithm for tile stitching (default: "auto")
- auto: Automatically selects method based on mask_blur
- multiband: Laplacian pyramid frequency-separated blending (best detail preservation)
- bilateral: Edge-preserving bilateral filter blending (best for artifact reduction)
- content_aware: Structure tensor adaptive blending (best for complex images)
- linear: Traditional gradient alpha blending (controlled by mask_blur)
- simple: Direct pixel averaging (fastest, good for high overlap)
-
mask_blur: Blending control for linear mode (default: 0)
- 0: Minimal blending - Maximum detail preservation
- 1-3: Smart minimal blur - Hides seams while preserving details
- 4+: Traditional blur - Smoother blending with some detail loss
- Note: Only affects "linear" mode; other methods have built-in blending strategies
Recommended Settings
Maximum Detail Preservation
- blending_method: multiband (Laplacian pyramid)
- tile_padding: 64 pixels (more overlap for better blending)
- tile_upscale_resolution: Highest your VRAM allows
- anti_aliasing_strength: 0.0-0.1
- tiling_strategy: Chess
Artifact Reduction (Photos/Compressed Images)
- blending_method: bilateral (edge-preserving filter)
- tile_padding: 32-64 pixels
- tile_upscale_resolution: 1024-1536
- anti_aliasing_strength: 0.1-0.2
- tiling_strategy: Chess
Complex Images (Varied Detail)
- blending_method: content_aware (structure-adaptive)
- tile_padding: 64 pixels
- tile_upscale_resolution: 1536-2048
- anti_aliasing_strength: 0.0-0.1
- tiling_strategy: Chess
Fast Processing
- blending_method: simple (pixel averaging)
- tile_padding: 32 pixels
- tile_upscale_resolution: 1024
- tiling_strategy: Linear
- anti_aliasing_strength: 0.0
Legacy/Backward Compatible
- blending_method: auto
- mask_blur: 0 for detail, 2-4 for smoothness
- Other parameters as preferred
Troubleshooting
OOM Errors
- Reduce
tile_upscale_resolution - Connect the
SeedVR2ExtraArgsnode and enablepreserve_vramand/ortiled_vae - Reduce
tile_widthandtile_height - Use the
SeedVR2 BlockSwap Confignode and connect it toblock_swap_configinput. Increaseblocks_to_swapuntil OOMs stop (requires RAM) - In
SeedVR2ExtraArgs, reducevae_tile_sizefor additional VAE memory savings
Visible Seams
- Try blending_method: multiband for frequency-separated seamless blending
- Try blending_method: bilateral for edge-preserving smoothness
- Increase
tile_paddingto 64+ pixels for more overlap - Use Chess tiling strategy for better distribution
- Avoid
blending_method: simple with low padding
Detail Loss
- Use blending_method: multiband for maximum detail preservation
- Use blending_method: content_aware for edge-adaptive preservation
- Ensure adequate
tile_padding(64+ pixels recommended) - Increase
tile_upscale_resolutionif possible - Set
anti_aliasing_strengthto 0
Slow Processing
- Use blending_method: simple (fastest algorithm)
- Use Linear tiling strategy (faster than Chess)
- Reduce
tile_paddingto 16-32 if seams aren't visible - Set
anti_aliasing_strength: 0 - Note: multiband and content_aware are slower due to pyramid/structure computation
Known issues
The progressbar in ComfyUI is showing "???" when the tiling upscaler is working. This is not an error per-se, but a nuisance.
License
MIT No Attribution
Permission is hereby granted, free of charge, to any person obtaining a copy of this software and associated documentation files (the "Software"), to deal in the Software without restriction, including without limitation the rights to use, copy, modify, merge, publish, distribute, sublicense, and/or sell copies of the Software, and to permit persons to whom the Software is furnished to do so.
THE SOFTWARE IS PROVIDED "AS IS", WITHOUT WARRANTY OF ANY KIND, EXPRESS OR IMPLIED, INCLUDING BUT NOT LIMITED TO THE WARRANTIES OF MERCHANTABILITY, FITNESS FOR A PARTICULAR PURPOSE AND NONINFRINGEMENT. IN NO EVENT SHALL THE AUTHORS OR COPYRIGHT HOLDERS BE LIABLE FOR ANY CLAIM, DAMAGES OR OTHER LIABILITY, WHETHER IN AN ACTION OF CONTRACT, TORT OR OTHERWISE, ARISING FROM, OUT OF OR IN CONNECTION WITH THE SOFTWARE OR THE USE OR OTHER DEALINGS IN THE SOFTWARE.
Credits
- Partly based on the Ultimate SD Upscale methodology and adapted to the SeedVR2 process
- Based on the latest nightly build of the ComfyUI-SeedVR2_VideoUpscaler by numz (https://github.com/numz/ComfyUI-SeedVR2_VideoUpscaler)
- Adapted for SeedVR2 models with detail preservation focus and advanced tiling capabilities
- Built for ComfyUI ecosystem
- Example image (https://www.flickr.com/photos/160246067@N08/44726249090, public domain license) by TLC Jonhson (https://www.flickr.com/photos/160246067@N08/)
Run ComfyUI workflows without the setup
No installs, no CUDA version roulette, no GPU sitting idle on your bill. Bring a workflow and run it in the browser.