
Realistic Bokeh and Dreamy Look
Depth-map-driven bokeh and depth of field with real optics (f-stop, focal length, sensor size, six bokeh shapes), plus a content-aware dreamcore finishing pass with glow, diffusion, halation, light streaks, film grain and overlay textures.
Nodes (4)
The dreamcore look, minus the seed lottery
The dreamy pass that decides what your image is before it finishes it
Real background bokeh on an image you already like
Bokeh that does the lens math, not just the blur
ComfyUI – Realistic Bokeh / Depth of Field
Depth-map-driven depth-of-field / bokeh. Two nodes share the same engine (category image/postprocessing):
Easy Bokeh (plug & play)— start here. Image + depth in, set a focus point, dial two sliders, done. Toggle + one strength slider for each extra.Realistic Bokeh / Depth of Field (advanced)— the full physically-based node (real f-stop / focal length / sensor / metric distances) for fine control.Dreamy Look (dreamcore)— a finishing pass for the soft, glowy, hazy "dreamcore" aesthetic. Drop it after the bokeh (or on any image).Dreamy Look Advanced— content-aware version: detects whether the input is a photograph / illustration / digital illustration / vintage illustration and enables the right combination of glow, diffusion, grain and up to three overlay textures with displacement.
Visual guide
Every setting on every node, shown as a labelled comparison strip rendered by running the nodes themselves:
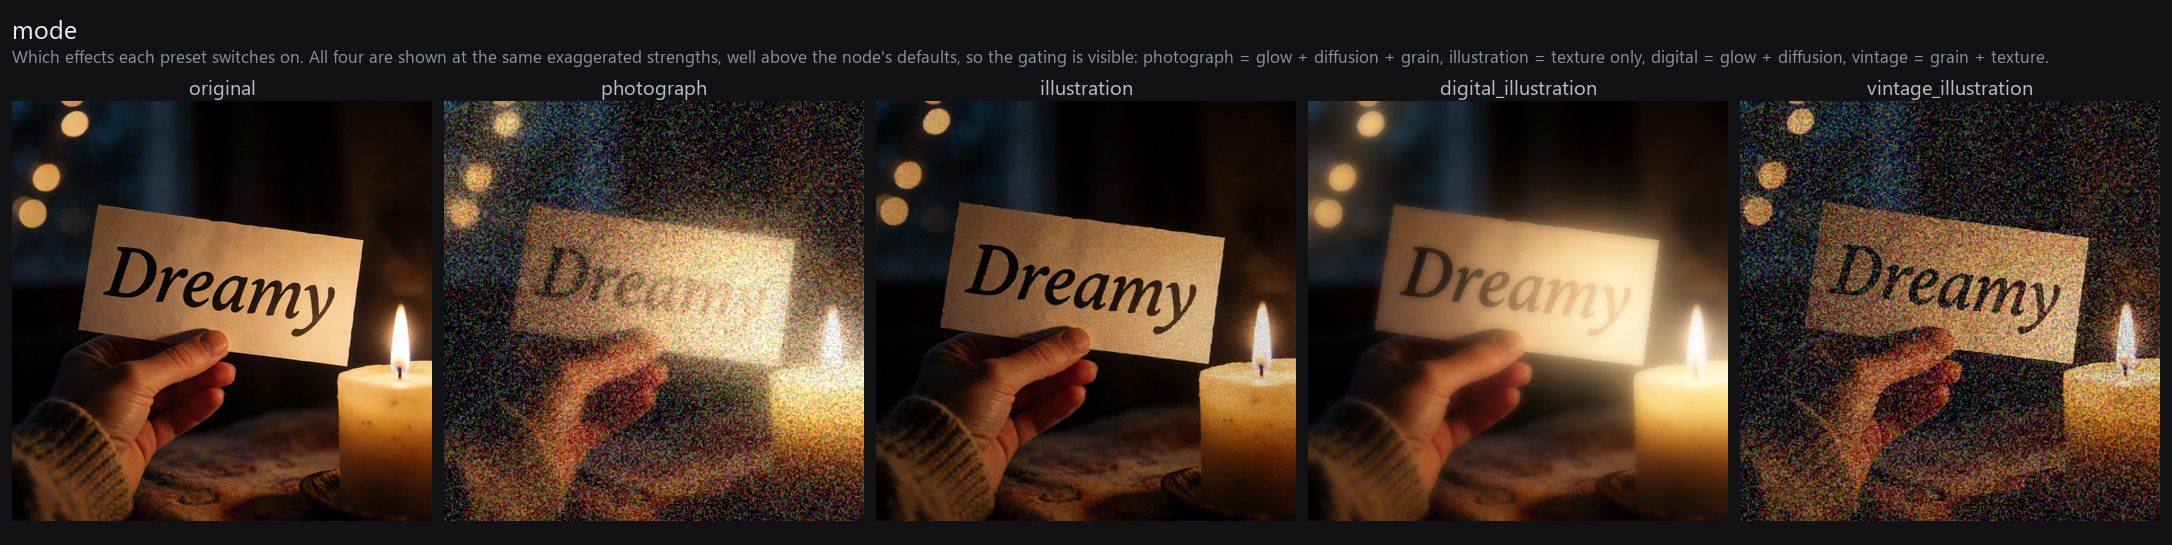
- Dreamy Look Advanced - glow, diffusion, haze, halation, grain, colour, textures and the four content-aware modes
- Dreamy Look (dreamcore) - the light streak controls
- Both bokeh nodes - blur, focus, bokeh shapes, bloom, chromatic aberration, cat's eye, f-stop and focal length
Regenerate any of them against your own image:
python docs/generate_docs_images.py your_image.png

Dreamy Look (dreamcore)
See docs/dreamy-look.md for the streak controls shown on a real image.
A post-processing node for the dreamy / ethereal look — soft glow, diffusion, haze, halation, rainbow light streaks, film grain and a warm pastel grade. Each effect is a toggle + strength; the defaults already produce the look.
| Effect | Controls | What it does |
|---|---|---|
| glow | strength, radius, threshold | Orton-style bloom: bright areas bleed into a soft halo. The heart of the look. |
| diffusion | strength | Pro-Mist softening — blends in a blurred copy. |
| haze | amount | Lifts the blacks toward a milky, faded tone. |
| halation | strength | Warm red/orange glow bleeding around highlights (film look). |
| streaks | strength, length, arms, angle, rainbow, threshold, smooth_threshold | Star/cross light streaks from bright points; rainbow spreads them into a prism dispersion. streak_length sets the actual visible length (fraction of the short side); streak_threshold controls how bright a point must be to streak. streak_smooth_threshold (default off): leaves the bold, coherent star-bursts exactly as they are, but changes how the threshold behaves — instead of every qualifying point streaking at full strength (so the slider only narrows which points qualify), raising the threshold now also dims the streaks, all the way to 1.0. Turn it on if you found the plain threshold too touchy and want a smooth "fewer streaks" dial without changing the look. |
| grain | strength, size, shadows, highs, color | Film grain (filmgrainer-style development curve). grain_shadows/grain_highs set how much grain lands in the dark/bright ends (mids are fixed); grain_color blends from mono to coloured grain. |
| grade | warmth, tint, saturation | Dreamy colour: warm/pastel push. |
| overall_strength | — | Blend the whole effect back toward the original. |
| seed | — | Grain randomisation. |
Usage: wire any image in, leave defaults for an instant dreamy pass, then turn on streaks + rainbow for the prism-light look. Stack it after the bokeh nodes for the full "subject in dreamy bokeh + glow" result.
Dreamy Look Advanced
See docs/dreamy-look-advanced.md for a picture of what every setting below actually does.
Content-aware finishing pass. In auto mode it detects the medium and picks
one of four treatments. The detector widget chooses how:
- siglip (default) — zero-shot SigLIP so400m (~1.6 GB, often already cached
by caption nodes; falls back to clip, then statistics, if it can't load).
Full image picks the class; when it reads as digital illustration, a second
pass inspects native-resolution crops for visible brushwork (fine strokes
vanish at model input size) and upgrades to
illustrationwhen the vote exceedspainterly_threshold— painterly art gets the paper treatment, clean "Niji"/2.5D/render styles stay digital. Calibrated on the owner's labeled dataset (2026-07-16, 62 images): threshold 0.65, accuracy ~94% (illustration votes ran 0.68–1.00, digital 0.02–0.60). The vote is printed in the info output — when a borderline image lands wrong, nudge the threshold past its printed vote. - clip — same pipeline on CLIP ViT-B/32 (~600 MB one-time download, ~300 MB resident, lightest option). Its brushwork vote is much less aligned with the owner's taste on AI art (use ~0.55 as the threshold).
Known limitation: soft-painterly images with no visible stroke texture (the
zijzo style) read as digital under every tested method; force mode for those.
- statistics — torch-only heuristics (midtone texture, edge hardness, saturation, noise, tonal fade, warm cast, palette size). Zero downloads, but much less reliable on stylized AI art.
| Detected / forced mode | Glow | Diffusion | Grain | Textures |
|---|---|---|---|---|
| photograph | on | on | on | — |
| illustration (drawing / traditional media) | — | — | — | all, + displacement |
| digital_illustration | on | on | — | — |
| vintage_illustration | — | — | on | all, + displacement |
Set mode to any of the four names to force that treatment, or to manual
to use the individual toggles (which also unlock haze and halation).
Textures: up to three optional image inputs (texture_1..3), each with its
own blend mode (multiply / overlay / soft_light / screen / hard_light /
linear_light / normal), opacity, scale (1 = stretch to fit, higher =
tiled that many times) and displace — the texture's luma is used as a
displacement map (in pixels) that physically warps the image, so paper fibers
and canvas weave push the "ink" around instead of just sitting on top. A slot
with opacity 0 but displace > 0 acts as a pure displacement map.
Textures are blended in slot order after the optical effects; grain lands on
top so it also sits on the paper. The second output (info) reports the
detected mode, per-class scores and the measured statistics — handy for
understanding (or overriding) a wrong guess. Detection runs on the first frame
of a batch.
Easy Bokeh (plug & play)
See docs/bokeh.md for a picture of what every setting below actually does.
The simplest path to "subject sharp, background bokeh". No lens math — blur is driven directly by depth distance from the focus.
| Control | What it does |
|---|---|
| image, depth_map | Your image + a depth map. |
| bokeh_shape | disk / polygon / anamorphic / star / heart / ring. |
| focus_x, focus_y | Point on the subject to focus (0–1, 0.5/0.5 = centre). |
| blur_amount | Overall background blur strength (0–1). |
| keep_in_focus | How much depth around the subject stays sharp (0–1). Raise it until the focus_preview green covers your whole subject. |
| subject_is_bright_in_depth | On if your subject is bright/white in the depth map (typical for Depth Anything / MiDaS). Turn off if focus lands on the background. |
Optional: keep_foreground_sharp (see below), focus_falloff (how fast blur
ramps away from the subject — 1.0 is linear, higher keeps more in focus),
focus_mask (focus on a masked subject instead of a point), toggle + strength for bloom (with a bloom_threshold
— how bright a highlight must be to bloom — and bloom_only_in_blur: when on,
bloom is applied only where there's blur, so the sharp in-focus subject doesn't
glow and only out-of-focus highlights bloom into bokeh balls),
chromatic_aberration and catseye, plus a quality (fast / balanced /
high) selector. Outputs image and focus_preview.
Cat's-eye note: it only reshapes large out-of-focus bokeh near the frame
edges (center bokeh stays round — that's how real optical vignetting works), so
you'll see it most with a high blur_amount and bright background highlights.
Why focus "just works": the artistic blur model measures each pixel's depth
distance from the focus and normalises it across the whole image, so the blur
gradient always spans the full range no matter how your depth map is scaled
(inspired by how LayerStyle's Film node handles depth). Because the focus plane is
read directly at your focus point, subject_is_bright_in_depth only affects
foreground-occlusion edges now — it can't put focus on the wrong plane.
keep_foreground_sharp — depth cap for "subject in front"
By default focus is a band: things both nearer and farther than the focus
point blur. If your subject is the closest thing (and the background is
behind it), a band fights you — widening it to keep a deep subject sharp also
grabs the background. Turn on keep_foreground_sharp to switch to a one-sided
depth cap: everything closer than the focus point stays sharp (the whole
foreground, however deep), and only what's farther blurs.
Put focus_x/focus_y on the farthest part of the subject you want sharp
(e.g. the face); the legs/hands/cat in front of it stay sharp automatically, and
the background behind blurs. (Caveat: it can't blur background that's at the exact
same distance as the subject — only focus_mask can separate same-distance
things.) Requires subject_is_bright_in_depth to be set correctly (so "near"
really is near).
Portrait mode (connect a focus_mask) — for tricky subjects
Depth-based focus picks a distance, so it can't isolate a subject that spans a
wide depth range (e.g. legs much closer than the face) or that shares a depth
with the background (e.g. a wall beside the subject). Widening keep_in_focus
just swallows the background too — depth alone can't tell subject from backdrop.
Connect a focus_mask (segment the subject — SAM / rembg / any mask node).
There are two ways the mask is used:
- Default (
mask_portrait_modeOFF): the mask just sets the focus depth (the subject's median depth); normal soft, depth-graded DOF runs from there. Natural transitions — best when the subject is at a reasonably distinct depth. mask_portrait_modeON: hard protect — the masked subject is forced perfectly sharp (whatever its depth range) and everything else blurs, graded by depth with a floor (mask_bg_blur_floor) so background sharing the subject's depth still blurs. Use this for the tricky wide-depth / overlapping cases; it's more of a cutout, so edges are harder.
mask_bg_blur_floor (portrait mode only, 0–1) is the minimum background blur:
raise it for more uniform background blur, lower it to let depth grade it more.
Recipe: drop it in, set focus_x/focus_y on the face, raise keep_in_focus
until the green preview covers the subject, set blur_amount to taste. That's it.
Advanced node
The physically-based version, with controllable aperture shape, f-stop, focal length and sensor size.
Node: Realistic Bokeh / Depth of Field (advanced).
What makes it look real
- Linear-light processing – blur sums light energy, not gamma-encoded values.
- Highlight bloom – fakes the HDR a clipped 0–1 image lost, so bright out-of-focus points form distinct bright bokeh balls instead of grey mush.
- Physical Circle of Confusion from focal length / f-stop / sensor size / focus distance – wider aperture & longer lens ⇒ shallower depth of field.
- Depth-layered occlusion compositing – a blurred foreground correctly bleeds over the in-focus subject.
- Shaped apertures:
disk,polygon(aperture blades),anamorphic(vertical oval),star,heart,ring(catadioptric / mirror-lens donut). - Optional chromatic fringing and cat's-eye optical vignetting.
Inputs
| Input | Notes |
|---|---|
| image | The image to blur (IMAGE). |
| depth_map | A depth map (IMAGE) — e.g. from Depth Anything / MiDaS / a ControlNet depth preprocessor. Resized to the image automatically. |
Outputs
image– the result.coc_map– grayscale preview of the blur amount (black = in focus).focus_preview– your image with the in-focus region tinted green, so you can instantly see what's sharp. Wire it to a Preview Image node.
Focusing (read this if the subject won't go sharp)
focus_depth is a raw value in the same (possibly inverted) space as your
depth map, so hitting the subject by hand means guessing its exact gray value
and getting depth_invert / depth_mode right. Instead, let the node read
the subject's depth for you via focus_mode:
point(default) – focuses on whatever is atfocus_x/focus_y(normalised 0–1, 0,0 = top-left). "Tap to focus." Invert-proof.mask– connect a subject mask to thefocus_maskinput; focuses on the median depth inside it. Best for keeping a segmented subject sharp. Invert-proof. (Pair with SAM / a segmentation node.)auto: nearest/auto: farthest– focus on the closest / furthest surface. Handy when the subject is clearly the nearest thing. These depend ondepth_invertbeing correct (they assume "near = low depth value").auto: center– focuses on the central region (subjects are usually centred). Invert-proof.manual– the oldfocus_depthslider.
The resolved focus depth + distance is printed to the console each run. Use the
focus_preview output to confirm the green tint covers your subject.
Depth of field width — focus_range (important!)
A real fast lens (e.g. 85mm f/1.4 up close) has a focal plane only millimetres deep, so only one slice of your subject is sharp and everything else — even the rest of the face — blurs. That's physically correct but rarely what you want.
focus_range0..1– a band of depth around the focus that stays fully sharp before blur ramps in. Raise it until thefocus_previewgreen covers your whole subject.0= pure razor-thin physics;~0.2–0.5keeps a subject sharp while the background still blurs. This is the knob to reach for when "the subject won't go sharp".focus_transition0..1– how soft the edge of that band is (the falloff from sharp to blurred). Larger = more gradual.
Other ways to widen depth of field: raise f_stop, shorten
focal_length_mm, or widen the near_distance_m/far_distance_m range.
Can I make a focus mask from the depth map?
You can (e.g. threshold the depth map to isolate the bright subject, then feed
it to focus_mask with focus_mode = mask) and it's a robust way to center
focus on the subject. But note a mask only sets where the focal plane sits —
it does not control how much depth stays sharp. For a "whole subject sharp,
background blurred" look the key control is focus_range above. Simplest
recipe: focus_mode = point on the subject + raise focus_range.
Key parameters
- bokeh_shape – aperture shape (see list above).
- focus_mode / focus_depth – see Focusing above.
- blur_model –
physical(real lens CoC from f-stop / mm / sensor / distance) orartistic(normalised depth-distance blur — the robust "just works" model the Easy node uses). focus_spread shapes the artistic falloff curve. - f_stop / focal_length_mm / sensor_width_mm – the physical lens. Lower f-stop and/or longer focal length = stronger blur / shallower DOF. (36mm sensor = full-frame; ~24mm = APS-C.)
- blur_scale – master multiplier on top of the physics, for taste.
- max_blur_px – hard cap on blur radius (bounds compute).
- quality_layers – number of depth slices (more = smoother depth falloff & occlusion, slower). 10–16 is a good range.
Depth handling
- depth_invert – enable when your depth map has the subject bright / background dark (the common case for Depth Anything, MiDaS, most depth preprocessors). If focus ends up on the wrong plane, toggle this.
- depth_mode –
inverse (disparity)matches monocular depth estimators (value ∝ 1/distance);lineartreats the map as linear distance. - near_distance_m / far_distance_m – metric range the depth map spans; affects how aggressively the physical CoC ramps.
Shape options
polygon: blades (sides), blade_curvature (0 = straight edges, 1 = round), shape_rotation.anamorphic: anamorphic_ratio (vertical stretch).star: star_points, star_depth (inner radius).ring: ring_thickness.- edge_weight:
>0brightens the rim (soap-bubble / nervous bokeh),<0brightens the center (smooth bokeh).
Realism extras (all optional)
- highlight_bloom / bloom_threshold / bloom_gain – the bokeh-ball glow.
Raise
bloom_gainfor brighter balls; lowerbloom_thresholdto bloom more of the image. - chromatic_aberration / ca_amount – color fringing on bokeh edges.
- catseye / catseye_strength / catseye_grid – optical vignetting: bokeh
squashes into lens shapes toward the frame edges. Note: uses spatially-
varying tiled convolution, so it is slower;
catseye_gridis the quality knob.
Typical setup
- Generate/Load an image.
- Get a depth map (e.g. Depth Anything V2 node) from that same image.
- Feed both into Realistic Bokeh / Depth of Field.
- Preview
coc_map, setfocus_depthon your subject, then pick a shape and dialf_stop/focal_length_mmfor the depth of field you want.
Performance
All math runs on the GPU (FFT convolutions). Cost scales with quality_layers
and max_blur_px; catseye multiplies cost by roughly the tile count. For fast
previews, drop quality_layers to ~6 and disable catseye.
Tests
python selftest.py– numerical checks (kernels, conv, CoC, full render).python visualtest.py– renders a synthetic night-lights scene to PNGs.
Built for torch ≥ 2.x. No extra dependencies beyond what ComfyUI ships.
Installation
Clone into your ComfyUI custom_nodes folder and restart:
cd ComfyUI/custom_nodes
git clone https://github.com/marcsole96/ComfyUI-RealisticBokeh.git
No extra runtime dependencies. Everything runs on the torch and numpy that ComfyUI already ships. Pillow is only needed if you want to regenerate the documentation images, and ComfyUI has that too.
The siglip and clip detectors in Dreamy Look Advanced download their model
on first use (roughly 1.6 GB and 600 MB). Pick the statistics detector, or
force a mode, if you would rather not download anything.
Licence
MIT, © 2026 Marc Solé.
A note on AI assistance
These nodes were written with the help of generative AI (Claude), and the
documentation set was too: the comparison images on this page and in
docs/ were produced by a script that drives the node directly, and that
script, the visual guide and this section were AI-assisted. The procedural
paper texture used in the texture examples is generated in code rather than
being a scanned asset.