
GenArchive
Links the generated image to the references
ComfyUI-GenArchive
Keep track of every generated image together with the reference images it was made from, review them in a fast fullscreen viewer, sort the failures into categories, and regenerate them with the exact same references — in one click per image instead of hunting for input files.
Typical use case: image-editing workflows with two or more reference images (e.g. a character + a location) running overnight in big batches (hundreds of results), where a certain percentage of generations always fails and has to be redone.
Also available in: Українська
🤖 Built with AI: all of the code in this project was written by Claude Sonnet 5.5 (Anthropic) — see Credits. · ☕ Support the project (USDT, BEP20)
Screenshots
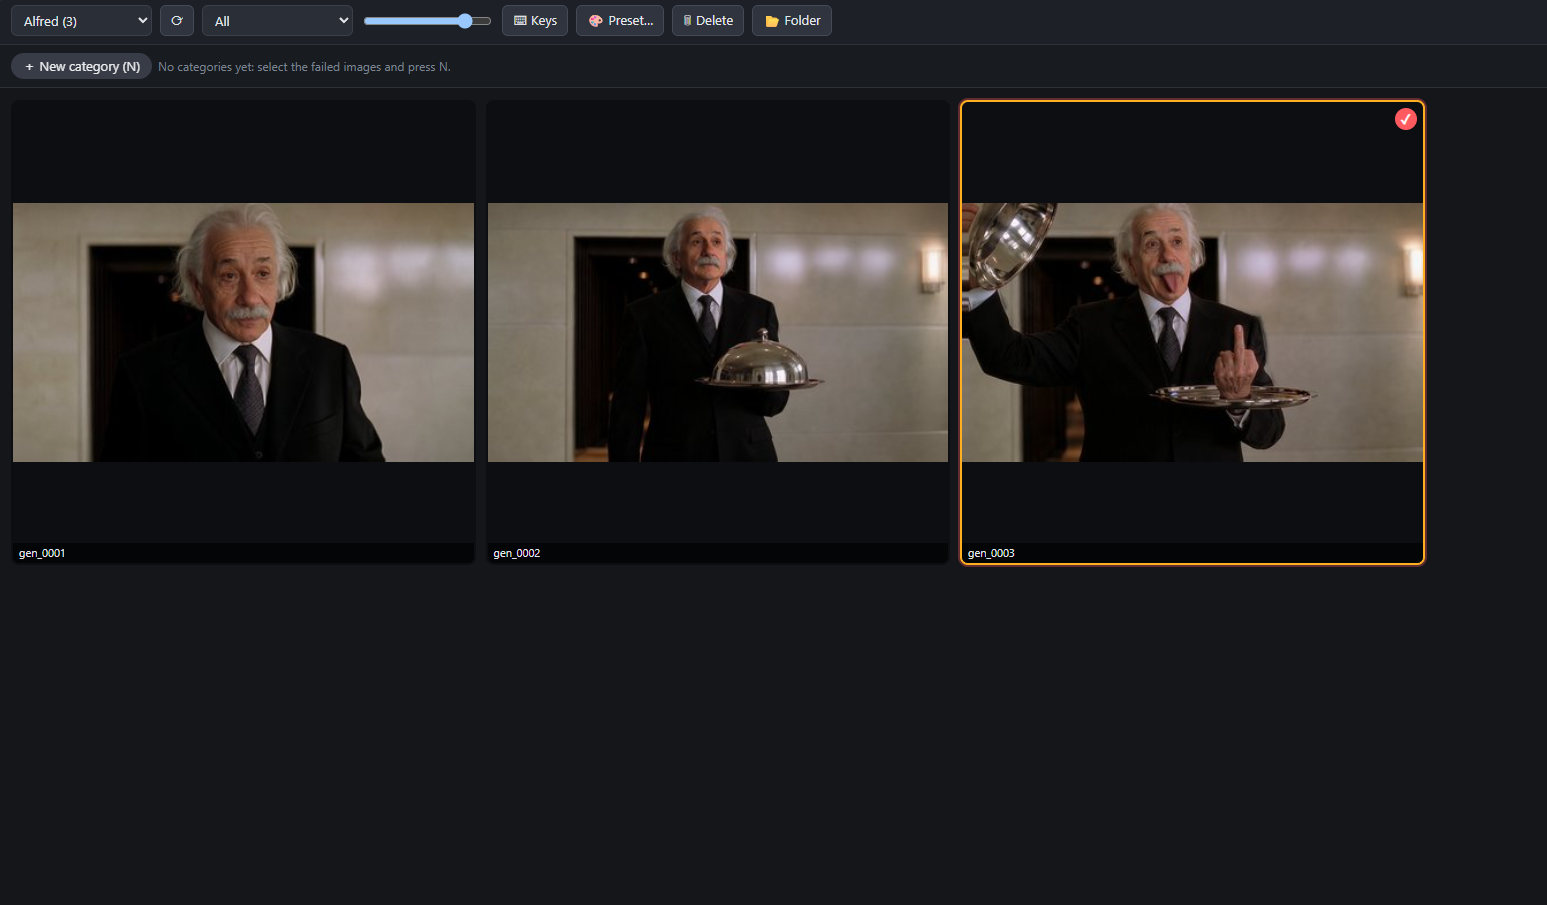
Viewer — every result of a session with its references behind it; select the failed ones with a click, sort them into categories, regenerate them with the same references.
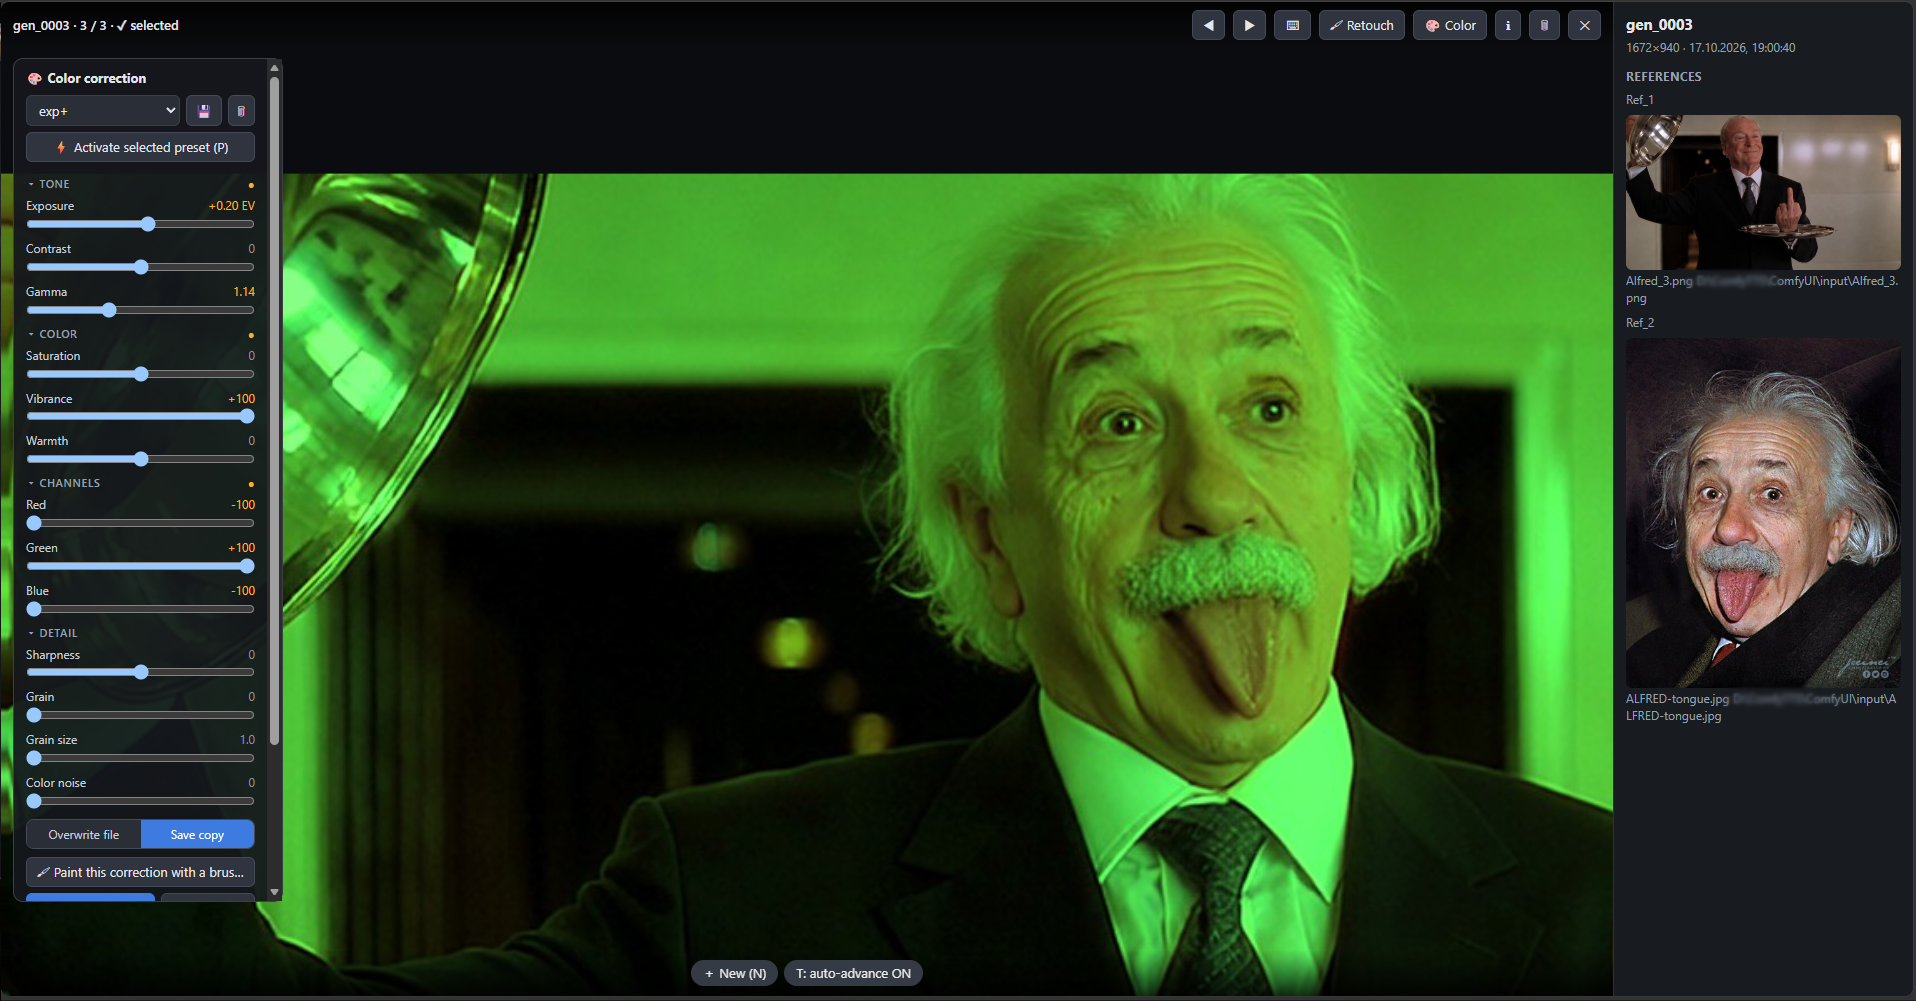
Color correction — sliders, presets, a color brush and per-image references in the info panel.
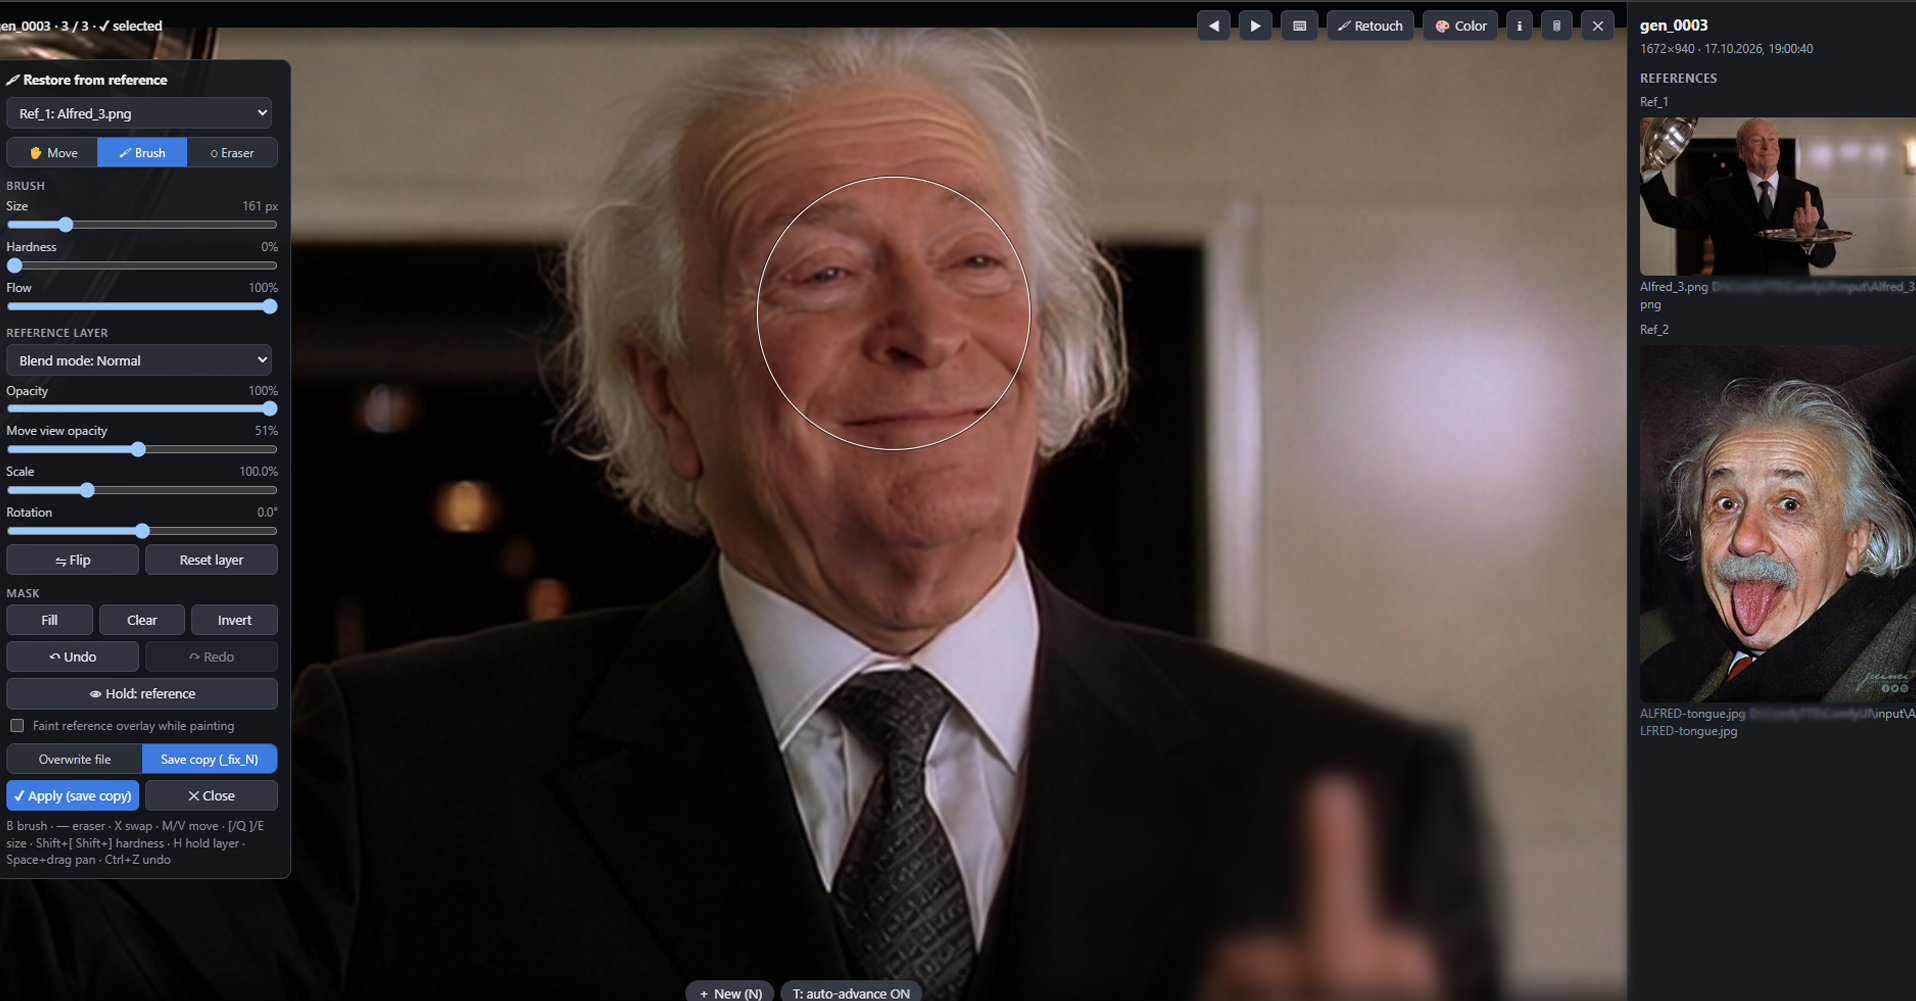
Retouch from a reference — bring a detail back from a reference (or another version) with a soft brush, blend modes and a movable layer.
Installation
Copy the ComfyUI-GenArchive folder into ComfyUI/custom_nodes/, restart ComfyUI and hard-refresh the page (Ctrl+F5). No extra Python packages are required. The nodes appear in the GenArchive category.
What is stored, and where
ComfyUI/output/GenArchive/<session name>/
Output/— generated results:gen_0007.png; regenerations:gen_0007_reg_1.png,gen_0007_reg_2.png; colour-corrected copies:gen_0007_color_1.pngand retouched copies:gen_0007_fix_1.png(they always sort right after the original)Ref_1/,Ref_2/… — copies of the reference images (each unique file is stored only once, even if it was used in 100 generations)registry.json— links "result → references" and the categories (registry.json.bakis an automatic backup)Categories/<category>/— only created if you use "Export" in a category's menu
When you are done you can simply delete the session folder.
1. Main workflow (generation)
Add the Generation Archive node:
| Input | Connect |
|---|---|
| images (result) | the generated images (e.g. VAE Decode output) |
| ref_1 … ref_4 | a branch from each reference loader (the loaders keep feeding your workflow as usual) |
| path_1 … path_4 (optional) | file_paths (CRT batch loader) or filename_text (WAS Load Image Batch) — lets the node record the exact file name/path |
| session | session name; change it to start a new session |
| regen_of (optional) | see "Regeneration" below |
| info (optional) | any text (seed, prompt…) shown in the viewer |
Without path_N, the node tries to find the source file from the loader's parameters; if that fails, it stores a copy of the image that came from the loader. The node also passes images through, so you can keep your own Save/Preview nodes.
2. Reviewing and sorting
Click 🖼 Open viewer on the node, or press Alt+G (press again to close).
- Click a thumbnail to select / deselect (Shift+click selects a range). Double-click or Enter opens it fullscreen.
- Arrow keys move the cursor, Space selects, Ctrl+A selects all, Esc clears the selection / closes.
- N — new category: type a name ("color", "anatomy"); the selected images are added to it.
- 1–9 — add the selection (or the current image) to the category with that number; press again to remove.
- Fullscreen: mouse wheel zooms, drag pans, Z / double-click toggles 100% / fit, ←/→ previous/next, ↑/↓ switch between the original and its regenerations (handy for comparing), I toggles the info panel (shows this image's references), T toggles auto-advance after adding to a category.
- Top bar: switch session, filter (all / no category / has regenerations / latest versions only / a single category), thumbnail size, 🗑 Delete, open the session folder.
- Delete (key or 🗑 button) permanently removes the selected image (or the current one in fullscreen) from the archive: the file leaves the
Output/folder, it is removed from all categories, and reference copies that no other image uses are cleaned up too. A confirmation is shown first. Typical use: you likegen_0007_reg_1, so deletegen_0007. - Right-click a category chip: show only this category, remove already-regenerated images from it, export copies to a folder, rename, delete (images are never deleted).
Color correction (fullscreen view)
Some models (especially upscalers) add too much contrast or gamma. Open an image fullscreen and click 🎨 Color (or press E) to expand a small panel; click again to collapse it.
- Sliders, in collapsible groups (a ● next to a group name means it has changes even when collapsed):
- Tone — Exposure (EV), Contrast, Gamma
- Color — Saturation, Vibrance (like Photoshop: boosts muted colors more than already-vivid ones and protects skin tones; negative values tone down vivid colors), Warmth
- Channels — Red, Green, Blue (per-channel gain; collapsed by default)
- Detail — Sharpness (negative = soften), Grain (film-like luminance grain, strongest in the midtones) with Grain size, Color noise (per-channel noise)
- Double-click a slider's name to reset it; Reset resets all. The grain pattern is fixed, so it doesn't flicker while you drag sliders.
- Presets: use the list at the top of the panel to load a preset, 💾 to save the current sliders under a name (saving under an existing name overwrites it after confirmation), 🗑 to delete the selected one. Presets are stored in
output/GenArchive/presets.jsonand shared by all sessions. - Applying a preset to many images: in the grid, select images and click 🎨 Preset… (or press P), pick a preset and choose Overwrite files or Save copies. With nothing selected, the image under the cursor is used.
- Fast workflow for a whole batch (fullscreen): pick a preset in the list — it stays selected for all images but is inactive. Press the ⚡ Activate selected preset button (or P); it turns green and the preset is shown on the current image as a live preview. S (same as ✔ Apply) saves it, then → for the next image: the button has switched itself off, so press P and S again — two keys per image. Tick Go to the next image after Apply and the viewer moves on by itself after S. Click the green button / press P again to switch it off.
- Keep the preset active on other images (checkbox, off by default): the green button then stays on when you change image and the preset is pre-applied to every image you open, so one S per image is enough. Images that were already edited (and copies) are never pre-applied a second time: for them the button turns amber (skipped here), the settings stay neutral, and a click on the button applies the preset on that image on request. Tweaking sliders on one image only affects that image; the next image's preview is rendered in the background. The on state is not remembered after closing the viewer (the selected preset is).
- The preview updates live and is rendered by the same code that does the final save, so what you see is what you get. Hold 👁 Hold: original to compare. Zoom and pan stay in place while you adjust (zoom to 100% to judge sharpness at full resolution).
- Choose what ✔ Apply does:
- Overwrite file — changes the image file itself. The very first original is kept as a backup, so ↩ Revert file can always restore it. Edited images get an "✎ edited" badge.
- Save copy — keeps the original and saves a new image next to it, named
<name>_color_N(e.g.gen_0007_color_1,gen_0007_reg_1_color_1). It appears right after the original in the viewer.
- PNG metadata (the ComfyUI prompt/workflow) is preserved. Unapplied changes are discarded when you navigate to another image or collapse the panel.
Color brush: apply a correction only where you paint it (fullscreen view)
Set the color sliders (or activate a preset), then click 🖌 Paint this correction with a brush in the Color panel (or press B). The image returns to its original colors, the sliders stay as they are, and the correction is applied only where you paint with the brush:
- Size, Hardness and Intensity control the brush (the same memory as the retouch brush). Intensity below 100% builds the effect up gradually: paint over the same spot again to make it stronger.
- The sliders stay live: change them at any time and the painted areas update. Hold: original (in the Color panel) and H (hold: the full correction) help you judge the result.
- X swaps brush ↔ eraser, E eraser,
[]size,Shift+[ ]hardness, Ctrl+Z / Ctrl+Shift+Z undo / redo, Fill / Clear / Invert for the mask. - S or ✔ Apply: the server applies the correction to the full-resolution image through your soft mask (partially painted = partially corrected). Overwrite file (with Revert) or Save copy
<name>_color_N. B / R / Esc leaves the brush mode; your slider values are kept.
Keyboard shortcuts (⌨)
Click ⌨ Keys (top bar of the grid, or the ⌨ button in the fullscreen view) to customize every shortcut. The list is grouped into Image grid, Fullscreen view and Retouch / color brush editor. Click a key to change it and press the new one (Esc cancels), × removes a key, + adds another key to the same action (e.g. both → and D for "next image"). If the key is already used in the same group you are asked whether to move it. Reset all to defaults restores the built-in keys. Notes: shortcuts are saved in your browser, they are matched by the physical key (so they work in any keyboard layout), a key only has to be unique inside its own group, and digits 1–9 (categories), Esc and Alt+G are fixed. The hint lines in the viewer follow your bindings; the tooltips on buttons mention the default keys.
Retouch: restore details from a reference (fullscreen view)
A generation is good, but the model repainted some detail (usually in the background)? Bring it back from a reference. Open the image fullscreen and click 🖌 Retouch (or press R).
- Layer source (list at the top): any reference of this image (
Ref_1,Ref_2…) or another version of the same image (original,reg_N,color_N… — handy for taking a detail back from the original into a regeneration). - ✋ Move — line the layer up. It is shown semi-transparent over the image; Move view opacity sets how transparent. Drag with the mouse, Ctrl+wheel scales around the pointer, arrow keys nudge by 1 px (Shift = 10 px). Sliders Scale (100% = fitted to cover the image, so different proportions are fine) and Rotation, plus Flip and Reset layer.
- 🖌 Brush / ◌ Eraser — the layer starts hidden; the brush brings the reference back where you paint, the eraser hides it again. Size, Hardness and Flow are adjustable; the last values are remembered between images and sessions. X swaps brush ↔ eraser, B brush, E eraser, M move,
[/]change the size,Shift+[/Shift+]the hardness, H (hold) shows the whole reference layer, Space+drag pans, Ctrl+Z / Ctrl+Shift+Z undo / redo. Mask: Fill, Clear, Invert. - Blend mode like in Photoshop (Normal, Multiply, Screen, Overlay, Soft light, Hard light, Darken, Lighten, Difference, Color, Luminosity) and layer Opacity. Faint reference overlay while painting is optional (off by default).
- ✔ Apply (or S): the picture is composed at full resolution. Overwrite file changes the image (the very first original is kept, ↩ Revert file restores it) or Save copy writes
<name>_fix_N(e.g.gen_0007_fix_1) right after the original. PNG metadata is preserved. R / Esc closes the editor (asks before discarding unsaved painting). - All hotkeys work by physical key, so they also work with a Ukrainian/Russian keyboard layout.
3. Regeneration
Add one Archive Container node (it works for all categories):
- Pick
sessionandcategory(the ▼ Choose… buttons list what exists). indexincrements after every run — queue as many runs as there are images in the category (thecountoutput tells you how many).- Outputs:
ref_1 … ref_4(the references of that exact image),original_result(the failed image),regen_id,ref_info,count. - Use
ref_1,ref_2in your workflow instead of the loaders. - Pass the new results through a Generation Archive node. If the Archive Container feeds your workflow (its
ref_N/original_resultoutputs are used anywhere upstream of the images), the node detects the regeneration automatically, no extra wire needed. The image is saved asgen_0007_reg_1(next timegen_0007_reg_2, always numbered from the first original), in the container's session, and inherits the original's references.regen_id→regen_ofis optional and only needed to override the detection (for example if the container'sindexinput is converted to a linked input).
You can copy the container into other workflows — it works by session and category name.
Notes and limitations
- With
regen_ofconnected, references are inherited from the original. To regenerate with different references, don't connectregen_of. - Deleting session files manually breaks the links for that session only.
- The archive keeps full copies of results and references; delete old sessions when you no longer need them.
Security notes
A workflow is code you run, so the node is deliberately careful about which files it touches:
- The optional
path_1 … path_4inputs are only hints for the original file of a reference. A path is used only if it is a real image file (verified, not just by extension) that lies inside ComfyUI'sinput/output/tempfolders, or inside a folder that you have trusted (see below). Folders merely set on a loader node inside a workflow are not trusted, because a workflow must not decide what the node may read. Otherwise it is ignored and the image that arrived through theref_Npin is stored instead. Paths with.., and symlinks that point outside the allowed folders, are rejected. A workflow can therefore not make the node copy keys, configs or other non-image files into the archive. - Using the original files from your own folders (for example a folder of locations that is not inside ComfyUI): list them in the environment variable
GENARCHIVE_TRUSTED_FOLDERSbefore starting ComfyUI — separate several folders with;on Windows (:on Linux/macOS). In a Windows launch.batthat looks likeset GENARCHIVE_TRUSTED_FOLDERS=D:\Locations;D:\Characters. Without it the node still works: it stores a copy of the image that came through the loader (for a loader that resizes images this is the resized copy) and prints a one-time hint in the console. - The viewer's web routes only serve and modify files inside
output/GenArchive/<session>/; file names read fromregistry.jsonmust stay inside that folder too.
Credits
All of the code in this repository — the Python nodes, the server routes, the browser UI and the documentation — was written by Claude Sonnet 5.5, Anthropic's AI assistant, in a long conversation with the project's author. The author had the idea, directed the design and tested the features in real ComfyUI workflows; Claude wrote the implementation and ran its own automated tests in a simulated environment (not inside a real ComfyUI), so bug reports are very welcome.
Support the project
If this saved you time and you would like to say thanks, you can send a few USDT:
USDT — BEP20 (BNB Smart Chain): 0x5312f341f0761bccd60f5055e7d00f993313abde
Send only USDT on the BNB Smart Chain (BEP20) network to this address — funds sent on other networks may be lost. Donations are voluntary and the node is free to use either way.