
ComfyUI VRM Pose Editor 3D
Interactive 3D pose editor inside ComfyUI. Load VRM/GLB/GLTF models, drag bones to pose, control shape keys/expressions, and capture as IMAGE. All Three.js dependencies are bundled locally (no CDN required).
Nodes (2)
3D Pose Editor — ComfyUI Custom Node



An interactive 3D pose editor node for ComfyUI.
Load VRM / GLB / GLTF models directly in the browser, drag bones to pose them, animate poses/camera/lights on a keyframe timeline, and output the result to your workflow.
You can also copy a pose from an image onto a VRM (SAM 3D Body via ComfyUI's native nodes) and let VRM models blink automatically.
ComfyUI 上で動作するインタラクティブな 3D ポーズエディタノードです。
VRM・GLB・GLTF モデルをブラウザから直接読み込み、ボーンをドラッグ操作してポーズを付け、キーフレームタイムラインでポーズ・カメラ・ライトをアニメーションさせ、そのままワークフローに出力できます。
画像の人物のポーズを VRM に写したり(ComfyUI ネイティブの SAM 3D Body を使用)、VRM を自動で瞬きさせたりすることもできます。
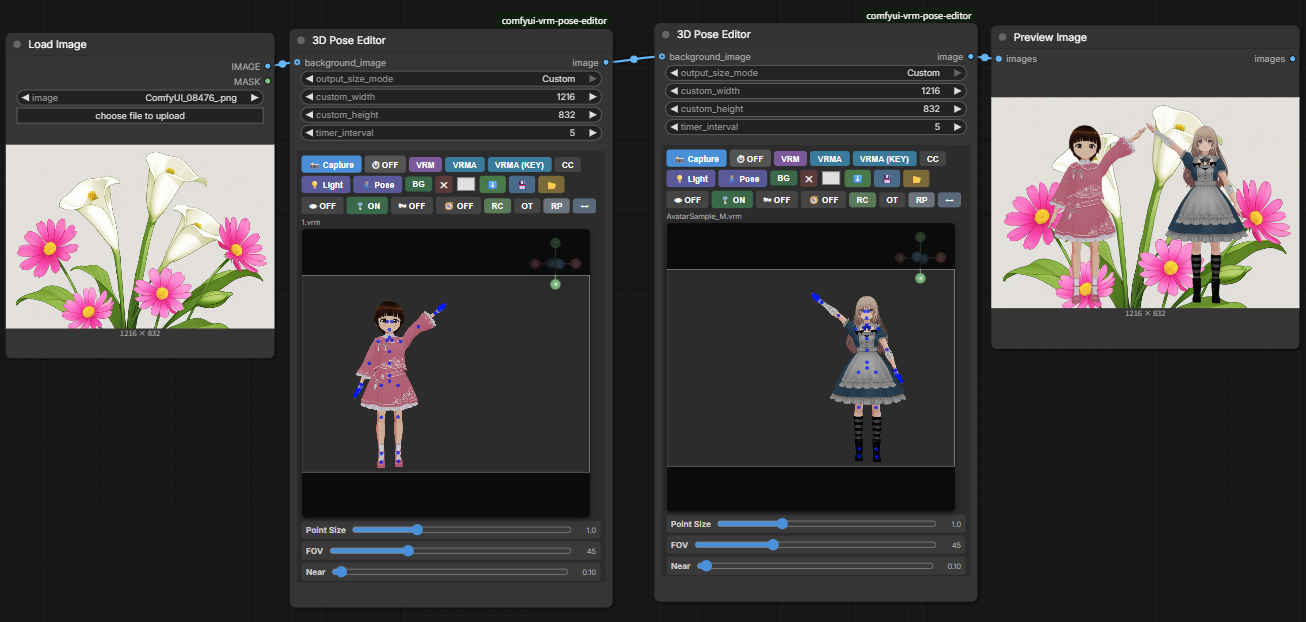
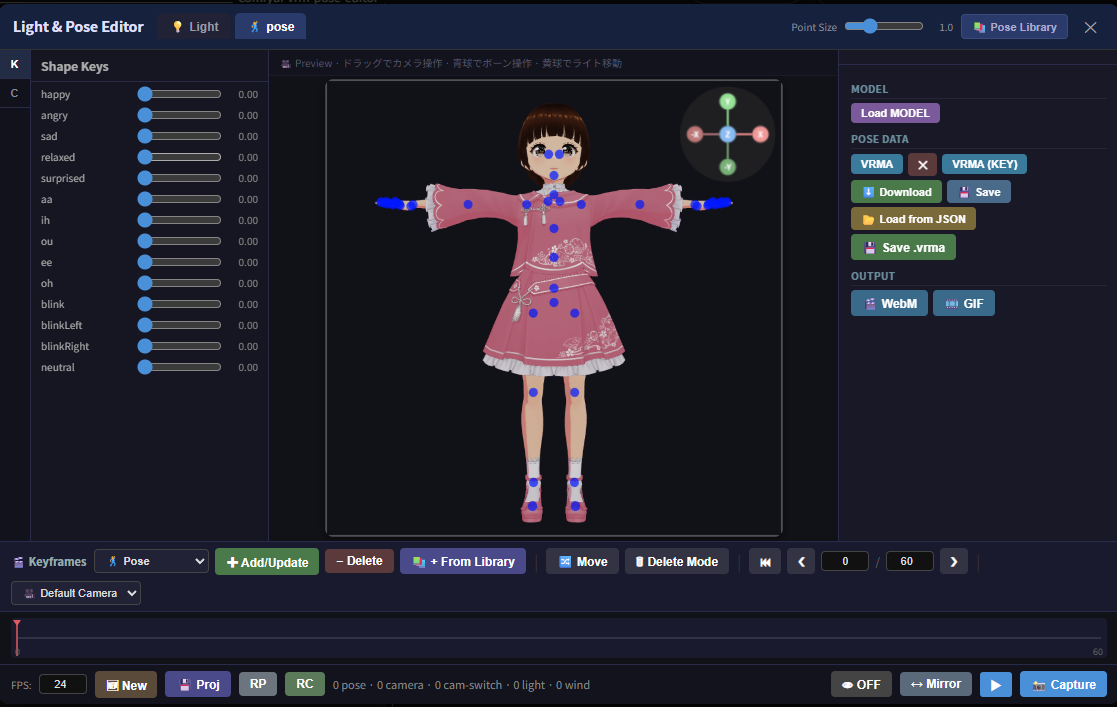
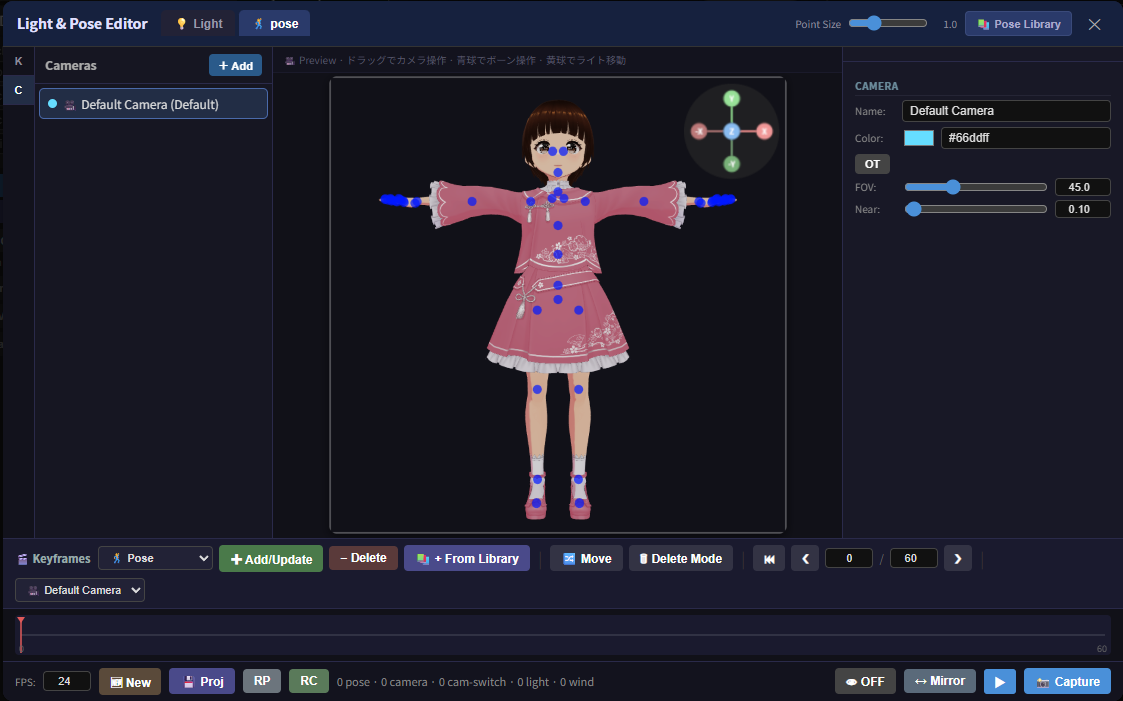
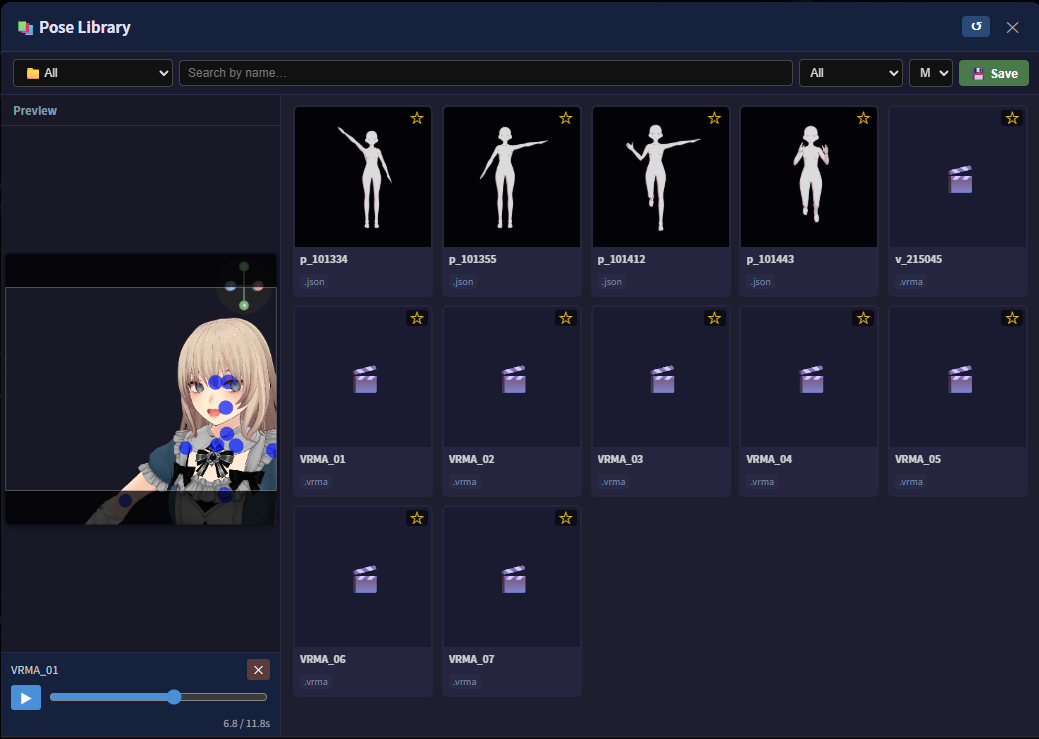

English
Features / Buttons
Row 1 (capture / timer / model)
| Button | Function |
|--------|----------|
| 📸 Capture | Send current pose as PNG to node output |
| ⏱ | Timer capture toggle — auto-captures every timer_interval seconds |
| VRM | Load VRM / GLB / GLTF file from local disk |
| VRMA | Load a .vrma animation and play it back on the current VRM (see VRMA Animation Playback below) |
| VRMA (KEY) | Load a .vrma file and sample it into pose keyframes on the Light & Pose Editor's timeline instead of playing it back as a clip (see Keyframe Timeline below). Opens the editor on its Pose tab automatically if it isn't already open |
| CC | Color correction ON/OFF (sRGB + ACES Filmic) |
Row 2 (Light & Pose Editor / background / pose file)
| Button | Function |
|--------|----------|
| Light | Open the Light & Pose Editor on its Light tab (see below) |
| Pose | Open the Light & Pose Editor on its Pose tab (see below) |
| BG | Load background image from local disk |
| ✕ | Clear background image and background color |
| 🎨 | Scene background color picker |
| ⬇️ | Download current pose as JSON file |
| ⬇️VP | Download current pose as a VRoid Studio .vroidpose file (VRM only) |
| 💾 | Save current pose to poses/ folder |
| 📂 | Load pose file (.json / .vroidpose) |
Row 3 (look-at / spring bone / camera / pose)
| Button | Function | |--------|----------| | 👁 | Toggle LookAt target — when ON, drag the cyan marker in the 3D view to steer the eyes/head (no effect if the model has no LookAt data). The target can also be switched to the active camera instead of the marker, and LookAt keyframes can be recorded on the 👀 Eyes track — see LookAt Target below | | 🎐 | Toggle spring bone physics (hair, skirts, etc.) — turning OFF freezes the current sway state | | 🌬 | Toggle a breeze wind effect on the spring bones (hair, skirts, etc.) — strength / direction / gustiness are adjusted in the Light & Pose Editor; has no effect while 🎐 is OFF | | 🧭 | Toggle the wind source marker — when ON, drag the orange cone in the 3D view to set the wind direction (same operation as the LookAt marker); while ON, the "direction" slider in the Light & Pose Editor is disabled | | RC | Reset camera | | OT / PR | Toggle Orthographic / Perspective camera | | RP | Reset pose — also available inside the Light & Pose Editor's keyframe panel | | ↔ | Mirror pose (flip left ↔ right) |
Row 4 (file name)
Displays the name of the currently loaded VRM / GLB / GLTF file.
LookAt Target (👁)
When enabled, the model's eyes/head automatically track a target — either a draggable cyan marker in the 3D view, or the currently active camera, switched with the 🎯 Marker / 🎥 Camera toggle at the bottom of the Light & Pose Editor (next to 👁). In Marker mode, drag the marker to steer the gaze; the marker itself is never captured in the output image. In Camera mode, the gaze follows whichever camera is currently active every frame — while 🖥 Monitor is on, it keeps looking at whichever camera was active right before Monitor was turned on instead of the free-roaming Monitor view itself (dragging that camera's helper icon moves the gaze too, just like dragging the marker). ON/OFF, target mode, and marker position can all be recorded as keyframes on their own 👀 Eyes track — see Keyframe Timeline below. Resetting/loading a pose or mirroring re-anchors spring bones so nothing jumps unexpectedly.
Spring Bone Physics (🎐)
Toggles the sway-bone simulation (hair, skirts, etc.) defined on the VRM. Turning it OFF freezes the sway at its current state instead of resetting to rest pose. On Reset Pose / Load Pose / Mirror, the spring bone internal state is re-anchored to the new pose so it doesn't snap unnaturally right after the switch.
Wind Effect (🌬) and Wind Source Marker (🧭)
Adds a gentle breeze to the spring bones (hair, skirts, etc.) on top of the model's own gravity, using a sum of sine waves so the strength and direction gently drift over time instead of blowing in one fixed direction. Since three-vrm has no built-in wind API, this is implemented by overwriting each spring bone joint's gravityDir/gravityPower every frame with "the model's original gravity vector + the current wind vector" (the vendor three-vrm module itself is never modified). Has no effect while 🎐 Spring Bone Physics is OFF (the joint physics loop itself is paused).
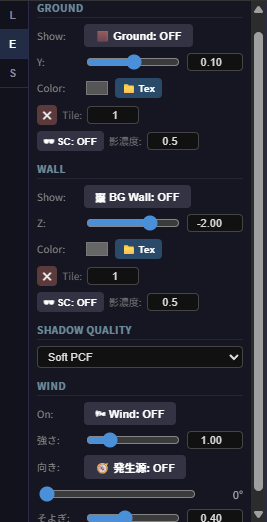
- 🌬 Wind: master ON/OFF toggle. Strength, direction, and gustiness are adjusted with the sliders in the Light & Pose Editor's Light tab → E (Environment) sub-tab, "Wind" section.
- 🧭 Wind Source Marker: when ON, an orange cone marker appears in the 3D view, using the exact same drag mechanism as the 👁 LookAt marker. The wind direction is computed as the direction from the marker toward a fixed reference point near the model, so you can steer the wind (including vertical components) just by dragging the cone. While ON, the "direction" slider in the Light & Pose Editor is disabled since the marker takes over. The marker is never captured in the output image.
Light & Pose Editor (💡 / 🕺)
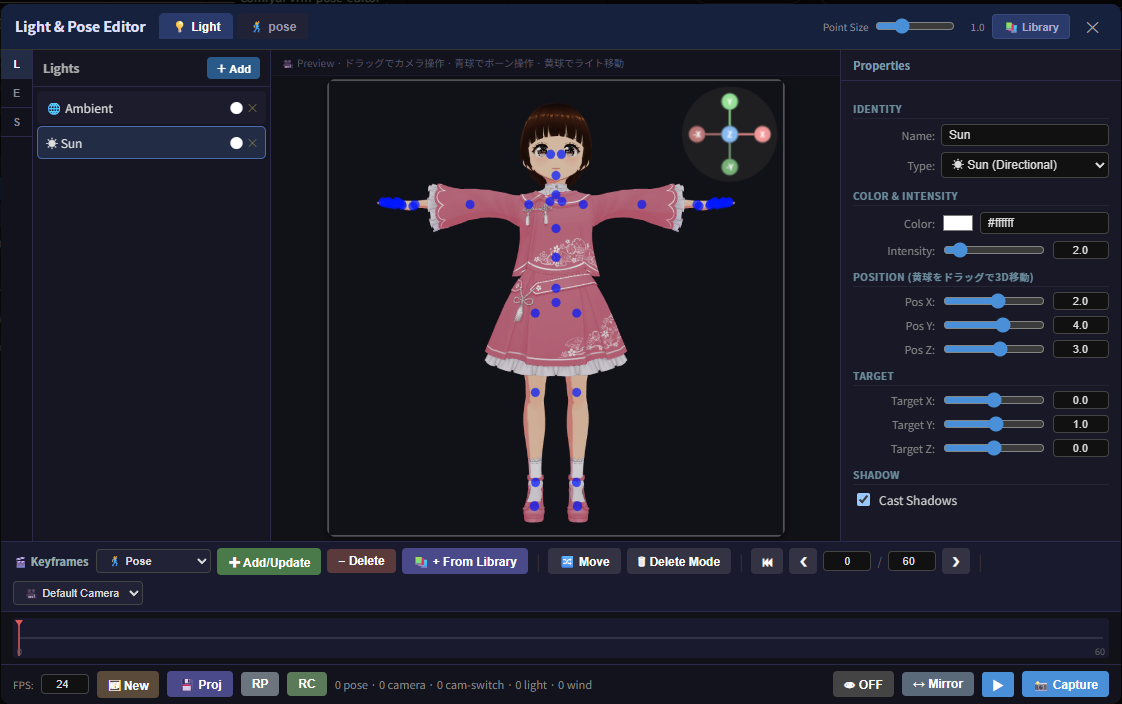
A single modal that combines what used to be three separate windows (Light Editor, Pose Library launcher, VRMA Timeline Editor) into one, so switching between lighting work and pose/animation work no longer means jumping between differently-shaped dialogs.
- Click Light or Pose on the node to open it directly on the corresponding tab.
- The header holds the 💡 Light / 🕺 pose / 🖼 Image tab switcher (the Image tab is described in Image tab below), a Point Size slider (same control as the node's own Point Size slider below the canvas — moving either one updates the bone-handle marker size; the node's slider is re-synced when the modal closes), and a 📚 Library button whose role depends on the active tab (see below).
- The center pane embeds the actual WebGL canvas (not a copy), scaled to fit — bone dragging, camera orbit, and light-helper dragging all work natively inside the modal exactly as on the node.
- A keyframe timeline panel is docked at the bottom and shared by all tabs — see Keyframe Timeline below.
Light tab
The left pane has three sub-tabs:
| Sub-tab | Contents |
|---------|----------|
| L — Lights | The light list (add/remove/rename lights) and, on the right, a Properties panel for the selected light: type (☀ Sun / 💡 Point / 🔦 Spot / ▭ Box RectArea / 🌐 Ambient), color, intensity, position XYZ, target XYZ (Directional/Spot), angle & penumbra (Spot), distance & decay (Point/Spot), shadow (Directional only) |
| E — Environment | Ground plane, background wall, shadow quality, and the 🌬 Wind controls described above |
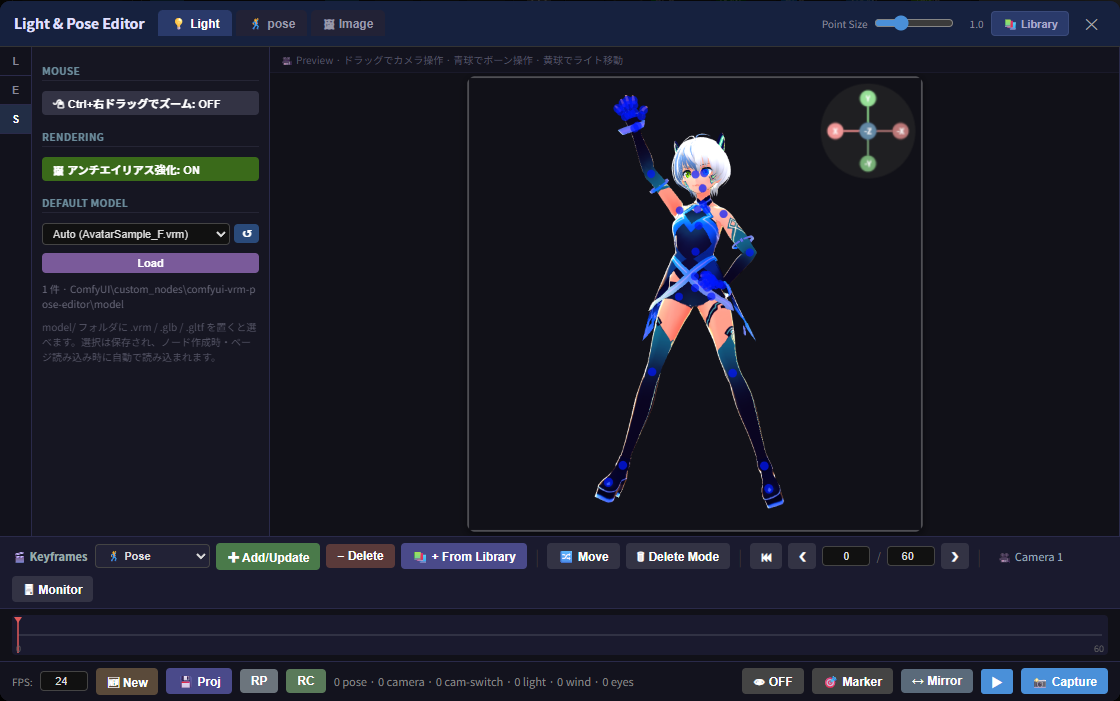
| S — Settings | 🖱 Ctrl+Right-drag zoom toggle (see Camera Controls), 🖼 anti-aliasing enhancement (supersampling) toggle, and Default Model (which model in model/ loads automatically — see Default Model) |
On the L sub-tab, 📚 Library toggles a light-preset library panel — see Light Library below. Drag the yellow sphere in the preview to reposition a light in 3D.
Pose tab
The left pane has four sub-tabs:
| Sub-tab | Contents |
|---------|----------|
| K — Shape Keys | Sliders (0.0 – 1.0) for every morph/expression on the model, updated in real time. This replaces the old collapsible "Shape Keys" panel that used to live at the bottom of the node. For VRMs with a blink expression, the list starts with 😑 Auto Blink (ON/OFF + interval) — see Blink track. Below the list is the collapsed 👄 Lip Sync block — see Lip Sync. |
| C — Camera | The camera list (add / select / delete / rename / recolor) — see Camera Management below |
| A — Audio | Audio files made from text for Lip Sync: pick, preview, and delete them — see Audio files and API settings |
| S — API settings | The speech engine (Lemonade or VOICEVOX) with its connection settings and a connection test, plus the mouth-level sliders — see the same section |
The right pane (kept at the same width as the Light tab's Properties panel so the dialog doesn't change size when you flip between tabs or sub-tabs; no "Properties" heading is shown, unlike the Light tab) shows different content depending on which left sub-tab is active:
- K sub-tab:
- Model — Load MODEL, a duplicate of the node's own model loader.
- Pose Data — grouped into three blocks: Load — VRMA, ✕ (unload the currently loaded VRMA), VRMA (KEY) (load a
.vrmaas pose keyframes instead of a clip), 📂 Load from JSON; Save (poses/) — 💾 Save and 💾 Save .vrma (moved here from the keyframe panel below, since that panel was getting crowded — see Keyframe Timeline); Download — ⬇️ Download (pose.json) and ⬇️ .vroidpose. - Output — 🎬 WebM, 🎥 MP4, and 🎞️ GIF, also moved here from the keyframe panel for the same reason.
- Save to ComfyUI output (checkbox): when on, the file is saved to ComfyUI's
output/vrm_pose_editor/(aspose_YYYYmmdd_HHMMSS.<ext>) instead of being downloaded. The saved path is shown under the checkbox. The setting is remembered (ComfyUI user data).
- Save to ComfyUI output (checkbox): when on, the file is saved to ComfyUI's
- C sub-tab: Camera properties for whichever camera is selected in the list — Name, Color, an OT/PR toggle, and FOV/Near sliders. These read/write the shared
editorstate for the currently active camera (same as the node's own OT/RC/FOV/Near controls), so either side stays in sync once the modal is closed or you switch tabs/cameras. (The Look at Target toggle used to live here too — it's been moved to the keyframe panel below, since it's a model-wide setting rather than a per-camera one.)
VRM/VRMA loading and unloading are routed through the same nodeActions bridge the node uses internally, so the node's own buttons/labels stay in sync too.
📚 Library opens the Pose Library instead of a preset panel.
Lip Sync
Turns text into mouth movement on the VRM's vowel shapes (aa / ih / ou / ee / oh; the VRM 0.x presets a / i / u / e / o are mapped automatically). Japanese (kana) and English are supported. Kanji have no reading, so each one is treated as an open-mouth unit — write Japanese in kana for accurate timing. Timing is estimated from the characters, not from phoneme alignment, so the sync is approximate.
- Type into the Lip Sync box at the bottom of the K list. The block is collapsed by default; click its header to open it. Closing the modal also copies the text into the node's
lip_textoutput. - ▶ Text: moves the mouth for the text without any audio.
- 🔊 Create audio from text: generates an audio file with the engine chosen in the S tab (Lemonade or VOICEVOX — see Audio files and API settings) and selects it.
- 🎵 Play selected audio: plays the selected file while the mouth follows its loudness.
- ■ Stop: returns the mouth to the values it had before. Manual shape-key values are kept.
- Keyframe T/A (checkbox): chooses what the Lip track records when you add a keyframe. OFF = T (the text in the box), ON = A (the selected audio; its loudness drives how far the mouth opens). The setting is kept while the modal is open.
- Mouth level (S tab): the text playback opens the mouth by a fixed amount (0–1), and the audio playback multiplies the loudness by a gain (0–3, capped at 1 after scaling). Adjust them separately if one looks too big or too small. The values are saved in the browser (
localStorage) and also apply to the Lip track.
Lip Sync only moves the mouth during playback; the exported .vrma is unchanged. To put speech on the timeline, use the Lip track.
Audio files and API settings (A · S)
Audio made from text is saved under ComfyUI's output folder: output/vrm_pose_editor/Audio/tts_YYYYmmdd_HHMMSS_<voice>.mp3 (Lemonade) or ..._vv<speaker id>.wav (VOICEVOX).
-
A — Audio: the toolbar at the top applies to the rows you tick.
- ✓ Select sets the Lip Sync audio. It needs exactly one ticked row.
- ▶ Play previews the file. It also needs exactly one ticked row.
- 🗑 Delete removes every ticked file, after a confirmation.
- Select all ticks or clears all rows.
Select and Play are greyed out unless exactly one row is ticked. Choosing a file clears the ticks, and the chosen file is highlighted.
-
S — API settings: pick the engine (Lemonade or VOICEVOX); only the selected engine is used. For Lemonade: the Base URL, Model (
kokoro-v1), and default Voice (a dropdown). Japanese voices:jf_alpha,jf_gongitsune,jf_nezumi,jf_tebukuro,jm_kumo. English voices:af_heart,af_bella,bf_emma. For VOICEVOX: the Base URL (defaulthttp://127.0.0.1:50021) and a speaker dropdown filled from the engine (Update speakers reloads it). Settings are saved tooutput/vrm_pose_editor/api_settings.json. Test connection calls Lemonade's/api/v1/healthor VOICEVOX's/version, depending on the engine. The same tab also has the mouth-level sliders described under Lip Sync.
Lemonade must be running on this PC with the kokoro-v1 model downloaded. Only localhost and loopback addresses (127.0.0.1, ::1) are accepted, so the server never calls other hosts. Lemonade and VOICEVOX are both optional: text-only Lip Sync works without them.
VOICEVOX (VOICEVOX, speech synthesis software) must be installed and running on this PC; the editor talks to its engine API (/audio_query → /synthesis). It is not bundled with this repository.
VOICEVOX license notice
- VOICEVOX is a separate product with its own terms: https://voicevox.hiroshiba.jp/term/. Read them before using the generated audio. This repository's MIT License does not cover VOICEVOX or its voices.
- According to the software terms, use is allowed commercially and non-commercially, but a credit that shows VOICEVOX was used is required, and you must follow the terms of each voice library (character) you use. Those terms differ by character, so check the one for your speaker.
- Redistributing VOICEVOX itself, and reverse engineering it, are prohibited. Do not bundle it with your own distribution.
- Audio created here is saved as
.wav; when you publish a video or other work made with it, add the credit yourself (the editor does not add it).- This is a summary, not legal advice. The terms on the official page above take precedence and may change.
Camera Management
The C sub-tab manages multiple cameras, the same way the Light tab's L sub-tab manages multiple lights — but with one key difference: only one camera (or the 🖥 Monitor free-view, see below) is ever "live" at a time.
- The scene starts with one camera (named Camera 1) plus any number of extra cameras added with + Add (named Camera 2, Camera 3, ... in the order they were created — the number never gets reused, even if you delete an earlier camera and add a new one). Every camera is equal — none of them is special or protected, and any camera (including Camera 1) can be deleted with its ✕ button. Deleting the last remaining camera drops you into 🖥 Monitor mode automatically (see below).
- Clicking a camera in the list makes it the active camera immediately: the preview jumps to that camera's saved viewpoint, and from then on normal mouse-drag camera controls (orbit / pan / zoom / Alt+Right-drag roll — see Camera Controls) move that camera. Switching away and back preserves its position, orientation, FOV, near-clip, and Orthographic/Perspective state exactly as you left them.
- Cameras you aren't currently controlling are drawn in the 3D view as small camera-shaped helper icons, scaled so they read as roughly the same size on screen regardless of distance. You can also drag any of these helpers to reposition that camera directly in 3D — it doesn't need to be the active camera; this is the easiest way to place a camera and immediately record a Camera track keyframe for it (see below) without switching your own view away from what you're currently framing.
- Each camera has a color (auto-assigned from a fixed palette when added, changeable from the Color field in its Properties) — this is the color its keyframes are drawn in on the timeline's 🎬 Cam Switch track, so you can tell at a glance which cut belongs to which camera (see Keyframe Timeline below).
Monitor (🖥)
The 🖥 Monitor toggle sits at the right end of the Keyframe Timeline toolbar (below). Turning it ON detaches the preview from every managed camera: you get a free-roaming third-person viewpoint that ignores the timeline's Cam Switch and per-camera Camera tracks entirely — scrubbing or playing back the timeline no longer moves the view out from under you. Every camera in the scene is drawn as a draggable helper icon while Monitor is on (regardless of which sub-tab you're on), so it's the natural place to lay out a whole camera rig by eye before recording any keyframes. The Monitor itself has no track and can't hold keyframes — it's purely a scouting viewpoint; add a camera if you want something you can key.
Turning Monitor OFF hands control back to a real camera: if the current frame has a Cam Switch keyframe, its camera becomes active (matching what playback would show at that frame); otherwise it falls back to whichever camera was active right before you turned Monitor on, or the first camera in the list if that one's gone.
If LookAt Target is enabled with its target set to 🎥 Camera, the Monitor's free viewpoint is deliberately excluded from being that target — looking at a scouting viewpoint that isn't really "in the shot" wouldn't make sense. While Monitor is on, the gaze instead keeps following whichever camera was active right before Monitor was turned on; dragging that camera's helper icon moves the gaze in real time, exactly like dragging the LookAt marker.
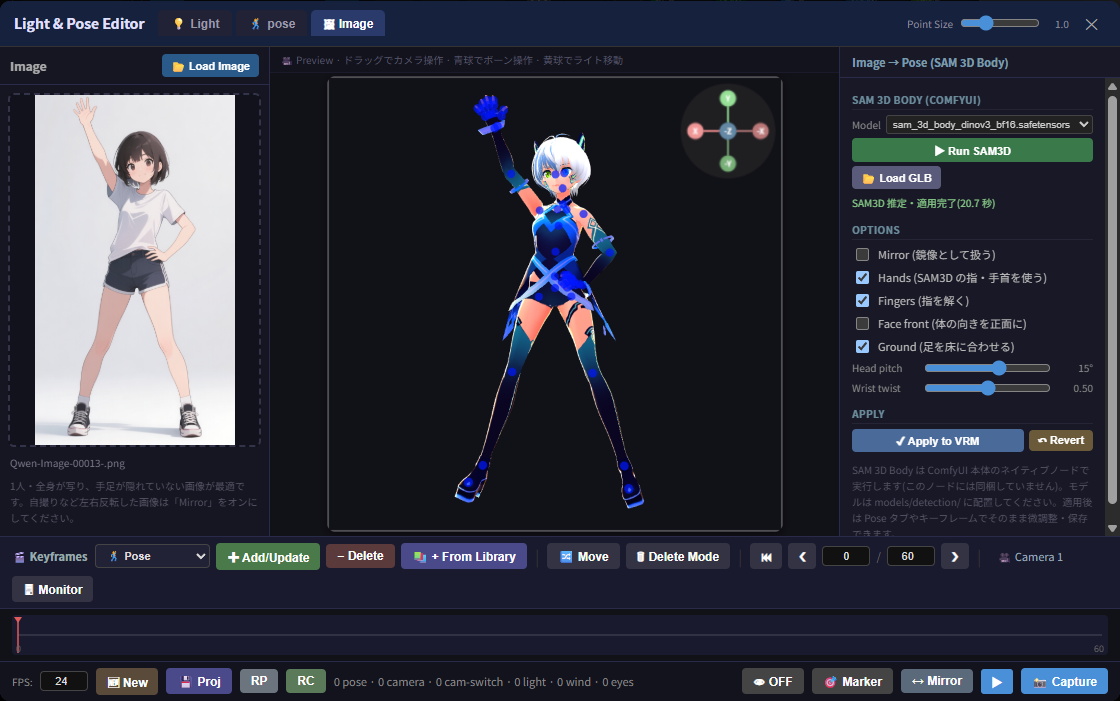
Image tab (🖼) — Image → Pose (SAM 3D Body)
Estimates the pose of a person in an image and applies it to the loaded VRM.
- Load a VRM (Pose tab → Load MODEL). GLB/GLTF models without humanoid bones are not supported.
- In the Image tab, load an image (Load Image or drag & drop).
- Press ▶ Run SAM3D. The image is sent to this ComfyUI server, the native SAM 3D Body nodes run as a small workflow (
SAM3DBody_Loader→SAM3DBody_Predict→BuildPoseFile×2 →SaveGLB×2), and the two output GLBs are read back:mesh_style=openpose— 3D joint positions, used to solve the bodymesh_style=body_mesh— MHR skeleton, used for wrist orientation and finger shapes
- The solved pose is applied immediately. Continue with the Pose tab / keyframes as usual.
| Option | Description | |---|---| | Mirror | Treat the image as mirrored (selfies) | | Hands | Use SAM3D's hand skeleton for wrists and fingers | | Fingers | Solve finger bones | | Face front | Remove the body's yaw relative to the camera | | Ground | Lift/lower hips so the feet touch the floor | | Head pitch | Corrects the head tilting down (nose below ears) | | Wrist twist | Share of wrist twist moved to the forearm |
- Load GLB: you can also load GLBs made elsewhere in ComfyUI with the same nodes (select both openpose and body_mesh files).
- Revert returns to the pose before the first apply.
- Requirements: ComfyUI 0.38+ (native SAM 3D Body nodes) and a SAM 3D Body model in
models/detection/(e.g.sam_3d_body_dinov3_bf16.safetensors). Foot (ankle) rotation is not estimated. - Licensing: this node does not include any SAM 3D Body code or model weights. It only calls ComfyUI's own HTTP API and parses the resulting GLB files. The SAM 3D Body model is subject to its own license, which you accept when you download it.
Keyframe Timeline (Pose · Camera · Cam Switch · Light · Wind · Eyes · Blink)
Docked at the bottom of the Light & Pose Editor (visible on both tabs), this panel lets you build a short animation by placing keyframes on a frame-based timeline, then preview it, save it, or render it out as .vrma / WebM / MP4 / GIF.
The track dropdown next to the "🎬 Keyframes" title holds 🕺 Pose, one Camera track per camera currently in the scene (labelled with that camera's own icon and name, e.g. "🎥 Camera 1" / "📷 Camera 2" — the list grows/shrinks live as you add, delete, or rename cameras in the C sub-tab), 🎬 Cam Switch, 💡 Light, 🌬 Wind, 👀 Eyes, and 👄 Lip (LookAt Target ON/OFF, target mode, and marker position — see LookAt Target above). Only the selected track's keyframes are drawn on the timeline (pose = yellow, light = orange, wind = cyan, eyes = cyan (matching the LookAt marker's own color), each per-camera Camera track = that camera's own color; Cam Switch markers are drawn in each keyframe's own camera's color too — see Camera Management), and the ✚ Add/Update / − Delete buttons always act on whichever track is selected (their color changes to match; the label itself no longer spells out the track name, since the dropdown already shows which one is selected). Dragging a marker (🔀 Move) onto a frame that already has a keyframe on a different track merges the two instead of overwriting the hidden track's data.
🗑 Delete Mode is a second way to remove keyframes: turn it on, then click a marker on the selected track to delete it, or drag across several markers to erase them one after another like an eraser. It's mutually exclusive with 🔀 Move — turning one on switches the other off.
| Control | Function |
|---------|----------|
| Track dropdown | Switches which track the Add/Delete buttons, the visible timeline markers, and 🔀 Move / 🗑 Delete Mode operate on: 🕺 Pose / one 📷 Camera track per camera / 🎬 Cam Switch / 💡 Light / 🌬 Wind / 👀 Eyes |
| ✚ Add/Update | Add a keyframe on the selected track at the current frame from whatever is currently set (or overwrite the one already there) |
| − Delete | Delete the selected track's keyframe at the current frame |
| 📚 + From Library | Pose track only. Pick a saved pose from the Pose Library and add it as a pose keyframe at the current frame |
| 🔀 Move | While ON, drag a marker on the timeline to move it to a different frame (if that frame already has a keyframe on the same track, the drag stops there instead of overwriting it) |
| 🗑 Delete Mode | While ON, click or drag across markers on the selected track to erase them like an eraser; mutually exclusive with 🔀 Move |
| ⏮ ❮ frame / total ❯ | Jump to frame 0 / step back one frame / current frame and total length / step forward one frame |
| Active-camera label | Read-only — shows the icon and name of whichever camera is currently active, or "🖥 Monitor" while the free view is on. Selecting a camera is done from the C sub-tab list; this label just reflects it |
| 🖥 Monitor | Toggles the free third-person view described in Camera Management above — ON detaches the preview from the timeline's camera tracks, OFF hands control back to a real camera |
| FPS | Playback frame rate used for preview, .vrma time conversion (time = frame / fps), and VRMA-to-keyframes sampling (see below) |
| 🆕 New | Clear the entire timeline (all tracks) and start over |
| 💾 Proj | Save/load the whole timeline as a named project on the server (.kf_projects/) |
| RP / RC | Reset pose / reset camera — same as the node's own RP/RC buttons |
| pose · camera · cam-switch · light · wind · eyes status | Keyframe count on each of the six tracks |
| 👁 LookAt | Toggle LookAt Target ON/OFF — moved here from the Pose tab's Properties panel, since it's a model-wide setting rather than a per-camera one |
| 🎯 Marker / 🎥 Camera | Switches the LookAt Target between the draggable marker and the active camera — see LookAt Target above |
| ↔ Mirror | Mirror the current pose left ↔ right — same as the node's own ↔ button |
| ▶ / ⏸ | Play/pause the timeline. Plays from the current frame through the last frame and loops back to 0, regardless of whether any pose keyframes exist |
| 📸 Capture | Same as the node's own 📸 Capture button — sends the current frame to the node's output |
💾 Save .vrma, 🎬 WebM, 🎥 MP4, and 🎞️ GIF used to live in this panel too — they've moved to the Pose tab's K sub-tab Properties (Pose Data / Output sections) to keep this toolbar from getting overcrowded. See Pose tab above.
Pose track — Shape Keys
The Shape Keys sliders' current values are bundled onto pose keyframes automatically whenever you add/update one — they're treated as part of the character's pose rather than a separate track. They're interpolated during preview/playback, but — like camera/light/wind/eyes keyframes — this is preview-only; only bone rotations are written into the exported .vrma (the glTF-based .vrma format has no camera/light/wind/LookAt/shape-key animation, and that export was intentionally left out of scope for now). If you need any of that baked into a shareable file, use 🎬 WebM, 🎥 MP4, or 🎞️ GIF instead, which render exactly what you see.
Eyes track
Records the LookAt Target's ON/OFF state, target mode (Marker/Camera), and marker position as its own independent track — unlike Shape Keys, it's not bundled onto Pose keyframes, so you can key the gaze on its own timing without needing a pose change at the same frame (and, conversely, adding/updating a Pose keyframe never touches the Eyes track). Marker position is linearly interpolated between surrounding Eyes keyframes; ON/OFF and target mode are discrete and switch over at the end of the interval, the same way Cam Switch cuts to a camera. Like the other non-Pose tracks, this is preview-only and not included in the exported .vrma.
Blink track (Auto Blink)
😑 Auto Blink (top of the Pose tab's Shape Keys list) makes a VRM blink automatically — a toggle plus an interval slider (average seconds between blinks, with a little natural variation). The blink timing is a pure function of time, so timeline playback and WebM / MP4 / GIF export blink at exactly the same frames; the normal preview blinks in real time. While Auto Blink is on, the blink shape-key slider keeps your own value (e.g. half-closed eyes) and Pose keyframes record that value rather than a mid-blink one.
The 😑 Blink track records Auto Blink's ON/OFF and interval as keyframes. Values are discrete: the last key at or before the current frame applies (no interpolation). Requires a VRM with the blink expression. Like the other non-Pose tracks, this is preview-only and not included in the exported .vrma.
Lip track
The 👄 Lip track records speech as text. Each Lip keyframe starts speaking its text on that frame, and the mouth closes at the next Lip keyframe or when the speech ends. A keyframe with empty text closes the mouth. The mouth shape is a function of timeline time, so playback and WebM / MP4 / GIF export produce the same frames (export does not play audio, so the mouth opens by a fixed amount for T keys, and by the loudness analyzed in advance for A keys). Which source a new key uses is set by the Keyframe T/A checkbox in the Lip Sync block: T records the text, A also records the selected audio file name (analyzed when the key is added, so the audio file must stay in the Audio folder). The mouth-level sliders in the S tab apply to both. Like the other non-Pose tracks, this is preview-only and not included in the exported .vrma.
Camera track
Every camera gets its own independent Camera track, storing {position, target, up, fov} linearly interpolated between that camera's own surrounding keyframes (up is normalized after interpolation so camera roll blends smoothly). A camera doesn't need to be active to record or play back its track — ✚ Add/Update captures whatever that camera's current position is (drag its helper icon into place first, or switch to it and move the view — either works), and during playback each camera's track drives that camera regardless of which one is currently on screen. Pair it with a Cam Switch keyframe if you want the timeline to actually cut to that camera at some point. While 🖥 Monitor is on, Camera tracks keep recording/deleting normally but stop being applied to the live view — see 🖥 Monitor above.
Cam Switch track
Records which camera is active as a cut rather than a blend — a discrete switch with no position interpolation, the same way LookAt's ON/OFF flips at the end of an interval instead of fading. Add a keyframe here and the moment playback reaches that frame, the preview jumps straight to that camera's current viewpoint. Each marker is drawn in its own camera's color (see Camera Management) so a glance at the timeline shows which cut belongs to which camera. Switching cameras by hand (independent of recording a keyframe) is done from the C sub-tab camera list. A Cam Switch keyframe can only target a real camera — the 🖥 Monitor free view has no track and is skipped entirely by playback (see 🖥 Monitor above).
Light track
Stores a full snapshot of every managed light (type, color, intensity, position, target, angle/penumbra, distance/decay, shadow — the same fields editable in the Light tab's L Properties panel). Interpolation matches lights between the surrounding keyframes by ID: numeric fields and positions are linearly interpolated, everything else (color, type, on/off) switches over at the end of the interval. If a light was added or removed between two Light keyframes, it isn't interpolated across that gap — it just holds its last known state.
Wind track
Stores the same Wind settings as the E (Environment) sub-tab's "Wind" section — enabled, strength, direction, gustiness, wind-source-marker enabled, and marker position. Interpolated the same way as the Light track (numeric/position fields blend, on/off switches at the interval's end).
Importing a .vrma as pose keyframes
Instead of playing a .vrma back as a single clip (see VRMA Animation Playback below), you can sample it directly onto the Pose track:
- 🔑 Load KEY in the Pose Library's mini player, or VRMA (KEY) on the node / in the Pose tab's Properties panel.
- The clip is sampled once per frame at the timeline's current FPS (
frame = 0 … round(duration × fps)), each frame captured as a full pose keyframe — nothing is thinned out.totalFramesis extended automatically if the clip is longer than the current timeline. - If the Pose track already has keyframes, a confirmation dialog appears first (camera/light/wind keyframes are never touched by this).
- VRMA (KEY) works even if the Light & Pose Editor isn't open yet — it opens on the Pose tab automatically and imports right after.
WebM export uses MediaRecorder + canvas.captureStream(); GIF export uses a small self-contained encoder (js/gif_encoder.js, NeuQuant color quantization + LZW, no external dependencies) and encodes one frame at a time so the browser tab stays responsive even on longer timelines — a GIF with many frames will still take a while to encode (color quantization is the slow part), the button label shows Encode n/total progress while it works. MP4 export generates the same WebM first, then sends it to a server-side ffmpeg endpoint for conversion to H.264 (browsers' MediaRecorder doesn't reliably support video/mp4) — this requires ffmpeg to be available (either on PATH or via the bundled imageio-ffmpeg dependency).
VRMA Animation Playback (VRMA)
Load a .vrma (VRM Animation) file — a single pre-made clip, as opposed to the multi-track timeline above — and play it back on the currently loaded VRM, then pause on any frame to use it as a regular still pose — 📸 Capture / 💾 Save / ⬇️ Download all work exactly as before on the paused frame, and bones can even be nudged further with the normal drag controls.
Want the clip as editable, per-frame keyframes instead of a single clip? Use VRMA (KEY) instead of VRMA — see Importing a
.vrmaas pose keyframes above.
Requires a VRM model with humanoid bones already loaded — plain GLB/GLTF models are not supported, since retargeting relies on the VRM humanoid rig.
Usage:
- Load a VRM, then click VRMA (or drop a
.vrmafile onto the canvas) to load an animation clip. - ▶ / ⏸ toggles playback. Drag the seek bar to scrub to any frame — dragging automatically pauses playback.
- While paused, use 📸 / 💾 / ⬇️ as usual to capture or save that frame as a still pose.
- ✕ unloads the animation and hides the timeline panel. The same button is also available next to VRMA in the Pose tab's Properties panel.
Notes:
- Loading a new VRM/GLB/GLTF model clears the currently loaded VRMA.
- If LookAt Target is enabled, it keeps working on top of a loaded/playing
.vrma— the eyes/head follow the live target every frame regardless of whatever the clip itself does with the head/eyes.
Timer Capture (⏱)
Click ⏱ to start / stop the timer.
| State | Color | Behavior |
|-------|-------|----------|
| OFF | Grey (#555) | No auto-capture |
| ON — waiting | Dark red (#7b0000) | Auto-captures every N seconds |
| ON — firing | Bright red (#e74c3c) | Flashes for 300 ms on each capture |
The interval is read from the timer_interval node parameter (1 – 3600 s, default 5 s).
While the timer is running, the 📸 Capture button does not flash — only the ⏱ button changes colour.
Installation
Option A: ComfyUI Manager (Recommended)
- Open ComfyUI Manager and click "Install Custom Nodes".
- Search for
comfyui-vrm-pose-editor. - Click Install and restart ComfyUI.
Option B: Manual
- Clone or copy this repository into
ComfyUI/custom_nodes/as a folder namedcomfyui-vrm-pose-editor(e.g.git clone https://github.com/ketle-man/comfyui-vrm-pose-editor). The folder name matters: ComfyUI serves the node's scripts at/extensions/<folder name>/, and other tools such as ComfyUI Comic Creator load them from/extensions/comfyui-vrm-pose-editor/. - Restart ComfyUI.
- Add the "3D Pose Editor" node (category:
3D Pose) from the node menu. - (Optional) Put your own
.vrm/.glb/.gltffiles inmodel/to have one load automatically — see Default Model. No model is bundled. - (Optional) For the Image tab, use ComfyUI 0.38+ and place a SAM 3D Body model in
models/detection/.
Camera Controls
| Action | Result |
|--------|--------|
| Left drag | Rotate camera |
| Ctrl + Left drag | Pan |
| Right drag | Pan |
| Scroll wheel | Zoom (default) |
| Ctrl + Right drag | Zoom — only when the "Ctrl+Right drag zoom" switch is ON in the Light & Pose Editor (see below) |
| Alt + Right drag | Roll the camera (rotate camera.up around the view axis) |
| Alt + Left drag | Zoom (Node 2.0 mode) |
| Click gizmo X/Y/Z axis | Snap to that view direction |
On some PCs the scroll wheel does not zoom (mouse/driver dependent). Open the Light & Pose Editor (💡), go to the Light tab's S sub-tab, and toggle 🖱 Ctrl+Right drag zoom to switch from wheel zoom to Ctrl+Right-drag zoom.
Camera Parameters (FOV / Near / Point Size)
Three sliders below the preview adjust the Perspective camera and bone-handle size in real time (the Point Size slider is duplicated in the Light & Pose Editor's header for convenience while the modal is open):
| Slider | Range | Default | Effect |
|--------|-------|---------|--------|
| Point Size | 0.2 – 3.0 | 1.0 | Bone-handle control-point sphere size multiplier |
| FOV | 10° – 120° | 45° | Field of view. While in Orthographic mode, the ortho frustum size is recomputed to match (distance × tan(fov/2)) so the two modes stay visually consistent |
| Near | 0.01 – 5 | 0.1 | Near clipping plane, applied to both Perspective and Orthographic cameras. Raise it only if you need to fix z-fighting; too high a value clips away geometry close to the camera |
Bone Controls
Drag the blue control points on each bone joint.
| Action | Rotation | |--------|----------| | Left / Right drag | Y-axis | | Up / Down drag | X-axis | | Alt + Up / Down drag | Z-axis |
Loading Models
Click the VRM button to select a local .vrm / .glb / .gltf file.
The model is automatically scaled and centred.
- VRM: bones detected via
@pixiv/three-vrmHumanBone. - GLB / GLTF: works with any skeleton-based model.
Default Model
Place model files (.vrm / .glb / .gltf, any file name) in the model/ folder, then choose which one loads automatically in Light & Pose Editor → Light tab → S (Settings) → Default Model.
| Choice | Behavior |
|----------|--------|
| Auto | The first file in model/ (by name) |
| A file name | That file |
| None | No model is loaded on startup |
- The choice is saved to ComfyUI's user data (
user/<user>/vrm_pose_editor_settings.json), so it survives node updates and reinstalls. It applies when a node is created or the page is loaded; Load loads the selected model into the current node right away (.vrm/.glbonly). - No model is bundled. If
model/is empty, the editor starts without a model (load one with the VRM button). - If the default model is a VRM, Pose Library can also generate thumbnails with it.
Pose Library (📚)
Open it via Pose → 📚 Library on the node (or the same button from inside the Light & Pose Editor's Pose tab).
- Pose files (
.json/.vroidpose) and.vrmaanimations stored in theposes/folder are displayed as thumbnails side by side. - A 1-column-wide preview pane on the left embeds the live 3D canvas (the same DOM-move technique the Light & Pose Editor itself uses), so applying a still pose or playing back a
.vrmais actually visible while the library is open — it no longer plays "behind" the dialog. - Subdirectory filtering: create subfolders inside
poses/to organise poses by category; select a folder from the dropdown to filter. - Click a
.json/.vroidposethumbnail to apply the pose immediately (shown in the preview pane). Click a.vrmathumbnail to load it into the mini player below the preview (name, ✕ eject, ▶/⏸, seek bar, time) — the animation plays right there in the preview, but clicking a card only previews it; it does not yet affect the node or the Light & Pose Editor's own timeline.- ⬇ Load (below the mini player) commits the previewed
.vrmato the node as-is (a regular clip, same as the node's own VRMA button) and closes the Pose Library. - 🔑 Load KEY samples the previewed
.vrmainto pose keyframes on the Light & Pose Editor's timeline instead (see Importing a.vrmaas pose keyframes) and closes the Pose Library.
- ⬇ Load (below the mini player) commits the previewed
- Right-click for more options:
- ↔️ Mirror & Apply (still poses only)
- ⭐ Add / Remove Favorites
- 📝 Edit Memo
- ✏️ Rename File
- 🖼 Regenerate Thumbnail (Front / Back)
- 💾 Save: saves the current editor pose to the
poses/folder asp_HHMMSS.json. - Thumbnails are auto-generated with the current VRM (the one you loaded, or the default model) and cached server-side, so later visits only load the small PNGs.
.vrmafiles are thumbnailed with their first frame and marked with a 🎬 badge. Generation starts when a card scrolls into view, loads the VRM only once per library session, and renders one pose at a time. VRM 0.x models (which face −Z) are shot from the front automatically. If no VRM is loaded, the header shows a notice instead. - The file-extension badge is color-coded:
.jsongreen,.vrmapink,.vroidposelight blue.
Pose Save / Load
| Button | Action |
|--------|--------|
| ⬇️ | Download pose as pose.json (browser download) |
| ⬇️VP | Download pose as pose.vroidpose for VRoid Studio (VRM only) |
| 💾 | Save pose to poses/p_HHMMSS.json on the server |
| 📂 | Load pose file (or drop onto canvas) |
Supported formats:
| Format | Description |
|--------|-------------|
| .json (own format) | Saved by ⬇️ or 💾 |
| .vroidpose | VRoid Studio pose file (body / arms / legs; finger presets not supported). Can also be exported with ⬇️VP (VRM only). VRoid Studio rebuilds the pose from the VRoidCustomData control points rather than from the bone rotations, so the exporter computes them on VRoid's standard skeleton. Finger poses are not written (hands use the Natural preset) |
VRM0 / VRM1 Compatibility
Pose JSON is saved in version 2 format (quaternion + vrmVersion tag).
Cross-version conversion (VRM0 ↔ VRM1) is applied automatically on load.
Legacy version 1 (Euler angles) files are still supported.
Mirror Pose (↔)
Click ↔ on the node (or right-click → ↔️ Mirror & Apply in the Pose Library) to flip the current pose left ↔ right.
Left/Right bone pairs are swapped and quaternions are YZ-flipped (qx, -qy, -qz, qw).
Light Library (📚)
On the Light & Pose Editor's Light tab → L sub-tab, click 📚 Library to open the light-preset library panel.
| Action | Description | |--------|-------------| | 💾 Save Current | Save all current settings as a named preset | | Click a preset card | Apply saved settings immediately | | Right-click a card | Rename or delete the preset | | Search field | Filter presets by name | | ↺ Reload | Refresh the preset list from the server |
Presets are stored server-side in .light_library/ inside the node folder.
They persist across browser restarts and are available on any machine sharing the same ComfyUI server.
Note: Texture images are not saved in presets (binary data is excluded).
All numeric settings (color, intensity, positions, Ground/Wall/Shadow values) are saved and restored.
Ground & Background Wall
Found on the Light & Pose Editor's Light tab → E (Environment) sub-tab.
| Control | Function | |---------|----------| | 🟫 Ground ON/OFF | Toggle ground plane (receives shadows) | | Y slider | Ground height | | 🖼 BG Wall ON/OFF | Toggle background wall (receives shadows) | | Z slider | Wall depth | | 🎨 Color picker | Surface color | | 📁 Tex | Load image texture (tiled) | | Tile | Texture repeat count | | 🕶 SC | Shadow Catcher — surface becomes transparent, shows shadows only | | 影濃度 / Opacity | Shadow darkness (0.01 – 1.0) |
Aspect Ratio Frame
When output_size_mode is Custom, a letterbox overlay is drawn in real time to show the output crop area.
Capture outputs only the framed region — no stretching.
Color Correction (CC)
Toggle sRGB color space + ACES Filmic tone mapping.
Enable if VRoid Studio / Blender models appear too dark.
日本語
機能・ボタン一覧
1行目(キャプチャ・タイマー・モデル)
| ボタン | 機能 |
|--------|------|
| 📸 Capture | 現在のポーズを PNG としてノード出力に送信 |
| ⏱ | タイマーキャプチャのトグル(timer_interval 秒ごとに自動キャプチャ) |
| VRM | VRM / GLB / GLTF ファイルをローカルから読み込む |
| VRMA | .vrma アニメーションを読み込み、現在の VRM 上で再生(後述のVRMAアニメーション再生を参照) |
| VRMA (KEY) | .vrma ファイルを読み込み、再生クリップとしてではなくLight & Pose Editorのタイムラインへポーズキーフレーム列としてサンプリング読み込みする(後述のキーフレームタイムラインを参照)。モーダルが未オープンなら自動的にPoseタブで開く |
| CC | カラー補正 ON/OFF(sRGB + ACES Filmic) |
2行目(Light & Pose Editor・背景・ポーズファイル)
| ボタン | 機能 |
|--------|------|
| Light | Light & Pose Editor をLightタブで開く(後述) |
| Pose | Light & Pose Editor をPoseタブで開く(後述) |
| BG | 背景画像をローカルから読み込む |
| ✕ | 背景画像および背景色をクリア |
| 🎨 | シーン背景色ピッカー |
| ⬇️ | 現在のポーズを JSON ファイルとしてダウンロード |
| ⬇️VP | 現在のポーズを VRoid Studio の .vroidpose ファイルとしてダウンロード(VRM のみ) |
| 💾 | 現在のポーズを poses/ フォルダに保存 |
| 📂 | ポーズファイルを読み込む(.json / .vroidpose) |
3行目(視線・揺れ・カメラ・ポーズ)
| ボタン | 機能 | |--------|------| | 👁 | 視線ターゲットの ON/OFF。ON にすると 3D ビュー内のシアン色マーカーをドラッグして目・頭の向きを誘導できる(モデルに LookAt 情報が無い場合は効果なし)。対象はマーカーの代わりにアクティブカメラへ切り替えることもでき、👀 Eyesトラックでキーフレーム化もできる — 詳細は後述の視線ターゲットを参照 | | 🎐 | 揺れ物理(髪・スカート等)の ON/OFF。OFF にすると現在の揺れ具合のまま固定される | | 🌬 | 揺れボーン(髪・スカート等)にそよ風エフェクトを加える ON/OFF。強さ・向き・そよぎはLight & Pose Editorで調整。🎐 が OFF の間は効果なし | | 🧭 | 風の発生源マーカーの ON/OFF。ON にすると 3D ビュー内のオレンジ色のコーンをドラッグして風向きを指定できる(視線マーカーと同じ操作方法)。ON の間、Light & Pose Editorの「向き」スライダーは無効化される | | RC | カメラをリセット | | OT / PR | Orthographic / Perspective カメラを切り替え | | RP | ポーズをリセット — Light & Pose Editorのキーフレームパネルにも同機能あり | | ↔ | ポーズを左右反転 |
4行目(ファイル名)
現在読み込まれている VRM / GLB / GLTF のファイル名を表示。
視線ターゲット(👁)
ON にすると、モデルの目・頭が対象を自動的に追従します。対象は3Dビュー内のドラッグ可能なシアン色マーカー、またはその時点でアクティブなカメラのどちらかで、Light & Pose Editor下部(👁の右隣)の🎯 Marker / 🎥 Cameraトグルで切り替えられます。Markerモードではマーカーをドラッグして視線の向きを調整でき、マーカー自体は出力画像には写り込みません。Cameraモードでは毎フレーム、その時点でアクティブなカメラの方を視線が追従します — 🖥 MonitorがONの間は、自由に動き回れるMonitor自体ではなく、Monitorに入る直前にアクティブだったカメラを見続けます(そのカメラのヘルパーアイコンをドラッグすると、マーカーをドラッグしたときと同じように視線も追従します)。ON/OFF・対象モード・マーカー座標は、専用の👀 Eyesトラックでキーフレーム化できます — 詳細は後述のキーフレームタイムラインを参照してください。ポーズリセット・ポーズ読込・ミラー実行時は揺れボーンの内部状態を新しいポーズに合わせて再アンカーするため、切替直後に不自然に跳ねることはありません。
揺れ物理(🎐)
VRM に定義された揺れボーン(髪・スカート等)の物理シミュレーションの ON/OFF を切り替えます。OFF にすると、リセット姿勢に戻るのではなく現在の揺れ具合のまま固定されます。ポーズリセット・ポーズ読込・ミラー実行の直後は揺れボーンの内部状態を新しいポーズに再アンカーするため、切替直後に不自然に跳ねることはありません。
風エフェクト(🌬)と発生源マーカー(🧭)
揺れボーン(髪・スカート等)に、モデル本来の重力に加えてそよ風を吹かせる機能です。複数のsin波を合成することで、風の強さ・向きが一定方向に吹き続けるのではなく時間とともに緩やかに揺らぐようにしています。three-vrmには風専用のAPIが存在しないため、各揺れボーンのgravityDir/gravityPowerを毎フレーム「モデル本来の重力ベクトル+現在の風ベクトル」で上書きすることで実現しています(vendorのthree-vrm本体は無改造)。🎐揺れ物理がOFFの間はジョイント物理演算自体が停止するため、風の効果もありません。
- 🌬 風: 全体のON/OFFトグル。強さ・向き・そよぎは、Light & Pose EditorのLightタブ →「E」(Environment)サブタブ内「Wind」セクションのスライダーで調整します。
- 🧭 発生源マーカー: ONにすると3Dビュー内にオレンジ色のコーンマーカーが表示されます。操作方法は👁視線マーカーと全く同じドラッグ方式です。風向きは「マーカー位置からモデル付近の固定基準点への方向」として計算されるため、コーンをドラッグするだけで(上下方向を含む)風向きを自由に指定できます。ONの間はマーカーが向きを決定するため、Light & Pose Editorの「向き」スライダーは無効化されます。マーカー自体は出力画像には写り込みません。
Light & Pose Editor(💡 / 🕺)
以前は別々のウィンドウだったLightエディタ・ポーズライブラリの起動口・VRMAタイムラインエディタを1つのモーダルへ統合したものです。ライティング作業とポーズ・アニメーション作業を行き来するたびに形の違うダイアログへ切り替わる、という煩わしさを解消しています。
- ノードの Light または Pose をクリックすると、対応するタブが直接開いた状態でモーダルが表示されます。
- ヘッダーには 💡 Light / 🕺 pose / 🖼 Image タブ切り替え(Imageタブは後述のImageタブを参照)、Point Size スライダー(ノード自身のPoint Sizeスライダーと同じ機能。どちらを動かしてもボーンハンドルの球サイズが変わり、モーダルを閉じるとノード側の表示値も再同期されます)、そしてタブに応じて役割が変わる 📚 Library ボタンがあります(後述)。
- 中央ペインには実際のWebGLキャンバス(コピーではない)が枠に合わせて埋め込まれ、ボーンドラッグ・カメラ操作・ライトヘルパードラッグがすべてノード上と全く同じようにモーダル内でネイティブに動作します。
- 下部には全タブ共通のキーフレームタイムラインパネルが常設されています(後述のキーフレームタイムラインを参照)。
Lightタブ
左ペインは3つのサブタブに分かれています。
| サブタブ | 内容 |
|---------|------|
| L — Lights | ライト一覧(追加・削除・名前変更)と、右側の選択中ライトのPropertiesパネル: タイプ(☀ Sun / 💡 Point / 🔦 Spot / ▭ Box RectArea / 🌐 Ambient)、色、強度、位置XYZ、ターゲットXYZ(Directional/Spot)、角度&ペナンブラ(Spot)、距離&減衰(Point/Spot)、シャドウ(Directionalのみ) |
| E — Environment | 地面・背景壁・シャドウ品質、および上述の🌬 Windコントロール |
| S — Settings | 🖱 Ctrl+右ドラッグでズームのトグル(カメラ操作参照)、🖼 アンチエイリアス強化(スーパーサンプリング)のトグル、Default Model(model/ のどのモデルを自動で読み込むか — デフォルトモデルの設定参照) |
Lサブタブでは、📚 Libraryでライトプリセットライブラリパネルをトグルできます(後述のライトライブラリを参照)。プレビュー内の黄色球体をドラッグしてライトを3D移動できます。
Poseタブ
左ペインは4つのサブタブに分かれています。
| サブタブ | 内容 |
|---------|------|
| K — Shape Keys | モデルが持つすべてのモーフ・表情のスライダー(0.0〜1.0)をリアルタイムに調整。従来ノード下部にあった折りたたみ式Shape Keysパネルはこちらに置き換わりました。blink 表情を持つ VRM では、一覧の先頭に 😑 Auto Blink(ON/OFF と間隔)があります — Blinkトラックを参照。一覧の下には折りたたみ式の 👄 Lip Sync があります(下記「リップシンク」を参照)。 |
| C — Camera | カメラ一覧(追加・選択・削除・名前変更・色変更)— 詳細は後述のカメラ管理を参照 |
| A — Audio | テキストから作った音声(Lip Sync 用)の選択・試聴・削除 — 後述の「音声ファイルと API 設定(A・S)」を参照 |
| S — API設定 | 音声作成エンジン(Lemonade / VOICEVOX)の選択と接続設定・接続テスト、口形のレベル調整 — 同じ節を参照 |
右ペイン(Lightタブ側のPropertiesパネルと同じ幅にすることで、Light/Poseタブやサブタブを切り替えてもダイアログ全体のサイズが変わらないようにしています。Lightタブと異なり「Properties」という見出しは表示しません)は、選択中の左サブタブに応じて内容が変わります:
- Kサブタブ:
- Model — Load MODEL(ノード側のモデルロード機能の複製)
- Pose Data — 3つのブロックに分かれています。Load — VRMA、✕(読み込み中のVRMAをアンロード)、VRMA (KEY)(
.vrmaをクリップではなくポーズキーフレームとして読み込む)、📂 Load from JSON。Save (poses/) — 💾 Save、💾 Save .vrma(下部のキーフレームパネルが手狭になったためこちらへ移設 — 詳細はキーフレームタイムラインを参照)。Download — ⬇️ Download(pose.json)、⬇️ .vroidpose。 - Output — 🎬 WebM・🎥 MP4・🎞️ GIF(こちらも同様の理由でキーフレームパネルから移設)
- Save to ComfyUI output(チェックボックス): オンにすると、ダウンロードせずに ComfyUI の
output/vrm_pose_editor/へpose_年月日_時分秒.<拡張子>として保存します。保存先はチェックボックスの下に表示されます。設定は ComfyUI のユーザーデータに保存され、次回以降も引き継がれます。
- Save to ComfyUI output(チェックボックス): オンにすると、ダウンロードせずに ComfyUI の
- Cサブタブ: リストで選択中のカメラのCameraプロパティ — Name、Color、OT/PR切替、FOV/Nearスライダー。共有の
editor状態のうち現在アクティブなカメラの状態を直接読み書きするため(ノード自身のOT/RC/FOV/Nearコントロールと同じ)、モーダルを閉じた際やタブ・カメラの切替時にどちら側も再同期されます。(以前ここにあったLook at Targetトグルは、カメラごとではなくモデル全体の設定であるため、下部のキーフレームパネルへ移設しました。)
VRM/VRMAの読み込み・アンロードはノード内部と同じnodeActionsブリッジ経由で処理されるため、ノード側のボタン表示も連動して更新されます。
📚 Libraryは光源プリセットパネルではなく、ポーズライブラリを開きます。
リップシンク(Lip Sync)
テキストから、VRM の母音の口形(aa / ih / ou / ee / oh)を動かします(VRM 0.x の a / i / u / e / o は自動で変換されます)。日本語(かな)と英語に対応しています。漢字は読みが無いため、口を開けた仮の単位として扱われます。タイミングは音素のアライメントではなく文字数からの推定なので、同期は近似です。読みを正確にするには、かなで入力してください。
- ポーズタブの K 一覧の下にある Lip Sync 欄に入力します(既定は折りたたみ。見出しをクリックして開きます)。モーダルを閉じると、テキストもノードの
lip_text出力に反映されます。 - ▶ テキストで再生: 音声なしで、テキストに合わせて口を動かします。
- 🔊 テキストから音声を作成: S タブで選んだエンジン(Lemonade または VOICEVOX)で音声ファイルを作り、選択します(後述の「音声ファイルと API 設定(A・S)」を参照)。
- 🎵 選択中の音声で再生: 選択中の音声を再生し、その音量に合わせて口を動かします。
- ■ 停止: 口を再生前の値に戻します。手動で設定したシェイプキーの値は保たれます。
- キーフレーム T/A(チェックボックス): Lipトラックにキーフレームを追加するときの音源を選びます。OFF = T(欄のテキスト)、ON = A(選択中の音声。音量で口の開きが決まります)。モーダルを開いている間は設定が保たれます。
- 口のレベル(S タブ): テキスト再生は口を一定量(0〜1)開き、音声再生は音量に倍率(0〜3。掛けた結果は 1 で頭打ち)を掛けます。片方だけ大きすぎる・小さすぎるときは、それぞれ調整してください。値はブラウザ(
localStorage)に保存され、Lipトラックにも同じ値が使われます。
リップシンクは再生中だけ口を動かし、書き出す .vrma は変えません。タイムラインに載せるには、下記の Lipトラックを使います。
音声ファイルと API 設定(A・S)
テキストから作った音声は、ComfyUI の output フォルダの output/vrm_pose_editor/Audio/ に保存されます(Lemonade は tts_YYYYmmdd_HHMMSS_<声>.mp3、VOICEVOX は ..._vv<話者ID>.wav)。
-
A — Audio: 上部のツールバーは、チェックした行に対して働きます。
- ✓ 選択: Lip Sync の音声を選びます。チェックは 1 件だけ必要です。
- ▶ 再生: 試聴します。チェックは 1 件だけ必要です。
- 🗑 削除: チェックしたファイルをすべて削除します(確認あり)。
- 全選択: すべての行をチェック、または解除します。
「選択」と「再生」は、チェックが 1 件のときだけ押せます。選択が決まるとチェックは外れ、選択中のファイルはハイライトされます。
-
S — API設定: エンジン(Lemonade または VOICEVOX)を選びます。使われるのは選んだエンジンだけです。Lemonade は Base URL、Model(
kokoro-v1)、既定の Voice(ドロップダウン)。日本語の声はjf_alpha/jf_gongitsune/jf_nezumi/jf_tebukuro/jm_kumo、英語の声はaf_heart/af_bella/bf_emmaです。VOICEVOX は Base URL(既定http://127.0.0.1:50021)と、エンジンから取得した 話者 のドロップダウン(話者を更新で再取得)。設定はoutput/vrm_pose_editor/api_settings.jsonに保存されます。接続テスト は、エンジンに応じて Lemonade の/api/v1/healthまたは VOICEVOX の/versionを確認します。同じタブに、リップシンクで説明した口のレベル調整もあります。
Lemonade はこの PC で kokoro-v1 モデルを読み込んだ状態で起動しておく必要があります。接続先は localhost とループバックアドレス(127.0.0.1、::1)だけに限定しています。Lemonade も VOICEVOX も必須ではなく、テキストだけのリップシンクは使えます。
VOICEVOX(VOICEVOX、音声合成ソフト)は、この PC にインストールして起動しておく必要があります。エディタはそのエンジン API(/audio_query → /synthesis)を呼びます。このリポジトリには同梱していません。
VOICEVOX のライセンスに関する注意
- VOICEVOX は別製品で、独自の利用規約があります: https://voicevox.hiroshiba.jp/term/。作成した音声を使う前に必ず確認してください。このリポジトリの MIT License は VOICEVOX 本体や各音声には及びません。
- ソフトウェア利用規約では、商用・非商用を問わず利用できますが、VOICEVOX を利用したことがわかるクレジット表記が必要で、使用する各音声ライブラリ(キャラクター)の規約にも従う必要があります。規約はキャラクターごとに異なるため、使う話者の規約を確認してください。
- VOICEVOX 本体の無断再配布やリバースエンジニアリングは禁止されています。自作の配布物に同梱しないでください。
- ここで作成した音声は
.wavで保存されます。これを使った動画などを公開するときは、クレジット表記を自分で入れてください(エディタは自動では付けません)。- これは要約であり、法的助言ではありません。上記の公式ページの規約が優先され、内容は変更されることがあります。
カメラ管理
Cサブタブは、LightタブのLサブタブがライトを複数管理するのと同じ要領でカメラを複数管理します。ただし、常に1台のカメラ、または後述の🖥 Monitor自由視点のどちらかだけが「操作対象」になる点が異なります。
- シーンには最初から1台のカメラ(Camera 1)が存在し、+ Addで好きなだけ追加できます(Camera 2、Camera 3...と作成順に命名され、途中のカメラを削除しても番号が使い回されることはありません)。すべてのカメラは対等で、特別扱いされ削除できないカメラはありません — Camera 1を含むどのカメラも**✕ボタンで削除できます。最後の1台を削除すると自動的に🖥 Monitor**モードへ切り替わります(後述)。
- リストでカメラをクリックすると、そのカメラが即座にアクティブになります: プレビューがそのカメラの保存済み視点へ切り替わり、以降は通常のマウスドラッグ操作(回転/パン/ズーム/Alt+右ドラッグでロール — カメラ操作参照)がそのカメラを動かすようになります。他のカメラへ切り替えて戻ってきても、位置・向き・FOV・ニアクリップ・Ortho/Perspective状態はそのまま保持されています。
- 現在操作していないカメラは、3Dビュー内に小さなカメラ形状のヘルパーアイコンとして表示されます(距離に応じて画面上でほぼ一定のサイズに見えるようスケール調整されます)。このヘルパーはドラッグして直接位置を動かすこともできます — アクティブにする必要はありません。狙った位置にカメラを置いて、そのままCameraトラックのキーフレームとして記録する(後述)のに使えます。
- 各カメラは色を持ちます(追加時に固定パレットから自動割り当て、PropertiesのColor欄で変更可能)。この色は、タイムラインの🎬 Cam Switchトラック上でそのカメラのキーフレームを描画する色になり、どのカットがどのカメラのものか一目で分かるようになります(詳細は後述のキーフレームタイムラインを参照)。
Monitor(🖥)
🖥 Monitorトグルは、後述のキーフレームタイムラインのツールバー右端にあります。ONにするとプレビューがどの管理カメラからも切り離され、タイムラインのCam Switchトラック・カメラごとのCameraトラックの影響を一切受けない、自由に動き回れる第三者視点になります — タイムラインをスクラブ/再生しても視点が勝手に動きません。Monitor中はどのサブタブを開いていても全カメラがドラッグ可能なヘルパーアイコンとして表示されるため、キーフレームを打つ前にカメラ配置全体を俯瞰しながら組み立てるのに向いています。Monitor自体にはトラックが無くキーフレームを記録できません — あくまで見て回るための視点で、記録したい場合はカメラを追加してください。
MonitorをOFFにすると、実際のカメラへ操作を戻します: 現在フレームにCam Switchのキーフレームがあればそのカメラへ(再生時と同じ挙動)、無ければMonitorをONにする直前にアクティブだったカメラへ、それも既に削除されていればリスト先頭のカメラへフォールバックします。
視線ターゲットがONで対象が🎥 Cameraの場合、Monitorの自由視点はあえて対象から除外されています — 「撮影に写り込まない見回し用の視点」に視線を向けるのは意味が通らないためです。Monitor中は、Monitorに入る直前にアクティブだったカメラを見続け、そのカメラのヘルパーアイコンをドラッグすると視線もリアルタイムに追従します。
Imageタブ(🖼)— 画像 → ポーズ(SAM 3D Body)
画像の人物のポーズを推定し、読み込み中の VRM に適用します。
- VRM を読み込む(Poseタブ → Load MODEL)。humanoid ボーンを持たない GLB/GLTF には適用できません。
- Image タブで画像を読み込む(Load Image またはドラッグ&ドロップ)。
- ▶ Run SAM3D を押す。画像をこの ComfyUI に送り、ネイティブの SAM 3D Body ノードを小さなワークフロー(
SAM3DBody_Loader→SAM3DBody_Predict→BuildPoseFile×2 →SaveGLB×2)として実行し、出力された 2 つの GLB を読み込みます。mesh_style=openpose— 関節の 3D 位置(体の向きを解く)mesh_style=body_mesh— MHR 骨格(手首の向きと指の形)
- 解いたポーズがすぐ適用されます。以降は Poseタブ・キーフレームで通常どおり微調整・保存できます。
| オプション | 内容 | |---|---| | Mirror | 自撮りなど鏡像の画像として扱う | | Hands | SAM3D の手の骨から手首・指を取り込む | | Fingers | 指のボーンを解く | | Face front | カメラに対する体全体の向き(ヨー)を除去して正面向きにする | | Ground | 足が床に付くよう腰の高さを調整 | | Head pitch | 頭のうつむき誤差(鼻が耳より下)の補正 | | Wrist twist | 手首のねじれを前腕に分配する割合 |
- Load GLB: ComfyUI で同じノードを使って別途作った GLB(openpose と body_mesh の両方を選択)も読み込めます。
- Revert で最初に適用する前のポーズへ戻せます。
- 必要環境: ComfyUI 0.38 以降(ネイティブ SAM 3D Body ノード)と、
models/detection/に SAM 3D Body のモデル(例:sam_3d_body_dinov3_bf16.safetensors)。足首(足先)の回転は推定しません。 - ライセンス: このノードには SAM 3D Body のコード・モデル重みを一切含みません。ComfyUI 本体の HTTP API を呼び、出力された GLB を解析するだけです。SAM 3D Body のモデルはそれぞれのライセンスに従い、ユーザーが各自導入してください。
キーフレームタイムライン(ポーズ・カメラ・カメラ切替・ライト・Wind・Eyes・Blink)
Light & Pose Editor下部(両タブ共通)に常設されたパネルで、フレームベースのタイムライン上にキーフレームを配置して短いアニメーションを作成し、プレビュー・保存・.vrma/WebM/MP4/GIFとして書き出せます。
「🎬 Keyframes」見出し横のドロップダウンには、🕺 Pose、シーン内のカメラの数だけ動的に増減するCameraトラック(そのカメラ自身のアイコン・名前でラベル表示、例:「🎥 Camera 1」「📷 Camera 2」— Cサブタブでカメラを追加/削除/リネームするたびにこのリストも連動します)、🎬 Cam Switch、💡 Light、🌬 Wind、👀 Eyes、👄 Lip(Look at TargetのON/OFF・対象モード・マーカー座標 — 前述の視線ターゲット参照)が並びます。タイムラインには選択中トラックのキーフレームだけが表示され(ポーズ=黄、ライト=橙、Wind=水色、カメラごとのCameraトラックはそのカメラ自身の色、Cam Switchのマーカーもそのキーフレームが指すカメラ自身の色で描画されます — カメラ管理参照)、✚ Add/Update/− Deleteボタンは常に選択中トラックに対して動作します(色は連動して切り替わりますが、ドロップダウン側で既にどのトラックか分かるため、ラベル自体にはトラック名を含めていません)。マーカーを別フレームへドラッグ移動(🔀 Move)した際、移動先に別トラックのキーフレームが既にある場合は上書きせずマージされます。
🗑 Delete Modeは、キーフレームを削除するもう一つの方法です。ONにした状態で選択中トラックのマーカーをクリックすると削除、複数のマーカーをまたいでドラッグすると消しゴムのように連続削除できます。🔀 Moveとは排他(片方をONにするともう片方は自動でOFFになります)。
| コントロール | 機能 |
|-------------|------|
| トラックのドロップダウン | Add/Deleteボタン・タイムライン上のマーカー・🔀 Move/🗑 Delete Modeの対象トラックを切り替える: 🕺 Pose / カメラごとの📷 Cameraトラック / 🎬 Cam Switch / 💡 Light / 🌬 Wind / 👀 Eyes |
| ✚ Add/Update | 選択中トラックの現在フレームに、今の設定をキーフレームとして追加(既にあれば上書き) |
| − Delete | 選択中トラックの現在フレームのキーフレームを削除 |
| 📚 + From Library | Poseトラック専用。ポーズライブラリから選んで現在フレームにポーズKFとして追加 |
| 🔀 Move | ONの間はタイムライン上のマーカーをドラッグして別フレームへ移動(移動先に同じトラックのKFが既にある場合は上書きせず、そこで止まる) |
| 🗑 Delete Mode | ONの間は選択中トラックのマーカーをクリック/ドラッグして消しゴムのように削除できる。🔀 Moveとは排他 |
| ⏮ ❮ フレーム / 合計 ❯ | フレーム0へ/1フレーム戻る/現在フレームと総フレーム数/1フレーム進む |
| アクティブカメラ表示 | 読み取り専用 — 現在アクティブなカメラのアイコン・名前、または自由視点中は「🖥 Monitor」を表示するだけ。カメラの選択(切替)はCサブタブのリストで行う |
| 🖥 Monitor | 上記カメラ管理で説明した自由な第三者視点をON/OFFする。ONにするとタイムラインのカメラ関連トラックの適用対象から外れ、OFFにすると実際のカメラへ操作が戻る |
| FPS | プレビュー再生・.vrma時刻変換(time = frame / fps)・後述のVRMAキーフレームサンプリングで使うフレームレート |
| 🆕 New | タイムライン(全トラック)を全クリアして新規作成 |
| 💾 Proj | タイムライン全体をサーバー上(.kf_projects/)に名前を付けて保存/読込 |
| RP / RC | ポーズ/カメラをリセット — ノード自身のRP/RCボタンと同じ機能 |
| pose · camera · cam-switch · light · wind · eyes ステータス | 6トラックそれぞれのキーフレーム数 |
| 👁 LookAt | Look at Targetの ON/OFF切替 — カメラごとの設定ではなくモデル全体の設定であるため、Poseタブ Propertiesパネルからこちらへ移設しました |
| 🎯 Marker / 🎥 Camera | Look at Targetの対象を、ドラッグ可能なマーカーとアクティブカメラの間で切り替える — 前述の視線ターゲットを参照 |
| ↔ Mirror | 現在のポーズを左右反転 — ノード自身の↔ボタンと同じ機能 |
| ▶ / ⏸ | タイムラインの再生/一時停止。現在フレームから最後のフレームまで再生し先頭へループ。ポーズキーフレームの有無に関わらず動作する |
| 📸 Capture | ノード自身の📸 Captureボタンと同じ機能 — 現在フレームをノード出力へ送信 |
💾 Save .vrma・🎬 WebM・🎥 MP4・🎞️ GIFは以前このパネルにありましたが、ツールバーが手狭になってきたためPoseタブのKサブタブ Properties(Pose Data/Outputセクション)へ移設しました。詳細は前述のPoseタブを参照してください。
Poseトラック — Shape Keys
Shape Keysスライダーの現在値は、ポーズKFを追加/更新するたびに自動で束ねて保存されます(別トラックにはせず、キャラクターの姿勢の一部として扱う設計)。プレビュー/再生時には補間されますが、カメラ・ライト・Wind・Eyesの各KFと同様にプレビュー専用です。エクスポートされる.vrmaにはボーン回転のみが書き出されます(glTFベースの.vrma形式にはカメラ/ライト/Wind/LookAt/シェイプキーのアニメーションが存在せず、これらの書き出しは現時点では意図的にスコープ外としています)。これらまで含めて共有可能な形にしたい場合は、見たままをそのまま録画する🎬 WebM・🎥 MP4・🎞️ GIFを使ってください。
Eyesトラック
視線ターゲットのON/OFF・対象モード(Marker/Camera)・マーカー座標を、独立したトラックとして記録します。Shape Keysと違い、ポーズKFには束ねられません — ポーズを変えずに視線だけを別のタイミングでキー打ちでき、逆にポーズKFを追加/更新してもEyesトラックには一切影響しません。マーカー座標は前後のEyes KF間で線形補間され、ON/OFFと対象モードは離散値としてCam Switchのカット切替と同じように区間終端で切り替わります。他の非Poseトラックと同様、プレビュー専用であり、エクスポートされる.vrmaには含まれません。
Blinkトラック(自動瞬き)
Poseタブの Shape Keys 一覧の先頭にある 😑 Auto Blink で、VRM を自動で瞬きさせます。トグルと間隔スライダー(瞬きの平均間隔・秒。少し揺らぎを入れています)で操作します。瞬きのタイミングは時刻だけで決まるため、タイムライン再生と WebM / MP4 / GIF の書き出しでは同じフレームで瞬きます。通常のプレビューは実時間で瞬きます。Auto Blink が ON の間も、blink シェイプキーのスライダーは自分で設定した値(半目など)を保ち、ポーズKFにも瞬き途中ではなくその値が記録されます。
😑 Blink トラックは、Auto Blink の ON/OFF と間隔をキーフレームとして記録します。値は補間されず、現在フレーム以前の最後のキーがそのまま使われます。blink 表情を持つ VRM が必要です。他の非Poseトラックと同様、プレビュー専用であり、エクスポートされる.vrmaには含まれません。
Lipトラック
👄 Lip トラックは、話す内容をテキストとして記録します。Lip キーフレームは、そのフレームから自分のテキストを話し始め、次の Lip キーフレームか発話の終わりで口を閉じます。テキストを空にしたキーフレームは、そこで口を閉じます。口形はタイムラインの時刻で決まるため、再生と WebM / MP4 / GIF の書き出しで同じフレームになります(書き出しでは音声を再生しないため、口の開きは T のキーでは一定量、A のキーでは事前に解析した音量です)。新しいキーの音源は、Lip Sync 欄の キーフレーム T/A チェックボックスで決まります。T はテキストを記録し、A は選択中の音声ファイル名も記録します(キーを追加するときに解析するため、音声ファイルは Audio フォルダに残しておいてください)。S タブの口のレベル調整は両方に効きます。他の非Poseトラックと同様、プレビュー専用で、エクスポートされる .vrma には含まれません。
Cameraトラック
カメラごとに独立したCameraトラックを持ち、それぞれ{position, target, up, fov}をそのカメラ自身の前後のKF間で線形補間します(upは補間後に正規化されるため、カメラロールも滑らかにブレンドされます)。記録・再生ともに、そのカメラがアクティブである必要はありません — ✚ Add/Updateはそのカメラの現在の位置をそのまま記録します(先にヘルパーアイコンをドラッグして位置を決めても、実際に切り替えて視点を動かしても、どちらでも構いません)。再生時も、画面に映っているカメラがどれであるかに関わらず、各カメラのトラックはそのカメラ自身を動かし続けます。ある時点でそのカメラへ実際に切り替えたい場合はCam Switch KFと組み合わせてください。🖥 MonitorがONの間もCameraトラックの記録・削除自体は普通にできますが、ライブのプレビューには適用されなくなります(🖥 Monitor参照)。
Cam Switchトラック
どのカメラがアクティブかをカットとして記録します — 補間ではなく離散的な切替です(Look at TargetのON/OFFが区間終端でフェード無く切り替わるのと同じ考え方で、位置の線形補間は行いません)。ここにキーフレームを打つと、再生がそのフレームに到達した瞬間、プレビューがそのカメラの視点へ即座に切り替わります。各マーカーはそのカメラ自身の色で描画される(カメラ管理参照)ため、タイムラインを見るだけでどのカットがどのカメラのものか分かります。キーフレームとして記録するかどうかに関わらず手動でカメラを切り替えたい場合は、Cサブタブのカメラ一覧で行います。Cam Switch KFが指せるのは実在するカメラのみで、🖥 Monitorの自由視点にはトラックが無いため再生時は素通りされます(🖥 Monitor参照)。
Lightトラック
管理下の全ライト(タイプ・色・強度・位置・ターゲット・角度&ペナンブラ・距離&減衰・シャドウ — LightタブのL Propertiesパネルで編集できるのと同じ項目すべて)のスナップショットを保存します。前後のKF間の補間はライトIDでマッチングし、数値項目・位置は線形補間、それ以外(色・タイプ・ON/OFF)は区間終端で切り替わります。2つのLight KFの間でライトが追加/削除された場合、そのライトはその区間では補間されず最後に分かっている状態のまま保持されます。
Windトラック
E(Environment)サブタブの「Wind」セクションと同じ設定 — ON/OFF・強さ・向き・そよぎ・発生源マーカーのON/OFF・マーカー座標 — を保存します。補間方法はLightトラックと同様です(数値・座標項目はブレンド、ON/OFF系は区間終端で切替)。
.vrmaをポーズキーフレームとしてインポートする
.vrmaを単一クリップとして再生する(後述のVRMAアニメーション再生)代わりに、Poseトラックへ直接サンプリング読み込みすることもできます:
- ポーズライブラリのミニプレイヤー内🔑 Load KEY、またはノード / Poseタブ Properties欄の**VRMA (KEY)**から。
- クリップはタイムラインの現在のFPS設定で1フレームずつサンプリングされ(
frame = 0 … round(duration × fps))、間引かずすべてのフレームがポーズKFとして記録されます。クリップの方が長ければtotalFramesも自動的に拡張されます。 - Poseトラックに既にKFがある場合は確認ダイアログが表示されます(カメラ・ライト・WindのKFはこの操作では変更されません)。
- **VRMA (KEY)**はLight & Pose Editorが未オープンでも動作します — 自動的にPoseタブで開いてからインポートされます。
WebM書き出しはMediaRecorder+canvas.captureStream()、GIF書き出しは外部依存の無い自作エンコーダ(js/gif_encoder.js、NeuQuant色量子化+LZW)を使用し、1フレームずつ非同期でエンコードすることでフレーム数が多いタイムラインでもブラウザタブが固まらないようにしています(それでも色量子化自体は重い処理のため、フレーム数が多いGIFはエンコードに時間がかかります。ボタンにはEncode n/totalの進捗が表示されます)。MP4書き出しは、まず同じ方式でWebMを生成し、それをサーバー側のffmpegエンドポイントへ送ってH.264へ変換します(ブラウザのMediaRecorderはvideo/mp4に確実に対応していないため)。動作にはffmpegが利用可能である必要があります(システムPATH上、または同梱のimageio-ffmpeg依存経由のいずれか)。
VRMAアニメーション再生(VRMA)
.vrma(VRM Animation)ファイル — 上記のマルチトラックタイムラインとは異なる、単一の完成済みクリップ — を読み込んで、現在ロード中のVRM上で再生できます。任意のフレームで一時停止すれば、通常の静止ポーズと全く同じように扱えます — 📸 Capture / 💾 Save / ⬇️ Download はそのフレームに対してそのまま動作し、一時停止中であれば通常のドラッグ操作でボーンをさらに微調整することもできます。
クリップをそのまま再生するのではなく、編集可能なフレーム単位のキーフレームとして読み込みたい場合は VRMA の代わりに VRMA (KEY) を使ってください — 上記の
.vrmaをポーズキーフレームとしてインポートするを参照。
ヒューマノイドボーンを持つVRMモデルが読み込み済みであることが前提です(プレーンなGLB/GLTFモデルには対応していません。VRMヒューマノイドリグへのリターゲットに依存しているため)。
使い方:
- VRMを読み込んでから VRMA ボタンをクリック(またはキャンバスに
.vrmaファイルをドロップ)してアニメーションクリップを読み込む。 - ▶ / ⏸ で再生・一時停止を切り替え。シークバーをドラッグすると任意のフレームへ移動でき、ドラッグ操作で自動的に一時停止します。
- 一時停止中は通常通り📸 / 💾 / ⬇️でそのフレームを静止ポーズとしてキャプチャ・保存できます。
- ✕ でアニメーションをアンロードし、タイムラインパネルを非表示にします。同じボタンはPoseタブ Properties欄のVRMAの隣にも配置されています。
注意点:
- 新しいVRM/GLB/GLTFモデルを読み込むと、読み込み中のVRMAはクリアされます。
- 視線ターゲットがONの場合、読み込み中/再生中の
.vrmaの上からでも引き続き機能します — クリップ自身が頭・目に対して何をしていても、毎フレーム実際のターゲットの方を目・頭が追従します。
タイマーキャプチャ(⏱)
⏱ ボタンをクリックしてタイマーを開始 / 停止します。
| 状態 | 色 | 動作 |
|------|----|----|
| OFF | グレー(#555) | 自動キャプチャなし |
| ON — 待機中 | 暗い赤(#7b0000) | N 秒ごとに自動キャプチャ |
| ON — 実行瞬間 | 明るい赤(#e74c3c) | 300ms 点灯して暗い赤に戻る |
間隔は timer_interval ノードパラメータ(1〜3600 秒、デフォルト 5 秒)で指定します。
タイマー動作中は 📸 Capture ボタンは変化せず、⏱ ボタンのみ色が変わります。
インストール
Option A: ComfyUI Manager(推奨)
- ComfyUI Manager を開き、「カスタムノードをインストール」 をクリック。
comfyui-vrm-pose-editorを検索。- Install をクリックして ComfyUI を再起動。
Option B: 手動インストール
- このリポジトリを
comfyui-vrm-pose-editorという名前のフォルダでComfyUI/custom_nodes/に配置(例:git clone https://github.com/ketle-man/comfyui-vrm-pose-editor)。フォルダ名は変えないでください。ComfyUI はノードのスクリプトを/extensions/<フォルダ名>/で配信し、ComfyUI Comic Creator などは/extensions/comfyui-vrm-pose-editor/から読み込みます。 - ComfyUI を再起動。
- ノードメニューから "3D Pose Editor"(カテゴリ:
3D Pose)を追加。 - (任意)
model/に.vrm/.glb/.gltfを置くと、自動で読み込むモデルにできます — デフォルトモデルの設定を参照。モデルは同梱していません。 - (任意)Imageタブを使う場合は、ComfyUI 0.38 以降にし、
models/detection/に SAM 3D Body のモデルを置いてください。
カメラ操作
| 操作 | 動作 |
|------|------|
| 左ドラッグ | カメラ回転 |
| Ctrl + 左ドラッグ | パン(平行移動) |
| 右ドラッグ | パン(平行移動) |
| ホイール | ズーム(既定) |
| Ctrl + 右ドラッグ | ズーム — Light & Pose Editorの「Ctrl+右ドラッグでズーム」スイッチが ON のときのみ有効(後述) |
| Alt + 右ドラッグ | カメラロール(視線方向まわりにcamera.upを回転) |
| Alt + 左ドラッグ | ズーム(Node2.0 モード時) |
| ビューギズモ軸クリック | その方向へスナップ |
PC 環境によってはマウスホイールでズームできない場合があります(マウス・ドライバ依存)。Light & Pose Editor(💡) を開き、LightタブのSサブタブにある 🖱 Ctrl+右ドラッグでズーム をトグルすると、ホイールズームから Ctrl+右ドラッグズームに切り替えられます。
カメラパラメータ(FOV / Near / Point Size)
プレビュー下部にある3つのスライダーで、Perspective カメラとボーンハンドルサイズをリアルタイムに調整できます(Point SizeスライダーはLight & Pose Editorのヘッダーにも同じものが複製されています)。
| スライダー | 範囲 | 既定値 | 効果 |
|-----------|------|--------|------|
| Point Size | 0.2〜3.0 | 1.0 | ボーンハンドル(コントロールポイント)の球サイズ倍率 |
| FOV | 10°〜120° | 45° | 画角。Orthographic 表示中は 距離 × tan(fov/2) でOrthoのサイズを再計算し、両モードの見た目を一致させる |
| Near | 0.01〜5 | 0.1 | ニアクリップ面。Perspective / Orthographic 両カメラに適用される。Zファイティング対策以外では上げる必要はなく、大きくしすぎるとカメラに近いジオメトリがクリップされて消える |
ボーン操作
ボーン上の青い点(コントロールポイント)をドラッグします。
| 操作 | 動作 | |------|------| | 左右ドラッグ | Y 軸回転 | | 上下ドラッグ | X 軸回転 | | Alt + 上下ドラッグ | Z 軸回転 |
ポーズライブラリ(📚)
ノードの Pose → 📚 Library(またはLight & Pose EditorのPoseタブ内の同ボタン)から開きます。
poses/フォルダ内のポーズファイル(.json/.vroidpose)と.vrmaアニメーションを、同じサムネイル一覧に並べて表示。- 左側に1列分の幅のプレビュー列があり、実際の3Dキャンバスを埋め込みます(Light & Pose Editor自身と同じDOM移動方式)。そのため静止ポーズの適用や
.vrmaの再生がその場で実際に見えます(以前はモーダルの背後で再生されていて見えませんでした)。 - サブディレクトリフィルター:
poses/内にサブフォルダを作成してポーズをカテゴリ分けし、ドロップダウンで絞り込み。 .json/.vroidposeのサムネイルをクリックするとポーズを即時適用(プレビュー列に反映)。.vrmaのサムネイルをクリックするとプレビュー下部のミニプレイヤー(名前・✕Eject・▶/⏸・シークバー・時刻)に読み込まれ、その場で再生できますが、クリックはあくまでプレビューのみで、ノードやLight & Pose Editor側のタイムラインにはまだ反映されません。- ミニプレイヤー下部の**⬇ Load**は、プレビュー中の
.vrmaをそのまま(通常クリップとして、ノード自身のVRMAボタンと同じ形で)ノードへ反映し、Pose Libraryを閉じます。 - 🔑 Load KEYは、プレビュー中の
.vrmaをLight & Pose EditorのタイムラインへポーズKF列としてサンプリング読み込みし(.vrmaをポーズキーフレームとしてインポートするを参照)、Pose Libraryを閉じます。
- ミニプレイヤー下部の**⬇ Load**は、プレビュー中の
- 右クリックでメニュー:
- ↔️ Mirror & Apply(左右反転して適用。静止ポーズのみ)
- ⭐ お気に入り追加 / 解除
- 📝 メモ編集
- ✏️ ファイル名変更
- 🖼 サムネイル再生成(正面 / 背面)
- 💾 Save: 現在のエディタのポーズを
poses/p_HHMMSS.jsonとして保存。 - サムネイルは、読み込み中の VRM(自分で読み込んだもの、またはデフォルトモデル)で自動生成し、サーバーに保存します。次回からは小さな PNG を表示するだけです。
.vrmaは1フレーム目のポーズでサムネイルを作り、🎬 の印を付けます。生成はカードが画面に入った時点で始まり、VRM の読み込みはライブラリを開くごとに1回だけ、描画は1件ずつ順番に行います。VRM 0.x のモデル(正面が −Z)も自動で正面から撮ります。VRM が読み込まれていないときは、ヘッダーに案内が表示されます。 - 拡張子の表示は色分けされます:
.jsonは緑、.vrmaはピンク、.vroidposeは水色。
ポーズの保存/読込
| ボタン | 動作 |
|--------|------|
| ⬇️ | ポーズを pose.json としてダウンロード(ブラウザダウンロード) |
| ⬇️VP | ポーズを VRoid Studio 用の pose.vroidpose としてダウンロード(VRM のみ) |
| 💾 | ポーズをサーバー上の poses/p_HHMMSS.json に保存 |
| 📂 | ポーズファイルを読み込む(またはキャンバスへドロップ) |
対応フォーマット:
| フォーマット | 説明 |
|-------------|------|
| .json(独自形式) | ⬇️ または 💾 で保存したもの |
| .vroidpose | VRoid Studio のポーズファイル(体幹・腕・脚。指プリセットは非対応)。⬇️VP で書き出しも可能(VRM のみ)。VRoid Studio はボーンの回転ではなく VRoidCustomData の制御点からポーズを復元するため、VRoid の標準骨格で制御点を計算して書き出します。指のポーズは書き出されません(手は Natural プリセット) |
VRM0 / VRM1 互換性
ポーズ JSON は version 2 形式(クォータニオン + vrmVersion タグ)で保存されます。
異なるバージョン間(VRM0 ↔ VRM1)の変換は読み込み時に自動適用されます。
旧 version 1(オイラー角)形式のファイルにも引き続き対応しています。
ポーズ左右反転(↔)
ノードの ↔ ボタン、またはポーズライブラリの右クリックメニュー ↔️ Mirror & Apply で現在のポーズを左右反転します。
Left/Right ボーンペアを入れ替え、クォータニオンを YZ 反転 (qx, -qy, -qz, qw) して適用します。
ライトライブラリ(📚)
Light & Pose EditorのLightタブ →「L」サブタブで 📚 Library をクリックするとライブラリパネルが開きます。
| 操作 | 内容 | |------|------| | 💾 Save Current | 現在の全設定をプリセット名を付けて保存 | | プリセットカードをクリック | 保存済みの設定を即時適用 | | プリセットカードを右クリック | 名前変更・削除 | | 検索フィールド | 名前で絞り込み | | ↺ リロード | サーバーから一覧を再読み込み |
プリセットはサーバー側の .light_library/ フォルダに保存されます(ノードフォルダ内)。
ブラウザを再起動しても残り、同じ ComfyUI サーバーを使う別のマシンからも利用できます。
注意: テクスチャ画像はプリセットに保存されません。
色・強度・位置・Ground/Wall/Shadow のすべての数値設定は保存・復元されます。
地面・背景壁
Light & Pose EditorのLightタブ →「E」(Environment)サブタブにあります。
| コントロール | 機能 | |------------|------| | 🟫 Ground ON/OFF | 地面(影を受ける)の表示切替 | | Y スライダー | 地面の高さ | | 🖼 BG Wall ON/OFF | 背景壁(影を受ける)の表示切替 | | Z スライダー | 壁の奥行き | | 🎨 カラーピッカー | 面の色 | | 📁 Tex | テクスチャ画像読み込み(タイル表示) | | Tile | テクスチャの繰り返し数 | | 🕶 SC | シャドウキャッチャー — 面を透明にして影のみ表示 | | 影濃度 | 影の暗さ(0.01 〜 1.0) |
デフォルトモデルの設定
model/ フォルダにモデル(.vrm / .glb / .gltf、ファイル名は自由)を置き、Light & Pose Editor → Lightタブ → S(Settings)→ Default Model で自動で読み込むものを選びます。
| 選択 | 動作 |
|-----------|------|
| Auto | model/ の先頭(名前順)のファイル |
| ファイル名 | そのファイル |
| None | 起動時にモデルを読み込まない |
- 選択は ComfyUI のユーザーデータ(
user/<user>/vrm_pose_editor_settings.json)に保存されるため、ノードの更新・再インストールでも消えません。ノード作成時・ページ読み込み時に反映されます。Load で選択中のモデルを今のノードにすぐ読み込めます(.vrm/.glbのみ)。 - モデルは同梱していません。
model/が空のときはモデル無しで起動します(VRM ボタンで読み込めます)。 - 既定モデルが VRM なら、Pose Library のサムネイル生成にも使われます。
Node I/O
| Item | Type | Description |
|------|------|-------------|
| background_image | IMAGE (optional) | Background composited with the captured pose on the Python side |
| output_size_mode | Standard / Background / Custom | Output resolution mode |
| custom_width / custom_height | INT | Output size in Custom mode |
| timer_interval | INT | Timer capture interval in seconds (1 – 3600, default 5) |
| lip_text | STRING | Text of the Light & Pose Editor's Lip Sync box (synced when the modal closes; hidden on the node) |
| output: image | IMAGE | Captured pose image (Torch tensor) |
| output: mask | MASK | Alpha channel of the composited 3D capture layer (all-zero if no pose image) |
| output: inverted_mask | MASK | 1 - mask |
| output: lip_text | STRING | The Lip Sync text, for routing to a TTS node |
A separate Lip Sync Text node (category 3D Pose) passes a text input through as a STRING output, for routing text to a TTS node.
Technical Specs
- Frontend: JavaScript + Three.js r160 + @pixiv/three-vrm 2.1.0 (bundled locally)
- Backend: Python — Base64 PNG → PIL → Torch Tensor;
mask/inverted_maskare derived from the composited pose layer's alpha channel - Pose Library API: aiohttp routes registered via
@PromptServer.instance.routes; also serves.vrmabinaries (GET /pose_library/vrma_content) and accepts server-side.vrmasaves (POST /pose_library/save_vrma) - Lip sync & audio API:
pose_audio_server.pyserves/pose_editor/audio/*(list, file, delete) and/pose_editor/tts/*(generate, health, settings, speakers).enginein the settings picks Lemonade or VOICEVOX; VOICEVOX is called asPOST /audio_querythenPOST /synthesis, and the speaker list comes fromGET /speakers. Files go to<output>/vrm_pose_editor/Audio/. Both engines are called throughhttp.client(urllib always sendsConnection: close, which broke long audio responses), and only loopback URLs are accepted. Mouth levels live injs/lip_sync.js(localStoragekeyvrm_pose_editor.lip_levels); for A Lip keys,analyzeAudioFile()decodes the audio and stores a 50 Hz loudness envelope that the core reads per frame. - Keyframe Project Library API:
GET/POST /kf_project/*— timeline projects stored in.kf_projects/, same route pattern as the Light Library API - Light Library API:
GET/POST /light_library/*— presets stored in.light_library/asl_HHMMSS.json - Capture: letterbox-cropped to output aspect ratio (no stretching)
- Camera: Perspective (FOV adjustable 10–120°, default 45°, via node slider) / Orthographic toggle; Near clip plane adjustable (0.01–5, default 0.1, shared by both cameras) via node slider; Alt+Right-drag rolls the camera by rotating
camera.uparound the view axis (same drag-detection pattern as the existing Ctrl+Right-drag zoom) - Pose JSON: version 2 (quaternion +
vrmVersiontag, VRM0/VRM1 cross-compatible) - VRM0 quaternion: Unity left-hand → Three.js right-hand
(x, y, -z, -w) - VRM1 quaternion: VRM0 conversion + VRM0→VRM1
(x, -y, z, -w) - Pose mirror: Left↔Right bone swap + YZ-flip
(qx, -qy, -qz, qw) - Lights: managed multi-light system (Directional / Point / Spot / RectArea / Ambient); shadow restricted to DirectionalLight (VRM MToon constraint)
- Ground / BG Wall:
MeshStandardMaterial(opaque) orShadowMaterial(shadow catcher); color, texture, tile, height/depth adjustable - Background color:
scene.background = THREE.Colorvia color picker; transparent by default - Zoom mode: wheel zoom (default) or Ctrl+Right-drag zoom, toggled from the Light & Pose Editor's Light tab → S sub-tab (
editor.getZoomMode()/setZoomMode()). Persisted inlocalStorage(vrmPoseEditor_zoomMode), shared across all ComfyUI nodes and pages on the same origin - Light presets: full scene snapshot (all lights + Ground/Wall/Shadow values); texture images excluded; stored server-side as JSON files
- Core module:
js/pose_editor_core.jsexportsinitPoseEditor3D()with zero ComfyUI dependency, so it can be imported directly from external pages (e.g./extensions/comfyui-vrm-pose-editor/pose_editor_core.js) alongsidelight_editor.js/pose_library.js/pose_vrma_export.js - Wind effect: implemented entirely in
pose_editor_core.jsby overwriting eachVRMSpringBoneJoint'ssettings.gravityDir/gravityPowerevery frame (_applyWindToSpringBones()), computed as "the joint's original gravity vector (captured on model load) + a wind vector"; the vendorthree-vrmmodule is unmodified. The wind vector is a sum of sine waves at several periods so strength and direction gust gently over time (_computeWindVector()for the angle-slider mode,_computeWindVectorFromSource()for the marker mode — the latter builds a pseudo-up axis orthogonal to the marker→reference-point direction and rotates the gust around it, so it generalizes cleanly to any 3D direction). Has no effect while spring bone physics is OFF, sinceVRMSpringBoneJoint.update()returns immediately whendelta <= 0. - Wind source marker: a cone mesh (
windSourceHelperMesh) added to the scene and hidden by default, reusing the exact same pointerdown/move/up drag-on-a-camera-facing-plane logic as the 👁 LookAt marker. It is excluded fromcapture()output the same way the LookAt marker is. - VRMA playback: @pixiv/three-vrm-animation 2.1.0 (bundled locally in
js/vendor/, matching the existing three-vrm 2.1.0)..vrmafiles are loaded through a dedicatedGLTFLoaderinstance withVRMAnimationLoaderPluginregistered, retargeted onto the current VRM's normalized humanoid bones viacreateVRMAnimationClip(), and played with aTHREE.AnimationMixer(vrm.scene). Playback of a single loaded.vrmaclip (the node's own VRMA button) is driven by an explicit_vrmaPlayingflag rather thanAnimationAction.paused(the latter also zeroes outdeltaTimeduring amixer.update()-based seek, which would break scrubbing); pausing simply stops callingmixer.update()each frame, soexportPose()/capture()see the frozen bone quaternions with no changes needed on their end. An earlier version clearedvrm.lookAt.targetfor the duration any VRMA clip was loaded, on the theory that a VRMA's own LookAt track (if present) would fight with the marker/camera-driven LookAt over the same bones — this was removed once the LookAt target-mode work below made permanent coexistence the intended design (see the_applyLookAtTargetnote there for why the fight never actually needed avoiding). - LookAt target modes:
_lookAtTargetMode("marker"|"camera") picks whatvrm.lookAt.targetpoints at. Camera mode assigns a plainTHREE.Object3Dproxy (lookAtCameraProxy) rather than the live camera object directly, and copies the active camera's.positiononto it everyanimate()frame beforecurrentVRM.update()runs —Object3D.getWorldPosition()callsupdateWorldMatrix()internally, sovrm.lookAtalways reads the current-frame position with no extra lag. While 🖥 Monitor is active (activeCameraId === null), that per-frame copy switches to readingmanagedCameras.find(c => c.id === _lastActiveBeforeMonitor).config.positioninstead of the live (Monitor) camera — the sameconfigobject that helper-dragging a non-active camera already keeps live (see Multi-camera management below), so dragging that camera's helper while in Monitor mode moves the gaze with no additional wiring. - Eyes track and the Pose/LookAt split:
kf.lookAt({enabled, targetMode, position}) is read/written only by the Eyes track's own capture/delete functions. It used to also be captured and cleared by the Pose track (bundled the same way Shape Keys still are), which caused two bugs once cameras/keyframes were layered on top of the original marker-only LookAt: adding a Pose keyframe would silently overwrite whatever gaze was already keyed on a given frame with "whatever the eyes happened to be doing at pose-capture time," breaking Eyes-track interpolation between real keyframes; and — independently —editor.exportPose()bakes every humanoid bone includingleftEye/rightEyeinto pose keyframes, so the self-loadback preview clip (refreshPreview()) would carry eye-bone tracks that fought with LookAt's own per-frame bone writes.refreshPreview()now stripsleftEye/rightEyefrom each keyframe's bones before building the preview clip whenever LookAt is enabled (does not affect the bones written into a downloaded.vrma), andapplyShapeKeysForFrame()similarly skips the VRM1 lookAt-preset expression names (lookUp/lookDown/lookLeft/lookRight) while LookAt is on, in case a given model's LookAt is expression-based rather than bone-based. - Pose/LookAt coexistence fix: even after the split above, adding a single Pose keyframe still left LookAt permanently disabled.
loadVRMAFromBuffer()— the function every preview-clip rebuild and every real.vrmaload goes through — used to unconditionally setcurrentVRM.lookAt.target = null"to avoid fighting with the VRMA's own look-at track," and_applyLookAtTarget()had an earlyif (_vrmaMixer) returnguard that made every subsequent ON/OFF toggle, target-mode switch, and Eyes-keyframe application a no-op for as long as any VRMA clip (including the self-preview one) stayed loaded — which, once any Pose keyframe exists, is permanently. Both were removed:loadVRMAFromBuffer()now calls_applyLookAtTarget()instead of forcingnull, and_applyLookAtTarget()always setslookAt.targetfrom the current enabled/mode state. This is safe becauseanimate()always callscurrentVRM.update()(which runsvrm.lookAt.update()) after any_vrmaMixer.update()call in the same frame, so LookAt's own bone writes are guaranteed to be the last ones each frame regardless of whether a VRMA clip is loaded or playing. - VRMA export: three.js
GLTFExporter(bundled locally asjs/vendor/GLTFExporter.js, matching the existing three.js r160; itsTextureUtils.jsdependency lives injs/utils/). Keyframe poses ({boneName:{qx,qy,qz,qw}}, the same shapeexportPose()produces) are converted into aTHREE.AnimationClipof per-boneQuaternionKeyframeTracks named`${normalizedBoneNode.name}.quaternion`, matching the namingGLTFExporterresolves against the exported scene automatically. The export target ishumanoid.normalizedHumanBonesRoot(bones only, no mesh/material data), temporarily reset to its T-pose viaresetNormalizedPose()/setNormalizedPose()for the duration of the export (VRMA's reference skeleton must be a rest pose) and restored immediately after. A custom exporter plugin (VRMCVrmAnimationExporterPlugin, registered viaGLTFExporter.register()) adds theVRMC_vrm_animationextension in itsafterParsehook, resolving each bone's node index fromwriter.nodeMap(populated by the timeafterParseruns). Source poses from a VRM0 model have their quaternion x/z components flipped before being written, since the VRMA spec's reference space is VRM1-canonical (mirroring the flipcreateVRMAnimationHumanoidTracksapplies at load time when the playback target is VRM0) — this path is implemented but not yet verified against a real VRM0 model. - Keyframe timeline: a single flat array of frame-indexed entries,
{frame, bones?, label?, shapeKeys?, lookAt?, cameras?, cameraId?, light?, wind?, blink?}— one entry per frame can carry data for more than one track simultaneously (camerasis an object keyed by camera id, e.g.{0: {position,target,up,fov}, 2: {...}}, one entry per camera that has a keyframe at that frame). Tracks are declared as aTRACKStable rebuilt on every camera add/remove/rename (buildTracks()/refreshTracks()), keyedpose/camera:<id>(one per camera currently in the scene) /cameraSwitch/light/wind/eyes/blink. Every track exposes the same four-function accessor interface —hasData(kf)/getValue(kf)/setValue(kf, v)/clearValue(kf)— so the simple single-field tracks (built by a smallfieldAccessors(field)factory) and the nested per-camera tracks (cameraTrackAccessors(cameraId), reading/writingkf.cameras[cameraId]) are indistinguishable to everything else that drives the timeline: the track-select dropdown, the Add/Delete buttons, the marker-drawing filter, hit-testing for 🔀 Move / 🗑 Delete Mode, and the empty-entry check (isEntryEmpty(), replacing an earlier hand-written!kf.bones && !kf.camera && ...chain that had to be edited by hand every time a track was added). Camera keyframes ({position, target, up, fov}) are linearly interpolated per-camera (upis normalized after interpolation so camera roll blends smoothly) and applied viaeditor.updateCameraConfig(cameraId, state), which writes straight into that camera's stored config regardless of whether it's the one currently on screen. Cam Switch keyframes store onlycameraId(a plain number, deliberately checked with!== undefinedeverywhere rather than a truthy check, since a camera's id can be0); playback walks the sorted list of Cam Switch keyframes and snapseditor.setActiveCameraId()to whichever one's frame is<= currentFrame— no interpolation, matching the same "switches at the interval's end" pattern LookAt's ON/OFF uses. Light keyframes store{lights: [...editor.getLights()]}, matched between keyframes by lightid; Wind keyframes store{enabled, strength, direction, turbulence, sourceEnabled, sourcePosition}. Both are interpolated by a shared genericlerpLightConfig(a, b, t)that inspects each field's shape at runtime (number → lerp,{x,y,z}→ vector-lerp, anything else → switches over att=1), reused as-is for Wind since its fields happen to fit the same three shapes. Shape Keys ({name: value}) are bundled onto pose keyframes rather than living on their own track; LookAt ({enabled, targetMode, position}, stored underkf.lookAt) used to be bundled the same way but now lives on its owneyestrack — see the LookAt bullets below for why that split was necessary. 🔀-Move onto an occupied frame now moves only the selected track's value (track.getValue/clearValue/setValue) rather than the whole entry — an earlier version copied the entire source entry withObject.assign(dest, moved), which silently dragged along whatever other tracks happened to share that frame. Playback is driven by the panel's ownrequestAnimationFrametimer advancing one frame every1000/fpsms and looping attotalFrames— deliberately not tied toAnimationMixer/isVRMAPlaying(), since those only exist once at least one pose keyframe has produced a loaded.vrmaclip, and theirdurationwould otherwise cap playback at the last pose keyframe instead of the full timeline. Projects (the full{fps, totalFrames, keyframes}state) are saved/loaded server-side (.kf_projects/, same pattern as light presets); amigrateLegacyCameraField()pass on load rewrites the pre-multi-camerakf.camerasingle field intokf.cameras = {0: kf.camera}for backward compatibility. - 🗑 Delete Mode: reuses the exact click/drag detection
nearestKeyframe()already provides for 🔀 Move, but instead of moving the hit keyframe it calls the selected track'sdelete()— which is hard-coded to act oncurrentFrame— after temporarily settingcurrentFrameto the hit keyframe's frame and restoring it (plus a forceddrawTimeline()) immediately after, so the playhead doesn't visibly jump to the deleted frame. Mutually exclusive with 🔀 Move (toggling one clears the other's flag and cursor style). - Multi-camera management:
managedCamerasis an array of{id, name, color, config, helperMesh}— every camera is equal, none is protected from deletion. Only the active camera ever has a live Three.js presence — it's whichever camera currently ownsperspCamera/orthoCamera/orbit(the same objects every other camera-related feature already reads from, soraycaster.setFromCamera(),renderer.render(), roll/pan/zoom, etc. needed no changes) — butgetCameraConfig(id)/updateCameraConfig(id, changes)can read/write any camera's config transparently regardless of whether it's active, which is what lets the Camera track record/scrub a non-active camera and what lets a helper-drag move one directly. Switching cameras snapshots the outgoing camera's live state into itsconfig(_captureLiveCameraConfig(): position/quaternion/up/target/fov/near/isOrtho) and loads the incoming camera'sconfigback onto the live objects (_applyCameraConfigToLive()). Non-active cameras are drawn as a small box+cone helper mesh (THREE.Group,userData.isCameraHelper/cameraId) tinted to the camera's own color and rescaled every frame to a roughly constant on-screen size (scale = distance-to-active-camera × constant); the same pointerdown/move/up handler used for light-helper dragging raycasts these helpers' child meshes, resolves the hit back to its parentGroup'suserData.cameraId, and drags it across a camera-facing plane exactly like a light. 🖥 Monitor (free third-person view) is modelled asactiveCameraId === null:_setActiveCamera(null)snapshots whichever camera was live into itsconfigand detaches the live Three.js objects from every managed camera without moving them, so the view stays exactly where you were;_setMonitorMode(on)remembers the previously-active camera (_lastActiveBeforeMonitor) as the OFF fallback, and the keyframe panel additionally re-runsapplyCameraSwitchForFrame()/applyAllCameraTracksForFrame()right after turning Monitor off so the current frame's Cam Switch state (if any) takes priority over that fallback. Helper visibility (_updateCameraHelperVisibility()) is(_cameraHelpersShown || activeCameraId === null) && c.id !== activeCameraId— so every camera shows up as a draggable helper while Monitor is on, independent of which tab/sub-tab is open, on top of the existing "C sub-tab is open" condition.getCameraConfig/updateCameraConfigalso letapplyCameraSwitchForFrame()/applyCameraTrackForFrame()early-return while Monitor is active, so timeline playback never fights the free view. - Alt+Right-drag roll fix: fixed as part of the multi-camera work — the roll handler previously always rotated
perspCamera.upeven while Orthographic was active (camera === orthoCamera), so the visible roll and the value captured into a camera'sconfigcould silently disagree. It now rotates whichever objectcameracurrently points at and re-syncsperspCamera.upafterward when Orthographic is active. - VRMA → pose keyframes:
importVrmaAsKeyframes(buffer, label)loads the buffer witheditor.loadVRMAFromBuffer(), then forf = 0..round(duration × fps)callseditor.seekVRMA(f / fps)followed byeditor.exportPose()and writes the result as a pose keyframe at framef— a straight per-frame bake with no keyframe-reduction/thinning, reusing the exact sameseekVRMA/exportPosepair the manual pose-KF capture path uses. Existing pose keyframes are cleared field-by-field (not full-entry deletion, so camera/light/wind data at those frames survives) after a confirmation dialog if any existed. The confirmation uses a customshowOverlayDialog()(with anonCancelcallback added alongside the pre-existingonOk) rather than the nativeconfirm(), since the latter blocks the tab under browser-automation tooling. - Cross-modal VRMA (KEY) bridge: the node's own "VRMA (KEY)" button and the Pose tab's duplicate must both work whether or not the Light & Pose Editor modal is currently open.
light_editor.jskeeps a module-level_activeKeyframePanelreference (set when a modal's keyframe panel is built, cleared oncleanup()) and exportsimportVrmaAsKeyframesFromNode(...): if a panel is active it's called directly; otherwisebuildModal()is invoked with apendingVrmaKeyImport: {buffer, name}argument and imports it viasetTimeout(..., 0)right after construction (deferred one tick past the modal's own DOM-embedding setup). - Node ↔ Editor sync bridge (
nodeActions):pose_editor_3d.jsbuildsnodeActions = { doCapture, loadVrmFile, loadVrmaFile, unloadVrma }and threads it throughopenLightPoseEditor()→buildKeyframePanel()/ the Pose tab's Properties panel, so duplicated buttons inside the modal (Capture, VRM/VRMA load, VRMA unload) call the exact same node-side functions instead of reimplementing their side effects (node model-buffer cache updates, node widget/label sync,updateNodeSize()). Controls with no such side effects (camera OT/PR, LookAt, FOV/Near, Mirror, Reset Pose/Camera) instead read/write the sharededitorobject directly from both sides; the node re-syncs its own button labels fromeditor's getters when the modal closes. - WebM export: renders each timeline frame with
editor.renderClean()(acapture()variant that hides bone/light/LookAt/wind-marker helpers and renders synchronously without the PNG-encode round trip), draws the canvas onto an offscreen<canvas>capped to 768px on the long edge, and pushes it into aMediaRecorderviaoffscreenCanvas.captureStream(0)+ manualtrack.requestFrame()per frame (video/webm;codecs=vp9where supported). - GIF export: same per-frame render pipeline as WebM, capped to 480px on the long edge, encoded with a bundled dependency-free encoder (
js/gif_encoder.js) implementing NeuQuant 256-color quantization and GIF LZW compression from scratch.encode()is async and yields to the event loop after each frame's quantization (the most expensive part, an O(colors²) 64³ nearest-color LUT build) so a many-frame GIF doesn't freeze the tab while encoding. - MP4 export: generates a WebM via the same pipeline, then
POSTs it topose_library_server.py's/pose_library/webm_to_mp4?fps=<fps>endpoint. Server-side,ffmpegis located viashutil.which("ffmpeg")then a fallback to theimageio-ffmpeg-bundled binary (same probing order as ComfyUI-VideoHelperSuite), and the H.264 encoder is chosen dynamically fromffmpeg -encodersoutput (libx264if present, elselibopenh264— some redistributed ffmpeg builds, e.g. StabilityMatrix's, disablelibx264for GPL-avoidance reasons).-r <fps>is applied on the input side (not the output) because the WebM's container timestamps come from wall-clock capture timing rather than the timeline's intended frame rate — reinterpreting the same frame count at the intended fps on read gives the correct duration. - Pose Library preview: when opened with a canvas reference,
pose_library.jstemporarily reparents the shared WebGL canvas into its own 280px-wide preview column using the same DOM-move + CSS-transform: scale()technique the Light & Pose Editor uses for its own preview panel, and restores the canvas's original position/style (plus, via anonClosecallback, re-triggers the caller's own scale recalculation) when the library closes. - Image → Pose (Image tab):
js/image_pose.jsuploads the image (/upload/image), queues a small API-format workflow with ComfyUI's native nodes (SAM3DBody_Loader→SAM3DBody_Predict→BuildPoseFile×2 →SaveGLB×2) via/prompt, polls/history, and downloads the two GLBs via/view.js/image_pose_solver.js(ported from a TypeScript prototype, no MediaPipe) reads theopenpose_*joint markers from themesh_style=openposeGLB and the MHR skeleton (bone_042/bone_078wrists + fingers) from themesh_style=body_meshGLB, solves VRM 1.0-convention local rotations for the normalized humanoid bones (limb twist from the bend direction, clavicle absorbs the residual shoulder line, hinge-constrained finger joints), flipsx/zfor VRM 0.x, optionally lifts the hips so the feet touch the floor, and applies everything througheditor.importPose()(version 2 JSON). No SAM 3D Body code or weights are included. - Default model:
default_model_server.pylistsmodel/(GET /pose_editor/models) and serves files from it (GET /pose_editor/models/<path>, restricted tomodel/afterresolve(), path-style so a.gltf's relative.bin/textures resolve). The choice is stored in ComfyUI user data (/userdata/vrm_pose_editor_settings.json). The node passes adefaultModelProvidertoinitPoseEditor3D();.vrm/.glbare fetched once and the same buffer is used for display and Pose Library thumbnails. Without a provider (pages other than the node), the core still falls back tojs/model.{glb,vrm,gltf}. - Save to ComfyUI output:
POST /pose_editor/save_output?ext=webm|mp4|gifwrites to<output>/vrm_pose_editor/pose_YYYYmmdd_HHMMSS[_n].<ext>. The server picks the file name, accepts only the three extensions, checks the leading bytes (EBML /ftyp/GIF87a·GIF89a), and caps the size at 1 GB. - Auto Blink: the core writes the
blinkexpression weight right beforevrm.update()in both the render loop andrenderClean(). The weight is a pure function of time (_blinkWeightAt(t, interval): blinks at(k + 0.5 + jitter(k)) × interval, close 0.06 s / hold 0.04 s / open 0.10 s,jittera hash ofk), so the keyframe panel only has to pass the timeline time (setBlinkTime(frame / fps)) during playback and export for every frame to match. While Auto Blink is on, theblinkshape key reads/writes a separate user value so pose keyframes never record a mid-blink weight. - Running outside ComfyUI's own page:
light_editor.jsand everything it imports are also imported dynamically by other pages on the same server (ComfyUI Comic Creator's/ccc), wherewindow.comfyAPIdoesn't exist. Those modules therefore never import../../scripts/api.js/app.jsstatically;js/comfy_api.jsuseswindow.comfyAPI.api.apiwhen present and falls back tofetch("/api" + route). Onlypose_editor_3d.js(the node itself) importsapp.js. - Pose Library thumbnails: keys are the md5 of the path relative to
poses/(moving the node folder or symlinking it doesn't orphan thumbnails; old absolute-path keys are migrated when listing).GET/POST /pose_library/thumbnail/{file_id}accept only a 32-hex-digit id and PNG data. A singlecreateThumbnailRenderer()per library session owns one WebGL context and one VRM, renders queued poses one at a time, and is disposed (VRMUtils.deepDispose+forceContextLoss) when the library closes.
License
MIT License
This repository does not include any SAM 3D Body code or model weights — the Image tab only calls ComfyUI's own native nodes through its HTTP API. The SAM 3D Body model is subject to its own license, which you accept when you download it. No 3D model is bundled either; screenshots use VRoid's sample model AvatarSample_F (redistribution and commercial use allowed, no credit required).
VOICEVOX is not included either. The optional VOICEVOX integration only calls the engine you installed yourself through its HTTP API. VOICEVOX and each voice library have their own terms (including a required credit) — see https://voicevox.hiroshiba.jp/term/ and https://github.com/VOICEVOX/voicevox.
このリポジトリには SAM 3D Body のコードやモデルの重みは含まれていません(Imageタブは ComfyUI 本体のネイティブノードを HTTP API 経由で呼び出すだけです)。SAM 3D Body のモデルは、それぞれのライセンスに同意して各自で導入してください。3D モデルも同梱していません。スクリーンショットには VRoid のサンプルモデル AvatarSample_F(再配布・商用利用可、クレジット不要)を使用しています。
VOICEVOX も同梱していません。任意の VOICEVOX 連携は、ユーザーが自分でインストールしたエンジンを HTTP API 経由で呼び出すだけです。VOICEVOX と各音声ライブラリにはそれぞれ独自の利用規約(クレジット表記を含む)があります。https://voicevox.hiroshiba.jp/term/ と https://github.com/VOICEVOX/voicevox を参照してください。