
Load GIF as Video
Loads an animated GIF/APNG/WEBP as a VIDEO stream, loops any VIDEO with variable playback speed, loads a frame range of a video file with a crop and a loop-point finder, and saves a VIDEO or image batch back out as an animated GIF (with a full set of color quantizers and dithering filters) or an animated WebP
Nodes (5)
Load GIF as Video — your GIF wants to loop, this node finally lets it
Your Clip Doesn't Loop. This Node Finds the Frame Where It Does
Loop Video — when your footage is 2 seconds and the video needs to be 20
The loop that survives a chat window without turning into soup
The node that finally gets animated GIFs out of ComfyUI looking right
ComfyUI-LoadGifAsVideo
English | 日本語
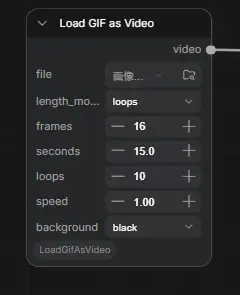
Three nodes for turning short looping material into a VIDEO stream of the length you actually need:
- Load GIF as Video — reads an animated GIF / APNG / animated WEBP from the ComfyUI input directory.
- Loop Video — takes any existing VIDEO (e.g. a short MP4 from the stock
Load Video) and loops it. - Load Video (Trim & Loop Assist) — loads a frame range of an MP4 / WEBM / MKV… file, optionally cropped, from a panel that scrubs the file and finds the frames where the picture repeats, so a seamless loop can be cut before it goes into
Loop Video.
Plus two extra nodes for the other direction, so an animation can come back out of the workflow as well as go in:
- Save as GIF — writes a VIDEO or an image batch back out as an animated GIF, with a full set of color quantizers and dithering filters.
- Save as Animated WebP — the same node without the palette: writes an animated WebP, lossless or lossy, with the same frame-dropping, scaling and tone controls.
Why
An animated GIF can be opened with the stock Load Video node, but it plays through exactly once and then ends — which makes it awkward to use as source material. Most GIFs are drawn to be looped forever, so a single pass is rarely the clip you actually wanted.
These nodes start from the animation as it looks while looping, and let you cut video material out of it at any length you ask for — a number of frames, a duration in seconds, or a number of full loops — with an adjustable playback speed. A one-second GIF becomes a clean five-second clip without chaining an image-batch loader, a frame counter and Create Video.
Nodes
Load GIF as Video
| Input | Type | Description |
| --- | --- | --- |
| file | COMBO (upload) | Animated GIF / APNG / WEBP in the ComfyUI input directory. Drag-and-drop upload is supported. A new node starts blank and reports "No animation file selected" until you pick one. |
| length_mode | frames / seconds / loops | How the output length is specified. |
| frames | INT | Number of frames to output. Used when length_mode = frames. |
| seconds | FLOAT | Duration to output in seconds. Used when length_mode = seconds. |
| loops | INT | Number of times the animation plays through. Used when length_mode = loops. |
| speed | FLOAT | Playback speed multiplier (1.0 = original speed, 2.0 = twice as fast). |
| background | black / white | Color that transparent pixels are composited over. |
| Output | Type | Description |
| --- | --- | --- |
| video | VIDEO | The animation as a video stream. Feed it to Save Video or any VIDEO input. |
| images | IMAGE | The same frames as an image batch, for feeding a sampler directly. Saves wiring up Get Video Components. speed is baked into these frames — see Speed and the images output. |
Loop Video
Loops any VIDEO — an MP4 or WEBM via the stock Load Video, a generated video, or the output of Load GIF as Video.
| Input | Type | Description |
| --- | --- | --- |
| video | VIDEO | The video to loop. |
| length_mode | frames / seconds / loops | How the output length is specified. |
| frames | INT | Number of frames to output. Used when length_mode = frames. |
| seconds | FLOAT | Duration to output in seconds. Used when length_mode = seconds. |
| loops | INT | Number of times the video plays through. Used when length_mode = loops. |
| speed | FLOAT | Playback speed multiplier. |
| Output | Type | Description |
| --- | --- | --- |
| video | VIDEO | The looped video. |
| images | IMAGE | The looped frames as an image batch. speed is baked into these frames — see Speed and the images output. |
Audio. At speed = 1.0 the audio is looped along with the frames: the source's audio is fitted to exactly one video loop (truncated or zero-padded) and then repeated, so every loop restarts in sync with frame 0. At any other speed only the frame rate changes, which would put the audio out of sync — so the audio is dropped. If you need the audio at a different speed, retime it separately.
Load Video (Trim & Loop Assist)
Loads a frame range of a video file as a VIDEO (with the audio of that range) and as an IMAGE batch, cropped if you ask. The node has its own panel: a scrubbable preview, a draggable range and crop box, and a loop assist that lists the frames which look like the one under the playhead. All of that works on the file directly — nothing has to be queued to search.
| Input | Type | Description |
| --- | --- | --- |
| file | COMBO | Video file in the ComfyUI input directory (MP4, WEBM, MKV, MOV, AVI, …). Upload with the panel's button or drop a file onto the preview. A new node starts blank. |
| start_frame | INT | First frame of the range, counting from 0. |
| end_frame | INT | The frame the range stops before; it is not included. 0 means the end of the file. |
| crop_x, crop_y | INT | Top-left corner of the crop box in pixels. |
| crop_w, crop_h | INT | Size of the crop box in pixels. 0 runs to the right / bottom edge, so all zeros is no crop. |
| speed | FLOAT (slider) | Playback speed, −4 to 4, baked into the frames at the file's own frame rate. 2 keeps every other frame of the range, 0.5 repeats each frame, a negative value plays the range backwards. Anything but 1 drops the audio. 0 is refused. |
| Output | Type | Description |
| --- | --- | --- |
| video | VIDEO | The range, cropped, at the file's own frame rate, with its audio (at speed = 1). |
| images | IMAGE | The same frames as an image batch. |
| fps | FLOAT | The file's frame rate — the one video carries. speed does not change it. |
| width, height | INT | Size of the frames as emitted, i.e. after the crop. |
end_frame is exclusive, and that is the point. The range is start_frame <= frame < end_frame. When the loop assist finds that frame 340 looks like frame 100, set start_frame = 100 and end_frame = 340: the output is frames 100–339, and looping it jumps from 339 back to 100, which is what 340 looked like. An inclusive end would show that picture twice at the seam. The panel's two thumbnails show exactly these two frames — Start and End (excluded, loop returns here), cropped the way the node will cut them — so a seamless loop is one where they look the same.
The panel. The timeline shows the range as a blue band with a handle at each end, the playhead in red, and search hits in orange. Click or drag anywhere on it to move the playhead (the mouse wheel over the bar steps one frame, ten with Shift; elsewhere it still zooms the graph), drag the handles to move the range, or use the buttons and keys: ← / → step one frame (Shift for ten), Home / End jump to the range ends, Space plays the range in a loop, [ and ] set start_frame / end_frame to the playhead. Crop shows the crop box on the preview; drag its edges or corners, or move it, pick an aspect ratio, or type a size. Everything the panel does lands in the ordinary widgets above it, and typing into those moves the panel.
Loop assist. Scrub to the frame you want the loop to start (or end) on and press Find similar. Every frame whose picture matches it at least similarity % is listed with its frame number, time and score, and marked on the timeline; the query frame itself heads the list, so one click brings you back to it after looking at the candidates. Click an entry to jump there and look at it; start / end on the entry set the range once you have decided. Two settings:
frames— how many consecutive frames have to match (default 1). With 2 or 3, the frames after the hit must match the frames after the query too, so the motion continues the same way rather than coinciding for a single picture. In practice 1 is the setting: real footage never matches that long, and animation is often drawn on twos.similarity %— the threshold. 100 is identical. Lossy encoding, noise and banding keep repeated frames from being bit-identical, so the default is 98; a re-encode of the same picture scores about 99.5, and the neighbouring frames of slow motion about 98–99. Raise it when the list is full of near-misses, lower it when a repeat you can see is missing.grid— the fingerprint used to compare frames (default32×32). Each frame is averaged down to that many cells per side first, which is what makes the comparison forgive noise, but it also means motion finer than a cell is invisible: a small object moving a few pixels can leave every frame looking the same at 32. Pick a finer grid (64, 96, 128) when a movement you can see is not separating the frames, and raisesimilaritywith it. The first search at a new grid re-reads the whole file, and a finer grid costs proportionally more memory (3 KB per frame at 32, 48 KB at 128).crop only(on by default) — when a crop box is set, compare only what is inside it. The subject then fills the whole grid instead of sharing it with the background, so the same grid resolves finer movement. Does nothing without a crop.metric—pixelsis the plain average difference over the grid, which the background dominates when the subject is small.motion-weightedweights every cell by how much it changes across the searched frames, so still background counts for nothing and the moving subject carries the comparison. Its scores run lower thanpixelsfor anything that is not a true repeat (that is the point), so expect to lowersimilaritya little.blur— a box blur, in grid cells, applied to the fingerprints before comparing. 1–2 takes the edge off codec noise and grain on fine grids; 0 is off.range only— search, and fingerprint, only the frames betweenstart_frameandend_frame. Memory then scales with the range instead of the file, which is what makes the fine grids (192 up to 640, i.e. 1.2 MB per frame) affordable: set a rough range first, tick this, choose a fine grid, and search within it. The playhead has to be inside the range. A build that would exceed 1.5 GB of fingerprints is refused with a message rather than attempted.
The scores of anything worth considering sit in a narrow band just under 100 (one grey level of codec noise already costs 0.4), so the threshold moves in steps of 0.01 and the list shows two decimals. Below the hits, the best few frames that fell short are listed dimmed as near misses with their scores, so you can see where the candidates are and set the threshold from that rather than by trial. A still passage matches itself for dozens of frames; those are collapsed into one entry (the best of the run, with the run's extent shown), and the run the query frame itself belongs to is left out (its extent is shown on the query row). That is also why a very low threshold finds nothing: once every frame clears the bar, the whole clip is one unbroken run around the query and there is nothing left to list — the panel says so instead of reporting "no match". The list stops at the best 100 hits and says so — raise the threshold rather than scrolling.
Frame numbers are exact. The first time a file is opened, the server decodes it once to record every frame's timestamp and a small fingerprint; that is what the search compares and what the thumbnails, the panel and the node all seek by, so frame 340 is the same frame everywhere. The pass takes about as long as decoding the file and is kept in memory, so later searches are instant and the node reuses it when the graph runs. The preview itself is the browser's video player; if it cannot play the container (MKV, AVI…), the panel shows server-rendered frames instead and stepping still works, only playback is off.
speed is frames, not a frame rate. The file's rate is reported unchanged on fps and carried by video, so a speed change has to be expressed in the frames themselves: at 2 the node emits every other frame of the range, at 0.5 every frame twice, at 1.5 two frames of every three — the same stepping Loop Video uses for its images output, round(count / |speed|) frames in all. A negative value walks that sequence from the end of the range back to its start, so -1 is the range reversed frame for frame. The panel previews the magnitude (the browser cannot play backwards) and its range label says what will come out. Audio is kept only at exactly 1: with the frame rate fixed, anything else would need the waveform resampled or reversed to stay in step, and no audio beats wrong audio.
Audio is cut to the same range. Length is deliberately not here — hand the output to Loop Video for that. The range is capped at 10000 frames, and so is the output after speed (a slow speed on a long range can hit it first).
Save as GIF
Writes a VIDEO or an image batch out as an animated GIF. GIF holds at most 256 colors, so the interesting part of saving one is how those colors are picked and how the colors it cannot hold are faked — which is what the quantizer and dither widgets are for.
| Input | Type | Description |
| --- | --- | --- |
| video | VIDEO (optional) | The video to save. Its own frame rate is used. |
| images | IMAGE (optional) | Frames to save, timed by the fps widget. Connect this or video, not both. |
| filename_prefix | STRING | Prefix for the file written into the ComfyUI output directory. |
| source_fps | FLOAT | The rate an images batch is meant to play at. Ignored when video is connected — a VIDEO carries its own. Describes the input only; nothing is written at this rate. |
| fps | FLOAT | Frame rate of the GIF. Below the source rate it drops frames: same running time, fewer frames, smaller file. Above it, nothing happens. |
| width | INT | Output width in pixels. 0 keeps the source width, or derives it from height. |
| height | INT | Output height in pixels. 0 keeps the source height, or derives it from width. |
| size_mode | pad / fit | What width × height means when the source's aspect ratio differs: pad writes a GIF of exactly that size with transparent bars, fit writes the largest frame that fits inside it, with no bars. |
| resample | see below | Filter used when scaling. |
| colors | INT | Palette size, 2–256. Fewer colors means a smaller file and a stronger dither pattern. |
| palette_scope | global / per_frame | One palette for the whole animation, or a fresh one per frame. |
| quantizer | see below | How the palette is chosen. |
| dither | see below | How colors the palette does not hold are approximated. |
| dither_strength | FLOAT | 0 disables the dither entirely, 1 applies it fully. In between trades banding back for less noise. |
| halftone_size | INT | Dot pitch of the halftone screen in pixels, 2–64 (halftone-* only). Bigger dots, less detail, smaller file. |
| halftone_steps | INT | How many tonal steps one halftone cell resolves, 0–255. 0 gives one per cell. Lower it to keep the dot size but coarsen the tone. |
| halftone_ink | black / white | Which end of the tonal range the dot grows from (halftone dithers only). |
| loop_count | INT | How many extra times the GIF replays. 0 loops forever. |
| frame_diff | BOOLEAN | Write only the pixels that changed since the previous frame and mark the rest transparent, so the viewer keeps what is already there. Costs one palette entry. Off by default. See Frame differencing below. |
| pillow_optimize | BOOLEAN | Pass optimize=True to Pillow's GIF writer, which trims each frame's colour table to the colours it uses. It rebuilds the palette per frame, so a global palette stops being shared and the file may grow. Off by default. |
| gamma | FLOAT | Tone correction applied to the frames before anything else, 0.1–10. 1 leaves them alone; above it brightens the midtones, below it darkens them, black and white stay put. Meant for the -mask dithers, whose ink screen makes the picture read darker (black ink) or lighter (white ink) than it is — see Mask screens. Works with every dither. |
| Output | Type | Description |
| --- | --- | --- |
| images | IMAGE | The dithered frames, byte for byte what went into the file. Handy for comparing settings without opening the GIF. |
| info | STRING | What was written: file name, size in KB and bytes, frame count, canvas size, frame rate, running time, palette size and dither. Connect it to the stock Preview as Text node to see it. |
Quantizers
| Value | After | Character |
| --- | --- | --- |
| median_cut_aforge | AForge.NET MedianCutQuantizer | Splits the color cube along its longest side at the median pixel, round-robin across cubes. Even and predictable, good on photographic frames. The default. |
| median_cut_gifsicle | gifsicle --color-method=median-cut | Same idea, but always splits whichever region holds the most pixels, and picks the split axis by luminance-weighted extent — so it spends colors where the eye looks. |
| diversity | gifsicle --color-method=diversity (XV) | Alternates between the most popular color left and the color furthest from everything chosen so far. Keeps small bright accents that median cut averages away. |
| blend_diversity | gifsicle --color-method=blend-diversity | diversity, then each chosen color is pulled toward the mean of everything that mapped to it. Slightly softer, usually slightly more accurate. |
The two diversity choosers also pick differently when dithering is on: they let a mix of two palette entries stand in for a color, which frees up slots for colors that cannot be mixed. That is automatic — the node tells them whether the result will be dithered.
Dithering filters
| Value | Family | Character |
| --- | --- | --- |
| none | — | Nearest color, no dither. Banding, but the smallest file. |
| floyd-steinberg | Error diffusion | The standard. Clean and neutral on photographic frames. The default. |
| burkes | Error diffusion | Wider spread than Floyd–Steinberg, softer grain. |
| stucki | Error diffusion | Wider still, very smooth. |
| jarvis-judice-ninke | Error diffusion | The widest classic kernel — smoothest gradients, most visible texture. |
| sierra, sierra-2, sierra-lite | Error diffusion | Progressively cheaper Sierra variants; sierra-lite is the tightest and grainiest. |
| atkinson | Error diffusion | Propagates only 6/8 of the error on purpose. Crisp, high-contrast, classic Mac look; crushes deep shadows and blown highlights. |
| bayer-2x2, bayer-4x4, bayer-8x8 | Ordered | Fixed threshold matrices, coarse to fine cross-hatch. |
| random-64x64 | Ordered | A 64×64 matrix with no repeating figure, in the spirit of gifsicle's ro64. Even grain without the Bayer weave. |
| halftone, halftone-square, halftone-diamond, halftone-brick | Ordered | Newsprint screens: a triangular, a square, a 45°-turned square and a running-bond dot lattice, sized by halftone_size and polarised by halftone_ink. Each cell is limited to two palette colors — ink and ground — which is what makes them read as printed halftone. |
| halftone-ordered, halftone-square-ordered, halftone-diamond-ordered, halftone-brick-ordered | Ordered | The same dot geometry with the two-color limit lifted, so a cell may use as many palette entries as it needs. An ordinary ordered dither on a halftone lattice: the dots stay visible but carry tone rather than just coverage, giving smoother gradients and softer edges than the screens above, at a slightly larger file. |
| halftone-mask, halftone-square-mask, halftone-diamond-mask, halftone-brick-mask | Ordered | A single-colour dot screen laid over the picture. The dot is exactly the halftone_ink colour — real black or real white — and everything it does not cover keeps the frame's own quantized colour. The lattice is identical in every frame, so it never crawls. See Mask screens. |
| halftone-mask-inverted, halftone-square-mask-inverted, halftone-diamond-mask-inverted, halftone-brick-mask-inverted | Ordered | The same screens with the two regions swapped: the picture shows through the dots and the halftone_ink colour fills the ground between them. Pixel for pixel the complement of the matching -mask method. See Mask screens. |
| halftone-poster, halftone-square-poster, halftone-diamond-poster, halftone-brick-poster | Ordered | ImageMagick's -ordered-dither. These do not search the palette at all — each channel is rounded on its own against the screen, so the picture collapses onto an even RGB grid and the dots are left carrying it. At 8 colors that is the corners of the RGB cube: hard primaries, heavy pattern, and by far the smallest file of anything here. See Poster dithers. |
The four lattices differ only in where the dots sit. halftone is gifsicle's hexagonal screen, with its rows of dots running horizontally and packed close (size×√3/2 apart); -square is an upright grid; -diamond is the same grid turned 45°, the classic newsprint mesh; -brick is a running bond — horizontal rows a full pitch apart, each shifted half a pitch against the one above so every dot sits under the gap in the row before it. Once the dots grow large — a mask screen at full strength, or the shadows of any screen — the hexagonal rows nearly touch and read as horizontal stripes, and the square grid as rows and columns. The diamond lattice's rows run diagonally, so it stays a mesh at every size; the brick lattice keeps its rows visibly staggered.
Mask screens
Every other halftone here decides a covered pixel's colour from that pixel, so a single dot ends up holding several colours — the pixels under one dot are not all the same colour in the source, and on the poster dithers the R/G/B dots come out slightly different sizes and leave a fringe around the rim.
halftone-mask, halftone-square-mask and halftone-diamond-mask paint every covered pixel the same ink instead. A dot is one flat colour, and the frame outside the dots is left as its plain nearest palette colour:
halftone_inknames the actual ink —blackis#000000,whiteis#ffffff. That colour is guaranteed to be in the palette, which costs one entry, socolors= 32 gives 31 adaptive colours plus the ink.- The screen is fixed. Same lattice, same dot size, in every frame — it depends on nothing but the frame's dimensions. A screen that tracked each frame's tone would make the dot rims flicker wherever the picture changed by even one level; measured on a 12-frame clip, a tone-following screen moved 12246 dot pixels, this one moves zero.
- Tone is carried entirely by the ground showing through the gaps, not by the dot size.
dither_strengthsets how much of the frame the dots cover, reaching half at1.0— half is where a dot screen carries the most, with dot and gap the same size, and past it the gaps close and the picture disappears.0.5covers a quarter,0removes the screen. Forhalftone-mask,halftone-square-maskandhalftone-diamond-maskthat is done by shrinking the dot inside a fixed cell.halftone-brick-maskdoes it the other way round: the dot keeps its size and the dots move apart. The pitch grows ashalftone_size/√dither_strength, rounded to whole pixels so the screen stays perfectly even, so0.5spaces them 1.4× further and0.25twice as far, with every dot the same disc it was at full strength. At small sizes the rounding means the strength moves in steps.halftone_sizesets the dot pitch — for the brick mask, the pitch at full strength, which also fixes the dot's size (a disc covering half of asize×sizecell).halftone_stepshas nothing to quantize here and is ignored.- At full strength the dots cover half of every cell, which is where a screen's rows start to touch:
halftone-maskthen reads as horizontal stripes andhalftone-square-maskas a grid.halftone-diamond-maskis the one to pick for a mesh, since its rows run diagonally;halftone-brick-maskfor staggered rows of separate, equal dots, withdither_strengthsetting the gap between them.
Unlike the poster dithers, these keep the picture's own colours in the ground — the screen masks the image rather than replacing it.
The screen changes the picture's apparent brightness, and gamma is there to correct it. At full strength half of every cell is ink, so a black screen reads about half as bright as the source and a white one about half as bright again the other way — the picture itself is untouched, but the eye averages the dots in. gamma lifts or lowers the midtones of the frames before the palette is built and the screen is laid on, and the ink is a fixed colour that never sees it, so the correction lands only on the ground between the dots. Raise it for black ink (1.5–2.5 is the useful range at full strength; 2 roughly restores the midtones), lower it for white ink (0.5–0.7). Black and white stay where they are, so highlights do not clip and shadows do not fill in. The widget works with every dither, and the images output shows the corrected result.
The -mask-inverted methods swap the two regions. halftone-mask-inverted, halftone-square-mask-inverted, halftone-diamond-mask-inverted and halftone-brick-mask-inverted use exactly the same lattice, dot and ink as their -mask counterparts, but the dots are the windows the picture shows through and the ink fills everything between them — the output is the pixel-for-pixel complement of the plain mask. dither_strength then sets how much of the picture shows, half at 1.0, so lowering it shrinks the windows (or, on the brick lattice, spreads them apart) and lets the ink take over; 0 still removes the screen rather than painting the frame solid. At full strength the two variants are the same halftone with the ink and the picture exchanged; at low strength the plain mask is a faint screen over an intact picture, and the inverted one is a field of ink with the picture peeking through small holes.
Poster dithers
halftone-poster, halftone-square-poster and halftone-diamond-poster work differently from every other dither in this node, and it is worth knowing how.
Everything else picks an adaptive palette that describes the source, then finds the nearest entry for each pixel. These two round each channel independently against the halftone screen, exactly as ImageMagick's -ordered-dither h6x6a does. The only colors that can come out are the points of an even RGB grid, so:
- They choose their own palette.
quantizerandpalette_scopehave nothing to decide and are ignored. colorsis rounded down to a cube: 8 → 2 levels per channel, 27 → 3, 64 → 4, 125 → 5, 216 or more → 6. At 2 levels the palette is the eight corners of the RGB cube, which is where the poster look comes from.- They throw away most of the source's tone on purpose. That is the point: the screen ends up carrying the picture, and the file gets dramatically smaller.
Measured on a 192×192, 12-frame clip:
| | floyd-steinberg 256 | halftone 256 | halftone-poster 216 | halftone-poster 27 | halftone-square-poster 8 |
| --- | --- | --- | --- | --- | --- |
| file size | 164 KB | 56 KB | 40 KB | 27 KB | 20 KB |
| vs. baseline | 1.0x | 2.9x | 4.1x | 6.0x | 8.1x |
dither_strength scales the screen around its midpoint here, so 0 is a plain posterize with no pattern at all and 1 is ImageMagick's own amplitude. halftone_ink works as it does for the other screens.
halftone_size behaves differently here, and not the way you would guess. For the palette-searching screens a coarser dot means a smaller file. For these it does not, because the cell size also sets how many threshold steps the screen has (steps = cells, capped at 255) — and more steps means finer tone, which means a more complicated pattern:
| halftone_size | 2 | 4 | 6 | 8 | 10 | 16 | 24 | 40 |
| --- | --- | --- | --- | --- | --- | --- | --- | --- |
| threshold steps | 4 | 16 | 36 | 64 | 100 | 255 | 255 | 255 |
| file size | 10.1 KB | 20.3 KB | 26.0 KB | 28.7 KB | 28.2 KB | 25.0 KB | 22.5 KB | 18.8 KB |
The curve peaks around size 8. Below that the extra tone costs more than the coarser dot saves; above 16 the step count is pinned at 255 and only the dot size is left to move, so it falls again. So: small cells for the smallest file, large cells for a visible dot pattern. (size 2 is small because the picture has nearly collapsed — four steps is not much tone left.)
halftone-square-poster's cell matches ImageMagick's orthogonal maps exactly: size 6 is a 6×6 cell with 36 steps, the same as h6x6o. halftone-poster does not match the angled maps — it is size × size×√3 with a step per cell, where h6x6a is 6×6 with 18 steps, since its two 45°-offset dots share ranks.
Resample filters
lanczos (default), bicubic, bilinear, hamming, box, nearest — Pillow's filters, best-quality-first for a downscale. box and hamming are softer, which leaves less high-frequency detail for the dither to chew on and often makes a smaller file. nearest is the specialist: it is the only one that keeps pixel art and hard-edged animation crisp instead of blurring it into new in-between colors the palette then has to spend entries on.
The ordered screens depend on the pixel's position alone, so they are stable frame to frame — the pattern does not crawl the way error diffusion does on animation. That is usually the reason to reach for one.
Save as Animated WebP
Writes a VIDEO or an image batch out as an animated WebP. WebP stores full 24-bit color, so there is no palette to choose and nothing to dither; everything Save as GIF does before the palette — dropping frames to fps, scaling into a box, gamma — works the same way here, and the color block is replaced by libwebp's three knobs.
| Input | Type | Description |
| --- | --- | --- |
| video | VIDEO (optional) | The video to save. Its own frame rate is used. |
| images | IMAGE (optional) | Frames to save, timed by source_fps. Connect this or video, not both. |
| filename_prefix | STRING | Prefix for the file written into the ComfyUI output directory. |
| source_fps | FLOAT | The rate an images batch is meant to play at. Ignored when video is connected. |
| fps | FLOAT | Frame rate of the WebP, up to 60. Below the source rate it drops frames: same running time, fewer frames, smaller file. Above it, nothing happens. |
| width | INT | Output width in pixels. 0 keeps the source width, or derives it from height. |
| height | INT | Output height in pixels. 0 keeps the source height, or derives it from width. |
| size_mode | pad / fit | What width × height means when the source's aspect ratio differs: pad writes a file of exactly that size with transparent bars, fit writes the largest frame that fits inside it, with no bars. |
| resample | see Resample filters | Filter used when scaling. |
| lossless | BOOLEAN | On (default): every pixel is stored exactly and the file decodes back to the images output bit for bit. Off: lossy VP8, much smaller on photographic material. |
| quality | INT | Lossy: picture quality, 0–100. Lossless: compression effort, 0 (fast) to 100 (slow) — the pixels are exact either way. |
| method | INT | How hard libwebp tries, 0 (fastest) to 6 (slowest, smallest). Changes only time and size, never the picture at a given quality. |
| loop_count | INT | How many times the animation plays. 0 loops forever. |
| gamma | FLOAT | Tone correction applied before encoding, 0.1–10. 1 leaves the frames alone; above it brightens the midtones, below it darkens them, black and white stay put. |
| Output | Type | Description |
| --- | --- | --- |
| images | IMAGE | The file read back: under lossless exactly the frames that went in, under lossy what the viewer will actually see, which is the thing to compare quality settings on. |
| info | STRING | What was written: file name, size, frame count, canvas size, frame rate, running time, mode, quality and method. Connect it to the stock Preview as Text node to see it. |
Behavior
The length and speed controls behave identically in Load GIF as Video and Loop Video. Load Video (Trim & Loop Assist) has no length control — it cuts a range and leaves looping to Loop Video — and its speed works differently: it is baked into the frames at the file's own rate (and can be negative), see that node.
Frame rate is automatic. The video output's frame rate comes from the source itself — its own rate multiplied by speed. There is no fps widget. Frames are never interpolated, and at speed = 1.0 both outputs are a frame-for-frame copy of the source at its original timing.
Looping. If the requested length is longer than the source, it repeats from the beginning as many times as needed (and is cut off mid-loop if the length does not divide evenly). If the requested length is shorter, the source is simply truncated.
length_mode = loops gives you whole passes with no partial loop at the end: loops = 3 on a 12-frame source is always exactly 36 frames. speed does not change that count — it only changes the frame rate, and therefore how long those 36 frames take to play.
seconds and speed interact. Because speed scales the output frame rate, asking for 2 seconds at speed = 2.0 produces twice as many frames as at speed = 1.0 — i.e. you see twice as much of the source in the same 2 seconds. That is the intended meaning of "faster".
Speed and the images output
An IMAGE batch carries no frame rate, so a speed expressed as one — the way the video output does it — is lost the moment you hand the batch to Create Video or a Video Combine node with its own fps widget. The images output therefore expresses the same speed change as frames instead: it steps speed source frames per output frame, over however many frames it takes to cover the same duration the video output covers. Played back at the source's own rate, images is the same length and shows the same motion as video.
The practical consequence is that images does not always have the same frame count as video. On an 8-frame, 10 fps source with length_mode = frames, frames = 16:
| speed | video | images | Both play for |
| --- | --- | --- | --- |
| 0.5 | 16 frames @ 5 fps | 32 frames (each source frame twice) | 3.2 s @ 10 fps |
| 1.0 | 16 frames @ 10 fps | 16 frames (identical to video) | 1.6 s @ 10 fps |
| 2.0 | 16 frames @ 20 fps | 8 frames (every other source frame) | 0.8 s @ 10 fps |
So slowing down duplicates frames into images, and speeding up drops them. If you need every source frame in the batch, leave speed at 1.0 and change the rate downstream instead. The video output is unaffected either way — it never duplicates or drops anything.
Frame limit. Output is capped at 10000 frames; exceeding it raises rather than trying to allocate the memory. This applies to images too, so a very low speed on a long output can hit the limit even when video is well under it.
Load GIF as Video only
Variable frame delays. GIFs may give every frame a different delay. Since a video has one frame rate, such an animation is resampled (nearest frame, no blending) onto its own average rate; the frame count and the total duration are preserved. Animations with a single uniform delay pass through untouched.
Transparency. VIDEO carries no alpha channel, so transparent pixels are composited over the background color.
Very short delays. GIFs that declare a delay of 0ms or 10ms mean "as fast as possible"; browsers render those at 100ms and so does this node.
Save as GIF only
Seeing the file size. The info output reports what was actually written, which is the number worth watching while tuning colors, dither, fps and halftone_size:
ComfyUI_00042_.gif
106.2 KB (108,758 bytes)
12 frames · 192×192 · 12 fps · 1.00 s
64 colors · floyd-steinberg
Connect it to the stock Preview as Text node (PreviewAny) to read it in the graph. It is a normal STRING, so it can also be fed anywhere else a string goes.
Dropping frames. fps is the rate the GIF is written at, and lowering it past the source rate drops frames rather than slowing the animation down. 60 frames of 30fps material at fps = 10 becomes 20 frames that still run for two seconds. This is the cheapest control over file size there is — roughly linear, and unlike colors or dither it costs nothing in the frames that remain:
| fps (from 24fps source) | 24 | 12 | 8 | 6 | 4 |
| --- | --- | --- | --- | --- | --- |
| frames | 24 | 12 | 8 | 6 | 4 |
| file size | 244 KB | 124 KB | 83 KB | 65 KB | 45 KB |
| running time | 1.00 s | 1.00 s | 1.00 s | 1.00 s | 1.00 s |
The source rate comes from the VIDEO when one is connected, and from source_fps for an images batch. Setting fps above the source rate does nothing: duplicating frames would cost bytes and show nothing new, so the source rate is used instead.
Frame delays. GIF stores delays in hundredths of a second, so most frame rates do not land on the grid. Each delay is taken as the difference between consecutive rounded playback times rather than as one rounded delay repeated — 12fps comes out as 8, 9, 8, 8, 9… centiseconds, so the animation ends on the same wall clock as the source instead of seconds early. A delay under 2cs is re-timed to 10cs by every browser, so the output is capped at 50fps, which is the real ceiling of the format.
The halftone screen. halftone_size is the dot pitch in pixels — the distance between neighbouring dots. halftone builds a triangular (hexagonal) lattice on a size × size×√3 tile, halftone-square an upright square one on a size × size tile, halftone-diamond a square lattice turned 45° on a size×√2 square tile, so the diagonal pitch is again size, and halftone-brick a running bond on a size × 2size tile — rows size apart, alternate rows shifted by half. Coarser dots carry less of the image and compress much better, which makes this the knob for trading detail against file size. On a 192×192 six-frame clip at 64 colors:
| | floyd-steinberg | halftone 6 | 10 | 16 | 24 | 40 |
| --- | --- | --- | --- | --- | --- | --- |
| file size | 63.5 KB | 32.6 KB | 31.4 KB | 28.9 KB | 26.4 KB | 23.9 KB |
Past 255 cells (size 13 for the triangular screen, 16 for the square one, 11 for the diamond, 12 for the brick) the screen stops growing its tonal ladder and starts sharing rungs between cells, so a very coarse dot costs no more to compute than a medium one — and loses tone, which is the point.
Dot size vs. tone. A halftone cell normally resolves one tonal step per pixel of its area, so halftone_size sets the dot size and the tone together — that coupling is why the poster dithers get bigger as the cell grows. halftone_steps breaks it: it caps how many steps a cell resolves, whatever its size. Big dots with coarse tone is the smallest a halftone gets, and it is the setting to reach for when a coarser screen did not shrink the file the way you expected:
| halftone_steps (halftone-square-poster, 8 colors) | auto | 16 | 8 | 4 | 2 |
| --- | --- | --- | --- | --- | --- |
| halftone_size = 8 | 31.3 KB | 29.5 KB | 28.8 KB | 25.5 KB | 19.6 KB |
| halftone_size = 40 | 20.7 KB | 21.1 KB | 20.7 KB | 19.6 KB | 14.9 KB |
0 and anything at or above the cell count both mean "one step per cell", so the default changes nothing. It works on every halftone dither, though the effect is much larger on the poster pair (up to 1.6x) than on the palette-searching screens (~1.1x) — and on those, 2 steps is not always smaller than 4, since a two-entry plan just alternates.
halftone_ink chooses which end of the tonal range the dot grows from. black grows the darker color out of the cell center, the way ink sits on paper: small dark dots in the light areas. white grows the lighter color instead, for light dots out of a dark ground. It moves the dots without changing the average tone, so the image does not get lighter or darker either way — only the texture inverts.
Frame differencing. Off, every frame is written in full, cropped to the rectangle that changed since the previous frame — Pillow does that on its own, and folds a frame identical to the previous one into its delay. frame_diff goes further: inside that rectangle every pixel whose colour did not change is written as transparent, and the frame is flagged "leave in place", so the viewer keeps the previous pixel there. It costs one palette entry, taken out of colors rather than added to it — 64 becomes 63 adaptive colours plus the transparent slot, so the colour table stays at 64 entries. It pays off when much of the frame holds still while the changes are scattered: several moving things, or a stable dither over a static background. Two small blocks moving at opposite corners of a 160×160 frame, 64 colours:
| | halftone-square | bayer-4x4 | halftone-brick-mask | none | floyd-steinberg |
| --- | --- | --- | --- | --- | --- |
| off | 40.6 KB | 47.1 KB | 34.0 KB | 17.0 KB | 70.1 KB |
| frame_diff | 11.0 KB | 12.2 KB | 9.8 KB | 6.0 KB | 64.6 KB |
It does nothing for a single moving object, where the rectangle was already tight. Error diffusion gains little because nearly every pixel changes every frame, and per_frame gains little because each new palette re-colours the static parts as well. The images output is unaffected: it is always the full composited frames, and the written file decodes back to exactly it.
pillow_optimize hands the same job to Pillow's own optimize=True, which also trims each frame's colour table to the colours that frame uses. That rebuilds the palette per frame, so under global the frames stop sharing one table and the file can grow rather than shrink. Both toggles are off by default; the size in info says whether either helped.
Global vs. per-frame palettes. global builds one palette from every frame and writes it once as the GIF's global color table — no color flicker between frames, and no per-frame table to pay for (768 bytes each on a 256-color GIF). per_frame gives each frame its own palette, which is more accurate on animations whose content changes a lot, at the cost of a larger file and some flicker in flat areas.
Output size and transparent bars. width and height set a box, and the frame is scaled to fit inside it keeping its aspect ratio — it is never stretched. size_mode decides what happens to the room left over when the box and the source disagree about aspect ratio:
pad(default): the box is the canvas. The frame is centred and whatever is left over is written as GIF transparency, so a 4:3 clip on a square canvas gets transparent bars top and bottom and the file is exactlywidth×height. Use this when the GIF has to be a fixed size.fit: the box is an upper bound. The frame is written at the largest size that fits inside it and nothing is padded, so a 4:3 clip into a 512 × 512 box comes out 512 × 384. Use this when you want "no bigger than" rather than "exactly".
Leave either axis at 0 to derive it from the other, or both at 0 to keep the source size; with fewer than two axes given there is nothing to pad and the two modes are identical.
The transparent slot costs one palette entry, so a letterboxed GIF quantizes to at most 255 colors instead of 256. The bars are transparent in the file itself; in the images output — which has no alpha channel — they come out as whichever color ended up in that slot, normally black. fit never reserves the slot, so it keeps all 256.
Transparency in the picture. Neither VIDEO nor IMAGE carries an alpha channel in ComfyUI, so the picture area is always written fully opaque. Only the letterbox bars are transparent. Composite onto a background before saving if you need transparency inside the frame.
Where this differs from the references. These are re-implementations, not bit-exact ports, and a few of the choices are deliberate:
- Colors are compared in plain 8-bit sRGB, as AForge does. gifsicle measures in a 15-bit gamma-corrected space; using one space throughout keeps every quantizer and every dither here comparable.
- Error diffusion runs in raster order, as AForge does. gifsicle alternates direction row by row.
- The diffused error is carried at full float precision. AForge writes it back into a byte buffer, where it saturates and is quietly lost at the extremes.
- Ordered dither plans are built on a 5-bit-per-channel source lattice, which is what makes gifsicle's plan-based approach affordable on true-color input. The snap error is at most ~4/255, far below the palette spacing any dither is working against.
atkinsonuses the published kernel. gifsicle's own Atkinson adds one neighbor twice and drops the lower-left one.
Save as Animated WebP only
Lossless or lossy. lossless is on by default, because an animation that has been through a workflow usually deserves to come out as it went in, and a lossless WebP is still smaller than the GIF of the same frames. Lossy WebP is a different thing: it is VP8 video coding applied frame by frame, and on photographic or rendered material it is smaller by an order of magnitude again, at the cost of the softness and ringing quality controls. On a 192×192 twelve-frame clip (a gradient, a soft blob and a moving hard-edged block):
| | Save as GIF 256 colors | Save as GIF 64 colors | lossless | lossy 90 | lossy 80 | lossy 60 |
| --- | --- | --- | --- | --- | --- | --- |
| file size | 226.7 KB | 161.3 KB | 140.2 KB | 9.2 KB | 5.8 KB | 3.6 KB |
quality and method under lossless. Both still do something, but only to the encoder's effort: quality 0–100 is libwebp's lossless search depth and method 0–6 its search breadth, and the output is exact at every setting. The returns are small and not guaranteed — on the clip above, quality 100 with method 6 took fifty times as long as the defaults and came out 4% larger. Leave the defaults unless a particular file is worth the wait, and read the size in info.
Frame durations. WebP stores durations in milliseconds, so most frame rates land on the grid almost exactly; the same bounded rounding as the GIF node is used (12fps is 83, 84, 83, 83, 84… ms), so the running time matches the source. fps is capped at 60: a frame of 10 ms or less is where browsers start re-timing GIF frames to 100 ms, and staying clear of it costs nothing.
Transparent bars. Under pad the letterbox bars are written as real alpha, and a file with no bars carries no alpha at all. The images output composites the bars onto black, the way the GIF node's does. As with GIF, the picture itself is always opaque: neither VIDEO nor IMAGE carries an alpha channel in ComfyUI.
Progress and cancel. The node's progress bar runs over three passes — converting the frames, encoding them, reading the file back — and Cancel takes effect between frames of whichever is running, so a long lossless encode at method 6 stops within a frame or two. Nothing is written until the encode is complete, so a cancelled job leaves no file behind.
Installation
Via ComfyUI Manager, or clone into ComfyUI/custom_nodes/:
cd ComfyUI/custom_nodes
git clone https://github.com/id-fa/ComfyUI-LoadGifAsVideo
Then restart ComfyUI. There are no extra Python dependencies — Pillow, NumPy, PyTorch and PyAV all ship with ComfyUI.
Requires a ComfyUI version that has the VIDEO type (comfy_api.input_impl). On older builds the nodes load but raise a clear error when run.
License
MIT.
The quantizers and dithering filters are clean-room implementations written from the published descriptions of the algorithms: Heckbert's median cut, XV's modified diversity method (Bradley/Lane), the Floyd–Steinberg, Burkes, Stucki, Jarvis–Judice–Ninke, Sierra and Atkinson error-diffusion kernels, Bayer's ordered threshold matrices, and Joel Yliluoma's positional dithering against an arbitrary palette. They follow the behavior of AForge.NET's AForge.Imaging.ColorReduction filters and of gifsicle's --color-method / --dither options — both of which are themselves re-implementations of that same published work. No code was copied from either project, and neither is a dependency. (AForge.NET is LGPLv3 and gifsicle is GPLv2; this package is MIT.)
日本語
English | 日本語
短いループ素材を、実際に必要な長さの VIDEO ストリームに変換する 3 つのノードです。
- Load GIF as Video — ComfyUI の
inputディレクトリにあるアニメーション GIF / APNG / アニメーション WEBP を読み込みます。 - Loop Video — 既存の VIDEO(標準の
Load Videoで読み込んだ短い MP4 など)を受け取ってループさせます。 - Load Video (Trim & Loop Assist) — MP4 / WEBM / MKV などの動画ファイルから、フレーム範囲を(必要ならクロップして)読み込みます。ファイルをスクラブしながら範囲を決められるパネル付きで、絵が繰り返す位置を探す「ループアシスト」により、
Loop Videoに渡す前に継ぎ目のないループを切り出せます。
おまけとして、逆方向の保存用ノードも 2 つ入っています。読み込むだけでなく、ワークフローの結果をアニメーションファイルに戻すこともできます。
- Save as GIF — VIDEO または画像バッチをアニメーション GIF として書き出します。減色アルゴリズムとディザリングフィルタを一通り備えています。
- Save as Animated WebP — 上のノードからパレット関連を取り除いたもの。アニメーション WebP を可逆または非可逆で書き出します。フレーム間引き・リサイズ・トーン補正は共通です。
このノードの主旨
アニメ GIF ファイルは標準の Load Video ノードでも開くことができますが、1 回再生したところで終了してしまうため、素材として利用するのが難しいという問題がありました。GIF の多くは延々とループする前提で作られているので、1 周だけ再生したものが欲しかった映像であることはまずありません。
このノードでは、ループ再生している状態を出発点として、任意の再生時間 / フレーム数 / ループ回数で動画素材にできます。再生速度も調整できます。1 秒の GIF を 5 秒のクリップにするのに、画像バッチローダーとフレームカウンターと Create Video を繋ぐ必要はありません。
ノード
Load GIF as Video
| 入力 | 型 | 説明 |
| --- | --- | --- |
| file | COMBO(アップロード) | ComfyUI の input ディレクトリにあるアニメーション GIF / APNG / WEBP。ドラッグ & ドロップでのアップロードにも対応しています。ノードを追加した直後は未選択状態で、ファイルを選ぶまで "No animation file selected" と表示されます。 |
| length_mode | frames / seconds / loops | 出力の長さの指定方法。 |
| frames | INT | 出力するフレーム数。length_mode = frames のときに使用されます。 |
| seconds | FLOAT | 出力する長さ(秒)。length_mode = seconds のときに使用されます。 |
| loops | INT | アニメーションを再生する回数。length_mode = loops のときに使用されます。 |
| speed | FLOAT | 再生速度の倍率(1.0 = 元の速度、2.0 = 2 倍速)。 |
| background | black / white | 透明ピクセルを合成する背景色。 |
| 出力 | 型 | 説明 |
| --- | --- | --- |
| video | VIDEO | アニメーションを動画ストリームにしたもの。Save Video などの VIDEO 入力に繋げます。 |
| images | IMAGE | 同じフレームを画像バッチとして出力したもの。サンプラーに直接渡せるので、Get Video Components を挟む手間が省けます。speed はこのフレーム自体に焼き込まれます(speed と images 出力を参照)。 |
Loop Video
任意の VIDEO をループさせます。標準の Load Video で読み込んだ MP4 や WEBM、生成した動画、Load GIF as Video の出力のいずれでも構いません。
| 入力 | 型 | 説明 |
| --- | --- | --- |
| video | VIDEO | ループさせる動画。 |
| length_mode | frames / seconds / loops | 出力の長さの指定方法。 |
| frames | INT | 出力するフレーム数。length_mode = frames のときに使用されます。 |
| seconds | FLOAT | 出力する長さ(秒)。length_mode = seconds のときに使用されます。 |
| loops | INT | 動画を再生する回数。length_mode = loops のときに使用されます。 |
| speed | FLOAT | 再生速度の倍率。 |
| 出力 | 型 | 説明 |
| --- | --- | --- |
| video | VIDEO | ループさせた動画。 |
| images | IMAGE | ループさせたフレームを画像バッチにしたもの。speed はこのフレーム自体に焼き込まれます(speed と images 出力を参照)。 |
オーディオについて。 speed = 1.0 のときは、フレームと一緒にオーディオもループします。元のオーディオをちょうど動画 1 ループ分の長さに合わせた(切り詰めるか、ゼロ埋めする)うえで繰り返すので、どのループもフレーム 0 と同期して始まります。それ以外の速度ではフレームレートだけが変化するため、オーディオがずれてしまいます。そのためオーディオは破棄されます。速度を変えたうえでオーディオが必要な場合は、別途タイムストレッチしてください。
Load Video (Trim & Loop Assist)
動画ファイルのフレーム範囲を、その範囲のオーディオ付きの VIDEO と IMAGE バッチとして読み込みます。クロップも指定できます。ノードには専用のパネルがあり、スクラブできるプレビュー、ドラッグで動かせる範囲とクロップ枠、そして再生ヘッド位置のフレームと似たフレームを一覧する「ループアシスト」を備えています。いずれもファイルに対して直接動作するので、探索のためにグラフを実行する必要はありません。
| 入力 | 型 | 説明 |
| --- | --- | --- |
| file | COMBO | ComfyUI の input ディレクトリにある動画ファイル(MP4、WEBM、MKV、MOV、AVI など)。パネルのボタンからアップロードするか、プレビューにファイルをドロップします。追加直後のノードは未選択です。 |
| start_frame | INT | 範囲の最初のフレーム(0 始まり)。 |
| end_frame | INT | 範囲がその手前で終わるフレーム。このフレーム自体は含まれません。0 はファイル末尾まで。 |
| crop_x, crop_y | INT | クロップ枠の左上座標(ピクセル)。 |
| crop_w, crop_h | INT | クロップ枠のサイズ(ピクセル)。0 は右端 / 下端まで。すべて 0 ならクロップなしです。 |
| speed | FLOAT(スライダー) | 再生速度、−4〜4。フレームレートはファイルのまま、フレーム自体に焼き込みます。2 なら範囲のフレームを 1 枚おきに、0.5 なら各フレームを 2 回ずつ、負の値なら範囲を逆再生します。1 以外ではオーディオは付きません。0 はエラーです。 |
| 出力 | 型 | 説明 |
| --- | --- | --- |
| video | VIDEO | 指定範囲をクロップしたもの。フレームレートはファイルのまま、オーディオ付き(speed = 1 のとき)。 |
| images | IMAGE | 同じフレームの画像バッチ。 |
| fps | FLOAT | ファイルのフレームレート。video が持つレートと同じで、speed では変わりません。 |
| width, height | INT | 出力フレームのサイズ、つまりクロップ後の値。 |
end_frame は範囲に含まれず、それが狙いです。 範囲は start_frame <= frame < end_frame です。ループアシストでフレーム 340 がフレーム 100 と同じ絵だと分かったら、start_frame = 100、end_frame = 340 にします。出力はフレーム 100〜339 になり、ループ再生では 339 から 100 に戻ります。100 は 340 と同じ絵なので継ぎ目が出ません。終端を含める方式だと、継ぎ目で同じ絵が 2 回表示されてしまいます。パネルの 2 枚のサムネイルはまさにこの 2 フレーム、Start と End (excluded, loop returns here) を、ノードが切り出すのと同じクロップで表示するので、両者が同じに見えればループは滑らかです。
パネル。 タイムラインには範囲が青い帯と両端のハンドル、再生ヘッドが赤、検索結果がオレンジで表示されます。クリックやドラッグで再生ヘッドを動かし(バーの上ではマウスホイールで 1 フレームずつ、Shift で 10 フレームずつ移動します。バー以外ではこれまで通りグラフのズームです)、ハンドルのドラッグで範囲を変えられます。ボタンとキーでも操作できます: ← / → で 1 フレーム移動(Shift で 10 フレーム)、Home / End で範囲の両端へ、Space で範囲をループ再生、[ と ] で再生ヘッド位置を start_frame / end_frame に設定。Crop を押すとプレビューにクロップ枠が出ます。辺や角をドラッグして拡縮、枠の内側をドラッグして移動、アスペクト比の固定やサイズの直接入力もできます。パネルでの操作はすべて上のウィジェットの値に反映され、ウィジェットに数値を入力すればパネル側も動きます。
ループアシスト。 ループの始点(または終点)にしたいフレームへスクラブして Find similar を押します。similarity % 以上で一致したフレームがフレーム番号・時刻・スコアとともに一覧され、タイムラインにもマークされます。一覧の先頭は検索元のフレーム自身なので、候補を見て回ったあとも 1 クリックで戻れます。項目をクリックするとそのフレームへ飛んで目視確認できます。決めたら項目の start / end で範囲に設定します。設定項目は 2 つです。
frames— 連続して一致させるフレーム数(省略時 1)。2 や 3 にすると、ヒットしたフレームの次以降も検索元の次以降と一致する必要があるため、たまたま 1 枚だけ似た絵ではなく、動きの続きも同じであることが期待できます。ただし実写では完全一致はまずなく、アニメは 2 コマ打ちで動くこともあるので、基本は 1 です。similarity %— しきい値。100 が完全一致です。不可逆圧縮のノイズやバンディングのため繰り返しフレームもビット単位では一致しないので、既定値は 98 です。同じ絵の再エンコードは 99.5 前後、ゆっくりした動きの隣接フレームは 98〜99 程度になります。惜しいだけのフレームばかり並ぶなら上げ、見て分かる繰り返しが出てこないなら下げてください。grid— フレーム比較に使うフィンガープリントの大きさ(既定32×32)。各フレームをまず一辺がこのセル数になるまで平均縮小してから比較します。ノイズに強いのはこのおかげですが、セルより細かい動きは見えなくなります。小さな物体が数ピクセル動いただけでは 32 では全フレームが同じに見えることがあります。見て分かる動きがあるのにフレームが区別されないときは、より細かいグリッド(64、96、128)を選び、あわせてsimilarityも上げてください。新しいグリッドでの最初の検索はファイル全体を読み直し、細かいグリッドほどメモリも比例して増えます(32 で 1 フレーム 3 KB、128 で 48 KB)。crop only(既定オン) — クロップ枠があるときは、枠の内側だけを比較します。被写体が背景と分け合わずグリッド全体を占めるので、同じグリッドでより細かい動きを区別できます。クロップがなければ何もしません。metric—pixelsはグリッド全体の単純な平均差で、被写体が小さいと背景に支配されます。motion-weightedは検索対象フレーム間での変化量で各セルに重みを付けるので、静止した背景はほぼ無視され、動いている被写体が比較を担います。本当の繰り返し以外のスコアはpixelsより低く出る(それが狙いです)ので、similarityを少し下げる前提で使ってください。blur— 比較前にフィンガープリントへ掛けるボックスぼかし(グリッドのセル単位)。細かいグリッドでは 1〜2 でコーデックノイズや粒状感を抑えられます。0 でオフ。range only—start_frameとend_frameの間のフレームだけを検索し、フィンガープリントもその範囲だけ作ります。メモリがファイル全体ではなく範囲の長さに比例するようになるので、細かいグリッド(192〜640、640 は 1 フレーム 1.2 MB)が現実的になります。先におおまかな範囲を決めてからこれをオンにし、細かいグリッドを選んで範囲内を検索してください。再生ヘッドは範囲内にある必要があります。フィンガープリントが 1.5 GB を超える構築は、実行せずメッセージで拒否されます。
検討に値するフレームのスコアは 100 のすぐ下の狭い帯に集まるため(コーデックノイズ 1 階調で既に 0.4 下がります)、しきい値は 0.01 刻みで動き、一覧は小数 2 桁で表示します。ヒットの下には、しきい値に届かなかった上位数フレームが薄い表示の「near miss」としてスコア付きで並ぶので、候補がどのあたりにいるかを見てしきい値を決められます。静止している区間は何十フレームも自分自身と一致してしまうので、連続する一致は 1 項目にまとめられ(区間内で最良のフレームを代表にし、区間の範囲も表示します)、検索元フレーム自身が属する区間は除外されます(その範囲は検索元の行に表示されます)。しきい値を極端に下げると何も見つからなくなるのも同じ理由です。全フレームがしきい値を超えると、クリップ全体が検索元を含むひと続きの区間になり、区切るものがなくなります。この場合パネルは「一致なし」ではなくその旨を表示します。一覧は上位 100 件で打ち切られ、その旨が表示されます。スクロールするより、しきい値を上げてください。
フレーム番号は正確です。 ファイルを初めて開いたとき、サーバーが一度だけ全体をデコードして各フレームのタイムスタンプと小さなフィンガープリントを記録します。検索はこれを比較し、サムネイル・パネル・ノードのすべてがこれを使ってシークするので、フレーム 340 はどこでも同じフレームです。この処理はファイルのデコードと同程度の時間がかかり、結果はメモリに保持されるため、以降の検索は一瞬で、グラフ実行時のノードも再利用します。プレビュー自体はブラウザの動画プレイヤーです。ブラウザが再生できないコンテナ(MKV、AVI など)では、代わりにサーバーが描画したフレームを表示します。コマ送りはそのまま使え、再生だけが無効になります。
speed はフレームレートではなくフレームで表現します。 ファイルのレートは fps にそのまま出力され、video もそのレートを持つので、速度の変化はフレーム自体で表すしかありません。2 なら範囲のフレームを 1 枚おきに、0.5 なら各フレームを 2 回ずつ、1.5 なら 3 枚のうち 2 枚を出力します。Loop Video が images 出力に使うのと同じ刻み方で、全体で round(フレーム数 / |speed|) 枚になります。負の値はその並びを範囲の末尾から先頭へ向かって辿るので、-1 は範囲をそのまま逆順にしたものです。パネルのプレビューは絶対値の速さで再生し(ブラウザは逆再生できません)、範囲のラベルに出力される内容が表示されます。オーディオが付くのはちょうど 1 のときだけです。フレームレートが固定なので、それ以外ではリサンプルや反転をしないと同期が取れず、間違ったオーディオより無音のほうがましだからです。
オーディオも同じ範囲に切り出されます。長さの指定は意図的にありません。出力を Loop Video に渡してください。範囲は 10000 フレームが上限で、speed 適用後の出力も同じ上限です(長い範囲に遅い速度を指定するとこちらに先に当たります)。
Save as GIF
VIDEO または画像バッチをアニメーション GIF として書き出します。GIF は最大 256 色しか持てないため、書き出しで問われるのは「どの色を選ぶか」と「持てない色をどう誤魔化すか」です。それを決めるのが quantizer と dither です。
| 入力 | 型 | 説明 |
| --- | --- | --- |
| video | VIDEO(任意) | 保存する動画。フレームレートはこの VIDEO のものがそのまま使われます。 |
| images | IMAGE(任意) | 保存するフレーム。時間は fps ウィジェットで決まります。video とどちらか一方を接続してください。 |
| filename_prefix | STRING | ComfyUI の output ディレクトリに書き出すファイル名の接頭辞。 |
| source_fps | FLOAT | images バッチが本来再生されるべきレート。video 接続時は無視されます(VIDEO 自身がレートを持つため)。入力の素性を伝えるだけで、このレートで書き出されるわけではありません。 |
| fps | FLOAT | GIF のフレームレート。元のレートより下げるとフレームを間引きます(再生時間はそのまま、フレーム数が減り、ファイルが小さくなる)。元より上げても何も起きません。 |
| width | INT | 出力の幅(ピクセル)。0 でソースの幅のまま、または height から比率で決定。 |
| height | INT | 出力の高さ(ピクセル)。0 でソースの高さのまま、または width から比率で決定。 |
| size_mode | pad / fit | ソースとアスペクト比が違うときの width × height の意味。pad はそのサイズのキャンバスに収めて余白を透過にし、fit はそのサイズに収まる最大サイズで余白なしに書き出します。 |
| resample | 下記参照 | 拡大縮小に使うフィルタ。 |
| colors | INT | パレットの色数、2〜256。少ないほどファイルは小さく、ディザの模様は強く出ます。 |
| palette_scope | global / per_frame | アニメーション全体で 1 つのパレットを使うか、フレームごとに作り直すか。 |
| quantizer | 下表参照 | パレットの選び方。 |
| dither | 下表参照 | パレットに無い色の近似方法。 |
| dither_strength | FLOAT | 0 でディザ無効、1 で完全に適用。中間ではバンディングとノイズのトレードオフになります。 |
| halftone_size | INT | 網点のピッチ(隣り合う網点の間隔、ピクセル)、2〜64。halftone-* のときのみ有効。大きいほど網点が粗くなり、情報量が減ってファイルが小さくなります。 |
| halftone_steps | INT | 網点セル 1 個が表現する階調段数、0〜255。0 でセルの面積ぶんの段数。下げると網点の大きさはそのままに階調だけを粗くできます。 |
| halftone_ink | black / white | 網点が階調のどちら側から成長するか。網点系ディザのときのみ有効。 |
| loop_count | INT | GIF を追加で何回再生するか。0 で無限ループ。 |
| frame_diff | BOOLEAN | 前フレームから変化したピクセルだけを書き、残りは透過にしてビューアに前の絵を残させます。パレットを 1 エントリ消費します。デフォルトはオフ。下の「フレーム差分」を参照。 |
| pillow_optimize | BOOLEAN | Pillow の GIF ライタに optimize=True を渡します。各フレームのカラーテーブルをそのフレームが使う色だけに詰めますが、パレットをフレームごとに組み直すため global パレットが共有されなくなり、ファイルが大きくなることもあります。デフォルトはオフ。 |
| gamma | FLOAT | フレームに最初に掛けるトーン補正、0.1〜10。1 で無補正、大きくすると中間調が明るく、小さくすると暗くなります(黒と白は動きません)。主に -mask 系ディザ向けで、インクの網点で絵が実際より暗く(黒インク)または明るく(白インク)見えるのを補正します。マスクスクリーンを参照。どのディザでも効きます。 |
| 出力 | 型 | 説明 |
| --- | --- | --- |
| images | IMAGE | ディザ後のフレーム。ファイルに書き込まれたものとバイト単位で同一です。GIF を開かずに設定を比較するのに使えます。 |
| info | STRING | 書き出した内容。ファイル名、サイズ(KB とバイト数)、フレーム数、キャンバスサイズ、フレームレート、再生時間、パレット色数、ディザ方式。標準の Preview as Text ノードに繋ぐと表示できます。 |
減色アルゴリズム(quantizer)
| 値 | 由来 | 特徴 |
| --- | --- | --- |
| median_cut_aforge | AForge.NET MedianCutQuantizer | 色立方体を最も長い辺で中央ピクセル位置から分割し、対象の立方体をラウンドロビンで選びます。均等で素直、実写系フレームに向きます。既定値。 |
| median_cut_gifsicle | gifsicle --color-method=median-cut | 同じ考え方ですが、常に最もピクセル数の多い領域を分割し、分割軸を輝度で重み付けした広がりで選びます。人の目が見る場所に色を割きます。 |
| diversity | gifsicle --color-method=diversity(XV 由来) | 「残った中で最も出現数の多い色」と「既に選んだ色から最も遠い色」を交互に選びます。median cut では平均に飲まれてしまう小さな鮮やかな差し色が残ります。 |
| blend_diversity | gifsicle --color-method=blend-diversity | diversity の後、選ばれた各色をそこに集まった色の平均へ引き寄せます。やや柔らかく、多くの場合わずかに正確です。 |
diversity 系の 2 つは、ディザを掛けるかどうかで選ぶ色そのものが変わります。ディザ有りの場合は「2 色の混色で代用できる色」を候補から外し、その枠を混色では作れない色に回します。この切り替えはノードが自動で伝えます。
ディザリングフィルタ(dither)
| 値 | 系統 | 特徴 |
| --- | --- | --- |
| none | — | 最近傍色のみ、ディザ無し。バンディングは出ますがファイルは最小。 |
| floyd-steinberg | 誤差拡散 | 標準的な選択。実写系フレームで素直かつ中庸。既定値。 |
| burkes | 誤差拡散 | Floyd–Steinberg より広く拡散し、粒状感が柔らかくなります。 |
| stucki | 誤差拡散 | さらに広く、非常に滑らか。 |
| jarvis-judice-ninke | 誤差拡散 | 古典的なカーネルの中で最も広い。グラデーションが最も滑らかで、テクスチャも最も目立ちます。 |
| sierra, sierra-2, sierra-lite | 誤差拡散 | 段階的に軽量化された Sierra 系。sierra-lite が最も引き締まって粒状感が強く出ます。 |
| atkinson | 誤差拡散 | 誤差の 6/8 だけを意図的に伝播します。輪郭が立つ高コントラストな古典 Mac 調。暗部と明部は潰れます。 |
| bayer-2x2, bayer-4x4, bayer-8x8 | 順序ディザ | 固定の閾値行列。粗い格子から細かい格子まで。 |
| random-64x64 | 順序ディザ | 繰り返し模様を持たない 64×64 行列。gifsicle の ro64 に相当する位置づけで、Bayer 特有の織り目なしに均一な粒状感が得られます。 |
| halftone, halftone-square, halftone-diamond, halftone-brick | 順序ディザ | 網点スクリーン。三角格子・正方格子・45° 回転した正方格子(斜め格子)・レンガ積み(1 行ごとに半ピッチずらした横並び)の 4 種類で、大きさは halftone_size、極性は halftone_ink で決まります。各セルをパレット 2 色(インクと地)に制限しており、これが印刷の網点らしく見える理由です。 |
| halftone-ordered, halftone-square-ordered, halftone-diamond-ordered, halftone-brick-ordered | 順序ディザ | 同じ網点配置のまま 2 色制限を外したもの。1 セルが必要なだけパレット色を使えます。ハーフトーン格子の上で動く普通の順序ディザで、網点の形は残しつつ、点が被覆率だけでなく濃淡も持ちます。上の 4 つよりグラデーションが滑らかでエッジも柔らかい代わり、ファイルは少し大きくなります。 |
| halftone-mask, halftone-square-mask, halftone-diamond-mask, halftone-brick-mask | 順序ディザ | 元絵の上に重ねる単色の網点。ドットは halftone_ink で指定した色そのもの(純黒または純白)で塗られ、ドットが覆わない部分は元フレームの色がそのまま残ります。格子は全フレームで完全に同一なので、模様が這い回りません。マスクスクリーンを参照。 |
| halftone-mask-inverted, halftone-square-mask-inverted, halftone-diamond-mask-inverted, halftone-brick-mask-inverted | 順序ディザ | 上の 4 つの絵が見える部分とマスクされる部分を入れ替えたもの。ドットの中から元絵が見え、ドットの外側が halftone_ink の色で塗り潰されます。対応する -mask とピクセル単位で完全に補集合です。マスクスクリーンを参照。 |
| halftone-poster, halftone-square-poster, halftone-diamond-poster, halftone-brick-poster | 順序ディザ | ImageMagick の -ordered-dither。パレット探索を一切行いません — 各チャンネルを網点スクリーンに対して独立に丸めるため、絵は均等な RGB グリッドに潰れ、網点だけが画を担うことになります。8 色なら RGB キューブの 8 頂点そのもので、原色が強く出てパターンも濃く、ファイルは本ノード中で群を抜いて小さくなります。ポスタライズ系ディザを参照。 |
4 種類の格子の違いは網点の並び方だけです。halftone は gifsicle の六方格子で、網点の列が水平に、しかも詰めて(行間 size×√3/2)並びます。-square は縦横に揃った正方格子、-diamond はそれを 45° 回転した、印刷でおなじみの斜め格子です。-brick はレンガ積みで、行間をピッチと同じ size にとった横一列を、1 行ごとに半ピッチずらして 1 つ上の行の隙間の真下に網点が来るようにしたものです。網点が大きくなると(マスクスクリーンの強度最大時や、どのスクリーンでも暗部)、六方格子は同じ列の網点同士がほぼ接して横縞に、正方格子は縦横の線に見えてきます。斜め格子は列が斜めに走るので、どの大きさでも網目のままです。レンガ積みは行の互い違いがそのまま見えます。
マスクスクリーン
他の網点はすべて、覆われたピクセルの色をそのピクセル自身から決めます。そのため 1 つのドットが複数の色を持つことになります(1 つのドットの下にあるピクセルは、元画像では同じ色ではないため)。ポスタライズ系では R/G/B のドットサイズがわずかにずれ、ドットの縁に色の輪郭が出ます。
halftone-mask、halftone-square-mask、halftone-diamond-mask は、覆われたピクセルをすべて同じインクで塗ります。ドットは 1 色のベタになり、ドットの外側は元フレームの最近傍パレット色のまま残ります。
halftone_inkがインクの色そのものを指定します。blackは#000000、whiteは#ffffffです。この色は必ずパレットに入るため 1 エントリを消費し、colors= 32 なら適応パレット 31 色 + インクになります。- 網点は固定です。格子の位置もドットの大きさも全フレームで同一で、フレームのサイズ以外には一切依存しません。フレームごとの明暗に追従する網点にすると、絵が 1 階調変わっただけでドットの縁が切り替わってちらつきます。12 フレームのクリップでの実測では、明暗追従型は 12246 ピクセルのドットが変化したのに対し、この方式は 0 です。
- 階調は、網点の隙間から見える地が担います。ドットの大きさは階調を表しません。
dither_strengthはフレームのどれだけをドットが覆うかを決め、1.0で半分になります。ドットと隙間が同じ大きさになる被覆率 50% が網点として最も情報を運べる状態で、それを超えると隙間が閉じて下の絵が見えなくなるためです。0.5で 25%、0で網点なしです。halftone-mask、halftone-square-mask、halftone-diamond-maskは固定のセルの中でドットを縮めてこれを実現します。halftone-brick-maskだけは逆で、ドットの大きさはそのままに間隔が広がります。 ピッチはhalftone_size/√dither_strengthを整数ピクセルに丸めたもので(模様が完全に均一になるようにするため)、0.5で 1.4 倍、0.25で 2 倍に広がり、ドットは強度最大のときと同じ円のままです。サイズが小さいと丸めのせいで強度が段階的にしか効きません。halftone_sizeは網点のピッチを決めます。レンガ積みマスクでは強度最大時のピッチで、ドットの大きさもここから決まります(size×sizeのセルの半分を覆う円)。halftone_stepsはここでは量子化する対象がないため無視されます。- 強度最大では網点が各セルの半分を覆い、ちょうど網点の列同士が接し始める大きさです。このとき
halftone-maskは横縞に、halftone-square-maskは格子線に見えます。網目状にしたいときは列が斜めに走るhalftone-diamond-mask、同じ大きさのドットを互い違いの行に並べて隙間をdither_strengthで開けたいときはhalftone-brick-maskを選んでください。
ポスタライズ系と違い、地には元絵の色が残ります。画像を置き換えるのではなく、網でマスクする方式です。
網点を重ねると絵の見かけの明るさが変わるため、その補正用に gamma があります。 強度最大では各セルの半分がインクなので、黒インクでは元絵のおよそ半分の明るさに、白インクでは逆に明るく見えます。絵そのものは触られていませんが、目はドットを平均して見るからです。gamma はパレットを作り網点を重ねる前にフレームの中間調を持ち上げたり下げたりします。インクは固定色で補正の影響を受けないので、補正が効くのはドットの隙間の地だけです。黒インクなら上げ(強度最大なら 1.5〜2.5 が実用域で、2 でおおむね中間調が戻ります)、白インクなら下げてください(0.5〜0.7)。黒と白は動かないため、ハイライトが飛んだりシャドウが潰れたりはしません。このウィジェットはどのディザでも効き、images 出力にも補正後の結果が出ます。
-mask-inverted 系は、絵が見える部分とマスクされる部分を入れ替えたものです。 halftone-mask-inverted、halftone-square-mask-inverted、halftone-diamond-mask-inverted、halftone-brick-mask-inverted は、対応する -mask と格子・ドット・インクがまったく同じで、ドットが「窓」になって中から元絵が見え、ドットの外側はすべてインクで塗り潰されます。出力は素の -mask のピクセル単位の補集合です。dither_strength はこのとき元絵が見える割合を決め、1.0 で半分になります。下げると窓が縮み(レンガ積み格子では窓の間隔が広がり)、インクの面積が増えます。0 はフレームをインクで塗り潰すのではなく、これまで通り網点を外します。強度最大では両者はインクと絵を入れ替えただけの同じ網点ですが、強度を下げると、素の -mask は無傷の絵に薄く網が乗った状態、-mask-inverted はインクの面に小さな穴から絵が覗く状態になります。
ポスタライズ系ディザ
halftone-poster、halftone-square-poster、halftone-diamond-poster だけは、他のディザとまったく別の仕組みで動きます。
他はすべて「元絵を表すパレットを適応的に作り、各ピクセルを最も近いエントリに写す」方式です。この 2 つは ImageMagick の -ordered-dither h6x6a と同じく、各チャンネルを網点スクリーンに対して独立に丸めます。出力しうる色は均等な RGB グリッドの格子点だけになるため:
- パレットを自分で決めます。
quantizerとpalette_scopeは判断する余地がなく、無視されます。 colorsは立方数に切り下げられます。8 → 各チャンネル 2 段階、27 → 3、64 → 4、125 → 5、216 以上 → 6。2 段階のときパレットは RGB キューブの 8 頂点そのもので、これがポスター調の見た目の正体です。- 元絵の階調を意図的に大きく捨てます。 それが狙いで、画を担うのは網点の側になり、ファイルは劇的に小さくなります。
192×192・12 フレームでの実測:
| | floyd-steinberg 256 | halftone 256 | halftone-poster 216 | halftone-poster 27 | halftone-square-poster 8 |
| --- | --- | --- | --- | --- | --- |
| ファイルサイズ | 164 KB | 56 KB | 40 KB | 27 KB | 20 KB |
| 基準比 | 1.0倍 | 2.9倍 | 4.1倍 | 6.0倍 | 8.1倍 |
dither_strength はここではスクリーンの振幅を中心値まわりで調整します。0 でパターンが完全に消えた単なるポスタリゼーション、1 で ImageMagick と同じ振幅です。halftone_ink は他の網点と同じように効きます。
halftone_size だけは効き方が違い、しかも直感に反します。 パレット探索型の網点では網点を粗くするほどファイルは小さくなりますが、ポスタライズ系ではそうなりません。セルサイズが閾値の段階数も決めており(段階数 = セル数、255 が上限)、段階数が増えると階調表現が細かくなってパターンが複雑になるためです。
| halftone_size | 2 | 4 | 6 | 8 | 10 | 16 | 24 | 40 |
| --- | --- | --- | --- | --- | --- | --- | --- | --- |
| 閾値段階数 | 4 | 16 | 36 | 64 | 100 | 255 | 255 | 255 |
| ファイルサイズ | 10.1 KB | 20.3 KB | 26.0 KB | 28.7 KB | 28.2 KB | 25.0 KB | 22.5 KB | 18.8 KB |
size 8 あたりが山になります。それ以下では階調が増える分のコストが網点を粗くする効果を上回り、16 以上では段階数が 255 に張り付いて網点の粗さだけが効くため再び減っていきます。つまりファイルを小さくしたいなら小さいセル、網点を目立たせたいなら大きいセルです(size 2 が小さいのは絵がほぼ潰れているからで、4 段階では階調がほとんど残りません)。
halftone-square-poster のセルは ImageMagick の直交マップと寸法が一致します。size 6 は 6×6 セル・36 段階で h6x6o と同じです。halftone-poster は傾斜マップとは一致しません。こちらは size × size×√3 でセルごとに 1 段階なのに対し、h6x6a は 6×6 で 18 段階です(45 度ずれた 2 つの網点が順位を共有するため)。
リサンプルフィルタ(resample)
lanczos(既定), bicubic, bilinear, hamming, box, nearest — Pillow のフィルタを、縮小時の品質が高い順に並べてあります。box と hamming は柔らかめで、ディザが拾う高周波成分が減るぶんファイルが小さくなることが多いです。nearest は用途が明確で、ドット絵やエッジのはっきりしたアニメーションをぼかさずに保てる唯一の選択肢です(他のフィルタは中間色を新たに作ってしまい、その色にパレットを消費させることになります)。
順序ディザ系はピクセル座標だけで決まるため、フレーム間で模様が安定します。誤差拡散のようにアニメーションで模様が這い回りません。順序ディザを選ぶ理由は多くの場合これです。
Save as Animated WebP
VIDEO または画像バッチをアニメーション WebP として書き出します。WebP は 24 ビットフルカラーを保持できるので、パレットを選ぶ必要もディザをかける必要もありません。Save as GIF がパレットより 前 に行うこと(fps へのフレーム間引き、ボックスへのリサイズ、gamma)はすべて同じ動作で、色まわりのウィジェットが libwebp の 3 つのつまみに置き換わっています。
| 入力 | 型 | 説明 |
| --- | --- | --- |
| video | VIDEO(任意) | 保存する動画。フレームレートはこの VIDEO のものがそのまま使われます。 |
| images | IMAGE(任意) | 保存するフレーム。時間は source_fps で決まります。video とどちらか一方を接続してください。 |
| filename_prefix | STRING | ComfyUI の output ディレクトリに書き出すファイル名の接頭辞。 |
| source_fps | FLOAT | images バッチが本来再生されるべきレート。video 接続時は無視されます。 |
| fps | FLOAT | WebP のフレームレート、最大 60。元のレートより下げるとフレームを間引きます(再生時間はそのまま、フレーム数が減り、ファイルが小さくなる)。元より上げても何も起きません。 |
| width | INT | 出力の幅(ピクセル)。0 でソースの幅のまま、または height から比率で決定。 |
| height | INT | 出力の高さ(ピクセル)。0 でソースの高さのまま、または width から比率で決定。 |
| size_mode | pad / fit | ソースとアスペクト比が違うときの width × height の意味。pad はそのサイズのキャンバスに収めて余白を透過にし、fit はそのサイズに収まる最大サイズで余白なしに書き出します。 |
| resample | リサンプルフィルタ参照 | 拡大縮小に使うフィルタ。 |
| lossless | BOOLEAN | オン(デフォルト): 全ピクセルをそのまま保存し、ファイルは images 出力とビット単位で一致します。オフ: 非可逆 VP8。写真的な素材ではずっと小さくなります。 |
| quality | INT | 非可逆: 画質、0〜100。可逆: 圧縮の 手間、0(速い)〜100(遅い)。可逆ではどの値でもピクセルは完全一致です。 |
| method | INT | libwebp の探索の深さ、0(最速)〜6(最も遅く、最も小さい)。同じ quality なら絵は変わらず、時間とサイズだけが変わります。 |
| loop_count | INT | アニメーションの再生回数。0 で無限ループ。 |
| gamma | FLOAT | エンコード前に掛けるトーン補正、0.1〜10。1 で無補正、大きくすると中間調が明るく、小さくすると暗くなります(黒と白は動きません)。 |
| 出力 | 型 | 説明 |
| --- | --- | --- |
| images | IMAGE | 書き出したファイルを読み戻したもの。lossless なら入力フレームそのもの、非可逆ならビューアで実際に見える絵です。quality の設定を比較するならこちらを見てください。 |
| info | STRING | 書き出した内容。ファイル名、サイズ、フレーム数、キャンバスサイズ、フレームレート、再生時間、可逆/非可逆、quality、method。標準の Preview as Text ノードに繋ぐと表示できます。 |
動作
長さと速度の制御は、Load GIF as Video と Loop Video で同じ挙動になります。Load Video (Trim & Loop Assist) には長さの指定がなく(範囲を切り出すだけで、ループは Loop Video に任せます)、speed の意味も違います。ファイルのレートのままフレームに焼き込み、負の値も取れます。そのノードの節を参照してください。
フレームレートは自動です。 video 出力のフレームレートはソース自身のレートに speed を掛けたもので、fps ウィジェットはありません。フレームの補間は一切行わず、speed = 1.0 では両方の出力が元のタイミングのままフレーム単位で忠実なコピーになります。
ループ。 要求された長さがソースより長い場合は、必要な回数だけ先頭から繰り返します(長さが割り切れない場合はループの途中で打ち切られます)。要求された長さのほうが短い場合は、単純に切り詰められます。
length_mode = loops では末尾に半端なループが残らず、必ず整数回の再生になります。12 フレームのソースに loops = 3 を指定すれば常にちょうど 36 フレームです。speed はこのフレーム数を変えません。変わるのはフレームレート、つまりその 36 フレームの再生にかかる時間だけです。
seconds と speed の関係。 speed は出力フレームレートを倍率で変えるため、speed = 2.0 で 2 秒を指定すると speed = 1.0 のときの 2 倍のフレーム数になります。つまり、同じ 2 秒間でソースを 2 倍見ることになります。これが「速くする」ということの意図した意味です。
speed と images 出力
IMAGE バッチはフレームレートを持ちません。そのため video 出力のようにフレームレートで speed を表現しても、Create Video や独自の fps ウィジェットを持つ Video Combine 系ノードにバッチを渡した時点で速度指定が失われてしまいます。そこで images 出力は、同じ速度変化をフレーム自体で表現します。出力 1 フレームあたりソースを speed フレームずつ進め、video 出力と同じ尺になるまでのフレーム数を出力します。ソース本来のレートで再生すれば、images は video と同じ長さ・同じ動きになります。
このため、images のフレーム数は video と一致するとは限りません。8 フレーム・10 fps のソースに length_mode = frames、frames = 16 を指定した場合:
| speed | video | images | 再生時間(どちらも) |
| --- | --- | --- | --- |
| 0.5 | 16 フレーム @ 5 fps | 32 フレーム(各フレームを 2 回ずつ) | 3.2 秒 @ 10 fps |
| 1.0 | 16 フレーム @ 10 fps | 16 フレーム(video と完全に同一) | 1.6 秒 @ 10 fps |
| 2.0 | 16 フレーム @ 20 fps | 8 フレーム(1 フレームおき) | 0.8 秒 @ 10 fps |
つまり、遅くすると images にはフレームが複製され、速くすると間引かれます。バッチにソースの全フレームが必要な場合は speed を 1.0 のままにして、速度は下流で変えてください。video 出力はどちらの場合も影響を受けません。複製も間引きも一切行いません。
フレーム数の上限。 出力は 10000 フレームで打ち切られます。超える場合はメモリを確保しようとせずエラーになります。これは images にも適用されるため、長い出力に非常に小さい speed を指定すると、video が上限に余裕があっても上限に達することがあります。
Load GIF as Video のみ
可変のフレームディレイ。 GIF はフレームごとに異なるディレイを持てます。動画のフレームレートは 1 つしかないため、そのようなアニメーションは自身の平均レートにリサンプリングされます(最近傍フレーム、ブレンドなし)。フレーム数と全体の長さは保たれます。ディレイが全フレーム一定のアニメーションは、そのまま無加工で通過します。
透過。 VIDEO はアルファチャンネルを持たないため、透明ピクセルは background の色に合成されます。
極端に短いディレイ。 ディレイに 0ms や 10ms を指定した GIF は「できるだけ速く」という意味です。ブラウザはこれを 100ms で再生するので、このノードも同じ扱いにします。
Save as GIF のみ
ファイルサイズの確認。 info 出力には実際に書き出した内容が入ります。colors、dither、fps、halftone_size を調整するときに見るべき数字です。
ComfyUI_00042_.gif
106.2 KB (108,758 bytes)
12 frames · 192×192 · 12 fps · 1.00 s
64 colors · floyd-steinberg
標準の Preview as Text ノード(PreviewAny)に繋ぐとグラフ上で読めます。ただの STRING なので、文字列を受け取る他のノードにも渡せます。
フレームの間引き。 fps は GIF に書き込まれるフレームレートで、元のレートより下げるとアニメーションが遅くなるのではなくフレームが間引かれます。30fps 素材 60 フレームを fps = 10 にすると 20 フレームになり、再生時間は 2 秒のままです。ファイルサイズに対して最も効果的なつまみで、削減はほぼ線形、しかも colors や dither と違って残ったフレームの画質は一切落ちません。
| fps(24fps 素材から) | 24 | 12 | 8 | 6 | 4 |
| --- | --- | --- | --- | --- | --- |
| フレーム数 | 24 | 12 | 8 | 6 | 4 |
| ファイルサイズ | 244 KB | 124 KB | 83 KB | 65 KB | 45 KB |
| 再生時間 | 1.00 秒 | 1.00 秒 | 1.00 秒 | 1.00 秒 | 1.00 秒 |
元のレートは、VIDEO を接続していればその VIDEO のもの、images バッチなら source_fps の値が使われます。fps を元のレートより上げても何も起きません。フレームを複製してもバイト数が増えるだけで新しい情報は増えないため、元のレートがそのまま使われます。
フレームディレイ。 GIF はディレイを 1/100 秒単位で保持するため、多くのフレームレートは格子上に乗りません。本ノードは「丸めた 1 フレーム分のディレイを繰り返す」のではなく、累積再生時刻を丸めた差分を各フレームのディレイにします。12fps なら 8, 9, 8, 8, 9… センチ秒となり、全体の長さが元と一致します(丸め誤差が累積して数秒早く終わることがありません)。2cs 未満のディレイはどのブラウザでも 10cs に読み替えられてしまうため、出力は 50fps で頭打ちになります。これは GIF という形式の実際の上限です。
網点スクリーン。 halftone_size は網点のピッチ(隣り合う網点の間隔、ピクセル)です。halftone は幅 size × 高さ size×√3 のタイルに三角(六方)格子、halftone-square は size × size のタイルに縦横に揃った正方格子、halftone-diamond は一辺 size×√2 のタイルに 45° 回転した正方格子を作ります(斜め方向のピッチがちょうど size になります)。halftone-brick は size × 2size のタイルにレンガ積み(行間 size、1 行おきに半ピッチずらし)を作ります。網点を粗くすると画像の情報量が減り圧縮がよく効くため、これがディテールとファイルサイズを引き換えにするつまみになります。192×192・6 フレーム・64 色での実測:
| | floyd-steinberg | halftone 6 | 10 | 16 | 24 | 40 |
| --- | --- | --- | --- | --- | --- | --- |
| ファイルサイズ | 63.5 KB | 32.6 KB | 31.4 KB | 28.9 KB | 26.4 KB | 23.9 KB |
セル数が 255 を超えると(三角格子なら size 13 以上、正方格子なら 16 以上、斜め格子なら 11 以上、レンガ積みなら 12 以上)、スクリーンは階調の段数を増やすのをやめてセル同士で段を共有し始めます。そのため非常に粗い網点でも計算量は中くらいのものと変わらず、その代わり階調が落ちます。それこそが狙いです。
網点の大きさと階調の分離。 網点セルは通常、面積のピクセル数だけ階調段数を持ちます。つまり halftone_size は網点の大きさと階調の細かさを同時に決めており、ポスタライズ系でセルを大きくするとかえってファイルが増えるのはこの結び付きが原因です。halftone_steps はこれを切り離し、セルの大きさに関わらず段数の上限を決めます。大きな網点 × 粗い階調が網点ディザで最も小さくなる組み合わせで、「網点を粗くしたのに小さくならなかった」ときに使うつまみです:
| halftone_steps(halftone-square-poster・8 色) | auto | 16 | 8 | 4 | 2 |
| --- | --- | --- | --- | --- | --- |
| halftone_size = 8 | 31.3 KB | 29.5 KB | 28.8 KB | 25.5 KB | 19.6 KB |
| halftone_size = 40 | 20.7 KB | 21.1 KB | 20.7 KB | 19.6 KB | 14.9 KB |
0 と、セル数以上の値はどちらも「セルの面積ぶんの段数」を意味するので、既定値では何も変わりません。すべての網点系ディザに効きますが、効果はポスタライズ系(最大 1.6 倍)の方がパレット探索型(約 1.1 倍)より遥かに大きく、後者では段数 2 が段数 4 より小さくなるとは限りません(2 エントリの plan は単に交互に並ぶだけになるため)。
halftone_ink は網点が階調のどちら側から成長するかを決めます。black はセル中心から暗い色が成長し、紙にインクが乗るのと同じく明るい領域に小さな黒点が並びます。white は逆に明るい色が成長し、暗い地に小さな白点が浮きます。網点の位置が入れ替わるだけで平均階調は変わらないため、どちらを選んでも画像が明るくなったり暗くなったりはせず、テクスチャだけが反転します。
フレーム差分。 オフのときも各フレームは前フレームから変化した矩形にクロップして書かれます(Pillow が自動で行い、前フレームと同一のフレームはディレイに合算されます)。frame_diff はさらに踏み込み、その矩形の中でも色が変わっていないピクセルを透過にし、フレームに「そのまま残す」を指定して、ビューアに前のピクセルを残させます。パレットを 1 エントリ消費しますが、colors に足すのではなく colors から引きます。64 なら適応パレット 63 色 + 透過スロットで、カラーテーブルは 64 エントリのままです。効くのは、画面の大部分が静止していて変化が散らばっているときです。動くものが複数ある、静止した背景に安定したディザが乗っている、などです。160×160・64 色で、対角の隅に小さなブロックが 2 つ動くクリップの実測:
| | halftone-square | bayer-4x4 | halftone-brick-mask | none | floyd-steinberg |
| --- | --- | --- | --- | --- | --- |
| オフ | 40.6 KB | 47.1 KB | 34.0 KB | 17.0 KB | 70.1 KB |
| frame_diff | 11.0 KB | 12.2 KB | 9.8 KB | 6.0 KB | 64.6 KB |
動くものが 1 つだけなら矩形クロップで既に十分なので効果はありません。誤差拡散はほぼ全ピクセルが毎フレーム変わるため効果が小さく、per_frame はパレットが変わるたびに静止部分の色も変わるためやはり効果が小さくなります。images 出力には影響しません。常に合成済みの完全なフレームで、書き出したファイルを読み戻すとそれと厳密に一致します。
pillow_optimize は同じ仕事を Pillow の optimize=True に任せるもので、加えて各フレームのカラーテーブルをそのフレームが使う色だけに詰めます。パレットをフレームごとに組み直すため、global でもフレーム間でテーブルが共有されなくなり、縮むどころか増えることもあります。どちらのトグルもデフォルトはオフです。効いたかどうかは info のサイズで確認してください。
global と per_frame パレット。 global は全フレームから 1 つのパレットを作り、GIF のグローバルカラーテーブルとして 1 回だけ書きます。フレーム間の色ちらつきが無く、フレームごとのローカルカラーテーブル(256 色なら 1 枚あたり 768 バイト)も不要です。per_frame はフレームごとにパレットを作るため、内容が大きく変わるアニメーションでは正確ですが、ファイルは大きくなり、平坦な部分でちらつきが出ます。
出力サイズと透過の余白。 width と height で枠を指定し、フレームはアスペクト比を維持したままその枠に収まるよう拡大縮小されます。引き伸ばされることはありません。枠とソースのアスペクト比が食い違うときに余った領域をどうするかは size_mode で選びます。
pad(デフォルト): 枠をそのままキャンバスにします。フレームは中央に配置され、余った領域は GIF の透過色として書き出されます。4:3 の素材を正方形に出すと上下に透明な帯が付き、ファイルはwidth×heightちょうどのサイズになります。GIF のサイズを固定したいときはこちらです。fit: 枠を上限として扱います。フレームは枠に収まる最大サイズで書き出され、余白は付きません。4:3 の素材を 512 × 512 の枠に出すと 512 × 384 になります。「ちょうど」ではなく「これ以下」にしたいときはこちらです。
片方を 0 にすればもう片方から比率で決まり、両方 0 ならソースのサイズのままです。両方指定していない場合は余白の出る余地がないため、2 つのモードは同じ結果になります。
透過にはパレットを 1 エントリ使うため、余白が付く場合の減色は 256 色ではなく最大 255 色になります。余白が透明なのはファイルの中での話で、アルファチャンネルを持たない images 出力では、そのエントリに割り当てられた色(通常は黒)として出てきます。fit では透過エントリを確保しないため、256 色すべてが使えます。
画面内の透過。 ComfyUI の VIDEO も IMAGE もアルファチャンネルを持たないため、絵の部分は常に完全不透明で書き出されます。透明になるのは余白の帯だけです。フレーム内に透過が必要な場合は、保存前に背景を合成してください。
移植元との違い。 これらは再実装であってビット単位の移植ではありません。以下は意図的な選択です。
- 色の比較は AForge と同じく 8bit sRGB 空間のユークリッド距離で行います。gifsicle は 15bit のガンマ補正空間で測りますが、本パッケージ内で空間を統一することで全ての quantizer と dither を横並びで比較できるようにしています。
- 誤差拡散は AForge と同じくラスタ順です。gifsicle は行ごとに走査方向を反転します。
- 拡散する誤差は float の精度のまま保持します。AForge は誤差をバイトバッファに書き戻すため、両端で飽和して失われます。
- 順序ディザの plan は 5bit/チャンネルに丸めた元色に対して構築します。gifsicle の plan 方式をフルカラー入力に対して現実的な速度で動かすための措置です。丸め誤差は最大でも約 4/255 で、ディザが相手にしているパレット間隔よりはるかに小さい値です。
atkinsonは公表されているカーネルを使っています。gifsicle の Atkinson 実装は 1 つの近傍を二重に加算し、左下の近傍を落としています。
Save as Animated WebP のみ
可逆か非可逆か。 lossless はデフォルトでオンです。ワークフローを通ったアニメーションは入ってきたままの絵で出ていくのが普通は望ましく、可逆 WebP でも同じフレームの GIF より小さいからです。非可逆 WebP は別物で、VP8 の動画符号化をフレームごとに適用したものです。写真的・レンダリング的な素材ではさらに桁違いに小さくなりますが、その代わり quality で決まるぼけやリンギングが乗ります。192×192・12 フレームのクリップ(グラデーション、柔らかい光の玉、エッジの立った動くブロック)での実測:
| | Save as GIF 256 色 | Save as GIF 64 色 | 可逆 | 非可逆 90 | 非可逆 80 | 非可逆 60 |
| --- | --- | --- | --- | --- | --- | --- |
| ファイルサイズ | 226.7 KB | 161.3 KB | 140.2 KB | 9.2 KB | 5.8 KB | 3.6 KB |
可逆での quality と method。 どちらも効きますが、変わるのはエンコーダの手間だけです。quality 0〜100 は libwebp 可逆モードの探索の深さ、method 0〜6 は探索の幅で、出力はどの設定でも完全一致です。見返りは小さく、保証もありません。上のクリップでは quality 100 + method 6 がデフォルトの 50 倍の時間をかけて 4% 大きく なりました。待つ価値のあるファイルでなければデフォルトのままにして、info のサイズで判断してください。
フレームの長さ。 WebP はフレームの長さをミリ秒で保持するため、ほとんどのフレームレートはほぼ格子に乗ります。GIF ノードと同じ累積丸めを使う(12fps なら 83, 84, 83, 83, 84… ms)ので、再生時間は元と一致します。fps の上限は 60 です。10 ms 以下のフレームは、ブラウザが GIF で 100 ms に読み替え始める領域で、そこに近づかないことには何のコストもないからです。
透過の余白。 pad のときの余白は本物のアルファとして書き込まれ、余白のないファイルにはアルファがまったく含まれません。images 出力では余白は GIF ノードと同じく黒に合成されます。GIF と同様、絵の部分は常に不透明です。ComfyUI の VIDEO にも IMAGE にもアルファチャンネルはありません。
進捗とキャンセル。 このノードの進捗バーは、フレームの変換・エンコード・ファイルの読み戻しの 3 パスにわたって進みます。キャンセルは実行中のパスのフレームの区切りで効くので、method 6 の長い可逆エンコードも 1〜2 フレームのうちに止まります。ファイルはエンコード完了後にしか書かれないため、キャンセルしたジョブがファイルを残すことはありません。
インストール
ComfyUI Manager から導入するか、ComfyUI/custom_nodes/ にクローンしてください。
cd ComfyUI/custom_nodes
git clone https://github.com/id-fa/ComfyUI-LoadGifAsVideo
その後 ComfyUI を再起動します。追加の Python 依存パッケージはありません(Pillow、NumPy、PyTorch はいずれも ComfyUI に同梱されています)。
VIDEO 型(comfy_api.input_impl)を持つバージョンの ComfyUI が必要です。それより古いビルドでもノードの読み込み自体は成功し、実行時に分かりやすいエラーを出します。
ライセンス
MIT。
減色アルゴリズムとディザリングフィルタは、公表されているアルゴリズムの記述からのクリーンルーム実装です。具体的には Heckbert の median cut、XV の modified diversity 法(Bradley / Lane)、Floyd–Steinberg / Burkes / Stucki / Jarvis–Judice–Ninke / Sierra / Atkinson の各誤差拡散カーネル、Bayer の順序閾値行列、および Joel Yliluoma の任意パレット向け位置ディザです。AForge.NET の AForge.Imaging.ColorReduction フィルタ群および gifsicle の --color-method / --dither の挙動に倣っていますが、これらもまた同じ公表アルゴリズムの再実装です。いずれのプロジェクトからもコードは複製しておらず、依存関係にも含みません(AForge.NET は LGPLv3、gifsicle は GPLv2 ですが、本パッケージは MIT です)。