
ImageCanvas mini
Small image editing tools for ComfyUI. Image Collage: drop images onto a grid on the node, arrange them, and output the composited image.
ComfyUI-ImageCanvas-mini
日本語 | English
ComfyUI 上で動く、シンプルな画像編集ツールです。 ノードの上で直接、GUI でコラージュ画像の作成と微調整ができます。
- 画像をノードにドラッグ&ドロップして並べ、位置・大きさ・角度をマウスで調整し、合成した画像を出力します。
- 機能が多すぎるとわかりにくくなるので、必要最低限の機能に絞っています。
- 細かい画像処理は AI に投げればいいので、ノード上でのレタッチ機能は実装していません(レイヤー編集機能は将来実装するかもしれません)。
- 単純な画像のリサイズやパディングの用途にも使えます。
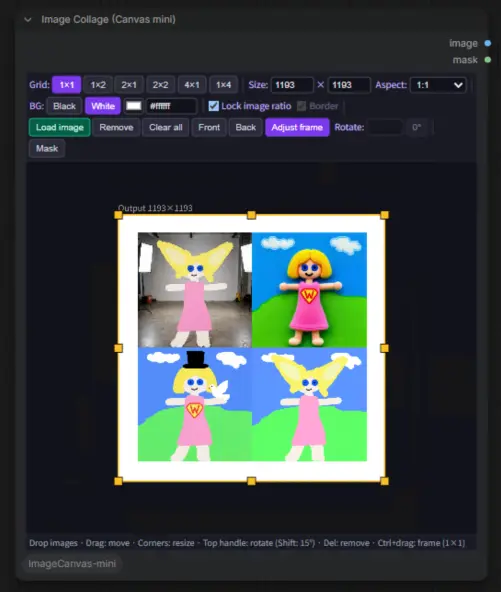
ノードは Image Collage (Canvas mini) の 1 つです(カテゴリ ImageCanvas-mini)。
インストール
cd ComfyUI/custom_nodes
git clone https://github.com/id-fa/ComfyUI-ImageCanvas-mini
ComfyUI を再起動してください。Python の依存パッケージは追加されません。
使い方
画像の入力スロットはありません。画像はノードに直接読み込みます。
- ノードを追加し、画像をキャンバスにドラッグ&ドロップします(
Load imageボタン、またはキャンバスをクリックしてからCtrl+Vでクリップボードの画像を貼り付けることもできます)。複数枚まとめてドロップできます。 - 画像をクリックして選択し、ドラッグで移動、四隅のハンドルでリサイズ、上に伸びた丸いハンドルで回転します。
- ワークフローを実行すると、破線の出力枠の内側がそのまま
imageとして出力されます。
枠の外側は作業用の領域です。はみ出した部分は半透明で表示され、出力されません。 配置はワークフローと一緒に保存されます。
出力
| 出力 | 内容 |
|---|---|
| image | 合成した画像 |
| mask | ノード上で塗ったマスク(塗った所が 1)。何も塗っていなければ全面 0 |
レイアウト
| 項目 | 内容 |
|---|---|
| Grid | 1×1 は自由配置(何枚でも重ねて置ける)。それ以外はグリッドで、1 セルに 1 枚、セルを埋めるように配置されます |
| Size | 出力画像の幅 × 高さ(16〜8192) |
| Aspect | 出力のアスペクト比。固定すると、幅と高さの片方を変えたときにもう片方が自動で追従します。Custom で 5:4 や 1.85 のように指定できます |
| BG | 背景(余白)の色。Black / White のほか、カラーピッカーと色コード(#808080)で指定できます |
| Border | グリッドの枠線の有無(1×1 では描きません) |
画像の操作
| 操作 | 内容 |
|---|---|
| ドラッグ | 移動 |
| 四隅のハンドル | リサイズ。Lock image ratio を外すと縦横比を変えられます |
| 上の丸いハンドル | 回転。Shift を押している間は 15° 刻み |
| Rotate | 角度を数値で指定(時計回り)。0° でリセット |
| Front / Back | 重なり順の変更(1×1 のみ) |
| Remove / Delete キー | 選択した画像を外す |
| Clear all | すべての画像(と Paint all の描画)を外す |
描画(Paint / Paint all)
ラフスケッチや、AI に編集箇所を指示するためのマークを描けます。簡単なペイントエディタが全画面で開きます。
| ボタン | 内容 |
|---|---|
| Paint | 選択した画像に直接描きます。Save (+bg) で画像+線、Save (lines) で白地に線だけを新しい画像として保存し、セルの画像を差し替えます(元の画像ファイルは残ります)。空のセルを選んで押すと、セルと同じサイズの白紙から描けます |
| Paint all | コラージュ全体の上に描きます。線は別のレイヤーとして保存され、下の画像はその後も動かせます。もう一度開けば線の続きを描いたり消しゴムで消したりでき、Clear して保存するとレイヤーが消えます |
エディタのツール: Pen / Brush(筆圧)/ Air(エアブラシ)/ Eraser(線だけ消す)/ Cover(白で塗りつぶし)/ Select(矩形を選んでコピーし、Paste で貼り付け・移動・リサイズ)。Undo(Ctrl+Z)、Esc で閉じます。
出力枠の調整(1×1 のみ)
先に画像を並べてから、切り抜く範囲を決められます。
Adjust frame ボタンを押すか、Ctrl を押しながら操作します。
- 枠の内側をドラッグ: 枠を移動
- 枠の辺・角をドラッグ: 枠をリサイズ(アスペクト比を固定していれば比率を保ちます)
画像はその場に残り、枠だけが動きます。
マスク
Mask ボタンでマスクの編集に入ります(この間、画像は動かせません)。inpaint 用のマスクを出力全体に対して塗れます。
| 項目 | 内容 |
|---|---|
| Brush / Eraser | 塗る / 消す |
| Size | ブラシの太さ(出力ピクセル単位) |
| Undo | 1 手戻す(Ctrl+Z でも可) |
| Clear mask | マスクをすべて消す |
リサイズ・パディングに使う
Grid を 1×1 にして画像を 1 枚だけ置くと、画像は出力枠に収まる大きさで中央に配置されます。
- リサイズ:
Aspectを画像と同じ比率にしてSizeを変える - パディング:
SizeやAspectを変えて余白を作り、BGで余白の色を決める
メモ
- 読み込んだ画像は ComfyUI の
input/imagecanvas_mini/に保存されます。ワークフローを他の環境に持っていく場合は、このフォルダの画像も必要です。 - マスクはブラシの軌跡としてワークフロー内に保存されます(画像ファイルは作りません)。
Paintの結果は<元の名前>_paint.png、Paint allのレイヤーはcollage_overlay.pngとして同じフォルダに保存されます(同名で内容が違うと連番が付きます)。
ライセンス
MIT
<a id="english"></a>
ComfyUI-ImageCanvas-mini (English)
日本語 | English
A simple image editing tool that runs on ComfyUI. Build a collage and fine-tune it with a GUI, right on the node.
- Drag and drop images onto the node, adjust position, size and angle with the mouse, and output the composited image.
- Too many features make a tool hard to understand, so this one keeps to the bare minimum.
- Detailed image processing can be handed to AI, so there are no retouching features on the node (layer editing may be added in the future).
- It also works for plain image resizing and padding.
There is one node: Image Collage (Canvas mini) (category ImageCanvas-mini).
Installation
cd ComfyUI/custom_nodes
git clone https://github.com/id-fa/ComfyUI-ImageCanvas-mini
Restart ComfyUI. No Python dependencies are added.
Usage
The node has no image input slot. Images are loaded directly into the node.
- Add the node and drag and drop images onto its canvas (or use the
Load imagebutton, or click the canvas and pressCtrl+Vto paste an image from the clipboard). You can drop several at once. - Click an image to select it, then drag to move, use the corner handles to resize, and the round handle above it to rotate.
- Run the workflow. Whatever is inside the dashed output frame is output as
image.
The area outside the frame is a work area. Parts that stick out are shown semi-transparent and are not output. The arrangement is saved with the workflow.
Outputs
| Output | Content |
|---|---|
| image | The composited image |
| mask | The mask painted on the node (1 where painted). All 0 if nothing is painted |
Layout
| Item | Description |
|---|---|
| Grid | 1×1 is the free layout (any number of images, overlapping). The others are grids: one image per cell, placed to fill the cell |
| Size | Output width × height (16–8192) |
| Aspect | Output aspect ratio. When fixed, changing width or height adjusts the other automatically. Custom accepts values such as 5:4 or 1.85 |
| BG | Background (padding) color: Black / White, a color picker, or a color code (#808080) |
| Border | Grid border lines on or off (never drawn for 1×1) |
Editing images
| Action | Description |
|---|---|
| Drag | Move |
| Corner handles | Resize. Uncheck Lock image ratio to change the proportions |
| Round handle on top | Rotate. Hold Shift for 15° steps |
| Rotate | Enter the angle as a number (clockwise). 0° resets it |
| Front / Back | Change the stacking order (1×1 only) |
| Remove / Delete key | Remove the selected image |
| Clear all | Remove all images (and the Paint all drawing) |
Drawing (Paint / Paint all)
For rough sketches, or marks that tell an AI what to edit. A simple full-screen paint editor opens.
| Button | Description |
|---|---|
| Paint | Draw directly on the selected image. Save (+bg) stores image + lines, Save (lines) the lines on white, as a new image that replaces the one in the cell (the original file is kept). With an empty cell selected it starts from a blank canvas of the cell's size |
| Paint all | Draw over the whole collage. The lines are stored as a separate layer, so the images underneath stay editable. Open it again to continue or erase lines; Clear and save removes the layer |
Editor tools: Pen / Brush (pressure) / Air (airbrush) / Eraser (lines only) / Cover (paint over with white) / Select (select a rectangle to copy, then Paste to place, move and resize it). Undo (Ctrl+Z), Esc closes.
Adjusting the output frame (1×1 only)
Arrange the images first, then decide what to crop.
Press the Adjust frame button, or hold Ctrl while dragging.
- Drag inside the frame: move the frame
- Drag an edge or corner: resize the frame (keeps the ratio if the aspect is fixed)
The images stay where they are; only the frame moves.
Mask
The Mask button switches to mask editing (images cannot be moved meanwhile). Paint an inpaint mask over the whole output.
| Item | Description |
|---|---|
| Brush / Eraser | Paint / erase |
| Size | Brush width (in output pixels) |
| Undo | Undo one step (also Ctrl+Z) |
| Clear mask | Erase the whole mask |
Resizing and padding
Set Grid to 1×1 and place a single image: it is fitted inside the output frame and centered.
- Resize: set
Aspectto the image's ratio and changeSize - Padding: change
SizeorAspectto create margins, and pick their color withBG
Notes
- Loaded images are stored in ComfyUI's
input/imagecanvas_mini/. To move a workflow to another environment, the images in this folder are needed too. - The mask is saved inside the workflow as brush strokes (no image file is created).
Paintresults are stored as<original name>_paint.pngand thePaint alllayer ascollage_overlay.pngin the same folder (a counter is appended when the name exists with different content).
License
MIT