
ComfyUI-TopazVideoLocal
Topaz Video AI nodes for ComfyUI. All processing runs locally.
Nodes (13)
Topaz Deinterlace, and the field-order setting that was quietly deleted
First node you should run after installing this pack — it tells you what's broken
The config hub for the whole Topaz pack — reach for it when something won't run
Three sliders that turn SDR footage into HDR — via Topaz's hyp-1 model
A stills upscaler that quietly outranks Topaz's own Gigapixel for automation
Topaz Frame Interpolation, and the frame-count arithmetic that trips everyone
Topaz Motion Deblur is a repair pass, not a sharpener — treat it that way
Let Topaz set its own sliders — then read the numbers it picked
Named output sizes with snapping — the little node that feeds half your graph
Steadying shaky video with Topaz, inside ComfyUI — and why it's two passes
The Topaz Video AI you already pay for, finally wired into ComfyUI
The tuning side of every Topaz upscale — profiles first, sliders second
One pass of a multi-pass Topaz upscale — Proteus for repair, Rhea for resolution
ComfyUI-TopazVideoLocal


Topaz Video AI nodes for ComfyUI. Everything runs locally through your own Topaz Video installation — no cloud, no API keys, no uploads.
Requirements
- Windows
- A licensed, signed-in Topaz Video installation
- ComfyUI with
numpy(already present in every standard install)
Install
From ComfyUI's custom_nodes directory:
git clone https://github.com/donangel85/ComfyUI-TopazVideoLocal.git
There is nothing to build and nothing to pip install: the only dependency is numpy,
which every ComfyUI installation already has.
To update later:
cd ComfyUI-TopazVideoLocal
git pull
Restart ComfyUI. Start with the Topaz Diagnostics node — it reports what was found and what is missing, without running a workflow.
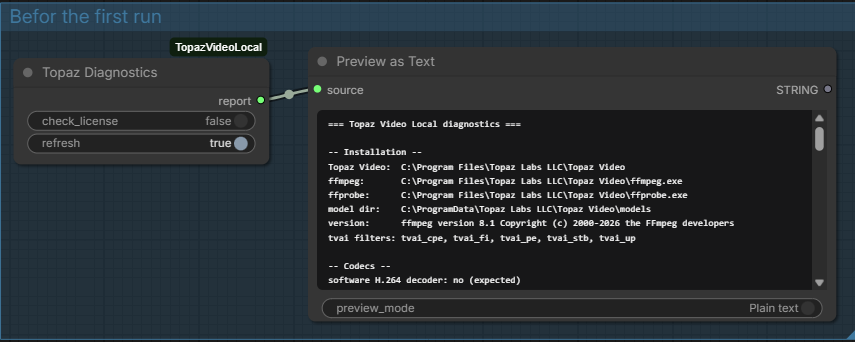
Every example workflow ships with that pair already wired up, in a group titled Before the first run.
Then open one of the example workflows. 07_video_upscale.json is the
graph this pack exists for; 01_basic_upscale.json is the smallest possible one.
Video is the main job
Topaz Video AI is a video product, and so is this pack. Every node takes a plain IMAGE batch, which is also what a still is, so the same graph does both — but the case it was built for is a clip.
Load Video → Get Video Components → Topaz Video Upscale → Create Video → Save Video
                    │  fps ──────────────────^                 ^   ^
                    │  audio ──────────────────────────────────┘   │
                    └──fps ────────────────────────────────────────┘
All four of those are ComfyUI's own nodes; nothing extra to install. To turn any of the still-image examples into a video graph, change only the two ends:
| Replace | With |
|---|---|
| Load Image | Load Video → Get Video Components |
| Save Image | Create Video → Save Video |
Everything in between stays exactly as it is. For most work the only thing to change is the preset in Topaz Upscale Params.
Three wires are easy to miss:
fpsinto the Topaz node. The motion models use it, and reading it off the clip beats typing a number that then disagrees with the source.fpsinto Create Video, or the clip plays at the wrong speed. After frame interpolation takeoutput_fpsfrom the interpolation node instead — that is what its second output is for.audiostraight across. An IMAGE batch carries no sound, so audio goes around the Topaz node and is reattached at Create Video, untouched and without a re-encode.
Memory is the practical limit. The whole clip is decoded into one IMAGE batch before anything runs. At 1080p a few hundred frames is already several gigabytes, and a 2× output is four times that again. Cut long clips into pieces, or enlarge last.
Nodes
| Node | What it does |
|---|---|
| Topaz Video Upscale | IMAGE → IMAGE through tvai_up. Proteus, Rhea, Iris, Gaia, Nyx, Themis, Starlight Mini and the rest. |
| Topaz Frame Interpolation | IMAGE → IMAGE through tvai_fi. Apollo, Aion, Chronos. Returns a different frame count by design. |
| Topaz Video Stabilize | IMAGE → IMAGE through tvai_cpe + tvai_stb. Full-frame or auto-crop, rolling-shutter correction. |
| Topaz Deinterlace | Dione models. Deinterlaces and optionally upscales in one pass. No field-order control — see below. |
| Topaz Motion Deblur | Themis. Resolution unchanged — Themis supports scale 1 only. |
| Topaz Parameter Estimate | Analyses the footage with tvai_pe and outputs the tuning Topaz would pick. |
| Topaz Image Upscale | Still images through tvai_up. Processes each picture independently by default, and supports the same multi-pass chain. |
| Topaz Engine Settings | Device, VRAM, transport, licence handling, verbose logging. Optional. |
| Topaz Upscale Stage | One pass of a multi-pass upscale. Chain several for Proteus → Rhea → … in a single run. Optional. |
| Topaz Upscale Params | Ready-made profiles, or manual control over preblur, noise, details, halo, blur, compression, grain, blend. Optional. |
| Topaz Hyperion HDR Params | SDR → HDR parameters for hyp-1. Optional. |
| Topaz Resolution | Named output sizes with orientation and a divisibility constraint. Outputs plain INTs, so it drives other nodes too. Optional. |
| Topaz Diagnostics | Installation, codecs, models, licence and CLI-lock status. |
The main nodes work on their own; attach the settings nodes only when you need them.
<img src="images/node-video-upscale.png" alt="Topaz Video Upscale" width="330">Choosing an output size
Both upscale nodes take scale_mode: factor | target_size. factor is an exact integer
multiple and the most predictable option. target_size accepts any resolution: Topaz
upscales far enough to cover it, and the result is fitted to the exact size you asked for.
Topaz Resolution exists so you do not have to type those numbers. Pick a named size, an orientation, and — where it matters — a divisibility constraint:
Topaz Resolution ──▶ width  ──▶ target_width
                 └─▶ height ──▶ target_height
It outputs plain INTs rather than a private type, so the same node drives MiniMax-H3,
LTX2.5, an empty latent, or anything else that takes dimensions.
Divisibility
Most latent video models only accept dimensions that are a multiple of some number, because their encoder downsamples by that factor. MiniMax-H3 wants multiples of 32, which is why Full HD there is 1920x1088, not 1920x1080.
Set divisible_by and both edges are snapped for you. rounding decides which way:
up never returns less than you asked for, down never returns more, nearest keeps
the smallest difference. Snapping happens after the orientation is applied, so portrait
sizes satisfy the constraint too.
Note that two different sizes both get called 2K, so the list names them: QHD 1440p is 2560x1440, DCI 2K is 2048x1080.
fit, fill and stretch
When the target does not match the source aspect ratio, fit_mode decides what happens.
A 4:3 frame going to 640x360:
| Mode | Result |
|---|---|
| fit (default) | scaled to 480x360, black bars either side. Nothing is lost or distorted. |
| fill | scaled to 640x480, then top and bottom cropped away. Fills the frame, loses the edges. |
| stretch | squashed to 640x360. No bars, no crop, but the aspect ratio changes. |
Every mode ends at exactly the size requested — an IMAGE batch has to be one size.
Topaz Upscale Stage offers the same scale_mode, so an intermediate pass can be
pinned to a resolution before the next model sees it.
Multi-pass upscaling
Topaz Video lets you stack enhancement passes, and so does this package. Feed one
Topaz Upscale Stage into the next through previous_stage, then connect the last one
to the upscale_chain input of Topaz Video Upscale:
Topaz Upscale Stage (Proteus, 2x)
  -> Topaz Upscale Stage (Rhea, 2x)      [previous_stage]
    -> Topaz Video Upscale (Proteus, 1x) [upscale_chain]
The stages run first, in order, and the Upscale node's own model runs last. Scales
multiply, so 2x then 2x gives 4x overall. Topaz Image Upscale takes the same
upscale_chain input, where it is arguably more useful still: repair on the first
pass with one profile, resolution on the second with another.
All passes happen inside one ffmpeg call as chained tvai_up filters, so the frames
never leave the process in between — no repeated model loading and no tensor round trip.
Wiring two Upscale nodes in series also works, but costs an extra process launch and
conversion each time.
Each stage takes its own params, so you can denoise hard on the first pass and sharpen
on the second. Scale factors are validated against the model before anything runs: Topaz
rejects e.g. pnat-1 at 1x, and the node says so immediately rather than failing several
seconds into a render.
Repair passes
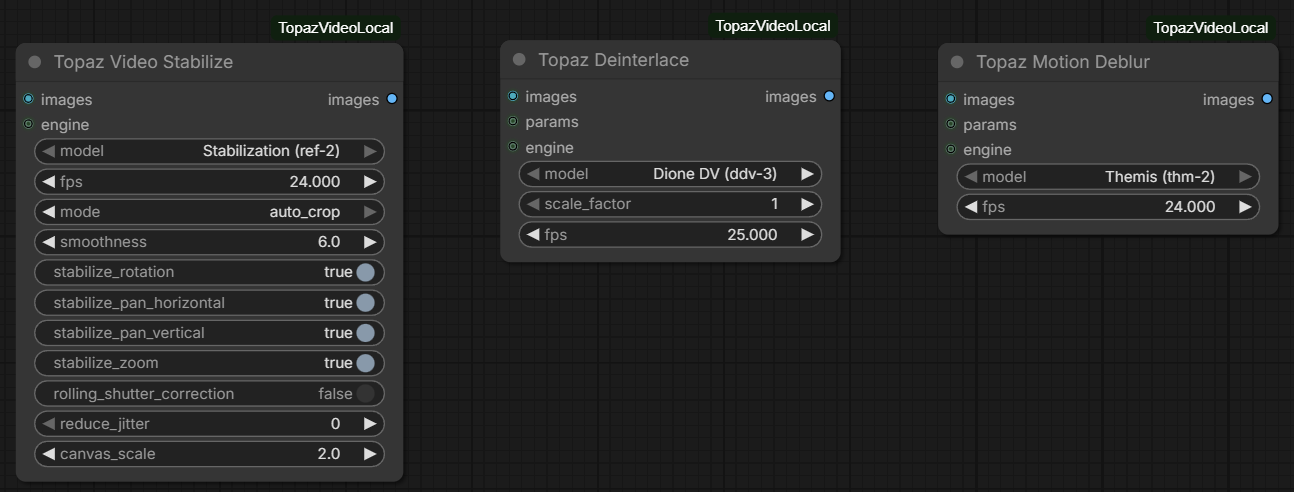
06_restore.json runs all three on the same source so you can compare them side by side,
and 09_video_restore_chain.json chains them in the order that makes sense.
Deinterlacing, and why there is no field-order control
The Topaz Deinterlace node has no top-field-first / bottom-field-first setting. That is measured, not an oversight.
It used to have one, sending a model parameter named interlacing. It did nothing:
ffmpeg -h filter=tvai_updocuments exactly three parameter groups — Hyperion, SAM2 and Grain. There is nointerlacing, and the Dione models take no parameters at all.parametersis an FFmpeg dictionary option, so any key is accepted and the filter drops the ones it does not recognise. An unknown parameter is taken in silence, never rejected — which is why a clean run had been mistaken for confirmation.- On genuinely interlaced test material both settings produced identical output.
setfieldandsetparamsahead of the filter changed nothing either.
The Dione models work it out themselves, and they do it well: on material combed 210x
above the progressive floor, ddv-3 removed 72% of the combing while the motion came
through at exactly the speed it went in.
A control that silently has no effect is worse than none — someone with stuttering output would spend an afternoon on it. If a future Topaz release starts documenting the parameter, the control can come back.
Frame interpolation: how many frames come back
The count is not the round number people expect, and a Create Video node downstream has
to agree with it or the clip runs at the wrong length. Measured on apo-8:
| Mode | 24 frames at 24 fps become | Output fps |
|---|---|---|
| target_fps 48 | 47 | 48 |
| target_fps 72 | 70 | 72 |
| target_fps 96 | 93 | 96 |
| slowmo 2× | 47 | 24 |
| slowmo 4× | 93 | 24 |
So target_fps at factor k returns N·k − (k−1): interpolation makes the frames
between the ones it was given, and there is no gap after the last one.
target_fps keeps the running time — 1.000 s in, 0.979 s out at 2× — so the audio still
fits. slowmo does not: same frame counts, but the rate stays put and the clip gets
longer (1.000 s in, 1.958 s out). Wire the input fps into Create Video for slowmo, and
handle the audio separately or leave it out.
The node's second output, output_fps, already carries the right number for whichever
mode is selected. Use it rather than typing the rate twice.
And why there is no SAM2 mask node
Same trap, second time. tvai_up's help documents a group headed "Segment-Anything-2
(vsam) parameters" with a clicks key and a grammar for it, and there was a node here
that sent one. That heading names a model, and this Topaz build does not have one.
model=vsam             ->  "Invalid value vsam for model, model should be in the
                            following list:"  ... and then all 51 it does accept.
                           Identical to the rejection of a name invented on the spot,
                           and different from the -22 a model with no weights gives.
clicks on prob-4       ->  exits 0, output unchanged
nonsense=42 on prob-4  ->  exits 0, output unchanged      (the control)
parameters is a dictionary option, so a key an upscale model has no use for is dropped
without a word. The node could never have done anything, so it is gone. If a future Topaz
build ships a vsam model, it can be rebuilt — against model=vsam, not as parameters on
something else.
What the picture actually does
Structure is easy to test and says nothing about whether the result looks right. These are measurements of the picture itself, on real 1080p footage rather than test patterns. The method throughout is the same: degrade real frames in a known way, or hold the real frames back as a reference, so there is always a right answer to score against.
| Case | Measured |
|---|---|
| 2× upscale vs a plain Lanczos resize, scored against the original frames | 28.56 dB / SSIM 0.928 against Lanczos's 27.75 dB / 0.919 — better on both, and the recovered detail lands short of the original rather than past it, so it is recovered and not invented |
| A photograph, same round trip | 26.86 dB / SSIM 0.934 against Lanczos's 25.28 / 0.914 |
| Deinterlace (ddv-3) on real frames woven into fields | 77% of the combing removed |
| Frame interpolation (apo-8) 24 → 48 fps on real motion | 24 frames became 47; frame-to-frame difference fell 0.083 → 0.050, with no duplicated frames standing in |
| Stabilisation (ref-2), real frames given a known ±6 px shake | 97% of it taken out — 6.86 px of wobble down to 0.18 px |
| Motion deblur (thm-2) against a known blur | 18% of the destroyed detail recovered, and 24.29 dB → 26.97 dB towards the sharp original |
| The compression parameter on footage re-encoded at CRF 45 | Reduces the visible block grid, but only slightly. Real damage of that severity does not come out |
Motion deblur is a repair pass, not a sharpener. Run on footage that was already sharp it costs about 8% of the gradient energy (37.2 dB / SSIM 0.978 against the untouched frames). Mild, but there is no reason to pay it: put it in the graph when there is motion blur to remove, and bypass it otherwise. The same goes for deinterlacing progressive footage and stabilising a locked-off shot.
Both halves are measured the same way. Synthetic material carries a defect of known size, so removing it can be counted exactly. Real footage has no ground truth of its own, so it is either degraded in a known way or held back as its own reference — which is what makes a number like "28.56 dB against 27.75" mean something rather than being an impression.
Letting Topaz choose the parameters
<img src="images/node-parameter-estimate.png" alt="Topaz Parameter Estimate" width="330" align="right">Topaz Parameter Estimate runs tvai_pe over the batch and reports the tuning it would
pick for that specific material. The result plugs straight into the params input of any
upscale node, and a second output gives you the numbers to read:
Topaz parameter estimate — Parameter Estimation (prap-3)
11 frame(s) analysed, aggregated by median

  preblur       -0.3962   (range -0.4136 … -0.3699)
  noise          0.0460   (range +0.0174 … +0.0549)
  details        0.2143   (range +0.1994 … +0.2869)
  ...
This differs from the Upscale node's own estimate option in three ways: you see the
numbers, you can reuse one estimate across several passes instead of re-analysing each
time, and you can analyse a sample (max_frames) rather than the whole clip.
Aggregation defaults to median, so a cut or a single black frame does not drag the whole clip's settings with it. The reported range tells you whether one setting really fits the material: a wide spread means the footage changes character partway through.
Profiles
Topaz Upscale Params starts with a profile dropdown. Leave it on manual and the
sliders apply as usual; pick anything else and that profile's values are used.
profile_strength scales a profile up or down — 0.5 for half the intervention, 0 to
disable its tuning entirely. In the browser, picking a profile also copies its values into
the sliders so you can adjust them — see below.
Three kinds of entry appear, and the prefix tells them apart:
Topaz: …— read live from Topaz Video's own preset folder, authored by Topaz Labs. Their GUI stores values on a -100..100 scale; they are converted to the -1..1 the filter expects. Only presets that actually set tuning values are listed: most of Topaz's presets only pick a model and output settings, and would otherwise fill the dropdown with identical empty entries. Topaz also ships an old and a new copy of nearly every preset under the same name, so duplicates are collapsed to the newer file.My: …— presets you saved yourself. See below.- No prefix — starting points shipped with this package, derived from what each parameter is documented to do. Useful defaults, not official Topaz values.
Whichever you pick, the resolved parameters are written to the log:
profile 'Compressed / web video' at strength 1 ->
  blur=0, compression=0.6, details=0.3, estimate=0, halo=0.1, noise=0.25, preblur=0
Topaz presets also log the model they were authored for.
Seeing and adjusting a preset's values
<img src="images/node-upscale-params.png" alt="Topaz Upscale Params with the preset buttons" width="330" align="right">Picking a profile in the browser copies its numbers straight into the sliders, so you
can see what the preset actually does and change any of it. profile_strength is applied
while copying, so what you end up looking at is what will run.
edit_preset_values, the last widget on the node, decides who wins:
| edit_preset_values | What runs |
|---|---|
| preset as-is (off) | The profile, exactly as authored. The sliders are ignored. |
| sliders (edited) (on) | The sliders. Your adjustments count. |
Picking a profile turns it on for you, because the sliders now hold that preset's values and adjusting them is the point. Turn it off to go back to the untouched preset — your slider values are kept, just not used, so you can flip between the two and compare.
It sits at the bottom rather than next to profile where it belongs by meaning. ComfyUI
maps a saved workflow's widget values onto the node by position, so a widget added
anywhere but the end shifts every later value in every workflow already saved.
Two buttons round it out:
- Reload preset into sliders — copies the selected profile in again. Useful after
changing
profile_strength, or to discard an experiment and start over. - Save sliders as preset — stores the current values under a name you choose. It
appears in the dropdown as
My: <name>and behaves like any other profile, strength scaling included. Saving under an existing name overwrites it.
Saved presets live in user_presets.json beside the package and are git-ignored — they
are your machine's data. Other Upscale Params nodes already on the canvas offer a newly
saved entry after the next ComfyUI restart.
All of this comes from a small frontend extension in web/. Without it — running a
workflow through the API, for instance — edit_preset_values stays off and the profile
dropdown behaves exactly as it always has, applied on the server. Nothing here depends on
a browser being involved.
What about audio?
Nothing is lost. These nodes are IMAGE → IMAGE, and a ComfyUI IMAGE batch has never
carried audio — it is just frames. The audio travels its own path through the workflow
and is attached where the video is written: the audio output of Get Video Components
goes straight into the audio input of Create Video, or into the AUDIO input of
Video Helper Suite's Video Combine if you use that instead. Either way it arrives
untouched, without a re-encode.
One exception: frame interpolation in slowmo mode makes the picture longer than the
sound. In target_fps mode the running time is unchanged and the audio still fits;
in slowmo it does not, so stretch it separately or leave it out.
How it works, and why
Topaz builds its FFmpeg with --disable-decoder=h264 --disable-decoder=hevc. The
software H.264 decoder is simply not there, so anything that hands Topaz an H.264 file
forces FFmpeg onto h264_qsv, h264_amf or h264_cuvid. On a machine without Intel
graphics, h264_qsv fails with Error creating a MFX session: -9.
This package sidesteps that entirely:
IMAGE tensor -> raw RGB24 -> ffmpeg stdin -> tvai_* -> raw file -> IMAGE tensor
There is no container and no input decoder, so there is no decoder to choose wrongly. It also avoids two lossy H.264 generations in the middle of your workflow.
A few other behaviours worth knowing about, all established by testing against a real installation:
- Minimum four frames. Topaz's temporal models crash with an access violation on fewer. Short batches are padded and trimmed back automatically.
devicedefaults to auto (-2). An explicitdevice=0has been observed to fail withFailed to configure output padon mixed NVIDIA/AMD systems.- The licence is checked once and cached in
config.json, keyed to the installation. A Topaz update or a path change triggers a re-check. A check that times out counts as unknown, never as invalid. stdoutis never logged. Topaz prints an auth token there; the package strips anything resembling one from all output.
Models
The dropdowns are built from Topaz's own JSON metadata, so new models appear on their
own. Models are shown as Proteus (prob-4) — readable name plus the short code that
actually goes to Topaz.
Models whose weights are not on disk are marked [download required]. Enable
allow_model_download in the Engine Settings node to let Topaz fetch them, or process
once in the Topaz app. This is off by default so processing stays entirely offline.
Upscale models are temporal — they look at neighbouring frames. Topaz Image Upscale
therefore defaults to processing each picture on its own, so unrelated photos in one batch
cannot bleed into each other. Switch it to sequence when the batch really is consecutive
video frames; that is considerably faster.
Not available: Astra, Starlight SLP-2.5 and Hyperion-2 run inside Topaz's
neuroserver runtime rather than through FFmpeg, and cannot be reached from outside the
Topaz application. They are hidden rather than offered and then failing.
Topaz Photo and Topaz Gigapixel
Not supported, and not for lack of trying. Both CLIs are locked behind a Topaz enterprise licence:
> gigapixel.exe --help
CLI access requires enterprise license.

> tpai.exe --cli --help
Topaz Photo CLI has been disabled.
Neither ships an FFmpeg-style interface, and their remaining integration points are Photoshop/Lightroom/Capture One plugins that need the host application running. The Diagnostics node reports the current lock status on your machine, so if Topaz ever changes this you will see it.
Troubleshooting
Run Topaz Diagnostics first. Then:
| Symptom | Cause |
|---|---|
| "No usable Topaz Video installation found" | Set install_path in Engine Settings. A folder only counts if its ffmpeg provides tvai_up. |
| "has no weights installed" | Enable allow_model_download, or run the model once in the Topaz app. |
| "Topaz reports a licence problem" | Open Topaz Video and sign in. |
| "batch is too short" | Fewer than four frames reached the node. |
Turn on verbose in Engine Settings to log the exact FFmpeg command for every call —
it can be pasted straight into a terminal to reproduce a failure.
Working on this
Fork it, clone your fork into custom_nodes, and you have a working setup: there is no
build step and the only dependency is numpy.
python -m pytest
The suite needs neither Topaz nor ComfyUI. topaz_video/ has no ComfyUI imports at
all, and the two test files that do reach into the node layer only read INPUT_TYPES.
That is what lets CI run it on Windows and Linux across Python 3.10 to 3.13 — a machine
with no Topaz Video installed still checks the command builder, error classification, the
model catalogue, frame conversion, the resolution arithmetic, installation discovery, the
preset store and every shipped example workflow.
Two things the suite deliberately cannot check, and how to check them yourself:
Does ComfyUI agree with these node definitions? That gap is where every bug in this package has come from, because ComfyUI maps a saved workflow's widget values onto a node by position. With ComfyUI running:
python tools/object_info_check.py --url http://127.0.0.1:8188
It reads /object_info — exactly what ComfyUI hands its frontend — and compares it
against the widget-order baselines, checks every value in examples/*.json against
ComfyUI's own ranges and choice lists, and confirms the preset routes answer. Read-only:
it queues no prompts and changes nothing.
Does it still produce the right picture? That needs a licensed Topaz installation and real footage, so it cannot live in CI. The measurements in What the picture actually does came from scripts kept outside this repository; if you change how a filter is built, run something equivalent before trusting the result. Structure passing is not the same as the output being right — a deinterlace that silently does nothing passes every structural test there is.
Layout
| Directory | Contents |
|---|---|
| topaz_video/ | Backend. Knows Topaz, knows nothing about ComfyUI, testable on its own. |
| topaz_nodes/ | The ComfyUI layer. Thin: gather widget values, call the backend, turn a failure into a message worth reading. |
| web/ | Frontend extension. Only the Upscale Params buttons — everything else works without it. |
| examples/ | The workflows, generated by tools/make_examples.py from the live node definitions. |
| tools/ | Checks that need something CI does not have: a running ComfyUI, or the repository itself. |
Changing an example workflow
Edit tools/make_examples.py and regenerate, rather than editing the JSON. A workflow
file stores widget values as a positional array, so a hand-edited example drifts the
moment a node gains a widget — silently, because nothing reads these files until somebody
loads one.
python tools/make_examples.py           # rewrite them
python tools/make_examples.py --check   # compare only, write nothing
Arranging the nodes by hand in ComfyUI and saving is fine and expected: regenerating carries every node's position, size, title and colour over from the file on disk. Only values, wiring and which nodes exist come from the generator.
Adding a widget to an existing node
Append it. Never insert it.
ComfyUI stores a node's widget values in a saved workflow as a plain array and maps them back by position. A widget added anywhere but the end shifts every later value in every workflow already saved, and it surfaces as a validation error naming widgets nobody touched:
Failed to convert an input value to a FLOAT value: grain_size, default
Value not in list: grain_type: 0 not in ['default', 'silver_rich', ...]
That is grain_size holding grain_type's old value and grain_type holding blend's
— everything one slot out.
Widgets are created required-first, then optional, in declaration order. Link-typed
inputs (IMAGE, TOPAZ_ENGINE, …) are sockets, not widgets, and do not take up a
position. tests/test_widget_order.py holds the published order for each node and fails
if it changes; a failure there means saved workflows will break, not that the baseline
needs updating.
This is why edit_preset_values sits at the bottom of Topaz Upscale Params and
scale_mode below scale_factor on Topaz Upscale Stage, rather than next to what they
govern.
Parameter ranges
topaz_video/parameters.py holds the valid range of every tvai_up tuning parameter,
read from the filter's own help text. Six of them run -1..1, but prenoise runs 0..0.1,
gsize 0..5, grain and blend 0..1.
Everything derives from that one table: the widget limits, the clamping in
Profile.resolve, the sanitising of saved presets, and the values the preset route hands
the browser. Restating a limit anywhere else invites them to drift apart, and a value
outside a widget's range fails the whole prompt:
Value 0.3 bigger than max of 0.1: prenoise
Licence
MIT — see LICENSE. Credits and prior art: NOTICE.md.
Not affiliated with Topaz Labs LLC.