
ComfyUI-TJ_NODE_STUDIO_ONE
One-node studio UI package for Z-Image Turbo, Flux.2 Klein, Qwen Image Edit 2511, and Krea 2 workflows, including T2I, I2I, inpaint, outpaint, edit, faceswap, angle, and upscale modes.
Nodes (12)
Anime with zero extra packs — Anima ONE STUDIO is the easy node in this lineup
A whole editing suite hiding behind one node
ITDA ONE STUDIO (TJ) is a video editor with a ComfyUI node bolted to it
The best base model of the year, trapped in one very busy node
MiniMax H3 ONE STUDIO — video plus audio from one node, stitched around the VRAM wall
Make a full song inside one node — local Ace-Step and MiniMax Music, no API key
Eight modes, one node, no mask file
Sentence editing, camera angles and faceswap in one panel
The beta all-in-one node for people who still live in SDXL
Hardware sharpening that never lies about detail
The text node with no output slots — that's the whole job
One node, eight modes, and a graph you never see
TJ NODE STUDIO ONE (통합 패키지)
TJ NODE STUDIO ONE (Integrated Package)
<img width="988" height="984" alt="image" src="https://github.com/user-attachments/assets/5764b302-b95d-40e1-98aa-a1a63c135c51" /> <img width="1201" height="816" alt="Screen Shot 2026-06-27 at 05 58 39 907 AM" src="https://github.com/user-attachments/assets/aaf0686e-e09b-43b4-8aff-c6d369e5f06c" />ComfyUI 올인원 생성 UI 패키지 — Z-Image ONE STUDIO, Flux.2 Klein ONE STUDIO, Qwen Image Edit 2511 ONE STUDIO, Qwen Image 2.1 ONE STUDIO, Krea 2 ONE STUDIO, SDXL ONE STUDIO, Minimax H3 ONE STUDIO, Anima ONE STUDIO, MusicMaker ONE STUDIO, ITDA ONE STUDIO 열 가지 노드를 단일 패키지로 제공합니다.
ComfyUI all-in-one generation UI package — Z-Image ONE STUDIO, Flux.2 Klein ONE STUDIO, Qwen Image Edit 2511 ONE STUDIO, Qwen Image 2.1 ONE STUDIO, Krea 2 ONE STUDIO, SDXL ONE STUDIO, Minimax H3 ONE STUDIO, Anima ONE STUDIO, MusicMaker ONE STUDIO, ITDA ONE STUDIO — ten nodes in a single package.워크플로우 배선 없이 노드 하나에서 T2I · I2I · Inpaint · Outpaint · ControlNet · Edit · Faceswap · ANGLE · Upscale(SeedVR2) 등 다양한 모드를 전환합니다. switch between modes in a single node without workflow wiring T2I · I2I · Inpaint · Outpaint · ControlNet · Edit · Faceswap · ANGLE · Upscale(SeedVR2) etc. switch between various modes.
🆕 MiniMax H3 Image to Video (F/L): 첫/마지막 프레임도 Reference처럼 Files / Gallery 또는 Asset Library 중 하나만 고릅니다. Prompt Edit에 에셋 프레임이 보이고, Prompt Write/Refine이 그 이미지를 LLM에 보냅니다.
🆕 MiniMax H3 Image to Video (F/L): First / Last frames now pick one source, Files / Gallery or Asset Library, like Reference. Prompt Edit shows the library frames and Prompt Write / Refine send them to the vision model.
🆕 ITDA ONE STUDIO: 렌더 결과를 ITDA 갤러리에 저장하고(목록·삭제·가져오기), 앱 설정이 서버에 저장되며, 설정·프로젝트·저장·갤러리가 ☰ Menu 하나로 모였습니다.
🆕 ITDA ONE STUDIO: renders are saved to the ITDA gallery (list, delete, import), app settings are stored on the server, and Settings / Project / Save / Gallery now live in one ☰ Menu.
🆕 이미지 노드 미리보기·비교·갤러리 확대에서 휠 = 확대, 왼쪽 드래그 = 이동, 더블클릭 = 맞춤. 비교 바는 그대로 있습니다. UPSCALE에 VOSR가 SeedVR2 옆에 추가되었고(Anima에도 UPSCALE 모드 추가), Qwen 2.1 POSE에 Preview & Angle 3D 뷰어와 Load 3D Pose 목록이 생겼습니다. 갤러리에는 3D 포즈 그림이 더 이상 섞이지 않습니다.
🆕 Wheel = zoom, left-drag = pan, double-click = fit in previews, Compare and the enlarged gallery picture of the image nodes; the compare bar stays put. UPSCALE gets VOSR next to SeedVR2 (Anima gains an UPSCALE mode), and Qwen 2.1 POSE gets the Preview & Angle 3D viewer and a Load 3D Pose list. Galleries no longer show the 3D pose pictures.
🆕 참조 영상이 훨씬 가벼워집니다. Reference 모드의 참조 영상은 원본 크기 그대로 모델에 들어가 프레임마다 토큰이 되기 때문에 큰 영상은 첫 스텝이 시작되기 전에 매우 오래 걸릴 수 있었습니다. 이제 영상 타일의 mp 칸(그리고 Asset 탭 영상 에셋의 mp (downscale))으로 큐에 들어갈 때 지정한 MP까지 줄입니다(원본 파일은 그대로, 더 작은 영상은 키우지 않음). Asset 탭 영상 에셋에는 구간(in/out), Video sound도 생겼습니다. Face Refine의 Turbo는 이제 메인 Turbo 섹션과 같은 선택(None / Turbo LoRA (Basic) / larryvrh / SLA)과 자기만의 LoRA·steps를 씁니다. 7+1에는 2단계 Activation chunk rows 칸이 추가되었습니다.
🆕 Reference videos get much lighter. A reference video went to the model at its own size and every frame became tokens, so a large clip could take very long before the first step. The video tile's mp field (and mp (downscale) on a video asset in the Asset tab) now downsizes it when the clip is queued — the file is untouched and a smaller video is never upscaled. Video assets in the Asset tab also get an in/out range and Video sound. Face Refine's Turbo now offers the main Turbo section's choices (None / Turbo LoRA (Basic) / larryvrh / SLA) with its own LoRA and steps. 7+1 gains a stage-2 Activation chunk rows field.
🆕 MiniMax H3에 7+1 하이레스 마무리가 추가되었습니다. Turbo LoRA (Basic)에서 7+1 hi-res finish를 켜면 8스텝 중 7스텝을 작은 해상도(Start MP)로 돌리고, 비디오 latent를 업스케일한 뒤 **마지막 1스텝만 최종 해상도(Final MP)**에서 마무리합니다. 같은 8스텝보다 빠르게 큰 해상도를 얻습니다. 텍스트·First/Last·Reference(라이브러리 포함), Audio Lock, One-Take와 함께 쓸 수 있고, 켜면 Canvas MP는 잠기며 7+1로 만든 클립은 갤러리에서 연핑크 테두리로 표시됩니다.
🆕 MiniMax H3 now has a 7+1 hi-res finish. With Turbo LoRA (Basic), tick 7+1 hi-res finish: 7 of the 8 steps run small (Start MP), the video latent is scaled up, and only the last step runs at the final size (Final MP). You get a larger picture faster than a full-size 8-step run. It works with Text, First/Last, Reference (library too), Audio Lock and One-Take; Canvas MP is locked while it is on, and 7+1 clips get a light-pink border in the gallery.
🆕 MiniMax H3에 Asset Library가 추가되었습니다. 첫 번째 Asset 탭의 + Add ▾ 메뉴(Single Image / Images as a set / Video / Audio / From Gallery)로 이미지·영상·오디오·이미지 세트를 등록하고(From Gallery는 모든 갤러리·MusicMaker에서 가져오며 숨김·Cache·미리듣기를 지원), 카테고리·태그·구간 자르기, 프로젝트(@별칭·순서)를 관리합니다. 참조 이미지는 노드 전체와 클립별 모두 Files / Gallery 또는 Asset Library 중 하나를 골라 쓰고, 프롬프트(메인 입력칸과 Prompt Edit 모두)에는
@토큰(자동완성 + Load 검사)을 쓰며 Prompt Write/Refine도@토큰으로 작성합니다. ComfyUI-TJ_NODE의 Reference Asset Library가 필요합니다.🆕 MiniMax H3 now has an Asset Library. The first Asset tab's + Add ▾ menu (Single Image / Images as a set / Video / Audio / From Gallery) registers images, videos, audio and image sets (From Gallery imports from every gallery and MusicMaker, with hide, Cache and audio preview), with categories, tags, audio trim and projects (@aliases, order). References — node-wide and per clip — come from either Files / Gallery or Asset Library; prompts (main box and Prompt Edit) use
@tokens(autocomplete + a Load check) and Prompt Write / Refine write with them. Needs ComfyUI-TJ_NODE's Reference Asset Library.🆕 모든 LLM 백엔드에 Connect Custom이 추가되었습니다. MiniMax H3(Brief · Vision · LTX Upscale), 이미지 노드의 Prompt Enhance · Image → Prompt Write, MusicMaker에서 OpenAI 호환 서버(LM Studio · Ollama · llama.cpp · 게이트웨이)를 URL/모델/컨텍스트만 넣어 쓸 수 있습니다. 이미지 노드의 LLM 설정은 이제 브라우저가 아니라 서버에 저장되어 브라우저가 바뀌어도(웹 앱 포함) 같습니다. H3에는 Prompt Refine → Include Images, 갤러리 Load more(Settings → Output에서 개수 지정, 기본 50), 2-pass 업스케일이 추가되었습니다.
🆕 Connect Custom is now a backend in every LLM picker. MiniMax H3 (Brief · Vision · LTX Upscale), the image nodes' Prompt Enhance · Image → Prompt Write, and MusicMaker can use any OpenAI-compatible server (LM Studio · Ollama · llama.cpp · a gateway) with just a URL / model / context. The image nodes' LLM settings are now stored on the server, not per browser, so they match across browsers (and the web app). H3 gains Prompt Refine → Include Images, gallery Load more (page size set in Settings → Output, default 50) and a 2-pass upscale.
🆕 MusicMaker 대규모 업데이트. 세 번째 엔진 YuE2(Text to Music · Cover Music)가 추가되었고, Melody Editor(피아노롤)로 멜로디를 직접 그리거나 실물 MIDI 건반·컴퓨터 키보드로 녹음해 YuE2에 넘길 수 있습니다(샘플 음원 악기, MIDI 파일 가져오기/내보내기 포함). 트랙 ⋯ 메뉴에 앨범 커버 복사 · 붙여넣기 · 업로드 · 갤러리에서 선택이 생겨 시리즈 곡의 커버를 통일할 수 있고, 태그(제목·가사·커버 등)는 이제 저장된 파일 자체에 들어갑니다. 플레이리스트 ↻ 새로고침 버튼도 추가되었습니다.
🆕 Big MusicMaker update. A third engine, YuE2 (Text to Music · Cover Music), and a Melody Editor piano roll where you draw a melody or record it from a real MIDI keyboard / the computer keyboard and hand it to YuE2 (with sample-based instruments and MIDI file import/export). The track ⋯ menu gains album cover Copy · Paste · Upload · From Gallery so a series can share one cover, and tags (title, lyrics, cover…) are now embedded in the saved file itself. A playlist ↻ refresh button was added too.
🆕 ITDA ONE STUDIO (TJ)가 새롭게 추가되었습니다. 영상·오디오 3-레인 스티치 타임라인 노드입니다(분할 · 그룹 · 스티치 · 스냅 · 웨이브폼 · Auto Stitch · 장면/비트 감지 · ffmpeg 내보내기). H3 영상 갤러리와 MusicMaker 플레이리스트에서 바로 미디어를 불러올 수 있습니다.
🆕 ITDA ONE STUDIO (TJ) has been added. A 3-lane video/audio stitch timeline node (split · group · stitch · snap · waveforms · Auto Stitch · scene/beat detect · ffmpeg export). Media can be imported straight from the H3 video gallery and the MusicMaker playlist.
🆕 MiniMax H3에 Postprocess · Image Generator · Character Sheet가 추가되었습니다. Postprocess는 Deblur → Denoise → Upscale → Skin Retouch → Add Grain → Interpolate → Resize를 한 번에 체인으로 처리하고, Image Generator는 T2I · Reference to Image 정지 이미지를, Character Sheet는 캐릭터 시트를 만듭니다(전용 H3 이미지 갤러리 포함).
🆕 MiniMax H3 gains Postprocess · Image Generator · Character Sheet. Postprocess chains Deblur → Denoise → Upscale → Skin Retouch → Add Grain → Interpolate → Resize in one pass, Image Generator makes T2I / Reference-to-Image stills, and Character Sheet makes character sheets (with a dedicated H3 image gallery).
🆕 이미지 노드 Prompt Edit 통합. Krea2 · Z-Image · Flux.2 Klein · Qwen 2511 · SDXL · Anima의 Prompt Edit이 한 화면으로 합쳐지고 LLM 백엔드가 세 가지(Local GGUF · ComfyUI native · OpenRouter)로 늘었으며, 프롬프트 헤더에 Auto Enhance 체크가 생겼습니다.
🆕 Unified Prompt Edit on the image nodes. Krea2 · Z-Image · Flux.2 Klein · Qwen 2511 · SDXL · Anima get one merged Prompt Edit screen with three LLM backends (Local GGUF · ComfyUI native · OpenRouter), plus an Auto Enhance checkbox in the prompt header.
🆕 Qwen Image 2.1 ONE STUDIO가 새롭게 추가되었습니다. Qwen Image 2.1 모델 계열을 위한 노드로, 2511의 UI/기능(T2I · I2I · Ref to Image · Edit · Inpaint/Outpaint · Upscale)을 그대로 따르면서 마스크 없는 인라인 드로잉 도구(펜/선/원/사각형, 단축키, 오른쪽 클릭 지우개)를 씁니다. POSE 모드도 새로 추가되어, VNCCS PoseStudio LoRA와 SAM3D Body를 사용해 한 이미지의 포즈를 다른 캐릭터에게 그대로 옮길 수 있습니다(비율 프리셋이 달린 크롭 도구 포함).
🆕 Qwen Image 2.1 ONE STUDIO has been added. A node for the Qwen Image 2.1 model family, following 2511's own UI/feature set (T2I · I2I · Ref to Image · Edit · Inpaint/Outpaint · Upscale) with a mask-free inline drawing tool (pen/line/circle/rect, keyboard shortcuts, right-click eraser). Also adds a new POSE mode that copies a pose from one image onto another character using the VNCCS PoseStudio LoRA and SAM3D Body (with an aspect-ratio-preset crop tool).
🆕 Anima ONE STUDIO가 새롭게 추가되었습니다. ComfyUI 네이티브 애니메이션풍 이미지 모델 Anima를 위한 노드로, T2I · Inpainting · Any Control to Image · Depth Control to Image 4가지 모드와 Turbo LoRA 토글, 브러시로 직접 칠하는 인라인 마스크 에디터(반전 포함)를 제공합니다.
🆕 Anima ONE STUDIO has been added. A node for ComfyUI's native anime-style image model Anima, with T2I · Inpainting · Any Control to Image · Depth Control to Image modes, a Turbo LoRA toggle, and an inline brush-paint mask editor (with invert).
미니맥스 H3 노드가 새롭게 추가 되었습니다. FL2VA / REF2VA / Turbo Lora / Cache와 멀티 프롬포트로 동시에 여러개의 클립을 생성하거나 이전 클립의 라스트 프레임을 다음 클립의 퍼스트 프레임으로 받아서 연속적인 영상을 만들수 있습니다. 여러개 클립의 생성시 최종 클립이 완료되면 모든 영상을 스티치하여 하나의 영상으로 생성도 가능합니다.
The MiniMax H3 node has been added. Using FL2VA, REF2VA, Turbo Lora, and Cache, along with multi-port functionality, you can create multiple clips simultaneously or use the last frame of the previous clip as the first frame of the next clip to generate a continuous video. When creating multiple clips, once the final clip is complete, you can stitch all the clips together to create a single video.
🆕 MusicMaker ONE STUDIO가 새롭게 추가되었습니다. 노드 하나에서 세 엔진 — Ace-Step 1.5(48 kHz, 3-스테이지 순차 샘플링, 기본값), MiniMax Music 3, YuE2 — 으로 노래·연주곡을 생성합니다. SUNO식 2-패널 레이아웃(스타일·가사·보컬·BPM/키/박자 / 인라인 플레이어가 붙은 플레이리스트), H3식 대기 큐(카드별 취소), 태그가 박힌 파일 다운로드, Krea2 앨범 커버, 캡션·가사 LLM(로컬 GGUF / OpenRouter / ComfyUI TextGenerate). 노래/연주곡 토글, 저장 폴더 지정.
🆕 MusicMaker ONE STUDIO has been added. One node, three engines — Ace-Step 1.5 (48 kHz, 3-stage progressive sampling, default), MiniMax Music 3 and YuE2 — for songs and instrumentals. SUNO-style two-pane layout (style · lyrics · vocals · BPM/key/time-sig, and a playlist with an inline player), an H3-style generation queue (per-card cancel), downloads of files with tags already embedded, Krea2 album covers, and a caption + lyrics LLM (Local GGUF / OpenRouter / ComfyUI TextGenerate). Song/Instrumental toggle, configurable save folder.
🆕 이미지 노드 · MiniMax H3의 LLM에 OpenRouter 백엔드가 추가되었습니다. Enhance / Image → Prompt 패널(Krea2 · Z-Image · Flux.2 Klein · Qwen 2511 · SDXL)과 MiniMax H3의 Image → Brief에서 로컬 GGUF 대신 OpenRouter 클라우드 모델을 선택할 수 있습니다. 키는 노드의
.env하나에 저장되어 세 계열이 공유하며 Settings에서 마스킹 표시됩니다.🆕 OpenRouter LLM backend for the image nodes and MiniMax H3. The Enhance / Image → Prompt panel (Krea2 · Z-Image · Flux.2 Klein · Qwen 2511 · SDXL) and MiniMax H3's Image → Brief can now use an OpenRouter cloud model instead of a local GGUF. One key in the node's
.env, shared by all three, shown masked in Settings.🆕 갤러리 눈가리기. 모든 노드 갤러리(+ MusicMaker 플레이리스트)의 각 썸네일에 👁 토글이 생겨 가릴 수 있고, 가린 목록은 서버에 한 곳으로 저장되어 노드와 AI ONE STUDIO 웹앱이 동기화됩니다.
🆕 Per-thumbnail blur (눈가리기). Every node gallery (and the MusicMaker playlist) gets a 👁 toggle on each thumbnail; the hidden list is stored server-side in one place and stays in sync between the nodes and the AI ONE STUDIO web app.
🧪 SDXL ONE STUDIO는 현재 테스트 버전입니다. 기능은 동작하지만 일부 옵션이 변경될 수 있습니다.
🧪 SDXL ONE STUDIO is currently a test/beta version. Core features are functional but some options may change.⚠️ 생성 방식: 모든 노드의 생성은 ComfyUI 상단 RUN이 아닌 노드 내부의 ▶ Generate 버튼으로 실행합니다. RUN 실행 시 마지막으로 생성된 이미지가 OUTPUT image 슬롯으로 출력됩니다. ⚠️ Generation Method: generation for all nodes is executed using at the top of ComfyUI RUNinstead of, use the button inside the node ▶ Generate button. When RUN is executed, the most recently generated image is output through the OUTPUT image slot..
⚠️ 설치 후 필수 단계 — 의존성 노드 설치
⚠️ Required step after install — install the dependency nodes
ComfyUI-Manager로 이 패키지를 설치하면 Python 패키지는 자동으로 설치되지만, 이 노드가 의존하는 다른 커스텀 노드 팩은 자동으로 설치되지 않습니다. (Manager의 nightly/git 설치 경로에는 노드 팩을 자동 설치하는 기능이 없습니다.) 설치 직후 아래 스크립트를 한 번 실행한 뒤 ComfyUI를 재시작하세요. 실행하지 않으면 노드는 뜨지만 Face Redraw · Faceswap · ControlNet · RE-BG · Upscale · MiniMax H3 Reference 등 여러 모드가 로드에 실패합니다. 어떤 팩이 빠졌는지는 ComfyUI 시작 시 콘솔에 배너로 표시됩니다.
Windows: 패키지 폴더의
install_requirements.bat더블클릭 Mac / Linux:bash install_requirements.sh자세한 목록은 필수 커스텀 노드 섹션 참고.
When you install this package via ComfyUI-Manager, the Python packages install automatically but the other custom-node packs this node depends on do NOT (Manager's nightly/git install path has no mechanism for auto-installing node packs). Run the script below once right after install, then restart ComfyUI. Without it the node loads but several modes fail — Face Redraw, Faceswap, ControlNet, RE-BG, Upscale, MiniMax H3 Reference. The ComfyUI console prints a banner at startup listing exactly which packs are missing.
Windows: double-click
install_requirements.batin the package folder Mac / Linux:bash install_requirements.shSee Required Custom Nodes for the full list.
🌐 웹 버전 — AI ONE STUDIO
🌐 Web Version — AI ONE STUDIO
designloves2/AI-ONE-STUDIO — 이 커스텀 노드 패키지의 UI를 그대로 재현한 독립 웹 애플리케이션입니다. ComfyUI를 백엔드로 그대로 사용하며(Manager/노드 설치 불필요, ComfyUI 서버만 켜져 있으면 됨), 브라우저에서 ComfyUI 캔버스 없이 풀스크린 메뉴형 UI로 각 ONE STUDIO 툴을 바로 사용할 수 있습니다.
designloves2/AI-ONE-STUDIO — a standalone web app that reproduces this custom-node package's UI as-is. It runs against a plain ComfyUI server as its backend (no Manager or node install needed on the client side — just keep ComfyUI running), and lets you use every ONE STUDIO tool in a fullscreen, menu-driven UI in the browser, without the ComfyUI graph canvas.
<img width="240" height="480" alt="m6" src="https://github.com/user-attachments/assets/1ba815a1-f980-4ee9-9f6c-595cb0bec63b" /> <img width="240" height="480" alt="m3" src="https://github.com/user-attachments/assets/aaba6fa9-a61b-47b1-b1b6-5110d753aed6" /> <img width="240" height="480" alt="m2" src="https://github.com/user-attachments/assets/53358f5c-d3ba-4544-93dd-448de6f28b00" /> <img width="240" height="480" alt="m1" src="https://github.com/user-attachments/assets/12520cc6-150a-4102-849e-f44f59a4bef2" /> <img width="1280" height="800" alt="w1" src="https://github.com/user-attachments/assets/79374177-b812-45f8-b2e3-e2ad30271a6f" />목차
Table of Contents
- 포함 노드
- Included Nodes
- 설치 방법
- Installation
- 필수 커스텀 노드
- Required Custom Nodes
- Z-Image ONE STUDIO — 기능 상세
- Z-Image ONE STUDIO — Feature Details
- Flux.2 Klein ONE STUDIO — 기능 상세
- Flux.2 Klein ONE STUDIO — Feature Details
- Qwen Image Edit 2511 ONE STUDIO — 기능 상세
- Qwen Image Edit 2511 ONE STUDIO — Feature Details
- Krea 2 ONE STUDIO — 기능 상세
- Krea 2 ONE STUDIO — Feature Details
- SDXL ONE STUDIO — 기능 상세 🧪
- SDXL ONE STUDIO — Feature Details 🧪
- 공통 기능
- Common Features
- MiniMax H3 ONE STUDIO — 기능 상세 🧪
- MiniMax H3 ONE STUDIO — Feature Details 🧪
- MusicMaker ONE STUDIO — 기능 상세 🧪
- MusicMaker ONE STUDIO — Feature Details 🧪
- ITDA ONE STUDIO — 기능 상세
- ITDA ONE STUDIO — Feature Details
- 버그 수정 이력
- Bug Fix History
- 라이선스
- License
포함 노드
Included Nodes
| 노드 이름<br><sub>Node Name</sub>| 대상 모델<br><sub>Target Model</sub>| 지원 모드<br><sub>Supported Modes</sub>| |---|---|---| | Z-Image ONE STUDIO (TJ) | Z-Image Turbo (flow-matching) | T2I · I2I · Inpaint · Outpaint · RE-BG · ControlNet · Face Redraw · Upscale | | Flux.2 Klein ONE STUDIO (TJ) | Flux.2-Klein (9B / 4B) | T2I · I2I · Edit · Inpaint · Outpaint · Faceswap · Upscale | | Qwen Image Edit 2511 ONE STUDIO (TJ) | Qwen2.5-VL 기반 Image Edit 모델<br><sub>Qwen2.5-VL based Image Edit model</sub>| T2I · I2I · Edit(최대 3장) · Inpaint · Outpaint · Faceswap · Angle · Upscale<br><sub>T2I · I2I · Edit(up to 3 images) · Inpaint · Outpaint · Faceswap · Angle · Upscale</sub>| | Qwen Image 2.1 ONE STUDIO (TJ) 🆕 | Qwen Image 2.1 모델 계열<br><sub>Qwen Image 2.1 model family</sub>| T2I · I2I · Ref to Image(최대 10장) · Edit(최대 10장) · Inpaint · Outpaint · Upscale · POSE(VNCCS PoseStudio LoRA)<br><sub>T2I · I2I · Ref to Image(up to 10 images) · Edit(up to 10 images) · Inpaint · Outpaint · Upscale · POSE (VNCCS PoseStudio LoRA)</sub>| | Krea 2 ONE STUDIO (TJ) | Krea.ai 이미지 생성 모델<br><sub>Krea.ai image generation model</sub>| T2I · I2I · ControlNet(depth/canny 🧪) · IDENTITY 🧪 · Upscale | | SDXL ONE STUDIO (TJ) 🧪 | SDXL Checkpoint / Separate UNET 모델<br><sub>SDXL Checkpoint / Separate UNET model</sub>| T2I · I2I · Inpaint · Outpaint · Upscale (테스트 버전 / Test Version) | | MiniMax H3 ONE STUDIO (TJ) 🧪 | MiniMax H3 영상+오디오 생성 모델<br><sub>MiniMax H3 video + audio model</sub>| Text / First-Last / Reference · 클립 릴레이 + 자동 합본 · 라이브 프리뷰 · Postprocess · Image Generator · Character Sheet (실험적 / Experimental) | | Anima ONE STUDIO (TJ) 🆕 | Anima (ComfyUI 네이티브 애니메이션풍 이미지 모델)<br><sub>Anima (ComfyUI-native anime-style image model)</sub>| T2I · Inpainting · Any Control to Image · Depth Control to Image · Turbo LoRA · 인라인 마스크 페인터<br><sub>T2I · Inpainting · Any Control to Image · Depth Control to Image · Turbo LoRA · inline mask painter</sub>| | MusicMaker ONE STUDIO (TJ) 🆕🧪 | Ace-Step 1.5 · MiniMax Music 3 · YuE2 (음악 생성)<br><sub>Ace-Step 1.5 / MiniMax Music 3 / YuE2 music model</sub>| 노래 / 연주곡 · 3 엔진 · Melody Editor(피아노롤 + MIDI 건반) · 앨범 커버 복사/붙여넣기/업로드/갤러리 · 대기 큐 · 캡션·가사 LLM (로컬 / OpenRouter / TextGenerate / Connect Custom) · 태그가 박힌 파일<br><sub>song / instrumental · 3 engines · Melody Editor (piano roll + MIDI keyboard) · album cover copy / paste / upload / gallery · generation queue · caption+lyric LLM (local / OpenRouter / TextGenerate / Connect Custom) · tags embedded in the file</sub>| | ITDA ONE STUDIO (TJ) 🆕 | 영상·오디오 스티치 타임라인 (ffmpeg)<br><sub>video / audio stitch timeline (ffmpeg)</sub>| 3-레인 타임라인 · 분할 / 그룹 / 스티치 / 스냅 · 웨이브폼 · Auto Stitch · 장면/비트 감지 · 내보내기 · H3 영상 갤러리·MusicMaker 플레이리스트에서 불러오기<br><sub>3-lane timeline · split / group / stitch / snap · waveforms · Auto Stitch · scene/beat detect · export · import from the H3 video gallery and MusicMaker playlist</sub>|
언어 지원: 모든 노드의 Settings에서 한국어 / English 전환 가능 Language Support: Korean / English can be selected in Settings for every node
🔗 PromptDB 파이프 연동 (TJ_NODE): 모든 ONE STUDIO 노드에
pipe입력이 있어,ComfyUI-TJ_NODE의PromptDBLoader(TJ)에서 고른 기록을 소켓 하나로 받아 생성 시점에 적용합니다. 적용 필드: 프롬프트(pos/neg) · seed · steps · cfg · sampler · scheduler. 모델은 파이프에서 적용하지 않고 각 노드가 자기 설정 모델을 사용합니다(노드마다 필요한 모델 계열이 달라서). 파이프에 있는 값만 오버라이드하고 없는 값은 노드 설정을 그대로 쓰며, 노드 UI는 변경되지 않습니다. TJ_NODE 미설치 시 해당 소켓만 비활성이고 노드는 정상 동작합니다. (TJ_NODE v2.10.1+) 🔗 PromptDB pipe (TJ_NODE): every ONE STUDIO node has apipeinput that receives a selected record fromPromptDBLoader(TJ)and applies it at generation time — prompt (pos/neg), seed, steps, cfg, sampler, scheduler. The model is NOT taken from the pipe; each node keeps its own configured model (different nodes need different model families). Only fields present in the pipe override the node's settings, the rest keep the node's own values, and the node UI is never changed. No hard dependency: if TJ_NODE isn't installed the socket is simply inactive. (TJ_NODE v2.10.1+)
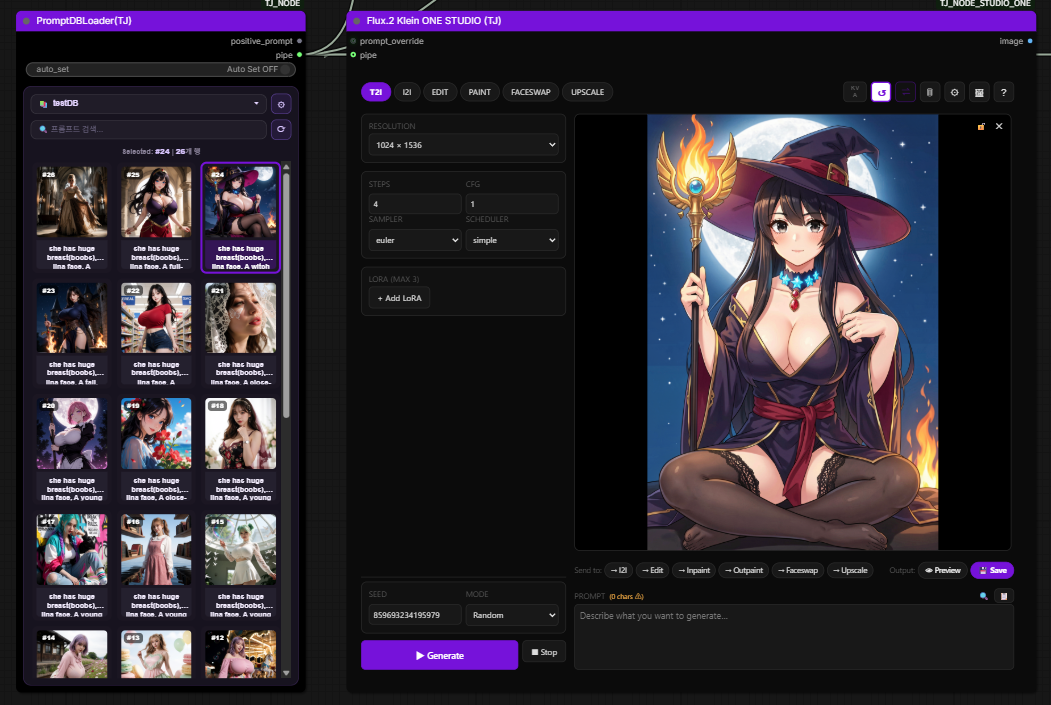
PromptDBLoader(TJ)의pipe출력을 ONE STUDIO 노드의pipe입력에 연결한 예시 (Flux.2 Klein) / examplepipeconnection (Flux.2 Klein)
선택된 기록의 상세 필드(model · seed · steps · cfg · sampler · scheduler · extra_settings · note) — model은 파이프로 전달되지 않음 / selected record's detail fields — model is not carried over the pipe
설치 방법
Installation
ComfyUI Manager (권장)
ComfyUI Manager (recommended)
ComfyUI Manager → Install Custom Nodes → ComfyUI-TJ_NODE_STUDIO_ONE 검색 후 설치
ComfyUI Manager → Install Custom Nodes → ComfyUI-TJ_NODE_STUDIO_ONE search and install
수동 설치
Manual Installation
cd ComfyUI/custom_nodes
git clone https://github.com/designloves2/ComfyUI-TJ_NODE_STUDIO_ONE.git
ComfyUI를 재시작하면 Add Node 메뉴에서 모든 노드를 찾을 수 있습니다. ComfyUI After restarting all nodes will be available in the Add Node menu.
필수 커스텀 노드
Required Custom Nodes
아래 노드들을 수동으로 설치하기 번거롭다면 자동 설치 스크립트를 사용하세요. Use the automatic installation script if installing the nodes below manually is inconvenient..
⚡ 자동 설치 (권장)
⚡ Automatic Installation (recommended)
이 패키지 폴더 안에 포함된 스크립트를 실행하면 필수 노드를 한 번에 설치합니다. Run the script included in this package folder to install all required nodes at once..
Windows:
install_requirements.bat ← 더블클릭으로 실행
Mac / Linux:
chmod +x install_requirements.sh
./install_requirements.sh
- 이미 설치된 노드는 자동으로 건너뜁니다
- Already installed nodes are skipped automatically
requirements.txt가 있는 노드는 pip install까지 자동 처리requirements.txtNodes with requirements.txt are automatically processed through pip install- 완료 후 ComfyUI를 재시작하면 모든 노드가 로드됩니다
- Restart ComfyUI after completion to load all nodes
수동 설치 목록
Manual Installation List
| 노드<br><sub>Node</sub>| 용도<br><sub>Purpose</sub>| 필수 대상<br><sub>Required For</sub>|
|---|---|---|
| ComfyUI-Impact-Pack | FaceDetailer — 얼굴 감지·재생성·블렌드 핵심 엔진<br><sub>FaceDetailer — core engine for face detection, regeneration, and blending</sub>| Z-Image Face Redraw |
| ComfyUI-Impact-Subpack | Impact Pack 필수 서브팩 (함께 설치 필요)<br><sub>Impact Pack required subpack (must be installed together)</sub>| Z-Image Face Redraw |
| ComfyUI-KJNodes | FluxKVCache · ImagePadKJ · FluxKontext 관련 노드<br><sub>FluxKVCache · ImagePadKJ · FluxKontext related nodes</sub>| Klein · QE2511 |
| ComfyUI-GGUF | GGUF 형식 모델 로딩<br><sub>GGUF format model loading</sub>| 선택 (GGUF 사용 시)<br><sub>selection (GGUF when used)</sub>|
| ComfyUI_FaceAnalysis | Faceswap 모드 얼굴 감지<br><sub>Faceswap mode face detection</sub>| Klein · QE2511 Faceswap |
| ComfyUI-RMBG | 배경 제거<br><sub>background removal</sub>| Z-Image RE-BG |
| comfyui_controlnet_aux | ControlNet 전처리기 (depth/canny)<br><sub>ControlNet preprocessor (depth/canny)</sub>| Z-Image ControlNet · Krea2 ControlNet 🧪 |
| ComfyUI-SeedVR2 | SeedVR2 AI 업스케일 노드<br><sub>SeedVR2 AI upscaling node</sub>| 전체 노드 Upscale 모드<br><sub>Upscale mode for all nodes</sub>|
| comfyui-krea2-controlnet 🧪 | Krea2 Control LoRA (depth)<br><sub>Krea2 Control LoRA (depth)</sub>| Krea2 ControlNet Depth |
| comfyui-krea2edit 🧪 | Krea2 in-context 편집<br><sub>Krea2 in-context edit</sub>| Krea2 IDENTITY |
| ComfyUI-NK2E 🧪 | Krea2 NK2E in-context (canny)<br><sub>Krea2 NK2E in-context (canny)</sub>| Krea2 ControlNet Canny |
| ComfyUI-MiniMaxH3-FirstBlockCache 🧪 | 스텝 재사용 캐시<br><sub>step-reuse cache</sub>| MiniMax H3 (선택)<br><sub>optional</sub>|
| ComfyUI-PlagueKind-Nodes 🧪 | H3 SLA Attention (블록-스파스)<br><sub>H3 SLA Attention (block-sparse)</sub>| MiniMax H3 (선택)<br><sub>optional</sub>|
| ComfyUI-sol-attn 🧪 | H3 전용 Sol 어텐션 · Fused Modulation<br><sub>H3-specific Sol attention + AdaLN fusion</sub>| MiniMax H3 (선택)<br><sub>optional</sub>|
| ComfyUI-MiniMax-H3-Turbo 🧪 | Turbo LoRA · Turbo 샘플러<br><sub>turbo LoRA + sampler</sub>| MiniMax H3 Accel=Turbo |
| ComfyUI-SolAttn_triton 🧪 | SolAttn 가속<br><sub>SolAttn acceleration</sub>| MiniMax H3 Accel=SolAttn (기본값)<br><sub>default</sub>|
| ComfyUI-Spectrum-MiniMax-H3 🧪 | Spectrum 가속<br><sub>Spectrum acceleration</sub>| MiniMax H3 Accel=Spectrum |
| ComfyUI-VideoHelperSuite 🧪 | 레퍼런스 비디오 입력<br><sub>reference video inputs</sub>| MiniMax H3 Reference 모드<br><sub>Reference mode</sub>|
| Nvidia RTX Nodes 🧪 | RTX Video Super Resolution | MiniMax H3 Upscale=RTX VSR |
| ComfyUI-FlashVSR_Ultra_Fast 🧪 | 타일 기반 디퓨전 VSR<br><sub>tiled diffusion video super-resolution</sub>| MiniMax H3 Upscale=FlashVSR VSR (좌측 패널 · 갤러리)<br><sub>left panel + gallery</sub>|
| ComfyUI-Fizgig-H3-Still 🧪 | 진짜 1프레임 H3 latent · 줄무늬 없는 디코드<br><sub>true single-frame H3 latent + banding-free decode</sub>| MiniMax H3 Image Generator Latent=Use Fizgig Latent<br><sub>(선택 · optional)</sub>|
| JK-AceStep-Nodes 🧪 | JKASS 품질 샘플러 (jkass_quality)<br><sub>JKASS quality sampler</sub>| MusicMaker Ace-Step 엔진<br><sub>MusicMaker Ace-Step engine</sub>|
| ComfyUI-Openrouter_node | OpenRouter LLM 키 저장소<br><sub>OpenRouter LLM key store</sub>| MusicMaker · 이미지 노드 · H3 의 OpenRouter LLM 백엔드 (선택)<br><sub>optional — OpenRouter LLM backend for MusicMaker / image nodes / H3</sub>|
Z-Image ONE STUDIO — 기능 상세
Z-Image ONE STUDIO — Feature Details
지원 모드
Supported Modes
| 모드<br><sub>Mode</sub>| 설명<br><sub>Description</sub>| |---|---| | T2I | 텍스트 → 이미지 기본 생성<br><sub>basic text-to-image generation</sub>| | I2I | 소스 이미지 기반 변형 생성<br><sub>source image-based transformation</sub>| | INPAINT | 내장 마스크 에디터로 특정 영역만 재생성 (DifferentialDiffusion)<br><sub>regenerate only selected areas using the built-in mask editor (DifferentialDiffusion)</sub>| | OUTPAINT | 이미지 캔버스 확장 후 빈 영역 인페인트<br><sub>extend the image canvas and inpaint empty areas</sub>| | RE-BG | RMBG로 서브젝트 분리 → 배경 완전 재생성 (경계선 없음)<br><sub>RMBGseparate the subject with RMBG and completely regenerate the background (without boundary artifacts)</sub>| | CONTROLNET | Depth / Canny / Pose / HED / MLSD 레퍼런스 가이드 생성<br><sub>Depth / Canny / Pose / HED / MLSD generate a reference guide</sub>| | FACE REDRAW | 얼굴 자동 감지 → 크롭 → LoRA 재생성 → 원본에 블렌드<br><sub>automatically detect the face, crop it, regenerate with LoRA, and blend it into the original</sub>| | UPSCALE | SeedVR2 AI 업스케일 — DiT 모델 기반 초고해상도 변환<br><sub>SeedVR2 AI — DiT ultra-high-resolution conversion using a DiT model</sub>|
필수 모델
Required Models
| 종류<br><sub>Type</sub>| 경로<br><sub>Path</sub>| 다운로드<br><sub>Download</sub>|
|---|---|---|
| Diffusion Model | models/diffusion_models/ | z_image_turbo_bf16 |
| Text Encoder | models/text_encoders/ | qwen_3_4b |
| VAE | models/vae/ | ae.safetensors |
| ControlNet (선택)<br><sub>ControlNet (selection)</sub>| models/controlnet/ | Z-Image-Turbo-Fun-Controlnet-Union |
Flux.2 Klein ONE STUDIO — 기능 상세
Flux.2 Klein ONE STUDIO — Feature Details
지원 모드
Supported Modes
| 모드<br><sub>Mode</sub>| 설명<br><sub>Description</sub>| |---|---| | T2I | 텍스트 → 이미지 기본 생성<br><sub>basic text-to-image generation</sub>| | I2I | 소스 이미지 기반 변형 생성<br><sub>source image-based transformation</sub>| | EDIT | 레퍼런스 이미지 1~5장 기반 멀티 레퍼런스 편집<br><sub>multi-reference editing based on 1–5 reference images</sub>| | PAINT | 내장 마스크 에디터로 특정 영역 재생성 + Outpaint 지원<br><sub>built-in mask editor regenerate selected areas with Outpaint support</sub>| | FACESWAP | BFS 얼굴 LoRA를 사용한 얼굴 교체·재생성<br><sub>BFS face replacement and regeneration using a BFS face LoRA</sub>| | UPSCALE | SeedVR2 AI 업스케일 — DiT 모델 기반 초고해상도 변환<br><sub>SeedVR2 AI — DiT ultra-high-resolution conversion using a DiT model</sub>|
필수 모델
Required Models
| 종류<br><sub>Type</sub>| 경로<br><sub>Path</sub>| 다운로드<br><sub>Download</sub>|
|---|---|---|
| Diffusion Model | models/diffusion_models/ | BFL FLUX.2 Collection |
| Text Encoder (9B) | models/text_encoders/ | Comfy-Org 9B pack |
| Text Encoder (4B) | models/text_encoders/ | Comfy-Org 4B pack |
| VAE | models/vae/ | Comfy-Org 9B pack |
| BFS LoRA (Faceswap) | models/loras/ | BFS-Best-Face-Swap |
KV Cache: 파일명에
kv가 포함된 모델은 자동으로 FluxKVCache 노드를 활성화합니다. KV Cache: Models whose filenames containkvautomatically FluxKVCache enable the node.
Qwen Image Edit 2511 ONE STUDIO — 기능 상세
Qwen Image Edit 2511 ONE STUDIO — Feature Details
지원 모드
Supported Modes
| 모드<br><sub>Mode</sub>| 설명<br><sub>Description</sub>| |---|---| | T2I | 텍스트로 이미지 생성<br><sub>generate an image from text</sub>| | I2I | 소스 이미지 기반 변형 생성<br><sub>source image-based transformation</sub>| | EDIT | 텍스트 프롬프트로 이미지 편집. 원본 + 참조 이미지 최대 3장 지원<br><sub>edit images using a text prompt. supports the original plus up to three reference images</sub>| | PAINT | 마스크 영역 인페인트. Outpaint(캔버스 확장) 포함<br><sub>inpaint masked areas. Outpaint(canvas expansion) included</sub>| | FACESWAP | BFS LoRA를 활용한 얼굴 교체. 자동 기본 프롬프트 제공<br><sub>BFS LoRAface replacement using BFS LoRA. provides an automatic default prompt</sub>| | ANGLE | 3D 씬에서 카메라 앵글(H/V/Z) 드래그 조절. Camera Angle LoRA는 ⚙ Settings에서 설정<br><sub>3D scene camera angle(H/V/Z) drag control. Camera Angle LoRAis configured in ⚙ Settings</sub>| | UPSCALE | SeedVR2 AI 업스케일<br><sub>SeedVR2 AI</sub>|
필수 모델
Required Models
| 종류<br><sub>Type</sub>| 경로<br><sub>Path</sub>| 다운로드<br><sub>Download</sub>|
|---|---|---|
| Diffusion Model | models/diffusion_models/ | Comfy-Org QE2511 |
| Text Encoder | models/text_encoders/ | Comfy-Org QE2511 |
| VAE | models/vae/ | Comfy-Org QE2511 |
| Lightning LoRA (선택)<br><sub>Lightning LoRA (selection)</sub>| models/loras/ | Qwen-Image-Edit-2511-Lightning |
| Camera Angle LoRA (선택)<br><sub>Camera Angle LoRA (selection)</sub>| models/loras/ | Multi Angle LoRa |
| BFS LoRA (Faceswap 필수)<br><sub>BFS LoRA (Faceswap required)</sub>| models/loras/ | BFS-Best-Face-Swap |
내부 의존 노드:
FluxKontextImageScale·TextEncodeQwenImageEditPlus·FluxKontextMultiReferenceLatentMethod— ComfyUI-KJNodes에 포함 Internal Dependency Nodes:FluxKontextImageScale·TextEncodeQwenImageEditPlus·FluxKontextMultiReferenceLatentMethod— ComfyUI-KJNodesincluded in
Krea 2 ONE STUDIO — 기능 상세
Krea 2 ONE STUDIO — Feature Details
지원 모드
Supported Modes
| 모드<br><sub>Mode</sub>| 설명<br><sub>Description</sub>| |---|---| | T2I | 텍스트로 이미지 생성 (+ ControlNet depth/canny 🧪)<br><sub>generate an image from text (+ ControlNet depth/canny 🧪)</sub>| | I2I | 소스 이미지 기반 변형 생성 (+ ControlNet depth/canny 🧪)<br><sub>source image-based transformation (+ ControlNet depth/canny 🧪)</sub>| | IDENTITY 🧪 | 지시문 기반 인물 정체성/외형 편집<br><sub>instruction-based identity / appearance editing</sub>| | UPSCALE | SeedVR2 AI 업스케일<br><sub>SeedVR2 AI</sub>|
필수 모델
Required Models
| 종류<br><sub>Type</sub>| 경로<br><sub>Path</sub>| 다운로드<br><sub>Download</sub>|
|---|---|---|
| Diffusion Model | models/diffusion_models/ | Comfy-Org Krea2 |
| Text Encoder | models/text_encoders/ | Comfy-Org Krea2 |
| VAE | models/vae/ | Comfy-Org Krea2 |
🧪 IDENTITY · ControlNet (depth / canny) — 실험적 기능
🧪 IDENTITY · ControlNet (depth / canny) — Experimental Features
⚠️ 실험적 기능 · 오류 가능성 있음 (Experimental — may produce errors or unexpected results)
IDENTITY 탭과 ControlNet(depth/canny)은 외부 커스텀 노드 + 별도 LoRA에 의존하는 실험적 기능입니다. 결과 품질이 일정하지 않을 수 있고, 노드/모델 미설치 시 생성이 실패합니다. depth·canny는 LoRA 기반이라 픽셀 단위로 정확하지 않습니다.
The IDENTITY tab and ControlNet (depth/canny) are experimental and depend on external custom nodes + separate LoRAs. Output quality can be inconsistent, and generation fails if the required nodes/models are missing. Because depth/canny are LoRA-based, they are not pixel-accurate.
- Depth = 전체 구도·프레이밍·스케일을 잡음(세밀한 포즈는 느슨) / captures overall composition·framing·scale (loose on fine pose)
- Canny = 윤곽선을 정확히 고정해 포즈·얼굴 방향·실루엣 재현 / locks contours for faithful pose·face-direction·silhouette
필수 커스텀 노드 (Required custom nodes)
| 노드<br><sub>Node</sub>| 기능<br><sub>Used for</sub>|
|---|---|
| comfyui-krea2edit | IDENTITY (Krea2EditModelPatch · Krea2EditGroundedEncode) |
| comfyui-krea2-controlnet | ControlNet Depth (Krea2ControlLoRALoader · …ImageEncode · …Apply) |
| ComfyUI-NK2E | ControlNet Canny (NK2EInContextEditNode) |
| comfyui_controlnet_aux | depth/canny 전처리기 (DepthAnythingV2Preprocessor · CannyEdgePreprocessor) |
필수 LoRA / 모델 (Required LoRAs / models) — models/loras/ 에 배치
| 기능<br><sub>Feature</sub>| 파일<br><sub>File</sub>| 다운로드<br><sub>Download</sub>|
|---|---|---|
| IDENTITY | krea2_identity_edit_v1_2.safetensors | conradlocke/krea2-identity-edit |
| Depth ControlNet | depth control LoRA (예: depth-control-lora.safetensors) | Patil/Krea-2-depth-controlnet |
| Canny ControlNet | NK2E canny LoRA (예: NK2E-canny-v0.1.safetensors) | nynxz/NK2E |
Depth 전처리 모델 자동 다운로드: depth 사용 시
depth_anything_v2_vitl.pth(Large, 권장)가 첫 실행에comfyui_controlnet_aux/ckpts/depth-anything/…로 자동 다운로드됩니다. (vitb/vits도 선택 가능. vitg(Giant)는 저장소가 비공개라 지원 안 함.)
Depth preprocessor auto-download: on first use,depth_anything_v2_vitl.pth(Large, recommended) is auto-downloaded tocomfyui_controlnet_aux/ckpts/depth-anything/…. (vitb/vits selectable too. vitg (Giant) is unsupported — its repo is gated.)
설정 방법 (Setup)
- 위 커스텀 노드 설치 후 ComfyUI 재시작 / install the nodes above, restart ComfyUI
- LoRA 파일을
models/loras/에 배치 / place the LoRA files inmodels/loras/ - ⚙ Settings 에서 IDENTITY LoRA, Depth/Canny Control LoRA 파일만 등록 / register only the LoRA files in Settings
- 조절값(strength·임계값·depth 모델·해상도 등)은 사이드 메뉴 CONTROLNET 패널에서 직접 조절 / adjust all tuning values in the side-menu CONTROLNET panel
SDXL ONE STUDIO — 기능 상세 🧪
SDXL ONE STUDIO — Feature Details 🧪
🧪 테스트 버전 (Test / Beta Version)
SDXL ONE STUDIO는 현재 테스트 단계입니다. 핵심 기능은 동작하지만 UI 및 옵션이 향후 변경될 수 있습니다.
SDXL ONE STUDIO is currently in the test stage. Core features are functional, but the UI and options may change in future versions.
지원 모드
Supported Modes
| 모드<br><sub>Mode</sub>| 설명<br><sub>Description</sub>| |---|---| | T2I | 텍스트 → 이미지 기본 생성<br><sub>basic text-to-image generation</sub>| | I2I | 소스 이미지 기반 변형 생성<br><sub>source image-based transformation</sub>| | INPAINT | 내장 풀스크린 마스크 에디터 (줌 1x–32x · 팬 · 브러시/지우개) — VAEEncodeForInpaint로 완전 마스킹<br><sub>built-in full-screen mask editor (zoom 1x–32x · pan · brush/eraser) — fully masked with VAEEncodeForInpaint</sub>| | OUTPAINT | 이미지 캔버스 확장 후 빈 영역 인페인트. 비교 슬라이더에서 패딩된 원본 미리보기 제공<br><sub>extend the image canvas and inpaint empty areas. padded original preview in compare slider</sub>| | UPSCALE | ESRGAN AI 업스케일 (latent 확대 → Refiner KSampler 정제)<br><sub>ESRGAN AI upscale (latent upscale → Refiner KSampler refinement)</sub>|
모델 로딩 방식
Model Loading Mode
SDXL ONE STUDIO는 Settings에서 두 가지 로딩 방식을 지원합니다.
SDXL ONE STUDIO supports two model loading modes in Settings.
| 방식<br><sub>Mode</sub>| 설명<br><sub>Description</sub>|
|---|---|
| CKPT | 단일 Checkpoint 파일 (models/checkpoints/) — 가장 간단한 방식<br><sub>single Checkpoint file (models/checkpoints/) — simplest setup</sub>|
| Separate (UNET) | UNET + DualCLIP(L/G) + VAE 분리 로딩 — GGUF·FP8 경량 모델 지원<br><sub>separate UNET + DualCLIP(L/G) + VAE loading — supports GGUF·FP8 lightweight models</sub>|
Refiner: CKPT / Separate 방식 모두 별도 Refiner Checkpoint를 항상 설정할 수 있습니다. Refiner는
CheckpointLoaderSimple로 독립 로딩됩니다.
Refiner: In both CKPT and Separate modes, a separate Refiner Checkpoint can always be configured. The Refiner is loaded independently viaCheckpointLoaderSimple.
주요 기능
Key Features
| 기능<br><sub>Feature</sub>| 설명<br><sub>Description</sub>| |---|---| | 📋 프롬프트 템플릿<br><sub>📋 Prompt Template</sub>| 자주 쓰는 프롬프트 저장·불러오기 (Klein 공유 템플릿 DB 사용)<br><sub>save and load frequently used prompts (shared template DB with Klein)</sub>| | 🔍 프롬프트 확대 편집<br><sub>🔍 Prompt Expand Edit</sub>| 전체화면 편집 팝업. TJ_NODE 설치 시 ✨ Enhance · 🖼 Image→Prompt 자동 활성화<br><sub>fullscreen edit popup. TJ_NODE install enables ✨ Enhance · 🖼 Image→Prompt</sub>| | CKPT ↔ UNET 표시기<br><sub>CKPT ↔ UNET Indicator</sub>| 현재 로딩 방식을 상단 배지로 표시. 방식 전환 시 즉시 업데이트<br><sub>display current loading mode as a top badge. Updates instantly on mode change</sub>| | ⇌ 비교 슬라이더<br><sub>⇌ Compare Slider</sub>| Outpaint: 패딩된 원본 vs 결과 / Inpaint: 원본 vs 마스킹 결과<br><sub>Outpaint: padded original vs result / Inpaint: original vs masked result</sub>| | 마스크 에디터<br><sub>Mask Editor</sub>| 팝업 풀스크린 에디터 — 줌·팬·브러시/지우개·크기 슬라이더 내장<br><sub>popup fullscreen editor — zoom · pan · brush/eraser · size slider built-in</sub>|
필수 모델
Required Models
| 종류<br><sub>Type</sub>| 경로<br><sub>Path</sub>| 비고<br><sub>Notes</sub>|
|---|---|---|
| SDXL Checkpoint (CKPT 방식) | models/checkpoints/ | 일반 SDXL .safetensors 파일<br><sub>standard SDXL .safetensors file</sub>|
| SDXL UNET (Separate 방식) | models/diffusion_models/ | GGUF / FP8 경량 파일도 지원<br><sub>GGUF / FP8 lightweight files also supported</sub>|
| CLIP-L (Separate 방식) | models/text_encoders/ | SDXL dual-encoder: clip_l<br><sub>SDXL dual-encoder: clip_l</sub>|
| CLIP-G (Separate 방식) | models/text_encoders/ | SDXL dual-encoder: clip_g<br><sub>SDXL dual-encoder: clip_g</sub>|
| VAE (Separate 방식) | models/vae/ | sdxl_vae.safetensors 등<br><sub>sdxl_vae.safetensors etc.</sub>|
| Refiner Checkpoint (선택)<br><sub>Refiner Checkpoint (optional)</sub>| models/checkpoints/ | SDXL-Refiner 계열 모델<br><sub>SDXL-Refiner series model</sub>|
| ESRGAN Upscale (Upscale 시 필수)<br><sub>ESRGAN Upscale (required for Upscale)</sub>| models/upscale_models/ | 4x-UltraSharp 등<br><sub>4x-UltraSharp etc.</sub>|
공통 기능
Common Features
설정 패널 (⚙ Settings)
Settings Panel (⚙ Settings)
- Diffusion Model / Text Encoder / VAE 드롭다운 선택
- Diffusion Model / Text Encoder / VAE dropdown selection
- ↻ Refresh Models — 모델 폴더 재스캔 (ComfyUI 재시작 없이 새 파일 인식)
- ↻ Refresh Models — rescan model folders (recognize new files without restarting ComfyUI)
- 언어 / Language — 한국어 / English 전환 (페이지 새로고침 적용)
- ** / Language** — Korean / English before (applied after page refresh)
- Negative Prompt — 전체 모드 공통 적용
- Negative Prompt — applied to all modes
- Prompt Suffix — 프롬프트 뒤에 자동 추가
- Prompt Suffix — automatically appended to the prompt
- Save Folder —
ComfyUI/output/내부 하위 저장 폴더 지정 - Save Folder —
ComfyUI/output/specify a subfolder under ComfyUI/output - 모델 오버라이드 슬롯 — Primitive(String) 노드 연결로 설정 드롭다운 우선 적용
- Model Override Slots — Primitive(String) connect a Primitive(String) node to override the Settings dropdown
SeedVR2 Upscale 모델 (전체 노드 공용)
SeedVR2 Upscale model (shared by all nodes)
| 경로<br><sub>Path</sub>| 파일<br><sub>File</sub>| 다운로드<br><sub>Download</sub>|
|---|---|---|
| models/SEEDVR2/ | DiT + VAE 모델<br><sub>DiT + VAE model</sub>| SeedVR2-models |
LoRA
- 최대 3개 LoRA 체인 (Faceswap 모드는 1개)
- up to three LoRA chains (Faceswap one in Faceswap mode)
.safetensors헤더에서 트리거 워드 자동 추출 및 표시.safetensorsautomatically extract and display trigger words from the .safetensors header- LoRA 교체 시 트리거 워드 자동 초기화 후 새 LoRA 트리거 워드 재로드
- when changing LoRA, clear the old trigger word and reload the new LoRA trigger word
- ON/OFF 토글로 개별 활성화
- ON/OFF individually enable with the ON/OFF toggle
- Strength 0~2 조절 (0 값 정상 저장)
- Strength 0~2 adjustment (0 value is saved correctly)
갤러리 (🖼 Gallery)
Gallery (🖼 Gallery)
- 저장된 이미지 타일 보기 (무한 스크롤, 정사각형 그리드)
- view saved images as tiles (infinite scrolling, square grid)
- 즐겨찾기(★) / 삭제 / 폴더 열기 / Send to(모드에 이미지 전달)
- favorite(★) / delete / open folder / Send to(send image to a mode)
- ESC 키로 닫기
- ESC close with the ESC key
비교 슬라이더 (⇌ Compare)
Comparison Slider (⇌ Compare)
- 생성 전 원본과 생성 후 결과를 드래그로 나란히 비교
- drag the slider to compare the original and generated result side by side
단축키
Keyboard Shortcuts
| 키<br><sub>Key</sub>| 동작<br><sub>Action</sub>|
|---|---|
| ESC | 열린 팝업 / 갤러리 / 오버레이 닫기<br><sub>close open popups, Gallery, or overlays</sub>|
MiniMax H3 ONE STUDIO — 기능 상세 🧪
MiniMax H3 ONE STUDIO — Feature Details 🧪
⚠️ 실험적 기능 · 오류 가능성 있음 (Experimental — may produce errors) 영상+오디오 생성 노드입니다. 외부 커스텀 노드와 별도 모델에 의존하며, 긴 영상은 클립을 이어 붙이는 방식이라 결과가 완벽하지 않을 수 있습니다. Video + audio node. It depends on external custom nodes and separate models, and long videos are assembled from chained clips, so results are not seamless.
왜 클립으로 나누는가 / Why clips
MiniMax H3는 프레임 수가 17k+5 격자에만 떨어지고 한 번에 만들 수 있는 길이가 제한적입니다(VRAM). 이 노드는 긴 프롬프트를 클립 단위로 나눠 순차 생성하고, 각 클립을 개별 저장한 뒤 마지막에 하나로 합칩니다. 클립마다 큐를 새로 제출하고, 클립 사이와 실행이 끝날 때 VRAM을 명시적으로 해제합니다(ComfyUI는 프롬프트 사이에 모델을 그대로 들고 있습니다). MiniMax H3 only accepts frame counts on a 17k+5 grid and a single pass is VRAM-limited. This node renders a long prompt as sequential clips, saves each one, then stitches them into one file. Each clip is its own queue submission, and VRAM is freed explicitly between clips and once the run ends — ComfyUI itself keeps models resident between prompts.
⚠️ 이미지 노드의 RUN 큐와는 다른 구조입니다 — 브라우저 탭이 계속 열려 있어야 합니다. 이미지 생성 노드는 ComfyUI 상단 RUN으로 그래프 전체를 서버에 한 번에 제출하므로, 브라우저를 닫아도 서버가 큐에 쌓인 걸 계속 처리합니다(이미지는 느려도 보통 2분 내외로 끝나서 체감이 잘 안 될 뿐입니다). 반면 MiniMax H3의 클립 릴레이(그리고 ⏭ Next Gen 대기 큐)는 다음 클립의 그래프를 "이전 클립의 실제 결과"를 보고 그때그때 만들기 때문에 미리 통째로 제출해둘 수가 없고, 그 판단을 브라우저 쪽 JS가 매 클립마다 내립니다. 그래서 지금 실행 중인 클립 하나는 브라우저를 닫아도 서버에서 끝까지 돌지만, 그다음 클립을 이어서 큐에 넣어줄 코드가 사라져 거기서 멈춥니다. 영상은 클립이 여러 개면 총 소요 시간이 수 분~수 시간까지 갈 수 있으니, 탭을 (백그라운드/최소화는 괜찮지만) 완전히 닫지 마세요. 컴퓨터/모니터가 절전모드(잠자기)로 들어가는 것도 탭을 닫는 것과 같은 문제입니다 — 그 시점의 클립은 서버에서 끝까지 돌지만 다음 클립을 이어서 넣어줄 브라우저 쪽 실행이 멈추므로, 긴 런을 돌릴 때는 절전모드를 꺼두세요. (완화책으로 실행 중에는 거의 무음에 가까운 낮은 볼륨의 오디오를 백그라운드에서 계속 재생해, 브라우저/OS가 탭을 완전히 절전 상태로 넘기지 않도록 유도합니다 — 100% 보장은 아니니 긴 런은 절전모드 자체를 꺼두는 쪽을 권장합니다.) 페이지를 그냥 새로고침한 경우에는 진행 상황이 저장되어 있어 자동으로 이어집니다. This is a different structure from the RUN queue on image nodes — the browser tab has to stay open. Image nodes submit the whole graph to the server in one shot via RUN, so the server keeps processing the queue even with the browser closed (this is easy to miss since an image usually finishes within ~2 minutes regardless). MiniMax H3's clip relay (and the ⏭ Next Gen queue) is different: the next clip's graph depends on the actual result of the previous one, so it can't be submitted upfront — that decision is made by the browser's own JS, clip by clip. The clip currently in flight will finish server-side even if you close the tab, but nothing is left to queue the next one, so the run stops there. A video run with several clips can take anywhere from minutes to hours, so keep the tab open (backgrounded/minimized is fine, just not closed). The computer/monitor going to sleep causes the exact same problem as closing the tab — the clip in flight still finishes server-side, but nothing is left running in the browser to queue the next one, so disable sleep for a long run. (As a mitigation, a near-silent low-volume tone plays in the background for the whole run, nudging the browser/OS away from fully suspending the tab — not a guarantee, so disabling sleep is still the reliable option for a long run.) A plain page refresh is safe — saved progress picks the run back up automatically.
지원 모드 / Supported Modes
| 모드<br><sub>Mode</sub>| 설명<br><sub>Description</sub>|
|---|---|
| Text only (T2VA) | 프롬프트만으로 생성<br><sub>prompt only</sub>|
| First/Last Frame (FL2VA) | 시작(+선택적 끝) 키프레임 지정<br><sub>start (+optional end) keyframe</sub>|
| Reference (REF2VA) | 레퍼런스 이미지 최대 9장, 프롬프트에서 <Picture 1> 등으로 지칭<br><sub>up to 9 reference images, addressed as <Picture 1> …</sub>|
| Postprocess 🆕 | 이미 만든 클립을 후처리: Deblur → Denoise → Upscale(FlashVSR / RTX VSR / 모델) → Skin Retouch → Add Grain(GLSL 필름 그레인) → Interpolate → Resize를 항상 이 순서로 체인(각 단계 선택). Preview 범위·버튼, 전용 Generate/Stop, Compare 뷰어<br><sub>post-process an existing clip: Deblur → Denoise → Upscale (FlashVSR / RTX VSR / model) → Skin Retouch → Add Grain (GLSL film grain) → Interpolate → Resize, always in that order (each step optional). Preview range + button, its own Generate / Stop, Compare viewer</sub>|
| Image Generator 🆕 | 정지 이미지 생성: T2I · Reference to Image(다중 레퍼런스, 동적 LoRA 슬롯), Turbo 스위치, 2차 패스 시그마 3/4/5스텝 선택, Preview 저장 토글. 전용 H3 이미지 갤러리(카드 레이아웃 · 멀티 선택 · Reuse Setting · Prompt View · 전체 화면 팬/줌)<br><sub>still images: T2I · Reference to Image (multiple references, dynamic LoRA slots), Turbo switch, 3/4/5-step second-pass sigma choice, Preview-save toggle. Dedicated H3 image gallery (card layout · multi-select · Reuse Setting · Prompt View · full-screen pan / zoom)</sub>|
| Character Sheet 🆕 | 레퍼런스에서 캐릭터 시트 생성(전용 프롬프트 박스)<br><sub>character sheets from references (own prompt box)</sub>|
Reference 모드는 전용 UNET을 사용합니다. Settings에서 First/Last용과 Reference용 UNET을 각각 지정하세요. Reference mode uses its own UNET — set the First/Last and Reference UNETs separately in Settings.
주요 기능 / Key Features
| 기능<br><sub>Feature</sub>| 설명<br><sub>Description</sub>|
|---|---|
| 라이브 프리뷰<br><sub>Live preview</sub>| 샘플링 중 디코딩된 프레임이 노드에 실시간 표시 (ModelPreviewOverrideKJ). 스피너가 아니라 실제 영상이 만들어지는 걸 봅니다<br><sub>decoded frames stream into the node while sampling — not a spinner</sub>|
| 클립 릴레이<br><sub>Clip relay</sub>| 클립 수 · 실제 총 길이 · 예상 소요시간을 설정 즉시 표시. 실측 시간으로 예상치 자동 보정<br><sub>clip count / actual length / ETA shown live, ETA self-corrects from measured clip times</sub>|
| 연속성<br><sub>Continuity</sub>| 메뉴 순서 None → One-Take (latent) → Reference → Last Frame Chain, 기본값은 One-Take. One-Take(기본값) — 클립의 샘플링된 latent 꼬리를 다음 클립의 머리에 그대로 이어붙입니다(TJ_NODE의 TJ_H3_LatentContinuation). VAE 왕복이 없고 원래 모드(Reference 포함)가 그대로 유지됩니다. 클립마다 새 큐를 제출하는 릴레이 구조상, latent는 디스크 체크포인트(TJ_H3_SaveLatentCheckpoint/LoadLatentCheckpoint)로 클립 사이를 이동합니다 · Last Frame Chain — 이전 클립의 마지막 프레임이 다음 클립의 첫 프레임이 됩니다(FL2VA로 강제 전환) · Reference(Reference 모드 전용) — 모든 클립이 같은 레퍼런스 이미지를 사용 · None — 아무것도 넘기지 않되 해당 모드의 모델은 그대로<br>모든 경우에 프롬프트의 공통 부분(스타일 머리말 · 사운드 꼬리말)은 모든 클립에 전달됩니다<br><sub>Menu order is None → One-Take (latent) → Reference → Last Frame Chain, default is One-Take. One-Take (default) feeds the previous clip's sampled latent tail straight into the next clip's head (TJ_NODE's TJ_H3_LatentContinuation) — no VAE round trip, and the run's own mode (Reference included) keeps going. Since the relay submits a fresh queue per clip, the latent crosses that boundary through a disk checkpoint (TJ_H3_SaveLatentCheckpoint/LoadLatentCheckpoint). Last Frame Chain hands the previous ending over as a real first frame (forces FL2VA); Reference (Reference mode only) re-uses the same reference images; None hands nothing across but stays on the run's own model. In every case the shared part of the prompt reaches every clip.</sub>|
| 원테이크 세부 설정<br><sub>One-Take controls</sub>| 겹침은 39프레임(1.625초)로 고정(latent에 실제로 구운 값과 어긋나면 잘못 합쳐지므로 조절 불가) · 오디오 전체 고정 옵션 · 실행 완료 시 자동으로 겹침을 잘라내고 하나로 합쳐 갤러리에 등록(끌 수 있음) — 개별 클립 파일 · 체크포인트도 재개용으로 그대로 남습니다<br><sub>overlap is fixed at 39 frames (1.625s) — not user-adjustable, since it has to match what's actually baked into the sampled latents or the stitch would be wrong · optional whole-audio lock · on a finished run, auto-stitches the overlap out and registers the combined file in the Gallery (toggle-able) — per-clip files and checkpoints stay on disk for resuming</sub>|
| 프롬프트 워크벤치<br><sub>Prompt workbench</sub>| 프롬프트마다 켜기/끄기 체크박스(끈 프롬프트는 건너뛰되 시드·파일명·오디오락 구간은 원래 번호 그대로 유지 — 중단 후 재개에 사용) · 클립별 첫 프레임 오버라이드(FL2VA로 전환) · 초기화 버튼 · 이름 붙여 서버에 저장하는 프롬프트 세트(불러오기/저장/삭제) — v1.20.0부터 레퍼런스 이미지·비디오·오디오까지 함께 저장/복원되고, 그 사이 사라진 파일은 빈 칸이 아니라 이름이 적힌 고스트 썸네일로 표시됩니다<br><sub>per-prompt on/off checkbox (an off prompt is skipped but keeps its own seed/filename/audio-lock offset) · per-clip first-frame override (forces FL2VA) · Reset button · named prompt sets saved server-side. Since v1.20.0 a set also carries its reference images, video and audio; a file that has since left the input folder shows as a named ghost tile rather than an empty slot</sub>|
| 클립별 레퍼런스 오버라이드 🆕<br><sub>Per-clip reference override</sub>| Prompt Edit의 override for this clip 체크박스. 켜면 그 클립만 자기 전용 이미지·first/last frame·비디오·오디오·헤더·사운드 꼬리말을 쓰고 공통 세트를 무시합니다(처음 켤 때 공통 세트를 복사해 채움). 멀티 프롬프트를 한 번에 돌리면서 샷마다 그림을 바꿔야 할 때를 위한 것입니다<br><sub>a checkbox in Prompt Edit makes one clip render with its own images, first/last frame, video, audio, header and sound tail instead of the shared set (seeded from the common set on first tick). This is what lets a multi-prompt run change its pictures shot by shot</sub>|
| 레퍼런스 비디오/오디오 슬롯 🆕<br><sub>Reference video / audio slots</sub>| 이미지 칸과 같은 썸네일 타일. 비디오는 마우스 오버 시 무음 재생되고 🖼 버튼으로 갤러리에서 바로 고를 수 있습니다. 타일 아래 재생/정지·처음부터·재생시간·(오디오)스크럽 바·in·out·소스 정보. in/out은 그 타일이 재생하는 구간이라 값을 고치면 즉시 반영되고, 파일을 처음 넣으면 in 0 / out 전체 길이로 채워집니다<br><sub>thumbnail tiles like the image slots — video previews muted on hover and can be picked straight from the gallery. Transport, play time, scrub bar (audio), in/out and source facts sit under each tile. in/out is the window the tile plays, applied live; a newly added file starts at in 0 / out = full length</sub>|
| 프롬프트 자동 분할<br><sub>Prompt auto-split</sub>| [Shot N] 타임코드 · --- · 빈 줄 기준으로 긴 브리프를 클립별 프롬프트로 분할. 스타일 머리말과 사운드 꼬리말은 공통 영역으로 올려서 모든 클립이 함께 받습니다 — 길이를 늘려도 룩이 유지되는 이유입니다<br><sub>splits a long brief on [Shot N], ---, or blank lines, and lifts the style preamble and sound tail into the common header/footer so every clip carries them</sub>|
| 이미지 → 브리프<br><sub>Image → Brief</sub>| 이미지 1~8장(First/Last=최대 2, Reference=최대 8)을 브리프로 변환. ComfyUI 자체 CLIP을 씁니다(TextGenerate로 이미지 전체를 한 번에 배치 분석 — 진짜 멀티이미지). 브리프 작성 모델과 비전 분석 모델은 각각 따로 지정<br><sub>turns 1-8 images (First/Last: max 2, Reference: max 8) into a brief, using ComfyUI's own CLIP via TextGenerate — every image batched in one call, genuine multi-image. Brief-writing and vision-analysis models are set separately. (v1.20.0: the external Ollama backend was removed)</sub>|
| 가속 / 업스케일<br><sub>Accel / Upscale</sub>| Turbo LoRA(FL2VA 전용) · SolAttn · Spectrum · None / Upscale Model · RTX VSR · FlashVSR VSR 🆕 · None. Turbo를 켜면 H3 Cache는 자동으로 꺼집니다(4스텝 스케줄은 캐시 재사용 임계값에 도달하지 않아 같이 켜면 속도/품질 비교가 왜곡됨). FlashVSR는 타일 기반이라 실시간 프리뷰가 없고(진행 중 배너로 대체), 좌측 패널과 갤러리 양쪽에서 모델/모드/배율/컬러픽스/타일 사이즈/타일 오버랩/시드/시드 컨트롤 8개 값을 설정합니다 — 기본값은 16GB 카드 기준 2배·384px 타일(약 7분 30초/클립), 타일을 256px로 줄이면 3배도 가능합니다(약 18분/클립)<br><sub>selectable acceleration and upscaling. Turbo forces H3 Cache off — its 4-step schedule never reaches the threshold H3 Cache reuses steps at, so leaving both on skews any speed/quality comparison. FlashVSR is tile-based with no live preview of its own (a waiting banner shows instead); both the left panel and the gallery expose the same 8 fields — model/mode/scale/color fix/tile size/tile overlap/seed/seed control. Shipped default is 2x/384px tiles on a 16GB card (~7m30s/clip); dropping the tile to 256px enables 3x (~18min/clip)</sub>|
| 설정 누락 차단<br><sub>Missing-model guard</sub>| UNET이 지정되지 않은 모드는 진입 자체가 막히고, 상단에 무엇이 빠졌는지 경고가 뜹니다. 해당 모델이 필요한 연속성 옵션도 사라지지 않고 회색으로 비활성화되어 이유가 표시됩니다<br><sub>a mode whose UNET is unset cannot be entered — the top bar says what Settings still needs, and a continuity option needing that model stays in the menu, greyed out with a reason, instead of disappearing</sub>|
| 갤러리<br><sub>Gallery</sub>| 클립·합본을 한 곳에서, 실제 첫 프레임 썸네일(서버에서 ffmpeg로 추출·캐시) + 길이 표시. 🔗 스티치 모드로 순서대로 골라 합치기(최대 10개, One-Take 클립이면 겹침 자동 트림 옵션 자동 체크) · ⬆ 업스케일 / 🎞 보간 / 디블러(디블러는 업스케일과 독립된 단계라 업스케일 없이 단독 실행되고 해상도를 바꾸지 않습니다). 업스케일·디블러·스티치 결과는 원본의 메타데이터를 그대로 가져갑니다 · 카드마다 ✕ 삭제(중앙 팝업 확인, Enter=삭제/Esc=취소) · 카드마다 생성에 쓰인 프롬프트로 다시 불러오거나 복사 · 전체화면 플레이어(스페이스=재생, ←→=이동, [/]=이전/다음, Esc=닫기)<br><sub>real first-frame thumbnails (ffmpeg-extracted and cached server-side) plus each clip's length. 🔗 Stitch mode picks clips in order (max 10, auto-checks overlap-trim for One-Take clips) · ✕ delete on every card (centered confirm, Enter=Delete/Esc=Cancel) · each card keeps the prompt it was rendered from (reuse or copy) · fullscreen player</sub>|
| Prompt Refine — Include Images 🆕<br><sub>Prompt Refine — Include Images</sub>| 🔧 Refine 입력창의 Include Images를 켜면 지금 첨부된 이미지(First/Last의 첫·끝 프레임, Reference의 참조 이미지)를 비전 LLM이 다시 분석해, 이미지를 바꾼 뒤에도 프롬프트를 새 이미지에 맞게 고쳐 줍니다. 끄면 텍스트만 보냅니다<br><sub>tick Include Images in the Refine dialog and the images attached right now are re-analysed by the vision LLM, so the prompt is rewritten to match pictures you swapped after writing it; off = text only</sub>|
| LLM 백엔드 — Connect Custom 🆕<br><sub>LLM backend — Connect Custom</sub>| Brief · Vision · LTX Upscale가 각각 OpenAI 호환 서버(LM Studio · Ollama · llama.cpp · 게이트웨이)를 따로 지정할 수 있습니다. 공개 주소는 HTTPS 필요, 로컬/사설망은 HTTP 가능. API 키는 Connect & test 때 한 번만 보내져 서버 메모리에만 머뭅니다(저장 안 함)<br><sub>Brief, Vision and LTX Upscale can each point at their own OpenAI-compatible server; public hosts need HTTPS, loopback / private LAN may use HTTP; the API key is sent once on Connect & test and kept only in server memory</sub>|
| 참조 영상 MP / 영상 에셋 설정 🆕<br><sub>Reference video MP / video asset settings</sub>| 영상 타일의 mp 칸은 큐에 들어갈 때 영상을 그 MP까지 줄입니다(0 = 그대로, 원본보다 크게 키우지 않음, 파일은 변경 안 됨). Asset 탭의 영상 에셋은 in/out 구간(숫자칸 + Whole / ▶ Range), mp (downscale), Video sound를 가지며 구간을 자른 카드에는 ✂ 표시가 붙습니다. 라이브러리 영상은 TJ_NODE의 레퍼런스 노드가 큐에 넣을 때 같은 설정을 적용합니다<br><sub>a video tile's mp downsizes it when queued (0 = as is, never upscaled, the file is not changed). A video asset in the Asset tab has an in/out range (number fields + Whole / ▶ Range), mp (downscale) and Video sound; trimmed cards show ✂. Library videos get the same settings applied by TJ_NODE's reference node when queued</sub>|
| Face Refine Turbo 🆕<br><sub>Face Refine Turbo</sub>| 메인 Turbo 섹션과 같은 선택(None / Turbo LoRA (Basic) / larryvrh / SLA)과 모드별 LoRA·강도·steps. 메인 렌더의 Turbo와는 따로 저장됩니다<br><sub>the main Turbo section's choices (None / Turbo LoRA (Basic) / larryvrh / SLA) with a LoRA, strength and steps per mode, stored apart from the main render's Turbo</sub>|
| 7+1 하이레스 마무리 🆕<br><sub>7+1 hi-res finish</sub>| Turbo LoRA (Basic) 전용 체크박스. 8스텝 중 7스텝은 Start MP, 비디오 latent 업스케일(MinimaxH3LatentUpscaler3D) 후 마지막 1스텝은 Final MP에서 실행(UNET·LoRA·Turbo LoRA·SigmaShift + H3 Memory Optimization + Sol-Attn block-sparse 고정 구성). 켜면 steps는 8로 고정, Canvas MP는 잠김. First/Last·Reference는 2단계용 conditioning을 최종 크기로 한 번 더 만듭니다. 프리셋 저장·Reuse에 포함, 2단계 Activation chunk rows(기본 2048) 설정, 렌더 중 마지막 스텝에는 프리뷰에 안내 문구, 갤러리 카드는 연핑크 테두리<br><sub>Turbo LoRA (Basic) only. 7 of 8 steps at Start MP, a latent upscale, then the last step at Final MP (same UNET / LoRAs / turbo LoRA / SigmaShift plus fixed H3 Memory Optimization and Sol-Attn block-sparse attention). Steps lock to 8 and Canvas MP is locked while on; First/Last and Reference build a second conditioning at the final size. Saved in presets and Reuse; a stage-2 Activation chunk rows field (default 2048); the preview shows a note during the last step; gallery cards get a light-pink border</sub>|
| Asset Library 🆕<br><sub>Asset Library</sub>| Asset 탭의 + Add ▾ 메뉴(Single Image · Images as a set 2-10 · Video · Audio · From Gallery)로 이미지·영상·오디오·세트를 등록·정리하고 프로젝트로 묶어, 참조 이미지를 파일 대신 에셋/프로젝트로 지정합니다. 프롬프트의 @토큰은 자동완성되고 LLM 작성·리파인도 같은 토큰을 씁니다<br><sub>register and organise images / videos / audio / sets in the Asset tab (+ Add ▾: Single Image · Images as a set 2-10 · Video · Audio · From Gallery), group them into projects, and use assets or a project as references instead of files; @tokens autocomplete in the prompt and the LLM writes with them</sub>|
| 갤러리 Load more 🆕<br><sub>Gallery Load more</sub>| 갤러리·레퍼런스 비디오 피커가 Settings → Output의 Gallery — items per load(기본 50, 10–300)만큼 먼저 불러오고 Load more로 이어 불러옵니다. 새로고침·삭제 후에도 불러온 개수를 유지합니다<br><sub>galleries and the reference-video picker load the first page (Settings → Output → Gallery — items per load, default 50, 10–300) and more on demand; refresh / delete keep what was loaded</sub>|
| 설정 저장<br><sub>Settings persistence</sub>| 노드 설정이 워크플로우에 함께 저장됩니다. 다른 PC에서 열거나 남에게 파일을 넘겨도 그대로 재현되고, 한 그래프에 노드를 여러 개 둬도 각자 값을 유지합니다<br><sub>settings are saved inside the workflow, so the file reproduces on another machine and multiple nodes keep separate values</sub>|
| 텍스트 인코더 VRAM 명시적 해제<br><sub>Explicit text-encoder VRAM release</sub>| conditioning 계산이 끝난 직후, 샘플링 시작 직전에 텍스트 인코더를 강제로 언로드(TJ_FreeTextEncoderVRAM, 설치돼 있을 때만 자동 적용). 아래 "왜 이걸 만들었는가" 참고<br><sub>force-unloads the text encoder right after conditioning is built and before sampling starts (TJ_FreeTextEncoderVRAM, applied automatically only when installed). See "Why this exists" below</sub>|
왜 텍스트 인코더를 명시적으로 내리는가 / Why explicit text-encoder unload
MiniMax H3는 한 클립 안에서 텍스트 인코더 로드 → conditioning 계산 → 디퓨즈 모델 로드 → 샘플링 → 디코드가 전부 한 큐 제출 안에서 순서대로 돕니다. 16GB급 카드에서 이 노드를 굴리며 VRAM이 빠듯해서 나온 최적화입니다 — ComfyUI의 스마트 메모리 관리가 필요할 때 알아서 모델을 내려주긴 하지만, 그 판단이 항상 100% 깔끔하게 텍스트 인코더를 전부 내려주는 건 아니라서(일부가 VRAM에 남는 경우가 있음), 샘플링 동안 디퓨즈 모델과 나란히 자리를 차지하며 여유 VRAM을 갉아먹었습니다. 샘플링 중엔 디퓨즈 모델만 올라와 있는 게 가장 효율적이라서, "conditioning이 다 나온 시점"에 명시적으로 강제 언로드 지점을 그래프에 박아뒀습니다.
구조: ComfyUI-TJ_NODE의
TJ_FreeTextEncoderVRAM 노드가 이 역할을 합니다. clip(내릴 텍스트 인코더)과
trigger(CONDITIONING 등 아무 타입이나)를 입력받아 trigger를 그대로 통과시키기만
하면서, 그 시점에 comfy.model_management.unload_model_and_clones(clip.patcher, unload_additional_models=True)를 호출합니다. 핵심은 unload_all_models()처럼 전부
내리는 게 아니라 그 CLIP 모델 하나만 콕 집어 내린다는 것 — 그래야 이미 로드해둔
디퓨즈 모델까지 같이 내려가서 최적화 의미가 없어지는 걸 피할 수 있습니다. 이 저장소에서는
MiniMaxH3ImageToVideo/MiniMaxH3ReferenceToVideo(conditioning 계산)와 BasicGuider
(샘플러 직전) 사이에 이 노드를 끼워 넣는 식으로 그래프를 구성합니다
(web/minimax/graph_builder_minimax.js). 노드가 설치돼 있지 않으면 조용히 건너뛰고
평소대로 동작합니다.
남들도 쓰거나 만들 수 있게 공개합니다. 어떤 워크플로우든 "텍스트 인코더로 conditioning을
다 뽑고 → 그 다음 디퓨즈 모델을 로드/샘플링"하는 순서라면 똑같이 적용 가능한 범용 기법입니다
— TJ_FreeTextEncoderVRAM을 conditioning 출력 바로 뒤에 끼워 넣기만 하면 됩니다(CLIPTextEncode
등 어떤 노드 조합이든 무방). 직접 만들고 싶다면 핵심은 이 세 줄뿐입니다:
import comfy.model_management as mm
mm.unload_model_and_clones(clip.patcher, unload_additional_models=True)
mm.soft_empty_cache()
주의할 점: negative conditioning을 별도로 인코딩하는 모델(SD1.5/SDXL류, CFGGuider 사용)은
positive만 트리거로 걸면 negative 인코딩이 이 노드보다 늦게 끝날 위험이 있어, 그런 모델을
지원하려면 트리거를 두 개(positive/negative) 받게 확장하는 게 안전합니다. MiniMax H3처럼
BasicGuider(positive만 있음)만 쓰는 모델은 이 문제가 없습니다.
MiniMax H3 runs text-encoder load → conditioning → diffusion-model load → sampling → decode all inside one queue submission per clip. This optimization came out of running this node on a 16GB card and needing to squeeze out every bit of headroom — ComfyUI's smart memory management unloads models when needed, but that judgment doesn't always fully clean out the text encoder (a piece can linger in VRAM), quietly eating into the headroom sampling needs. The diffusion model alone is the most efficient thing to have resident during sampling, so an explicit forced-unload checkpoint is placed right at "conditioning is done."
How it works: ComfyUI-TJ_NODE's
TJ_FreeTextEncoderVRAM node does this. It takes clip (the text encoder to unload) and
trigger (any type — CONDITIONING, etc.), passes trigger straight through, and as a side
effect calls comfy.model_management.unload_model_and_clones(clip.patcher, unload_additional_models=True) at that point. The key is that this targets only that one
CLIP model — not unload_all_models(), which would also drop the already-loaded diffusion
model and defeat the point. Here it's inserted between conditioning
(MiniMaxH3ImageToVideo/MiniMaxH3ReferenceToVideo) and the sampler's BasicGuider
(web/minimax/graph_builder_minimax.js), skipped silently if the node isn't installed.
Published so others can use or build it too — this is a general technique for any
workflow shaped "text encoder produces conditioning, then a diffusion model loads and
samples": drop TJ_FreeTextEncoderVRAM right after the conditioning output (works with any
node combination, not just CLIPTextEncode). To build your own, the core is just those three
lines above. Caveat: models that encode negative conditioning separately (SD1.5/SDXL-style,
CFGGuider) risk the negative encode finishing after this node if only positive is wired as
the trigger — supporting those safely needs two triggers (positive/negative). Models using
only BasicGuider (positive-only), like MiniMax H3, don't have this problem.
필수 모델 / Required Models
| 종류<br><sub>Type</sub>| 경로<br><sub>Path</sub>| 비고<br><sub>Notes</sub>|
|---|---|---|
| Diffusion Model (FL2VA) | models/diffusion_models/ | Text only · First/Last 모드용<br><sub>for text-only and first/last modes</sub>|
| Diffusion Model (REF2VA) | models/diffusion_models/ | Reference 모드용<br><sub>for reference mode</sub>|
| Text Encoder | models/text_encoders/ | Qwen3-VL 계열, CLIPLoader type=minimax<br><sub>Qwen3-VL, loaded with type=minimax</sub>|
| Video VAE / Audio VAE | models/vae/ | 두 개 모두 필요<br><sub>both are required</sub>|
| Turbo LoRA (선택) | models/loras/ | Accel = Turbo LoRA 일 때<br><sub>when Accel = Turbo LoRA</sub>|
다운로드 / Download: Comfy-Org/MiniMax-H3
필수 · 선택 커스텀 노드 / Required & Optional Custom Nodes
| 노드<br><sub>Node</sub>| 용도<br><sub>Purpose</sub>| 없으면<br><sub>If missing</sub>|
|---|---|---|
| ComfyUI 코어<br><sub>ComfyUI core</sub>| MiniMaxH3ImageToVideo · MiniMaxH3ReferenceToVideo · MiniMaxH3SigmaShift · CreateVideo · SaveVideo | 필수<br><sub>required</sub>|
| ComfyUI-KJNodes | 라이브 프리뷰 · SageAttention 패치<br><sub>live preview, SageAttention patch</sub>| 프리뷰만 비활성<br><sub>preview disabled</sub>|
| ComfyUI-MiniMaxH3-FirstBlockCache | 스텝 캐시 가속<br><sub>step-reuse cache</sub>| 해당 옵션만 비활성<br><sub>that option disabled</sub>|
| ComfyUI-PlagueKind-Nodes | H3 SLA Attention<br><sub>block-sparse attention</sub>| 해당 옵션만 비활성<br><sub>that option disabled</sub>|
| ComfyUI-sol-attn | H3 Sol 어텐션 · Fused Modulation<br><sub>H3 Sol attention + AdaLN fusion</sub>| 해당 옵션만 비활성<br><sub>that option disabled</sub>|
| ComfyUI-MiniMax-H3-Turbo | Turbo LoRA / Turbo 샘플러<br><sub>turbo LoRA + sampler</sub>| Accel=Turbo 비활성<br><sub>turbo accel disabled</sub>|
| ComfyUI-SolAttn_triton | SolAttn 가속<br><sub>SolAttn acceleration</sub>| Accel=SolAttn 비활성<br><sub>SolAttn disabled</sub>|
| Nvidia RTX Nodes | RTX Video Super Resolution | RTX 업스케일만 비활성<br><sub>RTX upscale disabled</sub>|
| ComfyUI-Spectrum-MiniMax-H3 | Spectrum 가속<br><sub>Spectrum acceleration</sub>| Accel=Spectrum 비활성<br><sub>Spectrum disabled</sub>|
| ComfyUI-VideoHelperSuite | Reference 모드의 레퍼런스 비디오 입력<br><sub>reference video inputs</sub>| 레퍼런스 비디오만 비활성 (이미지·오디오는 정상)<br><sub>reference videos disabled</sub>|
| ComfyUI-TJ_NODE (같은 제작자, 필요)<br><sub>ComfyUI-TJ_NODE (same author, required for some features)</sub>| TJ_H3_AudioLock(오디오 락) · TJ_H3_LatentContinuation + TJ_H3_Save/LoadLatentCheckpoint(Continuity: One-Take)<br><sub>TJ_H3_AudioLock (audio lock) · TJ_H3_LatentContinuation + TJ_H3_Save/LoadLatentCheckpoint (Continuity: One-Take)</sub>| 해당 기능만 비활성 — Continuity 메뉴에서 One-Take가 회색으로 비활성화되고 이유가 표시됨<br><sub>that feature disabled — One-Take stays in the Continuity menu, greyed out with a reason</sub>|
선택 노드는 설치 안 돼 있으면 해당 기능만 꺼지고 나머지는 정상 동작합니다 (설정 화면에 상태 표시). Optional packs degrade gracefully — the matching feature switches off and everything else still runs (status is shown in Settings).
MusicMaker ONE STUDIO — 기능 상세 🧪
MusicMaker ONE STUDIO — Feature Details 🧪
🧪 실험적 — 음악(노래·연주곡) 생성 노드. 노드 하나에서 세 엔진을 전환합니다. 🧪 Experimental — a music (song / instrumental) node. One node switches between three engines.
엔진 / Engines
| 엔진<br><sub>Engine</sub>| 그래프<br><sub>Graph</sub>| 특징<br><sub>Notes</sub>|
| --- | --- | --- |
| Ace-Step 1.5 (기본값 / default) | DualCLIPLoader(ace) + ModelSamplingAuraFlow + KSamplerSelect + 3-스테이지 SamplerCustom (progressive refine) + VAEDecodeAudio | 48 kHz, 깨끗한 고역. TextEncodeAceStepAudio1.5가 BPM·키·박자·언어를 구조화된 입력으로 받음. JKASS 품질 샘플러(jkass_quality) 사용 → JK-AceStep-Nodes 필요<br><sub>48 kHz, clean highs. BPM / key / time-sig / language are structured inputs. Uses the JKASS quality sampler → needs JK-AceStep-Nodes</sub>|
| MiniMax Music 3 | CLIPLoader(minimax) + MiniMaxMusic3TextEncode + KSampler 1회 + ConditioningZeroOut 네거티브 + VAEDecodeAudio(Tiled) | 구조화된 필드 없음 — BPM·키·박자·보컬은 캡션 텍스트에 녹여 전달. 오디오 VAE가 ~16.5 kHz에서 브릭월, 5–12 kHz를 광대역 노이즈로 렌더 → 보컬이 "바람 소리"처럼 들릴 수 있음(모델 특성, cfg 문제 아님)<br><sub>no structured fields — BPM / key / vocals are folded into the caption text. The audio VAE brick-walls at ~16.5 kHz and renders 5–12 kHz as broadband noise, so vocals can sound "windy" (a model trait, not a cfg artifact)</sub>|
| YuE2 | CheckpointLoaderSimple(모델·CLIP·VAE 한 파일) + YuE2GenerateABC(선택) + YuE2GenerateMusic + KSampler(32스텝 고정) + VAEDecodeAudio | Text to Music(스타일+가사로 작곡, 멜로디 스케치 자동 또는 직접 그린 멜로디 사용)와 Cover Music(올린 녹음의 멜로디를 SheetSage2가 악보로 옮기고 그걸 따라 새 곡 생성) 두 모드. 별도 네거티브 프롬프트·LoRA 슬롯 없음<br><sub>Text to Music (compose from style + lyrics, with an auto-sketched or a hand-made melody) and Cover Music (SheetSage2 transcribes an uploaded recording's melody and a new song follows it). No separate negative prompt and no LoRA slot</sub>|
Melody Editor (YuE2 · Text to Music)
- 작곡 패널의 Melody 섹션에서
🎹 Open Melody Editor…→ 피아노롤이 열립니다. ✎ Pen으로 노트를 그리거나(드래그로 이동·길이 조절, 우클릭/더블클릭/Del 삭제, 박스 선택, 복사·붙여넣기, 방향키, Quantize, Undo/Redo), ● 녹음으로 입력합니다. - 실물 MIDI 건반:
🎛 Connect MIDI→ 장치 선택(All / 개별) · ↻ 재검색 · 핫플러그 · 마지막 장치 기억 · 활동 LED. 브라우저의 Web MIDI를 쓰므로 Chrome / Edge에서 동작하고, 처음 한 번 접근 허용이 필요합니다(건반은 브라우저를 여는 PC에 연결). - 컴퓨터 키보드:
Z–M/Q–P가 건반,[]가 옥타브. 녹음은 카운트인(0/1/2마디) · 메트로놈 · 루프 · 입력 Quantize를 지원하고, 누르는 동안 노트가 실시간으로 길어지며, 소리가 귀에 닿는 출력 지연을 보정합니다. - 건반 소리: 내장 신디사이저 또는 직접 올린 음원 파일(wav 등)을 샘플 악기로 사용합니다(루트 노트 기준으로 음높이를 옮겨 재생, 루트는 파일명/오디오로 자동 감지, 브라우저에 저장).
- MIDI 파일: 가져오기(여러 트랙이면 선택)와 내보내기. BPM · 박자(4/4, 3/4, 6/8 …) · 조 · 마디 수 설정.
- 적용: ✓ Apply Melody → "Use my melody"가 켜지고, 멜로디는 단선율 ABC 악보(마지막 노트가 있는 마디까지)로
YuE2GenerateMusic에melody모드로 전달됩니다. 코드(동시 음)는 한 음(최고음/최저음 선택)으로 줄여집니다. 곡 길이는 Length 슬라이더가 아니라 멜로디 길이를 따릅니다. <sub>Open the Melody section in the compose panel →🎹 Open Melody Editor…. Draw notes with ✎ Pen (drag to move / resize, right-click / double-click / Del to delete, box select, copy-paste, arrow keys, Quantize, Undo/Redo) or record with ●. Real MIDI keyboard:🎛 Connect MIDI→ pick a device (All / one) · ↻ rescan · hot-plug · remembers the last device · activity LED; it uses the browser's Web MIDI, so it works in Chrome / Edge and asks for access once (the keyboard must be plugged into the PC running the browser). Computer keyboard:Z–M/Q–Pare keys,[]change octave. Recording has a count-in (0/1/2 bars), metronome, loop and input quantize, notes grow while a key is held, and output latency is compensated. Sound: the built-in synth or an audio file (wav, …) loaded as a sample instrument (pitch-shifted from its root note, auto-detected, stored in the browser). MIDI files: import (pick tracks) and export; BPM · meter · key · bars are editable. Apply: ✓ Apply Melody turns on "Use my melody" and sends a single-line ABC score (up to the bar of the last note) toYuE2GenerateMusicinmelodymode; chords are reduced to one note (highest / lowest). The song length follows the melody, not the Length slider.</sub>
작곡 패널 / Compose panel
- Style — 스타일 캡션(짧게 쓰면 ✨로 확장) + 스타일 칩. Reroll로 다른 표현 재작성.
- Lyrics —
[Verse]/[Chorus]태그 가사. 비어 있으면 제목·브리프에서 ✨로 작성. Song / Instrumental 토글 — Instrumental이면 가사·보컬 섹션이 숨겨지고 가사 없이 렌더. - Vocals — gender / delivery / tone.
auto가 아니면 캡션에 반영(✨나 Reroll 안 눌러도 그래프 빌드 시 적용). - BPM · key · time signature · Length — Ace-Step은 구조화 입력, MiniMax는 캡션 힌트. 브리프에
3:00/3분이 있으면 슬라이더보다 우선. - Advanced — MiniMax: steps · sampler cfg · guidance (cfg_scale, 텍스트 인코더 별도 노브) · top_k · tiled decode. Ace-Step: cfg_scale · temperature · top_p / min_p / top_k · shift · 샘플링 스테이지(1 항시, 2·3 체크박스 — 3은 2가 켜져야 활성, 끄면 이후 캐스케이드).
- LoRA — 최대 3개 (
LoraLoaderModelOnly체인, 두 엔진 공용).
대기 큐 / Generation queue
- ▶ Generate → 패널 전체를 스냅샷하고 플레이리스트 상단에 잡 카드 추가. 워커 1개가 FIFO로 소진(ComfyUI가 실제 실행을 직렬화).
- 카드별 ✕ — 대기 중이면 큐에서 제거, 실행 중이면
/interrupt후 다음 잡으로. Stop은 큐 전체 비움. - 클릭 후 패널을 수정해도 이미 스냅샷된 잡에는 반영되지 않음.
LLM (캡션 · 가사) / LLM
- 백엔드 4종: Local GGUF(
ComfyUI-TJ_NODE), OpenRouter(클라우드), ComfyUI TextGenerate, Connect Custom(OpenAI 호환 서버, URL·모델·컨텍스트 지정). Settings에서 선택. - 가사 작성 시 실제 곡 길이를 전달하고, 프롬프트에 길이별 구조표가 들어 있어 3분 곡이 20초짜리 가사로 나오지 않음.
- OpenRouter는 reasoning 모델이
finish_reason=length로 빈 응답을 주면 토큰 2배 + reasoning 포함으로 1회 재시도 후 답을 추출. reasoning 모델이 계속 실패하면 non-reasoning 모델 추천 메시지.
플레이리스트 / Playlist
- 인라인 플레이어(재생/일시정지, 다음/이전, single/continuous 토글), 즐겨찾기, 트랙별 Info(엔진·길이·시드·사용 LLM·파라미터) / Reuse.
- 태그 — 생성 직후, 그리고 제목·가사·커버를 바꿀 때마다 ffmpeg(스트림 복사, 재인코딩 없음)로 저장된 파일 자체에 제목·아티스트·앨범·스타일 코멘트·엔진·전체 가사·시드·커버 아트가 박힙니다(FLAC/MP3, Opus는 커버 제외). 이전에 만든 곡은 메타를 다시 저장하면 채워집니다.
- ↓ Download — 위 파일을 변환 없이 그대로 내려받습니다(확장자는 원본 그대로).
- ↻ Refresh — 다른 세션/웹앱에서 추가·삭제된 곡을 노드 리로드 없이 반영.
- 커버 —
Auto-generate album cover (Krea2)기본 ON.⋯ → Regenerate cover로 Auto(제목+가사) / Prompt(직접 설명 → LLM → Krea2 프롬프트) 선택.⋯ → Cover Image Copy / Paste / Upload / From Gallery로 이미 있는 커버를 다른 트랙에 붙여넣거나(여러 곡 선택 시 전체에 적용), 이미지를 올리거나, 이미지 노드 갤러리에서 골라 정사각으로 잘라 쓸 수 있습니다. 작곡 패널의 Use my own cover image를 지정하면 이후 생성 곡은 Krea2 대신 그 커버를 씁니다. - 저장 폴더 — Settings에서 지정, 저장 위치와 플레이리스트 스캔 둘 다에 반영.
- 눈가리기 — 각 커버에 👁 토글(서버 공유 목록).
- iOS Safari — 탭 시 동기 재생(제스처 스코프), FLAC은 브라우저가 못 읽으면
/music_one/downloadMP3로 대체.
필수 · 선택 노드 / Required & Optional Custom Nodes
| 노드<br><sub>Node</sub>| 용도<br><sub>Purpose</sub>| 없으면<br><sub>If missing</sub>|
| --- | --- | --- |
| ComfyUI 코어<br><sub>ComfyUI core</sub>| MiniMaxMusic3TextEncode · EmptyMiniMaxMusic3LatentAudio · TextEncodeAceStepAudio1.5 · EmptyAceStep1.5LatentAudio · ModelSamplingAuraFlow · KSamplerSelect · BasicScheduler · SamplerCustom · VAEDecodeAudio · SaveAudioAdvanced · YuE2GenerateABC · YuE2GenerateMusic · EmptyYuE2LatentAudio · SheetSage2AudioToABC | 필수 (최신 ComfyUI 필요)<br><sub>required (recent ComfyUI)</sub>|
| JK-AceStep-Nodes| JKASS 품질 샘플러 (jkass_quality)<br><sub>JKASS quality sampler</sub>| Ace-Step 엔진의 기본 샘플러 실패 — Settings에서 다른 샘플러로 바꾸거나 설치<br><sub>the Ace-Step engine's default sampler fails — pick another in Settings, or install it</sub>|
| ComfyUI-Openrouter_node| OpenRouter LLM 키 저장소 (선택)<br><sub>OpenRouter LLM key store (optional)</sub>| OpenRouter LLM 백엔드만 비활성 (로컬·TextGenerate는 정상)<br><sub>only the OpenRouter LLM backend is disabled</sub>|
| ComfyUI-TJ_NODE| 로컬 GGUF LLM · TextGenerate · TJ_MultiImageLoader<br><sub>local GGUF LLM path</sub>| 로컬 LLM 백엔드만 비활성 (OpenRouter는 정상)<br><sub>only the local LLM backend is disabled</sub>|
필수 모델 / Required Models
Ace-Step 1.5 / MiniMax Music 3 모델은 각자 배포처에서 받아 models/ 아래에 놓고 Settings에서 지정합니다 (Diffusion / Text Encoder(들) / Audio VAE). 어떤 엔진을 쓰느냐에 따라 필요한 파일이 다릅니다.
Download the Ace-Step 1.5 / MiniMax Music 3 model files from their own distributions, place them under models/, and pick them in Settings (Diffusion / Text Encoder(s) / Audio VAE). Which files you need depends on the engine.
YuE2는 체크포인트 한 파일(models/checkpoints/ — 예: yue2_3b_int8_convrot.safetensors, 모델·CLIP·VAE 포함)을 Settings의 YuE2 탭에서 지정하고, Cover Music에는 추가로 SheetSage2 오디오 인코더(models/audio_encoders/sheetsage2_bf16.safetensors)가 필요합니다.
YuE2 needs one checkpoint file (in models/checkpoints/ — e.g. yue2_3b_int8_convrot.safetensors, containing model + CLIP + VAE) picked in Settings → YuE2; Cover Music additionally needs the SheetSage2 audio encoder (models/audio_encoders/sheetsage2_bf16.safetensors).
ITDA ONE STUDIO — 기능 상세
ITDA ONE STUDIO — Feature Details
영상·오디오를 3개 레인에 올려 자르고 이어 붙이는 스티치 타임라인 노드입니다("잇다" = 이어 붙이다). 별도 ITDA 노드 팩에 의존하지 않고 그 코드를 이 패키지에 그대로 흡수했습니다. A stitch timeline node: put video and audio on three lanes, cut and join them. It no longer depends on a separate ITDA pack — that code was absorbed into this package as-is.
| 항목<br><sub>Item</sub>| 설명<br><sub>Description</sub>| | --- | --- | | 편집 / Editing | 분할 · 그룹 · 스티치 · 스냅 · 박스 선택 · 복사/붙여넣기 · 웨이브폼 · 줌/스크럽 · 전체 화면<br><sub>split · group · stitch · snap · box-select · copy-paste · waveforms · zoom / scrub · full screen</sub>| | 자동화 / Automation | Auto Stitch · 장면 감지 · 비트 감지 · 버전 · Pre-render<br><sub>Auto Stitch · scene detect · beat detect · versions · pre-render</sub>| | 미디어 빈 / Media bin | 로컬 영상·오디오 업로드, 그리고 H3 영상 갤러리 · MusicMaker 플레이리스트에서 바로 불러오기<br><sub>local video / audio upload, plus import straight from the H3 video gallery and the MusicMaker playlist</sub>| | 내보내기 / Export | 실제 ffmpeg로 스티치 적용·내보내기 (ffmpeg 필요)<br><sub>real ffmpeg stitch apply / export (needs ffmpeg)</sub>|
버그 수정 이력
Bug Fix History
v1.20.0 (현재) — MiniMax H3: 클립별 레퍼런스 오버라이드
v1.20.0 (Current) — MiniMax H3: per-clip reference override
-
추가 클립별 레퍼런스 오버라이드 — 헤더·사운드 꼬리말까지 함께 따라갑니다
-
추가 레퍼런스 비디오/오디오 입력을 미리보기·재생 가능한 썸네일 타일로 교체 (왼쪽 패널과 Prompt Edit 공용). 갤러리에서 레퍼런스 비디오 고르기
-
추가 프롬프트 세트가 첨부 파일까지 저장/복원. 사라진 파일은 고스트 썸네일로 표시
-
추가 파이프라인 프리셋 저장·이름변경·순서변경·삭제 · 노드 전체화면 · 노드 폭 +25%
-
추가 갤러리 이미지 피커에 INPUT 폴더 탭(기본 선택)
-
변경 디블러가 업스케일과 독립된 단계로 분리 — 업스케일 없이 단독 실행
-
삭제 Image → Brief의 외부 Ollama 백엔드. 네이티브 CLIP 경로만 남습니다
-
수정 Reuse가 이미지를 복원하지 못하던 문제(메타데이터에 이미지가 없었음). 업스케일·디블러·스티치 결과가 원본 메타를 가져가고, 스티치본 Reuse는 프롬프트를 분리 복원
-
수정 프롬프트 세트의 Save/Delete 버튼이 눌리지 않던 문제(ComfyUI가 브라우저 기본 다이얼로그를 억제), 저장 라우트가 첨부 파일 필드를 버리던 문제
-
added per-clip reference override, carrying the header and sound tail with it
-
added reference video/audio inputs rebuilt as previewable thumbnail tiles, shared by the left panel and Prompt Edit; reference video can be picked from the gallery
-
added prompt sets now save and restore their attachments; a file that has since been deleted shows as a named ghost tile
-
added savable pipeline presets, node fullscreen, +25% node width, INPUT folder tab
-
changed deblur is its own stage, independent of upscale
-
removed the external Ollama backend for Image → Brief — native CLIP only
-
fixed Reuse could not restore images (metadata never stored them); upscale/deblur/ stitch outputs now carry their source metadata
-
fixed prompt-set Save/Delete did nothing (ComfyUI suppresses browser dialogs), and the save route dropped every attachment field
v1.13.0 — 프롬프트 템플릿 저장소 독립화
v1.13.0 — prompt-template storage decoupled
- 사용자 템플릿을 Klein config에서 완전히 독립 — nl 풀(Klein·Krea2·Z-Image·Qwen2511· Anima 공유) / tag 풀(SDXL 전용) 두 개로 분리. 기존 템플릿은 중복 제거 후 자동 병합
- decoupled custom templates from Klein's config — split into an nl pool (shared by Klein/Krea2/Z-Image/Qwen2511/Anima) and a tag pool (SDXL only); existing templates auto-merged (deduped) on first boot
v1.12.0 — Anima ONE STUDIO 신규 + 마스크 에디터 공용화
v1.12.0 — new Anima ONE STUDIO + shared mask editor
- [신규] Anima ONE STUDIO — T2I · Inpainting · Any Control to Image · Depth Control to Image, Turbo LoRA 토글, 인라인 마스크 페인터(반전 포함), 다른 노드와 동일한 Settings/ Gallery(Send to)/템플릿/LLM 강화 패널 구조
- [new] Anima ONE STUDIO — T2I · Inpainting · Any Control to Image · Depth Control to Image, a Turbo LoRA toggle, an inline mask painter (with invert), and the same Settings/Gallery(Send to)/template/LLM-enhance structure as every other node
- 마스크 에디터를
web/shared/mask_paint.js로 통합 — Z-Image INPAINT 모드의 인라인 브러시/지우개/줌팬 에디터를 모든 노드가 공유 - shared mask editor — Z-Image's INPAINT inline brush/eraser/zoom-pan editor is now one module every node reuses
- 마스크 재로드 버그 수정 — 저장된 마스크를 다시 불러올 때 알파 채널 변환이 첫 픽셀에만 적용되어 이미지 전체가 마스크로 덮여 보이던 문제 (Klein/Qwen2511/SDXL/공용 모듈 4곳)
- fixed mask-reload bug — reloading a saved mask only rebuilt alpha on pixel 0, so the whole image read as masked (fixed in Klein/Qwen2511/SDXL/the shared module — 4 spots)
- 브러시 커서를 실제 반경 원으로 표시, Invert 버튼 추가
- brush cursor now shows the true-radius ring, added an Invert button
v1.11.0 — MiniMax H3: 프롬프트 워크벤치 + One-Take
v1.11.0 — MiniMax H3: prompt workbench + One-Take
- [MiniMax H3] One-Take (latent continuation) 신규 — TJ_NODE에
TJ_H3_LatentContinuation/TJ_H3_SaveLatentCheckpoint/TJ_H3_LoadLatentCheckpoint3개 노드 신설. 클립의 샘플링된 latent 꼬리를 다음 클립의 머리에 그대로 이어붙여 VAE 왕복 없이, 원래 모드(Reference 포함)를 유지한 채 연속성을 만듭니다. Continuity 메뉴 신규 항목이자 기본값. 실기기 2·3·4클립 체인을 FL2VA·REF2VA 양쪽에서 실행해 겹침 구간 latent가 float32 오차 수준(≤4.77e-7)으로 보존됨을 직접 대조 확인 - [MiniMax H3] One-Take new (latent continuation)** — three new TJ_NODE nodes
(
TJ_H3_LatentContinuation/TJ_H3_SaveLatentCheckpoint/TJ_H3_LoadLatentCheckpoint). Feeds a clip's sampled latent tail straight into the next clip's head — no VAE round trip, and the run's own mode (Reference included) keeps going. New Continuity menu entry and now the default. Live-verified 2/3/4-clip chains on both FL2VA and REF2VA, diffing the raw latent checkpoints directly — overlap region matches to float32 noise (≤4.77e-7) - [MiniMax H3] 갤러리 스티치에 One-Take 겹침 트림 옵션 — 🔗 스티치에서 고른 클립이 전부 One-Take 클립이면 자동 체크. 실행 완료 시에도 자동으로 겹침을 잘라내고 합쳐서 갤러리에 등록 (끌 수 있음)
- [MiniMax H3] gallery stitch gained a One-Take overlap-trim toggle — auto-checks when every picked clip is from a One-Take run. A finished One-Take run also auto-stitches with the overlap trimmed and registers the result in the Gallery (toggle-able)
- [MiniMax H3] 프롬프트 워크벤치 — 프롬프트별 켜기/끄기(원래 번호로 재개), 클립별 첫 프레임 오버라이드, 초기화 버튼, 서버에 저장하는 이름 붙인 프롬프트 세트
- [MiniMax H3] prompt workbench — per-prompt on/off (resume by original number), per-clip first-frame override, reset button, named prompt sets saved server-side
- [MiniMax H3] 갤러리 개선 — 실제 첫 프레임 썸네일(video 태그 대신 서버 추출 이미지라 클립이 많아도 크래시 없음), 카드마다 길이 표시, 삭제 버튼(중앙 팝업, Enter/Esc 단축키)
- [MiniMax H3] gallery improvements — real first-frame thumbnails (server-extracted images
instead of a
<video>per card, so large galleries no longer crash the tab), per-card duration, delete button (centered confirm, Enter/Esc shortcuts) - [MiniMax H3] Image → Brief 네이티브 비전 경로 추가 — Ollama 외에 ComfyUI 자체 CLIP
(
TextGenerate)으로 이미지 전체를 한 번에 배치 분석하는 경로 선택 가능. 실기기 검증 완료 - [MiniMax H3] Image → Brief gained a native vision path — alongside Ollama, ComfyUI's own
CLIP (
TextGenerate) can batch-analyze every image in one call. Live-verified - [MiniMax H3] Turbo + H3 Cache 상호배제 — Turbo 켜면 H3 Cache 자동으로 꺼짐(체크박스도 비활성화) — 4스텝 스케줄에서는 캐시가 아무 역할도 못 하면서 결과만 왜곡시킴
- [MiniMax H3] Turbo/H3 Cache mutual exclusion — Turbo now forces H3 Cache off (checkbox disabled too) — the cache never reuses anything on a 4-step schedule, just skews results
- [MiniMax H3] Canvas Aspect 5:4/2:3/3:2 추가, 비율순 정렬
- [MiniMax H3] added 5:4/2:3/3:2 aspect ratios, sorted by ratio
- [MiniMax H3] 프리뷰 영상 백그라운드 재생 버그 수정 — 재생 중인 클립을 숨기기만 하고 멈추지 않아서 다음 클립 넘어가도 뒤에서 계속 재생되던 문제 3곳 수정
- [MiniMax H3] fixed preview videos playing in the background — three spots hid a playing
<video>without pausing it, so a clip kept playing behind whatever came next
v1.5.0
- [Krea2] I2I ControlNet 추가 — comfyui-krea2-controlnet 통합. I2I 탭 하단에 ControlNet 패널 추가. Control LoRA 선택 + 강도 + Channel Mode(RGB/Grayscale) + Normalize + Invert + 컨트롤 이미지 업로드. ON/OFF 토글로 기존 I2I와 동일하게 사용 가능. Depth Control LoRA: Patil/Krea-2-depth-controlnet
v1.4.1
v1.4.1 (Current)
- [전체] LoRA 트리거 워드 초기화 버그 수정:
loraSelect검색 필터 입력 시 표시값(s.value)이 아닌 내부currentValue기준으로 복원하도록 수정 —availableLoras로드 전 UI가 "none"으로 표시된 상태에서 검색 타이핑 시 currentValue가 오염되던 문제 해결 - [All] LoRA fixed the LoRA trigger-word reset bug:
loraSelectwhen typing in the search filter display value(s.value)instead of the internalcurrentValuerestored based on —availableLorasbefore availableLoras was loaded, the UI "none"fixed an issue where typing in search while displayed as "none" corrupted currentValue - [전체] LoRA 교체 시 트리거 워드 재로드: 다른 LoRA로 교체하면 이전 트리거 워드를 초기화하고 새 트리거 워드를 자동 fetch. 같은 LoRA 재선택 시에는 기존 트리거 워드 유지
- [All] reload trigger words when changing LoRA: when switching to another LoRA, clear the previous trigger word and automatically fetch the new one. reselecting the same LoRA preserves the existing trigger word
- [전체] strength 0 저장 버그 수정:
parseFloat(v) || 1연산으로 strength=0 설정 시 항상 1로 리셋되던 문제 수정 →isNaN(v) ? 1 : v로 변경 - [All] strength 0 fixed the save bug:
parseFloat(v) || 1fixed an issue where setting strength=0 always reset it to 1 because of the operation →isNaN(v) ? 1 : vchanged to
v1.2
- [전체] 언어 지원 추가: QE2511 · Krea2 Settings에 한국어/English 언어 선택기 추가
- [All] added language support: QE2511 · Krea2 Settings Korean/English added a Korean/English language selector
- [전체] 도움말 개선: QE2511 · Krea2 도움말을 Z-Image 스타일로 전면 재작성 (모델 다운로드 URL 포함, 클릭 가능 링크)
- [All] improved Help: QE2511 · Krea2 completely rewrote QE2511 and Krea2 Help in the Z-Image style (including model download URLs, clickable links)
- [Klein · QE2511] Outpaint 색상 버그 수정:
ImagePadKJ의 color 파라미터를[R,G,B]배열(ComfyUI가 노드 링크로 오해 → "Bad linked input" 오류)에서"R, G, B"문자열 형식으로 수정 - [Klein · QE2511] Outpaint fixed the Outpaint color bug:
ImagePadKJchanged the ImagePadKJ color parameter from[R,G,B]array(which ComfyUI misinterpreted as a node link → "Bad linked input" error)to"R, G, B"string format - [Klein] Outpaint 레퍼런스 불인식 버그 수정:
GetImageSize가 패딩 전 원본 이미지를 읽어EmptyFlux2LatentImage와VAEEncode의 해상도가 불일치 → 모델이 레퍼런스 컨디셔닝을 무시하고 완전히 새 이미지를 생성하던 문제 수정.GetImageSize가ImageScaleToTotalPixels출력(스케일된 패딩 이미지)을 읽도록 변경 - [Klein] Outpaint fixed the Outpaint reference recognition bug:
GetImageSizeGetImageSize read the original image before padding, causingEmptyFlux2LatentImageandVAEEncodeto have mismatched resolutions → fixed an issue where the model ignored reference conditioning and generated a completely new image.GetImageSizeImageScaleToTotalPixelsoutput(scaled padded image)now reads
v1.1
- [QE2511]
FluxKontextMakeReferenceLatent노드 제거 (미설치 오류 수정) →FluxKontextMultiReferenceLatentMethod에 vaeEnc 직접 연결 - [QE2511]
FluxKontextMakeReferenceLatentremoved the node (fixed missing-node errors) →FluxKontextMultiReferenceLatentMethodconnected vaeEnc directly to FluxKontextMultiReferenceLatentMethod - [QE2511] Camera Angle LoRA를 ⚙ Settings 패널로 이동 (영구 저장)
- [QE2511] Camera Angle LoRA ⚙ Settings moved to the Settings panel (persistent storage)
- [QE2511] ANGLE 모드 카메라 바디 핑크 블롭 → 작은 점으로 교체
- [QE2511] ANGLE ANGLE mode camera-body pink blob → replaced with a small dot
- [QE2511] ANGLE 모드 Send To 대상 추가 (→ Edit, → I2I, → Paint, → Upscale)
- [QE2511] ANGLE Mode Send To added Send To targets (→ Edit, → I2I, → Paint, → Upscale)
- [QE2511] Send To Edit 모드 필드명 버그 수정 (
editImage→editImage1) - [QE2511] Send To Edit fixed the Send To Edit field-name bug (
editImage→editImage1) - [QE2511] FACESWAP 모드 진입 시 기본 프롬프트 자동 설정
- [QE2511] FACESWAP automatically sets the default prompt when entering FACESWAP mode
- [QE2511 · Krea2] 갤러리 그리드
gridAutoRows: 120px추가로 정사각형 타일 수정 - [QE2511 · Krea2] Gallery
gridAutoRows: 120pxadded to fix square Gallery tiles
함께 쓰면 더 강력한 — TJ_NODE
More Powerful Together with — TJ_NODE
ComfyUI-TJ_NODE — Wireless Workflow Architecture Toolkit
| TJ_NODE 주요 노드<br><sub>TJ_NODE Key Nodes</sub>| 기능<br><sub>Feature</sub>| |---|---| | Prompt Studio (TJ) | LLM 기반 프롬프트 생성 · 강화 · 이미지→프롬프트 변환<br><sub>LLM LLM-based prompt generation, enhancement, and image-to-prompt conversion</sub>| | Scene Maker (TJ) | Visual Beat 프롬프트 구조 노드. KO/EN/JP/CN 자동 번역<br><sub>Visual Beat Visual Beat prompt-structure node. KO/EN/JP/CN automatic translation</sub>| | Wireless Architecture | Fake-Wire 무선 라우팅 · Multi Router · Batch Workflow<br><sub>Fake-Wire wireless routing · Multi Router · Batch Workflow</sub>|
✨ 인노드 LLM 통합 (v1.4+)
✨ In-Node LLM Integration (v1.4+)
TJ_NODE가 설치되어 있으면 4개 노드 모두의 프롬프트 확대창(🔍 버튼)에서 LLM 기능이 자동 활성화됩니다.
TJ_NODEWhen TJ_NODE is installed all four nodesprompt expansion window(🔍 button)automatically enables LLM features.
| 탭<br><sub>Tab</sub>| 기능<br><sub>Feature</sub>| |---|---| | ✏️ Edit | 기존 전체화면 텍스트 편집 (변경 없음)<br><sub>existing full-screen text editor (unchanged)</sub>| | ✨ Enhance | 현재 프롬프트를 LLM으로 강화. Model Format · Aesthetic · Extra Instructions 설정 지원<br><sub>enhance the current prompt with an LLM. Model Format · Aesthetic · Extra Instructions supports settings</sub>| | 🖼 Image→Prompt | 이미지 업로드 또는 URL 다운로드 → 비전 LLM으로 프롬프트 생성 → 현재 모드에 전송<br><sub>upload an image or download from a URL → generate a prompt with a vision LLM → send it to the current mode</sub>|
v1.25+: Enhance / Image→Prompt 패널에 Backend 선택이 생겼습니다 — Local GGUF(TJ_NODE), ComfyUI native(TextGenerate; v1.31에서 추가) 또는 OpenRouter(클라우드). OpenRouter를 고르면 OR 모델 선택 + 마스킹된 키 필드가 나오고, 키는 노드의
.env하나에 저장되어 MusicMaker·MiniMax H3와 공유됩니다. TJ_NODE 미설치 시 자동으로 OpenRouter로 폴백합니다. v1.32+: Connect Custom(OpenAI 호환 서버)도 선택할 수 있고, 이 패널의 설정은 브라우저가 아니라 서버에 저장됩니다. v1.25+: the Enhance / Image→Prompt panels gained a Backend selector — Local GGUF (TJ_NODE), ComfyUI native (TextGenerate; added in v1.31) or OpenRouter (cloud). Under OpenRouter you get an OR model picker + a masked key field; the key lives in the node's.env, shared with MusicMaker and MiniMax H3. If TJ_NODE isn't installed the panel falls back to OpenRouter automatically. v1.32+: Connect Custom (any OpenAI-compatible server) is also selectable, and this panel's settings are stored on the server, not per browser.
- GGUF 모델·설정이 자동 기억되어 매번 다시 선택할 필요 없음 (4개 노드 공유)
- GGUF models and settings are remembered automaticallyso they do not need to be selected every time (shared by all four nodes)
- 이미지 전송 전 1MP 이하 자동 리사이즈 — Context Overflow 방지
- before sending an image 1MP automatically resize to 1 MP or less — Context Overflow prevention
- AI 처리 중 링 스피너 오버레이로 진행 상태 시각 표시
- AI during AI processing ring spinner overlayvisually displays progress
- TJ_NODE 미설치 시 확대창 안 ⬇ 설치 버튼 한 번으로 자동 설치 (git clone + pip)
- TJ_NODE if TJ_NODE is not installed, use the ⬇ install button to install automatically with one click (git clone + pip)
- ComfyUI Manager 미등록 상태이므로 수동 설치:
git clone https://github.com/designloves2/ComfyUI-TJ_NODE - ComfyUI Manager is not registered in ComfyUI Manager, so install it manually:
git clone https://github.com/designloves2/ComfyUI-TJ_NODE
→ github.com/designloves2/ComfyUI-TJ_NODE
TJ NODE STUDIO ONE — 설치 및 설정 가이드
TJ NODE STUDIO ONE — Installation and Configuration Guide
Z-Image ONE STUDIO · Flux.2 Klein ONE STUDIO · Qwen Image Edit 2511 ONE STUDIO · Krea 2 ONE STUDIO
ComfyUI 올인원 이미지 생성 UI — 워크플로우 배선 없이 노드 하나에서 T2I · I2I · Inpaint · Outpaint · Edit · Faceswap · Upscale 등 모든 모드를 전환합니다. ComfyUI image generation UI — switch between modes in a single node without workflow wiring T2I · I2I · Inpaint · Outpaint · Edit · Faceswap · Upscale etc. Mode before.
목차
Table of Contents
- TJ NODE 패키지
- TJ NODE Package
- 필수 커스텀 노드
- Required Custom Nodes
- 모델 다운로드
- Model Downloads
- 초기 설정
- Initial Setup
- 모드별 간략 설명
- Mode Overview
- 문제 해결
- Troubleshooting
1. TJ NODE 패키지
1. TJ NODE Package
이 패키지 (통합 설치)
This Package (Unified Installation)
| 패키지<br><sub>Package</sub>| 설명<br><sub>Description</sub>| GitHub | | ---------------------- | ------------------------------------------------ | ------------------------------------------------------------ | | TJ_NODE_STUDIO_ONE | Z-Image · Klein · QE2511 · Krea2 ONE STUDIO 통합<br><sub>Z-Image · Klein · QE2511 · Krea2 ONE STUDIO</sub>| ComfyUI-TJ_NODE_STUDIO_ONE |
설치: ComfyUI Manager → Install Custom Nodes →
ComfyUI-TJ_NODE_STUDIO_ONE검색
Installation: ComfyUI Manager → Install Custom Nodes →ComfyUI-TJ_NODE_STUDIO_ONE또는 수동:cd ComfyUI/custom_nodes && git clone https://github.com/designloves2/ComfyUI-TJ_NODE_STUDIO_ONE.gitor manually:cd ComfyUI/custom_nodes && git clone https://github.com/designloves2/ComfyUI-TJ_NODE_STUDIO_ONE.git
함께 쓰면 더 강력한 — TJ_NODE
More Powerful Together with — TJ_NODE
| 패키지<br><sub>Package</sub>| 설명<br><sub>Description</sub>| GitHub | | ----------- | ------------------------------------------------------------ | ------------------------------------------------------------ | | TJ_NODE | Wireless Workflow Architecture Toolkit — LLM 프롬프트 생성 · Fake-Wire 무선 라우팅 · 대규모 워크플로우 구조화<br><sub>Wireless Workflow Architecture Toolkit — LLM generation · Fake-Wire wireless routing ·</sub>| ComfyUI-TJ_NODE |
2. 필수 커스텀 노드
2. Required Custom Nodes
⚡ 자동 설치 스크립트 (권장)
⚡ Automatic Installation (recommended)
이 패키지 폴더(ComfyUI-TJ_NODE_STUDIO_ONE/) 안에 설치 스크립트가 포함되어 있습니다.
This Package (ComfyUI-TJ_NODE_STUDIO_ONE/) Installation included .
필수 노드 8개를 한 번에 설치하고 pip requirements까지 처리합니다.
required Node **8 ** Installation pip requirements .
Windows — 파일 탐색기에서 더블클릭: Windows — double-click in File Explorer:
install_requirements.bat
Mac / Linux — 터미널에서 실행: Mac / Linux — run in Terminal:
chmod +x install_requirements.sh
./install_requirements.sh
이미 설치된 노드는 자동으로 건너뜁니다. 완료 후 ComfyUI를 재시작하세요. Already installed nodes are skipped automatically. Restart ComfyUI when installation is complete.
수동 설치 목록
Manual Installation List
| 커스텀 노드<br><sub>Custom Node</sub>| 용도<br><sub>Purpose</sub>| 필요 노드<br><sub>Required Node</sub>| GitHub |
| -------------------------- | ------------------------------------------------ | ----------------------- | ------------------------------------------------------------ |
| ComfyUI-Impact-Pack | FaceDetailer — 얼굴 감지·재생성·블렌드 핵심 엔진<br><sub>FaceDetailer — core engine for face detection, regeneration, and blending</sub>| Z-Image · Face Redraw | ltdrdata/ComfyUI-Impact-Pack |
| ComfyUI-Impact-Subpack | Impact Pack 의존 서브팩<br><sub>Impact Pack dependency subpack</sub>| Z-Image · Face Redraw | ltdrdata/ComfyUI-Impact-Subpack |
| ComfyUI-KJNodes | FluxKVCache · ImagePadKJ · FluxKontext 노드 포함<br><sub>FluxKVCache · ImagePadKJ · FluxKontext Node included</sub>| Klein · QE2511 | kijai/ComfyUI-KJNodes |
| ComfyUI-GGUF | GGUF 양자화 모델 로딩<br><sub>GGUF model</sub>| 선택 (GGUF 사용 시)<br><sub>selection (GGUF when used)</sub>| city96/ComfyUI-GGUF |
| ComfyUI_FaceAnalysis | Faceswap 얼굴 임베딩 분석<br><sub>Faceswap face embedding analysis</sub>| Klein · QE2511 Faceswap | cubiq/ComfyUI_FaceAnalysis |
| ComfyUI-RMBG | 배경 제거 (RE-BG 모드)<br><sub>background removal (RE-BG Mode)</sub>| Z-Image · RE-BG | 1038lab/ComfyUI-RMBG |
| comfyui_controlnet_aux | ControlNet 전처리기 (Depth · Canny · Pose 등)<br><sub>ControlNet preprocessor (Depth · Canny · Pose etc.)</sub>| Z-Image · ControlNet | Fannovel16/comfyui_controlnet_aux |
| ComfyUI-SeedVR2 | SeedVR2 AI 업스케일 (UPSCALE 모드)<br><sub>SeedVR2 AI (UPSCALE Mode)</sub>| 전체 노드<br><sub>All Node</sub>| numz ComfyUI-SeedVR2_VideoUpscaler |
| comfyui-krea2-controlnet 🧪 | Krea2 Control LoRA (depth)<br><sub>Krea2 Control LoRA (depth)</sub>| Krea2 · ControlNet Depth | facok/comfyui-krea2-controlnet |
| comfyui-krea2edit 🧪 | Krea2 in-context 편집<br><sub>Krea2 in-context edit</sub>| Krea2 · IDENTITY | lbouaraba/comfyui-krea2edit |
| ComfyUI-NK2E 🧪 | Krea2 NK2E in-context (canny)<br><sub>Krea2 NK2E in-context (canny)</sub>| Krea2 · ControlNet Canny | Nynxz/ComfyUI-NK2E |
| ComfyUI-KJNodes 🧪 | 라이브 프리뷰 (ModelPreviewOverrideKJ) · SageAttention 패치<br><sub>live preview + SageAttention patch</sub>| MiniMax H3 | kijai/ComfyUI-KJNodes |
| ComfyUI-SolAttn_triton 🧪 | SolAttn 가속 (기본 가속값)<br><sub>SolAttn acceleration (default)</sub>| MiniMax H3 | kijai/ComfyUI-SolAttn_triton |
| ComfyUI-Spectrum-MiniMax-H3 🧪 | Spectrum 가속<br><sub>Spectrum acceleration</sub>| MiniMax H3 | xmarre/ComfyUI-Spectrum-MiniMax-H3 |
| ComfyUI-MiniMaxH3-FirstBlockCache 🧪 | 스텝 재사용 캐시<br><sub>step-reuse cache</sub>| MiniMax H3 | duckyshell/ComfyUI-MiniMaxH3-FirstBlockCache |
| ComfyUI-PlagueKind-Nodes 🧪 | H3 SLA Attention (블록-스파스)<br><sub>H3 SLA Attention (block-sparse)</sub>| MiniMax H3 | PlagueKind/ComfyUI-PlagueKind-Nodes |
| ComfyUI-MiniMax-H3-Turbo 🧪 | Turbo LoRA · Turbo 샘플러 (FL2VA 전용)<br><sub>turbo LoRA + sampler, FL2VA only</sub>| MiniMax H3 | Larryvrh/ComfyUI-MiniMax-H3-Turbo |
| ComfyUI-VideoHelperSuite 🧪 | 레퍼런스 비디오 입력 (VHS_LoadVideo)<br><sub>reference video inputs</sub>| MiniMax H3 · Reference | Kosinkadink/ComfyUI-VideoHelperSuite |
| Nvidia RTX Nodes 🧪 | RTX Video Super Resolution | MiniMax H3 · Upscale | Comfy-Org/Nvidia_RTX_Nodes_ComfyUI |
| ComfyUI-FlashVSR_Ultra_Fast 🧪 | 타일 기반 디퓨전 VSR (FlashVSRInitPipe/FlashVSRNodeAdv)<br><sub>tiled diffusion video super-resolution</sub>| MiniMax H3 · Upscale=FlashVSR VSR | lihaoyun6/ComfyUI-FlashVSR_Ultra_Fast |
| JK-AceStep-Nodes 🧪 | JKASS 품질 샘플러 (jkass_quality)<br><sub>JKASS quality sampler</sub>| MusicMaker · Ace-Step | jeankassio/JK-AceStep-Nodes |
| ComfyUI-Openrouter_node | OpenRouter LLM 키 저장소<br><sub>OpenRouter LLM key store</sub>| MusicMaker · 이미지 노드 · H3 (OpenRouter LLM) | gabe-init/ComfyUI-Openrouter_node |
MiniMax H3용 노드는 모두 선택 사항입니다. 없으면 해당 기능만 꺼지고 나머지는 정상 동작하며, 노드 설정 화면에 상태가 표시됩니다. Every MiniMax H3 pack is optional — a missing one only switches its own feature off, and Settings shows the status.
3. 모델 다운로드
3. Model Downloads
3-1. Z-Image ONE STUDIO 모델
3-1. Z-Image ONE STUDIO model
Diffusion Model → models/diffusion_models/
| 파일명<br><sub>File</sub>| 설명<br><sub>Description</sub>| 다운로드<br><sub>Download</sub>|
| -------------------------------- | --------------------------- | ------------------------------------------------------------ |
| z_image_turbo_bf16.safetensors | Z-Image Turbo BF16 권장<br><sub>Z-Image Turbo BF16 recommended</sub>| 다운로드<br><sub>Download</sub>|
전체 모델 목록: https://huggingface.co/Comfy-Org/z_image_turbo Full model list: https://huggingface.co/Comfy-Org/z_image_turbo
Text Encoder → models/text_encoders/
| 파일명<br><sub>File</sub>| 다운로드<br><sub>Download</sub>|
| ----------------------- | ------------------------------------------------------------ |
| qwen_3_4b.safetensors | 다운로드<br><sub>Download</sub>|
VAE → models/vae/
| 파일명<br><sub>File</sub>| 다운로드<br><sub>Download</sub>|
| ---------------- | ------------------------------------------------------------ |
| ae.safetensors | 다운로드<br><sub>Download</sub>|
ControlNet → models/controlnet/ (ControlNet 모드 사용 시)
ControlNet → models/controlnet/ (ControlNet Mode when used)
| 파일명<br><sub>File</sub>| 다운로드<br><sub>Download</sub>|
| ------------------------------------------------ | ------------------------------------------------------------ |
| Z-Image-Turbo-Fun-Controlnet-Union.safetensors | 다운로드<br><sub>Download</sub>|
Face Detector → models/ultralytics/bbox/ (Face Redraw 모드 사용 시)
Face Detector → models/ultralytics/bbox/ (Face Redraw Mode when used)
| 파일명<br><sub>File</sub>| 다운로드<br><sub>Download</sub>|
| -------------------------- | ------------------------------------------------------------ |
| face_yolov8m.pt 권장<br><sub>face_yolov8m.pt recommended</sub>| 다운로드<br><sub>Download</sub>|
| face_yolov9c.pt | 다운로드<br><sub>Download</sub>|
BG Removal → models/background_removal/ (RE-BG 모드 사용 시)
BG Removal → models/background_removal/ (RE-BG Mode when used)
| 다운로드<br><sub>Download</sub>| | | ------------------------------------------------------------ | ---- | | Comfy-Org/BiRefNet — background_removal | |
3-2. Flux.2 Klein ONE STUDIO 모델
3-2. Flux.2 Klein ONE STUDIO model
Diffusion Model → models/diffusion_models/
| 모델<br><sub>model</sub>| 설명<br><sub>Description</sub>| 다운로드<br><sub>Download</sub>|
| ---------------------------- | ---------------------- | ------------------------------------------------------------ |
| flux2-klein-9b.safetensors | FLUX.2 Klein 9B (메인)<br><sub>FLUX.2 Klein 9B (main)</sub>| Black Forest Labs Collection |
| flux2-klein-4b.safetensors | FLUX.2 Klein 4B (경량)<br><sub>FLUX.2 Klein 4B (lightweight)</sub>| Black Forest Labs Collection |
⚠ 9B 모델은 HuggingFace 로그인 후 Non-Commercial License 동의 필요 ⚠ 9B model is HuggingFace requires Hugging Face login and acceptance of the Non-Commercial License
Text Encoder → models/text_encoders/
| 대상<br><sub></sub>| 다운로드<br><sub>Download</sub>| | --------- | ------------------------------------------------------------ | | 9B 모델용<br><sub>9B for the model</sub>| Comfy-Org 9B — split_files/text_encoders | | 4B 모델용<br><sub>4B for the model</sub>| Comfy-Org 4B — split_files/text_encoders |
VAE → models/vae/
| 다운로드<br><sub>Download</sub>| | ------------------------------------------------------------ | | Comfy-Org 9B — split_files/vae |
Faceswap LoRA → models/loras/ (Faceswap 모드 사용 시)
Faceswap LoRA → models/loras/ (Faceswap Mode when used)
| 파일명<br><sub>File</sub>| 다운로드<br><sub>Download</sub>|
| -------------------------------------------------------- | ------------------------------------------------------------ |
| bfs_head_v1_flux-klein_9b_step3500_rank128.safetensors | 다운로드<br><sub>Download</sub>|
| bfs_head_v1_flux-klein_4b.safetensors | 다운로드<br><sub>Download</sub>|
BG Removal → models/background_removal/ (Edit·Paint 마스크 사용 시)
BG Removal → models/background_removal/ (Edit·Paint when used)
| 다운로드<br><sub>Download</sub>| | ------------------------------------------------------------ | | Comfy-Org/BiRefNet — background_removal |
3-3. Qwen Image Edit 2511 ONE STUDIO 모델
3-3. Qwen Image Edit 2511 ONE STUDIO model
전체 모델 목록: https://huggingface.co/Comfy-Org/Qwen-Image-Edit_ComfyUI/tree/main/split_files Full model list: https://huggingface.co/Comfy-Org/Qwen-Image-Edit_ComfyUI/tree/main/split_files
Diffusion Model → models/diffusion_models/
| 파일명<br><sub>File</sub>| 설명<br><sub>Description</sub>| 다운로드<br><sub>Download</sub>|
| ------------------------------------------- | ----------------------- | ------------------------------------------------------------ |
| Qwen2.5-VL-7B-Image-Edit-bf16.safetensors | 메인 모델 BF16 권장<br><sub>main model BF16 recommended</sub>| HF 목록<br><sub>HF list</sub>|
| GGUF 경량 버전<br><sub>GGUF lightweight version</sub>| 저VRAM 환경<br><sub>low-VRAM environment</sub>| HF 목록<br><sub>HF list</sub>|
Text Encoder (CLIPLoader qwen_image) → models/text_encoders/
| 파일명<br><sub>File</sub>| 다운로드<br><sub>Download</sub>|
| -------------------------------------- | ------------------------------------------------------------ |
| qwen2.5vl-7b-vis-encoder.safetensors | HF 목록<br><sub>HF list</sub>|
VAE → models/vae/
| 파일명<br><sub>File</sub>| 다운로드<br><sub>Download</sub>|
| ---------------- | ------------------------------------------------------------ |
| ae.safetensors | HF 목록<br><sub>HF list</sub>|
Lightning LoRA → models/loras/ (4스텝 고속 생성, 선택사항)
Lightning LoRA → models/loras/ (4 fast generation, optional)
| 파일명<br><sub>File</sub>| 다운로드<br><sub>Download</sub>|
| ------------------------------------------------------------ | ------------------------------------------------------------ |
| Qwen-Image-Edit-2511-Lightning-4steps-V1.0-bf16.safetensors | HF 목록<br><sub>HF list</sub>|
Multi Angle LoRA → models/loras/ (Angle 모드 필수)
Multi Angle LoRA → models/loras/ (Angle Mode required)
| 파일명<br><sub>File</sub>| 다운로드<br><sub>Download</sub>|
| ------------------------------------------------------- | ------------------------------------------------------------ |
| qwen-image-edit-2511-multiple-angles-lora.safetensors | HF 목록<br><sub>HF list</sub>|
BFS LoRA → models/loras/ (Faceswap 모드 필수)
BFS LoRA → models/loras/ (Faceswap Mode required)
| 다운로드<br><sub>Download</sub>| | ------------------------------------------------------------ | | Alissonerdx/BFS-Best-Face-Swap |
QWEN IMAGE 2.1 ONE STUDIO — POSE 모드 모델 (POSE 모드 필수)
QWEN IMAGE 2.1 ONE STUDIO — POSE mode models (POSE mode required)
VNCCS PoseStudio LoRA → models/loras/
| 파일명<br><sub>File</sub>| 다운로드<br><sub>Download</sub>|
| ------------------------------------------ | ------------------------------------------------------------ |
| VNCCS_QI2_PoseStudioV1.1.safetensors | MIUProject/VNCCS_PoseStudio_QI2.1 |
SAM3D Body pose-extraction model (✂ Crop Pose Image → SAM3D 단계에 필요, ComfyUI 코어 내장 comfy_extras.nodes_sam3d_body의 SAM3DBody_Loader가 요구하는 파일 — 이 노드팩은 모델 1개만 필요합니다<br><sub>required for the ✂ Crop Pose Image → SAM3D step, needed by the core SAM3DBody_Loader node (comfy_extras.nodes_sam3d_body) — this node pack needs only one model</sub>)
| 폴더<br><sub>Folder</sub>| 파일명<br><sub>File</sub>| 다운로드<br><sub>Download</sub>|
| -------------------- | ------------------------------------------ | ------------------------------------------------------------ |
| detection/ | sam_3d_body_dinov3_bf16.safetensors | Comfy-Org/sam-3d-body |
3-4. Krea 2 ONE STUDIO 모델
3-4. Krea 2 ONE STUDIO model
전체 모델 목록: https://huggingface.co/Comfy-Org/Krea2 Full model list: https://huggingface.co/Comfy-Org/Krea2
Diffusion Model → models/diffusion_models/
| 설명<br><sub>Description</sub>| 다운로드<br><sub>Download</sub>| | ----- | ------------------------------------------------------------ | | Krea2 | HF 목록<br><sub>HF list</sub>|
Text Encoder (CLIP krea2) → models/text_encoders/
| 다운로드<br><sub>Download</sub>| | ------------------------------------------------------------ | | HF 목록<br><sub>HF list</sub>|
VAE → models/vae/
| 다운로드<br><sub>Download</sub>| | ------------------------------------------------------------ | | HF 목록<br><sub>HF list</sub>|
3-5. SDXL ONE STUDIO 모델 🧪
3-5. SDXL ONE STUDIO model 🧪
🧪 테스트 버전 — SDXL 계열 모델을 그대로 사용합니다.
🧪 Test Version — uses standard SDXL-family models as-is.
Checkpoint → models/checkpoints/ (CKPT 방식)
Checkpoint → models/checkpoints/ (CKPT mode)
| 예시<br><sub>Example</sub>| 설명<br><sub>Description</sub>|
|---|---|
| sd_xl_base_1.0.safetensors | SDXL Base 공식 모델<br><sub>SDXL Base official model</sub>|
| SDXL 계열 커스텀 Checkpoint | CivitAI 등에서 배포되는 SDXL 파인튠 모델<br><sub>SDXL fine-tuned models distributed on CivitAI etc.</sub>|
Separate 방식 — UNET → models/diffusion_models/
Separate Mode — UNET → models/diffusion_models/
GGUF 또는 FP8 경량 SDXL UNET 파일 사용 가능.
GGUF or FP8 lightweight SDXL UNET files are supported.
Separate 방식 — Text Encoder → models/text_encoders/
Separate Mode — Text Encoder → models/text_encoders/
| 파일<br><sub>File</sub>| 설명<br><sub>Description</sub>|
|---|---|
| clip_l.safetensors | SDXL CLIP-L 텍스트 인코더<br><sub>SDXL CLIP-L text encoder</sub>|
| clip_g.safetensors | SDXL CLIP-G 텍스트 인코더 (DualCLIP 필요)<br><sub>SDXL CLIP-G text encoder (DualCLIP required)</sub>|
VAE → models/vae/
| 예시<br><sub>Example</sub>|
|---|
| sdxl_vae.safetensors |
Refiner Checkpoint (선택) → models/checkpoints/
Refiner Checkpoint (optional) → models/checkpoints/
| 예시<br><sub>Example</sub>| 설명<br><sub>Description</sub>|
|---|---|
| sd_xl_refiner_1.0.safetensors | SDXL Refiner 공식 모델<br><sub>SDXL Refiner official model</sub>|
Refiner는 CKPT / Separate 방식 모두에서 항상 선택 가능합니다.
The Refiner can always be configured regardless of CKPT or Separate loading mode.
ESRGAN Upscale (Upscale 모드 필수) → models/upscale_models/
ESRGAN Upscale (required for Upscale mode) → models/upscale_models/
| 예시<br><sub>Example</sub>| 설명<br><sub>Description</sub>|
|---|---|
| 4x-UltraSharp.pth | 고품질 4x 업스케일 모델 (권장)<br><sub>high-quality 4x upscale model (recommended)</sub>|
| 4x_NMKD-Superscale-SP_178000_G.pth | 범용 4x 업스케일 모델<br><sub>general-purpose 4x upscale model</sub>|
3-6. MiniMax H3 ONE STUDIO 모델 🧪
3-6. MiniMax H3 ONE STUDIO model 🧪
영상+오디오 노드입니다. UNET 2종 · 텍스트 인코더 · VAE 2종이 모두 필요합니다. Video + audio node. It needs two UNETs, a text encoder and both VAEs.
전부 한 저장소에 있습니다 / All from one repo: Comfy-Org/MiniMax-H3
Diffusion Model → models/diffusion_models/
| 파일명<br><sub>File</sub>| 설명<br><sub>Description</sub>| 필요 모드<br><sub>Needed for</sub>|
| --- | --- | --- |
| minimax_h3_fl2va_* | First/Last-to-Video+Audio | Text only · First/Last — 그리고 Last Frame Chain으로 이어지는 모든 클립<br><sub>and every chained clip</sub>|
| minimax_h3_ref2va_* | Reference-to-Video+Audio | Reference |
두 모드를 다 쓰려면 둘 다 받아야 합니다. Settings에서 각각 지정하며, 지정되지 않은 모드는 노드에서 진입이 막히고 상단에 경고가 뜹니다. Download both if you want both modes. They are set separately in Settings; a mode whose UNET is unset cannot be entered and the node's top bar says so.
Text Encoder → models/text_encoders/
| 파일명<br><sub>File</sub>| 설명<br><sub>Description</sub>|
| --- | --- |
| qwen3vl_*_minimax_h3_* | Qwen3-VL 계열. CLIPLoader type=minimax 로 로드됩니다<br><sub>loaded with type=minimax</sub>|
VAE → models/vae/
| 파일명<br><sub>File</sub>| 설명<br><sub>Description</sub>|
| --- | --- |
| minimax_h3_video_vae_* | 영상 VAE<br><sub>video VAE</sub>|
| minimax_h3_audio_vae_* | 오디오 VAE<br><sub>audio VAE</sub>|
둘 다 필수입니다. 그리고 오디오 슬롯에는 반드시
minimax_h3_audio_vae_*를 넣으세요 — 다른 오디오 VAE(예: LTX)를 넣으면 디코딩 단계에서size of tensor a … must match … b (128)같은 크기 불일치 오류가 납니다. Both are required, and the audio slot must hold aminimax_h3_audio_vae_*file — pointing it at another audio VAE (LTX's, for example) fails at decode with a tensor-size mismatch.
Turbo LoRA (선택) → models/loras/
| 파일명<br><sub>File</sub>| 설명<br><sub>Description</sub>|
| --- | --- |
| minimax_h3*turbo* | 4스텝 고속 생성. FL2VA 전용 — Reference 모드에서는 선택지에 나타나지 않습니다<br><sub>4-step fast path, FL2VA only — not offered in Reference mode</sub>|
3-7. SeedVR2 Upscale 모델 (전체 노드 공용)
3-7. SeedVR2 Upscale model (shared by all nodes)
모든 노드의 UPSCALE 모드에서 동일한 폴더를 사용합니다. Node UPSCALE Modeto use.
→ models/SEEDVR2/
| 파일명<br><sub>File</sub>| 설명<br><sub>Description</sub>| 다운로드<br><sub>Download</sub>|
| --------------------------------------- | ------------------- | ------------------------------------------------------------ |
| seedvr2_ema_3b_fp16.safetensors | DiT 3B FP16 | SeedVR2-models |
| seedvr2_ema_3b_fp8_e4m3fn.safetensors | DiT 3B FP8 (저VRAM)<br><sub>DiT 3B FP8 (VRAM)</sub>| SeedVR2-models |
| seedvr2_ema_7b_fp8_e4m3fn.safetensors | DiT 7B FP8 (고품질)<br><sub>DiT 7B FP8 (high quality)</sub>| SeedVR2-models |
| ema_vae_fp16.safetensors | VAE FP16 | SeedVR2-models |
DiT 모델과 VAE 모델 둘 다 필요합니다.
DiT model VAE model both are required. Upscale 모드 → ↻ Refresh 버튼으로 모델 목록을 새로 고칩니다. Upscale Mode → ↻ Refresh button refreshes the model list.
4. 초기 설정
4. Initial Setup
ComfyUI 캔버스에서 노드 우상단 ⚙ 버튼을 눌러 Settings를 엽니다. ComfyUI on the ComfyUI canvas, click the ⚙ button at the top-right of the node to open Settings.
| 항목<br><sub>Item</sub>| 설명<br><sub>Description</sub>|
| -------------------- | --------------------------------------------- |
| Diffusion Model | 다운로드한 UNet/DiT 파일 선택<br><sub>select the downloaded UNet/DiT file</sub>|
| Text Encoder | 텍스트 인코더 파일 선택<br><sub>select the text encoder file</sub>|
| VAE | VAE 파일 선택<br><sub>select the VAE file</sub>|
| ↻ Refresh Models | ComfyUI 재시작 없이 새 모델 파일 인식<br><sub>ComfyUI when recognize new model files</sub>|
| 언어 / Language<br><sub>** / Language**</sub>| 한국어 / English 전환 (선택 후 자동 새로고침)<br><sub>Korean / English before (automatically refreshes after selection)</sub>|
| Negative Prompt | 전 모드 공통 부정 프롬프트<br><sub>negative prompt shared by all modes</sub>|
| Prompt Suffix | 모든 프롬프트 끝에 자동 추가 키워드<br><sub>keywords automatically appended to all prompts</sub>|
| Save Subfolder | ComfyUI/output/ 하위 저장 폴더명<br><sub>ComfyUI/output/ output subfolder name</sub>|
| 💾 Save All | 서버에 설정 영구 저장<br><sub>save settings permanently on the server</sub>|
MiniMax H3는 항목이 조금 다릅니다 — UNET을 First/Last용과 Reference용 두 개 지정하고, VAE도 영상용·오디오용 두 개를 지정합니다. 지정되지 않은 모델이 있으면 노드 상단에 ⚠ 경고가 뜨고, 그 모델이 필요한 모드와 연속성 옵션은 선택할 수 없습니다. MiniMax H3 differs: it takes two UNETs (First/Last and Reference) and two VAEs (video and audio). Anything unset raises a ⚠ in the node's top bar, and the modes and continuity options needing it are disabled.
설정이 저장되는 곳 / Where settings live (v1.10.0~)
-
워크플로우 파일 — 노드 설정이 워크플로우와 함께 저장됩니다. 다른 PC에서 열거나 파일을 남에게 넘겨도 그대로 재현되고, 한 그래프에 같은 노드를 여러 개 둬도 각자 값을 유지합니다
-
브라우저 — 마지막에 쓰던 설정이 별도로 기억되어, 새로 꺼낸 노드가 그 값을 물려받습니다. 남의 워크플로우를 여는 것만으로는 이 값이 바뀌지 않습니다
-
v1.10.0 이전에 저장한 워크플로우는 설정이 파일에 담겨 있지 않습니다 — 다시 설정하고 저장하면 이후로는 유지됩니다
-
Workflow file — settings are stored in the workflow, so it reproduces elsewhere and multiple nodes keep separate values.
-
Browser — the settings you last used are remembered separately and seed any newly added node; opening someone else's workflow does not overwrite them.
-
Workflows saved before v1.10.0 carry no settings — set them once more and save.
모델 오버라이드 슬롯 (고급)
Model Override Slots (Advanced)
Settings → Model Override 체크박스를 켜면 노드에 입력 슬롯이 노출됩니다.
Settings → Model Override enable the checkbox to expose input slots on the node.
Primitive (String) 노드를 연결해 파일명을 입력하면 드롭다운보다 우선 적용됩니다.
Primitive (String) connect a Primitive (String) node and enter a filename to override the dropdown.
.gguf 파일명 입력 시 자동으로 GGUF 로더를 사용합니다.
.gguf entering a .gguf filename automatically uses the GGUF loader.
5. 모드별 간략 설명
5. Mode Overview
Z-Image ONE STUDIO (TJ)
| 모드<br><sub>Mode</sub>| 설명<br><sub>Description</sub>| 주요 설정<br><sub>Key Settings</sub>| | --------------- | ------------------------ | ------------------------------------------------------------ | | T2I | 텍스트 → 이미지<br><sub>→ image</sub>| 해상도 프리셋, Steps, CFG, Shift, Sampler, LoRA (최대 3개)<br><sub>resolution preset, Steps, CFG, Shift, Sampler, LoRA ( 3)</sub>| | I2I | 이미지 → 이미지 변형<br><sub>image → image</sub>| 소스 이미지 업로드, Denoise (0.5~1.0)<br><sub>upload source image, Denoise (0.5~1.0)</sub>| | INPAINT | 특정 영역 재생성<br><sub>regenerate selected area</sub>| 소스 이미지 → 캔버스에서 마스크 드로잉 (DifferentialDiffusion)<br><sub>source image → draw a mask on the canvas (DifferentialDiffusion)</sub>| | OUTPAINT | 캔버스 확장<br><sub>canvas expansion</sub>| Up/Down/Left/Right 픽셀 설정 → 빈 영역 자동 생성<br><sub>Up/Down/Left/Right pixel settings → automatically generate empty areas</sub>| | RE-BG | 배경 완전 재생성<br><sub>completely regenerate the background</sub>| BiRefNet으로 피사체 분리 → 새 배경 생성 후 합성<br><sub>BiRefNet separate the subject → generate a new background and composite it</sub>| | CONTROLNET | 레퍼런스 기반 생성<br><sub>reference-based generation</sub>| 레퍼런스 이미지 → Preprocessor 선택 → Strength 조절<br><sub>reference image → Preprocessor selection → Strength adjustment</sub>| | FACE REDRAW | 얼굴 자동 감지 후 재생성<br><sub>automatically detect and regenerate the face</sub>| YOLOv8/v9 감지 → LoRA 적용 재생성 → 원본에 자연 블렌드<br><sub>YOLOv8/v9 detection → LoRA regenerate with LoRA → blend naturally into the original</sub>| | UPSCALE | SeedVR2 AI 업스케일<br><sub>SeedVR2 AI</sub>| DiT 모델 + VAE 선택 → Resolution / Attention Mode 설정<br><sub>DiT model + VAE selection → Resolution / Attention Mode settings</sub>|
Flux.2 Klein ONE STUDIO (TJ)
| 모드<br><sub>Mode</sub>| 설명<br><sub>Description</sub>| 주요 설정<br><sub>Key Settings</sub>| | ------------ | --------------------------- | ------------------------------------------------------------ | | T2I | 텍스트 → 이미지<br><sub>→ image</sub>| 해상도, Steps(권장 4), CFG(권장 1), Sampler(euler_sde), LoRA (최대 3개)<br><sub>resolution, Steps(recommended 4), CFG(recommended 1), Sampler(euler_sde), LoRA ( 3)</sub>| | I2I | 이미지 → 이미지 변형<br><sub>image → image</sub>| Denoise 0.5~0.75(형태 유지) / 0.8~1.0(대폭 변형)<br><sub>Denoise 0.5~0.75(preserve structure) / 0.8~1.0(major transformation)</sub>| | EDIT | 멀티 레퍼런스 편집<br><sub>multi-reference editing</sub>| 참조 이미지 1~5장, Size Source (이미지1 기준 출력 크기)<br><sub>reference images 1~5, Size Source (output size based on Image 1)</sub>| | PAINT | 특정 영역 재생성 + Outpaint<br><sub>regenerate selected area + Outpaint</sub>| 캔버스 마스크 드로잉, 아웃페인트 방향/크기 설정<br><sub>draw a canvas mask, set Outpaint direction and size</sub>| | FACESWAP | 얼굴 교체 재생성<br><sub>face replacement and regeneration</sub>| Source(얼굴 공여자) + Target(원본) 업로드, BFS LoRA 강도 조절<br><sub>Source(face donor) + Target(original) upload, BFS LoRA adjust strength</sub>| | UPSCALE | SeedVR2 AI 업스케일<br><sub>SeedVR2 AI</sub>| DiT 모델 + VAE 선택<br><sub>DiT model + VAE selection</sub>|
Qwen Image Edit 2511 ONE STUDIO (TJ)
| 모드<br><sub>Mode</sub>| 설명<br><sub>Description</sub>| 주요 설정<br><sub>Key Settings</sub>| | ------------ | ------------------------- | ------------------------------------------------------------ | | T2I | 텍스트 → 이미지<br><sub>→ image</sub>| 해상도, Steps, CFG, Sampler, LoRA (최대 3개), Lightning LoRA (⚙ Settings)<br><sub>resolution, Steps, CFG, Sampler, LoRA ( 3), Lightning LoRA (⚙ Settings)</sub>| | I2I | 이미지 → 이미지 변형<br><sub>image → image</sub>| 소스 이미지, Denoise 조절<br><sub>source image, Denoise adjustment</sub>| | EDIT | 멀티 레퍼런스 텍스트 편집<br><sub>multi-reference text editing</sub>| 참조 이미지 최대 3장, Outpaint 포함<br><sub>up to three reference images, Outpaint included</sub>| | PAINT | 특정 영역 재생성<br><sub>regenerate selected area</sub>| ComfyUI 내장 마스크 에디터, Denoise 0.7~0.9 권장<br><sub>ComfyUI built-in mask editor, Denoise 0.7~0.9 recommended</sub>| | FACESWAP | 얼굴 교체<br><sub>face replacement</sub>| Target + Source 이미지, BFS LoRA 필수<br><sub>Target + Source image, BFS LoRA required</sub>| | ANGLE | 카메라 앵글 3D 조절<br><sub>3D camera-angle control</sub>| H(방위각) · V(고도각) · Z(줌) 드래그 조절, Camera Angle LoRA (⚙ Settings)<br><sub>H(azimuth) · V(elevation) · Z(zoom) drag control, Camera Angle LoRA (⚙ Settings)</sub>| | UPSCALE | SeedVR2 AI 업스케일<br><sub>SeedVR2 AI</sub>| DiT 모델 + VAE 선택<br><sub>DiT model + VAE selection</sub>|
Krea 2 ONE STUDIO (TJ)
| 모드<br><sub>Mode</sub>| 설명<br><sub>Description</sub>| 주요 설정<br><sub>Key Settings</sub>| | ----------- | -------------------- | ------------------------------------------------------------ | | T2I | 텍스트 → 이미지<br><sub>→ image</sub>| 해상도, Steps, CFG, Sampler, LoRA (최대 3개), Lightning LoRA (⚙ Settings)<br><sub>resolution, Steps, CFG, Sampler, LoRA ( 3), Lightning LoRA (⚙ Settings)</sub>| | I2I | 이미지 → 이미지 변형<br><sub>image → image</sub>| 소스 이미지, Denoise 조절<br><sub>source image, Denoise adjustment</sub>| | UPSCALE | SeedVR2 AI 업스케일<br><sub>SeedVR2 AI</sub>| DiT 모델 + VAE 선택<br><sub>DiT model + VAE selection</sub>|
SDXL ONE STUDIO (TJ) 🧪
🧪 테스트 버전 — 기능 동작 중이나 일부 옵션이 변경될 수 있습니다.
🧪 Test Version — functional but some options may change.
| 모드<br><sub>Mode</sub>| 설명<br><sub>Description</sub>| 주요 설정<br><sub>Key Settings</sub>|
| ----------- | -------------------- | ------------------------------------------------------------ |
| T2I | 텍스트 → 이미지<br><sub>text → image</sub>| CKPT 또는 Separate(UNET+CLIP-L/G+VAE) 선택, 해상도, Steps, CFG, Sampler, Refiner<br><sub>CKPT or Separate(UNET+CLIP-L/G+VAE), resolution, Steps, CFG, Sampler, Refiner</sub>|
| I2I | 이미지 → 이미지 변형<br><sub>image → image</sub>| 소스 이미지, Denoise 조절<br><sub>source image, Denoise adjustment</sub>|
| INPAINT | 특정 영역 재생성<br><sub>regenerate selected area</sub>| 팝업 풀스크린 마스크 에디터 (줌·팬·브러시), VAEEncodeForInpaint 방식<br><sub>popup fullscreen mask editor (zoom · pan · brush), VAEEncodeForInpaint method</sub>|
| OUTPAINT | 캔버스 확장<br><sub>canvas expansion</sub>| Top/Bottom/Left/Right 픽셀 설정, 비교 슬라이더에서 패딩 미리보기<br><sub>Top/Bottom/Left/Right pixel settings, padded preview in compare slider</sub>|
| UPSCALE | ESRGAN + Refiner 업스케일<br><sub>ESRGAN + Refiner upscale</sub>| ESRGAN 모델 선택 (models/upscale_models/), Refiner KSampler 정제<br><sub>ESRGAN model selection (models/upscale_models/), Refiner KSampler refinement</sub>|
MiniMax H3 ONE STUDIO (TJ) 🧪
🧪 실험적 — 영상+오디오 노드. 긴 영상은 클립을 이어 붙여 만들므로 결과가 완벽하지 않을 수 있습니다. 🧪 Experimental — video + audio. Long videos are assembled from chained clips, so results are not seamless.
| 모드<br><sub>Mode</sub>| 설명<br><sub>Description</sub>| 주요 설정<br><sub>Key Settings</sub>| | --- | --- | --- | | Text only (T2VA) | 프롬프트만으로 영상+오디오<br><sub>prompt only</sub>| 클립 길이, 해상도(비율·MP), Steps, 가속<br><sub>clip length, aspect + MP, steps, accel</sub>| | First/Last Frame (FL2VA) | 시작(+선택적 끝) 키프레임<br><sub>start (+optional end) keyframe</sub>| 키프레임 이미지 업로드<br><sub>keyframe upload</sub>| | Reference (REF2VA) | 레퍼런스 이미지·비디오·오디오로 인물/장면 고정<br><sub>reference images, videos and audio</sub>| 이미지 최대 9장 · 비디오/오디오 각 3개(인·아웃 구간 지정)<br><sub>up to 9 images, 3 videos, 3 audio with in/out points</sub>|
클립과 길이 / Clips and length
프롬프트 1개 = 클립 1개입니다. 총 길이는 입력하는 값이 아니라 클립 수 × 클립 길이로 따라옵니다. 길게 만들려면 프롬프트를 추가하거나, 긴 브리프를 ✂ Split into clips 로 샷 단위 분리하세요. 분리하면 스타일 머리말과 사운드 꼬리말이 공통 영역으로 올라가 모든 클립에 함께 전달되므로 길이를 늘려도 룩이 유지됩니다.
One prompt is one clip; total length follows from clips × clip length rather than being typed in. Split a long brief into shots to make a longer piece — the shared style and sound text is lifted into the common header/footer so every clip carries it.
| 연속성<br><sub>Continuity</sub>| 동작<br><sub>What it does</sub>| | --- | --- | | Last Frame Chain | 이전 클립의 마지막 프레임이 다음 클립의 첫 프레임이 됩니다. first frame을 받는 모델은 FL2VA뿐이라, 이어지는 클립은 어떤 모드로 시작했든 FL2VA로 렌더됩니다 (Reference 이미지는 첫 클립에만 적용)<br><sub>frame-exact continuation; continued clips render on FL2VA whatever the run started as</sub>| | Reference (Reference 모드 전용) | 모든 클립이 같은 레퍼런스 이미지를 사용. 컷은 붙지 않지만 인물·화풍이 유지됩니다<br><sub>every clip re-uses the same references</sub>| | None | 클립 간 전달 없음. 해당 모드의 모델은 그대로 유지되며, 공통 프롬프트만 일관성을 잡아줍니다<br><sub>nothing handed across; the run stays on its own model</sub>|
그 밖에 / Also
- 라이브 프리뷰 — 샘플링 중 디코딩 프레임이 노드에 실시간 표시 (KJNodes 필요)
- 갤러리 — 클립·합본을 한 곳에서. 카드마다 생성에 쓰인 프롬프트가 저장되어
↩ Reuse/⧉ Copy가능. 전체화면 플레이어(Space 재생, ←→ 이동,[/]이전·다음, Esc 닫기) - Prompt Edit / COMMON Prompt — 클립별 프롬프트 편집 팝업, 공통 머리말·꼬리말 분리 편집, Ollama LLM으로 브리프 확장(결과는 팝업으로 먼저 검토)
- 스티치 On/Off — 합본 여부를 왼쪽 패널에서 선택. 개별 클립은 항상 저장됩니다
- VRAM — 클립 사이(선택)와 실행 종료 시(항상) 자동 해제
MusicMaker ONE STUDIO (TJ) 🧪
🧪 실험적 — 음악(노래·연주곡) 생성. 노드 하나에 Ace-Step 1.5 / MiniMax Music 3 / YuE2 세 엔진. 🧪 Experimental — music (song / instrumental). One node, three engines: Ace-Step 1.5 / MiniMax Music 3 / YuE2.
| 항목<br><sub>Item</sub>| 설명<br><sub>Description</sub>| | --- | --- | | 엔진 / Engine | Ace-Step 1.5(기본, 48 kHz, 3-스테이지 샘플링, BPM/키/박자 구조화 입력) · MiniMax Music 3(단일 KSampler, 캡션에 힌트 녹임) · YuE2(Text to Music / Cover Music)<br><sub>Ace-Step 1.5 (default) / MiniMax Music 3 / YuE2</sub>| | Melody Editor 🆕 | YuE2 전용 피아노롤 — 펜으로 그리거나 실물 MIDI 건반·컴퓨터 키보드로 녹음, 샘플 악기, MIDI 가져오기/내보내기<br><sub>YuE2-only piano roll — draw, or record from a real MIDI keyboard / computer keys; sample instruments; MIDI import / export</sub>| | Song / Instrumental | 명시적 토글. Instrumental은 가사·보컬 섹션을 숨기고 가사 없이 렌더<br><sub>explicit toggle</sub>| | 캡션·가사 LLM / LLM | Local GGUF · OpenRouter · ComfyUI TextGenerate · Connect Custom 중 선택. 가사 작성 시 실제 곡 길이 반영<br><sub>pick a backend; the lyric writer gets the real target length</sub>| | 대기 큐 / Queue | ▶ Generate가 패널을 스냅샷 → 플레이리스트에 잡 카드. 카드별 취소, Stop으로 전체 비움<br><sub>H3-style queue with per-card cancel</sub>| | 플레이리스트 / Playlist | 인라인 플레이어, 즐겨찾기, Info/Reuse, ↻ 새로고침, 태그가 박힌 파일 다운로드, Krea2 앨범 커버(기본 ON, Auto/Prompt 재생성) + 커버 복사/붙여넣기/업로드/갤러리<br><sub>inline player, ↻ refresh, download of files with tags embedded, Krea2 covers + cover copy / paste / upload / gallery</sub>| | 저장 폴더 / Save folder | Settings에서 지정 — 저장 위치 + 플레이리스트 스캔<br><sub>configurable, drives save + scan</sub>|
자세한 내용은 MusicMaker ONE STUDIO — 기능 상세 참고. See MusicMaker ONE STUDIO — Feature Details for the full breakdown.
공통 기능
Common Features
| 기능<br><sub>Feature</sub>| 설명<br><sub>Description</sub>| | ----------------- | ------------------------------------------------------------ | | ⇌ Compare | 드래그 슬라이더로 원본 / 결과 나란히 비교<br><sub>original / result</sub>| | 🖼 Gallery | 저장된 이미지 정사각형 그리드 보기. 즐겨찾기(★) · 삭제 · Send to<br><sub>save image square grid view. favorite(★) · delete · Send to</sub>| | 📋 Templates | 자주 쓰는 프롬프트 저장 · 불러오기<br><sub>save · load</sub>| | 🔍 Prompt Edit | 확장 편집 팝업. TJ_NODE 설치 시 ✨ Enhance · 🖼 Image→Prompt 탭 자동 활성화 (GGUF 모델 필요)<br><sub>. TJ_NODE Installation when ✨ Enhance · 🖼 Image→Prompt Tab automatic (GGUF model required)</sub>| | Scroll Zoom | 결과 이미지 위 마우스 스크롤 확대/축소<br><sub>result image zoom/out</sub>| | Double Click | 결과 이미지 더블클릭 → 전체화면 뷰어<br><sub>result image click → All</sub>| | Send to | 결과를 다른 모드의 소스로 즉시 전달<br><sub>result Mode source when send</sub>| | Language | Settings에서 한국어 / English 전환<br><sub>Settingsto Korean / English before</sub>| | ESC | 열린 팝업 / 갤러리 / 전체화면 닫기<br><sub>/ Gallery / All close</sub>|
LLM 모델 안내 (Enhance · Image→Prompt)
LLM model (Enhance · Image→Prompt)
LLM 기능은 GGUF 형식 모델만 지원합니다. 일부 모델은 호환되지 않을 수 있으므로 동작하지 않으면 다른 모델로 교체해 보세요. LLM The feature **GGUF ** model supports. Some models may be incompatible; try another model if it does not work..
✨ Enhance — 텍스트 LLM GGUF 사용: ✨ Enhance — uses a text LLM GGUF:
| 추천<br><sub>Recommended</sub>| 다운로드<br><sub>Download</sub>| |---|---| | huihui-ai GGUF 컬렉션 (Qwen · Llama · Mistral 계열)<br><sub>huihui-ai GGUF collection (Qwen · Llama · Mistral family)</sub>| noctrex/huihui-ai 컬렉션<br><sub>noctrex/huihui-ai collection</sub>|
🖼 Image→Prompt — 비전 LLM(VLM) GGUF + mmproj 파일 필요. Qwen3-VL 계열 권장: 🖼 Image→Prompt — vision LLM(VLM) GGUF + mmproj file required. Qwen3-VL family recommended:
| 추천<br><sub>Recommended</sub>| 다운로드<br><sub>Download</sub>| |---|---| | Qwen3-VL-8B-NSFW-Caption-V4.5 GGUF | mradermacher GGUF | | huihui-ai Qwen3-VL 계열 GGUF<br><sub>huihui-ai Qwen3-VL family GGUF</sub>| noctrex/huihui-ai 컬렉션<br><sub>noctrex/huihui-ai collection</sub>|
모델 파일(
.gguf)과 mmproj 파일을 함께 다운로드한 뒤 TJ_NODE GGUF 모델 폴더에 넣고, LLM 설정 패널에서 각각 선택하세요. model file(.gguf) mmproj File download together, then TJ_NODE GGUF place them in the TJ_NODE GGUF model folder and, LLM select each file in the LLM settings panel.
6. 문제 해결
6. Troubleshooting
| 증상<br><sub>Symptom</sub>| 해결 방법<br><sub>Solution</sub>|
| -------------------------------------- | ------------------------------------------------------------ |
| 모델이 드롭다운에 안 보임<br><sub>model not shown in the dropdown</sub>| Settings → ↻ Refresh Models 클릭<br><sub>Settings → ↻ Refresh Models click</sub>|
| SEEDVR2 모델 목록 안 나옴<br><sub>SEEDVR2 model list is empty</sub>| Upscale 모드 → ↻ Refresh 클릭 · models/SEEDVR2/ 폴더 확인<br><sub>Upscale Mode → ↻ Refresh click · models/SEEDVR2/ check the folder</sub>|
| Outpaint 생성 시 완전히 새 이미지 생성<br><sub>Outpaint generates a completely new image during Outpaint</sub>| ComfyUI-KJNodes 최신 버전 설치 확인 (ImagePadKJ 노드 필요)<br><sub>ComfyUI-KJNodes make sure the latest version is installed (ImagePadKJ node required)</sub>|
| Face Redraw 오류<br><sub>Face Redraw error</sub>| ComfyUI-Impact-Pack + ComfyUI-Impact-Subpack 설치 확인<br><sub>ComfyUI-Impact-Pack + ComfyUI-Impact-Subpack verify installation</sub>|
| KV Cache 오류 (Klein)<br><sub>KV Cache error (Klein)</sub>| 파일명에 kv 미포함 시 자동 비활성화 — KV 모델 파일명 확인<br><sub>Models whose filenames contain kv automatically disabled when the filename does not contain kv — KV check the KV model filename</sub>|
| GGUF 모델 안 로딩<br><sub>GGUF model does not load</sub>| ComfyUI-GGUF 커스텀 노드 설치 확인<br><sub>ComfyUI-GGUF Custom Node verify installation</sub>|
| Faceswap 얼굴 미감지<br><sub>Faceswap face is not detected</sub>| ComfyUI_FaceAnalysis 설치 + insightface pip 설치 확인<br><sub>ComfyUI_FaceAnalysis Installation + insightface pip verify installation</sub>|
| RE-BG 오류<br><sub>RE-BG error</sub>| ComfyUI-RMBG 설치 + models/background_removal/ 모델 확인<br><sub>ComfyUI-RMBG Installation + models/background_removal/ model check</sub>|
| QE2511 FluxKontext 노드 미발견 오류<br><sub>QE2511 FluxKontext Node missing-node error</sub>| ComfyUI-KJNodes 최신 버전으로 업데이트<br><sub>ComfyUI-KJNodes update to the latest version</sub>|
| 언어 전환 후 반영 안 됨<br><sub>language change is not applied</sub>| Settings에서 언어 선택 후 자동 새로고침 대기<br><sub>Settingsto automatically refreshes after selection</sub>|
| [MiniMax H3] 모드 버튼이 눌리지 않음<br><sub>a mode pill is greyed out</sub>| 그 모드의 UNET이 지정되지 않은 상태입니다. 상단 ⚠ 경고를 클릭 → Settings에서 First/Last · Reference UNET 지정<br><sub>its UNET is unset — click the ⚠ in the top bar and set it in Settings</sub>|
| [MiniMax H3] 오디오 디코딩 크기 불일치 오류<br><sub>audio decode tensor-size mismatch</sub>| 오디오 VAE 슬롯에 minimax_h3_audio_vae_* 가 맞게 지정됐는지 확인. 다른 오디오 VAE(LTX 등)를 넣으면 발생합니다<br><sub>the audio VAE slot must hold a MiniMax audio VAE</sub>|
| [MiniMax H3] Reference 모드에서 Turbo가 안 보임<br><sub>Turbo missing in Reference mode</sub>| 정상입니다. Turbo LoRA는 FL2VA 전용이라 Reference에서는 제공되지 않습니다 (걸면 adaln 오류) — SolAttn·Spectrum·None 사용<br><sub>expected: turbo LoRAs are FL2VA-only</sub>|
| [MiniMax H3] 레퍼런스 비디오 항목이 없음<br><sub>reference video inputs missing</sub>| ComfyUI-VideoHelperSuite 설치 확인 (VHS_LoadVideo)<br><sub>install ComfyUI-VideoHelperSuite</sub>|
| [MiniMax H3] 합본(스티치) 실패<br><sub>stitching fails</sub>| ffmpeg가 필요합니다. pip install imageio-ffmpeg 또는 시스템 PATH에 ffmpeg 설치<br><sub>needs ffmpeg — pip install imageio-ffmpeg or put one on PATH</sub>|
| [MiniMax H3] 클립이 이어지지 않고 따로 노는 느낌<br><sub>clips feel unrelated</sub>| Continuity를 Last Frame Chain으로. 그리고 공통 스타일·사운드 문구는 COMMON Prompt에 넣으세요(모든 클립에 전달됩니다)<br><sub>use Last Frame Chain, and put shared style/sound text in COMMON Prompt</sub>|
| [MiniMax H3] 생성 후 VRAM이 안 내려감<br><sub>VRAM stays high after a run</sub>| 실행이 끝나면 자동 해제됩니다. 즉시 비우려면 상단 🗑 버튼<br><sub>freed automatically when a run ends; 🗑 in the top bar frees it now</sub>|
| [전체] 워크플로우를 열었는데 설정이 기본값<br><sub>settings are default after opening a workflow</sub>| v1.10.0 이전에 저장한 워크플로우입니다. 그때는 설정이 파일에 담기지 않았습니다 — 다시 설정하고 저장하면 이후로는 유지됩니다<br><sub>saved before v1.10.0, when settings were not stored in the file</sub>|
폴더 구조
Folder Structure
ComfyUI/
├── custom_nodes/
│   └── ComfyUI-TJ_NODE_STUDIO_ONE/     ← 이 패키지
│
└── models/
    ├── diffusion_models/         ← UNet / DiT 메인 모델 (전체 노드)
    ├── text_encoders/            ← CLIP / Qwen / Gemma / Krea2 인코더
    ├── vae/                      ← VAE (전체 노드)
    ├── loras/                    ← LoRA (Faceswap BFS, Lightning, Angle 포함)
    ├── controlnet/               ← ControlNet Union (Z-Image)
    ├── ultralytics/
    │   └── bbox/                 ← face_yolov8m.pt 등 (Z-Image Face Redraw)
    ├── background_removal/       ← BiRefNet 모델 (Z-Image RE-BG)
    ├── upscale_models/           ← ESRGAN 계열 (SDXL Upscale · MiniMax H3 Upscale)
    └── SEEDVR2/                  ← SeedVR2 DiT + VAE (전체 노드 Upscale)
MiniMax H3는 위 폴더들을 그대로 씁니다 — UNET 2종은 diffusion_models/, 텍스트 인코더는 text_encoders/,
영상 VAE와 오디오 VAE 두 개 모두 vae/, Turbo LoRA(선택)는 loras/.
결과물은 output/one_minimax_h3/ 아래에 모입니다:
output/
└── one_minimax_h3/
    ├── MMH3_clip001_*.mp4        ← 클립별 결과 (항상 저장)
    ├── MMH3_full_*.mp4           ← 합본 (스티치를 켠 경우)
    ├── frames/                   ← 각 클립의 마지막 프레임 PNG (체인·노드 IMAGE 출력용)
    └── metadata/                 ← 클립별 사이드카 JSON (생성에 쓰인 프롬프트 등)
감사의 말 (Acknowledgements)
Acknowledgements (Acknowledgements)
이 패키지의 핵심 아이디어와 기본 구조는 yanokusnir-ai 님의 오픈소스 프로젝트에서 영감을 받아 탄생했습니다. The core idea and basic structure of this package were inspired by yanokusnir-ai open-source project..
one-node-flux-2-klein
— 단일 노드에서 Flux.2 Klein을 올인원으로 다루는 핵심 아이디어의 원작 — the original project behind the core idea of handling Flux.2 Klein as an all-in-one solution within a single node
TJ NODE STUDIO ONE 패밀리(Z-Image · Klein · QE2511 · Krea2)는 이 아이디어를 기반으로 다중 모델·다중 모드로 확장한 파생 작업입니다.
TJ NODE STUDIO ONE family(Z-Image · Klein · QE2511 · Krea2) is a derivative work that expands this idea to multiple models and multiple modes.
원작자의 기여와 오픈소스 정신에 진심으로 감사드립니다. 🙏
We sincerely thank the original author for their contribution and open-source spirit.. 🙏
Some TJ_NODE systems were rebuilt and extended based on concepts inspired by:
-
TooBusy Nodes - 너무바쁜베짱이
-
TooBusy Nodes - TooBusy Grasshopper https://github.com/designloves2/toobusy<br> https://www.youtube.com/@%EB%84%88%EB%AC%B4%EB%B0%94%EC%81%9C%EB%B2%A0%EC%A7%B1%EC%9D%B4<br>
-
comfyui-deno-custom-nodes https://github.com/Deno2026/comfyui-deno-custom-nodes<br> https://www.youtube.com/@Denoise-AI<br>
-
RebelsPromptEnhancer node https://github.com/designloves2/RebelsPromptEnhancer<br> https://www.youtube.com/@realrebelai<br>
Several nodes were heavily reworked and integrated into the TJ wireless workflow architecture.
MiniMax H3 🧪
- Comfy-Org/MiniMax-H3 — 모델 / models
- duckyshell/ComfyUI-MiniMaxH3-FirstBlockCache — 스텝 재사용 캐시 / step-reuse cache
- PlagueKind/ComfyUI-PlagueKind-Nodes — H3 SLA Attention (블록-스파스) / H3 SLA Attention (block-sparse)
- designloves2/ComfyUI-sol-attn — H3 Sol 어텐션 · Fused Modulation / H3 Sol attention + AdaLN fusion (원 저장소 삭제되어 미러 / original repo deleted, this is a mirror)
- Larryvrh/ComfyUI-MiniMax-H3-Turbo — Turbo LoRA · 샘플러 / turbo LoRA + sampler
- kijai/ComfyUI-SolAttn_triton — SolAttn 가속 / acceleration
- xmarre/ComfyUI-Spectrum-MiniMax-H3 — Spectrum 가속 / acceleration
- kijai/ComfyUI-KJNodes — 라이브 프리뷰 / live preview
- Kosinkadink/ComfyUI-VideoHelperSuite — 레퍼런스 비디오 입력 / reference video inputs
- Comfy-Org/Nvidia_RTX_Nodes_ComfyUI — RTX Video Super Resolution
- lihaoyun6/ComfyUI-FlashVSR_Ultra_Fast — 타일 기반 디퓨전 VSR / tiled diffusion video super-resolution
- shootthesound/ComfyUI-Fizgig-H3-Still — 진짜 1프레임 H3 latent + 디코드 / true single-frame H3 latent + decode
Krea2 ControlNet
- Krea-2-controlnet — Thanks to Tanmaypatil123 for documenting the reference Krea2 control-LoRA inference pipeline.
- Patil/Krea-2-depth-controlnet — Thanks for providing the public depth Control LoRA weights.
- facok/comfyui-krea2-controlnet — Thanks for the ComfyUI Krea2 Control LoRA node implementation used in this project.
라이선스
License
MIT License · TJ NODE STUDIO ONE