
comfyui-daz-tools
A collection of ComfyUI utility nodes. The Workflow Config nodes (WAN2.2 and LTX2.3) let you store multiple named presets — models, LoRA stacks, prompts, dimensions, and sampling parameters — and switch between them from a single dropdown, making it easy to test variations, manage scene setups, and iterate across versions without rebuilding your workflow or creating and maintaining multiple copies of it. Additional nodes: Lora Inspector (scans and displays safetensors metadata for any LoRA in your library), Check Null (detects null, None, NaN, or empty values), Null Audio Checker (detects silent/missing audio tracks from video inputs), and Abs Int (absolute value for integers).
Nodes (16)
The one-line math node that saves you a converter
Ask 'did that node actually return something?'
The boring node that stops your audio and frames disagreeing by a hair
The grid that tells you your take loaded the right clips
Untangling the daz config nodes' one fat media wire
A tiny timeline editor for laying audio onto your video, inside ComfyUI
Read any LoRA's training card without leaving ComfyUI
Document your workflow on the canvas, where you can actually see it
Did that generated video actually get an audio track?
A prompt playlist that advances one cue per cycle while you autopilot
The unpacker that makes prompt stacks actually usable
Save a whole still-image setup as one dropdown
The LTX 2.3 flavor of the same scene switcher
Stop rewiring your LTX workflow every time you switch takes
The same scene system, pointed at MiniMax's H3
Save a whole Wan 2.2 setup as one dropdown
comfyui-daz-tools

ComfyUI custom nodes by deny azzolin.
Installation
Install from Github...
cd ComfyUI/custom_nodes
git clone https://github.com/denyazzolin/comfyui-daz-tools
...and restart ComfyUI.
You can also install using the ComfyUI Manager. Look for comfyui-daz-tools
Nodes
Workflow Config WAN2.2 (utils) · Workflow Config LTX2.3 (utils) · Workflow Config LTX2.5 (utils) · Workflow Config Image (utils) · Workflow Config MiniMaxH3 (utils)
[!CAUTION] Breaking change in v5. The audio track of a video slot now comes out on its own Media Splitter outputs,
audio_from_video1andaudio_from_video2, instead of on the regularaudio_1/audio_2outputs. A workflow that takes a video's sound fromaudio_1oraudio_2must be rewired to the new outputs, and older Media Splitter nodes must be deleted and added again to show them. This mostly affects MiniMax H3 REF2VA workflows. See A video's own audio.
These nodes let you store named workflow configurations "scenes" — models, prompts, dimensions, LoRAs, and sampling parameters — and switch between them using a dropdown. When you select a scene, the node loads all the models, vae, loras, etc and sends every value downstream automatically for you to wire to your ComfyUI workflows. There is no need to rewire anything when switching between scenes in a given workflow.
The configs are mapped in this way:
- Movies are actual json files holding the scene configurations (see more below)
- Each movie file can have multiple scenes, they are the main data with all loras, models, prompts, etc
- Each scene can have multiple takes, with their own prompts, models, etc. They are effectively "versions" of a given scene. Each scene has at least one take.
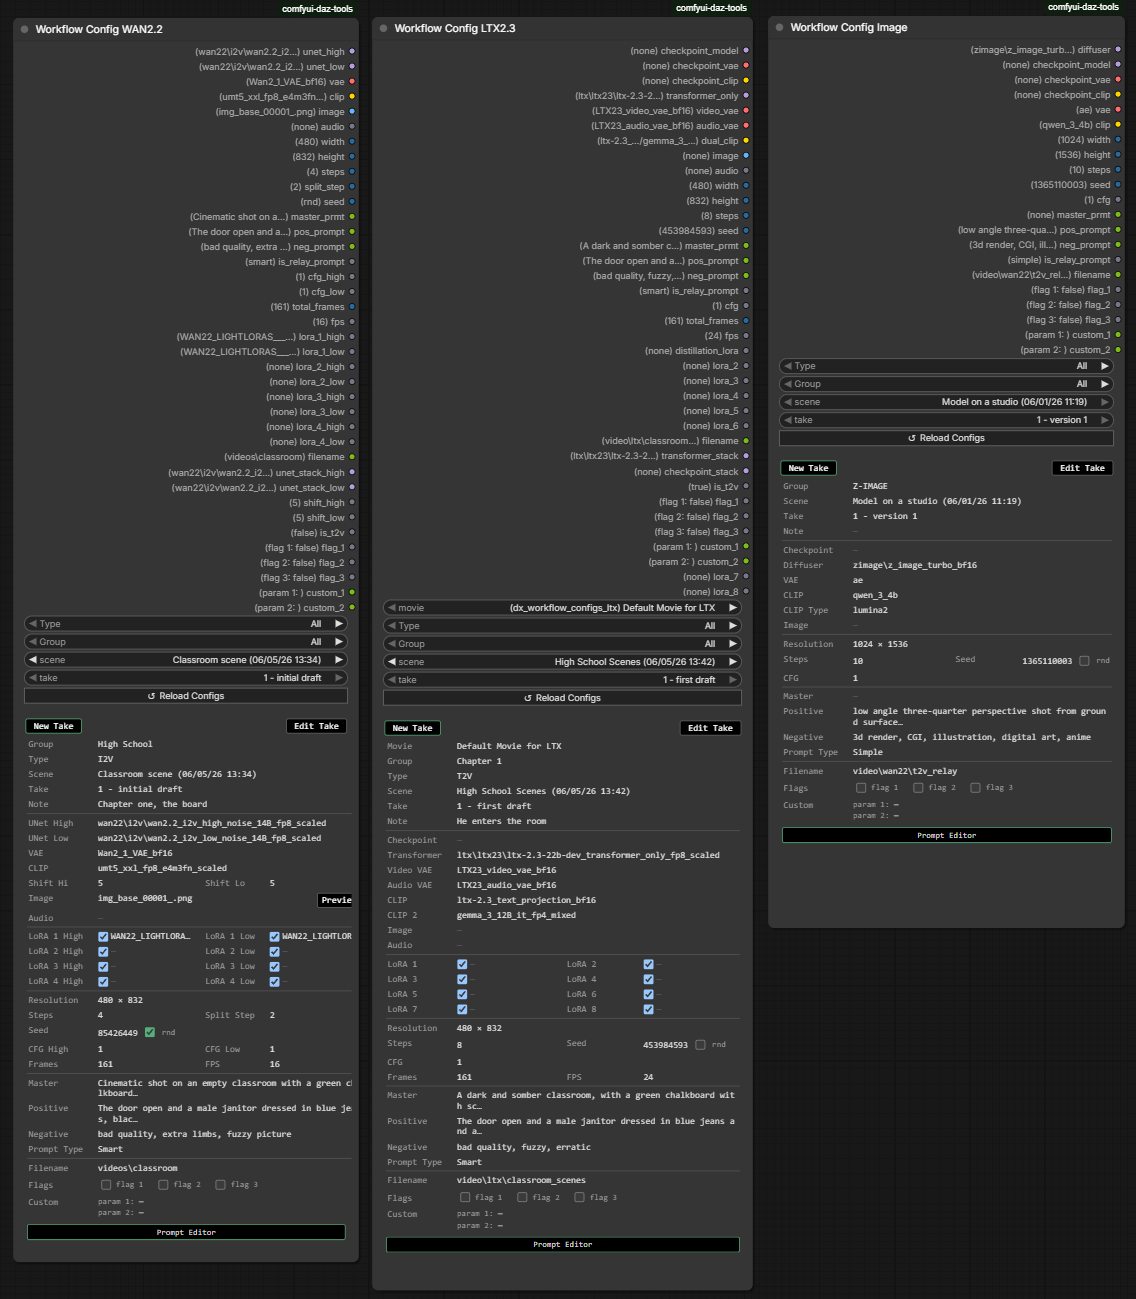
Movie files
Movie files are stored as dx_*.json files inside ComfyUI/user/default/workflows/.dx_mgr/. A default movie file (dx_workflow_configs.json) is created automatically the first time you add a preset through the node UI.
You can have as many movie files as you like — any dx_*.json file in that folder is picked up automatically, and a movie dropdown appears when more than one file exists. Each file can hold scenes for any node class (WAN2.2, LTX2.3, etc.), and each node shows only its own class entries. Use multiple files to organise movies and scenes by project, client, style, or any other grouping.
Custom location: To store movie files somewhere else, create
dx_root_dir_config.jsonin the plugin folder (custom_nodes/comfyui-daz-tools/) with the key"workflows_root_dir"pointing to your preferred path. An annotated example is included asdx_root_dir_config.example.jsonc.
Movie Manager
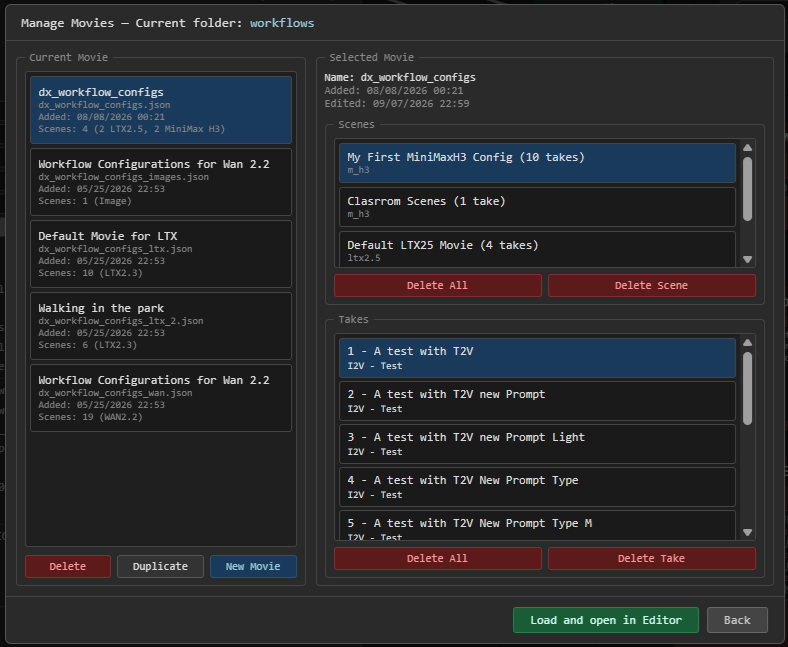
Click the Movie Manager button on any WorkflowConfig node to open a full-screen popup for managing movie files across all node classes at once — not just the ones matching the node you opened it from.
The popup has two panels:
- Current Movie (left) — every
dx_*.jsonfile found, with name, filename, and scene counts. Buttons let you Delete, Duplicate, or create a New Movie file. - Selected Movie (right) — the chosen file's Scenes (any class, not just the current node's) and, nested inside, that scene's Takes. Each take also shows its type/group and note. Buttons let you delete a single scene/take or all scenes/all takes at once.
All destructive actions ask for confirmation first, and the popup stays open and refreshes in place after every change so you can keep working without reopening it.
Load and open in Editor applies the selected movie/scene/take to the node and opens the edit panel on it — this is how you switch a node to a scene stored in a different movie file. If the selected take belongs to a scene of a different class than the node you opened the Manager from, a warning pops up first (since the node won't be able to load that take's data). Continuing anyway still switches the node to that movie file and shows the node's normal empty state with a Create button — letting you create a brand-new scene for the node's class right there, which is handy for reusing an existing movie file across classes instead of creating a new one just to hold a different class's scenes.
Back closes the popup without loading anything, reconciling the node's dropdowns to whatever still exists on disk (in case something was deleted while the Manager was open).
Filters
Five possible filters at the top of the node let you narrow down which scenes/takes are shown:
- Movie - filter among movie files found (only visible if more than one file with scenes for the node's class are found)
- Type — filter by workflow type:
All,I2V(image-to-video),T2V(text-to-video), orMULTI, or none. - Group — filter by a custom group name you assign to presets, or
Allto show everything. - Scene - Selects which scene to load
- Take - selects which take of the selected scene to load.
Filters check across all takes of a scene, so a scene that has both an I2V and a T2V version (in the case of videos) appears under both type filters. The take dropdown also updates to show only matching takes.
What each node stores
All five nodes share a common set of configurable fields:
| Field | What it controls |
|---|---|
| Name / Group / Type | How the preset is identified and filtered |
| Label | Optional short label shown in the take dropdown (e.g. 2 - cinematic) |
| Note | Free-form note (up to 900 characters), shown on the node while in use |
| Image | Reference input image — a filename inside ComfyUI's input folder, or an absolute path |
| Audio | Reference input audio — a filename inside ComfyUI's input folder, or an absolute path. When set, the node outputs the decoded audio on the audio output for use downstream |
| Width / Height | Output frame dimensions. On the four video nodes these are the input to the Dimensions and More rule below, which decides what the width and height outputs actually report |
| Use media size / Reference media / Scale | On WAN2.2, LTX2.3, LTX2.5 and MiniMax H3 only — governs the size outputs and which media get resized. See Dimensions and scaling |
| Extended media | Extra named images, videos and audio the take carries alongside the single Image and Audio slots above. On the four video nodes only — see Extended media |
| Steps | Number of denoising steps |
| Seed | Sampler seed. Enable Randomize to pick a new seed automatically on every run |
| Duration (s) | Editor-only helper on the WAN2.2, LTX2.3, LTX2.5 and MiniMax H3 nodes: type a length in seconds — or hit one of the 5 / 7 / 10 / 15 / 20 quick buttons (no 20 on MiniMax H3) — and Total frames is recalculated for you. The quick button matching the current duration stays highlighted; type anything else and none of them are. Editing Total frames or FPS updates Duration back the other way. FPS must be set first; with FPS at zero the field reports FPS is not defined and leaves the frame count alone. How the two convert depends on the node — see Duration and frame counts |
| Total frames / FPS | Video length and playback speed |
| Master prompt | Base text combined with the positive prompt (see Prompts below) |
| Positive / Negative prompts | Conditioning text sent to the sampler |
| LoRA slots | Up to 8 LoRA slots, each with a model name, strength, and enabled toggle. Disabled or empty slots are skipped automatically |
| Filename | Output path, relative to ComfyUI's output folder. It is cleaned so it works on Windows, Linux and macOS: backslashes become /, characters Windows refuses become _, and .., a leading / or a drive letter are dropped so the path stays inside the output folder. Tick Use take's name to replace the file name (the last part of the path) with the take's version and label, made safe for any OS — video/h3/tests/video on take 4 "Jennifer Scene 1 - Test" becomes video/h3/tests/4_Jennifer_Scene_1-Test |
| Flags 1 / 2 / 3 | Three boolean toggles with configurable labels — useful for routing or switching behaviour downstream |
WAN2.2 additionally stores:
| Field | What it controls | |---|---| | UNet High | Diffusion model used for the high-quality pass (supports GGUF — see GGUF unet loading) | | UNet Low | Diffusion model used for the low/draft pass (supports GGUF — see GGUF unet loading) | | VAE | Video VAE | | CLIP | Text encoder | | Split step | The step at which the sampler switches from the high to the low model | | CFG High / CFG Low | CFG scale for each model pass | | Shift High / Shift Low | Timestep shift applied to the high and low model passes respectively (default 5.0). Equivalent to ComfyUI's ModelSamplingSD3 node |
LoRA slots in WAN2.2 are arranged as 4 High/Low pairs, so each LoRA can be applied independently to each model pass. The node outputs a ready-to-use model stack for each pass (unet_stack_high and unet_stack_low) with all enabled LoRAs applied and the timestep shift already patched in — connect those directly to your sampler. Shift is applied automatically inside these stacked outputs. WAN2.2 and MiniMax H3 are the two nodes that patch a shift into their stacked output — the LTX2.3, LTX2.5 and Image nodes have no shift field at all. What the two patch in differs: WAN2.2 sets a timestep shift per model pass, MiniMax H3 a video/audio flow shift pair on its single model.
LTX2.3 additionally stores:
| Field | What it controls |
|---|---|
| Checkpoint | A combined model file that includes the diffusion model, CLIP, and VAE in one |
| UNet / Transformer | Standalone diffusion model, used when not loading from a checkpoint (supports GGUF — see GGUF unet loading) |
| Video VAE / Audio VAE | Separate VAE models for video and audio |
| CLIP / CLIP 2 | Primary and secondary text encoders |
| Latent Upscaler | Latent upscale model from models/latent_upscale_models, loaded through ComfyUI's Load Latent Upscale Model node and exposed on the latent_upscaler output. Optional — leave it on none and the output is empty |
| CFG | CFG scale |
You can fill in either the checkpoint path or the standalone model paths — both sets of outputs are available on the node. The node outputs a ready-to-use model stack with all enabled LoRAs already applied for both the standalone transformer and the checkpoint model.
Workflow Config LTX2.5 targets LTX v2.5. It drops the checkpoint loader and the second CLIP slot that LTX2.3 needs — LTX2.5 ships a single text encoder file (gemma4-12b-with-proj-…) that already contains the text-embedding projection weights LTX2.3 keeps in a separate file. Otherwise it matches LTX2.3: video/audio dual-VAE split, reference image and audio inputs, single CFG, and 8 LoRA slots.
| Field | What it controls |
|---|---|
| Transformer | Diffusion model (supports GGUF — see GGUF unet loading) |
| Video VAE / Audio VAE | Separate VAE models for video and audio, both loaded from models/vae |
| CLIP | Single text encoder (loaded with the LTXV CLIP type) |
| Latent Upscaler | Latent upscale model from models/latent_upscale_models, loaded through ComfyUI's Load Latent Upscale Model node and exposed on the latent_upscaler output. Optional — leave it on none and the output is empty |
| CFG | CFG scale |
The node outputs a ready-to-use model stack (transformer_stack) with all enabled LoRAs already applied.
Workflow Config Image is designed for still-image pipelines. It has no LoRA slots, no audio field, and no video parameters (frames / FPS). The Type filter is also not shown — all scenes/takes are listed regardless of type.
| Field | What it controls |
|---|---|
| Checkpoint | A combined model file that includes the diffusion model, CLIP, and VAE in one |
| Diffuser | Standalone diffusion model, used when not loading from a checkpoint (supports GGUF — see GGUF unet loading) |
| VAE | Standalone VAE |
| CLIP | Standalone text encoder |
| CLIP Type | The encoder family used when loading the standalone CLIP — one of stable_diffusion, flux, sd3, wan, hidream, chroma, and many others |
| CFG | CFG scale |
| Custom param 1 / 2 | Two free-form string outputs (custom_1, custom_2), each with a configurable label. Useful for passing arbitrary values downstream (e.g. style names, scheduler identifiers, preprocessor flags) |
You can fill in either the checkpoint path or the standalone model paths — all outputs are available on the node regardless of which set is populated.
Workflow Config MiniMaxH3 targets the MiniMax H3 model. Unlike WAN2.2, it has a single UNet/CFG (no High/Low pass split) but keeps the video/audio dual-VAE split, reference image and audio inputs, and 8 LoRA slots.
| Field | What it controls |
|---|---|
| Unet | Diffusion model (supports GGUF — see GGUF unet loading) |
| Video VAE / Audio VAE | Separate VAE models for video and audio |
| CLIP | Text encoder (loaded with the MiniMax CLIP type) |
| CFG | CFG scale |
| Shift Video / Shift Audio | Flow shifts patched into unet_stack — the pair ComfyUI's ModelSamplingMiniMaxH3 node takes as shift_video and shift_audio (12.0 and 3.0 there). Stored as shift_high / shift_low. The model derives the two together, so they are set together or not at all: leave both at 0 and the model comes out unpatched, which is what a take that has never touched them does. Set just one and neither is applied, with a note in the console |
GGUF unet loading
The standalone unet field on each node (UNet High/Low on WAN2.2, UNet/Transformer on LTX2.3, Transformer on LTX2.5, Diffuser on Image, Unet on MiniMaxH3) can point at a GGUF-quantized model instead of a regular .safetensors file. The model dropdown lists regular and .gguf files together; picking a .gguf entry automatically checks the read-only gguf checkbox shown above the dropdown, and the node loads it through ComfyUI-GGUF's unet loader instead of the standard diffusion model loader — no other configuration needed.
Requires the ComfyUI-GGUF custom node package. Without it installed, .gguf files won't be listed, and running a scene configured for GGUF raises a clear error instead of silently falling back.
LoRAs and the shift model patch (WAN2.2 and MiniMax H3) are fully supported on GGUF-loaded unets, same as regular models.
Presets carry the gguf flag along with the model name, so applying a preset with a GGUF model correctly sets the loader to use.
How to start?: hit the New Scene button, which will bring up the editor for you to start creating your scene/take! (if there's presets in place, the editor will ask you to pick one or go anew).
As you create scenes and takes, you may easily just duplicate one to keep working on a separate scene or to bootstrap the creation of a new scene.
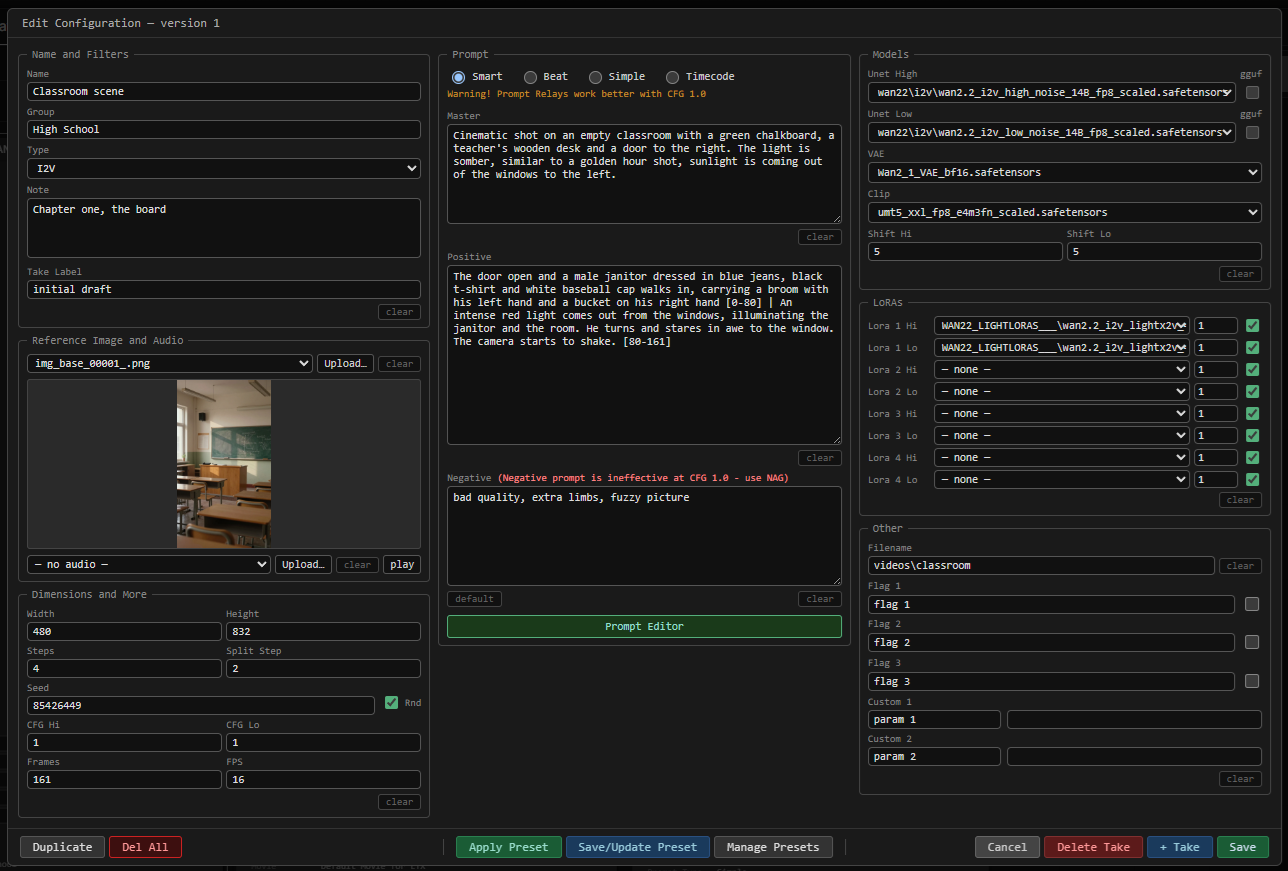
Below is a picture of the scene editor.
Versioned takes
In order to expedite the experimentation with scenes, you can create as many takes as you want. Each named scene can hold multiple takes — independent snapshots of the scene's settings, numbered from 1 and with an optional label. The takes cover all of a scene's settings (like model paths, vae paths, resolution, steps, prompts, loras, etc). So you can vary everything, experiment with new prompts, add other reference images, other loras, etc, all in the context of the same scene.
Each take can have an optional short label shown in the dropdown (e.g. 2 - cinematic). To create a new take, just change whatever you want and hit the "Save as New Take" button — or hit New/Duplicate Take on the node, which opens the editor on the current take and saves it as a new take in the same scene.
Dimensions and scaling
The four video nodes (WAN2.2, LTX2.3, LTX2.5, MiniMaxH3) size their width / height outputs and resize media together, from Use media size, Reference media and the Scale box in the editor's Dimensions and More panel. The Image node has none of them — its Width and Height are what you type. Resizing always uses lanczos.
Two separate choices are involved:
- Reference media picks the one image or video the rule measures — any filled slot in the Reference Image and Audio box, listed as type - label / file (w x h).
- Resize, in the corner of each image and video preview, marks the slots the rule applies to. Any number of them, each scaled against its own size — so a factor of 0.5 halves every marked slot, whatever size each one started at. An unmarked slot is handed to the node untouched. A marked slot shows the size it will come out at in yellow, under its own size, as soon as the rule has a size to give it.
Use media size off — the Width and Height you typed are the input to the scale mode:
| Scale mode | Width / height outputs | Each marked slot | |---|---|---| | None | As typed | Untouched | | Factor | Both multiplied by Scale by | Multiplied by the same factor, on its own aspect ratio | | Longest dimension | Follow the reference media's new size, or scale the typed size if there is no reference | Its longest side becomes the value, aspect ratio kept | | Fit | As typed | Scaled to cover the box and cropped at the centre; media smaller on both axes is stretched instead, so nothing needs padding |
Every size in that table that the rule calculates — the Factor and Longest dimension rows, both the outputs and the marked slots — is then rounded down to a multiple of the divisor picked beside the sizing button. None and Fit calculate nothing: their sizes are the ones you typed, and those are used exactly as typed. Each axis is rounded on its own, so a snapped size can sit slightly off the aspect ratio it came from, and nothing is ever rounded below one whole step.
Use media size on — the outputs are the reference media's own size and the typed values are ignored. Only None and Factor are offered, and a factor scales the outputs and the marked slots together. Unavailable until a reference is picked.
Whenever the size comes from the reference the editor fills the boxes in and shows them read-only; what you typed comes back when it stops. The stored Width and Height are never rewritten by a run.
Extended media
Beyond the single Image and Audio slots, a take can carry named extra media for workflows that need more than one reference — REF2VA on MiniMax H3, MSR on LTX2.3 and LTX2.5, first-frame/last-frame and multi-frame setups anywhere. The four video nodes carry the whole lot on one extended_media output; the Image node has none.
A take has 5 image slots, 2 video slots and 2 audio slots. Image slot 1 and audio slot 1 are the take's own Image and Audio; the rest are the extra ones. Those numbers are the ones the editor shows and the ones the Media Splitter's sockets carry — image slot 3 is always image_3, whatever else is filled.
A slot is a fixed position rather than a place in a list: filling or clearing one never shifts another, gaps are fine, and an empty slot simply outputs nothing. Each slot also carries a name of your own, written in the box beside its clear button — a label for you, which never renames a socket.
A video slot loads a window of the clip, not the whole thing — the two handles under its preview pick which stretch, and a slot left alone loads the clip whole.
Decoded frames are float32 RGB — about 12 bytes a pixel — so a decode also stops at 600 frames or 4 GB, whichever comes first, and says in the console which ceiling it hit.
Resize, the checkbox in the corner of an image or video preview, marks that slot for the take's scale rule — see Dimensions and scaling. Any number of slots may be marked, the take's own reference image included.
Reference media, in the Dimensions and More box, names the one slot the rule measures. It lists every filled image and video slot, and the pick is on the slot: re-picking a file there keeps the rule measuring it, and clearing the slot clears the pick.
A video's own audio
Each video slot also hands on its own sound, on the Media Splitter's audio_from_video1 and audio_from_video2. Include audio, beside Resize in the corner of the video preview, turns it on or off for that slot. For a clip with no audio track the checkbox reads Include silence instead, and the node outputs silence the length of the clip. Either way, an output that's wired always gets an audio, so the workflow doesn't need rewiring when a take swaps one clip for another.
The checkbox is on for every newly loaded clip. The sound is cut to the stretch the video's handles chose, and then fitted to the frames that were actually decoded: padded with silence or trimmed at the tail, never resampled. A track that ends before that stretch starts gives silence, the same as a clip with no track. MiniMax H3 fits it to a whole number of its 40 Hz audio tokens, and the other nodes fit it to the clip's duration. The console reports each fix, and each clip that got silence.
The Reference Image and Audio box in the editor is where all of it is set. Three tabs — Images, Audio, Video — switch what the box is showing, always opening on Images. Images and Video each show a row of numbered slot buttons above one picker and one preview: the button picks the slot, the picker and the Upload… and clear buttons act on whichever slot is showing, and Resize in the corner of the preview marks that slot for the take's scale rule — with Include audio beside it on a video. A slot button's number is grey while that slot is empty, so the row says what is filled without clicking through it. Each preview reports the size of what is in it in the top corner — and, under that in yellow, the size the take's scale rule will resize it to, whenever the slot is marked Resize and the rule has a size to give it. Each also carries a name box beside clear. A video preview plays and pauses when clicked and loops when it reaches the end, and reads the rate, frame count and frame size off the file itself — all three belong to the clip, so none is stored in the take. Under it, two handles pick the stretch the take uses: dragging one stops playback and shows the frame under it, and the preview then plays that stretch alone. Picking, uploading or clearing a file hands them back the whole clip. Only the slot on screen streams, so the preview buffers the whole clip ahead of the playhead without a second slot competing for it. Audio has no preview or slots to switch: both lines are shown together, each framed with its own number, picker, upload, clear, name and a play button that toggles to stop while it is sounding.
Duration and frame counts
Duration (s) is never stored — only Total frames and FPS are, and the duration is parsed back from them every time the editor opens. Each node converts the two its own way:
| Node | Duration → Total frames |
|---|---|
| WAN2.2, LTX2.3, LTX2.5 | duration × fps + 1, counting the first frame |
| MiniMax H3 | padded up to the next count where (frames - 5) ÷ 17 is whole, the grid the model renders best on — at 24 fps that is 5s → 124, 7s → 175, 10s → 243, 15s → 362 |
You can always type a frame count of your own; the duration follows it. Parsing back aims to reproduce the duration originally entered rather than to divide, so a clip asked for as 5s reads as 5s and not as the fraction its frame count divides into. Rounding shows up at values the formula would not have produced — a hand-typed frame count, a fractional duration, or MiniMax below 17 fps — where the duration reported may differ slightly from what was entered.
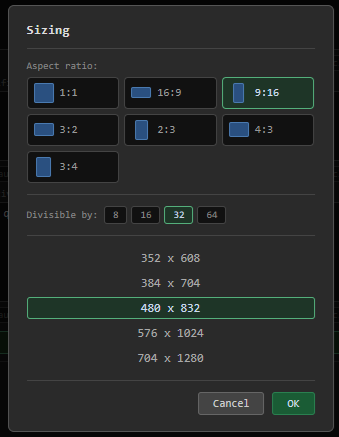
The Sizing dialog
The sizing button beside Width and Height opens a picker of known-good resolutions: choose an aspect ratio (1:1, 16:9, 9:16, 3:2, 2:3, 4:3, 3:4), choose what the result must divide by (8, 16, 32, 64), and take one of the six sizes offered. On WAN2.2 and MiniMax H3, a size in green is one the model publishes as native; the other nodes have no such list and show none. OK writes the pair into Width and Height, Cancel discards — nothing else closes the dialog. It opens on the current size if that size is in the list, otherwise on 9:16 ÷32, and is disabled while the size is being derived from the image.
The 8 / 16 / 32 / 64 buttons beside it are the divisor the scale rule rounds its calculated sizes down to — see Dimensions and scaling above. They are toggles: clicking the lit one turns the divisor off, which is the only way to reach 0, so there is no button for it. New takes start on 32. The Image node has no scale rule and so has no buttons.
A yellow ! not /X flags a Width or Height that is not a multiple of the divisor, and says nothing while the divisor is off. Advisory only — it fires on sizes the rule does not round, which is exactly the ones you typed yourself.
Managing prompts
Each scene/take stores three prompt fields — Master, Positive, and Negative — along with a Prompt Type that controls how the positive prompt is structured, plus an optional Qualifiers (trail) prompt that's appended to the end of the positive prompt after a blank line when the workflow runs. Master and Qualifiers each have a Default button (fills in a class-specific default template, when one is defined for the node's class/type) next to their Clear button.
| Type | How it works |
|---|---|
| Smart | The positive prompt is split into pipe-separated segments, each covering a frame range (text [start-end] \| text [start-end] \| …). A downstream Prompt Relay node handles distribution across frames. Best used with CFG ≈ 1.0. |
| Beats | Segments are aligned to time ranges in seconds ([start-ends] text, one per line). Frame counts are derived from FPS automatically. |
| Timecode | Segments are aligned to absolute start times ([MM:SS] text, one per line). Each marker is the segment's start time; frame counts are derived from the gap to the next marker (or the end of the video) using FPS. |
| H3 | One segment per line. The first segment opens with [Shot 1] and carries no time; every later one starts with its start time, At MM:SS.mmm, text (two-digit minutes and seconds, three-digit milliseconds). Tick is Shot on a segment in the editor and it also gets a [Shot N] in front of its time — shots are numbered in order on save. Each segment's text gets a trailing period if it doesn't already have one. Frame counts are derived the same way as Timecode; a [Shot N] with no time after it splits the frames evenly. Parsing back starts a segment at every [Shot N], wherever it sits in the line, and at every line that starts with a time mark. The comma after the time is required, and the old At X.Ys, marks are still read, so saving rewrites them in the new format. When the prompt has section labels, only a [Shot N] under integrated_multimodal_description: or detailed_description: starts a segment — those under subject_definitions:, summary: and the like stay as text. A prompt saved as another type is never read as H3. |
| Simple | A single flat text string passed as-is. |
For Simple, Beats, Timecode, and H3 types, the Master prompt is combined with the positive prompt before it reaches the sampler. An Append checkbox lets you switch the Master to go after the positive text instead of before (the default). For Smart, the positive text goes to the relay as-is, and the Master is available as a separate output.
Prompt Editor
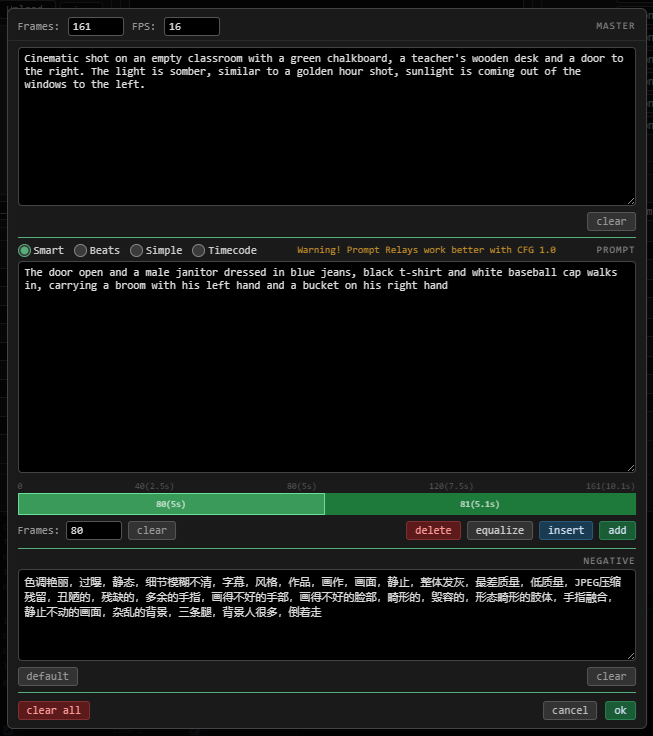
Click Prompt Editor inside the edit panel to open a full-screen editor. It loads the current Master, Positive, Negative, Qualifiers, total frames, and FPS values and lets you work with them visually.
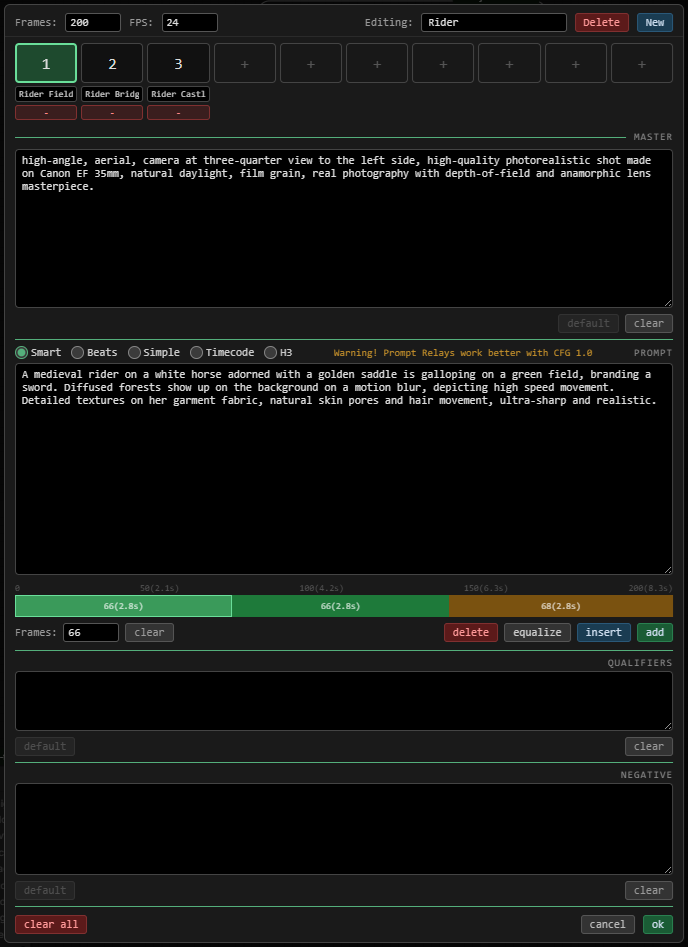
- Frames / FPS — changing Frames rescales all segment lengths proportionally; changing FPS updates the time labels on the ruler.
- Master — free-form text area. A Default button (left of Clear) fills in a class-specific default template, when one is defined for the node's class — currently only MiniMax H3, whose default varies by I2V/T2V/MULTI workflow type. For Beats, Timecode, H3, and Simple, an Append checkbox next to it sets whether the Master goes before or after the positive prompt.
- Prompt type — switch between Smart, Beats, Timecode, H3, and Simple. Switching converts existing segments where possible (e.g. Beats → Simple merges all segment texts into one block). Switching to H3 from another type also takes a pasted full prompt apart: the text before the
[Shot 1]that opens the first segment is added to the end of the Master, and the last segment's text fromoverall_soundscape:ornon_diegetic_music:onward is added to the front of the Qualifiers — so a full prompt pasted as Simple is split up just by selecting H3. - Paste Special — shown for every type but Simple. Opens a box to paste a full prompt of the current type, which then replaces the Master, the segments and the Qualifiers. For Beats and Timecode, the text before the first mark goes to the Master and the first blank line after the last mark starts the Qualifiers; for Smart, the Master ends at the last blank line before the first segment and the Qualifiers are whatever follows the last
[X-Y]. Tick segments only to replace just the segments and leave the Master and the Qualifiers alone. A popup asks before anything is replaced; if none of the type's marks are found, it offers to put the whole text into a single segment instead. Pasted times are kept as they are, with a warning when they run past the prompt's frames. H3 is described under H3 Paste Special below. - Segment bar — a horizontal bar showing each segment as a proportional colour-coded block. Click any block to select it; the active segment is highlighted in green.
- Frame ruler — marks 0%, 25%, 50%, 75%, and 100% of total frames. When FPS is set, labels include both frame number and seconds (e.g.
40 (2.5s)). - Segment text — edit the text for the selected segment.
- Segment controls — set the exact frame count, clear the text, delete the segment, or equalize all segments evenly. Insert adds a new segment right before the selected one; Add appends one at the end. Both fill any remaining space first; once the timeline is full, they instead carve out a one-second segment (based on FPS) and proportionally rescale every other segment to preserve its relative timing (minimum 1 frame each).
- Qualifiers — free-form text area for the trail prompt, with its own Default button (same class-specific-template mechanism as Master) aligned to the left, like Negative's. When re-opening a saved prompt, text at the end of the last segment that matches the saved Qualifiers text (after a newline) is stripped back out so it isn't shown duplicated inside the segment.
- Negative — free-form text area with a Default button that fills in a class-specific default negative prompt, when one is defined.
- Clear All — resets Master, Positive, Negative, and Qualifiers to empty and collapses to a single segment.
- Show full Prompt — opens the Paste Special box with the full positive prompt the node outputs: the Master (before or after, per its Append setting), the segments written out in the prompt's type, and the Qualifiers, each separated by a blank line. Smart leaves the Master out, as the node relays it separately. copy puts the text on the clipboard and closes the box; segments only is greyed out.
- Undo — first discards the edits made since the editor opened, then steps back through the prompts saved earlier with OK, one at a time. The history is kept in memory for the browser session — per take, per edit panel and per prompt-stack slot — so you can click OK, reopen the editor and still undo; it is lost on a page reload. Cancel drops an undo that was not saved, and a prompt changed outside the editor starts a fresh history. It covers Master (with its Append setting), Positive with its type, Negative and Qualifiers, but not Frames or FPS.
Clicking OK sends all values back to the edit panel. It does not save to disk — use Save or + Take in the edit panel to persist.
H3 Paste Special
Paste Special on an H3 prompt takes a full structured prompt, such as the REF2VA or FL2VA ones, and splits it in three:
- Master — everything before the first segment mark:
subject_definitions:,summary:,retention_analysis:and thedetailed_description:(orintegrated_multimodal_description:) label with any text that follows it before[Shot 1]. The Master is set to go before the positive prompt. - Segments — from the first mark to the end of the shot section. The first mark is usually
[Shot 1], but a line starting withAt MM:SS.mmm,works too. A new segment starts at every later[Shot N]and at every line that starts with a time mark, exactly as when an H3 prompt is read back (see the H3 row above). - Qualifiers — the section labels that close the shot section,
overall_soundscape:andnon_diegetic_music:, through the end of the text.
Which [Shot N] count as marks depends on the labels. With a detailed_description: or integrated_multimodal_description: label, only the ones inside that section do, so a [Shot 1] mentioned under retention_analysis: stays in the Master. Without one, but with labels before the first shot, only a [Shot N] that starts a line counts. Without labels at all, every [Shot N] does, and the Qualifiers start at the first overall_soundscape: or non_diegetic_music:.
The pasted times are kept exactly, snapped to frames at the prompt's FPS; if the last segment starts at or past the prompt's frames, a warning says so and the segments are left running past the end. When no [Shot N] or time mark is found at all, a popup offers to Continue, putting the whole text into one segment and leaving the Master and Qualifiers as they are, or Stop, going back to the paste box with the text still in it. Saved straight away, a pasted prompt comes out as it went in, apart from the blank line the editor puts between the section label and [Shot 1].
Edit mode
Open the full-screen edit panel by clicking the node's Edit Take button (or double-clicking the node on the canvas).
The panel has three columns:
- Left: Name, Group, Type, Note, reference image and audio, dimensions, seed, CFG, frames, and FPS.
- Center: Prompt Type selector, Master / Positive / Qualifiers / Negative prompts, and the Prompt Editor button.
- Right: Model selectors, LoRA slots (name, strength, enabled toggle), filename, and flag labels.
| Button | What it does | |---|---| | Save | Overwrites the current take with the panel values | | + Take | Saves the current panel as a new auto-numbered take | | Duplicate | Copies this preset — you can duplicate all takes, just the current take, or add a new take to the same preset. If there are unsaved changes, prompts to save or discard first | | Delete Take | Removes the current take (removes the entire scene if it is the last take) | | Del All | Deletes the entire preset and all its versions | | Cancel | Returns to use mode; prompts to discard if there are unsaved changes |
Name conflicts — if saving or duplicating would clash with an existing preset name, a popup offers to cancel or auto-rename (appends _alt + 4 random digits).
Rename warning — saving with a changed name applies to all versions in the preset; a confirmation popup appears before proceeding.
Use mode — when not in edit mode, the node shows a summary of the active take, including its movie (when more than one file is loaded), group, type, scene, take, and note. LoRA enabled toggles and flag toggles can be changed directly from use mode without opening the edit panel, and save immediately.
When no presets exist yet, the node shows an empty state with a centred Create button.
Errors and warnings — after a run, the use-mode panel shows what the node reported, under the Prompt Editor button, with the same text the console got:
- Red — the error the run stopped on, for example a scene that could not be loaded because the movie file is missing or unreadable. An error that didn't come from these nodes only says the run failed and points at the console.
- Yellow — a model field the take leaves empty. That is allowed, since the node outputs nothing for it, but whatever is wired to that output will fail. On LTX2.3 the checkpoint and transformer stand in for each other, and the two CLIPs load as one, so each pair only warns when both are empty.
The messages belong to the scene and take that ran: picking another one hides them, and the next run replaces them.
Preset library
The preset library is a shared collection of model-and-parameter templates (dx_workflow_presets.json inside .dx_mgr/). Presets are not tied to any single workflow — they capture a node's key settings (models, dimensions, CFG, type, etc.) and can be applied to any config of the same class. This makes spinning up a new scene significantly faster: instead of filling in every field from scratch, you pick a preset and the edit panel is pre-filled in one click.
For WAN2.2, LTX2.3, LTX2.5, and MiniMax H3, presets also carry the full LoRA setup — all 8 slots, including empty/disabled ones. Applying a preset overwrites all of the current config's LoRA slots, so the pre-filled panel always reflects exactly the preset's LoRA setup rather than a merge with whatever was there before.
Presets also carry the 3 flag toggles and 2 custom params, labels included, for all node classes. Presets carry the Qualifiers (trail) prompt alongside Master/Positive/Negative for every node class.
For WAN2.2, LTX2.3, LTX2.5, and MiniMax H3, presets carry Total frames and FPS as well — applying one re-derives the editor's Duration (s) from them. Those four also carry the Use media size, Scale and divisor settings (see Dimensions and scaling) — but not Reference media, which names one of the take's own slots and so stays as the take had it; applying one re-checks the rest against the config being edited, so a preset saved with Use media size on lands with it off if the config has no reference picked. LTX2.3 and LTX2.5 presets additionally carry the Latent upscale model. The Image node has no frame count, FPS, or reference image, so its presets carry none of these.
Presets saved before these fields existed simply do not include them, and applying such a preset leaves the corresponding fields in the panel untouched rather than zeroing them.
Three buttons in the edit panel footer give access to the library:
Apply Preset — opens a browser showing all saved presets for this node class (every class except Image includes a type filter). Select a preset and click Apply to write its values into the current edit panel. When you create a new config and presets already exist for that class, this browser opens automatically.
Save / Update Preset — opens the same browser with three actions:
- Update the Version — overwrites the selected preset version with the current config's values.
- Save as new Version — saves the current config as an additional numbered version under the same preset name.
- Save as New Preset — opens a form to name the new preset, choose its type (every class except Image), add an optional version label and note. All model and parameter values are captured from the current config automatically. Saving is blocked if a preset with the same name already exists at version 1 for this class.
Manage Presets — opens the browser in delete mode. You can remove a single version or the entire preset and all its versions.
Prompt Stack Manager (utils) · Prompt Stack Splitter (utils)
A prompt stack is a library that can hold an arbitrary collection of named prompt sequences. A sequence is up to 10 ordered slots, each slot a full prompt made of a Master prompt, a Positive prompt (typed as Smart (relay), Beats, Timecode, H3, or Simple — see Managing prompts for what each type means), a Negative prompt, and an optional Qualifiers (trail) prompt appended to the end of the positive prompt after a blank line.
This sequencing is particularly useful for video workflows made up of several sequential parts with their own prompts — e.g. WAN2.2 SVI 2.0 flows — where each part of the video needs its own prompt fed to a downstream sampler/relay in order.
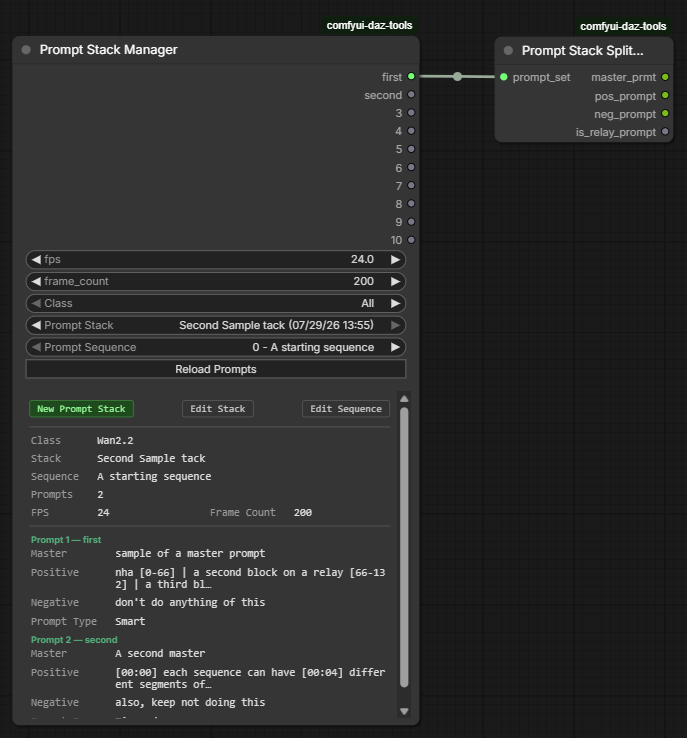
- Prompt Stack Manager stores and edits named prompt stacks, each holding one or more sequences (versions of the stack). It outputs each slot's prompt as a single bundled
DX_PROMPT_SETvalue onprompt_seq_1…prompt_seq_10; slots beyond the sequence's prompt count output nothing (None). A first output,selected_prompt, carries whichever prompt is picked by the Prompt dropdown (or the sequence's first prompt when it's set to All) — handy for wiring a single slot without picking throughprompt_seq_1…prompt_seq_10. - Prompt Stack Splitter takes one
DX_PROMPT_SETinput and unpacks it intomaster_prmt,pos_prompt,neg_prompt,is_relay_prompt, andtrail_prmt(STRING/STRING/STRING/BOOLEAN/STRING), using the same master+positive combination rule as the WorkflowConfig nodes' prompt handling.pos_promptalready has the Qualifiers (trail) prompt merged onto its end;trail_prmtexternalizes that same text on its own for wiring separately. Feed itNone(an unused slot) and it outputs("", "", "", False, "").
Stacks are stored in a single file, dx_prompt_stacks.json inside .dx_mgr/, alongside the movie files. Unlike WorkflowConfig, there's no per-class node or movie-file switching — one node handles every class, and a stack's Class (Wan 2.2, LTX 2.3, LTX 2.5, Images, Krea2, Flux2 Klein 9B, Qwen Image, Chroma, Z-Image Turbo, FLux 2, Wan Image, MiniMax H3, or none) is just an informational tag you can filter by.
Prompt Stack Manager panel
The node has Class (filters the Prompt Stack dropdown), Prompt Stack, Prompt Sequence, and Prompt dropdowns, plus FPS and Frame Count fields (stored per-stack, changing them saves immediately). The panel also shows the stack's ID — a unique string (GUID) assigned automatically when the stack is created, stable across renames, reserved for future referral/integration use. Prompt lists every slot in the active sequence and defaults to All; picking a single slot narrows the read-only panel below to just that prompt (and drives the selected_prompt output) — Master, Positive, Negative, Qualifiers, and Prompt Type for each.
Wiring an upstream STRING into the optional external_prompt input adds an External Prompt entry to the Prompt dropdown; selecting it makes selected_prompt carry the wired text as a Simple positive prompt instead of any stored slot, without saving anything to the stack file (prompt_seq_1…prompt_seq_10 are unaffected). An optional external_negative_prompt input supplies that prompt's negative text — it's not required and defaults to empty if unwired. Selecting External Prompt with external_prompt disconnected or empty raises an error at runtime.
Three buttons above the panel:
| Button | What it does | |---|---| | New Prompt Stack | Opens a small form for a name and class, creates the stack with one empty sequence, and switches the node to it | | Edit Stack | Opens a popup to rename the stack, change its class, Duplicate or Delete it, and manage its sequences — New, Duplicate, Delete, or Edit Sequence (which opens the prompt editor below) | | Edit Sequence | Jumps straight into the prompt editor for the currently active sequence |
The prompt editor for stacks is the same full-screen editor used by the WorkflowConfig nodes' Prompt Editor, opened here in a mode that edits a whole sequence's list of prompts at once (add/remove/reorder prompts, each with its own label, Master/Positive/Negative text, and Prompt Type — Smart/Beats/Timecode/Simple, same rules as described under Managing prompts). Saving there writes the sequence back to the stack file and closes both the editor and the Edit Stack popup. A stack is capped at 10 sequences, and each sequence at 10 prompts, matching the node's fixed 10 outputs.
Media Splitter (utils)
Unpacks the extended_media output of a WorkflowConfig node into one output per slot: image_1…image_5 and video_1…video_2 (IMAGE — a video slot is an image batch of its decoded frames), and audio_1…audio_2 (AUDIO). After preview come audio_from_video1 and audio_from_video2 (AUDIO): each video slot's own sound, or silence for a clip with no track — see A video's own audio. Slots the take left empty output nothing (None), and so does a video slot's audio with Include audio off.
The numbering is the editor's, so image_1 and audio_1 are the take's own reference image and audio — the same ones the WorkflowConfig node puts on its image and audio outputs, ridden along here so a workflow can take every slot off this node instead of reaching back for the first of each. They are handed on, not loaded again, so wiring both costs nothing. A take with no reference image or audio leaves those outputs empty like any other unfilled slot.
The outputs are fixed and slot-numbered, so image_3 is always the take's image slot 3 regardless of what the other slots hold. After a run, each output whose slot has a name is labelled with it, cut to 40 characters. A video's audio output is labelled with the video's name after audio:, as in audio:walk, whether the clip had sound or silence. A slot with no name keeps its socket's own name. See Extended media for what goes into the slots.
When an output that's wired comes out empty, the console names it and says why, for example that the take has nothing in that slot or that Include audio is off for that video.
preview passes the extended_media input on unchanged, for wiring an Extended Media Preview next to the splitter. It keeps working when the splitter is bypassed. The slot outputs get no value then, so a node wired to one of them that requires its input stops the run with a missing-input error.
A Media Splitter saved in a workflow before preview or the audio_from_video outputs were added doesn't show them, because ComfyUI rebuilds a loaded node's outputs from the workflow. Delete the node and add it again, then reconnect its links.
Extended Media Preview (utils)
Shows what a WorkflowConfig node's extended_media output carries, inside the node: every loaded image, the first frame of every loaded video, and a box with a music note for every loaded audio, in that order. Each gets one square cell, up to three to a row, sized to fill the node however it's resized. Empty slots take no cell, so a take with just one extra image shows a single cell and a full one (5 images, 2 videos, 2 audios) a 3-wide grid three rows deep.
Images and frames keep their aspect ratio. Each cell shows the media's name top left (its file name when it has none), its width x height top right for images and videos, and Image, Video or Audio bottom left. The size is what the WorkflowConfig node outputs, so a slot marked for the dimensions rule shows its resized size, and a video's first frame is the first of its trimmed window. Nothing plays; the grid refreshes each time the workflow runs.
AV Sync Fixer (utils)
Fits an audio track to a batch of frames, for frames and audio that come from a loader of their own rather than from a WorkflowConfig take — the same fix the WorkflowConfig nodes apply to a video slot's own audio. A muxed file's audio rarely ends exactly where its frames do, and an encoder that turns both back into latents rejects the pair when the audio comes out a token short or long.
Inputs are images, audio, the clip's fps (a batch of frames carries no rate of its own, so wire the loader's fps output here) and a target: Wan2.2 / LTX2.3 / LTX2.5 fits the audio to the frames' duration at that fps, and MiniMax H3 fits it to a whole number of H3's 40 Hz audio tokens. The frames pass through untouched; the audio is padded with silence or cut at its tail, never resampled. The console says what was fixed and by how much, or that the pair was already in sync. If nothing comes in on images or audio, the node stops and says which one is missing.
Sound Mixer (audio)
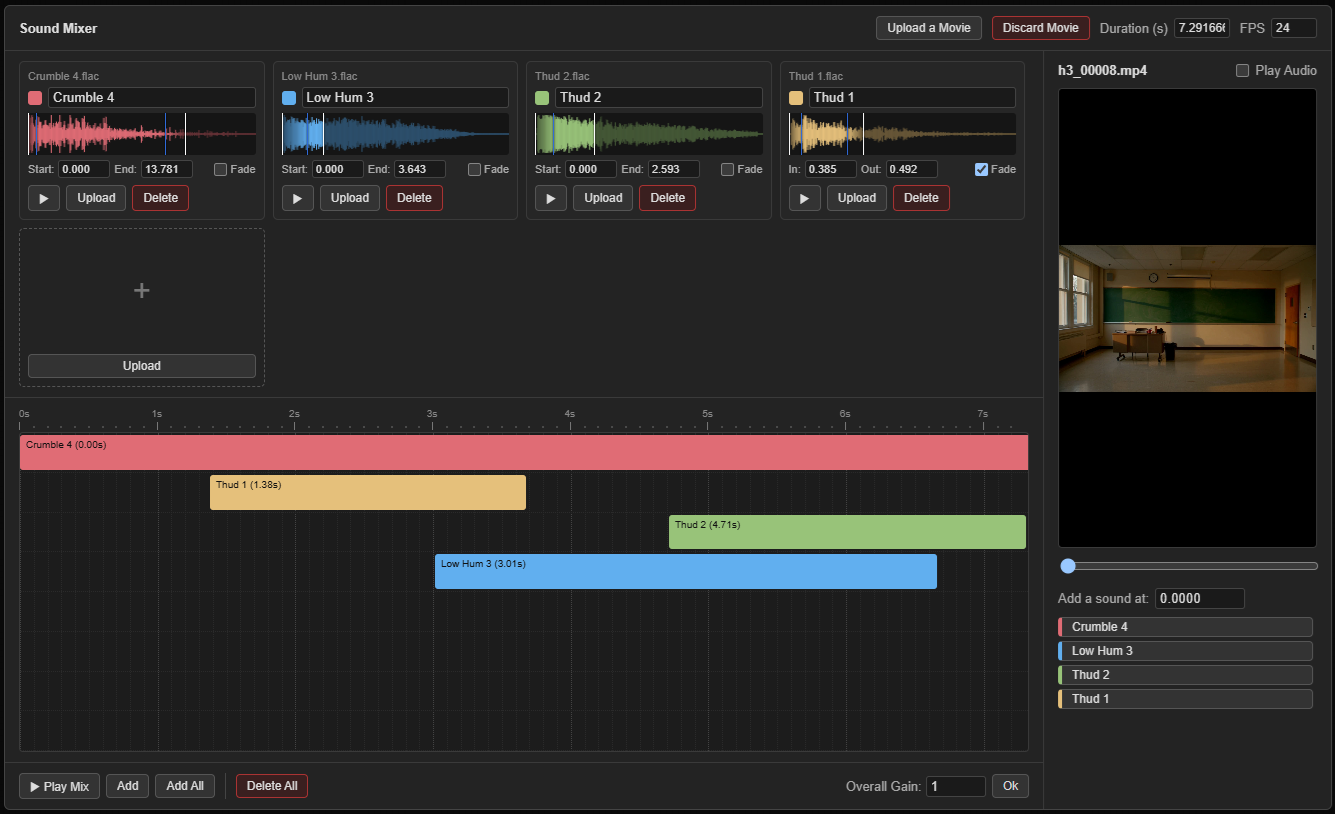
Mixes multiple audio files into one AUDIO output. Click Edit Mix to open the mix editor.
In general, the editor lets you: set the overall mix duration; add up to 16 sources (uploaded audio files), each with its own trim (start/end crop) and fade in/out, both dragged as sliders over the waveform — a Fade checkbox switches which pair the sliders set; place a source on the timeline any number of times, freely repositioning each placement with a slider and adjusting its own gain; play the whole mix, a single source, or one placement at any point while editing, stopping it again with the same button; and optionally load a video, scrub through its exact frames, and add sources at a time picked straight from the video — with the video and audio mix playable together in real time.
The video is remembered with the workflow, so it's still loaded next time you open the editor. An FPS box beside Duration re-rates it: the movie plays back as if it ran at that frame rate, and every placement moves with the frame it was set against — a sound on frame 32 of a 32 fps movie sits at 1s and moves to 2s once the movie is called 16 fps. The value shows red while it differs from the file's own rate, and Esc in the box restores it. Whenever the movie's length and the mix duration disagree, the editor offers to match them.
A mix can be kept outside the workflow. Save Mix (bottom bar) asks for a Folder and a Name and writes <name>.json under .dx_mgr/sound_mixes/, alongside the movie files; the folder is optional and just for your own grouping. Load / Manage Mix (top bar) lists every saved mix as folder\name, 12 at a time, and loading one replaces whatever is currently set up — it asks first if there's anything to lose. Every row there has a checkbox, and the red Delete below the list — greyed out until something is ticked — removes the ticked mixes from disk after a confirmation, then re-reads the list; a folder left with no mixes in it goes with them. Saving over an existing file asks before replacing it, and a file that isn't a valid mix is reported rather than half-loaded.
The file holds everything needed to rebuild the mix: duration and sample rate, overall gain, every source with its trim and fades, every placement with its gain, and the movie with its FPS override. The audio and video files themselves aren't copied — only their names, resolved against ComfyUI's input/ directory. Once a mix has been saved or loaded, the editor's title reads Sound Mixer - folder\name and Save Mix reopens on that folder and name. Delete that file and the title goes back to plain Sound Mixer, while the mix itself stays open and unchanged.
Check Null (utils)
- Input: any value (optional)
- Output:
is_null(BOOLEAN) —Trueif the value is null, None, NaN, or empty string
Null Audio Checker (audio)
Checks if the audio output from ComfyUI-VideoHelperSuite is null (video had no audio track).
- Input:
audio(AUDIO) - Output:
is_empty(BOOLEAN)
Abs Int (math)
- Input:
value(INT) - Output:
abs_value(INT)
Lora Inspector (utils)
Scans models/loras, reads safetensors metadata, and caches results to models/loras/dx_lora_db.json.
- Inputs:
lora(dropdown, prefixed by category) ·rescan(BOOLEAN) - Output:
lora_data(STRING) — JSON with three sections:general:filename,path,category,base_model_version,network_dim,network_alpha,potential_triggerwords,file_size_mb,last_modifiedextended:network_module,network_args,steps,num_epochs,epoch,resolution,num_train_images,training_commenttraining:optimizer,learning_rate,unet_lr,text_encoder_lr,lr_scheduler,noise_offset,min_snr_gamma,mixed_precision
Categories (inferred from ss_base_model_version):
| Category | Matches |
|---|---|
| WAN2.2 | Wan 2.2 |
| WAN2.1 | Wan 2.1 |
| LTX2.3 | LTX v2.3 |
| LTX2 | LTX v2.x |
| LTX | LTX (any other) |
| Flux1 | Flux.1 |
| Flux2 | Flux 2 |
| Flux2 Klein | Flux Klein |
| Chroma | Chroma |
| ZIT | Z-Image |
| Qwen | Qwen |
| Others | Anything else or missing metadata |
First-time setup: entries show as Unknown until you tick Rescan = Yes, run the node once, then reload the page.