
ComfyUI Extension
Simple CSV Parser
A ComfyUI custom node for parsing CSV files with positive and negative prompts
content-and-code/ComfyUI-SimpleCSVParse
Nodes1
On cloudLocal install
Categoryutils
Stars1
Updated2 months ago
Readme
ComfyUI Simple CSV Parser
A ComfyUI custom node that allows you to parse CSV files with positive and negative prompts.
Features
- Drag and drop CSV files into ComfyUI's input directory
- Read prompts from CSV files line by line
- Toggle to enable/disable negative prompt column
- Outputs positive prompt, negative prompt, and total row count
- Navigate through rows using an index parameter
Sample Workflow
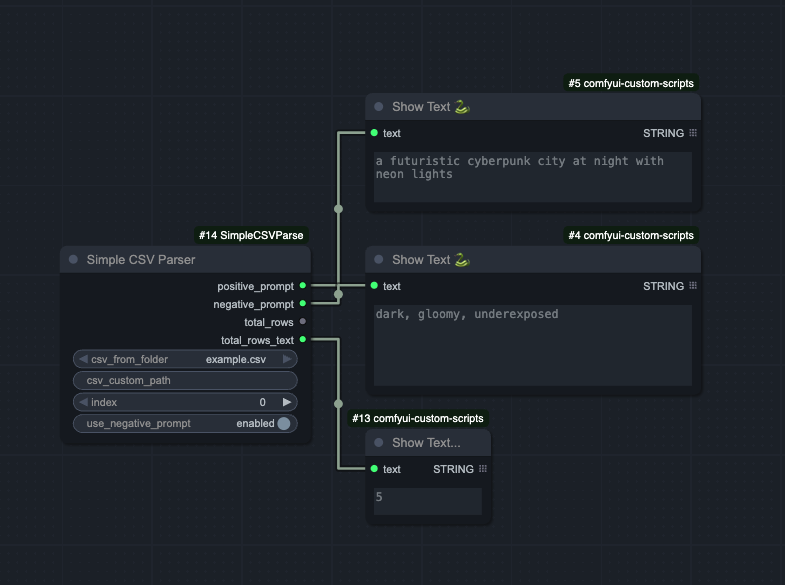
Installation
-
Clone this repository into your ComfyUI custom_nodes directory:
cd ComfyUI/custom_nodes/ git clone <your-repo-url> ComfyUI-SimpleCSVParse -
Restart ComfyUI
Usage
CSV File Format
Create a CSV file with two columns (header row is optional and will be auto-detected):
positive_prompt,negative_prompt
a beautiful landscape,"blurry, low quality"
a cute cat,"distorted, ugly"
a futuristic city,"dark, gloomy"
Note: If your prompts contain commas, wrap them in double quotes as shown above.
Or without headers:
a beautiful landscape,"blurry, low quality"
a cute cat,"distorted, ugly"
a futuristic city,"dark, gloomy"
Using the Node
The node automatically detects which input method you're using. You can either select from a dropdown or enter a custom path.
Option 1: From Input Folder (Dropdown)
- Place your CSV file in the ComfyUI
inputfolder - Add the "Simple CSV Parser" node to your workflow
- Select your CSV file from the
csv_from_folderdropdown - Leave
csv_custom_pathempty - Set the index to choose which row to read (0 = first row)
- Toggle "use_negative_prompt" on/off to include the negative prompt column
- Connect the outputs to your prompt nodes
Option 2: From Custom Path
- Add the "Simple CSV Parser" node to your workflow
- Enter the full path to your CSV file in the
csv_custom_pathfield- Mac/Linux example:
/Users/yourname/Desktop/prompts.csv - Windows example:
C:\Users\yourname\Desktop\prompts.csv - You can use
~for your home directory:~/Desktop/prompts.csv
- Mac/Linux example:
- The
csv_from_folderdropdown will be ignored if custom path is provided - Set the index and toggle as above
- Connect the outputs to your prompt nodes
Outputs
- positive_prompt (STRING): The positive prompt from the selected row
- negative_prompt (STRING): The negative prompt from the selected row (empty if toggle is off)
- total_rows (INT): Total number of rows in the CSV (useful for looping)
- total_rows_string (STRING): Total number of rows as text (for connecting to ShowText nodes)
Example CSV
See example.csv for a sample file format.
Notes
- The node automatically detects and skips header rows if they contain common headers like "positive", "positive_prompt", or "prompt"
- Index is 0-based (0 = first data row after any header)
- If the index exceeds the number of rows, an error message is returned
- Empty cells are handled gracefully