
ComfyUI Extension: Image Filter
Run ComfyUI workflows without the setup
No installs, no CUDA version roulette, no GPU sitting idle on your bill. Bring a workflow and run it in the browser.
A set of custom nodes that pause the flow to allow you to pick images, edit parameters, set masks etc..
Looking for a different extension?
Custom Nodes (12)
README
CG Image Filter
Problems?
If you have issues after an update, try removing the filter node and then adding it back before reporting it as a bug.
If you use the String to Int or String to Float nodes and get an error reporting that the nodes don't exist,
delete them and add them again. Due to a conflict in naming with other popula node packs they have had an id change.
Please read how to report a bug well before reporting a bug. I'm far, far more likely to be able to fix things if you give me the information requested.
Introduction
A set of nodes designed to pause execution of the workflow to allow you to make selections and/or edits before continuing. There's an example workflow that illustrates all of them at the end.
- 'Image Filter' - pause the flow and pick which images from a set you want to proceed with
- 'Mask Image Filter' - launch the mask editor for the image, and return the image and mask
- 'Text Image Filter with Extras' - as 'Text Image Filter' but with three extra single line texts fields that are also returned
There are also some helper nodes.
Examples of what you might do with them
- Generate an image or batch, and select which ones you want before spending the time upscaling
- Generate an image and pick part of it to inpaint all in one go (the example workflow below does this)
- Edit auto-generated captions before saving them
- Iterate through a folder of images, picking a masked area to inpaint (and the inpainting prompt) for each
- you ideas here...
Example workflow
If you prefer trying a workflow to reading docs, use of the nodes is illustrated in this blob (drag the image into Comfy):
<img src="https://github.com/chrisgoringe/cg-image-filter/raw/main/images/blob.png" alt="Seahorse" width="200" height="200">or jump down to example workflows for more examples.
Recent Changes
New in 1.9
- Custom audio
- triple-click in text field in
TextImageFilterto insert last sent text - added option in
Mask Image Filterto
New in 1.8
- Fix for
Mask Image Filterwhen using more than one in a workflow - More reliable flash on background tab
- Better handling of filters in subgraphs
- New option - selecting image unselects others
New in 1.7
- Options for
Mask Image Filterbehaviour when no inputs are changed - Fixed several bugs in
Mask Image Filter - Updated to use new Comfy UI node specification
- Added typing shortcuts
For older changes see Change History
Image Filter
The image filter node pauses execution of the workflow while you choose which, if any, of the images produced, you want to progress.
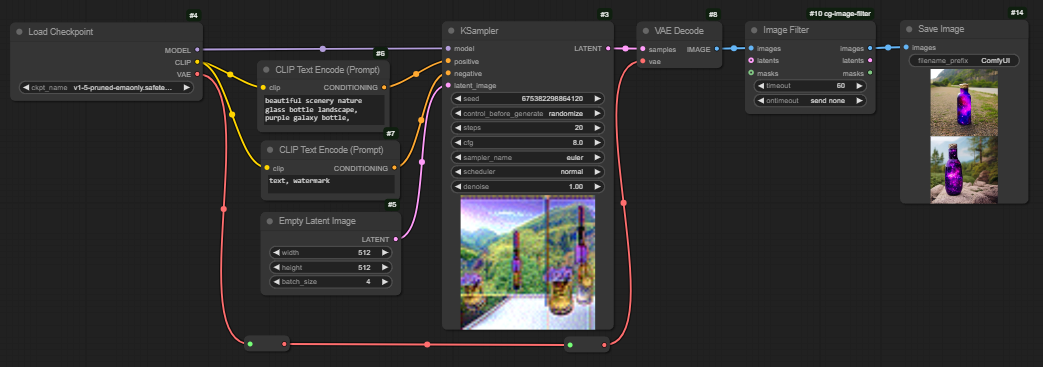
Insert it like this:
When you run the workflow, and get to this point, a popup window will appear displaying the image(s) for you to select which, if any, you want to progress:
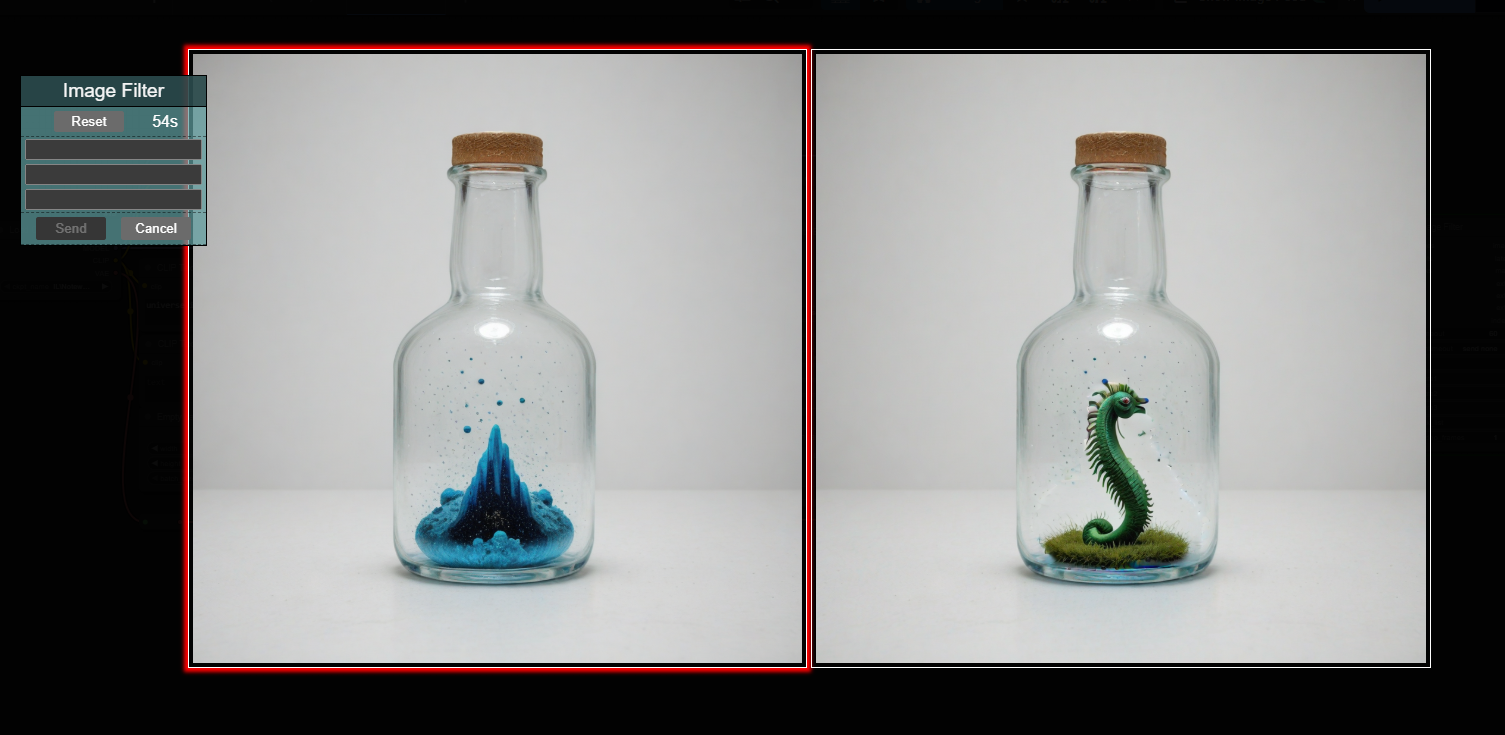
Click the images that you want to keep (their border will turn green) and then click 'Send' to continue the workflow. If you don't want to keep any of the images, click 'Cancel' (or press 'escape') to terminate the workflow.
The node also has a timeout specified, and a countdown is shown on the left hand side. If you don't Send or Cancel before the timeout, the node will either cancel or send all the images, depending on the option you have selected.
Here's a simple use: generate a batch of images and pick which ones you want to save:
Zoom
If you hover over an image (it gets a red border) and press the space bar, it will zoom to fill the screen.
You can also use the Enter the Image Filter node with an image zoomed setting to start in this mode.
While zoomed, you can navigate with keyboard or mouse:
| |Mouse|Keyboard|Notes|
|-|-|-|-|
|Select/unselect/send|Click the zoomed image|Arrow Up|Will select/unselect the image, or send it if you have Clicking an image sends it turned on|
|Previous/Next|Click the arrows to the left or right|Arrow Left Arrow Right|The image number is shown near the top right|
|Unzoom| |Space|Back to the grid view|
Optional inputs
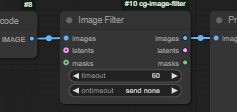
The Latent and Mask inputs are optional. If used, they should have the same number of latents (or masks) as the image batch, and the latents (or masks) corresponding to the selected images will be output. Use this if (for instance) you want to select from a batch of images, but the next stage uses the latent - that way you avoid the decode-recode loss, or if you want to pick a mask (perhaps from options automatically generated)
Other things (like prompts, segs etc.) that have been used can be selected using the Pick from List helper node.
pick_list
Sometimes you know which images you are going to want. If you provide a comma separated list of integers in pick_list,
these images will be selected without user input. Values will be taken modulo the number of images (which means you can use -1 for the last image).
You could also use this to make a larger batch of images (repeat a value and the image will appear repeated times in the output).
Note that this uses zero indexing (the first image is '0').
video_frames
If you set this to greater than one, the image filter node will batch up each set of n images and treat them as a video snip.
Set the FPS for playback in the global settings.
This is a new, experimental feature, so please report any issues...
audiofile
The sound to play when the node is triggered. Can be one of the built-in options,
beep.mp3, ding.mp3, or honk.mp3,
or the path to a local audiofile, or a URL of an audiofile.
You can add files to js/audio and then just use their names.
If a file can't be loaded, it will fallback to ding.mp3
Mask Image Filter
Designed for a single image, when executed the Mask Image Filter node will automatically launch the mask editor.
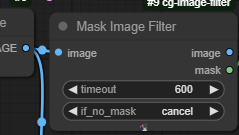
When you finish mask editing the image and mask will be output. Here's a simple use - generate an image, and then mask the bit you don't like, before doing an img2img step.
Again, there is a timeout, and if you don't save a mask before the end of the timeout (or if you press the cancel button in the mask editor), it will either cancel, or send a blank mask, depending on the option chosen.
Mask in
There is an optional mask input, which allows you to specify the mask when the editor is launched:
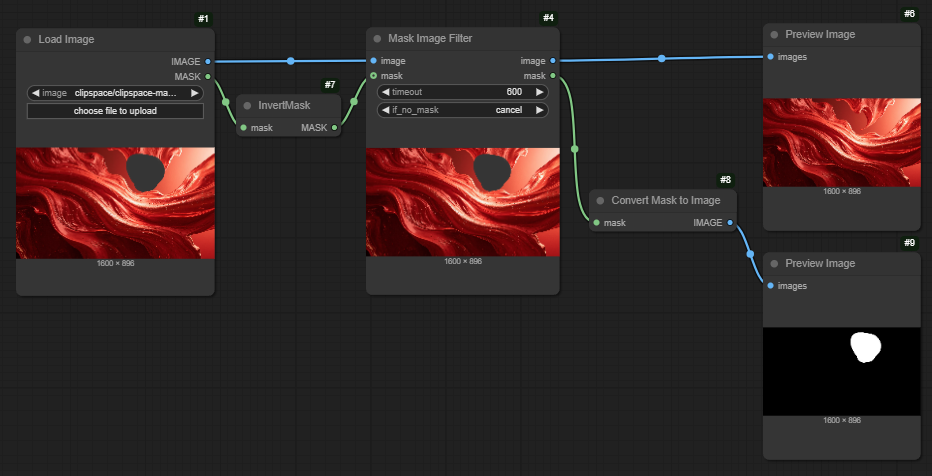
Note that the Mask Image Filter works with the new Mask Editor; it does not work with the old one

If inputs unchanged
There are four options for what to do if the inputs are exactly the same as before:
Run normally: use the input mask, if any, as the starting pointStart with last output: use the last mask sent as the starting pointResend last output: don't launch the editor, just resend the outputAlways start with last output: use the last mask sent even if the inputs have changed, as long as the image dimensions are the same
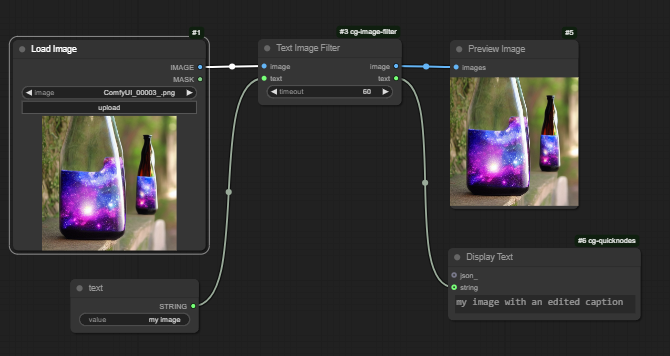
Text Image Filter
Also designed for a single image, this node will show the image and a string of text; you can edit the text and then press send.

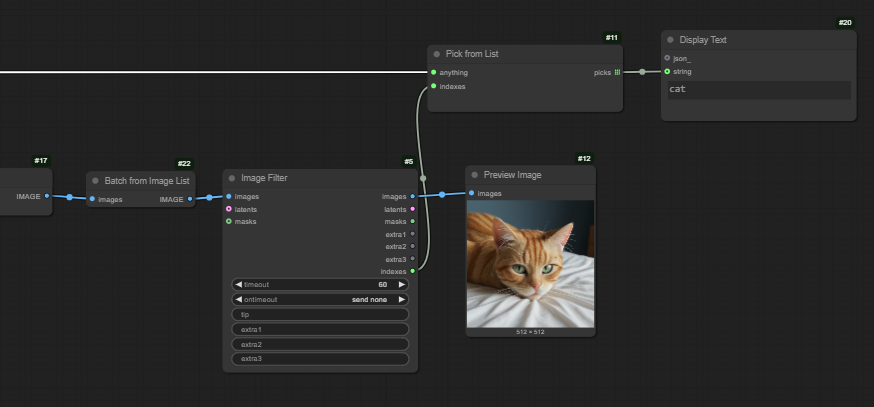
The image and (edited) text are output. One example use is for captioning workflows; you can read and edit each caption as it is generated. Here's a trivial workflow:
If you triple-click in the text area, it will replace the contents with the text from the previous run (useful if you are tweaking a prompt for the I2I
Global Options
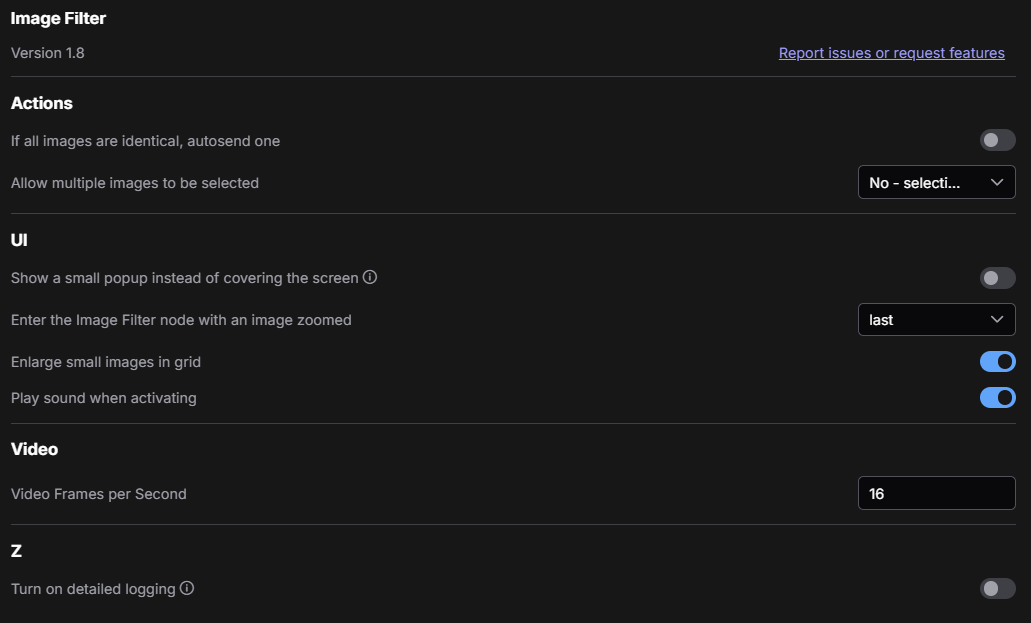
If all images are identical, autosend one- in theImage Filternode, if all images are identical (including if there is just one image) then send an image without user interaction.Allow multiple images to be selected- Default isYes, which allows theImage Filternode to pass multiple images from a batch through. Alternatives areNo - selecting sends(click an image to select and send it) orNo - selecting unselects previous(click an image to select it and unselect previous choice).Show a small popup instead of covering the screen- instead of taking over the whole screen immediately, display a tiny version of the image in the top left. Click that image to go into the full screen mode. You can move the tiny image window around to where you want it by dragging the title bar.Enter the Image Filter node with an image zoomed- instead of showing the grid of images, zoom in on one. Options arefirstorlastPlay sound when activating- play a 'ding' sound when any of the filter nodes becomes active. You can change the sound by replacing the fileding.mp3in thejssubfolder.Reminder sound every x seconds- the 'ding' is repeated after x seconds if you are not interacting with the window.Video Frames per Second- when previewing video(s), try to play them at this speed
Keyboard shortcuts
In Image Filter and Text Image Filter (not Mask Image Filter)
Spacewhen hovering over an image enlarges it. SeeZoomin theImage Filtersection below.Escapeto click the cancel buttonEnterto click the send button- digits
0,1, etc. to click an image (zero-indexed) (select/deselect or send, depending on the value ofClickSends)
In Image Filter only
ctrl-Ato select/unselect all images
A few bits and pieces
Text Image Filter and Image Filter each provide three extra text fields, intended for short form - like specifying the denoising you want on the next step, or a prefix to save the file with.
If you use the optional tip input, the contents will be displayed under the extras input fields, so you can remind yourself what they are for! In the Text Image Filter you can use the format {{text}} in the tip to create a clickable link which will insert text at the end of the text field - useful for phrases you use a lot!
The floating window that displays the controls takes its name from the name of the node, which can be useful for reminding yourself where you are in a complex workflow.
Helper Nodes
Masked Section
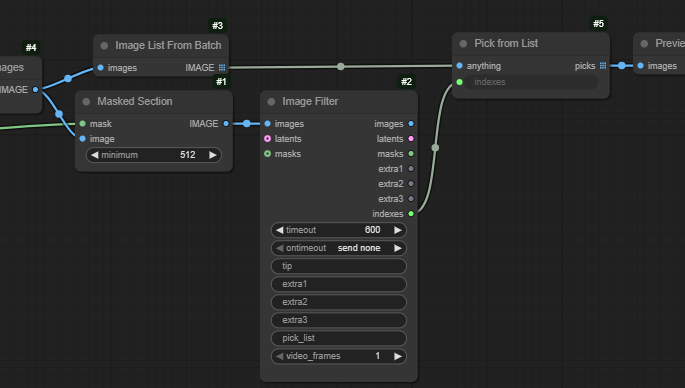
Masked Section takes a mask and a (batch of) images and outputs the images cropped to the bounding box of the mask (with a minimum size).
Here's how you might use it to preview the parts of the image that were changed in img2img (also using Pick from List and Image List from Batch described below)
String handling
Split String on Characterallows you to split a text string into up to five pieces, splitting on a character of your choice. It outputs the first five non-blank values when split, and a list with all the non-blank values. It also strips whitespace, so that the strings can be easily parsed, especially by...String to IntandString to Floatconvert a string to an int or a float, with a fallback default.
Together, these nodes allow you to specify lots of information in the extras fields. For instance, if doing an inpaint, you might have an extras field that takes the format 0.4, 20 meaning 'denoise 0.4, 20 steps'. Split the string, feed the pieces into the converters, and feed that into other nodes. Like this:
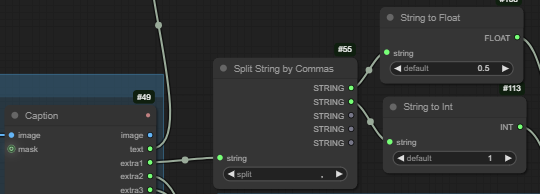
Split String by Commas produces five string outputs. If there are fewer than five terms, the extra ones will havee an empty string; if there are more than five terms the fifth output will be a comma separated list of the fifth and subsequent terms.
There is also a sixth output which is a list of all the strings.
Any List to String does what it says - takes any list and converts it into a single string. Probably of very limited use!
List and Batch Handling
When working with multiple images - Image Filter expects a batch, Mask Image Filter and Text Image Filter need a list.
So if you generate a load of images using lists of, for instance, prompts, to feed them into Image Filter you will want to combine them with the helper node Batch from Image List.
If you generate a batch of images and want to use the Mask Image Filter or Text Image Filter, which only handle a single image, you will want to do the opposite - convert the batch to a list with Image List From Batch. Then the images will be shown sequentially.
The Image Filter node outputs a string, indexes, which is a comma separated list of the indexes
(0 based by default, but you can pick a different start value if you need to with pick_list_start) of the images selected.
Connect this to a Pick from List node, and connect a list of anything to the anything input, and the Pick from List node will output a list corresponding to the selected images.
For instance, if you create a set of images using a list of prompts, this can be used to select the prompts that correspond to the selected images. But you might well want to batch the images if you did use lists - see below.
So something like this:
Example Workflows
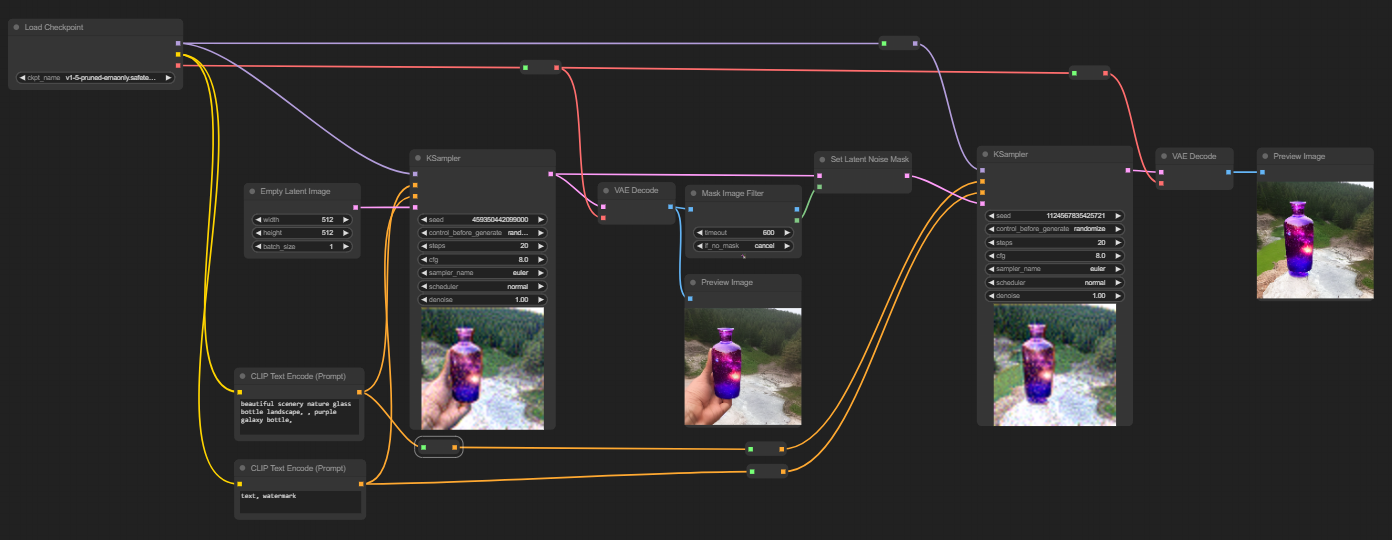
Basic use of all three nodes
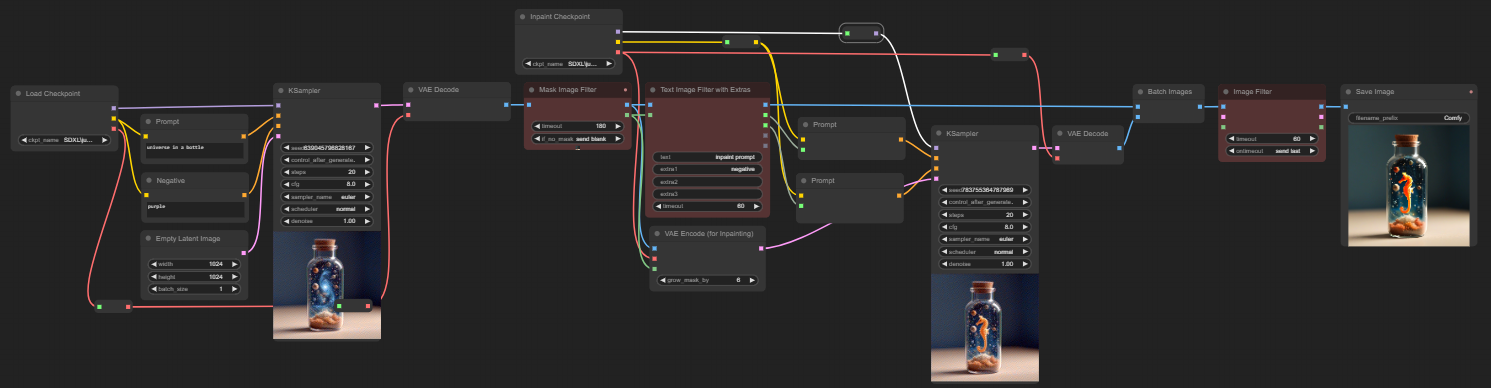
This workflow:
- generates an image
- uses 'Mask Image Filter' to allow you to mask part of the image for inpainting
- uses 'Text Image Filter with Extras' to enter a prompt (and negative prompt) for the inpainting
- inpaints
- uses 'Image Filter' to choose which, if either, of the two images (before and after inpaint) to save
The workflow is embedded in the blob in a bottle:
<img src="https://github.com/chrisgoringe/cg-image-filter/raw/main/images/blob.png" alt="Seahorse" width="200" height="200">More examples to come!
Feel free to send me examples of how you use the nodes!
Bugs, Ideas, and the future
Take a look at the issues list to see what I'm thinking of, to report problems, or to make suggestions.
How to report a bug well
Please read this guide before you post a bug!
Change history
New in 1.6.4
- Small window now has a button that can be used to hide/show the main window, allowing you to view the workflow
New in 1.6
Masked Sectionnode to crop images to just the masked area
New in 1.5
- Floating window for extras and tips
- Mask editor node now has option for text extras
- Keyboard and mouse navigation in zoomed view
New in 1.4
Video previews!
New in 1.3.2
- works with old mask editor as well
- keyboard shortcuts are back
- various minor fixes
New in 1.3
- pick_list to automatically select images in
Image Filter - optional initial mask input to
Mask Image Filter
Run ComfyUI workflows without the setup
No installs, no CUDA version roulette, no GPU sitting idle on your bill. Bring a workflow and run it in the browser.