
comfyui-lmstudio-bridge
A bridge for ComfyUI to seamlessly integrate with LM Studio's capabilities, enabling advanced image-to-text and text generation workflows using local models.
ComfyUI LM Studio Bridge


LM Studio Bridge is a single, powerful ComfyUI node that connects to LM Studio’s native REST API. Run LLMs and vision models locally and use them directly in your image‑generation workflows – for prompt enhancement, image captioning, style analysis, or any text‑to‑text / image‑to‑text task.
🚀 Key features – automatic model detection, adaptive image resizing, PNG optimisation, keep‑alive HTTP sessions, and full control over generation parameters.
📦 Installation
-
Navigate to your ComfyUI
custom_nodesdirectorycd /path/to/ComfyUI/custom_nodes -
Clone this repository
git clone https://github.com/caradat/comfyui-lmstudio-bridge.git comfyui-lmstudio-bridge -
Install Python dependencies
Activate your ComfyUI environment (venv/conda) and run:pip install requests Pillow numpy(If a
requirements.txtis present, you can usepip install -r requirements.txtinstead.) -
Restart ComfyUI – the node will appear under
ComfyExpo/RESTasLM Studio Bridge.
🚀 Getting Started
1. Prepare LM Studio
- Download and launch LM Studio.
- Load a model (for image‑to‑text, ensure it’s a vision model, e.g. qwen35, gemma4, etc.).
- Go to the Developer tab (
<->) and start the server (default port1234). - (Optional) Note the
model_keyshown in LM Studio if you want to specify a model manually.
2. Use the Node in ComfyUI
- Right‑click → Add Node → search for
LM Studio Bridge. - Connect:
prompt(required) – your main text instruction.image(optional) – connect an image if you use a vision model.model_key(optional) – leave empty to auto‑detect the loaded model.
- Set generation parameters (
temperature,max_output_tokens, etc.). - Run the workflow – the generated text appears at the
Generated Textoutput.
🔧 Node Reference
LM Studio Bridge
| Input | Type | Default | Description |
|-------|------|---------|-------------|
| prompt | STRING | "Make the ready-to-use prompt with the image description:" | Main text prompt. |
| system_prompt | STRING | "You are a helpful AI assistant." | System instruction for the model. |
| host | STRING | "localhost" | LM Studio server hostname or IP. |
| port | INT | 1234 | LM Studio server port. |
| max_output_tokens | INT | 2000 (min 1, max 4096) | Maximum tokens in the response. |
| temperature | FLOAT | 0.6 (0.0–2.0, step 0.1) | Randomness – lower = more deterministic. |
| image | IMAGE (optional) | – | Image input for vision models. |
| model_key | STRING (optional) | "" | Specific model ID. If empty, the first loaded model from LM Studio is used automatically. |
| debug | BOOLEAN | False | Enable verbose logging in the ComfyUI console. |
| timeout_seconds | INT | 300 (10–3600) | Request timeout. |
Output:
Generated Text(STRING) – the model’s response.
Note on
IS_CHANGED: The node includes a hash of all inputs (including image data when present). This ensures that ComfyUI re‑executes the node whenever any parameter or the uploaded image changes.
🧠 Automatic Model Detection
If you leave model_key empty, the node:
- Queries LM Studio’s
/api/v1/modelsendpoint. - Finds the first model that has at least one loaded instance (field
loaded_instances> 0). - Uses that model ID for the generation.
This makes switching models in LM Studio seamless – no need to update the node. In debug mode, the detected model ID is printed to the console.
🖼️ Image Optimisation
To reduce token usage and network latency (vision models encode images into tokens), the node automatically:
- Resizes images if either dimension exceeds 1536 px (aspect ratio preserved).
- Converts RGBA → RGB when the alpha channel is fully opaque.
- Saves as PNG with
optimize=Trueandcompress_level=6.
These steps typically reduce image size by 50‑80% without noticeable quality loss.
🔁 Persistent HTTP Session
The node uses a single requests.Session() for all calls. This enables HTTP keep‑alive and connection reuse, improving performance when the node is executed multiple times in a workflow.
📡 API Format
This node uses LM Studio’s native REST API (not the OpenAI‑compatible endpoint).
- Endpoint:
/api/v1/chat - Payload format (text-only):
{ "model": "...", "input": "your prompt", "system_prompt": "...", "max_output_tokens": 2000, "temperature": 0.6 } - For vision models,
inputbecomes an array of objects:"input": [ {"type": "text", "content": "Describe this image"}, {"type": "image", "data_url": "data:image/png;base64,..."} ]
Make sure your LM Studio server is using the native API (the default when you start the server).
🛠️ Troubleshooting
| Problem | Likely Fix |
|---------|-------------|
| Error: Cannot connect to LM Studio server at host:port | LM Studio must be running and the server started (button in the Server tab). |
| Error: The LM Studio server is accessible, but no models are known. Load a model in LM Studio and try again. | Load at least one model in LM Studio before starting the server. |
| Error when requesting the model list: ... | Check network connectivity or firewall. The node uses HTTP GET to /api/v1/models. |
| Image encoding failed | The input image tensor may be invalid. Try using a Load Image node and connect it directly. |
| Error: Request to LM Studio server failed: ... | Inspect the full error in the console; enable debug=True for more details. |
| Response is empty or No content generated. | The model may not have produced any output. Check your prompt and system prompt. |
| Timeout after X seconds | Increase timeout_seconds or check system load (some large models can be slow). |
Enable debug = True to see detailed logs:
- Model detection process
- Payload (truncated for large images)
- HTTP response status
- Preview of the generated text
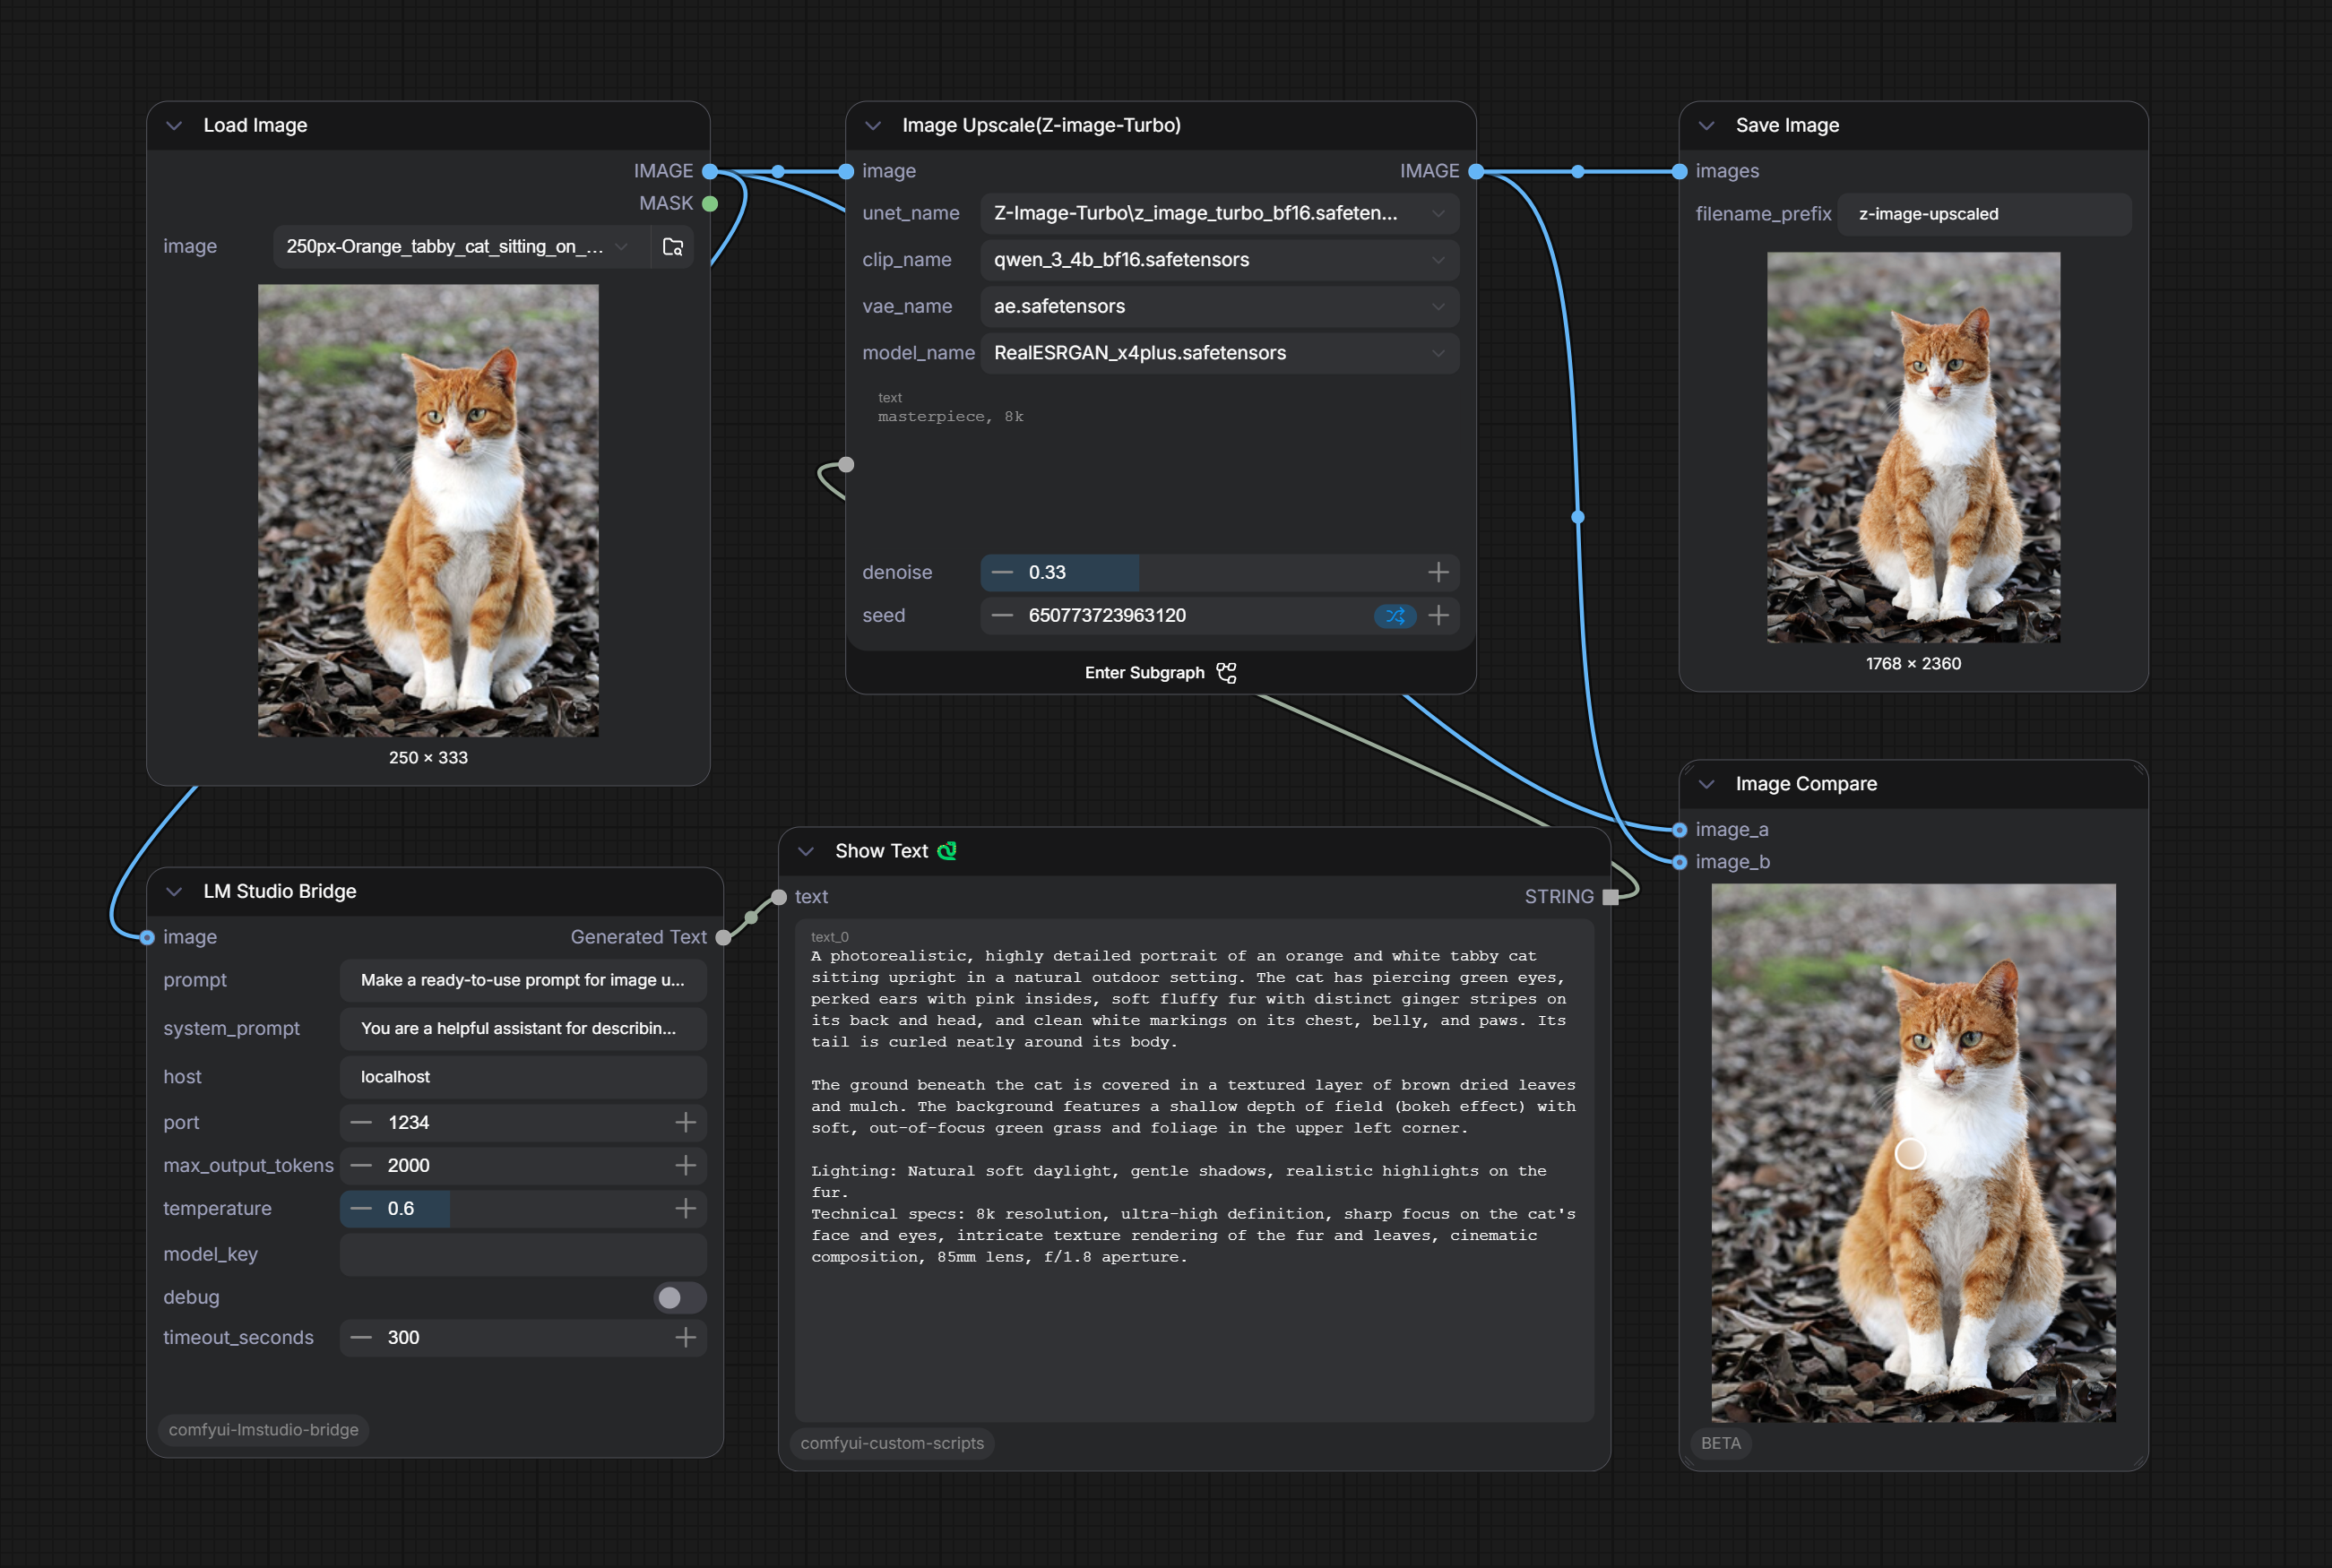
📚 Example Workflow
- Load an image (e.g., a photograph of a landscape).
- LM Studio Bridge node:
prompt:"Describe this image in one short sentence for use as a Stable Diffusion prompt."- Connect the image to the
imageinput. model_key: leave empty (auto‑detects your loaded vision model).temperature:0.4(more focused).
- Connect the
Generated Textoutput to a Show Text node.
Run the workflow – the model writes a caption. Then you can copy that caption into a positive prompt for Stable Diffusion.
For a full visual example, see
workflow.pngin the repository.
📄 License
This project is licensed under the MIT License – see the LICENSE file for details.