
ComfyUI-AusBoss
Image and video nodes with compact controls: crop/rotate/pad editors for images and video, Load Image + Pad, Image Resize, Color Match, Compare A/B, Save Image and Save Video, Load Video, Frame Interpolate, Mask Refine, LaMa Inpaint, Crop/Stitch Inpaint, a LoRA Loader stack, Resolution Master, Seed, Workflow Note, Run Timer and utility nodes. Published on the Comfy Registry as ausboss-nodes.
Nodes (44)
The 'why won't this sampler take my size' fix
The canvas note that stays readable at 30% zoom
The fix for 'that inpainted region is slightly too bright'
A/B your images without squinting at two canvases
Inpaint at full resolution without touching the rest of the frame
One number, five wires, zero retyping
Retime video to a real fps target, not just a doubled one
A VRAM breather that passes everything through
A crop, rotate, and pad tool that feels like an editor, not a widget farm
Run one workflow over 200 pictures without queueing 200 times
One node that finally handles aspect, masks, and clean multiples
Stop retyping dimensions into resize nodes
One source for every steps and size that used to live in five widgets
The Krea 2 encoder that also carries the reference image
The node that tells Krea 2 where your image actually sits
The classic model-based inpaint that refuses to download anything
Stop writing 'cat on the left' — draw the box instead with Layout Boxes
Outpainting that doesn't feel like assembling a puzzle by hand
A video loader that trims, thins, and doesn't eat your RAM
A whole LoRA stack in one node, trigger words included
Type \"the dog\" and get the mask, no painting
Click the jacket, not the whole person
A calculator on the canvas that can't run your code
Join two clips into one, without the silent resize surprise
Your Qwen edit came back 5% taller — measure it, warp it back
Turn a scratchy selection into a mask you'd actually sample with
Stop retyping 832×1216 and let the canvas pick its own shape
A stopwatch you drop on the canvas so you stop guessing how slow your workflow is
PNG, lossless JXL, exact filenames, and captions that land beside the file
The video saver that knows what 'lossless' means
One seed, every sampler — and the button that gets your good seed back
Thin a video before the expensive part
Grab one frame out of a batch without guessing the index
A text display that sits mid-wire instead of at a dead end
Cut a clip in half and treat the halves differently
The other half of the only inpaint pattern that guarantees nothing else moves
One prompt, four encoders, one box to edit
Redraw at the megapixels you asked for, tile by tile
Turning a pile of redrawn tiles back into one picture
Find one frame in a video and transform it, in one node
Black bands, a hard edge, and the clip comes back widescreen
The sticky note that tells the next person which models they're missing
One card that turns half your graph off
Erase a watermark (or any object) in ComfyUI without touching a sampler
I made these nodes for my own ComfyUI workflows, mostly because I wanted features I couldn't find in other packs. I use them myself, and I keep adding new ones.
Most of them are for image and video work. ComfyUI's core nodes already cover the basics, like seeds, sizes and prompts, so use these where they add something. A few of the things they do:
- Mask by Touch: click a thing on the picture and get its mask. Hover shows what a click would take, and Fine edges follows hair and fur.
- Mask by Name: type "the red jacket" and get its mask and a cut-out.
- Image Crop + Rotate + Pad: turn, crop and pad a picture by dragging handles on the node, for outpainting.
- Stitch Inpaint: after an inpaint or outpaint, everything you didn't ask to change is your original pixels again.
- Video Crop + Rotate + Pad → Clip: trim a clip on a timeline, and pad or crop it to a new shape.
- Tiled Upscale: upscale a picture in tiles to the megapixels you set.
- Image Folder: tick pictures in a folder and run the workflow on each one.
- Layout Boxes: draw boxes where things and words go in the picture, for MOSS-Image.
- Image Compare A/B: a before-and-after slider, and a brush to mix the two.
- LoRA Loader: a whole LoRA stack in one node, each row with its own switch and strength.
- Workflow Switches: turn parts of a workflow off and on from one small card.
The ? in a node's title bar opens a short card with its inputs and outputs, and every node has a longer help page in ComfyUI's node help panel. I post the workflows I make with them on Civitai and X @Zanzibased, and videos of them on YouTube @ausbossdev. If a node saves you time, a star on the repo helps other people find it.
Install
In ComfyUI-Manager, open the Custom Nodes Manager, search for AusBoss and install it. From the command line, comfy node install ausboss-nodes does the same. To get the newest changes first, clone the repository instead:
cd ComfyUI/custom_nodes
git clone https://github.com/ausboss/ComfyUI-AusBoss.git
Restart ComfyUI and search the node library for AusBoss.
After an update, through Manager or git pull, restart ComfyUI and hard-refresh the browser with Ctrl+Shift+R. Otherwise the browser keeps the old JavaScript, and the pack warns you about it. Manager can install a version or two behind while the Comfy Registry reviews a new release. To get the newest one, pick it in Manager's version list, or update by hand: delete the pack's folder in ComfyUI/custom_nodes and clone the repository as shown above.
The pack uses the Pillow, NumPy, Torch and PyAV that come with ComfyUI. Each example lists the models it needs on its Workflow Note. LaMa Inpaint also needs big-lama.pt in ComfyUI/models/lama/. The pack never downloads weights by itself.
Upgrading from 1.x
2.0 removed LM Studio Chat (use Text for a fixed prompt) and Align Image's offset_x and offset_y outputs. Math Expression's a, b and c are sockets now instead of typed boxes, so put constants in the expression itself. 1.2 removed Drop Shadow, Pad Image (use Load Image + Pad) and Frame Chooser. Save Image writes only inside ComfyUI's output folder. The changelog has the details.
| Section | What's in it | |---|---| | Image nodes | Rotate, crop and pad; resize, align and measure; upscale in tiles; run a whole folder; match colors; realign edits; compare; save | | Video nodes | Load and trim, pick a frame, transform a clip, change the frame rate, save | | Mask and inpaint nodes | Mask a thing by clicking it or typing its name, refine masks, remove objects with LaMa, crop around a mask and stitch the result back | | Models and conditioning | LoRA stack, Krea 2 prompts and references | | Workflow utilities | Canvas size, seed, batches, math, text, memory, notes, callouts, switches, timer | | Example workflows | Ready-made workflows, each with a setup card | | For workflow creators | Setup cards, before and after, repeatable seeds, measured run times | | Pack-wide tools | Help cards, node colors, recreate and replace, run status, completion sound |
Image nodes
Image Crop + Rotate + Pad
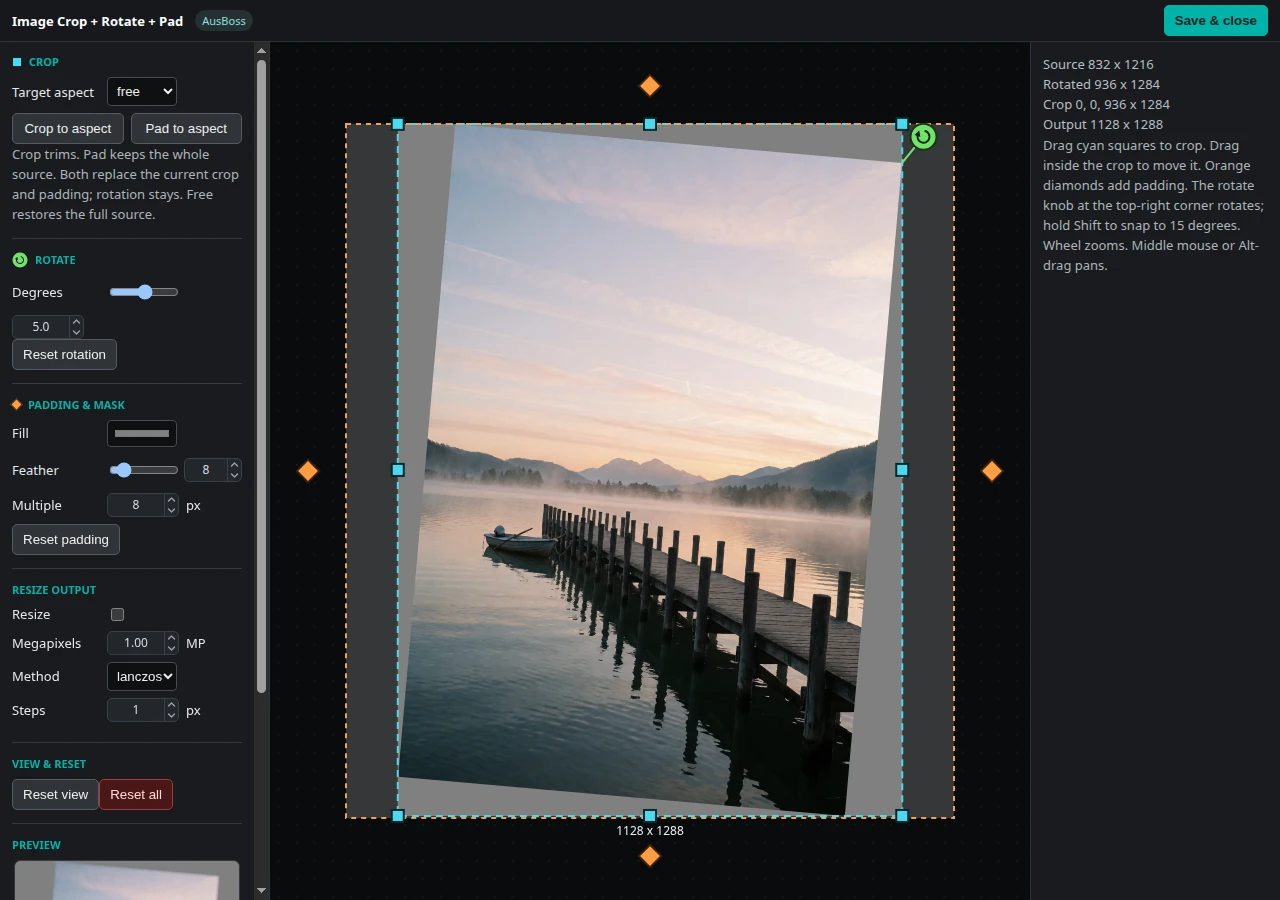
Rotate, crop and pad a picture by dragging handles on the node. Cyan squares crop, orange diamonds pad, and the green handle rotates. It rotates first, then crops, then pads. The full-screen editor adds exact sizes, zoom and pan.
Tap a ratio under the preview to pad the picture to it, or to crop it with Fit set to crop. A lit ratio is the shape the canvas has right now: drag a handle to another shape and it goes dark, and the row says Custom. The padlock at the end of the row keeps the shape while you drag, and the button at the start turns the shape between portrait and landscape. Reset crop brings back the whole picture, and Divisible by makes the width and height divide evenly by a number such as 8, 16 or 32, for models that need it. Feather and output resizing are on the node and in the editor.
It returns the image, a mask of everything the model paints (padding, see-through parts of the source and the corners a rotation opens up), a stitcher, the untouched original, the output width and height, and a prompt_image. Wire the stitcher into Stitch Inpaint after the sampler to put your original back. See-through parts of a PNG, such as a cutout's missing background, are filled like the padding and painted; prompt_image and original show them as white. Give prompt_image to whatever writes your prompt, so it describes a real backdrop instead of the gray fill. Load Image + Pad has more fill choices and a separate reference output.
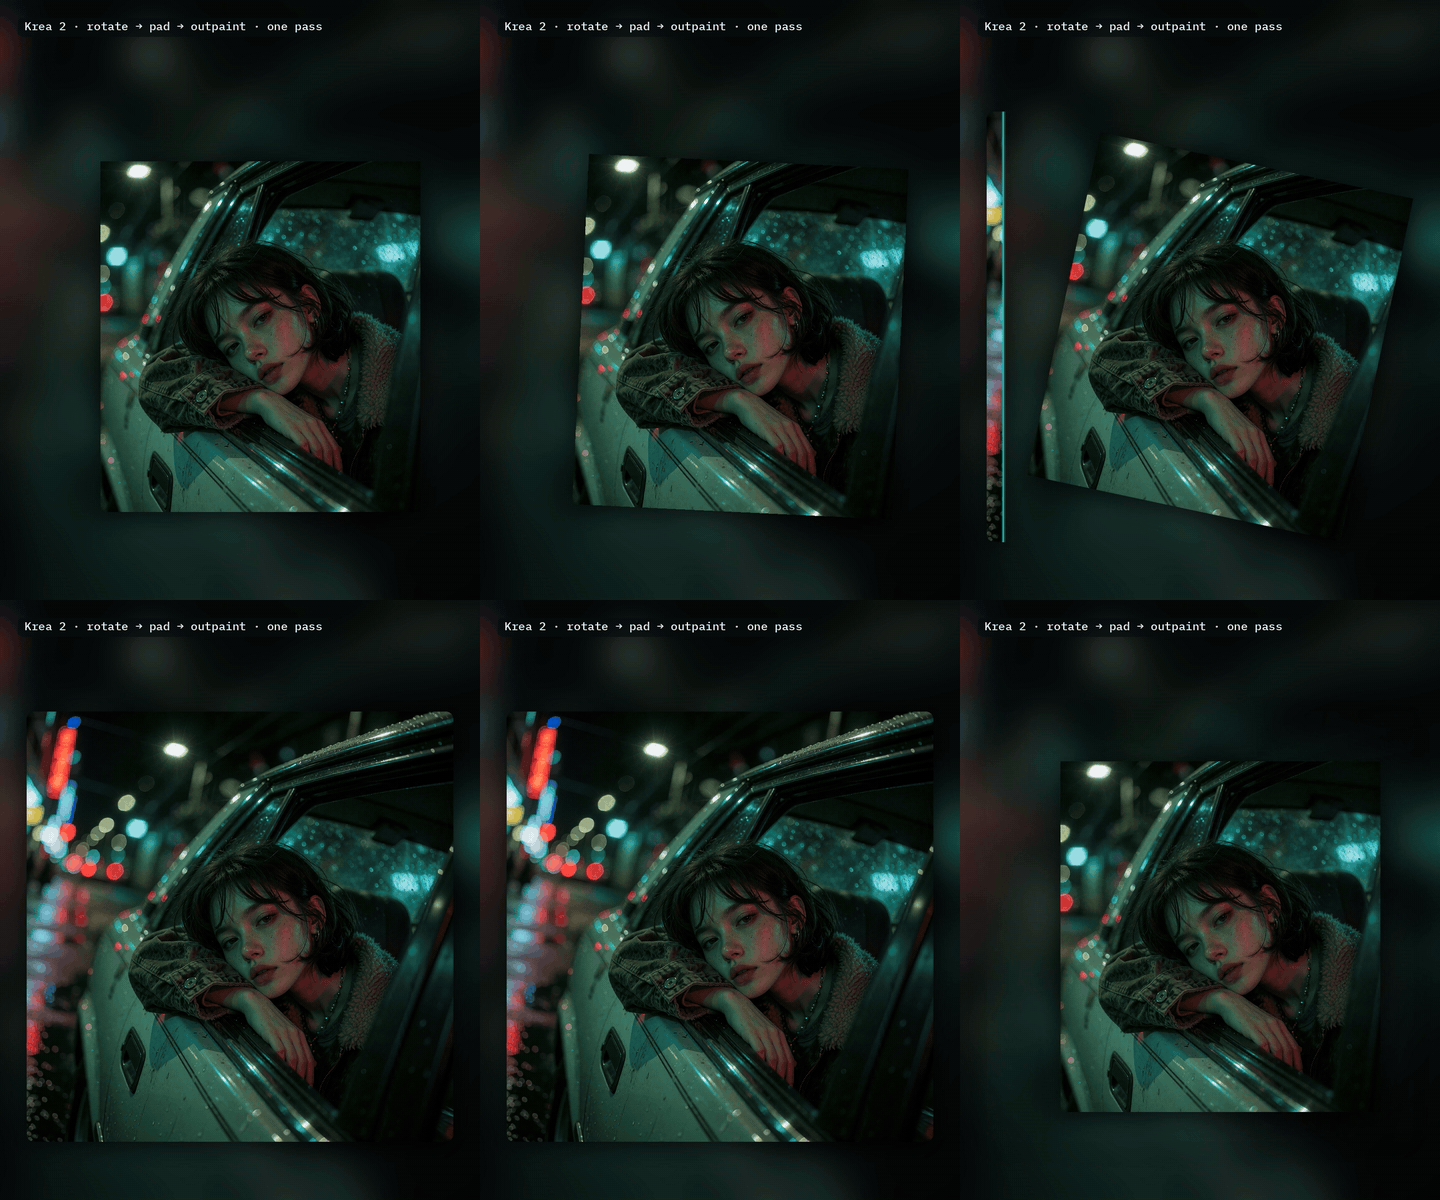
Krea 2 Rotate + Outpaint turns a photo, pads it and paints the new area in one pass. Try the Krea 2 Rotate + Outpaint example →
Load Image + Pad
Makes a canvas for outpainting: drag the edges out to add room around a picture. The Source list shows the picture under the pointer. The new area can be a solid color, the average color of the nearest edge, the edge pixels smeared outward, a blurred copy of the picture, or a mirror of it. The card also has a seam feather, a canvas multiple and a megapixel budget, and Exact padding opens one control per side. A budget of 0 keeps the picture's size, and anything higher resizes the picture before padding. A picture wired into source_image is padded instead of the chosen file.
It returns the padded image, a mask of the padding, width, height, a stitcher, and a smaller unpadded reference for the model. Wire the stitcher into Stitch Inpaint after the sampler, and everything outside the seam stays your original picture.
The Klein 9B Outpaint example pads its picture with Load Image + Pad. Open the Klein 9B Outpaint workflow →
Image Folder
Pick a folder, tick the pictures you want in a thumbnail gallery, and run the workflow on each one. All in one run does every picked picture with one press of Run. One per run loads one picture each run and steps to the next by itself, so a picture that fails only skips itself. It gives each picture's mask, its file name for saving the result under the same name, its number and how many there are.
Browse lists the folders inside ComfyUI's input or output folder. A folder from anywhere else on your computer is brought in: drop it on the node, or choose it in your file explorer, and its pictures are copied into the input folder. A really big folder asks first. The node reads nothing outside those two folders.
Image Resize
Resizes to a width and height, a longest or shortest edge, a megapixel count, or a scale factor. It can fit inside the size, stretch to it, fill it and crop the rest, or pad with a color you pick. New nodes start in megapixels mode, and saved workflows keep their mode. The card shows only the controls for the chosen mode, and width and height each take their own link.
An optional mask is resized the same way. It returns image, mask, width and height. Padding shows up white in the mask, and with no mask wired in, the rest of the mask is black. divisible_by rounds the size to a multiple, and interpolation picks the resize filter.
Tiled Upscale
Sets the size of the finished picture in megapixels and cuts your picture into tiles a model can redraw one at a time. A picture that fits in one tile stays whole, and a small picture is not redrawn far past the detail it has. Send the tiles through your sampler, then into Tiled Upscale Stitch with the stitcher.
Megapixels is the one control to set. Under More are the tile size, the overlap, the grid multiple and the redraw limit, and an upscale model can be plugged in. It returns tiles, stitcher, before (your picture enlarged the plain way to the finished size), width, height and a report that says what was done.
Tiled Upscale Stitch
Puts the redrawn tiles from Tiled Upscale back together, blends the joins and brings the picture to the size you asked for. Keep colors matches each tile to the same tile of your picture first, so the tiles agree with each other and grain in an old photo does not push the colors.
The Qwen Image 2.1 Upscale + Restore example redraws a small or worn photo sharp at the megapixels you set, in tiles above about 2. Try the Qwen Image 2.1 Upscale + Restore example →
Align Image
Rounds a picture's size to a multiple you choose, by resizing, cropping or padding. Use it when the next model needs sizes that divide evenly and you don't want to type a target size. Crop and pad have anchors for where to cut or add, and padding can repeat the edge pixels or use a solid color. It returns the picture with its width and height.
Image Size
Reads a picture's width, height, longest_edge, shortest_edge and batch count as whole numbers. Wire them into a resize, a latent, a frame count or Math Expression, so the rest of the graph follows the source's size. After a run the node shows each number beside its output.
Color Match
Matches a picture's colors to a reference, with LAB, RGB, MKL or histogram transfer. Strength sets how much, and an optional mask (with invert) limits where. With reference_mode set to first frame, every frame of a batch matches the batch's first frame. That can cut down color drift in a clip, but it does not steady motion.
Realign to Source (EXPERIMENTAL 🧪)
Lines an edited picture back up with the original. Qwen Image 2.1 often draws an edit, especially a style change, a little bigger or shifted: up to about 12% taller, by a different amount every seed. Wire in the edit and the picture it was made from. The node measures how far the edit moved and moves it back, at the original's size. It fixes the zoom and shift of the whole picture, not shapes the edit redrew in a new place, so the result lines up closely rather than pixel for pixel.
For the best result, pad the picture with Load Image + Pad's mirror fill before the edit and wire its stitcher in. The edit gets room to move, and you get back just your picture's area with real picture at the edges. Without that margin, an edit made at the picture's own size loses a thin strip the model pushed out of view. empty_mask marks that strip so you can crop or inpaint it, and Empty fill picks what it shows in the meantime.
Fit is zoom + shift (how Qwen edits drift) or affine, which also fixes a slight tilt. When the drift is a whole number of pixels, the node cuts the picture out as it is, with no resizing. report gives the measured zoom and shift, and the margin a side needed when an edit ran out of picture. A picture it can't measure passes through at the source's size, and the report says why. Try the Qwen Image 2.1 Edit + Realign example →
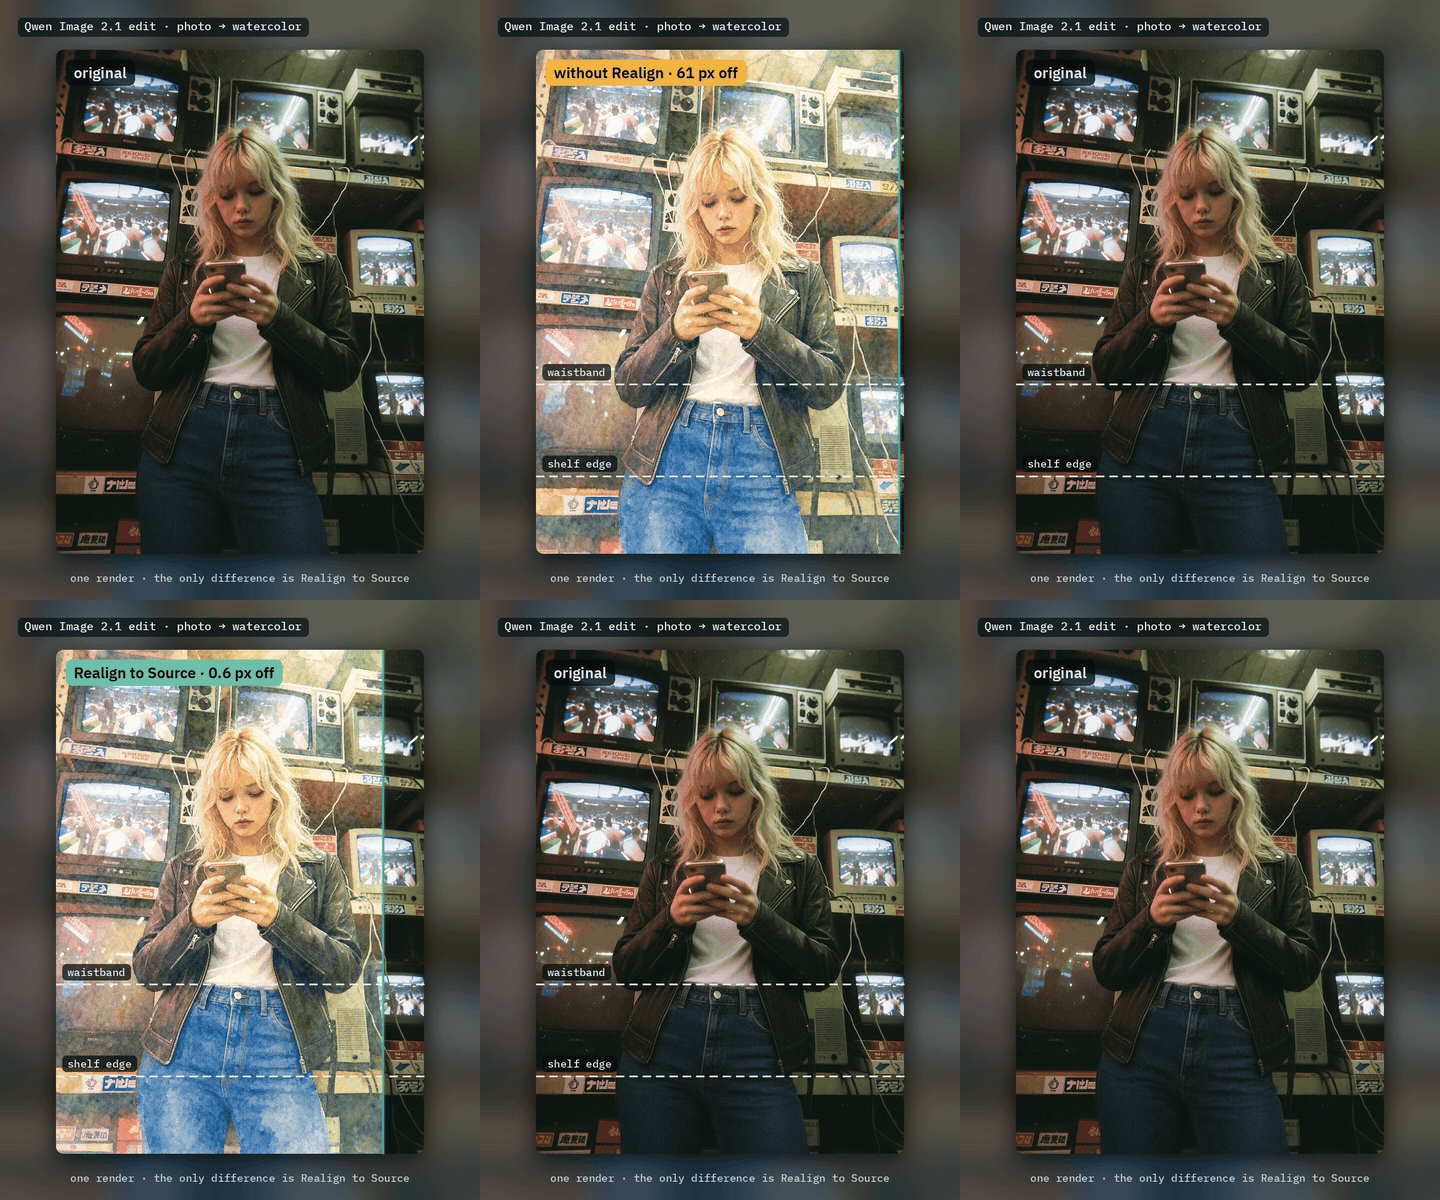
The same watercolor edit without and with Realign to Source: 61 px off before, 0.6 px after.
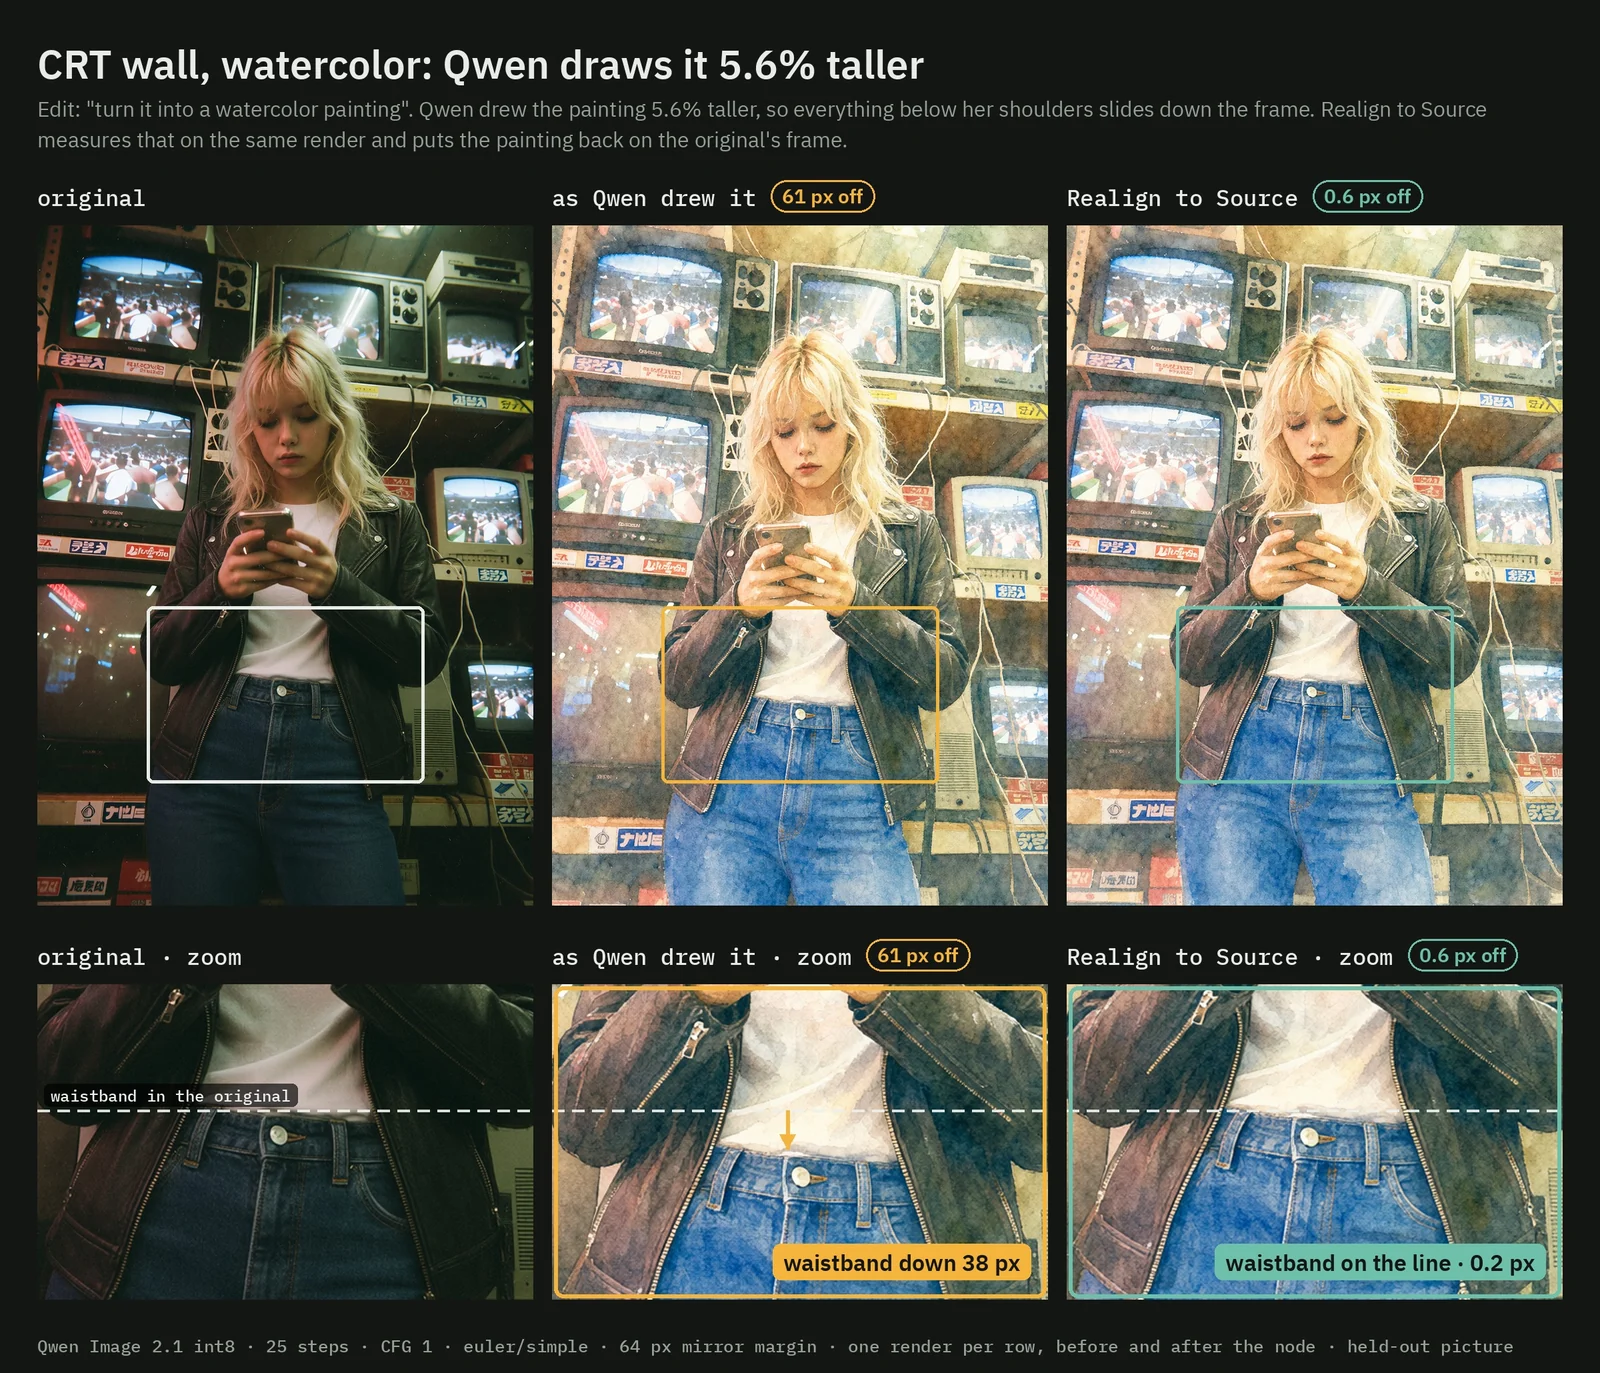
Qwen drew this watercolor 5.6% taller, and Realign to Source lined it back up with the original.
Image Compare A/B
Compares two pictures with a slider, or flips between them whole. Nothing covers the picture, and its size shows underneath. The panel grows with the node, and images A and B pass through, so you can put it anywhere on an image wire. Erase mixes the two by hand: rub parts of one picture away with a brush so the other shows through, then save the mix as a PNG under a name you type, with a layered PSD for Photoshop or GIMP if you want it.
Save Image
Saves PNG, lossless WebP or lossless JPEG XL, with the workflow embedded if you want it. Pick a folder inside ComfyUI's output folder or browse its subfolders, edit the file name, and the path preview shows where the file will go. Chips add a counter, the date, the time, the size or a batch number to the name. Name tokens work as in ComfyUI's own Save Image: %date:yyyy-MM-dd%, %width%, %KSampler.seed%.
Link filename to keep a name from upstream, or caption_text to write a matching .txt next to each picture. The counter picks a name that isn't taken yet. Turn it off to reuse the same path on purpose. JPEG XL needs the optional pillow-jxl-plugin extra. The help page has the full naming and compatibility notes.
Video nodes
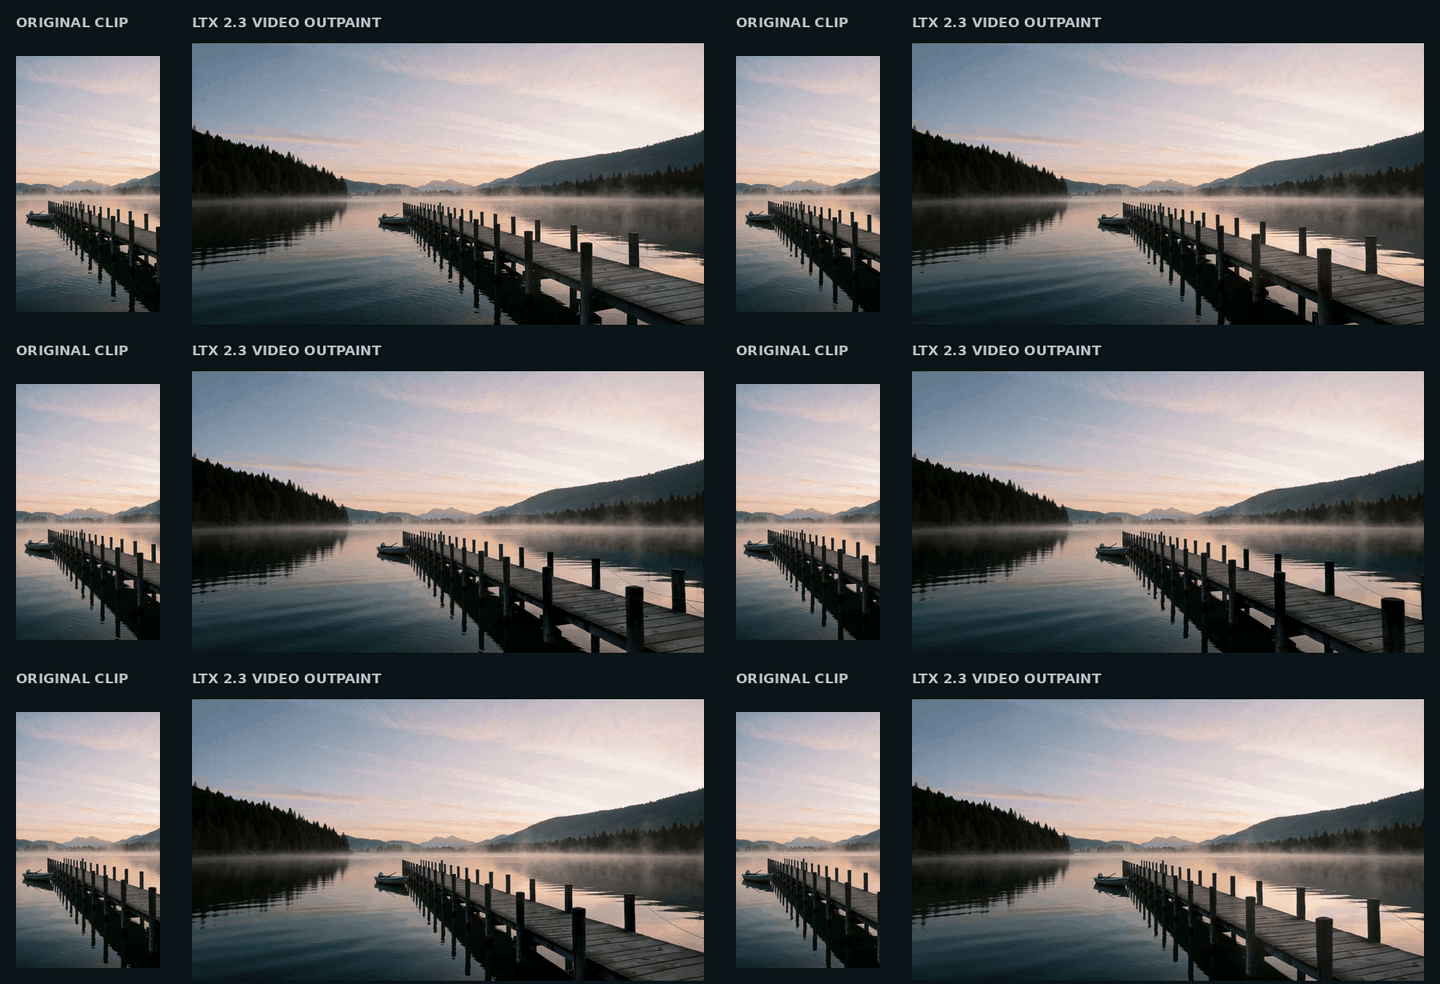
Here LTX 2.3 Video Outpaint takes a square clip to 9:16 and stitches the original frames back in.
The example keeps the clip's audio when there is any. The outpaint LoRA needs a pure black fill, since gray or white bands come back flat. With a black canvas it works at any aspect ratio and on any side. Open the LTX 2.3 Video Outpaint workflow →
Load Video
Upload a video, or pick one from the Source list, which plays the clip under the pointer. Trim it with IN and OUT handles or typed timecodes. The player plays the part you kept and can loop it. Width and height resize while decoding, and setting only one keeps the shape. every_nth skips frames and lowers the reported fps so the timing stays right, and max_frames caps how many frames load.
It returns the frames, audio, frame count, fps, width, height, duration and a core VIDEO. Only the part you kept is decoded, and it checks memory before a large load. When you save the frames, wire its fps into the save node.
Video Crop + Rotate + Pad → Frame
Picks one frame from a video, then gives you the same rotate, crop and pad controls as the image node, plus an optional megapixel resize. Scrub to the frame with the playhead on the node; the editor adds frame-by-frame stepping and playback. It returns the transformed image, a mask of the added area, a stitcher, the chosen original frame, and the output width and height. For a whole clip, use the Clip version below.
Video Crop + Rotate + Pad → Clip
Applies one rotate, crop and pad to every frame of a trimmed clip. It has the source picker, a timeline with a playhead and frame-accurate IN and OUT handles, frame skipping, a frame limit, the transform handles and output resizing. While you drag a trim handle, the node shows the exact first or last frame the run keeps. The bright part of the selection is what gets output.
Fill, feather and the resize budget sit on the node face, and a new clip keeps them. That matters for video outpainting, because the black, hard-edged canvas the model needs survives a source swap. A fresh Clip node starts with that canvas, and the editor's Reset transform goes back to it. Frames for trims the end to the frame count the next video model takes: LTX (8n+1) or Wan (4n+1). Tap a ratio to pad the clip to it; a new clip is padded to the lit ratio too. The padlock keeps the shape while you drag a handle.
It returns the frames, mask, audio, frame count, fps, size, duration, a stitcher, and the chosen original frames before the transform. Inpaint & Stitch in the editor sets the protected source area and previews the blend. After a video outpaint, wire the stitcher straight into Stitch Inpaint, with no Crop For Inpaint in between. It works in chunks to keep memory down.
Fixed frames sets an exact output length: 120 frames at 24 fps is five seconds. Drag either handle, or drag the highlighted band to move the whole window. Type the count, or link a frame count into fixed_frames. 0 turns the fixed length off. The frame limit still caps the length.
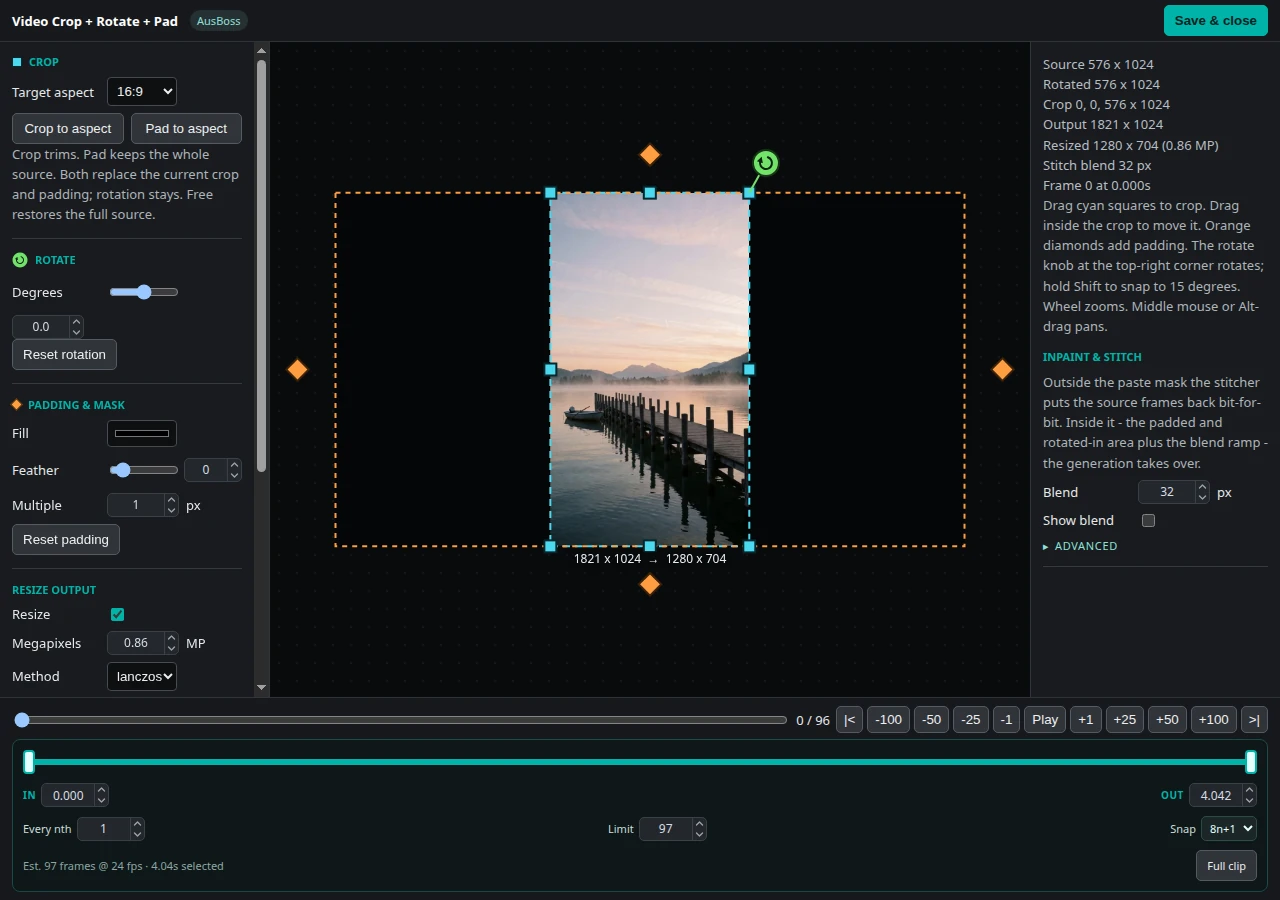
The Clip node's editor, from the video outpaint example.
Select Frame
Picks one frame from a batch, unchanged: 1 is the first, -1 the last and -2 the one before it. 0, or a number past the end, stops with an error that gives the valid range. The preview switch shows the frame, or hides it and skips writing the preview file.
Frame Interpolate
Changes a clip's frame rate by making in-between frames. You set the source and target fps, so 24 to 30 works as well as doubling. The blend method crossfades frames, and optical flow uses RAFT weights you put in place yourself. At a hard cut it holds the frame instead of blending two unrelated shots. It works in chunks to keep memory down.
It returns the new frames and their fps. It doesn't touch audio, so carry the source audio to Save Video separately. The help page covers the weights and timing.
Save Video
Saves a frame batch or a core VIDEO as MP4 (H.264 or H.265), WebM (VP9 or AV1), ProRes MOV, lossless FFV1 MKV, GIF or WebP. Which encoders you get depends on your FFmpeg and PyAV build, and H.264 and H.265 come in CPU and NVENC versions. The videos carry color tags, and optionally audio and the workflow.
Ping-pong plays forward and then back without repeating the turnaround frames. A wired VIDEO brings its own frame rate; otherwise wire fps from Load Video or Frame Interpolate. The player on the node shows the saved file. Drop a saved video back on the canvas to load the workflow inside it, for the formats that can hold one. The help page has the format and audio details.
Mask and inpaint nodes
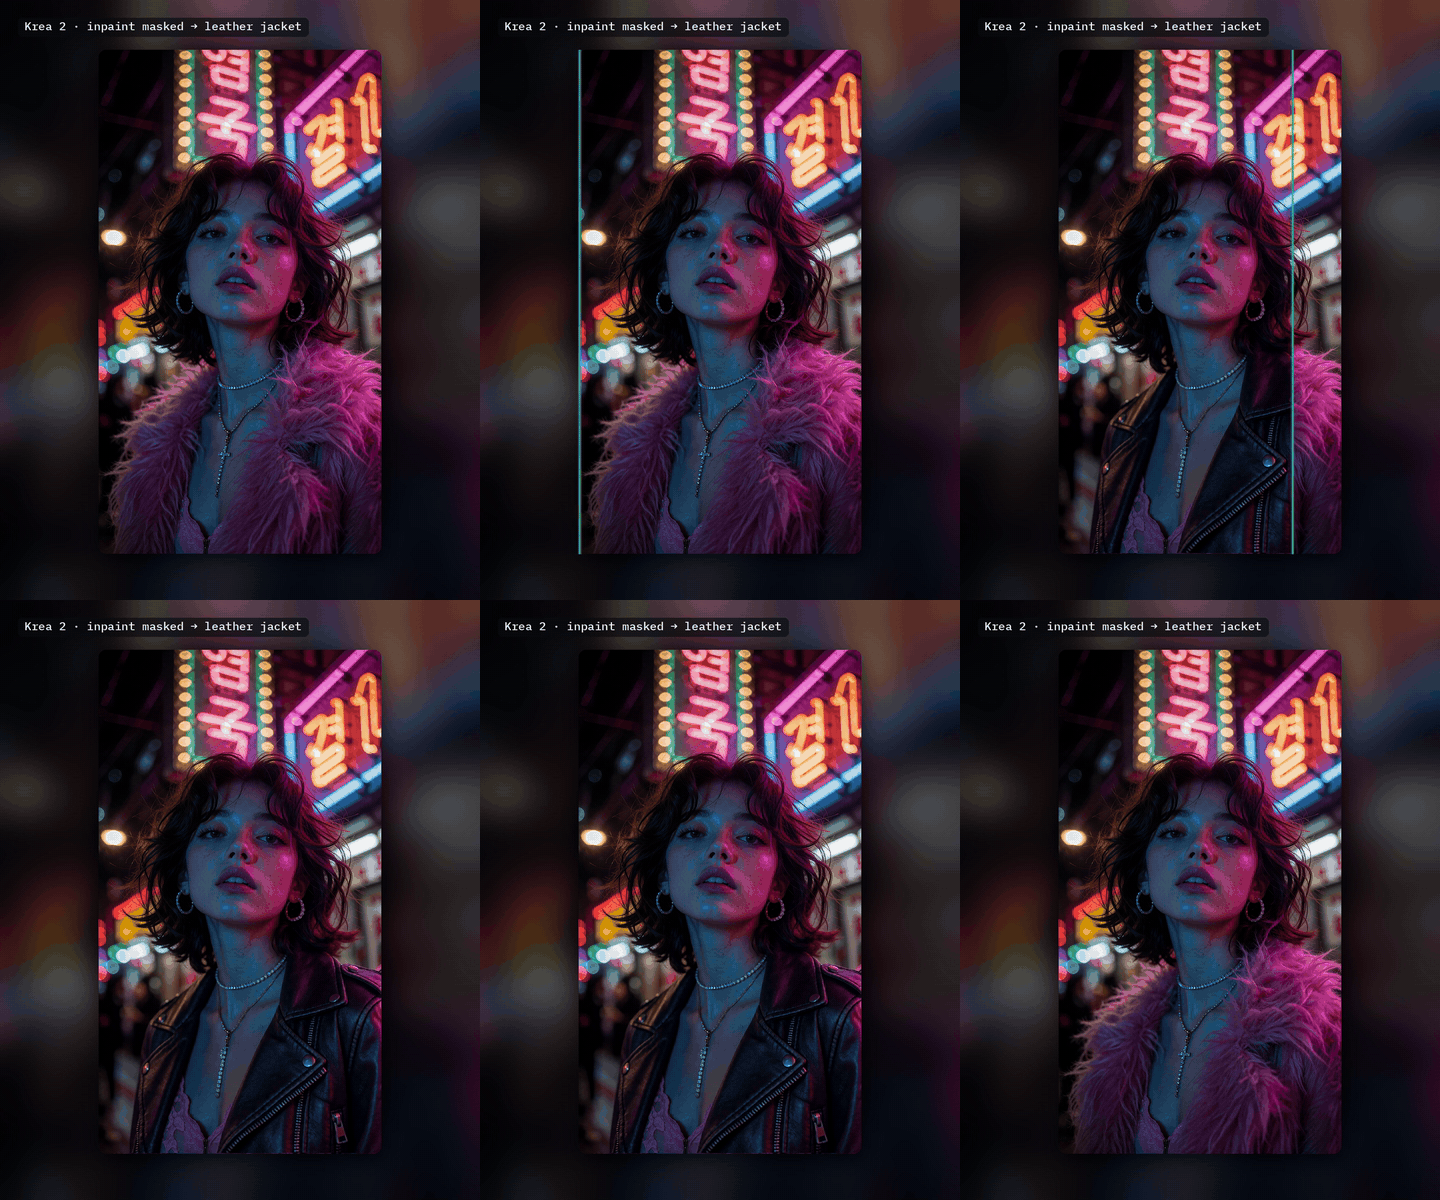
Krea 2 Inpaint Masked turns the painted fur coat into a leather jacket, using Mask Refine, Crop For Inpaint and Stitch Inpaint. Open the Krea 2 Inpaint Masked workflow →
Mask by Name
Type what to find in a picture, like "the dog" or "the red jacket", and get its mask. Nothing to paint. The node shows what it found, tinted on the picture, with how sure it is, and FIND runs only this node so you can check the mask before the rest of the workflow runs. When it finds nothing it stops the run with a plain message, so nothing after it runs on an empty mask; a setting passes an empty mask on instead.
It also returns the thing cut out on a see-through background, and how many things matched. Under More: how sure SAM 3 must be, fill the holes in the mask, and free SAM 3 from VRAM after the search. If you build a workflow that loads a big model after this node, turn Free VRAM on. The search is ComfyUI's own SAM 3: wire model and clip from a Load Checkpoint that loads the SAM 3 file. Needs ComfyUI 0.20 or newer, which has SAM 3 built in.
The Mask by Name example finds a thing by its name and saves its cut-out and its mask, with a Workflow Switches card to skip either one. Open the Mask by Name workflow →
Mask by Touch
Click a thing on the picture and get its mask. No name to type and no MaskEditor: the picture is on the node. Move the pointer over it and the thing a click would take lights up, with its name beside the pointer: the jacket, not the whole person. Click to pick it, and click more things to add them. What is lit in teal is what the mask will be.
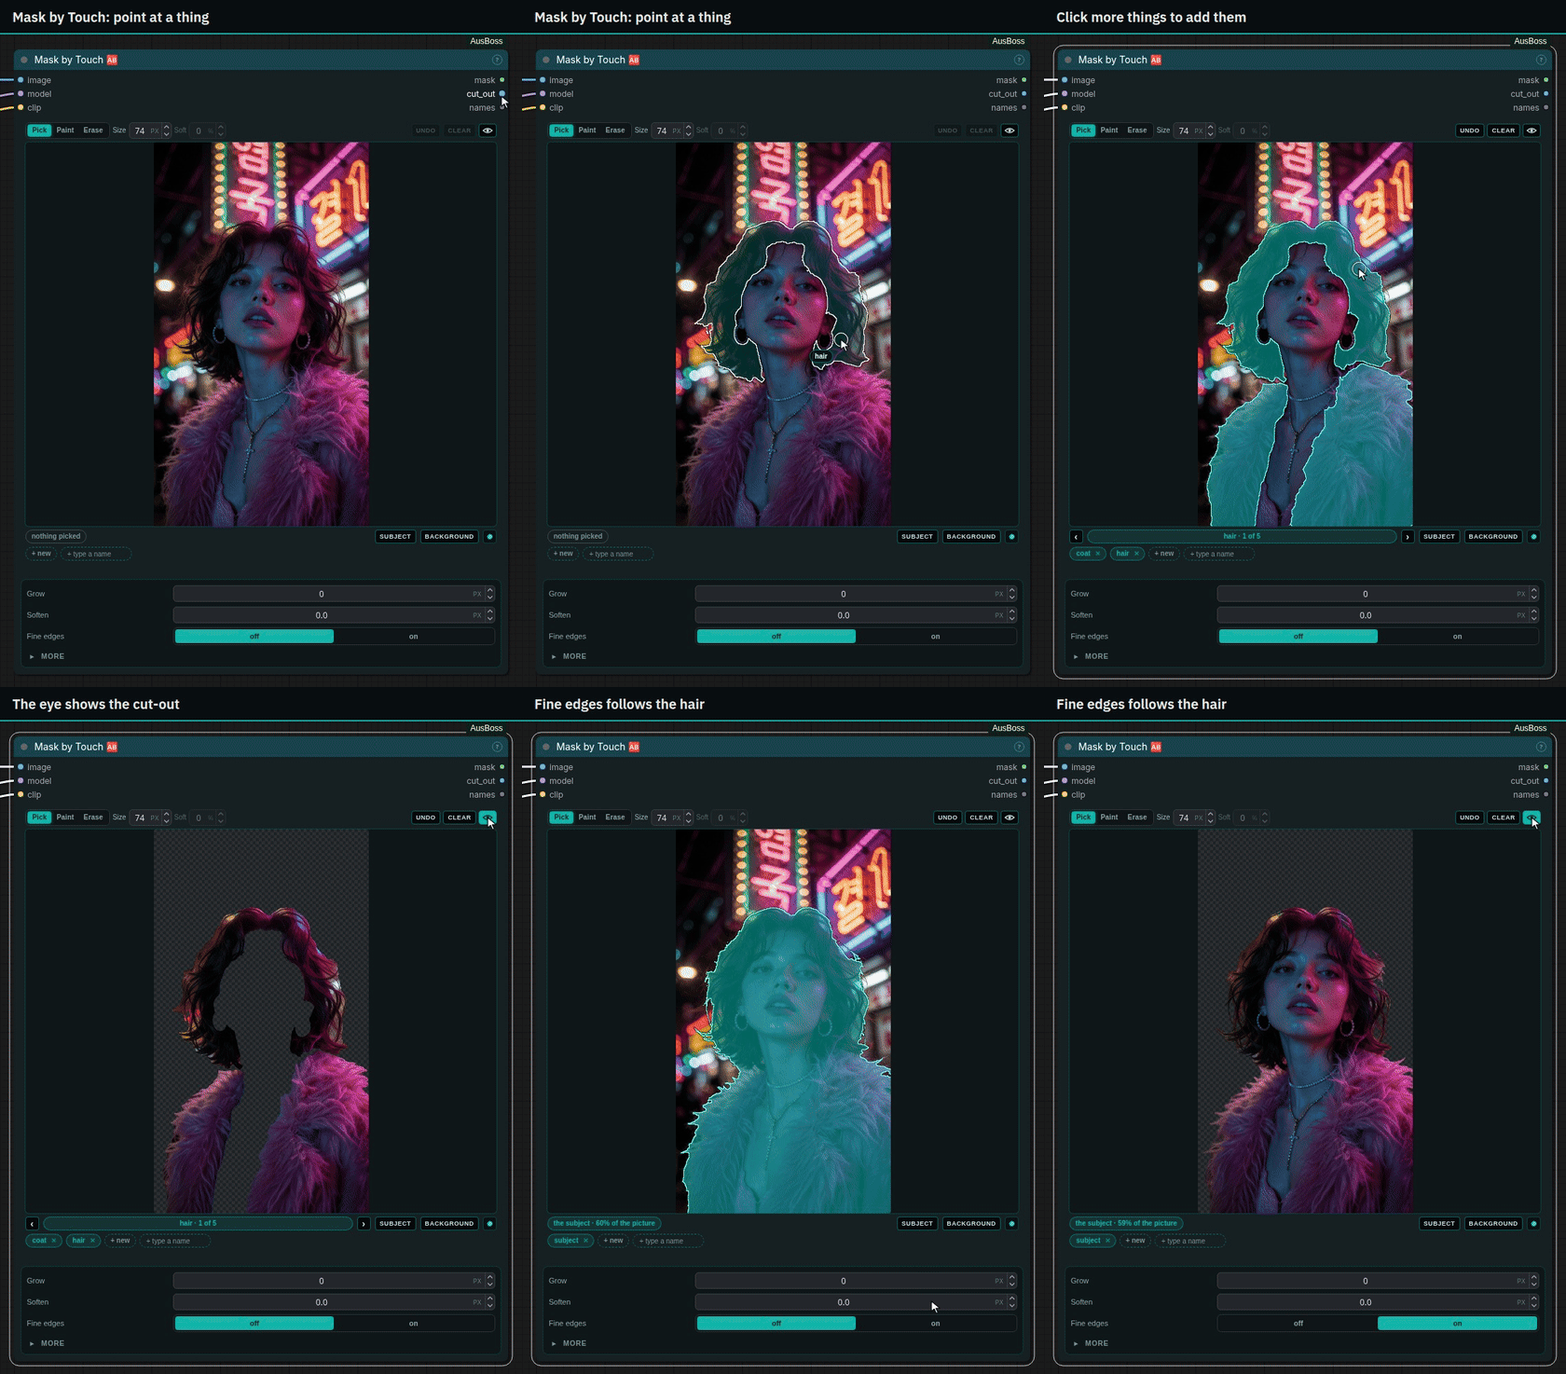
When a click could mean more than one thing, the node shows the pick with two arrows, like ‹ jacket · 1 of 3 ›: an arrow swaps it for the next thing at that spot. A stroke across two things, like both shoes, takes both. Ctrl-click a thing to take it away again.
To fix the mask by hand, switch Pick | Paint | Erase (or press W, B or E, as in Photoshop). The brush has a size and a soft edge, set with [ and ] or by holding Alt and the right mouse button and dragging, and it shows under the pointer as it will paint. Hold Ctrl for the opposite: erase while you paint, paint while you erase.
Every area has a chip under the picture: a thing you picked, or an area you painted. Paint that touches an area joins its chip, and erasing makes none. A chip's cross takes that area away, a click selects it so what you paint joins it, and all 3 on a named pick takes every thing of that name. The field at the end of the row takes a name you type, for things that did not light up.
Subject picks the picture's main subject in one click, and Background everything else. Fine edges is for hair and fur: switched on, the outline of the subject is followed strand by strand, on light and dark backgrounds, and the cut-out loses the colour of the old background. All three use ComfyUI's own background-removal model (birefnet.safetensors, ComfyUI 0.21 or newer); the help page says where to get it.
Grow and Soften show on the picture while you drag them. Under More: Smooth, Fill small holes, Invert, what to do when nothing is picked, and Free VRAM. The eye beside Undo and Clear hides everything else to show the result, as a cut-out or as the mask.
It also returns the picked area cut out on a see-through background, and the names of what was picked as text. The search is ComfyUI's own SAM 3: wire model and clip from a Load Checkpoint that loads the SAM 3 file. Needs ComfyUI 0.20 or newer, which has SAM 3 built in. The help page has the keys and the details.
The Mask by Touch example loads a picture, lets you click what you want, and saves its cut-out and its mask, with Fine edges on. Open the Mask by Touch workflow →
The Qwen Image 2.1 Inpaint example uses the same click to change one thing: click it, say what it should become, and only that part is repainted. Open the Qwen Image 2.1 Inpaint workflow → · Watch it on YouTube →
Mask Refine
Grows or shrinks a mask, blurs it, fills holes, smooths jagged edges, and sets black and white points. The card shows Expand and Blur, and More opens the rest. AUTO picks expand and blur values from the mask's size. The optional preview shows the result.
It returns the refined mask and its inverse. The guided filter and matting edge modes use a guide picture and each need an optional extra (see Optional extras). The default, off, needs nothing extra.
LaMa Inpaint
Removes what is under the white part of a mask and fills the hole from the surroundings, using a local LaMa model. Pixels under black stay as they are. One mask can cover a whole batch, and video frames go through one at a time to keep VRAM use down. The preview can show frames as they finish, or be switched off.
Put big-lama.pt in ComfyUI/models/lama/. It works one frame at a time, so a hard texture in a video may need more cleanup across frames. The old SimpleWatermarkRemover node id still loads, so older workflows keep working. Try the Simple Video Watermark Remover example →
Crop For Inpaint
Crops the masked area plus some of what's around it, and can resize the crop to a target size or megapixel budget. It returns the cropped image, the mask the model paints in, and a stitcher. The card shows the usual mask and blend settings, and target size and canvas extension fold behind a disclosure.
The mask and the blend are separate. Growing or blurring the mask changes what the model can repaint, and the blend margin changes how the result joins the original. Raise Context or Extra context when the model needs to see more around the area. Stay in picture, on by default, stops the crop at the picture's edges. The extend_* controls grow the canvas for outpainting.
Stitch Inpaint
Puts a generated crop or outpaint back into the original, using the stitcher from Crop For Inpaint, Load Image + Pad or any Crop + Rotate + Pad node. Everything outside the blend area keeps the stitcher's original pixels exactly. A video stitcher carries every original frame.
For a turned picture, or an outpaint with Tone match off, set Seam to blend in in the card's gear menu. It fades the model's picture into yours with no tone shift. Tone match evens out color steps at the seam. Fix edge halo cleans up a rim that got blended twice. It needs the optional matting extra, and without it the node warns and stitches normally. The help page explains the stitcher and batches.
Models and conditioning
LoRA Loader
A whole LoRA stack in one node. Each row has an on switch, a searchable picker for the file and a strength you scrub. The strength bars share one scale, so the rows are easy to compare, and switching off the strongest row rescales the rest. Model and CLIP strengths can be split, and the CLIP input is optional.
The toolbar has the stack toggle, saved templates, reconnect and settings. The toggle turns the whole stack off, and back on to the rows you had on. Absorb chain LoRAs in the settings menu moves a chain of other LoRA loaders into this stack, in the order they applied, repeats included. It bypasses the old loaders only when every MODEL, CLIP and other connection can be kept. A shared branch or linked stack settings leave the chain alone.
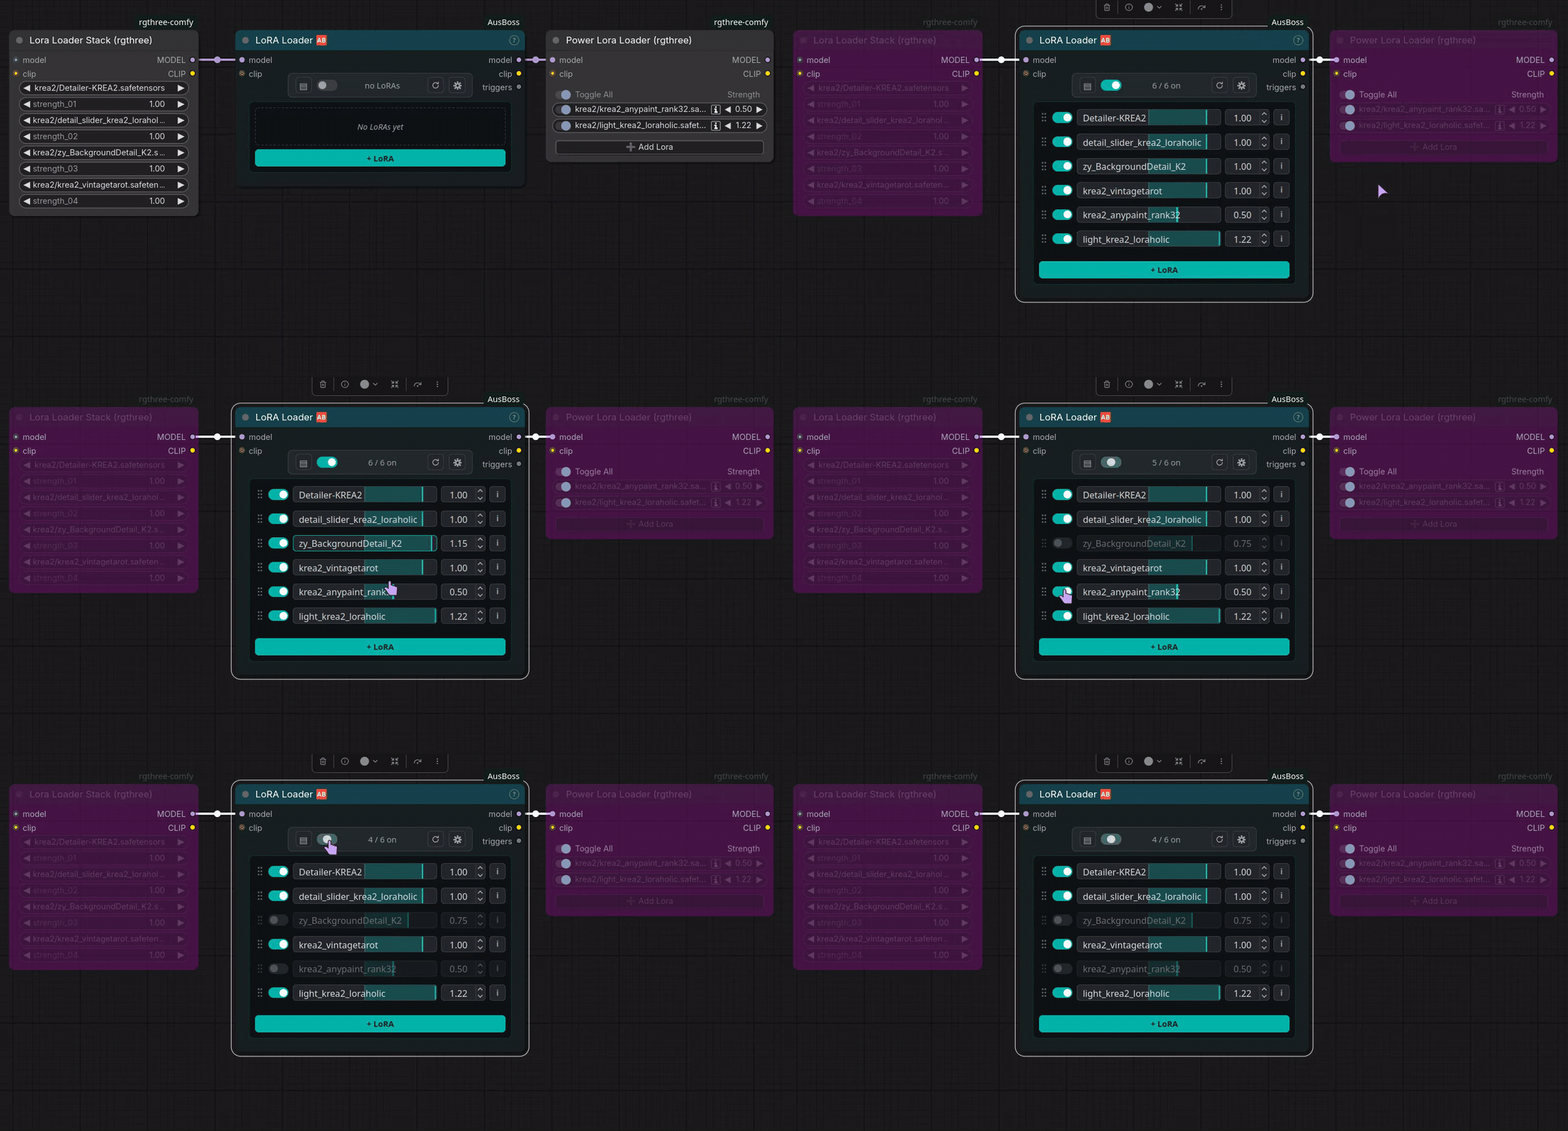
Each LoRA gets an info card from the file's metadata, a .civitai.info file next to it, and words you save yourself. The card's Fetch Civitai info button looks the file up on Civitai (your browser asks civitai.com, only when you click) and saves the answer as that .civitai.info file. Files Civitai doesn't know, such as unpublished or hidden models, come back as not found. The trigger words you pick come out of the triggers output. The same click saves the LoRA's picture from Civitai next to the file, so hovering the LoRA shows it (PG-13 or milder unless you allow more in the gear menu; a picture you already have is never replaced).
In the + LoRA list, tick several files to add them at once. Rows can be gathered into groups, like layer groups in an image editor: each group folds away, and has its own switch that turns all its LoRAs off while each one keeps its own setting. A Workflow Switch can turn a whole group on and off.
When a file has moved, the node finds it by name if only one file matches. A missing LoRA that is switched on stops the run by default. Turn off Stop on missing LoRA to warn and skip it instead. A LoRA that changes nothing in the model gets a warning with its file name.
Krea 2 Encode
Krea 2's positive and negative prompts in one card. Connect a VAE and reference pictures, and it adds them as references too, resized for the model first. VLM reference sets whether the text encoder also looks at them. Leave the references empty for plain text to image. For an outpaint, connect the pad node's mask too: the model then sees the new area in your picture's own colour instead of gray, so it paints it rather than keeping a gray frame.
The prompt box takes several lines and a linked text. The help page covers preparing references. With an outpaint LoRA, copy the wiring from the matching example.
Krea 2 Outpaint Model Patch
Tells Krea 2 where a reference picture sits on the canvas. It's made for Krea 2 outpaint LoRAs, and the two that exist want different placements. Put it after the LoRAs and before the sampler, and connect a stitcher and the reference conditioning from Krea 2 Encode.
The card has Reference placement and KV cache. The placement has to match the LoRA:
- Whole canvas + AnyPaint: the padded picture is the reference, VLM reference is on, the pad mask goes into Krea 2 Encode's
mask, and a masked starting latent keeps the known pixels. Several sides can extend in one pass. The Krea 2 Outpaint example works this way. - Source rectangle + Registered Outpaint: use the unpadded reference with VLM reference off. The source has to span the whole canvas in one direction, so extend left and right, or top and bottom, in each pass, including any padding added for rounding.
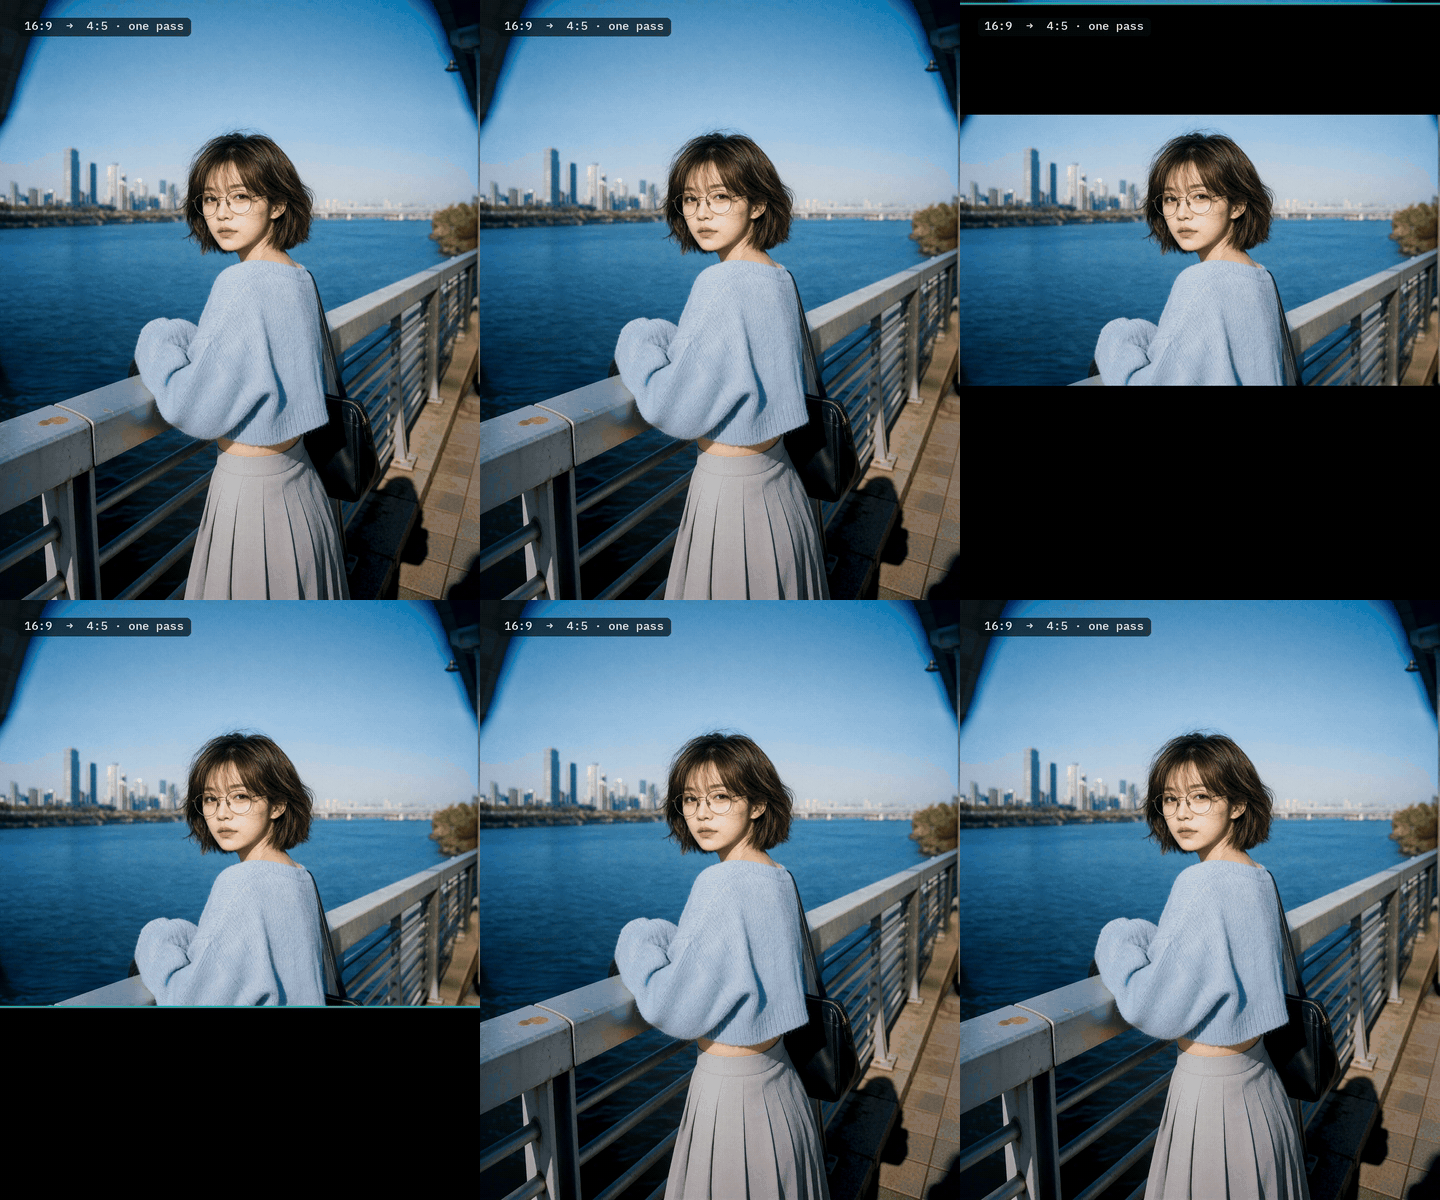
Here Krea 2 Outpaint takes a 16:9 photo to 4:5 in one pass. Open the Krea 2 Outpaint workflow →
The patch relies on ComfyUI's internal attention code. Its help page explains both setups and what happens without reference conditioning.
Workflow utilities
Core ComfyUI has its own nodes for most of these jobs, and they work fine. These versions add the extras described under each one.
Latent Size
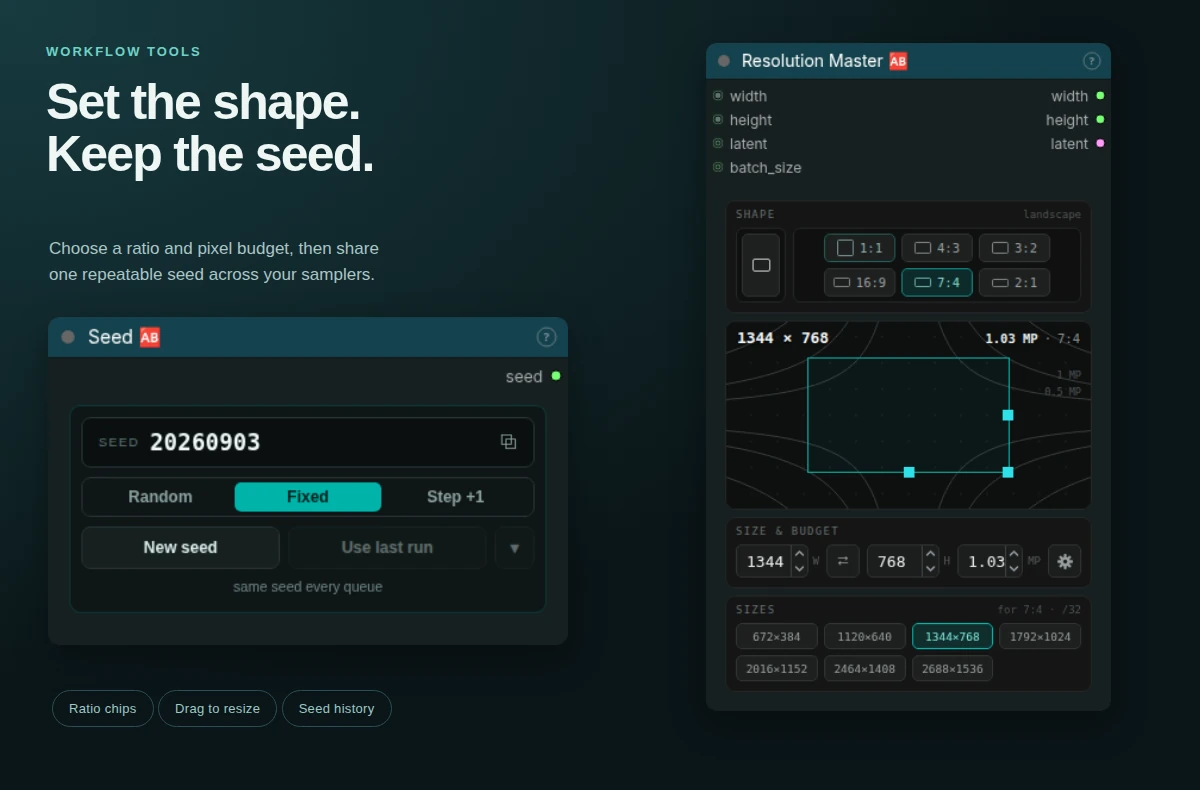
Sets a canvas size. Pick landscape or portrait, a ratio and a megapixel budget, or drag the canvas handles. Orientation stays separate from the ratio, even on square. Typed sizes stay exact, and how drags snap is adjustable. It was called Resolution Master before 2.4.0.
It returns width, height and an empty image latent. The gear picks the latent layout (4, 16 or 128 channels) and the batch size. The latent's size rounds down to whole latent cells, so pick sizes that suit the layout when you wire the latent to a sampler. For video, use width and height with the model's own video latent node.
Layout Boxes
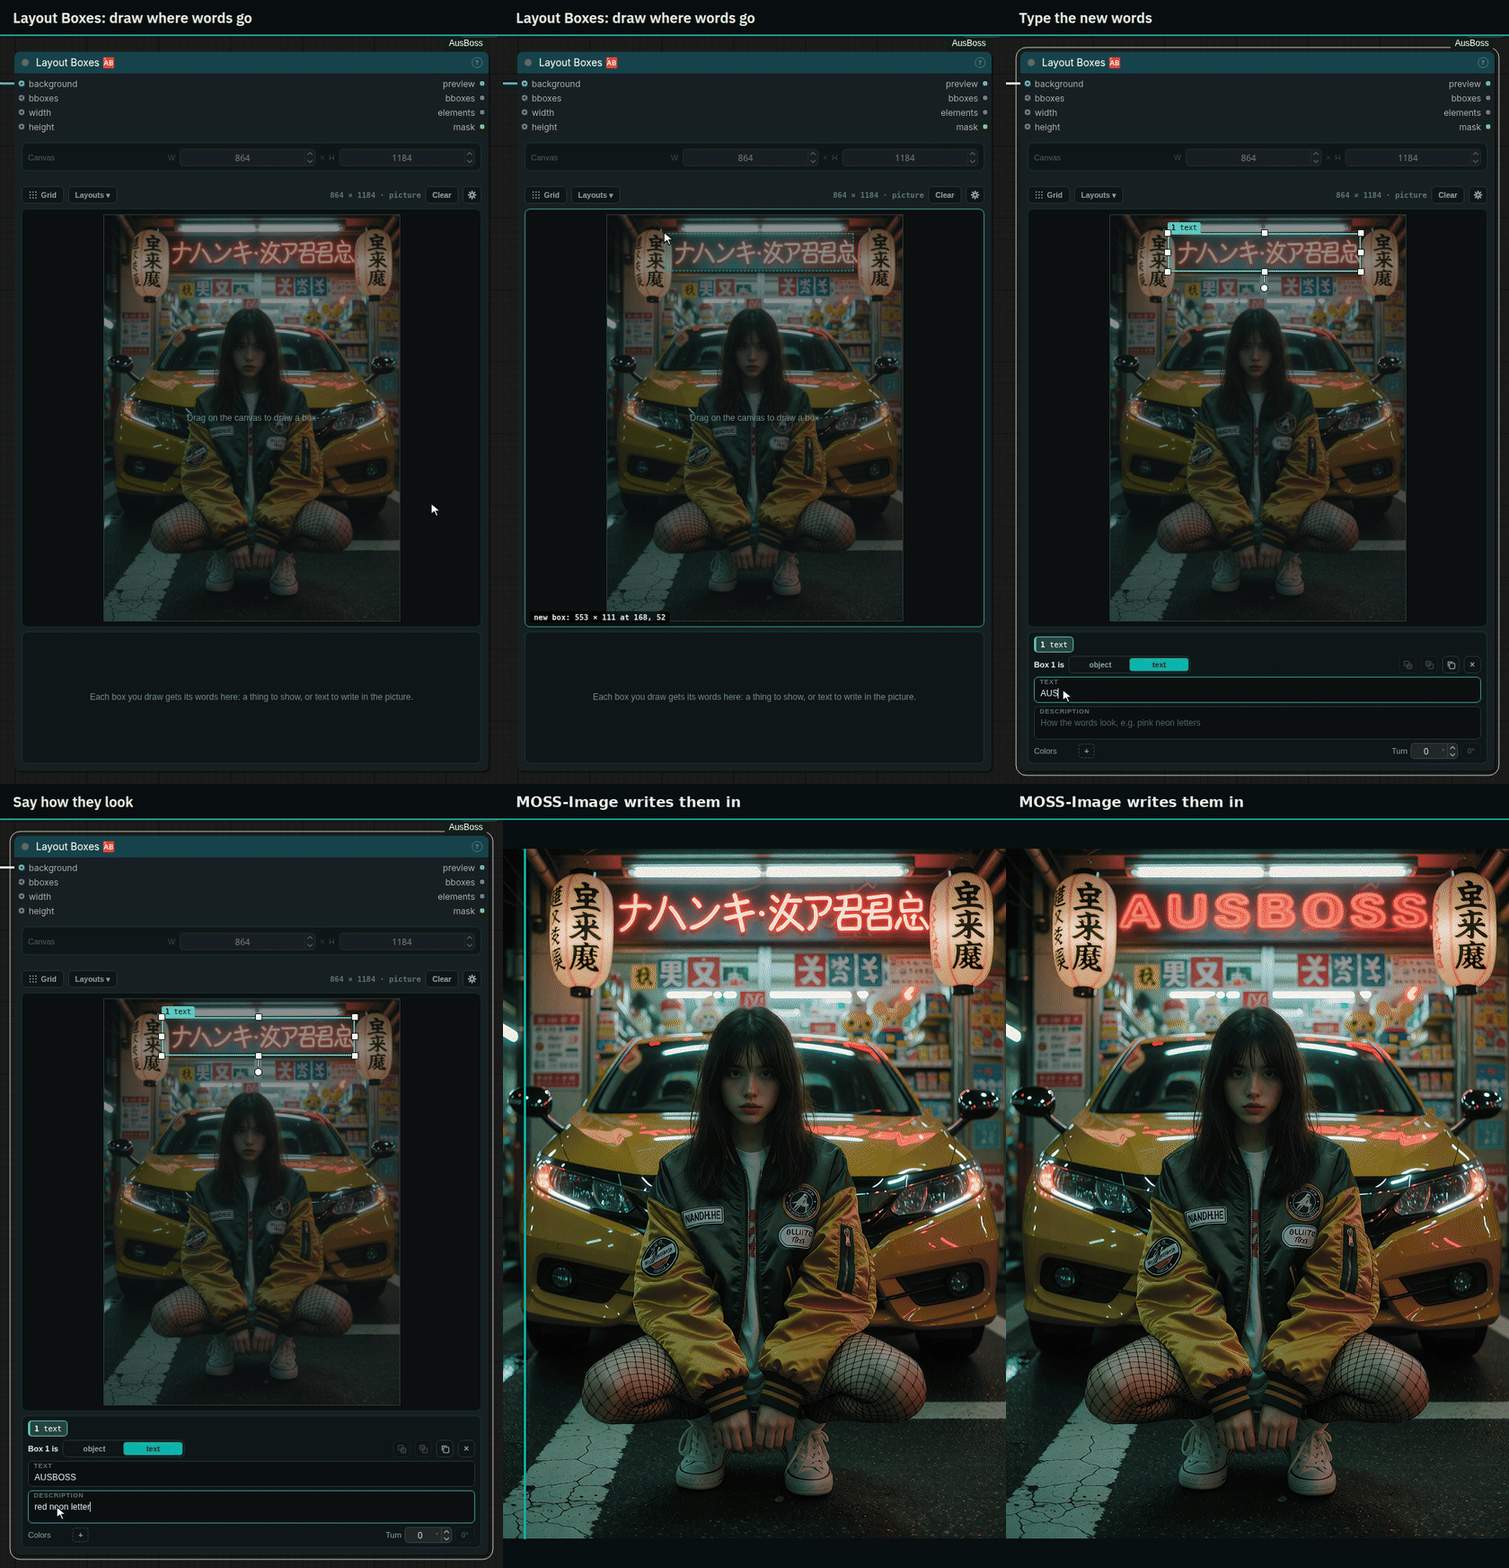
Draw boxes on a canvas and say what goes in each one: a thing, or words to write in the picture. Wire elements to MOSS-Image Layout Prompt and the picture puts each thing where its box is. It does what ComfyUI's own Create Bounding Boxes does, with the same inputs and the same outputs from the same boxes, and its canvas also works in the classic node look.
Drag to draw a box, drag it to move it and its handles to size it; under the canvas each box gets object or text, its words and up to five colors. A picture on background shows under the boxes and sets the canvas size, width and height can come from Latent Size, and boxes on the bboxes wire fill the canvas when the workflow runs. Grid snaps the boxes as you drag them, starts off over a picture and takes its size from the gear, Layouts starts from a ready arrangement, the arrow keys move the chosen box one pixel at a time (ten with Shift), and Delete and Ctrl + D remove and copy it.
The mask output is white inside every box: load a picture, draw a box over the words on a sign, and an inpaint chain can write new words there while the rest of the picture stays as it was. For words at a slant, drag the round handle over a box to turn it: the mask turns with it, and a turned text box tells the model its slant.
Seed
One seed for several samplers. Random, Fixed and Step set what happens after each run. Switching to Random, or from Fixed to Step, changes the seed right away, so the next run is a new one. New seed rolls a value and keeps it. Use last run brings back the seed the last run actually used. The history menu keeps the last eight seeds and saves them with the workflow.
Select Every Nth
Keeps every nth picture of a batch, after an offset that counts from 0. With nth 2, offset 0 keeps frames 1, 3 and 5, and offset 1 keeps 2, 4 and 6. The order stays the same. Wire the batch's fps in, and the fps output is divided by nth, so the thinned clip still lasts as long.
Split Batch
Splits a batch after a frame number, counting from 1. Output a ends with that frame, and b gets the rest. Each side needs at least one frame, so a split point that breaks that stops with an error that gives the valid range.
Merge Batches
Puts batch b after a. When the sizes match, nothing is resized. When they differ, it resizes to a's size or b's size, or stops with an error, whichever you pick. Both need the same number of channels.
Text
A text box that grows with the node and sends its text, unchanged, down a STRING wire. Use it for a prompt, caption, path or other text that several nodes share. Spaces and line breaks are kept. Ctrl + Up and Ctrl + Down change the weight of the selected words, as in ComfyUI's own prompt boxes.
Integer
One whole number (INT) on a scrub control, for sharing a size, count or other whole number across nodes. Like every number box in the pack, it takes a typed sum: 1024*1.5.
Float
One decimal number (FLOAT) on a scrub control, for sharing a strength, scale, frame rate or duration across nodes.
Math Expression
Works out a number from linked a, b and c inputs, each an integer or a decimal. An input left unwired counts as 0. It handles arithmetic plus min, max, abs, round, floor, ceil and sqrt, for example a * 2 or ceil(a / 32) * 32. It returns a float and a rounded integer, and halves round away from zero. The expression is parsed, never run as Python code.
Show Text
Shows what arrives on a wire, in a panel you can select from and resize: text, a number, or any other value. Text is passed on unchanged, and a number comes out as text. The last text shown saves with the workflow. Very long text may be cut short on screen, but the output keeps all of it. It runs as an output node, so nothing has to be connected after it.
Free Memory
Passes any value through and, on the way, unloads ComfyUI's cached models, runs Python's garbage collection and clears the CUDA cache where there is one. Put it between two heavy stages when the second one needs the room. It runs only when its input changes, like any cached node, and later stages may take longer while models load again.
Workflow Note
A setup card for a shared workflow: a title, instructions in Markdown, each model's download link and folder, the node packs it needs, and your links. It checks the models and packs against the install it's opened in. Edit changes the card, and Banner turns it into a small section title. The note never runs, and its text is never shown as raw HTML.
Callout
A note for the canvas whose text grows to fill it, so it reads without zooming in. Double-click to type; a blank line starts a new point and **two stars** stress a word. Type an arrow emoji such as ⬆️ and it turns into a teal arrow in the middle of the line. Click a node while you edit, then press an arrow, and the arrow is linked to that node: click it later and the canvas brings the node into view. It never runs and has no wires.
Run Timer
A stopwatch for the whole run, with no wires. It starts when the queue starts running, holds the total when the run ends, and saves the last time with the workflow. Recent times are in its right-click menu. You can resize it. It only shows time and doesn't change how the graph runs.
Workflow Switches
Turns parts of a workflow off and on from one small card. Select the nodes of one part, such as a box and its Save Image, press + Switch, and they get one off | on switch with a name you choose. Every group can have a switch of its own too. Off bypasses the nodes, so a step in the middle of a chain can be skipped and the picture still reaches the steps after it; a setting mutes them instead. A switch can change settings instead: save what chosen nodes hold for on and for off, and one click sets Steps to 8 and turns a LoRA row on. Done shrinks the card to the labels and their switches. A row whose nodes are only partly on reads mixed. The node never runs and has no wires.
Example workflows
These are the workflows where the nodes do something core ComfyUI doesn't do by itself: outpainting and inpainting that put your original picture back, lining an edit back up with its source, upscaling a picture in tiles, masking a thing by its name or with a click, and removing a watermark from a clip. Open a JSON file from example_workflows/, or find them under this pack in ComfyUI's template browser. Each one has a thumbnail, numbered groups and a Workflow Note with the setup steps and model downloads.
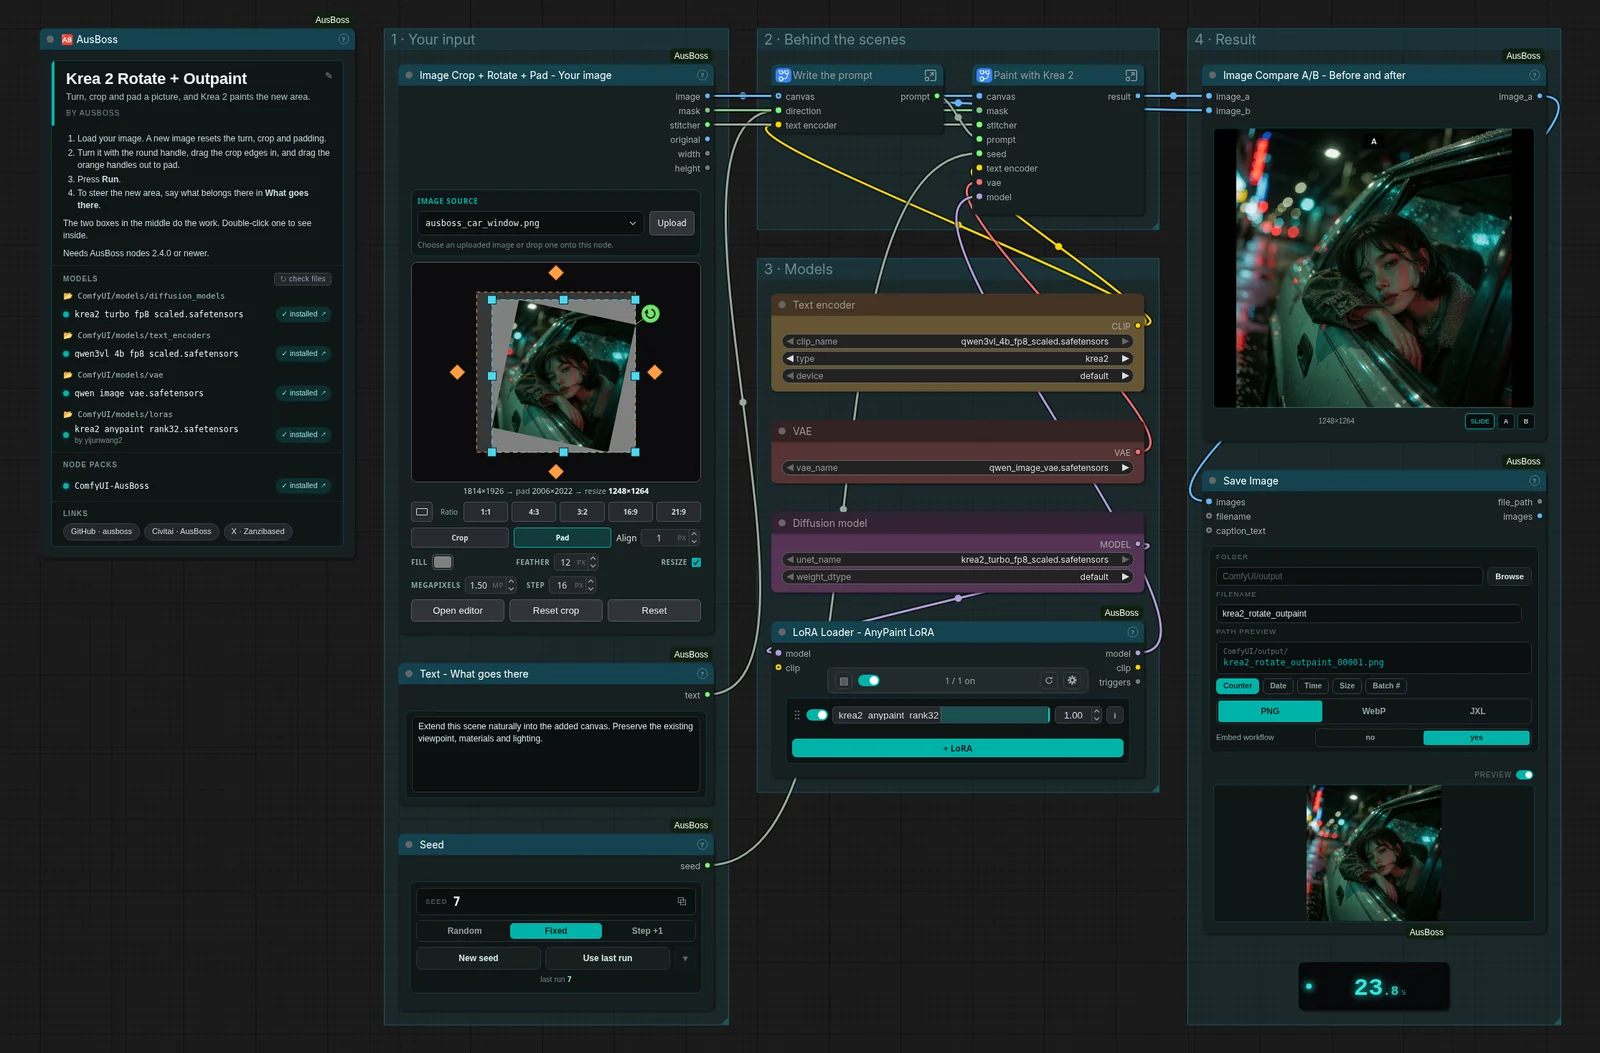
The examples use this layout: named groups for your input, the models and the result, with the plumbing inside two boxes you can double-click to open.
The workflows open with their image and video loaders empty, so you load your own picture or clip. To try one with a sample first, copy the pier photo or the short pier clip from example_workflows/inputs/ into ComfyUI/input/. If you keep models in subfolders, pick your copy in each loader before you run. A green model check on the note only means the file exists; it doesn't mean the loader has that file selected. The models' licenses and any download terms are their authors'.
| Workflow | What it does | What you need |
|---|---|---|
| Krea 2 Outpaint | Pick a ratio or drag the orange handles out, and Krea 2 paints the new area | Krea 2 Turbo and the AnyPaint LoRA; its text encoder also writes the caption |
| Krea 2 Inpaint Masked | Paint over part of a picture, say what goes there, and Krea 2 repaints only that | Krea 2 Turbo and the AnyPaint LoRA |
| Krea 2 Rotate + Outpaint | Turn, crop and pad a picture, and Krea 2 paints the new area | Krea 2 Turbo and the AnyPaint LoRA |
| Klein 9B Outpaint | Extend a picture with the PixaOutpaint LoRA, then stitch the original back | Distilled Klein 9B, its Qwen encoder and the Flux 2 VAE, the PixaOutpaint LoRA, and Qwen3-VL 8B INT8 for the caption |
| LTX 2.3 Video Outpaint | Widen a vertical clip, keeping its audio and original pixels | LTX 2.3, the distilled LoRA and the outpaint IC-LoRA |
| Qwen Image 2.1 Edit + Realign | Type a short edit, and Realign to Source lines Qwen's result back up with your picture | Qwen Image 2.1 INT8, Qwen3-VL 8B INT8 and the 2.1 VAE |
| Qwen Image 2.1 Upscale + Restore | Load a small or worn photo, set the megapixels, and Qwen redraws it sharp, in tiles above about 2 | Qwen Image 2.1 INT8, Qwen3-VL 8B INT8, the 2.1 VAE, the Restore LoRA and, for Fast, the Viggle Turbo LoRA |
| Qwen Image 2.1 Inpaint | Click a thing in your picture, say what to change, and Qwen repaints only that part | Qwen Image 2.1 INT8, Qwen3-VL 8B INT8, the 2.1 VAE, ComfyUI's own SAM 3.1 and, for Fast, the Viggle Turbo LoRA |
| Mask by Name | Type what to find in a picture, and get its mask and a cut-out with a see-through background | ComfyUI's own SAM 3.1 (ComfyUI 0.20 or newer) |
| Mask by Touch | Click a thing in a picture, or its whole subject, and get its mask and a cut-out with hair-fine edges | ComfyUI's own SAM 3.1 and its background-removal model (ComfyUI 0.21 or newer) |
| Simple Video Watermark Remover | Find an overlay in a clip and remove it, with a one-frame comparison branch | ComfyUI's own SAM 3.1 (ComfyUI 0.20 or newer), plus big-lama.pt |
Every example uses only core nodes and this pack. Speed and memory use depend on the models, the sizes, the frame count and whatever else is using the GPU.
For workflow creators
If you share workflows, a few of these nodes help the people who download them:
- Workflow Note puts a setup card on the canvas with each model's download link, folder and size, the node packs it needs and your links, and checks them against the reader's install.
- Callout is a note with big readable text and teal arrows you type with an emoji.
- Image Compare A/B shows the result against its source with a slider.
- Seed keeps runs repeatable, and Use last run brings back the seed the last run used.
- Run Timer shows how long the whole run took, so a speed note is measured.
- Save Image embeds the workflow in PNG, lossless WebP or JPEG XL files, with names you control.
- Workflow Switches gives each optional part of your workflow one off | on switch, so people skip what they don't need without breaking the chain.
- Free Memory between two heavy stages, and Free VRAM on Mask by Name and Mask by Touch, give the next model its room on a smaller graphics card.
People who download your workflow get the nodes through ComfyUI-Manager's missing-node install, like any other pack.
Pack-wide tools
- Help cards: the ? in a node's title bar opens its description, inputs and outputs. Run Timer has no title bar, so it has About this node in its right-click menu.
- Recreate node 🆎 (right-click an AusBoss node) rebuilds a node saved by an older version from the current definition. It keeps the values, links, position and colors.
- Replace with AusBoss nodes 🆎 (canvas right-click or the command palette) finds third-party nodes this pack can stand in for, such as VideoHelperSuite's Load Video and Video Combine or KJNodes' Color Match. It previews each swap and replaces the ones you leave ticked.
- Node colors: Settings → 🆎 AusBoss → Appearance sets the scheme for every AusBoss node (AusBoss, Graphite, Slate, Teal, Moss, Plum, Rust, Navy, Custom or Theme default). A node's right-click AusBoss color menu recolors just that node, and nodes you colored by hand keep their colors.
- Run status: under Settings → 🆎 AusBoss → Chrome, the queue status can show in the browser tab's title and icon, running nodes get live progress badges, and each node's run time can be shown.
- Completion sound: Settings → 🆎 AusBoss → Notifications plays a short chime when the queue finishes.
Editor controls and settings
- Drag a number box to scrub it, or click it to type. Hold Shift for fine steps.
- Hold Shift while you turn the green rotation handle to snap to 15° steps.
- In the full-screen editor, the mouse wheel zooms, and the middle mouse button or Alt-drag pans. On the node itself, the wheel and middle mouse button still move the graph.
- Alt+E opens the selected node's transform editor. Change the key in Settings → Keybindings.
- The video editors have frame stepping, playback and exact timeline seeking, on the node face as well as in the editor. The Clip node's IN and OUT handles sit on the source's own frames, so the frame shown for IN is the first one decoded and the frame shown for OUT is the last.
- Your own aspect presets go in
ausboss_presets.jsonbeside the pack. Copyausboss_presets_example.jsonto start. Your file survives updates.
LoRA Loader and Latent Size have their own gear menus for per-node preferences.
The video transform nodes read a video you pick from a list of ComfyUI's input folder (Uploads) or output folder (Outputs), never one named by a whole path, and Save Image writes only inside the output folder. No widget can point the pack anywhere else on the disk. See the video transform help.
Optional extras
Three features need an extra Python package. Install it with the Python that runs ComfyUI. For the Windows portable build, that is python_embeded\python.exe -m pip install ... from the portable folder.
python -m pip install opencv-contrib-python   # Mask Refine: guided filter
python -m pip install "pymatting>=1.1"        # Mask Refine: matting; Stitch Inpaint: edge halo
python -m pip install pillow-jxl-plugin       # Save Image: lossless JPEG XL
The default mask settings, ordinary stitching, PNG and lossless WebP don't need them. Optical flow needs RAFT weights on disk, and the node's help page explains the setup. Which video codecs you have depends on your ComfyUI environment.
Compatibility and development
The pack needs ComfyUI 0.27.1 or newer. An example for a newer model needs a ComfyUI core that supports that model, and updating only this pack can't add it. Every night it is checked against the newest ComfyUI release and ComfyUI's development version. It works on the classic canvas and in Nodes 2.0, and running a workflow doesn't need an editor open.
Backend changes need a full ComfyUI restart, and frontend changes need a hard refresh. Run the backend tests with ComfyUI's Python:
python scripts/validate_nodes.py
python scripts/release_preflight.py
python scripts/run_python_tests.py
node --test tests/*.test.mjs
The backend tests run in separate processes, because their offline ComfyUI stubs must not leak between files. CONTRIBUTING.md covers bug reports and pull requests. docs/live_testing.md covers canvas, mouse-drag, save and reload, and workflow checks, and docs/adding_a_node.md lists what a new public node needs.
Feedback
Bug reports and workflow ideas are welcome in issues. Security problems go through SECURITY.md. Every release is in the changelog. If a node saves you time, a star on GitHub helps other people find it. There is also a Ko-fi page if you want to leave a tip.
License
MIT. See LICENSE.