
Manga Screen
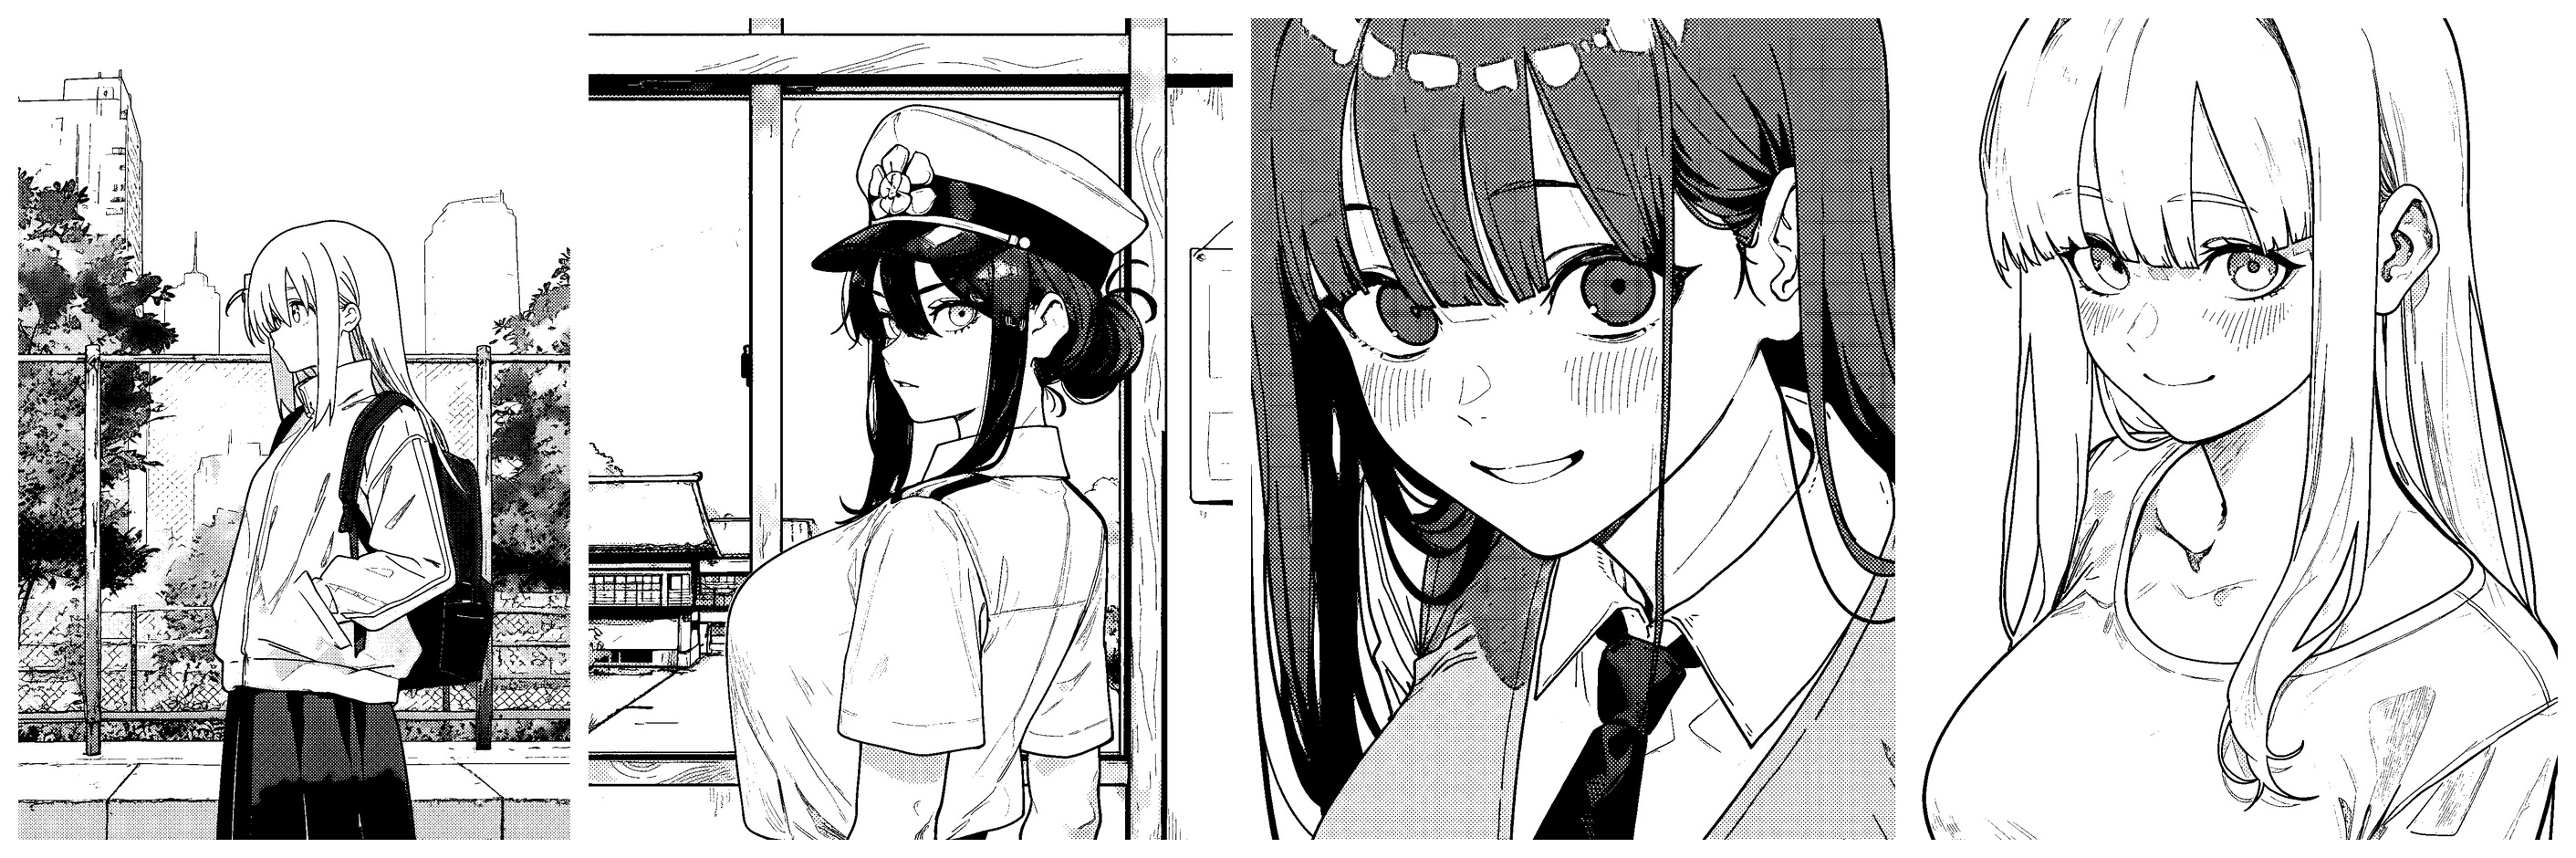
Turn an illustration into a clean black-and-white manga page: crisp lines, flat tone areas, real screentone, white lines inside solid black, and panel framing.
ComfyUI-MangaScreen
Turn an illustration into a clean black-and-white manga page — lines kept crisp, values pushed into a few flat areas, real screentone only where it belongs.
Workflows: QWEN-Manga · Manga-Lite (no edit model)
<p align="center"> <img src="examples/panel_1.jpg" width="24%"> <img src="examples/panel_3.jpg" width="24%"> <img src="examples/panel_10.jpg" width="24%"> <img src="examples/panel_6.jpg" width="24%"> </p> <p align="center"> <img src="examples/panel_2.jpg" width="24%"> <img src="examples/panel_7.jpg" width="24%"> <img src="examples/panel_5.jpg" width="24%"> <img src="examples/panel_4.jpg" width="24%"> </p> <p align="center"> <img src="examples/panel_8.jpg" width="24%"> <img src="examples/panel_11.jpg" width="24%"> <img src="examples/panel_9.jpg" width="24%"> <img src="examples/panel_12.jpg" width="24%"> </p>English


What it does
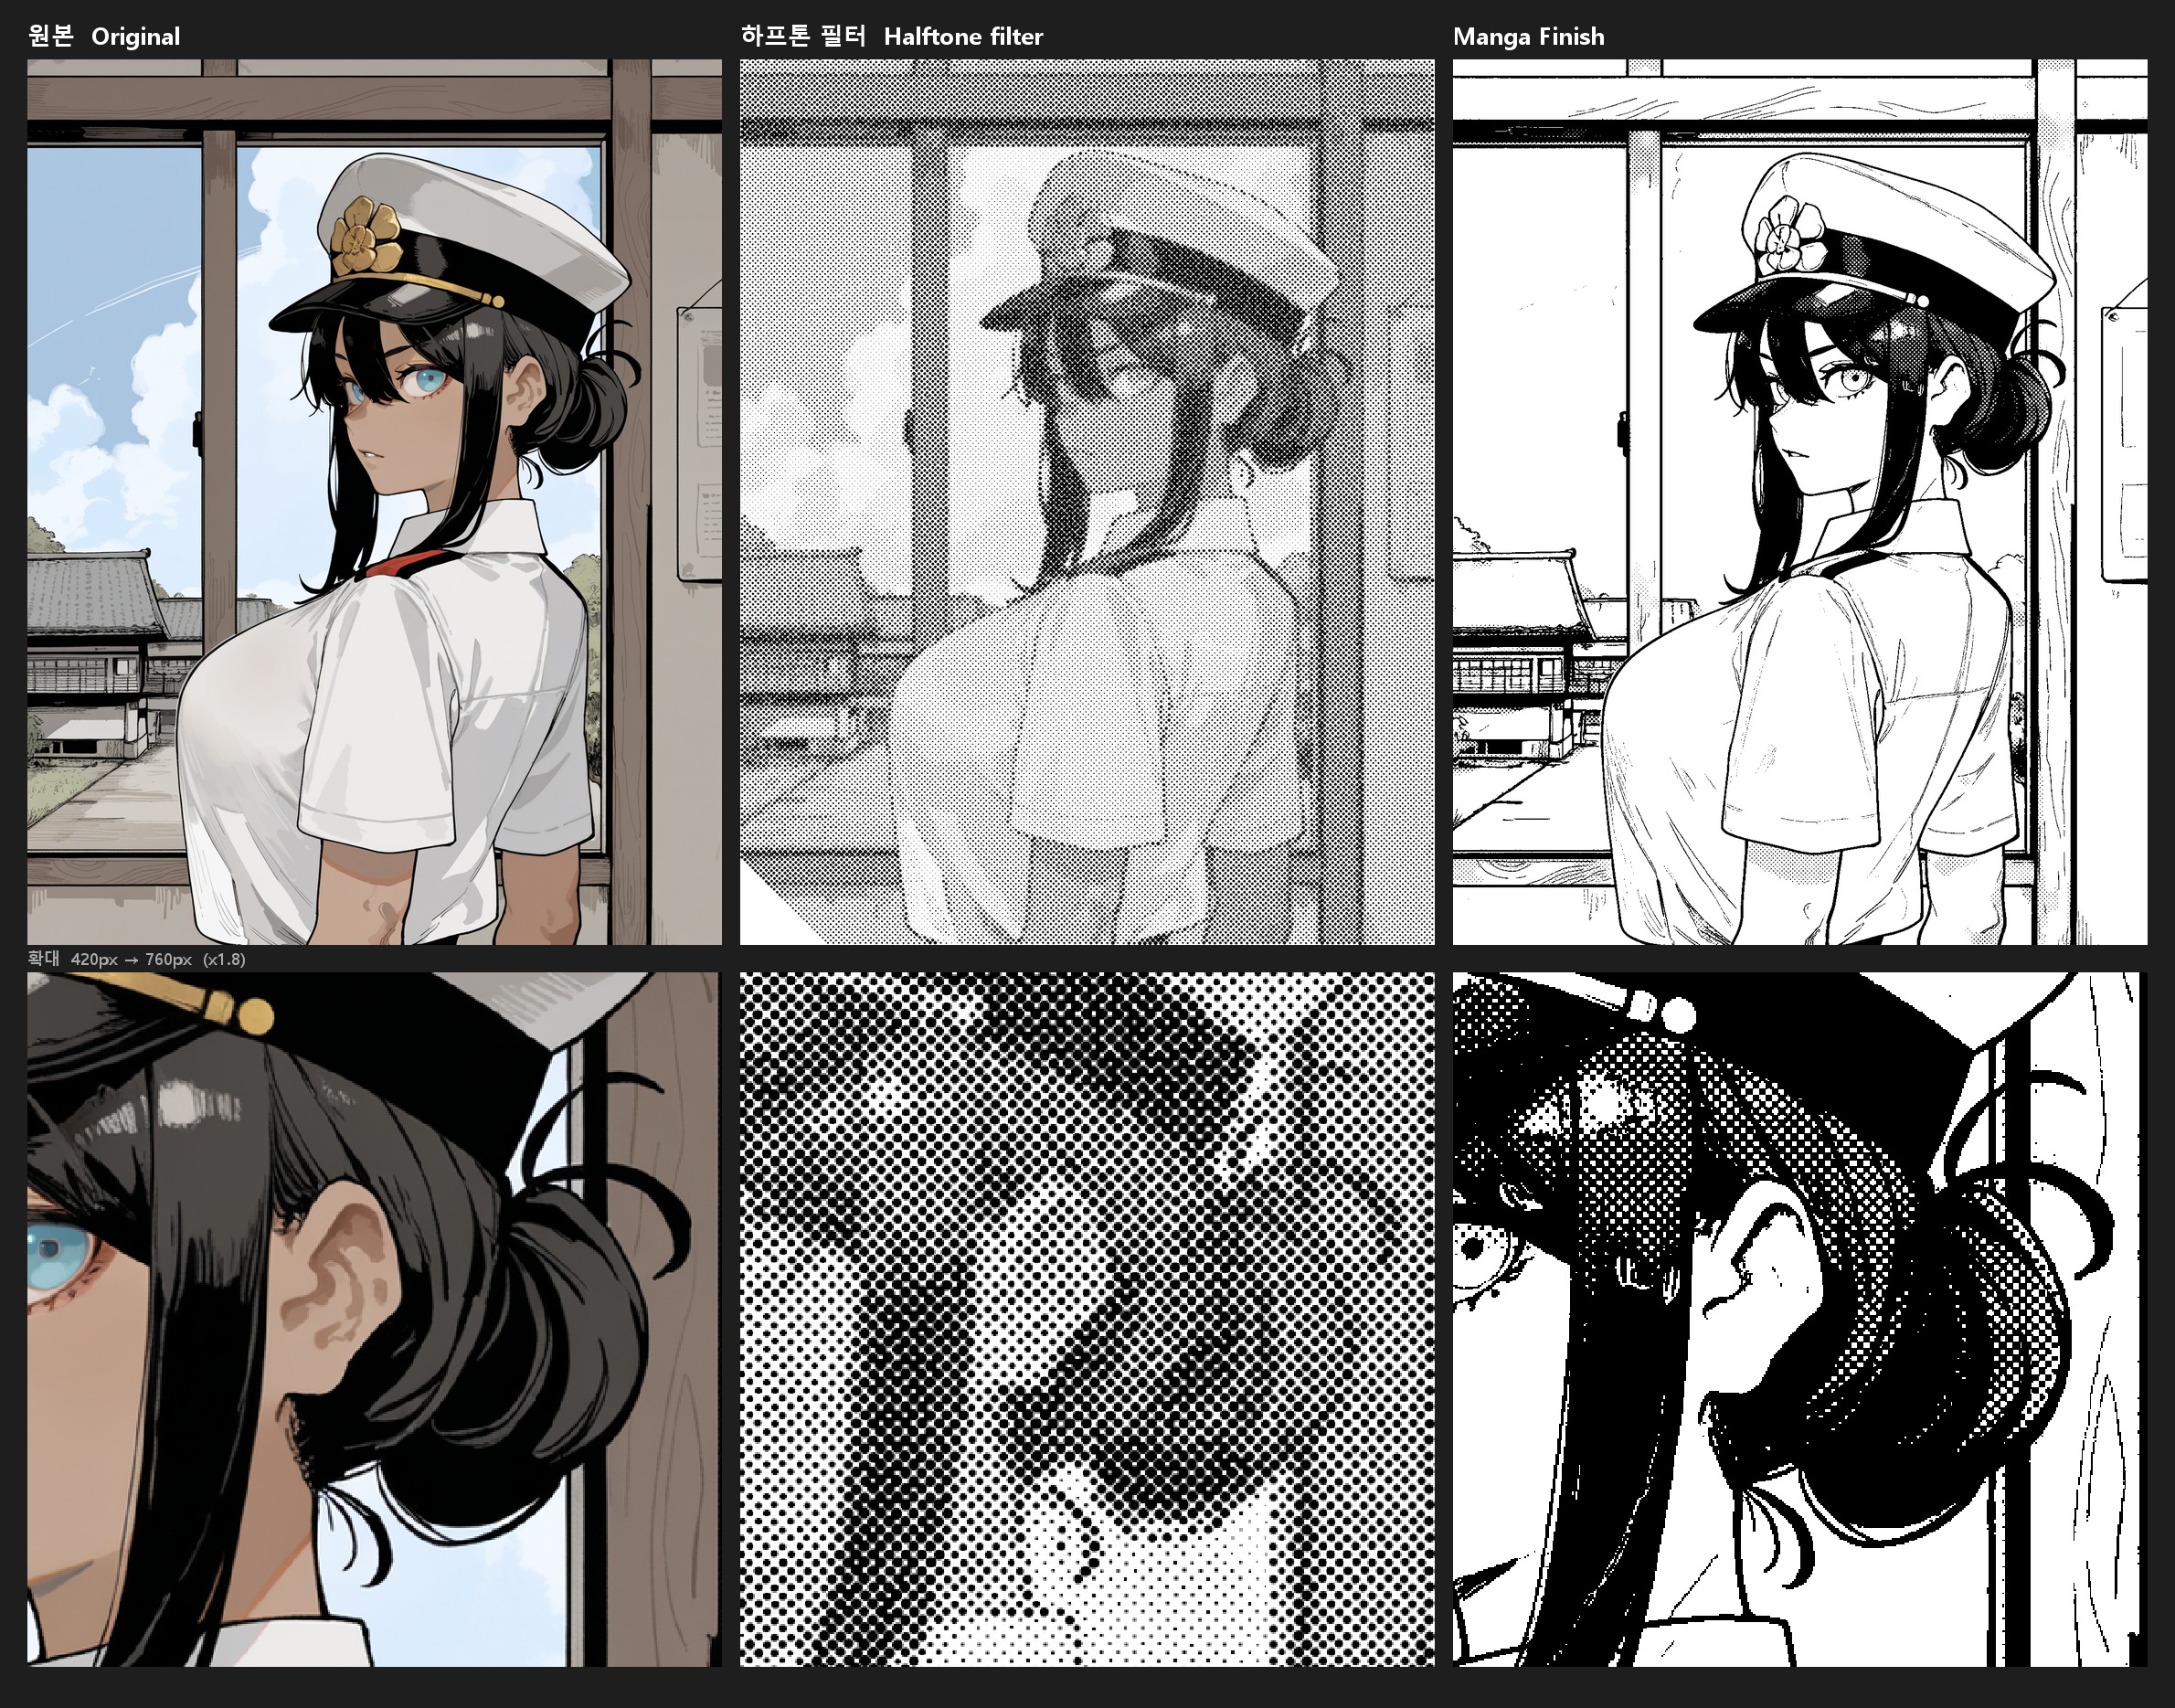
A plain halftone filter turns every grey of the whole picture into dots: lines get muddy, skin and highlights fill with dots, and nothing looks drawn. Manga Finish does what a manga artist does with separate layers, automatically:
- Lines — strokes are separated by shape (long and thin = line, compact blobs = dots or noise) and kept as crisp black on their own layer.
- Values — the image is read with the lines masked out, so no dark halo is left around them; existing dots and soft greys are averaged away.
- Flat areas — values are pushed into paper white / light tone / dark tone / solid black, and small fragments are merged into their surroundings.
- Gradation — areas that hide a smooth shadow get a gradation tone instead of flat steps.
- Print — one page-aligned 45° dot screen, binary black and white, no moiré between areas.
- White lines in black — inside solid black, the main folds and seams are cut out thin and white, the way a dark coat is inked.
Manga Panel then crops the page into a panel with a border and margin, with an optional light paper and ink feel.
Manga Levels is grayscale + levels, the light prep for when you cannot run an edit model.
The included workflow runs a Qwen-Image 2.1 Turbo edit first ("redraw as a black-and-white manga panel"). The edit decides values by meaning rather than brightness — skin and white cloth become paper, only truly dark things stay dark — and Manga Finish turns that into a printed page. Manga Finish also works on its own on any image.
Nodes
Manga Finish
| Input | Default | | |---|---|---| | screen_lines | 200 | Rows of dots across the width. 120 coarse, 200 normal, 300 fine. Same value, same look at any resolution | | white_point | 0.80 | Brighter than this becomes paper. Lower it to clear more tone | | black_point | 0.30 | Darker than this becomes solid black. Raise it for more black | | light_tone / dark_tone | 0.18 / 0.42 | Dot coverage of the two flat tones | | gradation | 1.0 | Gradation tone for smooth shadows. 0 = flat areas only | | pen_lines (optional) | | A line map drawn on top, e.g. Manga Lineart from comfyui_controlnet_aux | | pen_threshold | 0.30 | Lower draws more of the pen lines | | white_lines | 0.4 | How many lines are cut out white inside solid black. 0 = off |
Manga Levels
| Input | Default | |
|---|---|---|
| black / white | 0.20 / 0.70 | Input levels. Lower white until skin and light hair lose their tone |
| gamma | 1.3 | Above 1 brightens the mid tones |
Manga Panel
| Input | Default | | |---|---|---| | frame | 4:3 wide | Panel shape: original (no crop), 4:3 wide, 16:9 wide, 3:4 tall, 1:1 | | crop_x / crop_y | 0.5 / 0.4 | Where the panel is cut | | border / margin | 5 / 60 | Border and paper margin, in pixels at 1024 px width | | paper | white | white / off-white / cream | | ink | 0.5 | Soft ink edges and slightly uneven blacks. 0 = pure black and white |
Install
cd ComfyUI/custom_nodes
git clone https://github.com/ashukae/ComfyUI-MangaScreen
Needs opencv-python and numpy (usually already installed with ComfyUI). Restart ComfyUI.
Workflow
QWEN-Manga (workflows/QWEN-Manga.json) — the full version. Drag it into ComfyUI, put an image in Input image and run. No prompt or tags needed.
- Models: Qwen-Image 2.1 Turbo (diffusion model), a Qwen-Image 2.1 text encoder and VAE — select your own files in the three loaders.
- comfyui_controlnet_aux for the pen lines (Manga Lineart; its model downloads on first use).
- Compare Images shows the original and the result with a slider.
- Working size is 2 MP. If you work smaller, lower
screen_lines(keep at least ~5 px per dot).
Manga-Lite (workflows/Manga-Lite.json) — no edit model, so it runs anywhere ComfyUI runs (CPU is fine): Manga Levels → pen lines → Manga Finish → Manga Panel. On clean line art with a simple background it gets close to the full version; Qwen pulls ahead on painted backgrounds (it redraws them as lines) and on things brightness cannot tell apart, like blush or a red dress vs a red ribbon.
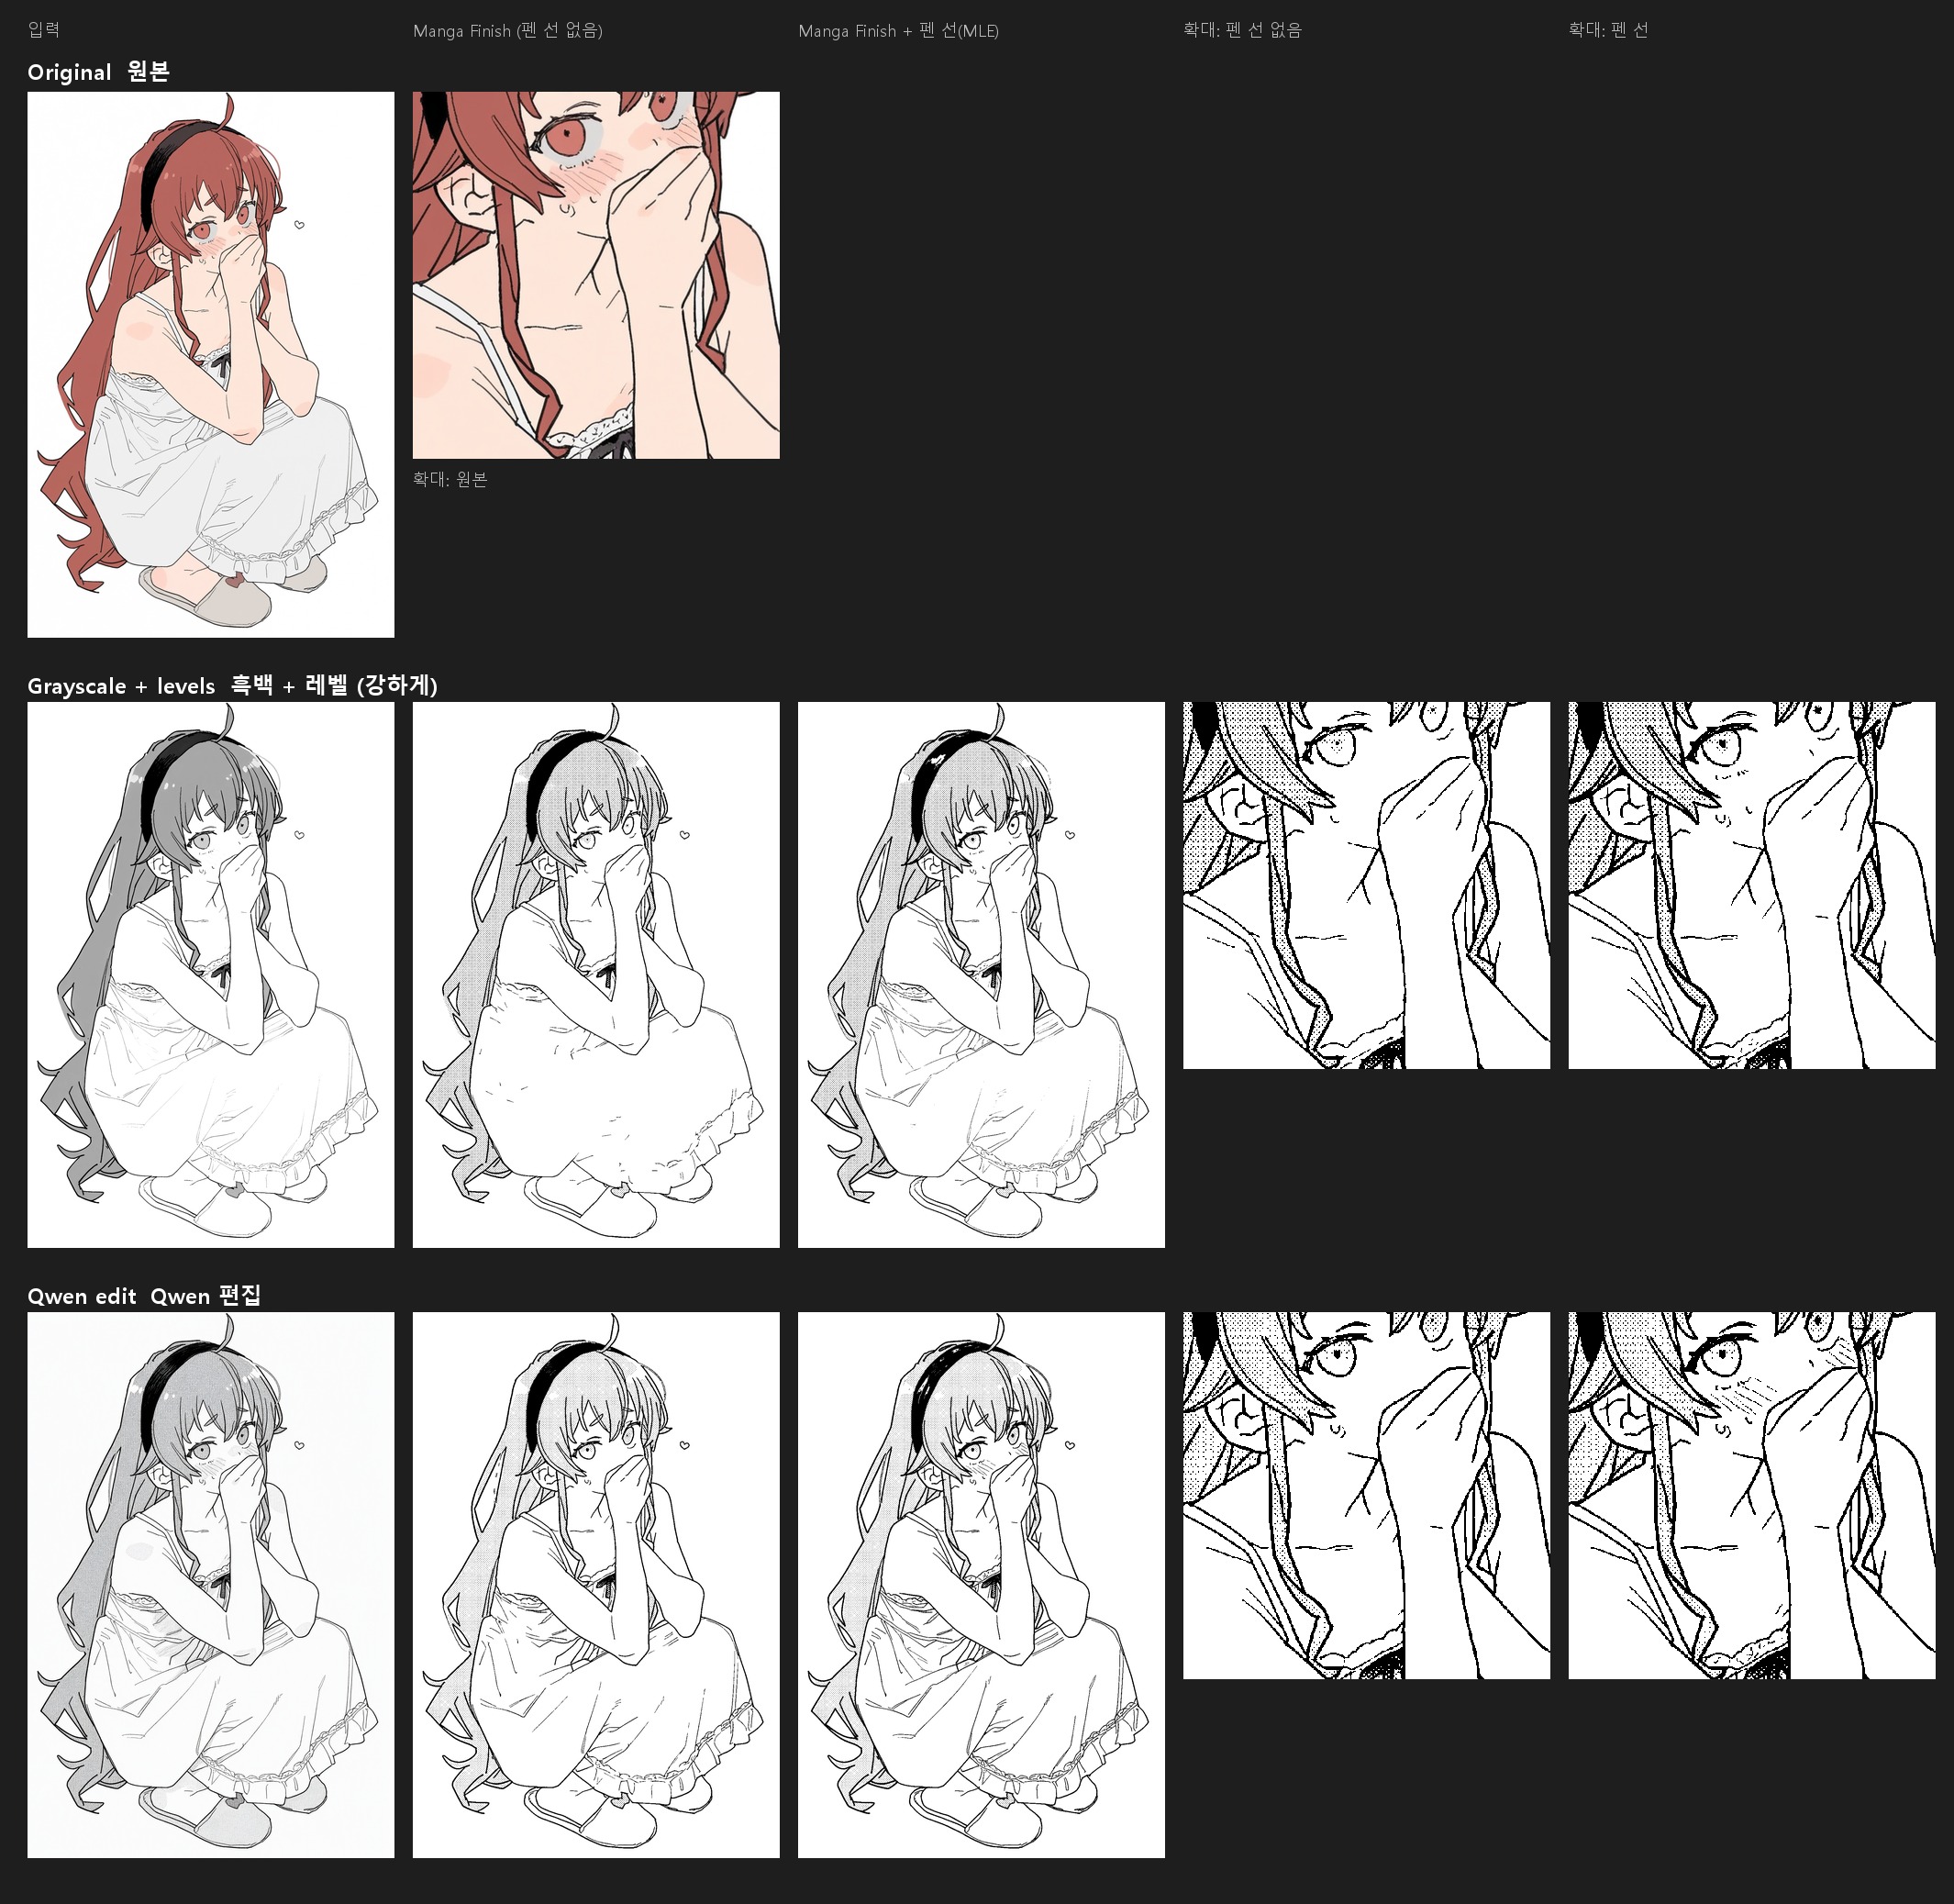
Manga-Lite vs QWEN-Manga, background

Tip: to send dark clothes to solid black, raise black_point to 0.5–0.6 — Qwen tends to draw them dark grey. A bolder edit instruction is in the workflow note (use it with black_point 0.40).
한국어
일러스트를 깔끔한 흑백 만화 원고로 바꿉니다. 선은 선명하게 남기고, 명암은 몇 개의 면으로 정리하고, 진짜 스크린톤은 필요한 곳에만 찍습니다.
하는 일
일반 하프톤 필터는 그림 전체의 회색을 모두 점으로 바꿉니다. 그래서 선이 탁해지고 피부까지 점이 깔립니다. Manga Finish는 만화가가 레이어를 나눠 작업하는 과정을 자동으로 합니다.
- 선 분리: 길고 가는 것은 선, 동글동글한 덩어리는 점이나 잡티로 보고, 선만 깨끗한 검정으로 따로 둡니다.
- 명암 읽기: 선을 뺀 채로 명암을 읽어서 선 주변이 지저분해지지 않습니다. 원래 있던 망점과 회색은 평균으로 녹여 지웁니다.
- 면 정리: 흰 종이 / 옅은 톤 / 짙은 톤 / 먹(베타)으로 밀고, 작은 조각은 주변에 합칩니다.
- 그라데이션: 매끈한 그림자 영역은 계단 대신 그라데이션 톤으로 찍습니다.
- 인쇄: 페이지 전체에 하나의 45° 망점을 찍습니다. 결과는 흑백 두 값뿐이고 영역 사이 모아레가 없습니다.
- 베타 속 흰 선: 먹칠 안의 주요 주름과 솔기는 가는 흰 선으로 남깁니다.
Manga Panel은 결과를 한 컷으로 잘라 테두리와 여백을 두르고, 종이와 잉크 느낌을 살짝 줍니다.
Manga Levels는 흑백 변환 + 레벨 조정입니다. 편집 모델을 쓸 수 없을 때의 가벼운 전처리입니다.
포함된 워크플로우는 먼저 Qwen-Image 2.1 Turbo로 "흑백 만화 컷으로 다시 그리기" 편집을 합니다. 편집 모델이 밝기가 아니라 의미로 명암을 정해 주고(피부와 흰 옷은 종이, 정말 어두운 것만 먹), Manga Finish가 그걸 인쇄된 원고로 마무리합니다. Manga Finish 노드만 단독으로 써도 됩니다.
설치
cd ComfyUI/custom_nodes
git clone https://github.com/ashukae/ComfyUI-MangaScreen
opencv-python과 numpy가 필요합니다. 보통 ComfyUI에 이미 설치돼 있습니다. 설치 후 ComfyUI를 재시작하세요.
워크플로우
QWEN-Manga (workflows/QWEN-Manga.json): 전체 버전입니다. ComfyUI에 끌어다 놓고, Input image에 그림을 넣어 실행합니다. 프롬프트나 태그는 필요 없습니다.
- 모델: Qwen-Image 2.1 Turbo, Qwen-Image 2.1 텍스트 인코더와 VAE. 로더 세 개에서 각자 가진 파일을 고르세요.
- 펜 선: comfyui_controlnet_aux의 Manga Lineart를 씁니다. 모델은 처음 실행할 때 자동으로 받아집니다.
- Compare Images 노드에서 원본과 결과를 슬라이더로 비교할 수 있습니다.
- 작업 해상도는 2MP입니다. 더 작게 작업한다면
screen_lines를 낮추세요. 망점 하나가 5px 이상은 되는 게 좋습니다.
Manga-Lite (workflows/Manga-Lite.json): 편집 모델 없이 Manga Levels → 펜 선 → Manga Finish → Manga Panel 순서로 처리합니다. ComfyUI가 돌아가는 환경이면 어디서나 쓸 수 있습니다(CPU도 가능). 선화가 깔끔하고 배경이 단순한 그림은 전체 버전과 꽤 비슷하게 나옵니다. Qwen이 앞서는 건 칠해진 배경(선으로 다시 그림)과, 볼 홍조나 빨간 옷과 빨간 리본처럼 밝기로는 구분되지 않는 것들입니다. 비교 이미지는 영어 섹션에 있습니다.
팁: 어두운 옷을 먹으로 보내려면 black_point를 0.5~0.6으로 올리세요. Qwen이 어두운 옷을 짙은 회색으로 그리는 경향이 있습니다. 더 과감한 편집 지시문은 워크플로우 메모에 있습니다(black_point 0.40과 함께 쓰세요).
日本語
イラストを、きれいなモノクロ漫画原稿に仕上げます。線はシャープに残し、明暗はいくつかのフラットな面にまとめ、本物のスクリーントーンを必要な場所にだけ貼ります。
できること
一般的なハーフトーンフィルターは、画像全体のグレーをすべて網点に変えます。そのため線が濁り、肌やハイライトにまで網点が入ります。Manga Finish は、漫画家がレイヤーを分けて行う作業を自動で行います。
- 線画の分離 — 細長いものは線、丸い塊は網点やノイズと判定し、線だけをくっきりした黒として別に保持します。
- 明暗の読み取り — 線を除いた状態で明暗を読むので、線の周りが汚れません。元からある網点やグレーは平均化して消します。
- 面の整理 — 紙の白 / 薄いトーン / 濃いトーン / ベタの4段階にまとめ、小さな欠片は周囲の面に統合します。
- グラデーション — なめらかな影の部分は、段差ではなくグラデーショントーンで表現します。
- 印刷 — ページ全体に揃った45°の網点を1種類だけ使います。出力は白黒の2値で、領域間のモアレも出ません。
- ベタの中の白線(白抜き) — ベタの中の主なシワや縫い目を細い白線で残します。黒いコートを描くときと同じ処理です。
Manga Panel は仕上がったページをコマとして切り抜き、枠線と余白を付け、紙とインクの質感を軽く加えます。
Manga Levels はグレースケール変換+レベル補正です。編集モデルを使えない環境向けの軽い前処理です。
付属のワークフローは、まず Qwen-Image 2.1 Turbo で「モノクロ漫画のコマとして描き直す」編集を行います。編集モデルが明るさではなく意味で明暗を決め(肌や白い服は紙の白、本当に暗いものだけを黒に)、Manga Finish がそれを印刷された原稿に仕上げます。Manga Finish ノードだけを単体で使うこともできます。
インストール
cd ComfyUI/custom_nodes
git clone https://github.com/ashukae/ComfyUI-MangaScreen
opencv-python と numpy が必要です(通常は ComfyUI に同梱されています)。インストール後、ComfyUI を再起動してください。
ワークフロー
QWEN-Manga(workflows/QWEN-Manga.json)— フル版です。ComfyUI にドラッグし、Input image に画像を入れて実行します。プロンプトやタグは不要です。
- モデル: Qwen-Image 2.1 Turbo(拡散モデル)、Qwen-Image 2.1 のテキストエンコーダーと VAE。3つのローダーでお手持ちのファイルを選んでください。
- ペン線: comfyui_controlnet_aux の Manga Lineart を使います(モデルは初回実行時に自動でダウンロードされます)。
- Compare Images ノードで、元画像と結果をスライダーで比較できます。
- 作業解像度は 2MP です。小さいサイズで作業する場合は
screen_linesを下げてください(網点1つが5px以上になるのが目安です)。
Manga-Lite(workflows/Manga-Lite.json)— 編集モデルを使わず、Manga Levels → ペン線 → Manga Finish → Manga Panel の順に処理します。ComfyUI が動く環境ならどこでも使えます(CPU でも可)。線画がきれいで背景がシンプルな絵なら、フル版にかなり近い仕上がりになります。Qwen が優れるのは、塗りで描かれた背景(線画として描き直す)や、頬の赤みや赤い服と赤いリボンのように明るさでは区別できないものです。比較画像は英語セクションにあります。
ヒント: 暗い服をベタにしたいときは、black_point を 0.5〜0.6 に上げてください。Qwen は暗い服を濃いグレーで描く傾向があります。より大胆な編集指示文をワークフローのメモに入れてあります(black_point 0.40 と一緒に使ってください)。
Credits
- Pen lines: Manga Line Extraction (Li et al., Deep Extraction of Manga Structural Lines, SIGGRAPH 2017) via comfyui_controlnet_aux.
- Related work: Generating Manga from Illustrations via Mimicking Manga Creation Workflow (Zhang et al., CVPR 2021), Sketch2Manga (2024).
License
MIT