ComfyUI Extension: ComfyUI-Curve
Run ComfyUI workflows without the setup
No installs, no CUDA version roulette, no GPU sitting idle on your bill. Bring a workflow and run it in the browser.
Professional image adjustment tools for ComfyUI - Curves, Levels, HSL, and Camera Raw adjustments with real-time preview
Looking for a different extension?
Custom Nodes (9)
README
ComfyUI-Curve
<!-- 语言切换 | Language Switch --> <div align="center"> <a href="#中文">中文</a> | <a href="#english">English</a> </div>中文
ComfyUI专业色彩调整扩展,提供类似Photoshop的曲线、HSL、色阶调整功能,支持70+种预设风格、高级遮罩和Lightroom风格的色彩分级功能。
📅 最新更新 (2025-07-02)
🎯 CurvePreset智能联动功能
- ✅ 智能通道识别:每个预设风格都配置了基于色彩理论的最佳适用通道
- ✅ 自动应用机制:PS Curve节点自动将预设应用到建议通道,无需手动选择
- ✅ 70+风格智能映射:电影蓝橙→蓝色通道,日系清新→绿色通道,港风经典→红色通道
- ✅ 专业工作流程:CurvePresetNode → PS Curve,一步到位获得专业调色效果
📊 PS Curve直方图增强 (2025-06-25)
- ✅ 通道独立直方图:每个通道(RGB/R/G/B)显示对应的直方图背景
- ✅ 双输出支持:PS Curve节点现在输出处理后的图像和曲线分析图表
- ✅ 实时直方图更新:工作流执行后自动使用处理后的图像更新直方图
- ✅ 弹窗支持:节点和弹窗编辑器都支持直方图显示
🌟 主要功能
项目介绍视频:https://www.bilibili.com/video/BV1bxKqzQEw1/?vd_source=443ea67b1e3e510a92de1942e4d60082
🎨 曲线调整 (Photoshop Curve)
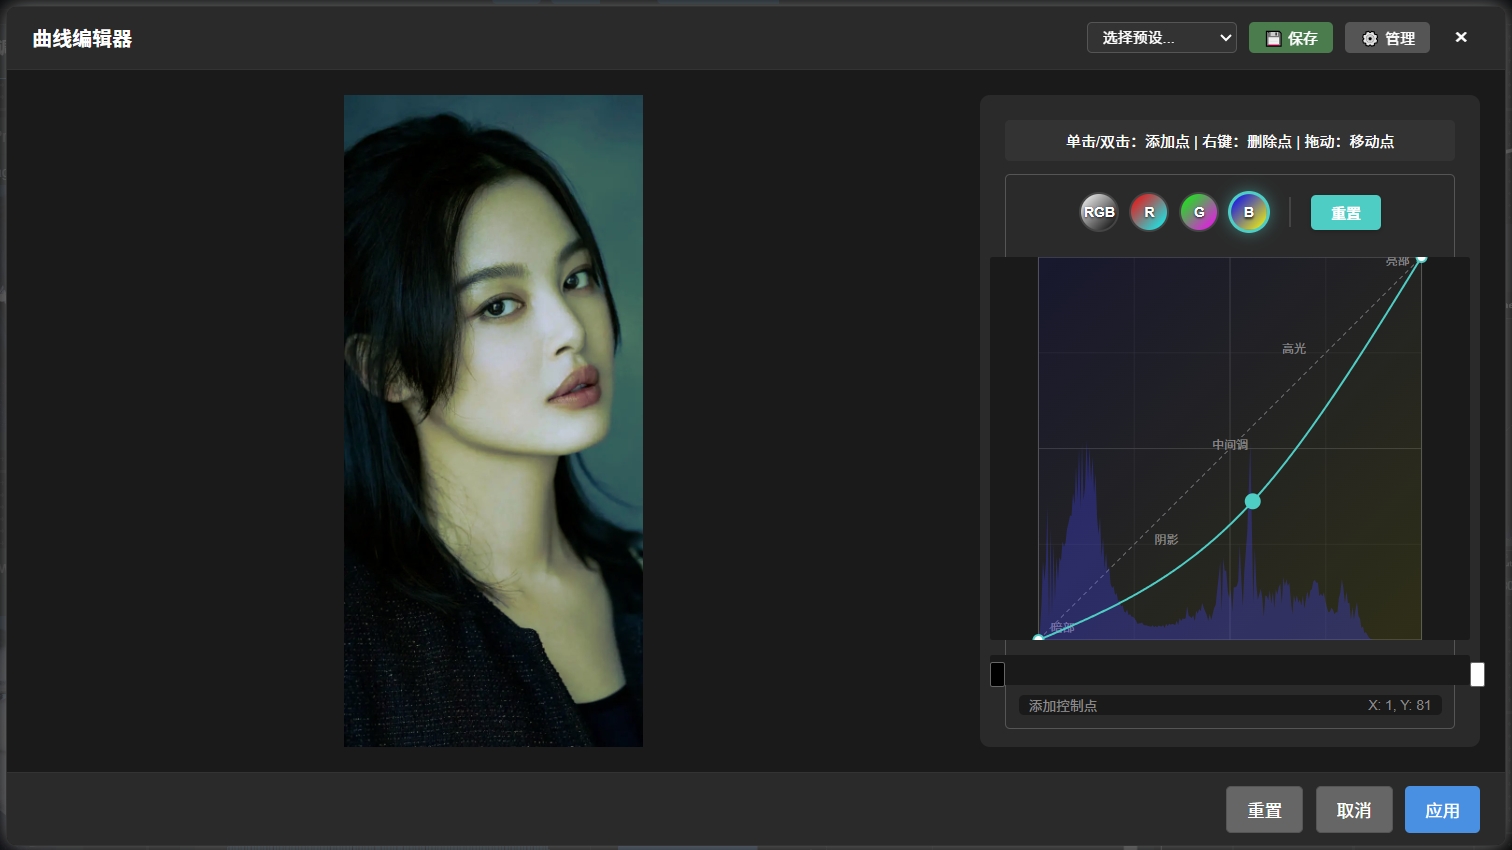
- 类似Photoshop的专业曲线调整,支持多种插值方式
- 双击节点进入实时调整界面:在弹出窗口中直接拖动控制点,即刻观察图像变化效果
- 通道独立直方图背景:每个通道显示对应的直方图,便于精确调整
- 支持RGB整体或单独R/G/B通道调整
- 双输出功能:主图像输出 + 曲线/直方图分析图表
- 可调曲线效果强度(0-200%)
- 弹窗内调整立即应用:所有曲线修改无需重新运行工作流即可在弹窗内实时查看效果
- 简化数值输入:点击"🎯 数值输入"显示精确坐标输入工具,不影响曲线编辑器操作
- 内置70+种预设风格:人像、风景、电影、复古等多种风格,可直接从下拉列表选择应用
- 支持自定义预设:可保存、加载、管理和分享您的曲线预设
- 智能预设联动:可接收CurvePresetNode的预设数据,自动应用到最佳颜色通道
🎭 HSL调整 (Photoshop HSL)
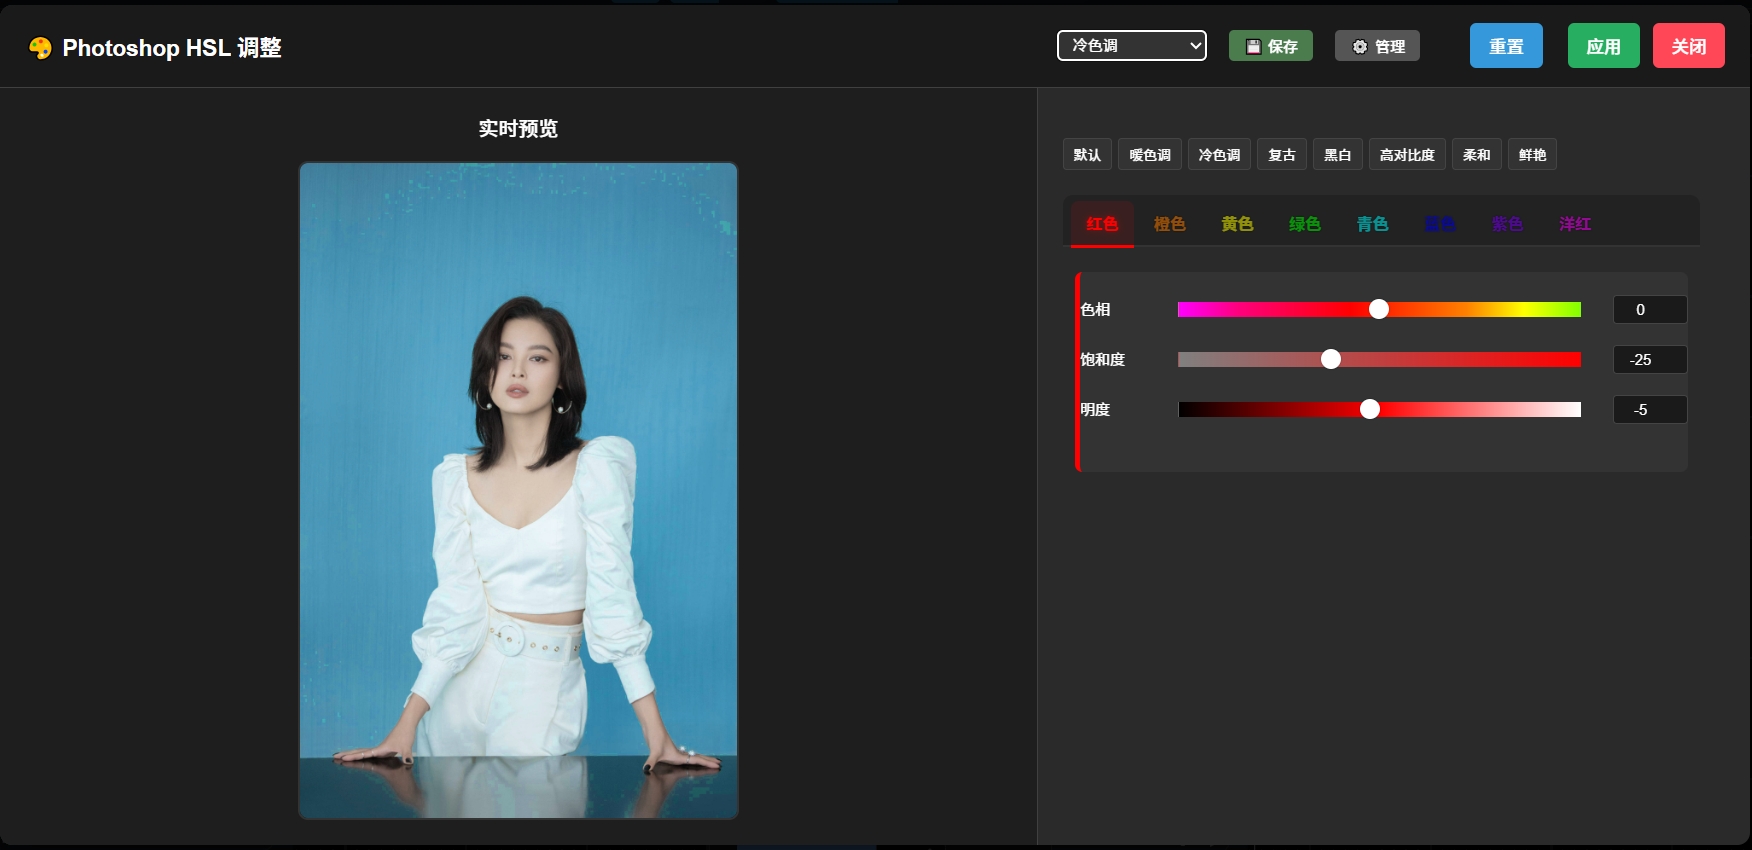
- 精准控制8个颜色通道:红、橙、黄、绿、浅绿、蓝、紫、品红
- 每个颜色可独立调整色相、饱和度、明度
- 双击节点打开HSL调整弹窗:在弹出窗口中滑动调节器立即显示颜色变化效果,所见即所得
- 支持遮罩和羽化效果
- 弹窗内实时交互响应:在弹出界面中调整任何HSL参数都能即时反映在预览图像上
- 支持自定义预设:可保存、加载、管理和分享您的HSL调整预设
🎚️ 色阶调整 (Photoshop Levels)
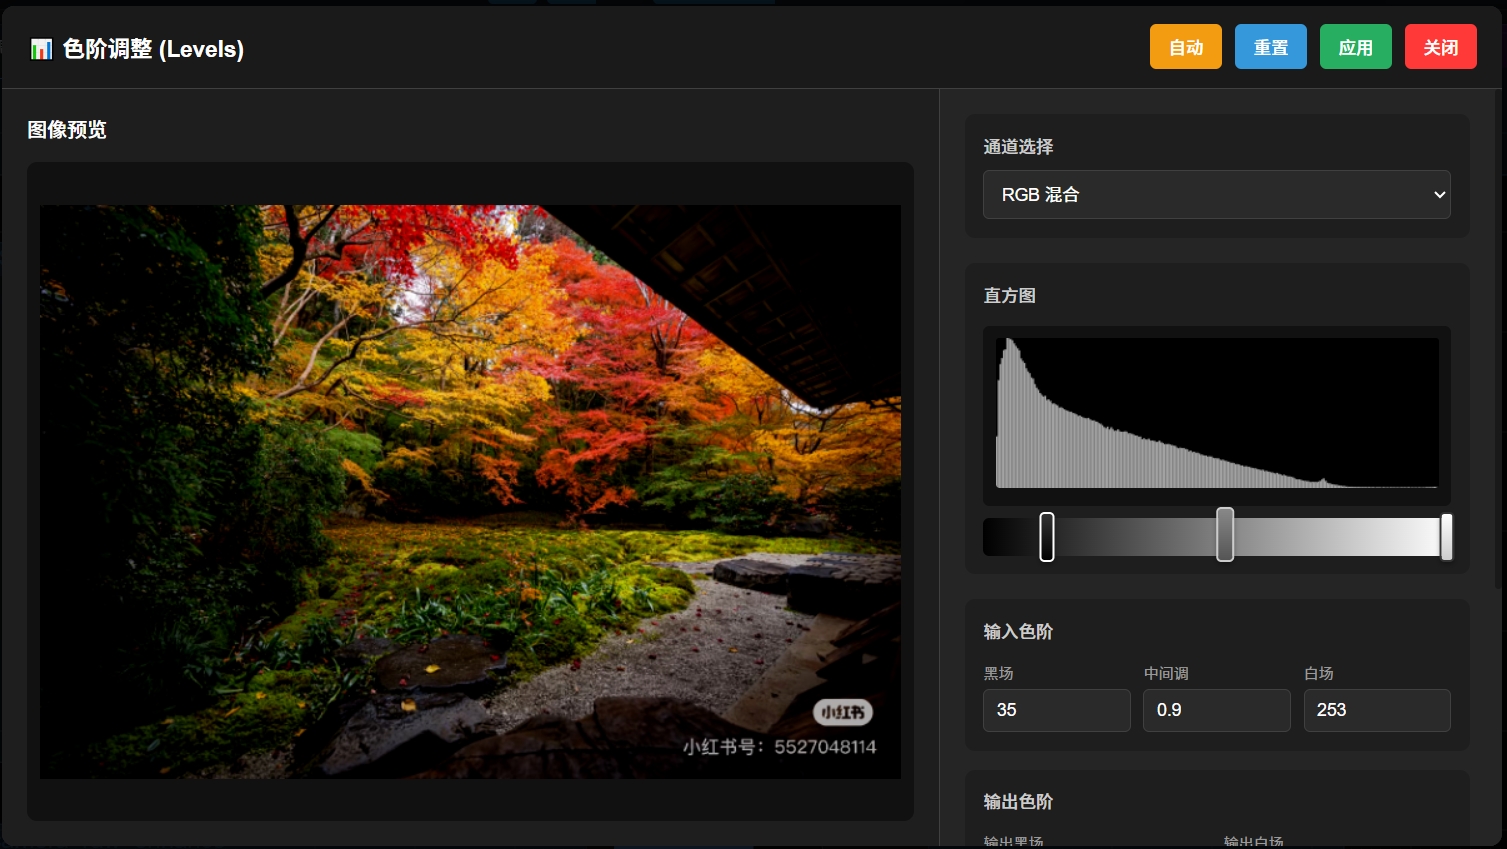
- 双击节点打开Photoshop风格色阶调整界面:专业三点控制(黑场、灰场、白场)
- 实时预览调整:拖动滑块即时查看色阶调整效果
- 自动色阶功能:一键自动优化图像对比度和色阶分布
- 自动对比度功能:智能增强图像对比度
- 精确数值控制:输入/输出黑白场点、伽马值精确调整
- 直方图背景显示:在色阶界面中显示实时直方图,便于精确调整
🎨 色彩分级 (Color Grading)
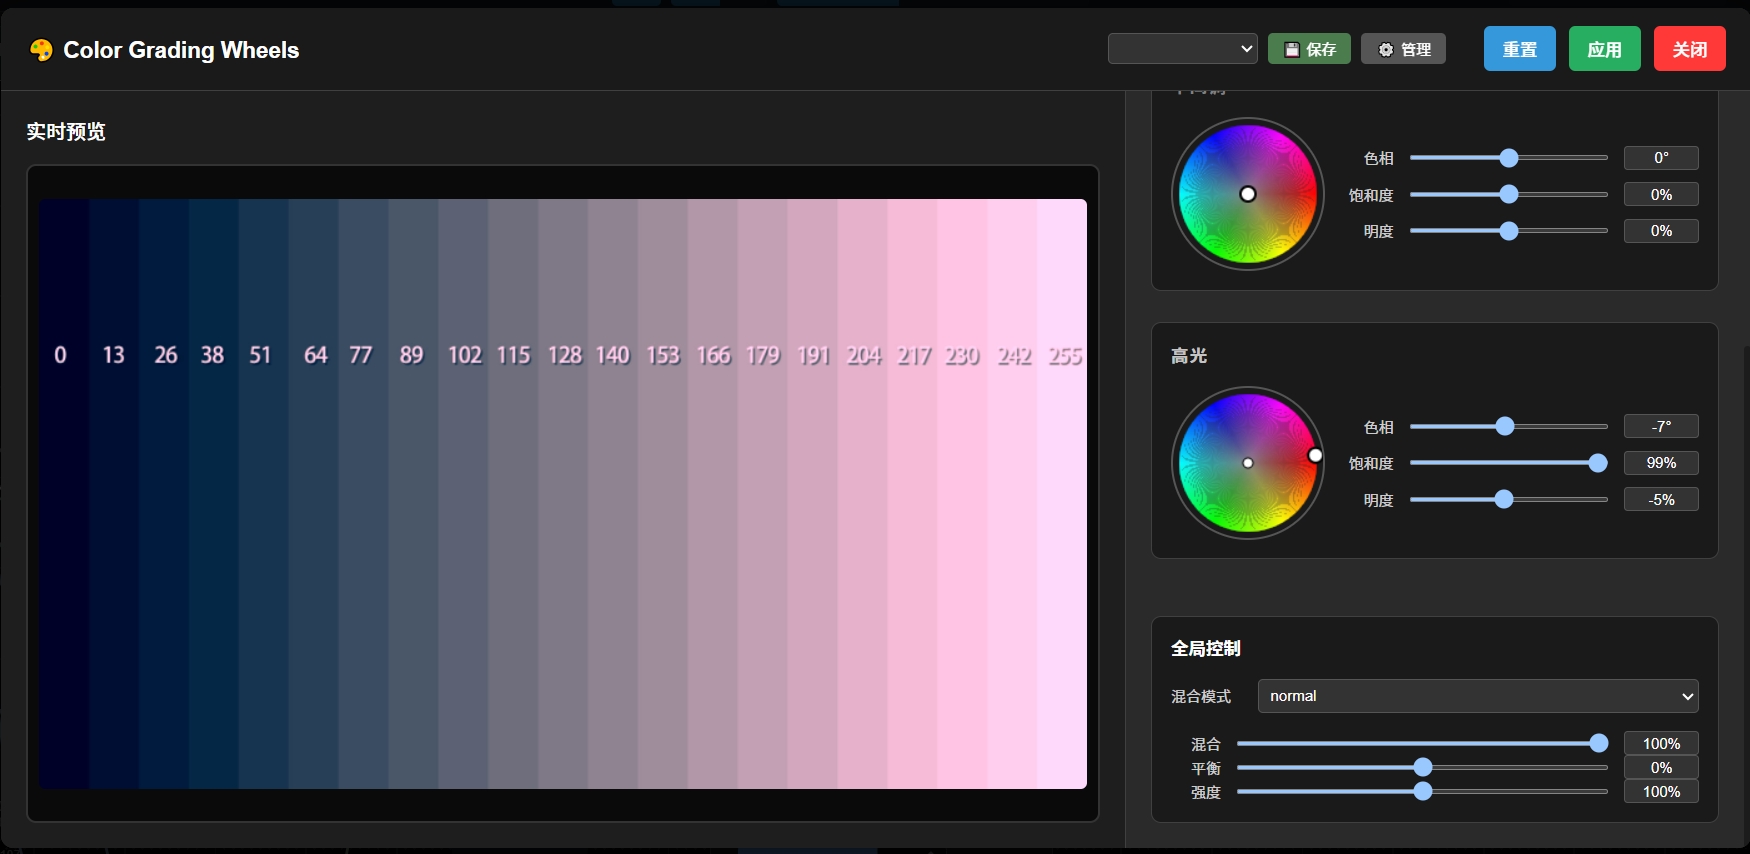
- 双击节点打开Lightroom风格的色彩分级界面:专业三色轮设计(阴影、中间调、高光)
- 实时交互式色轮操作:直接在色轮上拖拽调整色相和饱和度,实时预览效果
- 专业的色彩处理:精确的色彩控制,确保调色准确性
- 多种混合模式:normal、multiply、screen、overlay、soft_light等专业混合选项
- 分区域调色:独立控制阴影、中间调、高光区域的色彩
- 强度控制:可调整整体效果强度(0-200%)
- 支持自定义预设:可保存、加载、管理和分享您的色彩分级预设
🔀 高斯模糊 (Gaussian Blur with Mask)
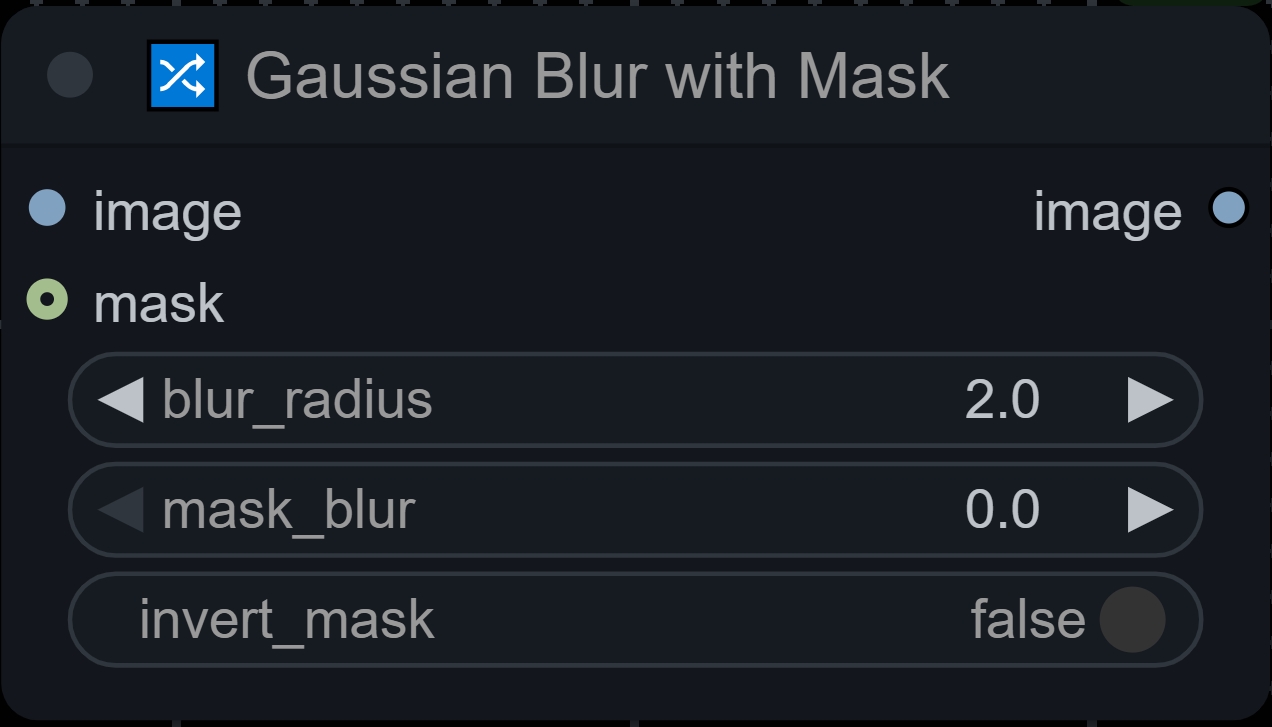
- 选择性模糊处理:通过遮罩精确控制模糊区域
- 可调模糊半径:支持0-100像素的模糊强度调整
- 遮罩羽化:0-20像素的边缘羽化,实现自然过渡
- 遮罩反转:快速反转模糊区域
- 应用场景:背景虚化、焦点突出、隐私保护、艺术效果
🔍 直方图分析 (Histogram Analysis)
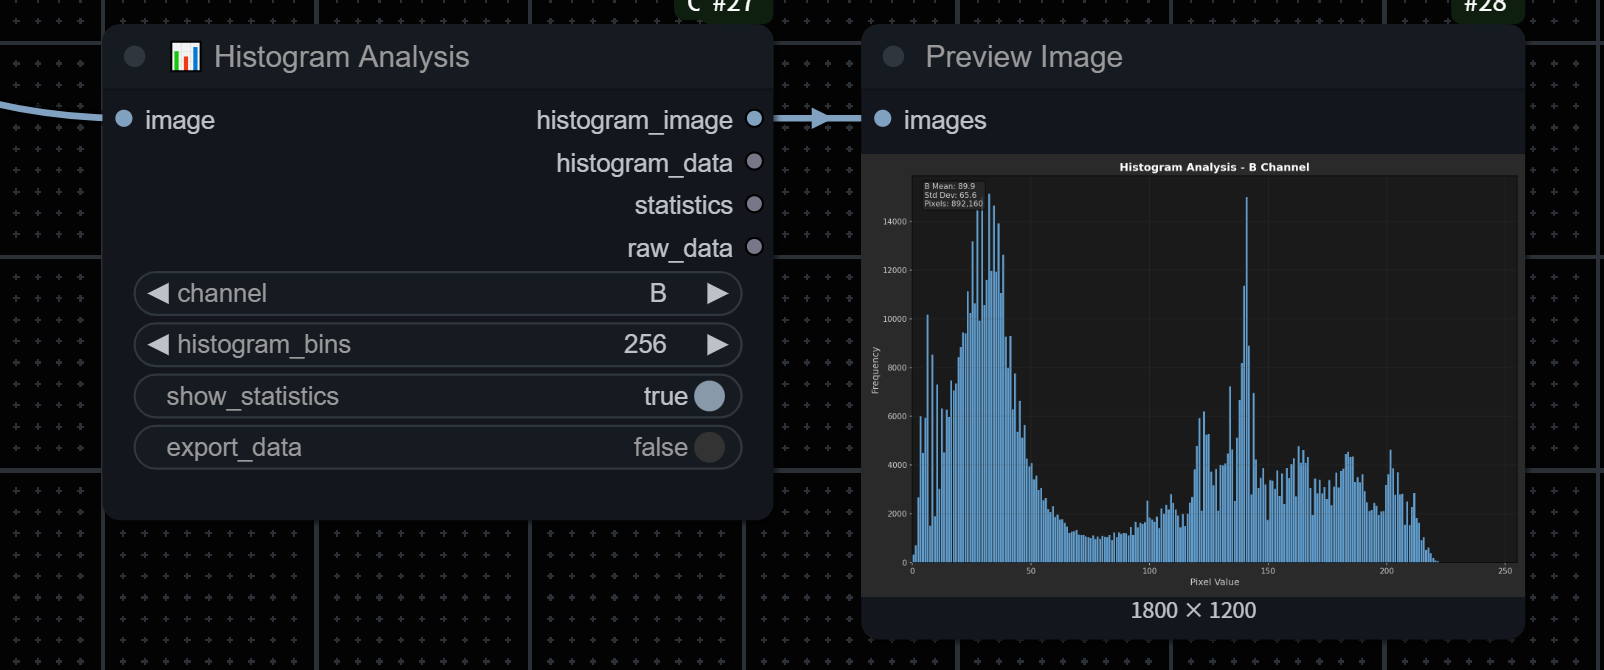
- 专业的图像直方图分析节点
- 详细的统计信息:平均值、中位数、标准差等图像统计数据
- 像素分布可视化:清晰显示图像的亮度和颜色分布情况
- 多通道支持:支持RGB整体或单独R/G/B通道分析
- 为其他调整节点提供数据参考
🎯 Camera Raw增强 (Camera Raw Enhance)
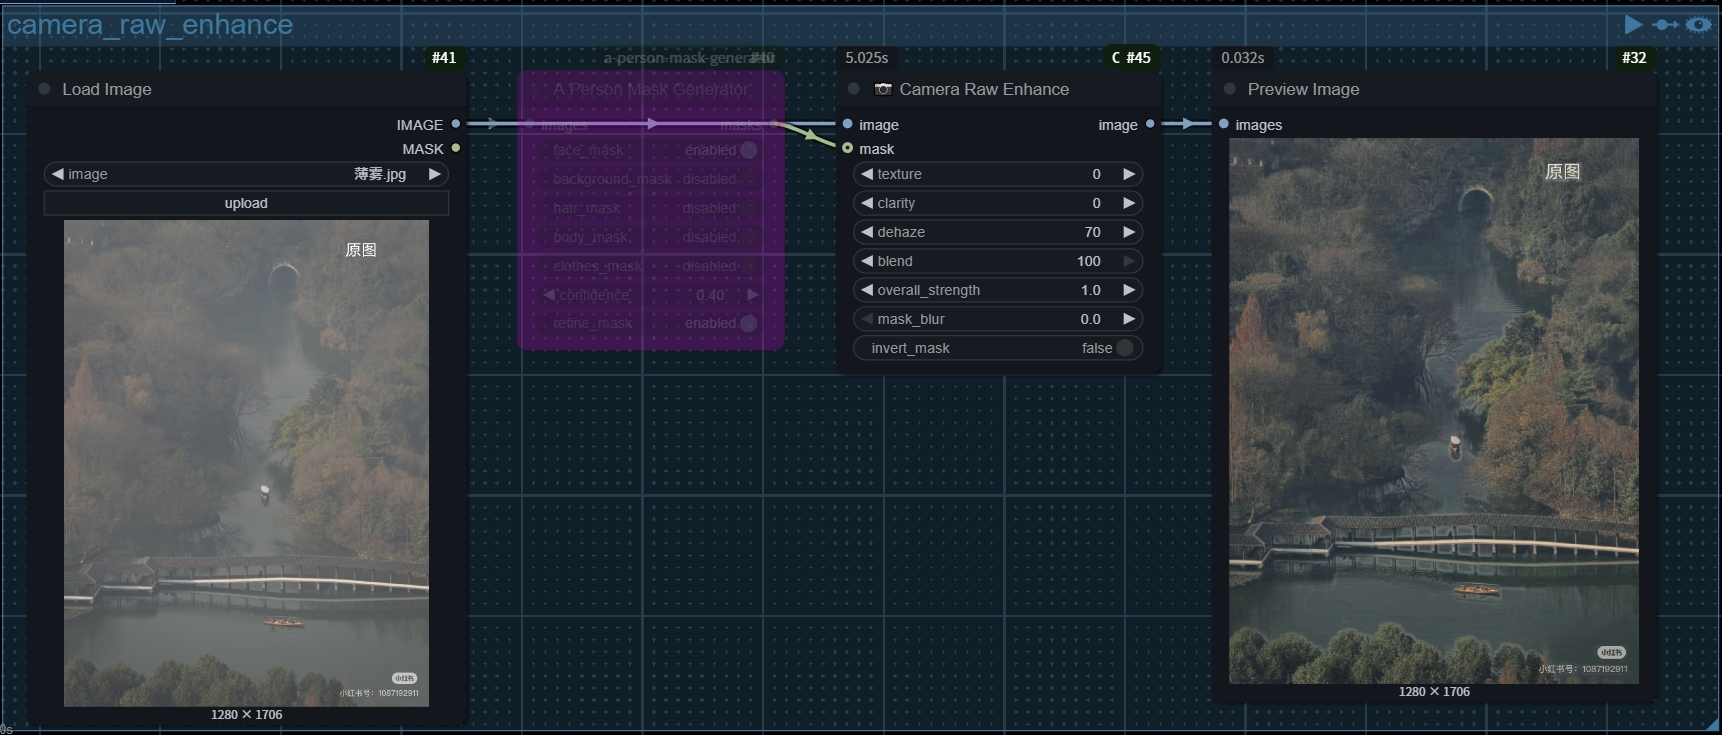
去薄雾效果对比:
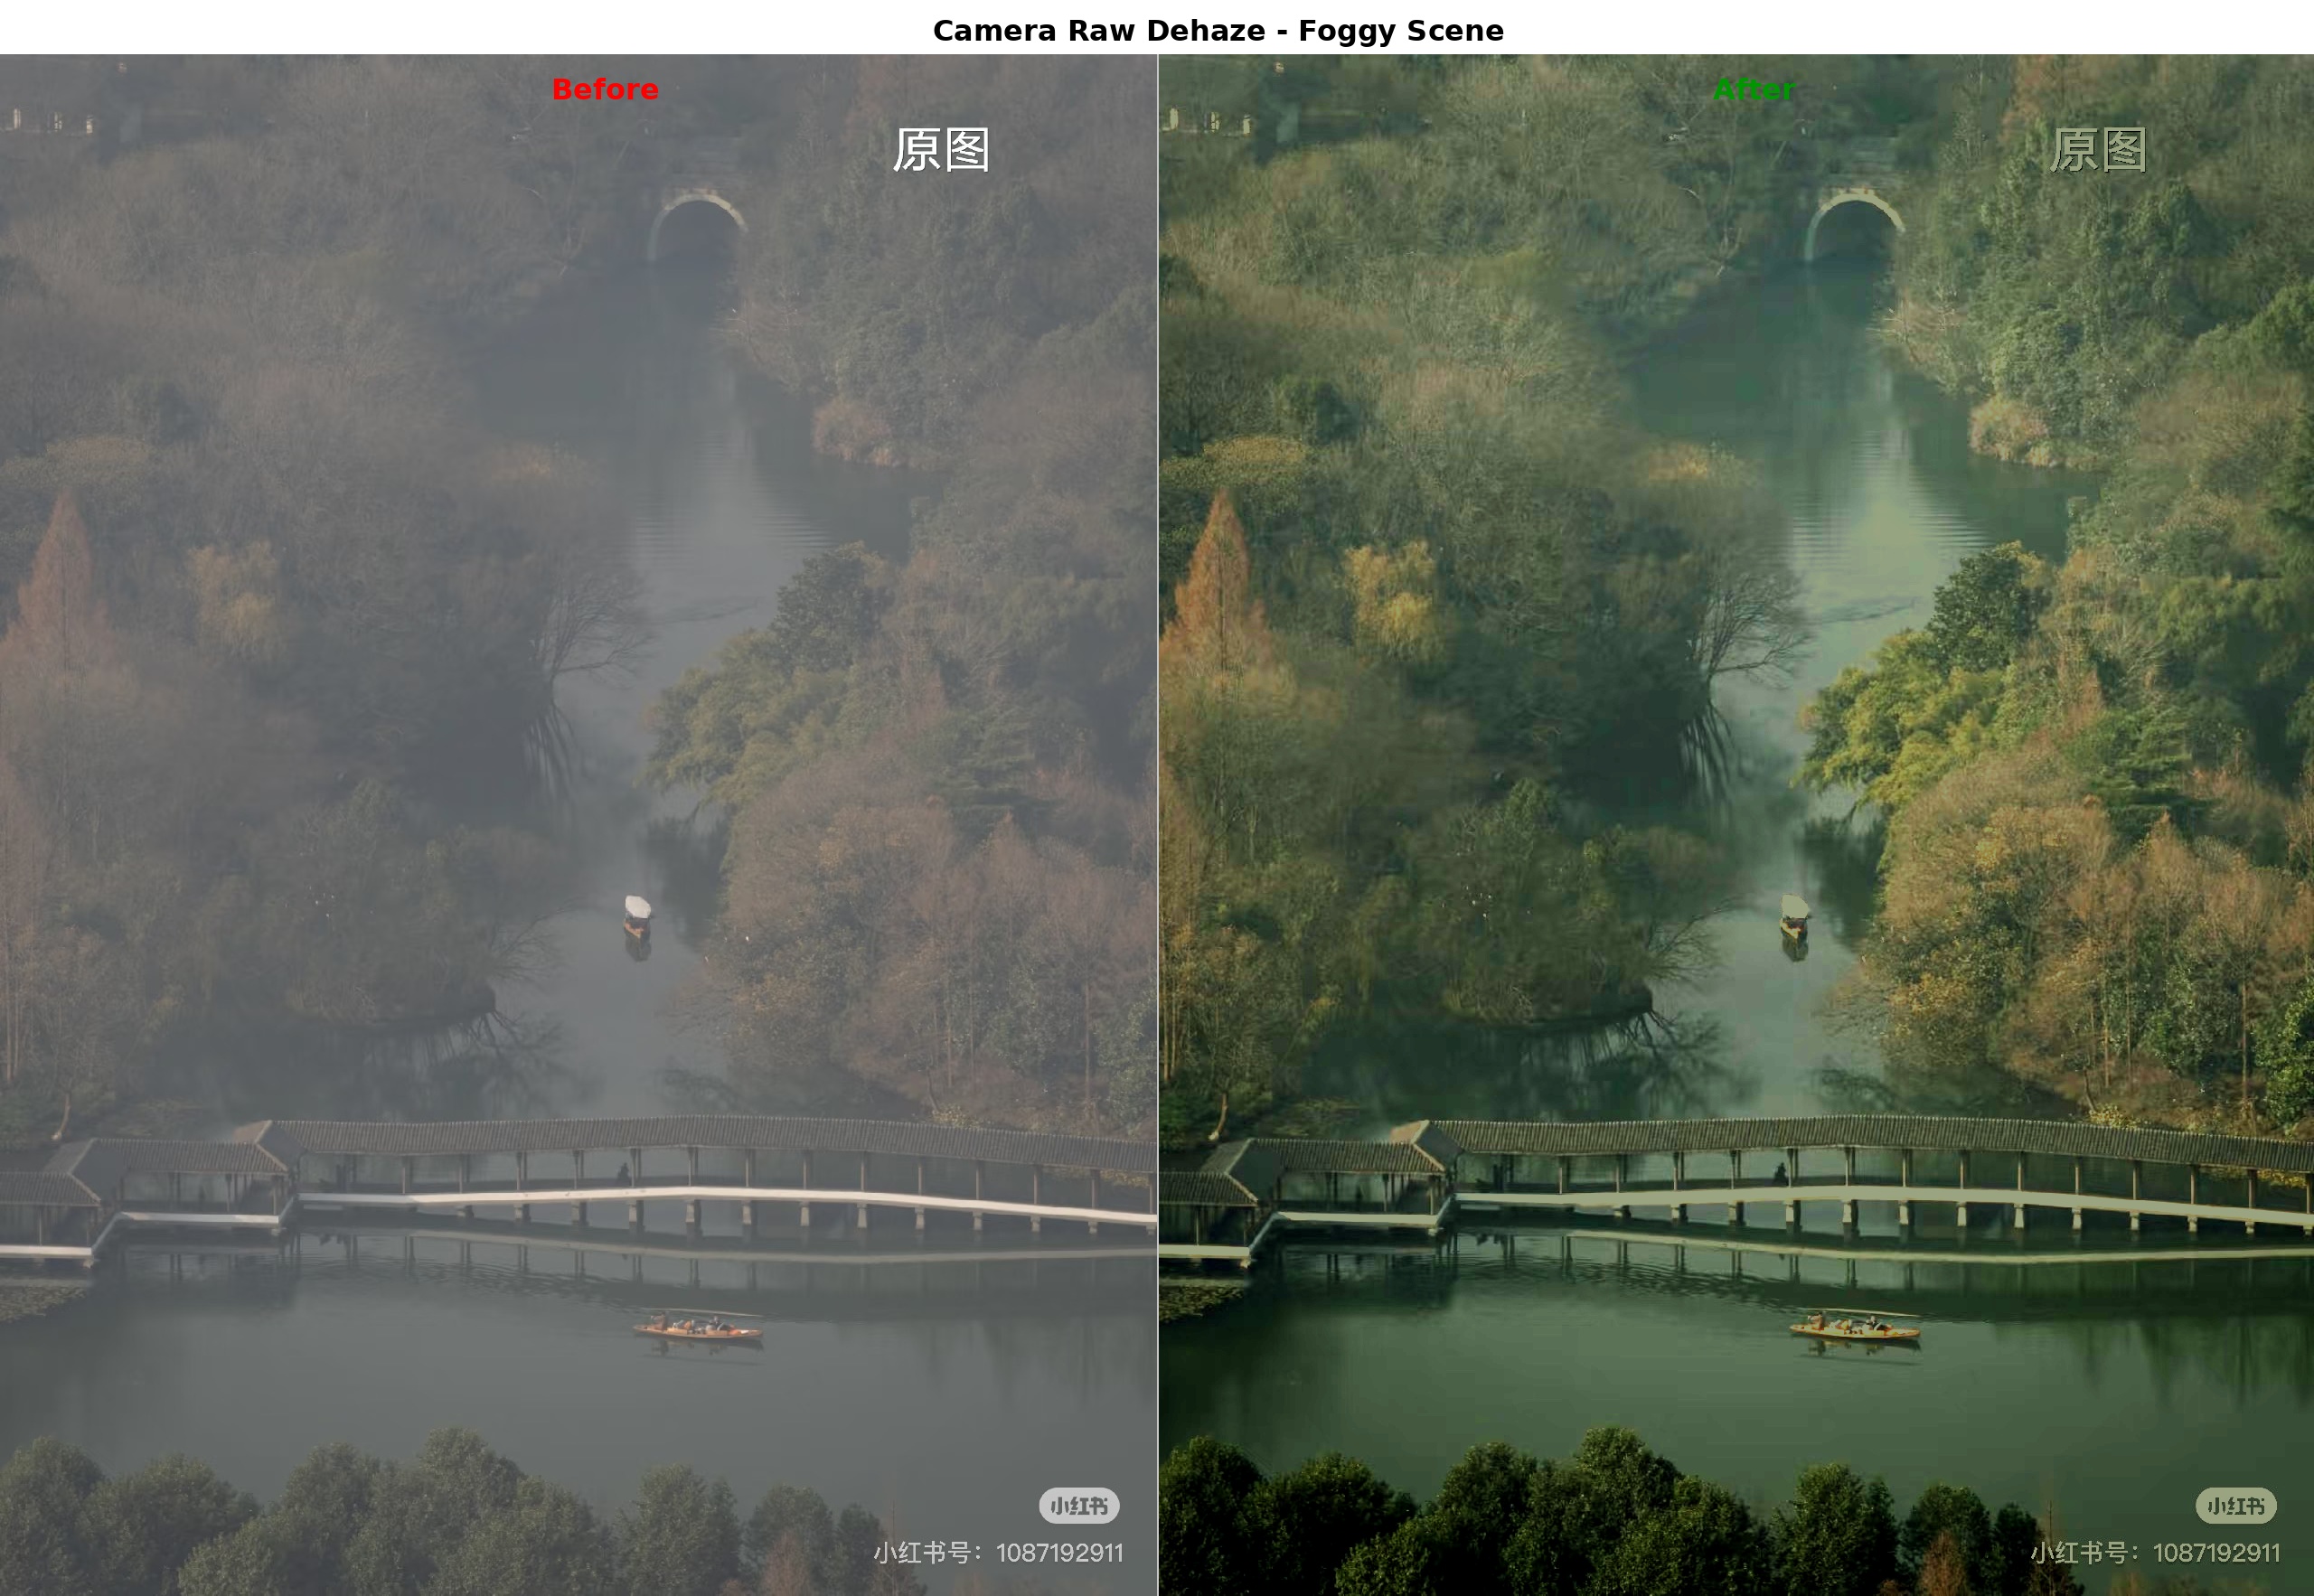
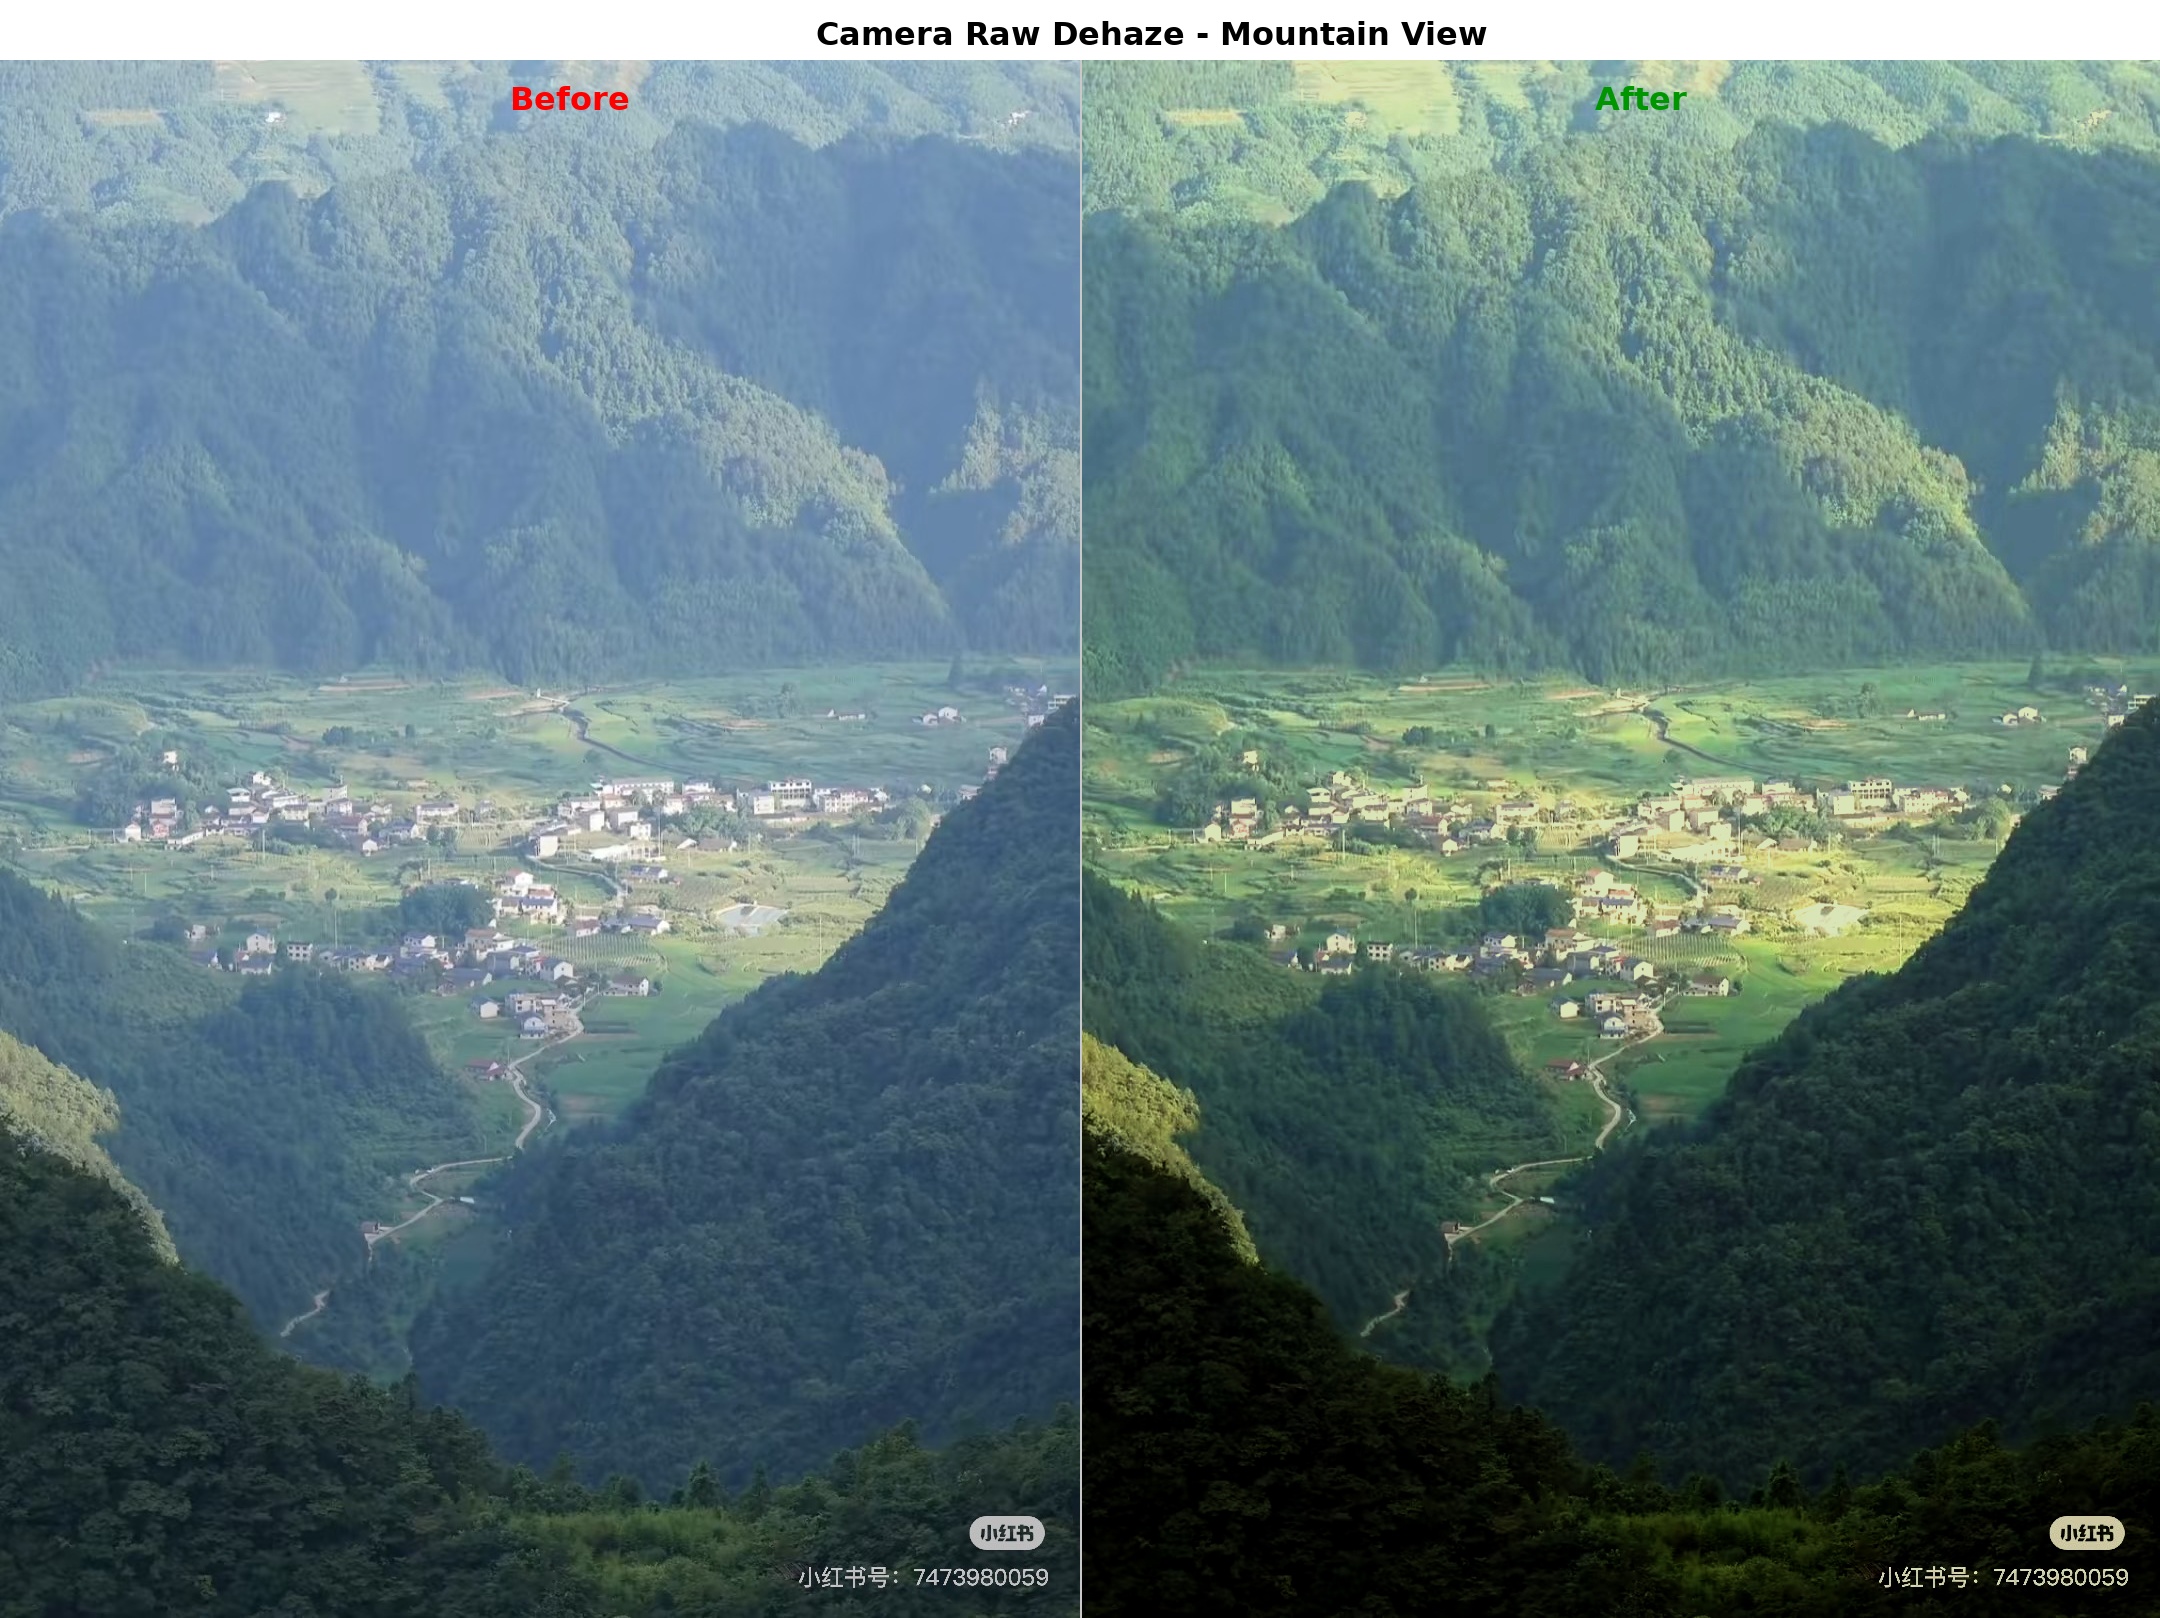
- 集成Adobe Camera Raw的三个核心增强功能
- 纹理 (Texture):增强中等大小细节的对比度,范围-100到100
- 清晰度 (Clarity):增强中间调对比度,让图像更锐利,范围-100到100
- 去薄雾 (Dehaze):减少或增加大气雾霾效果,范围-100到100
- 前后端算法完全一致:实时预览效果与最终输出完全匹配
- 智能算法选择:根据图像特征自动选择最优去薄雾算法
- 支持混合控制和整体强度调节
- 包含完整的前端JavaScript界面,支持实时预览
- 支持自定义预设:可保存、加载、管理和分享您的增强预设
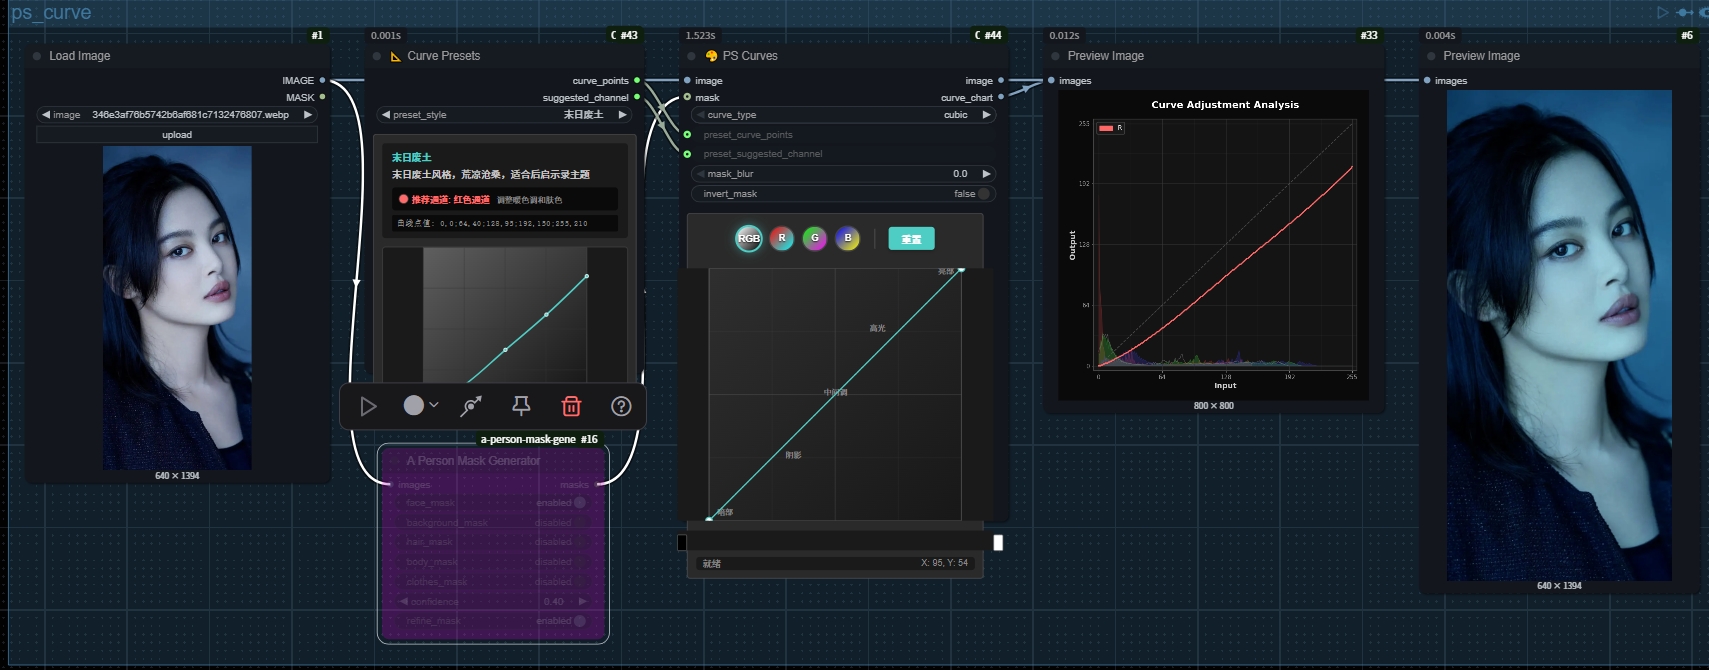
📐 曲线预设 (Curve Presets)

- 70+专业预设风格:覆盖人像、风景、电影、日系、港风、时尚等多种调色风格
- 智能通道建议:每个预设都配置了基于色彩理论的最佳适用通道
- 一键专业调色:选择风格后自动输出曲线数据和建议通道信息
- 与PS Curve完美联动:连接PS Curve节点实现预设的智能应用
- 分类明确:基础风格、电影级调色、胶片风格、日系风格、港风系列等
- 专业通道映射:
- 冷色调风格 → 蓝色通道:电影蓝橙、赛博朋克、科技感
- 自然色调风格 → 绿色通道:日系清新、风景增强、自然风光
- 暖色调风格 → 红色通道:港风经典、复古暖调、人像美颜
- 全局调整风格 → RGB通道:人像专用、高对比度、商业摄影
🎯 高级遮罩支持
- 选择性调整特定区域
- 遮罩边缘羽化,自然过渡
- 支持遮罩反转
💡 交互式编辑
- 双击节点打开专业调整弹窗,在弹出界面中实时预览调整效果
- 弹窗内所有调整参数实时同步,无需重新运行工作流
- 零延迟反馈:在弹出窗口中调整参数时图像实时更新,像使用专业图像编辑软件一样流畅
- 支持曲线、HSL、色阶和色彩分级节点的交互式编辑
- 类似Photoshop的专业编辑体验
🚀 未来计划
🎨 高级图层功能
- ✨ 自动混合图层功能:智能混合多个调整效果,自动优化图层顺序和混合模式
- 📏 图层蒙版管理:支持矢量蒙版、智能蒙版和渐变蒙版
- 🔄 非破坏性编辑:保存完整的调整历史,随时回到任何编辑状态
🎯 算法精度提升
- 🔧 PS Curve效果完全对齐:将曲线调整效果与Adobe Photoshop完全对齐,确保1:1还原专业调色效果
- 🌈 色彩空间扩展:支持更多专业色彩空间(ProPhoto RGB、Adobe RGB等)
- ⚡ 性能优化:GPU加速处理,大幅提升处理速度
🎬 专业工作流增强
- 📸 RAW文件直接支持:直接处理相机RAW格式文件
- 🎥 视频调色支持:扩展到视频序列的专业调色
- 🎨 LUT导入导出:支持业界标准LUT文件格式
📥 安装方法
Git克隆(推荐)
cd ComfyUI/custom_nodes
git clone https://github.com/aiaiaikkk/ComfyUI-Curve.git
手动下载
- 下载ZIP文件
- 解压到
ComfyUI/custom_nodes/ComfyUI-Curve - 重启ComfyUI
依赖要求
- torch>=1.9.0
- numpy>=1.21.0
- scipy>=1.7.0
📝 使用技巧
如何使用CurvePreset智能联动功能
-
智能预设应用流程:
- 在工作流中添加CurvePresetNode(📐 Curve Presets)
- 在工作流中添加PhotoshopCurveNode(🎨 PS Curves)
- 将CurvePresetNode的curve_points输出连接到PS Curve的preset_curve_points输入
- 将CurvePresetNode的suggested_channel输出连接到PS Curve的preset_suggested_channel输入
- 在CurvePresetNode中选择您想要的风格(如"电影蓝橙")
- 自动完成:PS Curve会自动将曲线应用到蓝色通道(建议通道)
- 运行工作流即可获得专业的电影级蓝橙色调效果
-
智能通道映射示例:
- 选择"日系清新" → 自动应用到绿色通道,增强自然色彩
- 选择"港风经典" → 自动应用到红色通道,营造经典港片暖调
- 选择"赛博朋克" → 自动应用到蓝色通道,突出科幻冷调
- 选择"人像专用" → 自动应用到RGB通道,整体提升人像效果
如何使用弹窗实时预览功能
-
曲线调整实时预览:
- 在工作流中添加Photoshop Curve节点
- 连接输入图像和遮罩(可选)
- 双击节点打开调整弹窗
- 此时您可以看到弹出窗口中的图像预览区域和曲线编辑区域
- 在弹窗内曲线上添加控制点:点击曲线添加新控制点
- 在弹窗内拖动控制点:左键按住并拖动控制点,观察图像实时变化
- 在弹窗内删除控制点:右键点击控制点
- 在弹窗内切换通道:点击RGB、R、G、B按钮切换不同通道曲线
- 在弹窗内调整强度:移动强度滑块即时查看不同强度效果
- 数值输入控制点:点击帮助栏中的"🎯 数值输入"显示坐标输入工具,输入X,Y值后点击"添加"
- 批量输入控制点:在数值输入工具中点击"批量"按钮,输入格式:0,0;64,80;128,128;192,200;255,255
- 完成后点击弹窗中的应用按钮,参数将自动同步到节点
-
HSL调整实时预览:
- 在工作流中添加Photoshop HSL节点
- 连接输入图像和遮罩(可选)
- 双击节点打开HSL调整弹窗
- 在弹出窗口中选择您想调整的颜色通道(红、橙、黄等)
- 在弹窗内移动色相滑块:左右拖动调整该颜色的色相值
- 在弹窗内移动饱和度滑块:左右拖动调整该颜色的饱和度
- 在弹窗内移动明度滑块:左右拖动调整该颜色的明度
- 弹窗内每个滑块调整都会实时更新预览图像
- 完成后点击弹窗中的应用按钮,参数将自动同步到节点
-
Color Grading调整实时预览:
- 在工作流中添加Color Grading节点
- 连接输入图像和遮罩(可选)
- 双击节点打开色彩分级调整弹窗
- 在弹出窗口中您将看到三个色轮:阴影、中间调和高光
- 色轮操作:直接在色轮上拖拽调整各区域的色彩
- 饱和度控制:通过滑块调整颜色的鲜艳程度
- 使用亮度滑块调整各区域明暗程度
- 选择混合模式控制颜色应用方式
- 调整整体强度控制效果程度
- 预览窗口实时更新,所见即所得
- 完成后点击弹窗中的应用按钮,参数将自动同步到节点
-
色阶调整实时预览:
- 在工作流中添加Photoshop Levels节点
- 连接输入图像和遮罩(可选)
- 双击节点打开色阶调整弹窗
- 在弹出窗口中您将看到带直方图背景的色阶调整界面
- 三点控制调整:
- 左侧滑块:调整黑场点(输入暗部范围)
- 中间滑块:调整伽马值(中间调亮度)
- 右侧滑块:调整白场点(输入亮部范围)
- 输出色阶调整:设置输出的黑白场范围
- 自动功能:
- 点击"自动色阶"按钮自动优化图像对比度
- 点击"自动对比度"按钮智能增强对比度
- 所有调整都会在预览窗口中实时显示效果
- 完成后点击弹窗中的应用按钮,参数将自动同步到节点
-
弹窗预览界面通用操作:
- 放大/缩小预览:在弹窗内使用鼠标滚轮或+/-按钮
- 平移预览:在弹窗内按住中键并拖动
- 对比原图:在弹窗内按住空格键查看原始图像,释放返回调整后效果
- 重置参数:点击弹窗内的重置按钮恢复默认设置
- 取消编辑:点击弹窗内的取消按钮放弃当前更改
- 应用编辑:点击弹窗内的应用按钮确认更改并同步到节点
曲线调整技巧
- S形曲线:增加对比度
- 反S形:减少对比度
- 上移曲线:提亮图像
- 下移曲线:压暗图像
- 实时预览技巧:在弹窗中使用多个控制点微调局部区域,观察实时效果找到最佳调整
HSL调整技巧
- 肤色调整:微调红橙色相和饱和度
- 天空增强:调整蓝色和浅绿通道
- 叶绿增强:调整绿色和黄色通道
- 日落效果:增强橙色和品红通道
- 实时预览技巧:在弹窗中逐个通道调整并观察实时效果,找到理想的颜色平衡点
直方图分析技巧
- 亮度分布判断:
- 左侧堆积:图像偏暗,考虑提亮处理
- 右侧堆积:图像偏亮,考虑压暗处理
- 中间集中:对比度较低,需要增强对比
- 双峰分布:图像层次丰富,对比度良好
- 颜色通道分析:
- R/G/B通道偏移:判断色偏问题
- 某通道过度集中:该颜色饱和度可能过高或过低
- 统计数据应用:
- 平均值:判断整体亮度水平
- 标准差:评估图像对比度和层次
- 中位数:了解像素分布的平衡点
色阶调整技巧
- 三点控制策略:
- 黑场点:设置图像中最暗部分的位置,影响阴影细节
- 白场点:设置图像中最亮部分的位置,影响高光细节
- 伽马值:调整中间调亮度,<1变亮,>1变暗
- 自动功能使用:
- 自动色阶:适合欠曝或过曝图像的快速修正
- 自动对比度:适合对比度不足的平淡图像
- 输出色阶控制:
- 压缩动态范围:适合打印输出或特殊效果
- 扩展输出范围:增强图像对比度
- 结合直方图调整:观察直方图变化,避免过度调整导致的色阶断层
Color Grading技巧
- 三区域独立调色:分别调整阴影、中间调、高光的色彩
- 饱和度控制:调整各区域颜色的鲜艳程度
- 风格化调色:
- 电影风格:阴影区域添加蓝色,高光添加暖色
- 复古效果:阴影添加青色,高光添加橙黄色
- 日落效果:阴影添加紫色,高光添加橙色
- 冷调风格:所有区域朝向蓝青色调整
- 暖调风格:所有区域朝向橙黄色调整
- 混合模式应用:
- soft_light:自然的颜色增强,适合微调
- overlay:强烈的对比增强,适合戏剧效果
- multiply:压暗效果,适合营造神秘氛围
- screen:提亮效果,适合梦幻风格
Camera Raw增强技巧
- 纹理调整:
- 正值(1-100):增强细节,让图像更有质感
- 负值(-1到-100):柔化细节,适合人像皮肤处理
- 清晰度调整:
- 正值:增强中间调对比度,让图像更锐利
- 负值:减少中间调对比度,产生柔焦效果
- 去薄雾调整:
- 正值:减少雾霾,增强清晰度和色彩饱和度
- 负值:增加雾霾效果,营造朦胧氛围
- 组合使用建议:
- 风景照片:纹理+10,清晰度+20,去薄雾+15
- 人像照片:纹理-10,清晰度+5,去薄雾+5
- 建筑摄影:纹理+20,清晰度+25,去薄雾+10
遮罩应用技巧
- 人像皮肤:建议2-4像素羽化
- 天空背景:建议5-10像素羽化
- 物体边缘:建议1-3像素羽化
- 大面积区域:建议8-15像素羽化
🆕 历史更新
2025-06-26 - 系统优化与算法对齐
- 前后端算法同步:修复Camera Raw去薄雾算法不一致问题
- 错误修复:修复GaussianBlurNode参数传递错误
- 项目清理:删除临时测试文件,保持结构整洁
- CurvePreset智能联动:实现预设与PS Curve的智能通道映射
2025-06-25 - PS Curve直方图增强
- 通道独立直方图:每个曲线通道显示对应的直方图
- 双输出支持:新增curve_chart输出,显示曲线和直方图分析
- 实时更新:工作流执行后自动更新直方图
- 问题修复:修复Histogram Analysis批处理输出和弹窗直方图显示问题
2025-06-24 - 预设系统增强
- PS Curve预设:完整的预设管理功能,支持保存/加载/导出
- HSL预设:为HSL调整添加预设支持
- 遮罩改进:扩大羽化范围至0-50像素
- 问题修复:修复默认预设加载问题
2025-06-22 - 完整模块化重构
- 架构升级:重构为清晰的模块化架构(18个Python模块)
- 更好的组织:节点按功能类型分类
- 代码复用:BaseImageNode消除重复代码
- 易于维护:每个节点独立文件
📄 许可证
MIT许可证 - 查看 LICENSE 文件。
English
Professional color adjustment extension for ComfyUI with Photoshop-like Curve, HSL, and Levels adjustment functionality, 70+ preset styles, advanced mask support, and Lightroom-style Color Grading. The standout feature is the ability to double-click nodes to open popup windows with real-time preview that allows you to color grade with the precision of professional image editing software.
📅 Latest Updates (2025-06-26)
🔧 System Optimization & Algorithm Alignment
- ✅ Frontend-Backend Algorithm Sync: Fixed Camera Raw dehaze algorithm inconsistency between frontend and backend, preview effects now match actual processing results more closely
- ✅ Bug Fix: Fixed GaussianBlurNode parameter passing error, improved system stability
- ⚠️ Dehaze Algorithm Ongoing Optimization: Currently achieved basic algorithm alignment, but still has gaps with PS Camera Raw effects, continue debugging
- 🧹 Project Cleanup: Removed temporary test files, maintaining clean project structure
🎯 CurvePreset Smart Linking Feature
- ✅ Intelligent channel recognition: Each preset style is configured with optimal color channel based on color theory
- ✅ Automatic application: PS Curve node automatically applies presets to suggested channels without manual selection
- ✅ 70+ smart style mapping: Cinematic Blue-Orange→Blue channel, Japanese Fresh→Green channel, Hong Kong Classic→Red channel
- ✅ Professional workflow: CurvePresetNode → PS Curve, one-step professional color grading
📊 PS Curve Histogram Enhancement (2025-06-25)
- ✅ Channel-specific histograms: Each channel (RGB/R/G/B) now shows its corresponding histogram in the curve editor background
- ✅ Dual output support: PS Curve node now outputs both processed image and curve analysis chart
- ✅ Live histogram updates: Histograms update automatically after workflow execution using the processed image
- ✅ Modal support: Histogram display works in both node and popup modal editors
🌟 Key Features
🎨 Curve Adjustment (Photoshop Curve)
- Professional Photoshop-style curve adjustment with multiple interpolation methods
- Double-click node for real-time adjustment interface: Directly drag control points in the popup window and instantly see image changes
- Channel-specific histogram backgrounds: Each channel displays its corresponding histogram for precise adjustments
- Support for RGB overall or individual R/G/B channel adjustment
- Dual outputs: Main image output + curve/histogram analysis chart
- Adjustable curve effect intensity (0-200%)
- Popup window adjustments apply immediately: All curve modifications can be viewed in real-time within the popup without re-running the workflow
- Simplified numerical input: Click "🎯 数值输入" to show precise coordinate input tools without affecting curve editor operation
- Built-in 70+ preset styles: Portrait, landscape, cinematic, vintage and more, directly selectable from dropdown
- Custom preset support: Save, load, manage and share your curve presets
- Smart preset linking: Accepts preset data from CurvePresetNode and automatically applies to optimal color channels
🎭 HSL Adjustment (Photoshop HSL)
- Precise control over 8 color channels: Red, Orange, Yellow, Green, Cyan, Blue, Purple, Magenta
- Independent adjustment of Hue, Saturation, and Lightness for each color
- Double-click node to open HSL adjustment popup: Slide controllers in the popup window to immediately see color change effects, WYSIWYG
- Support for masks and feathering effects
- Real-time interactive response in popup: Any HSL parameter adjustment in the popup interface instantly reflects in the preview image
- Custom preset support: Save, load, manage and share your HSL adjustment presets
🎚️ Levels Adjustment (Photoshop Levels)
- Double-click node for Photoshop-style levels adjustment interface: Professional three-point control (black point, gray point, white point)
- Real-time preview adjustment: Drag sliders to instantly see levels adjustment effects
- Auto levels function: One-click automatic optimization of image contrast and level distribution
- Auto contrast function: Intelligent image contrast enhancement
- Precise numerical control: Accurate adjustment of input/output black/white points and gamma values
- Histogram background display: Shows real-time histogram in levels interface for precise adjustments
🎨 Color Grading
- Double-click for Lightroom-style color grading interface: Professional three-wheel design (shadows, midtones, highlights)
- Real-time interactive color wheel operation: Directly drag on wheels to adjust hue and saturation with instant preview
- Professional color processing: Precise color control ensures grading accuracy
- Multiple blend modes: normal, multiply, screen, overlay, soft_light and other professional blending options
- Independent region grading: Control colors separately for shadows, midtones, and highlights
- Strength control: Adjustable overall effect intensity (0-200%)
- Custom preset support: Save, load, manage and share your color grading presets
🔀 Gaussian Blur with Mask
- Selective blur processing: Precisely control blur areas through masks
- Adjustable blur radius: Supports 0-100 pixel blur intensity adjustment
- Mask feathering: 0-20 pixel edge feathering for natural transitions
- Mask inversion: Quickly reverse blur areas
- Applications: Background blur, focus enhancement, privacy protection, artistic effects
📊 Histogram Analysis
- Professional image histogram analysis node
- Detailed statistical information: Mean, median, standard deviation and other image statistics
- Pixel distribution visualization: Clear display of image brightness and color distribution
- Multi-channel support: Supports RGB overall or individual R/G/B channel analysis
- Provides data reference for other adjustment nodes
🎯 Camera Raw Enhance
Dehaze Effect Comparison:
- Integrates three core Adobe Camera Raw enhancement features
- Texture: Enhances medium-sized detail contrast, range -100 to 100
- Clarity: Enhances midtone contrast for sharper images, range -100 to 100
- Dehaze: Reduces or adds atmospheric haze effect, range -100 to 100
- Frontend-backend algorithm consistency: Real-time preview effects match final output perfectly
- Intelligent algorithm selection: Automatically chooses optimal dehaze algorithm based on image characteristics
- Supports blend control and overall strength adjustment
- Includes complete frontend JavaScript interface with real-time preview
- Custom preset support: Save, load, manage and share your enhancement presets
📐 Curve Presets
- 70+ professional preset styles: Covers portrait, landscape, cinematic, Japanese, Hong Kong, fashion and other color grading styles
- Intelligent channel suggestions: Each preset is configured with optimal color channel based on color theory
- One-click professional grading: Select a style and automatically output curve data and suggested channel information
- Perfect PS Curve integration: Connect to PS Curve node for intelligent preset application
- Clear categorization: Basic styles, cinematic grading, film styles, Japanese styles, Hong Kong series, etc.
- Professional channel mapping:
- Cool tone styles → Blue channel: Cinematic Blue-Orange, Cyberpunk, Tech
- Natural tone styles → Green channel: Japanese Fresh, Landscape Enhancement, Natural Light
- Warm tone styles → Red channel: Hong Kong Classic, Vintage Warm, Portrait Beauty
- Global adjustment styles → RGB channel: Portrait Pro, High Contrast, Commercial Photography
🎯 Advanced Mask Support
- Selective adjustment of specific areas
- Mask edge feathering for natural transitions
- Support for mask inversion
💡 Interactive Editing
- Double-click nodes to open professional adjustment popup with real-time preview in the window
- All adjustment parameters in the popup sync instantly without re-running the workflow
- Zero-delay feedback: Images update in real-time in the popup window as parameters are adjusted, as smooth as using professional image editing software
- Supports interactive editing for Curve, HSL, Levels and Color Grading nodes
- Professional editing experience similar to Photoshop and Lightroom
🚀 Future Plans
🎨 Advanced Layer Features
- ✨ Automatic Blend Layer Function: Intelligently blend multiple adjustment effects, automatically optimize layer order and blend modes
- 📏 Layer Mask Management: Support for vector masks, smart masks and gradient masks
- 🔄 Non-destructive Editing: Save complete adjustment history, return to any editing state at any time
🎯 Algorithm Precision Enhancement
- 🔧 PS Curve Effect Full Alignment: Align curve adjustment effects completely with Adobe Photoshop, ensuring 1:1 restoration of professional color grading effects
- 🌈 Color Space Extension: Support for more professional color spaces (ProPhoto RGB, Adobe RGB, etc.)
- ⚡ Performance Optimization: GPU-accelerated processing, dramatically improving processing speed
🎬 Professional Workflow Enhancement
- 📸 Direct RAW File Support: Process camera RAW format files directly
- 🎥 Video Color Grading Support: Extend to professional color grading of video sequences
- 🎨 LUT Import/Export: Support industry-standard LUT file formats
📥 Installation
Git Clone (Recommended)
cd ComfyUI/custom_nodes
git clone https://github.com/aiaiaikkk/ComfyUI-Curve.git
Manual Download
- Download ZIP file
- Extract to
ComfyUI/custom_nodes/ComfyUI-Curve - Restart ComfyUI
Dependencies
- torch>=1.9.0
- numpy>=1.21.0
- scipy>=1.7.0
📝 Usage Tips
How to Use CurvePreset Smart Linking
-
Smart Preset Application Workflow:
- Add CurvePresetNode (📐 Curve Presets) to your workflow
- Add PhotoshopCurveNode (🎨 PS Curves) to your workflow
- Connect CurvePresetNode's curve_points output to PS Curve's preset_curve_points input
- Connect CurvePresetNode's suggested_channel output to PS Curve's preset_suggested_channel input
- Select your desired style in CurvePresetNode (e.g., "Cinematic Blue-Orange")
- Automatic completion: PS Curve will automatically apply the curve to the blue channel (suggested channel)
- Run the workflow to achieve professional cinematic blue-orange color grading
-
Smart Channel Mapping Examples:
- Select "Japanese Fresh" → Automatically applies to green channel, enhancing natural colors
- Select "Hong Kong Classic" → Automatically applies to red channel, creating classic Hong Kong film warm tones
- Select "Cyberpunk" → Automatically applies to blue channel, highlighting sci-fi cool tones
- Select "Portrait Pro" → Automatically applies to RGB channel, overall portrait enhancement
How to Use Popup Real-time Preview
-
Curve Adjustment Real-time Preview:
- Add Photoshop Curve node to your workflow
- Connect input image and mask (optional)
- Double-click the node to open the adjustment popup window
- You'll see the image preview area and curve editing area in the popup
- Add control points in the popup: Click on the curve to add a new control point
- Move control points in the popup: Left-click and drag a control point to see real-time image changes
- Delete control points in the popup: Right-click on a control point
- Switch channels in the popup: Click on RGB, R, G, B buttons to toggle different channel curves
- Adjust intensity in the popup: Move the intensity slider to instantly see different strength effects
- When finished, click Apply in the popup window and parameters will automatically sync to the node
-
HSL Adjustment Real-time Preview:
- Add Photoshop HSL node to your workflow
- Connect input image and mask (optional)
- Double-click the node to open the HSL adjustment popup window
- In the popup window, select the color channel you want to adjust (Red, Orange, Yellow, etc.)
- Move Hue slider in the popup: Drag left/right to adjust the hue value for that color
- Move Saturation slider in the popup: Drag left/right to adjust the saturation
- Move Lightness slider in the popup: Drag left/right to adjust the lightness
- Each slider adjustment in the popup will update the preview image in real-time
- When finished, click Apply in the popup window and parameters will automatically sync to the node
-
Color Grading Real-time Preview:
- Add Color Grading node to your workflow
- Connect input image and mask (optional)
- Double-click the node to open the color grading popup window
- In the popup, you'll see three color wheels for shadows, midtones, and highlights
- Color wheel operation techniques:
- Normal click and drag: Set positive saturation (enhance colors)
- Hold Shift key and drag: Set negative saturation (desaturation effect)
- Wheel indicator colors: White circle = positive saturation, Gray circle = negative saturation
- Saturation sliders: -100 to +100 range
- Positive values: Enhance color saturation in that region
- Negative values: Reduce color saturation in that region (toward grayscale)
- -100: Complete desaturation of that region to grayscale
- Use luminance sliders to adjust brightness levels for each region
- Select blend mode to control how colors are applied
- Adjust overall strength to control effect intensity
- Preview window updates in real-time, showing exactly what you'll get
- When finished, click Apply in the popup window and parameters will automatically sync to the node
-
Levels Adjustment Real-time Preview:
- Add Photoshop Levels node to your workflow
- Connect input image and mask (optional)
- Double-click the node to open levels adjustment popup
- In the popup window you'll see levels adjustment interface with histogram background
- Three-point control adjustment:
- Left slider: Adjust black point (input shadow range)
- Middle slider: Adjust gamma value (midtone brightness)
- Right slider: Adjust white point (input highlight range)
- Output levels adjustment: Set output black and white point range
- Auto functions:
- Click "Auto Levels" button to automatically optimize image contrast
- Click "Auto Contrast" button for intelligent contrast enhancement
- All adjustments display effects in real-time in the preview window
- When finished, click Apply in the popup window and parameters will automatically sync to the node
-
Popup Preview Interface Common Operations:
- Zoom in/out preview: Use mouse wheel or +/- buttons in the popup
- Pan preview: Hold middle mouse button and drag in the popup
- Compare with original: Hold spacebar in the popup to view original image, release to return to adjusted effect
- Reset parameters: Click the reset button in the popup to restore default settings
- Cancel editing: Click cancel button in the popup to discard current changes
- Apply editing: Click apply button in the popup to confirm changes and sync to node
Curve Adjustment Tips
- S-curve: Increases contrast
- Inverse S-curve: Reduces contrast
- Moving curve up: Brightens image
- Moving curve down: Darkens image
- Curve format:
x1,y1;x2,y2;x3,y3(e.g.,0,0;128,150;255,255) - Real-time preview tip: Use multiple control points in the popup window to fine-tune local areas, observe real-time effects to find optimal adjustments
HSL Adjustment Tips
- Skin tone adjustment: Fine-tune Red and Orange hue and saturation
- Sky enhancement: Adjust Blue and Cyan channels
- Foliage enhancement: Adjust Green and Yellow channels
- Sunset effect: Enhance Orange and Magenta channels
- Real-time preview tip: In the popup window, adjust channels one by one while observing real-time effects to find the ideal color balance
Histogram Analysis Tips
- Brightness distribution assessment:
- Left-side clustering: Image is too dark, consider brightening
- Right-side clustering: Image is too bright, consider darkening
- Center concentration: Low contrast, needs contrast enhancement
- Bimodal distribution: Rich image layers with good contrast
- Color channel analysis:
- R/G/B channel shifts: Identify color cast issues
- Excessive concentration in one channel: Color saturation may be too high or low
- Statistical data application:
- Mean: Judge overall brightness level
- Standard deviation: Evaluate image contrast and tonal range
- Median: Understand pixel distribution balance point
Levels Adjustment Tips
- Three-point control strategy:
- Black point: Set position of darkest part in image, affects shadow detail
- White point: Set position of brightest part in image, affects highlight detail
- Gamma value: Adjust midtone brightness, <1 brightens, >1 darkens
- Auto function usage:
- Auto Levels: Suitable for quick correction of underexposed or overexposed images
- Auto Contrast: Suitable for flat images lacking contrast
- Output levels control:
- Compress dynamic range: Suitable for print output or special effects
- Expand output range: Enhance image contrast
- Combined histogram adjustment: Observe histogram changes to avoid over-adjustment causing tone breaks
Color Grading Tips
- Saturation adjustment techniques:
- Positive saturation (1-100): Enhance color vibrancy in that region
- Negative saturation (-1 to -100): Reduce color vibrancy toward grayscale
- All regions at -100 saturation: Achieve complete grayscale effect, perfect for black & white photo foundation
- Selective desaturation: Apply negative saturation only to specific regions (shadows or highlights)
- Color wheel operation techniques:
- Normal drag: Adjust hue and positive saturation
- Shift+drag: Adjust hue and negative saturation (desaturation direction)
- Watch indicators: White dot = positive saturation, Gray dot = negative saturation
- Stylistic color grading:
- Cinematic look: Add blue to shadows and warm tones to highlights
- Vintage effect: Add cyan to shadows and orange/yellow to highlights
- Sunset effect: Add purple to shadows and orange to highlights
- Cool tone style: Adjust all regions toward blue-cyan tones
- Warm tone style: Adjust all regions toward orange-yellow tones
- Blend mode applications:
- soft_light: Natural color enhancement, suitable for subtle adjustments
- overlay: Strong contrast enhancement, suitable for dramatic effects
- multiply: Darkening effect, suitable for creating mysterious atmosphere
- screen: Brightening effect, suitable for dreamy styles
Camera Raw Enhancement Tips
- Texture adjustment:
- Positive values (1-100): Enhance details for more texture
- Negative values (-1 to -100): Soften details, suitable for portrait skin
- Clarity adjustment:
- Positive values: Enhance midtone contrast for sharper images
- Negative values: Reduce midtone contrast for soft focus effect
- Dehaze adjustment:
- Positive values: Reduce haze, enhance clarity and color saturation
- Negative values: Add haze effect for dreamy atmosphere
- Combination suggestions:
- Landscape photos: Texture +10, Clarity +20, Dehaze +15
- Portrait photos: Texture -10, Clarity +5, Dehaze +5
- Architecture photography: Texture +20, Clarity +25, Dehaze +10
Mask Application Tips
- Portrait skin: Recommended 2-4 pixel feathering
- Sky background: Recommended 5-10 pixel feathering
- Object edges: Recommended 1-3 pixel feathering
- Large areas: Recommended 8-15 pixel feathering
🆕 Recent Updates
2025-06-26 - System Optimization & Algorithm Alignment
- Frontend-Backend Algorithm Sync: Fixed Camera Raw dehaze algorithm inconsistency
- Bug Fix: Fixed GaussianBlurNode parameter passing error
- Project Cleanup: Removed temporary test files, maintaining clean structure
- CurvePreset Smart Linking: Implemented intelligent channel mapping between presets and PS Curve
2025-06-25 - PS Curve Histogram Enhancement
- Channel-specific histograms: Each curve channel now displays its corresponding histogram
- Dual output support: Added curve_chart output showing curves and histogram analysis
- Live updates: Histograms update automatically after workflow execution
- Bug fixes: Fixed Histogram Analysis batch output and modal histogram display issues
2025-06-24 - Preset System Enhancement
- PS Curve presets: Complete preset management with save/load/export functionality
- HSL presets: Added preset support for HSL adjustments
- Mask improvements: Expanded feathering range to 0-50 pixels
- Bug fixes: Fixed default preset loading issues
2025-06-22 - Complete Modular Refactoring
- Architecture upgrade: Refactored into clear modular architecture (18 Python modules)
- Better organization: Nodes categorized by function type
- Code reuse: BaseImageNode eliminates duplicate code
- Easy maintenance: Each node in its own file
Major Color Grading Improvements
- Fixed -100 saturation color cast issue: -100 saturation now achieves complete grayscale effect without cyan or other color casts
- Added negative saturation support: Full -100 to +100 saturation range, negative values achieve desaturation effects
- Enhanced Shift key interaction: Hold Shift key while operating on color wheels to set negative saturation values
- Color wheel visual indicators: White indicators for positive saturation, gray indicators for negative saturation
- Lab color space optimization: Corrected Lab neutral value calculations for accurate color when fully desaturated
- Global desaturation detection: Automatically applies global grayscale conversion when all regions are set to -100 saturation
- Improved luminance mask algorithm: Uses sigmoid functions for smooth transitions, closer to Lightroom effects
- Multiple blend mode support: Added multiply, screen, overlay, soft_light and other professional blending options
- Real-time preview performance optimization: Improved popup preview response speed and accuracy
📄 License
MIT License - See LICENSE file.
<div align="center">
If this project helps you, please give it a Star!
</div>Run ComfyUI workflows without the setup
No installs, no CUDA version roulette, no GPU sitting idle on your bill. Bring a workflow and run it in the browser.