
ComfyUI-OTP-Auth
Adds simple One-Time Password (OTP) authentication using Google Authenticator to protect publicly accessible ComfyUI instances.
ComfyUI-OTP-Auth
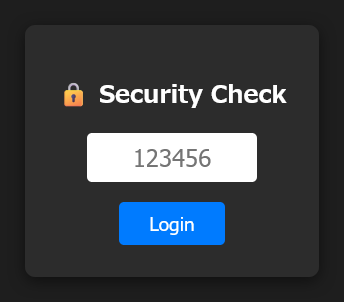
A lightweight TOTP authentication gate for ComfyUI. It can protect the whole ComfyUI web UI with codes from Google Authenticator, Microsoft Authenticator, 1Password, Authy, or another standard TOTP application.
Features
- TOTP authentication.
- First-run QR setup.
- Signed, expiring session cookies.
HttpOnly,SameSite, and configurableSecurecookie attributes.- Login brute-force rate limiting.
- Localhost bypass and IP/CIDR whitelist options.
- Current ComfyUI route registration through
PromptServer.instance.routes. - No ComfyUI workflow nodes are added; this extension only protects the web server.
Installation
Clone this repository into ComfyUI's custom_nodes directory and install the dependency:
pip install -r requirements.txt
Restart ComfyUI, open it in a browser, scan the QR code, and confirm the displayed 6-digit TOTP code.
Configuration
config.ini is created automatically and is ignored by Git. Restart ComfyUI after changing settings manually.
[AUTH]
SECRET_KEY = <generated TOTP secret>
COOKIE_NAME = <generated cookie name>
SESSION_SECRET = <generated session-signing secret>

IS_SETUP_COMPLETED = True
SKIP_AUTH_ON_LOCALHOST = False
IP_WHITELIST =

SESSION_MAX_AGE_DAYS = 30
COOKIE_SECURE = Auto
COOKIE_SAMESITE = Strict
Cookie security
SESSION_SECRET signs authentication cookies with HMAC-SHA256. A client cannot create a valid login cookie just by knowing the cookie name or the old literal value.
COOKIE_SECURE = Auto: adds the Secure flag when aiohttp sees an HTTPS request.COOKIE_SECURE = True: always adds the Secure flag. Recommended when HTTPS terminates at a reverse proxy.COOKIE_SECURE = False: allows HTTP cookies. Use only on trusted local networks.COOKIE_SAMESITE:Strict,Lax, orNone. Default isStrict.
Existing cookies from releases before the signed-session-cookie update are intentionally invalid after this update. Log in once with TOTP again.
Localhost / reverse proxy warning
SKIP_AUTH_ON_LOCALHOST = True trusts the network peer seen by ComfyUI. If Cloudflare Tunnel, nginx, Caddy, another reverse proxy, or a similar service runs on the same machine, a remote request may arrive at ComfyUI from 127.0.0.1. In that architecture, do not enable localhost bypass.
The same caution applies to broad IP whitelist ranges. Keep the bypass disabled for internet-facing deployments unless you fully understand the proxy path.
Reset / re-setup
For a full reset, stop ComfyUI, delete config.ini, and start ComfyUI again. A new TOTP secret, cookie name, and session-signing secret will be generated.
To keep the current TOTP secret but show setup again, stop ComfyUI, set:
IS_SETUP_COMPLETED = False
and restart it.
Logout
A POST request to /custom_auth/logout clears the authentication cookie.
Compatibility
Version 1.1.1 was tested with ComfyUI 0.37.0. ComfyUI changes over time, so testing against newer releases is recommended before exposing a server publicly.
<a name="日本語"></a>
日本語
ComfyUI 全体のWebアクセスに TOTP(ワンタイムパスワード)認証を追加する軽量なカスタム拡張です。Google Authenticator など標準的なTOTPアプリを利用できます。
主な機能
- TOTPによるログイン
- 初回起動時のQRコードセットアップ
- HMAC-SHA256署名付き・有効期限付きセッションCookie
HttpOnly/SameSite/SecureCookie設定- ログイン失敗回数による簡易レート制限
- localhost認証スキップ
- IPアドレス/CIDRホワイトリスト
- 現行ComfyUIの
PromptServer.instance.routes形式でAPIを登録
セキュリティ上の変更点
このセキュリティ更新より前はログイン済みCookieの値が固定文字列でした。現在はランダムな SESSION_SECRET を使ってCookieへ署名するため、Cookie名を知っているだけでは認証済みCookieを偽造できません。
アップデート前のCookieは無効になります。アップデート後、TOTPで一度ログインし直してください。
localhost認証スキップの注意
同じPC上で Cloudflare Tunnel、nginx、Caddy などを動かしている場合、インターネットからのアクセスでもComfyUIからは接続元が 127.0.0.1 に見える場合があります。
その構成では:
SKIP_AUTH_ON_LOCALHOST = False
を推奨します。
HTTPS / Secure Cookie
ComfyUIへ直接HTTPSで接続している場合は COOKIE_SECURE = Auto で自動判定できます。
リバースプロキシ側でHTTPSを終端し、ComfyUIとの間がHTTPの場合は次を推奨します。
COOKIE_SECURE = True
ブラウザへ返るCookieにSecure属性が付きます。
複数ユーザーについて
現在は「1つのComfyUIインスタンスに1つのTOTP秘密鍵」という単一ユーザー方式です。
複数人で使う場合は、公開セルフ登録ではなく、管理者がユーザーを追加して各ユーザーへ個別のTOTP秘密鍵を発行する方式が安全です。公開セルフ登録を有効にすると認証ゲートそのものを誰でも通過できる設計になり得るため、デフォルト機能にはしていません。