
Adachi-Inpaint-Workbench
Paint the inpaint mask directly on the node canvas instead of a modal mask editor, with no save/load round-trip per stroke. The connected inpaint node hosts the live painting tools and WebUI-style sampling controls, and supports whole-image or padded masked-area sampling with original-resolution compositing, Alt temporary erase, Ctrl+wheel brush size, hover image comparison and one-click adoption of a result as the next source image. All user-facing strings default to English and the node pack follows the ComfyUI language setting through the locales/ mechanism. MIT licensed; reuses ComfyUI's NumPy, Pillow and PyTorch.
Adachi-Inpaint-Workbench
Load an image, paint a mask and inpaint directly inside the workflow node — no modal mask editor and no save/load round-trip on every stroke.
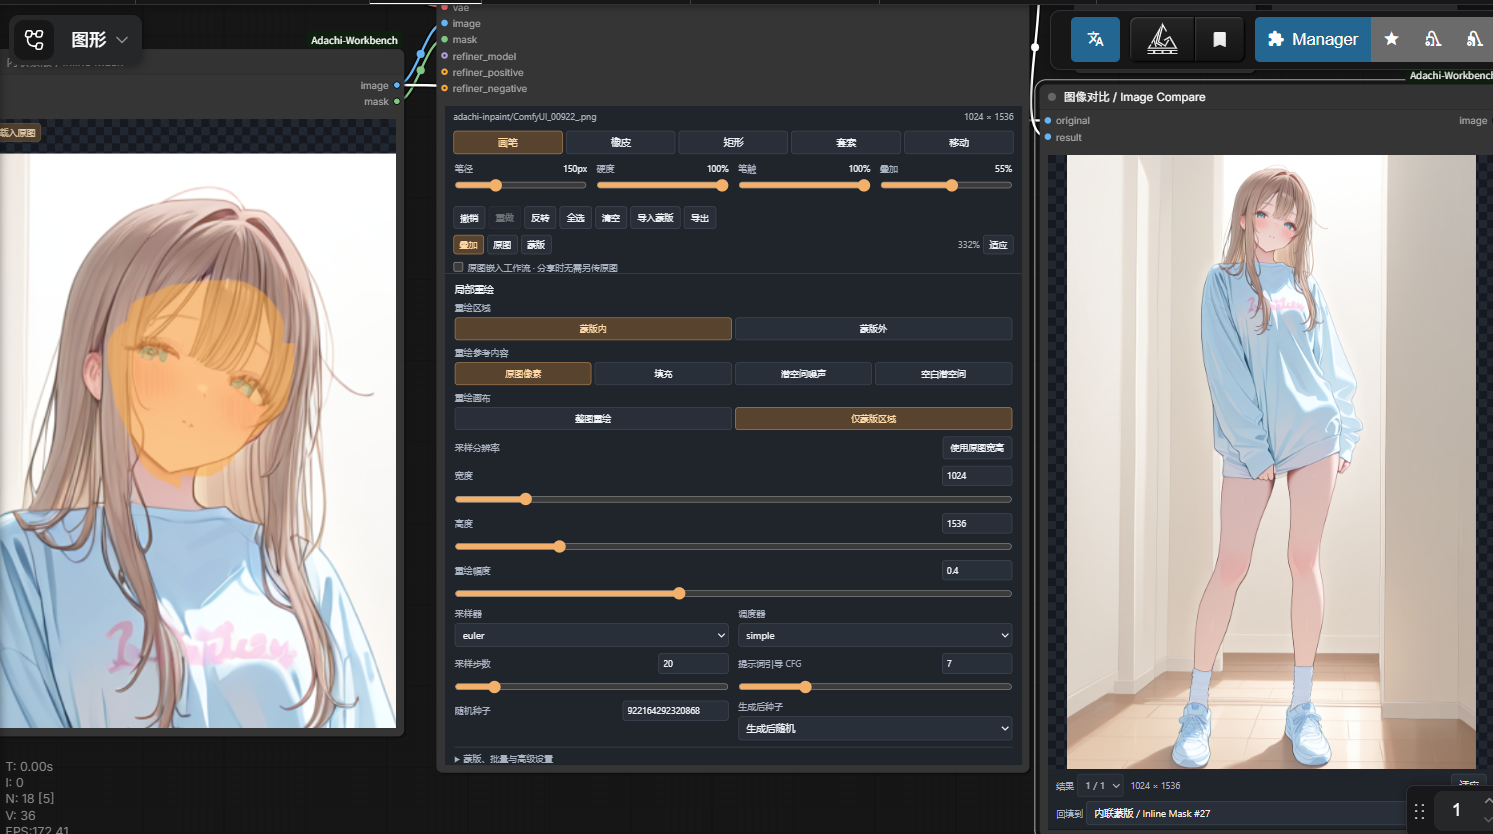
MIT licensed, by Adachi. Supports whole-image and masked-area sampling, an Alt temporary eraser, Ctrl+wheel brush size, image comparison and one-click adoption of a result as the next source image.
How this differs from other nodes
| | ComfyUI's built-in mask editing | This node pack |
|---|---|---|
| Where you paint | A modal editor opens over the graph (MaskEditor); you close it to get back to the workflow | You paint on the node's own canvas, and the mask lives in the workflow |
| Per-stroke cost | Commit the mask in the dialog, then re-run | Every stroke updates the mask in the browser and is stored with the workflow; no disk save/load per stroke |
| Sampling | Left to the workflow you build | The connected WebUI Inpaint node carries the sampling controls (area, width/height, padding, mask_blur, mask_grow, fill mode, sampler, Refiner) |
The built-in Painter node draws an image and exposes a mask, but it stops there — it has no inpaint pipeline. The built-in MaskEditor edits masks in a modal dialog. ComfyUI-Inpaint-CropAndStitch does crop-and-stitch well but does not paint. This pack connects the whole loop in one place: paint → sample → composite at original resolution → compare → adopt the result as the next source and keep painting.
Install
Copy the whole Adachi-Inpaint-Workbench folder into ComfyUI/custom_nodes/, keeping web/, backend.py and __init__.py.
Restart ComfyUI, then hard-refresh the browser with Ctrl+F5.
Search for Inline Mask or WebUI Inpaint; the category is Adachi-Inpaint-Workbench.
The node pack follows the ComfyUI language setting: node names, sockets and tooltips come from locales/, and the canvas buttons and parameter panel from web/i18n.js, so a Chinese ComfyUI shows the Chinese labels. English is the built-in default, and any missing entry falls back to English.
On Windows you can instead run the installer from the unzipped plugin folder, pointing it at your ComfyUI directory (the one containing main.py).
powershell -ExecutionPolicy Bypass -File .\install.ps1 -ComfyUIPath "D:\ComfyUI_windows_portable\ComfyUI"
The installer only copies this plugin; on update it zips the previous installation into user/adachi-workbench-backups/ and does not restart the server.
The plugin uses ComfyUI's existing PyTorch, NumPy and Pillow — no extra pip or npm packages.
To uninstall, close ComfyUI and delete custom_nodes/Adachi-Inpaint-Workbench.
ComfyUI Manager and Comfy Registry
Manager Git URL installation can use https://github.com/adachi0130/Adachi-Inpaint-Workbench, or clone it into ComfyUI/custom_nodes:
git clone https://github.com/adachi0130/Adachi-Inpaint-Workbench.git
A Manager listing submission is open at ComfyUI-Manager PR #3378 and still needs the maintainer to merge it and refresh the index, so search visibility is not guaranteed yet. A Comfy Registry publisher is not configured; see the publishing notes.
Quick start
- Drag
examples/01-inline-inpaint.jsoninto ComfyUI and pick your checkpoint. - In Inline Mask, upload, drop or paste an image and paint the areas to repaint directly on the canvas.
- Edit the positive/negative prompts, then set the painting tools, sampling area, sampling resolution, sampler and denoise in the WebUI Inpaint node, and run.
imageoutputs the full composited picture,cropoutputs the actual sampling canvas, andmaskoutputs that canvas's mask.
White repaints, black preserves; orange is the painted area on the canvas.
With mask_mode=outside this inverts and everything outside the painted area is repainted.
mask_blur, mask_grow and extra feathering change the effective mask boundary, so blend pixels at that boundary change too; pixels where the effective mask is zero are preserved exactly.
The two sampling areas
| area | What it does | Behaviour |
|---|---|---|
| whole_image | Repaint at the source extent | Scales the whole image to width × height, samples, then composites back through the mask |
| only_masked | Repaint at the mask extent | Takes the mask bounding box, adds padding context, expands toward the target ratio, upscales that region to the sampling size, and pastes the result back in place |
width/height are the sampling canvas size and must be multiples of 8; the final image keeps the uploaded image's resolution in both modes.
That differs from the WebUI whole-image mode, which usually outputs at the target size — take crop, or add a resize node after the full output, if you want a target-size image.
padding, mask_blur and mask_grow are all measured in source pixels.
When the mask touches an image edge, masked-area mode uses aspect-preserving fill to keep the entire mask instead of cropping it to match the ratio.
resize_mode (stretch, center crop, aspect fill) applies to whole_image; masked-area mode automatically uses the transform that keeps the whole mask.
Canvas controls
| Action | How |
|---|---|
| Brush / eraser | Toolbar toggle, B / E; hold Alt or use the right mouse button to erase temporarily and release to restore the previous tool; the eraser cursor and a pale pink dashed outline show the erase mode |
| Rectangle / freehand lasso | R / L, drag out the region to repaint |
| Brush size / hardness / brush opacity | Source-pixel brush size, edge hardness and painting opacity |
| Orange overlay | Display opacity only; it never changes the real mask |
| Undo / redo | Ctrl+Z / Ctrl+Shift+Z, or Ctrl+Y |
| Zoom / pan | Wheel to zoom; drag with Space, the middle button or H to pan; Fit to reset |
| Brush size keys | [ / ] |
| Fast brush size | With the pointer over the canvas, hold Ctrl and wheel up/down; the plain wheel still zooms the image |
| Editor height | Drag the ↕ bar at the bottom of the editor; the size is saved with the workflow |
| Invert / fill / clear | Act on the current painted mask and are undoable |
| Import / export mask | Full-resolution PNG; greyscale images import by brightness, images with alpha import by alpha |
| Image / mask / overlay | Preview toggles only; they do not change the output |
Brush pressure and soft brushes are supported; the mouse uses a fixed pressure. Inline Mask keeps only the image editing area and a small Load image button in the corner, and adjusts the canvas height to the image ratio after loading to reduce empty margins. The brush, eraser, rectangle, lasso, pan, four brush sliders, undo/redo, mask actions, view toggles, fit and the embed option all live in the connected WebUI Inpaint node and drive that same inline canvas. You upload the image once; every stroke then updates the mask in the browser and is stored as PNG data in the workflow and in the executed parameters, so there is no saving and reloading of files per stroke. Wheel events over the picture zoom it; over the toolbar, buttons, sliders or the parameter panel they follow ComfyUI's canvas navigation settings. A continuous wheel gesture that starts on the ComfyUI canvas keeps navigating the outer canvas when it moves over the picture; scrolling inside the picture again after stopping zooms the image. Very large images still use browser memory, and PNG encoding time depends on resolution and hardware, so instant completion is not guaranteed for every image.
Painting tools and inpainting parameters
Once Inline Mask is connected to the image input of WebUI Inpaint, the original painting controls appear in that inpaint node, and the parameter panel below drives the node's real sampling parameters.
Width and height each get their own row with both a slider and a number field; denoise is a slider too, and Use source size fills in the source dimensions, rounded to the nearest multiple of 8 the sampler requires.
Mask mode, fill, sampling area, sampler, scheduler, steps, CFG and seed are shown directly; mask processing, batch and Refiner switching live under Mask, batch and advanced settings.
If one inline source feeds several inpaint nodes, the painting controls go to the first WebUI Inpaint node and each node keeps its own parameter panel; disconnecting or deleting that node moves the tools to the next available one.
Parameters driven by an external link disable the matching panel control; a modular workflow puts the painting tools in Inpaint Prepare and keeps the sampling parameters in the separate sampler node.
Comparison and chained inpainting
Add an Image Compare node and connect Inline Mask's image to original and the final full-size generated image to result, then run.
With the pointer over the picture, the thin divider shows the generated result on the left and the original on the right; leaving the picture hides the divider and shows the full result, and the plain wheel zooms. Batch selection, dimensions and the fit button sit below the picture.
When you are happy, click Adopt this result: the plugin uploads the selected result as the new source image and writes it back into the upstream inline editor while preserving the painted mask, current undo/redo history and viewport. Use Clear when you want to start a new mask; a normal Load image upload still starts a fresh mask.
To preserve mask coordinates, an adopted result must match the source dimensions; a mismatched result is rejected without changing the current source or mask. The mask remains embedded in saved workflow data; command-level undo history is retained during adoption in the current session.
If the original is routed through intermediate IMAGE nodes the plugin walks upstream to find the inline editor; when several candidates exist you can pick one explicitly under Adopt into.
Adoption only happens when you click the button and never starts the next generation automatically; the image output still passes the whole result batch, so you can feed a Save Image node.
Comparison previews live in ComfyUI's temp directory and may need a re-run after cleanup or restart; an adopted source image is stored in input/adachi-inpaint/ and does not depend on temp previews.
Group bypass presets
Search for Group Bypass Presets (Chinese: 组忽略预设) under Adachi-Inpaint-Workbench. It needs no connections and does not require rgthree or Danbooru.
- Click + New preset, name it and save. The preset captures the current groups' enabled/bypassed state.
- Choose Enabled, Bypassed or Keep current for each group on the right. Changes update and apply the selected preset immediately.
- Add more presets. Clicking a name on the left applies that preset to all of its configured groups at once. You can also right-click the node and choose Apply preset.
- Use Save current group states to capture changes you made directly in the workflow, or rename/delete presets as needed.
Presets are stored in the workflow. Group renames retain their preset mapping; newly added groups stay unmanaged until configured. Loading a workflow restores its saved node modes without automatically applying a preset. If groups overlap, the smaller group's setting takes priority; the preset controller itself stays enabled. Bypass uses ComfyUI's standard bypass mode, so a bypassed node still needs compatible input/output types when it sits on an active data path. Try examples/03-group-presets.json, which uses only empty images and colour inversion and needs no model.
Fill, batch and Refiner
| fill | Behaviour |
|---|---|
| original | Encode the source pixels into the latent |
| fill | Multi-scale fill from the colours surrounding the mask, then encode |
| latent_noise | Fill the masked latent with seed-dependent noise |
| latent_nothing | Zero the masked latent |
The two latent fills are implemented by the all-in-one WebUI Inpaint node; standalone Inpaint Prepare only handles pixels and masks, so choose original or fill in a standard-node pipeline.
denoise=0 and an empty mask return the source image directly and skip VAE and sampling; batch_size is the number of variants per input image, and the same seed reproduces the same batch.
For repeated batches use ComfyUI's queue count together with the seed's after-generate control; batch_size controls a single run.
Keep inpaint_model=false for ordinary SD/SDXL checkpoints; enable it only for dedicated inpainting models, which switches to ComfyUI's native InpaintModelConditioning.
You can optionally attach a compatible refiner_model and use refiner_switch for the share of base sampling steps; 0.8 means roughly the first 80% of steps run on the base model.
Encoding with the Refiner's own CLIP and wiring refiner_positive/refiner_negative is recommended; if left unconnected the original conditioning is reused and the VAE still comes from the base side.
refiner_switch=1 uses only the base model and 0 uses only the Refiner; a known-incompatible latent format raises an error.
Auto Exclusive Switch
Search for Auto Exclusive Switch / 自动二选一 under Adachi-Inpaint-Workbench.
Connect two alternative branches to input_a / input_b and connect output to the common downstream input.
For example, connect the CONDITIONING outputs of two positive CLIP Text Encode nodes to A/B, then connect output to the sampler's positive input.
Bypass one encoder (Ctrl+B), or use a Group Bypass Preset to enable one group and bypass the other: the remaining branch is selected automatically.
Both enabled, or neither connected/enabled, produces an error instead of silently preferring A.
The node accepts conditioning, strings, images, masks, models, latents and other ComfyUI data types; both alternatives and the downstream socket should use the same data type.
The model-free examples/04-exclusive-switch.json demonstrates two branches with two group presets.
It has no switch widget. A small internal value is computed from the graph when queuing, including when a bypassed image/model transform would otherwise pass its input through.
Place the selector outside the two controlled groups and connect each group's final node to it; any routing nodes between them should remain enabled.
The ignored branch is not requested by this selector; any separate preview/save outputs on that branch may still execute independently.
For raw API prompts, omit the ignored input and omit the internal active_inputs field; exactly one of input_a / input_b must remain.
Using a standard sampling workflow
examples/02-modular-inpaint.json shows a wiring you can swap samplers into.
Inline Mask ── image/mask ──> Inpaint Prepare
                                pixels ──> VAE Encode ──> Set Latent Noise Mask ──> KSampler
                                mask ──────────────────────────┘                      │
                                context ──────────────────────────────────────┐      │
                                                                             │      ▼
                                                                        Inpaint Composite <── VAE Decode
                                                                             │
                                                                          Save Image
Always wire Prepare.context back into Inpaint Composite so the local result returns to the source coordinates and size.
The modular example targets ordinary checkpoints; a dedicated inpainting checkpoint should use the conditioning nodes it needs, or the all-in-one node directly.
When several input images each produce several variants, Composite needs the variants grouped per source image (for example A,A,B,B); the all-in-one node already orders them that way, while an external latent-repeat node that outputs A,B,A,B needs its batch order adjusted first.
Sharing and compatibility
The painted mask is written into the workflow automatically; by default only a relative path inside ComfyUI's input/ is stored for the source image.
To hand someone a workflow that opens on the same picture, tick Embed source in workflow below the canvas before saving the JSON; they install this plugin, pick their own model and can keep editing.
Without embedding you have to supply the source image as well and keep the same relative path under input/.
Embedding grows the workflow file, and the source and mask then travel with the shared workflow, so check the picture content before sharing.
This is an original WebUI-style implementation and does not promise pixel-perfect agreement with AUTOMATIC1111/Forge results.
soft_edge is extra Gaussian feathering with soft_strength controlling the extra radius; it does not reimplement WebUI's Soft Inpainting algorithm or its full parameter set.
Samplers, schedulers and Refiner use the current ComfyUI implementations, and the fill algorithms are this plugin's own.
Static images and 4-dimensional latents are supported; video VAEs, WebUI scripts/extensions and automatic reading of WebUI plugin configuration are not.
Limits are 64 MiB per file, 32 megapixels per image and 16384 px per side; no models are bundled and nothing is downloaded.
Node loading, canvas editing, workflow/executed-parameter save and restore have been verified in an isolated CPU ComfyUI service on the development machine, and the backend is verified with mock VAE/samplers; real-checkpoint image quality and compatibility across every model family and Refiner have not been tested.
Tests
Run the CPU tests from this plugin directory with your ComfyUI Python:
python -m unittest discover -s tests -v
中文简介
本插件把蒙版绘制放在工作流节点内部,不需要弹出遮罩编辑器,也省去每画一笔就保存、加载磁盘文件的往返。
连接 WebUI 局部重绘 节点后,画笔工具与采样参数都在该节点内,支持整图范围与蒙版范围重绘、原尺寸回贴、Alt 临时橡皮擦、Ctrl+滚轮笔径、图像对比,以及把满意的结果一键回填为新的原图继续重绘。
代码里的默认文案是英文,以便 Manager 用户直接使用;节点搜索可输入 Inline Mask,分类为 Adachi-Inpaint-Workbench。
想用中文界面时,把 ComfyUI 的语言切成中文即可,插件会自动跟随:
在 ComfyUI 设置里找到 Locale / 语言(设置项 Comfy.Locale)选择 zh,然后刷新浏览器(Ctrl+F5)。
节点名称、分类、输入输出名与提示由 locales/zh/ 提供,通过 ComfyUI 的 /i18n 机制加载;
画布按钮与参数面板由 web/i18n.js 读取同一个语言设置翻译,因此「宽度」「高度」「载入原图」等也会一起变回中文。
英文用户看到的一直是英文(英文是内置默认值);某个词条若没有对应翻译,会自动回退为英文。
两套语言共用同一个节点类 ID 和参数键名,所以已保存的工作流不受语言切换影响。
新增「自动二选一」:把两个正面条件(或图像、模型等同类型数据)接到输入 A/B,输出接共同下游;忽略其中一个分支,就自动使用另一个。两路都启用或都无输入会报错,不需要 switch。切换节点放在两个被控制分组之外,也能配合组忽略预设使用。