
Filexa2ComfyUI
Run local ComfyUI T2I/I2I/T2V/I2V workflows from Telegram via @FilexaAIBot, using your PC resources for image and video generation.
Filexa2ComfyUI Connector
SET IT UP ONCE. IT JUST KEEPS WORKING: capture your workflows one time, then run Filexa jobs from Telegram without returning to ComfyUI.
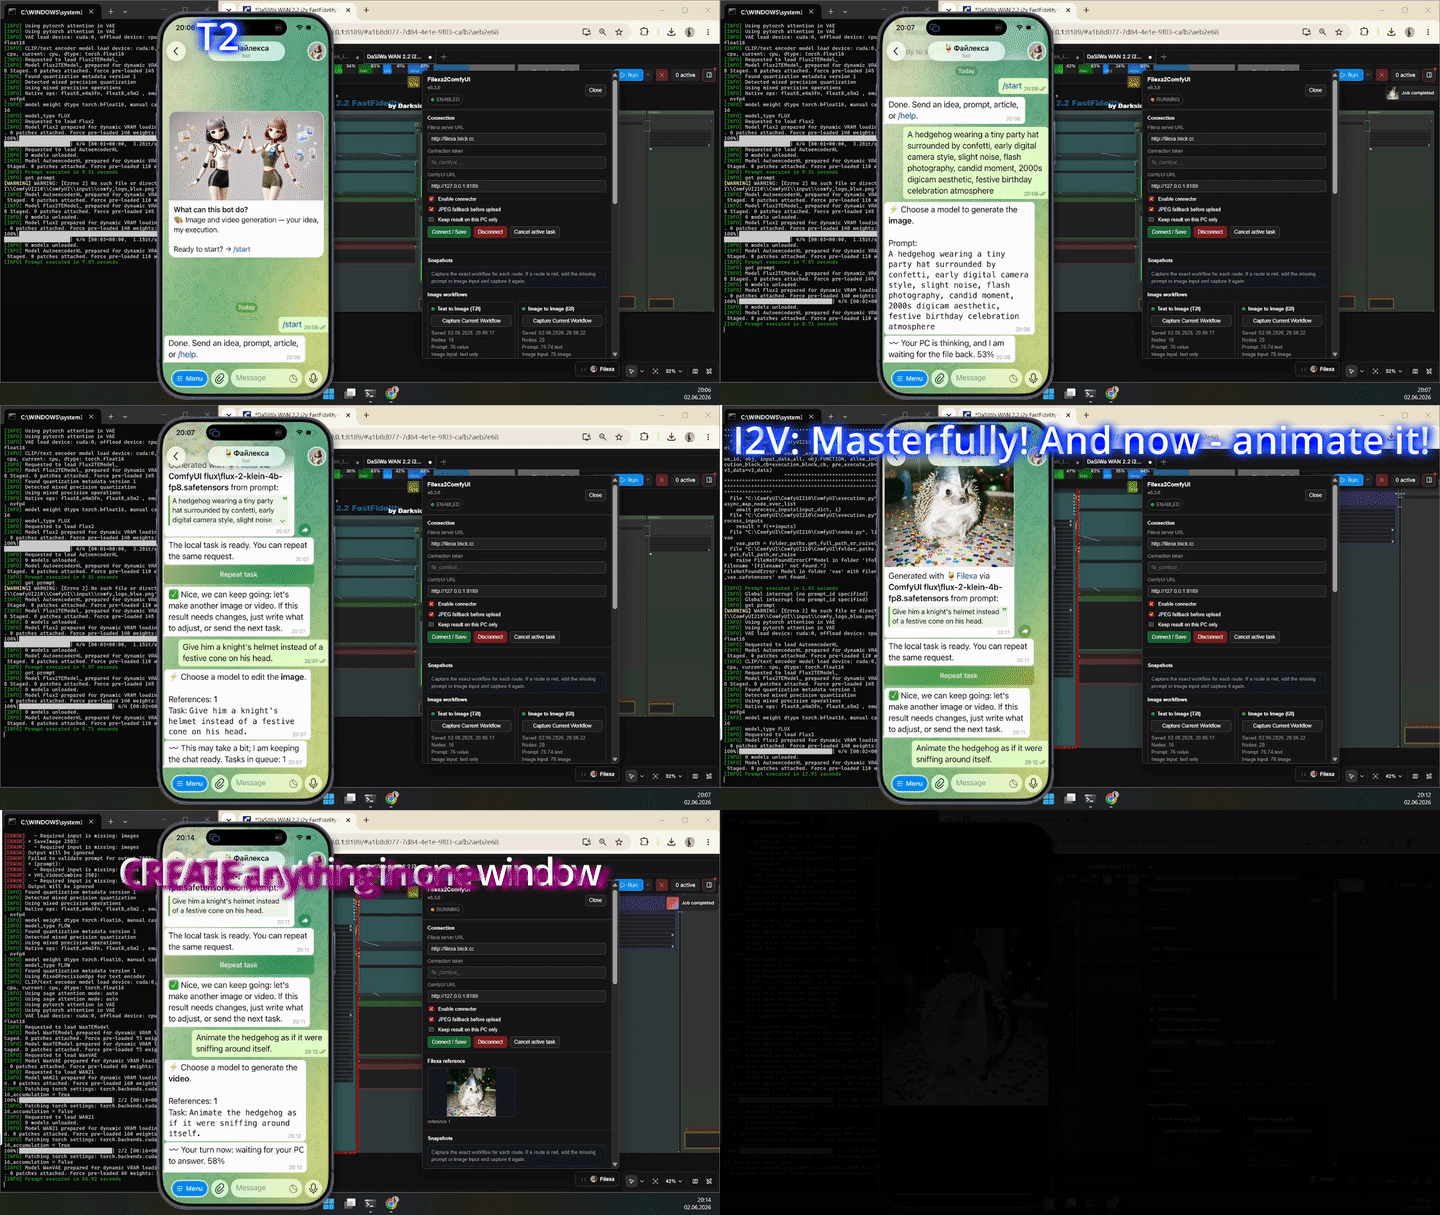
Filexa2ComfyUI works with the Telegram bot @FilexaAIBot as a task-control interface for local ComfyUI T2I, I2I, T2V, and I2V workflows. Its goal is to let Telegram users generate images and videos through Filexa while using the local resources, models, and workflows on their own PC.
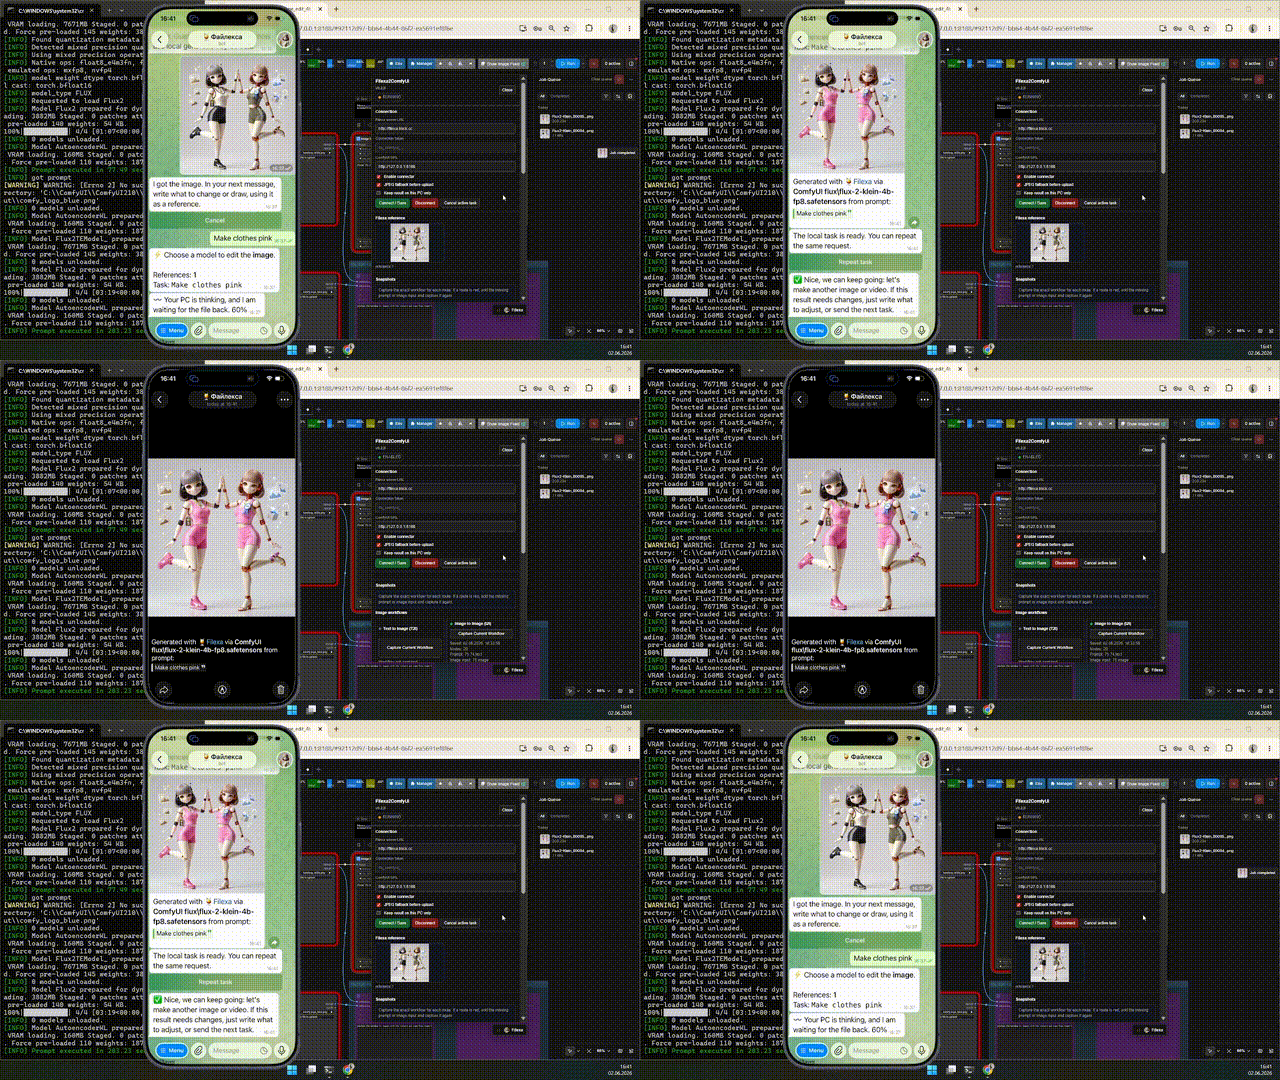
Bot: https://t.me/FilexaAIBot
Not affiliated with, endorsed by, or sponsored by ComfyUI.
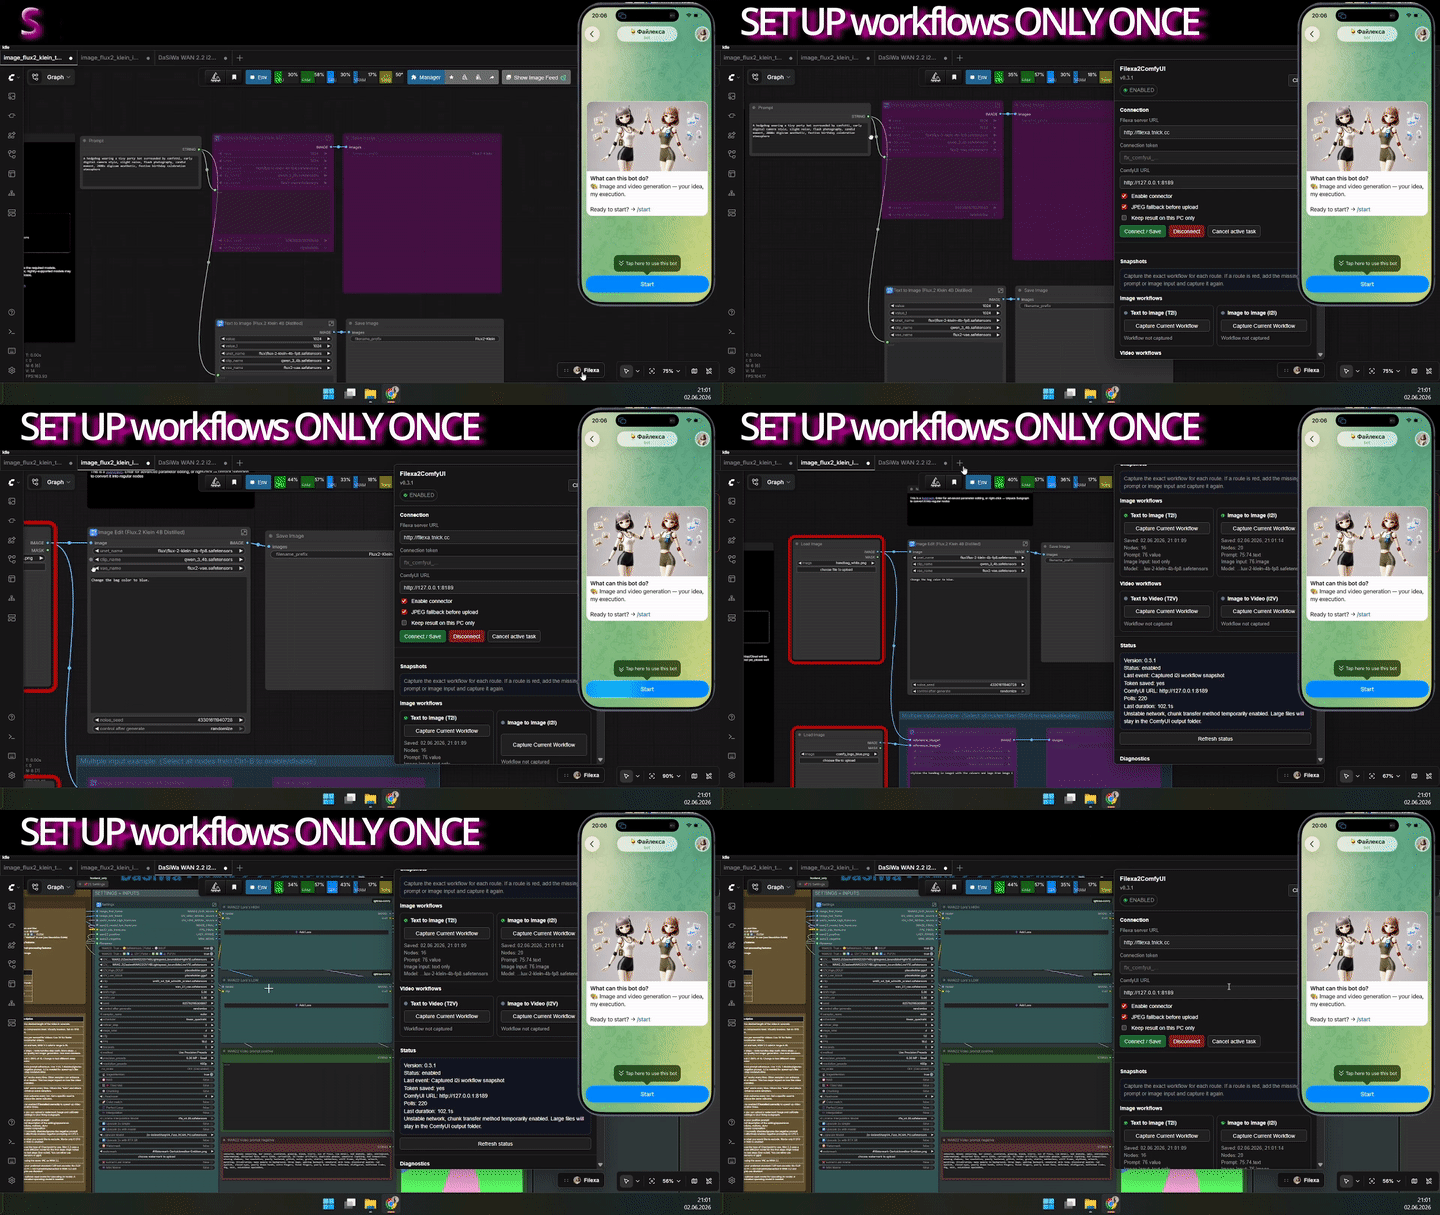
SETUP ONLY ONCE
CREATE ALL IN ONE WINDOW
Layout
__init__.pyandfilexa2comfyui.py- ComfyUI custom node backend and Filexa worker.web/- ComfyUI browser panel.API_CONTRACT.md- bot-side API contract for compatible servers.README.md- installation and usage guide.README.ru.md- Russian installation and usage guide.CHANGELOG.md- release notes.LICENSE- source code license.NOTICE.md- legal notices and disclaimers.SECURITY.md- vulnerability reporting policy.pyproject.toml- Comfy Registry metadata..comfyignore- files excluded from the Comfy Registry archive..github/workflows/publish_action.yml- optional Comfy Registry publish workflow.plugin_info.json- lightweight GitHub update-check metadata for this connector.requirements.txt- optional dependency hint for ComfyUI managers.
Prebuilt binaries are not distributed in this repository.
Install
-
Install ComfyUI from the official project: https://github.com/comfyanonymous/ComfyUI
-
Start ComfyUI once and verify that your target image and/or video workflow runs manually.
-
Install the connector using one of these methods:
Recommended after Registry publication, through ComfyUI-Manager:
- open
Manager->Custom Nodes Manager; - search for
Filexa2ComfyUIorfilexa2comfyui; - install the node and restart ComfyUI.
Comfy CLI after Registry publication:
comfy node install filexa2comfyuiGit URL install through the ComfyUI interface if ComfyUI-Manager is available:
- open
Manager->Custom Nodes ManagerorInstall via Git URL; - install from
https://github.com/Teutonick/Filexa2ComfyUI; - restart ComfyUI after installation.
Manual Git install:
cd ComfyUI\custom_nodes
git clone https://github.com/Teutonick/Filexa2ComfyUI Filexa2ComfyUI
Manual copy from this Filexa repository is also possible for development:
external_soft/comfyui->ComfyUI/custom_nodes/Filexa2ComfyUI - open
-
If your ComfyUI environment does not already include the declared dependencies, install:
pip install -r ComfyUI/custom_nodes/Filexa2ComfyUI/requirements.txt -
Restart ComfyUI.
-
Open the ComfyUI web UI and click the floating
Filexabutton. Drag it by the::handle if it covers part of your workspace. -
Paste the Filexa API URL and token shown by the Telegram bot, then click
Connect / Save. -
Capture the exact workflows you want to use:
Text to Image (T2I),Image to Image (I2I),Text to Video (T2V), and/orImage to Video (I2V). Use the matchingCapture Current Workflowbutton after loading each workflow. -
Keep ComfyUI running.
The connector stores configuration and snapshots in:
ComfyUI/custom_nodes/Filexa2ComfyUI/data/
The token is hidden after saving. Write it down if you plan to reuse it; otherwise create a new token from the Filexa bot when needed.
The panel shows the live connector status, route readiness dots, diagnostics, and a small preview of the Filexa reference image while an I2I/I2V task is active.
During active generation the connector reads ComfyUI websocket progress events when available and sends live percentages back to Filexa. If the websocket is unavailable, Filexa keeps showing the last known stage percentage instead of dropping back to an empty waiting placeholder.
Registry and ComfyUI-Manager installations are updated by ComfyUI/Manager, so the connector does
not check GitHub on startup in non-Git folders. For manual Git installations, the panel checks the
public GitHub plugin_info.json; if a newer version is available, an update marker and Update
button appear next to the version. That built-in updater runs only git pull --ff-only in the
custom node folder; restart ComfyUI after it downloads an update. It does not run pip install or
install packages at runtime.
Comfy Registry Metadata
The Registry node id is filexa2comfyui, while the user-facing display name and recommended
custom node folder are Filexa2ComfyUI.
Before publishing, make sure the PublisherId in pyproject.toml matches the publisher id created
on Comfy Registry. The bundled value is teutonick to match the planned GitHub namespace.
Publishing is done from the repository root with:
comfy node publish
The included GitHub Actions workflow is manual-only (workflow_dispatch) so normal pushes do not
try to publish the node. It uses actions/checkout@v6, actions/setup-python@v6, and
comfy node publish --token "$REGISTRY_ACCESS_TOKEN" directly, avoiding the older Node 20 publish
action wrapper. Add the Comfy Registry publishing API key as a repository secret named
REGISTRY_ACCESS_TOKEN, then run Publish to Comfy Registry from the Actions tab when you are
ready to publish. After publishing, the workflow also sends the matching CHANGELOG.md section to
the Comfy Registry version changelog API so the Registry Updates panel is populated. To backfill
the changelog for an already published version, run the same workflow with publish_node set to
false.
Snapshot Model
Filexa2ComfyUI uses four saved API workflows:
data/t2i_snapshot.jsondata/i2i_snapshot.jsondata/t2v_snapshot.jsondata/i2v_snapshot.json
Each snapshot contains:
- the full ComfyUI API workflow;
- the optional UI workflow metadata for PNG info;
- saved date;
- node count;
- detected prompt binding;
- detected image-input binding;
- validation issues shown in the panel;
- a short model/workflow hint reported back to Filexa captions.
Prompt detection prefers prompt/text inputs on CLIPTextEncode, Qwen/prompt/text, encode, and
conditioning nodes, and avoids filename, path, negative prompt, model, seed, and save-node fields.
Reference detection looks for LoadImage or compatible image-input nodes and stores the first
matching input. I2I and I2V snapshots are marked invalid until an image input is found.
Capture can be repeated at any time. A new capture replaces the previous snapshot for that route. Green dots mean the route is ready, gray means it has not been captured, and red means Filexa cannot see a required prompt/image input or that this route was the last one to fail during execution.
Task Behavior
Image tasks use separate image snapshots:
image-> T2I, prompt injected into the detected prompt node;image_edit-> I2I, prompt injected and first Filexa reference uploaded to ComfyUI, then placed into the detected image input.
Video tasks use separate video snapshots:
videowithout references -> T2V;videowith one reference -> I2V, prompt injected and the reference placed into the detected image input.
The workflow itself owns model selection, sampler settings, video nodes, dimensions, output format,
and save nodes. After changing a workflow, capture it again. If a route returns an old manual image,
capture the matching route again and make sure the workflow has one clear prompt/text input that
actually drives generation. Filexa prefers prompt nodes that lead to an output/save/preview branch,
so decorative or disconnected prompt examples should not be selected. Complex workflows with helper
text fields may still need a simpler prompt node or an explicit params.prompt_binding override
from an advanced integration.
Outputs
The connector reads ComfyUI /history/{prompt_id}, fails fast on ComfyUI execution errors, finds
the first generated media item, downloads it through /view, and sends it to Filexa. While waiting
for the result, it also listens to ComfyUI /ws progress messages for the queued prompt.
Supported direct result types:
- images: PNG, JPEG, WebP;
- videos: MP4, WebM, MOV.
Images use the same network fallbacks as Filexa2Wan2GP:
- direct raw upload capped at 40 MiB;
- optional JPEG conversion before upload;
- binary chunks of 50 KiB for compressed results up to 3 MiB;
- JSON/base64 chunks of 8 KiB and then 4 KiB safe mode;
- local-only completion if the result is still too large or upload cannot work.
Videos are direct-upload only and capped at 50 MiB. If a video is too large or direct upload fails, the file stays in the ComfyUI output folder and Filexa receives a neutral local-only completion.
Advanced Task Overrides
The normal Filexa bot does not need these. Compatible servers can send optional fields in
task.params:
comfyui_workflow: full API workflow override for one task;prompt_binding:{ "node_id": "6", "input": "text" };image_binding:{ "node_id": "10", "input": "image" };reference_bindings: map"node_id.input"or"node_id.inputs.input"to"first","all", an index, or a list of indexes.
Without explicit reference bindings, the connector uses the detected image-input binding and the first Filexa reference.
Troubleshooting
The panel does not appear.
Check that the folder is exactly:
ComfyUI/custom_nodes/Filexa2ComfyUI
Then restart ComfyUI and check the terminal for import errors.
A route is red or says the prompt input was not found.
Make sure the workflow has an API-visible text prompt input that actually drives generation,
usually CLIPTextEncode.text, a Qwen prompt input, or a simple text/prompt node connected to the
generation path.
I2I or I2V says no image input was found.
Add a LoadImage or compatible image-input node, connect it to the workflow, and capture the
snapshot again.
The result does not return to Filexa.
Open the Filexa2ComfyUI panel and check Status and Diagnostics. If the network is unstable, the connector will switch to chunk fallback for images. Oversized images/videos stay in the ComfyUI output folder and Filexa receives a local-only completion.
ComfyUI failed but Filexa kept waiting.
Version 0.2.0 and newer read ComfyUI prompt history errors and report terminal failure plus an emergency cancel to Filexa. Check the panel Diagnostics for the original ComfyUI error and recapture the matching T2I/I2I/T2V/I2V route after fixing the workflow.
Everything is stuck.
Cancel the task in Filexa with /cancel, click Cancel active task in the panel, then restart
ComfyUI if the queue is still blocked.
Legal Notice
This repository contains only the Filexa2ComfyUI Connector source code.
The connector is licensed under the MIT License. The Filexa bot/API service is provided under separate Filexa Terms of Use and Privacy Policy: https://teutonick.github.io/bot-legal-docs/privacy
Users are solely responsible for installing ComfyUI, installing custom nodes, selecting and licensing models, securing their API tokens, operating their local computer, reviewing generated outputs, and complying with applicable laws and third-party terms.
The connector makes outbound HTTP/HTTPS requests to the configured Filexa API endpoint and calls the configured local ComfyUI API URL. It does not require exposing the user's ComfyUI port to the public internet.
Security issues should be reported privately according to SECURITY.md.