
ComfyUI-StepByStep-Sampler
ComfyUI StepByStep Sampler is a plugin for ComfyUI that provides a step-by-step sampling method for image generation. It allows users to generate images in a more controlled and iterative manner, making it easier to achieve desired results.
Nodes (3)
ComfyUI-StepByStep-Sampler
A set of custom nodes for ComfyUI designed to analyze and compare the image generation process step-by-step. It quantifies changes in latent variables (using metrics like PSNR/SSIM) and provides a dedicated viewer for intuitive inspection. Furthermore, since sampling automatically stops once image generation converges, image generation can be performed with the optimal number of steps.


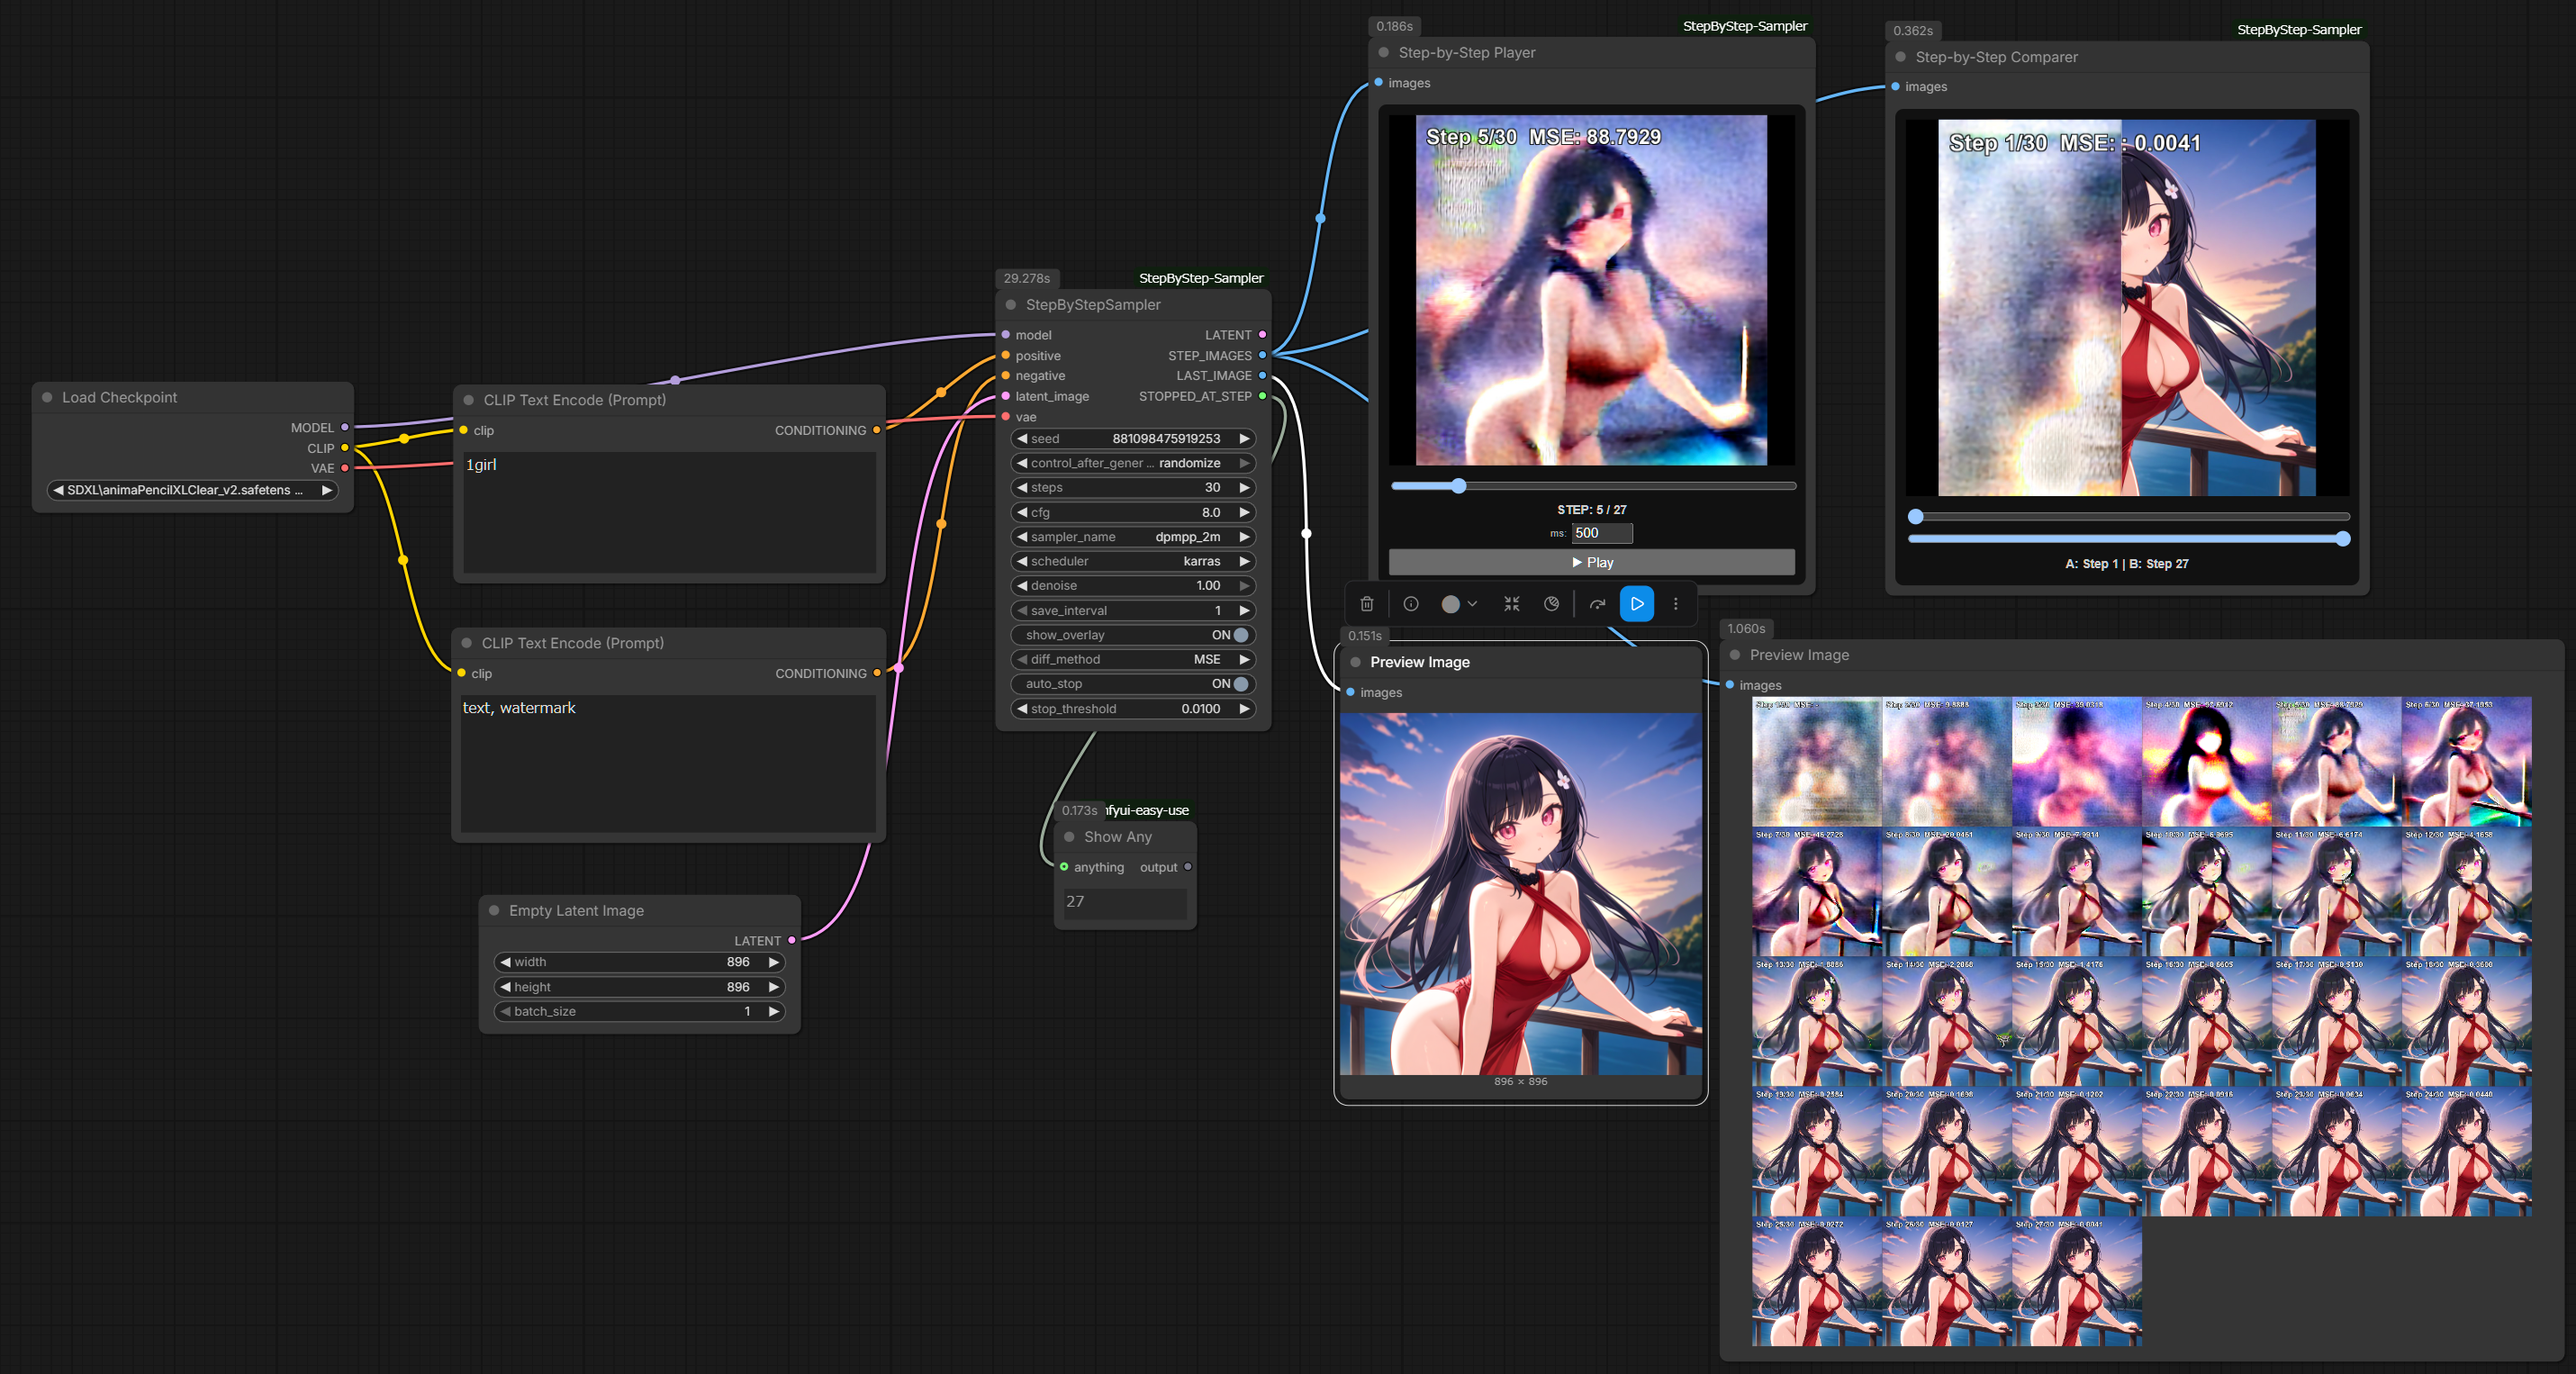
Node description
1. Step-by-Step Sampler
Hooks into the generation process to capture intermediate images at specified intervals by VAE decoding the latent state. It can be integrated with Preview Image or Save Image nodes to display or output the progression as a sequence.
Calculates the amount of change from the previous step using MSE, RMSE, L1, PSNR, or SSIM, allowing you to monitor convergence numerically.
Draws step counts and difference values directly onto the images, making it easy to track the step number and the delta from the preceding frame.
Since sampling automatically stops once image generation converges, image generation can be performed with the optimal number of steps.
Outputs the final result as a standard LATENT (similar to KSampler), but can also output the VAE-decoded image via the LAST_IMAGE socket.
2. Step-by-Step Player
Visualizes the image list output from the STEP_IMAGES socket of the Step-by-Step Sampler. Use the slider or the Play button to view the generation process as an animation.
3. Step-by-Step Comparer
A side-by-side visualization tool for the STEP_IMAGES output. It allows you to compare two different steps (e.g., Step 5 vs. Step 20) using an interactive split-screen slider.
Installation
Manual Install
cd ComfyUI/custom_nodes
git clone https://github.com/TakkunRed/ComfyUI-StepByStep-Sampler.git
How to Use
Workflow Integration
- Add the Step-by-Step Sampler node.
- Connect
model,positive,negative,latent_image, andvaeto the respective inputs. - Connect the
STEP_IMAGESoutput to theStepStepPlayerorStepStepComparernode. You can also connect it toPreview ImageorSave Image. - Turning on
auto_stopwill stop sampling based on thestop_threshold. - Run Queue Prompt as usual, and the generation process will appear in the viewers.
Viewer Controls
- Sliders (Player / Comparer): click anywhere on the track to jump, drag the handle, or hover over a slider and use the mouse wheel (down = next step, up = previous step). Arrow keys /
Home/Endalso work while the slider is focused. Player: Change steps using the bottom slider or use the "Play" button for auto-playback.Comparer: Select two steps to compare using the sliders, and drag the vertical bar on the image to reveal the differences between side A and side B.
Step-by-Step Sampler Settings
save_interval: Determines how often images are saved (e.g., set to 1 to capture every step).show_overlay: Toggles the on-image display of step numbers and difference metrics.diff_method: Selects the algorithm for calculating step-to-step changes:- Metric Characteristics (at convergence):
MSE → 0 (Emphasizes large changes)
RMSE → 0 (MSE scaled back to L1 range)
L1 → 0 (Simple, robust against outliers)
PSNR → ∞ (Higher dB means closer to previous step; 40dB+ is a typical convergence target)
SSIM → 1.0 (Structural Similarity Index; 0.99+ is a typical convergence target)
- Metric Characteristics (at convergence):
auto_stop: Enable/Disable automatic convergence stop. When it stops early, the image of the stop step is always included inSTEP_IMAGES(regardless ofsave_interval), and the returnedLATENTis the state at the stop step.stop_threshold: Threshold for determining convergence. The direction depends ondiff_method:MSE/RMSE/L1: stops when the difference is at or below the threshold (e.g.0.0001).PSNR/SSIM: stops when the value is at or above the threshold (e.g.40dB /0.99). If the threshold is clearly unsuitable for the method (PSNR below 10 dB, SSIM below 0.5 — e.g. the MSE-scale default left unchanged),auto_stopis ignored and a warning is printed to the console, instead of stopping at step 2.
Notes
STEP_IMAGESand the overlay use the first image of the batch.LAST_IMAGEcontains the whole batch.- The Player / Comparer viewers receive the step images as temporary JPEG files (
temp/step_by_step/), not as base64 in the message/history, so long runs do not bloat the server history. Files of the previous run of the same node are removed automatically.
License
MIT