
SeargeSDXL
Custom nodes for easier use of SDXL in ComfyUI including an img2img workflow that utilizes both the base and refiner checkpoints.
Nodes (72)
The dynamic-CFG and detail knobs in Searge SDXL
The pack's plain checkpoint loader
A 2-way switch for conditioning (deprecated)
A 5-way switch for conditioning (deprecated)
The prompt-conditioning scales in Searge SDXL
The condition-mixing input box in Searge SDXL
Attach ControlNet or Revision in the Searge SDXL workflow
Select the control-lora files for Searge SDXL
Tap the upscaled image out of the Searge Magic Box
Grab the image right after VAE decode in Searge SDXL
The prompt-mode selector box in Searge SDXL
Dump the Searge data stream to the console
The on/off switch for Searge's SDXL workflow
A one-value float source (deprecated)
A tiny float calculator node (deprecated)
The two-float holder from the old Searge SDXL workflow
Free quality bump, bolted into the Searge data stream
The flow-control selectors Searge pulls from its parameters
The main settings node for Searge SDXL v4
Searge's hi-res fix, with detail and final-upscale controls
The denoise + mask controls for img2img and inpaint
Feed a source image and mask into Searge's data stream
The old Searge save-image node with %date% folders
Control which Searge outputs get saved (and how)
The five-prompt box at the head of the Searge input chain
The old all-in-one settings box for Searge SDXL
The base/refiner split and batch settings in Searge SDXL
The model picker (base, refiner, VAE, upscalers, LoRA) in Searge
How Searge weights and combines your five prompts
The hi-res fix settings in the Searge SDXL workflow
Operation mode, prompt style, and LoRA strength in Searge
A single number you can wire anywhere
A five-operation calculator node for integers
Emit two integers from one node (deprecated)
Multiply a number and snap it to a multiple
The 3-way latent switch behind Searge's mode picker
The pack's own LoRA loader (and why you'd use the built-in instead)
Stack up to five LoRAs in one node
The engine that runs the whole Searge SDXL workflow
Pick base, refiner and VAE for the Searge SDXL workflow
The mode + prompting switch on Searge's v4 data stream
Unpacking the five prompts (plus image and mask) in Searge
Seed, steps, CFG, sampler — Searge's core generation settings
Unpacking Searge's base/refiner and batch parameters
Unpack the model-names bundle into individual selectors
Unpacking Searge's prompt-weighting parameters
Unpacking Searge's hi-res fix parameters
Unpacking LoRA strength from the Searge parameters bundle
The node that turns Searge inputs into parameters
The entry point of Searge SDXL's Magic Box
Where Searge SDXL's Magic Box stream ends
A save node with an on/off switch and a passthrough
Six prompt slots into one Searge data stream
Glue two prompts together with a separator
The style-template stage in Searge SDXL's pipeline
A plain text box that outputs a string
Pick a sampler and scheduler, hand them off
Output folder or input folder, that's the whole node
Dual-CLIP conditioning for the base model only
The v1 img2img + hi-res node (deprecated)
The v2 img2img + hi-res node (deprecated)
The dual-CLIP prompt encoder for base and refiner
Aesthetic-score conditioning for the SDXL refiner
SDXL base + refiner in one node (now deprecated)
The base+refiner engine at the heart of Searge SDXL
The streamlined base+refiner sampler
A cosmetic divider for Searge SDXL's dense UI
The unfinished style node Searge left behind
The text box you type your Searge prompts into
Load an ESRGAN upscaler for the Searge workflow
Pick the ESRGAN models for the Searge SDXL hi-res passes
Searge's VAE loader, and when you actually need it
Searge-SDXL: EVOLVED v4.x for ComfyUI
Custom nodes extension for ComfyUI, including a workflow to use SDXL 1.0 with both the base and refiner checkpoints.
Table of Content
<!-- TOC -->- Searge-SDXL: EVOLVED v4.x for ComfyUI
- Table of Content
- Version 4.3
- Installing and Updating
- Updates
- The Workflow File
- Workflow Details
- More Example Images
Version 4.3
Instead of having separate workflows for different tasks, everything is integrated in one workflow file.
Always use the latest version of the workflow json file with the latest version of the custom nodes!
<img src="docs/img/main_readme/banner.png" width="768">Installing and Updating
New and Recommended Installation (Windows)
- For this to work properly, it needs to be used with the portable version of ComfyUI for Windows, read more about it in the ComfyUI readme file
- Download this new install script
and unpack it into the
ComfyUI_windows_portabledirectory - You should now have
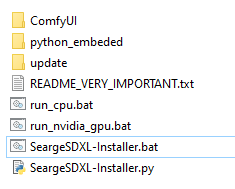
SeargeSDXL-Installer.batandSeargeSDXL-Installer.pyin the same directory as the ComfyUIrun_cpu.batandrun_nvidia_gpu.bat - To verify that you are using the portable version, check if the directory
python_embededalso exists in the same directory that you unpacked these install scripts to - Run the
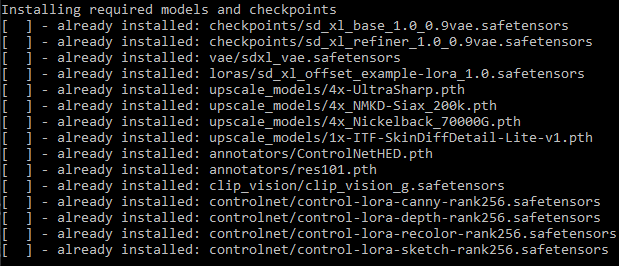
SeargeSDXL-Installer.batscript and follow the instructions on screen
Manual Installation
- If you are not using the install script, you have to run the command
python -m pip install opencv-pythonin the python environment for ComfyUI at least once, to install a required dependency - Navigate to your
ComfyUI/custom_nodes/directory - Open a command line window in the custom_nodes directory
- Run
git clone https://github.com/SeargeDP/SeargeSDXL.git - Restart ComfyUI
Alternative Installation (not recommended)
- Download and unpack the latest release from the Searge SDXL CivitAI page
- Drop the
SeargeSDXLfolder into theComfyUI/custom_nodesdirectory and restart ComfyUI.
Updating an Existing Installation
- Navigate to your
ComfyUI/custom_nodes/directory - If you installed via
git clonebefore- Open a command line window in the custom_nodes directory
- Run
git pull
- If you installed from a zip file
- Unpack the
SeargeSDXLfolder from the latest release intoComfyUI/custom_nodes, overwrite existing files
- Unpack the
- Restart ComfyUI
Checkpoints and Models for these Workflows
These can now also be installed with the new install script (on Windows) instead of manually downloading them.
Description
This workflow depends on certain checkpoint files to be installed in ComfyUI, here is a list of the necessary files that the workflow expects to be available.
If any of the mentioned folders does not exist in ComfyUI/models, create the missing folder and put the
downloaded file into it.
I recommend to download and copy all these files (the required, recommended, and optional ones) to make full use of all features included in the workflow!
Direct Downloads
(from Huggingface)
-
(required) download SDXL 1.0 Base with 0.9 VAE (7 GB) and copy it into
ComfyUI/models/checkpoints- (this should be pre-selected as the base model on the workflow already)
-
(recommended) download SDXL 1.0 Refiner with 0.9 VAE (6 GB) and copy it into
ComfyUI/models/checkpoints- (you should select this as the refiner model on the workflow)
-
(optional) download Fixed SDXL 0.9 vae (335 MB) and copy it into
ComfyUI/models/vae- (instead of using the VAE that's embedded in SDXL 1.0, this one has been fixed to work in fp16 and should fix the issue with generating black images)
-
(optional) download SDXL Offset Noise LoRA (50 MB) and copy it into
ComfyUI/models/loras- (the example lora that was released alongside SDXL 1.0, it can add more contrast through offset-noise)
-
(recommended) download 4x-UltraSharp (67 MB) and copy it into
ComfyUI/models/upscale_models- (you should select this as the primary upscaler on the workflow)
-
(recommended) download 4x_NMKD-Siax_200k (67 MB) and copy it into
ComfyUI/models/upscale_models- (you should select this as the secondary upscaler on the workflow)
-
(recommended) download 4x_Nickelback_70000G (67 MB) and copy it into
ComfyUI/models/upscale_models- (you should select this as the high-res upscaler on the workflow)
-
(optional) download 1x-ITF-SkinDiffDetail-Lite-v1 (20 MB) and copy it into
ComfyUI/models/upscale_models- (you can select this as the detail processor on the workflow)
-
(required) download ControlNetHED (30 MB) and copy it into
ComfyUI/models/annotators- (this will be used by the controlnet nodes)
-
(required) download res101 (531 MB) and copy it into
ComfyUI/models/annotators- (this will be used by the controlnet nodes)
-
(recommended) download clip_vision_g (3.7 GB) and copy it into
ComfyUI/models/clip_vision- (you should select this as the clip vision model on the workflow)
-
(recommended) download control-lora-canny-rank256 (774 MB) and copy it into
ComfyUI/models/controlnet- (you should select this as the canny checkpoint on the workflow)
-
(recommended) download control-lora-depth-rank256 (774 MB) and copy it into
ComfyUI/models/controlnet- (you should select this as the depth checkpoint on the workflow)
-
(recommended) download control-lora-recolor-rank256 (774 MB) and copy it into
ComfyUI/models/controlnet- (you should select this as the recolor checkpoint on the workflow)
-
(recommended) download control-lora-sketch-rank256 (774 MB) and copy it into
ComfyUI/models/controlnet- (you should select this as the sketch checkpoint on the workflow)
Now everything should be prepared, but you may to have to adjust some file names in the different model selector boxes on the workflow. Do so by clicking on the filename in the workflow UI and selecting the correct file from the list.
<img src="docs/img/main_readme/full_graph.png" width="768">Updates
Find information about the latest changes here.
What's new in v4.3.2?
This is a minor update to make the workflow and custom node extension compatible with the latest changes in ComfyUI.
What's new in v4.3.1?
This is a minor update to make the workflow and custom node extension compatible with the latest changes in ComfyUI.
What's new in v4.3?
This update added support for FreeU v2 in addition to FreeU v1.
New Features
- Support for FreeU v2 has been added and is included in the v4.3 workflow
- Added more presets for FreeU and a selector to switch between v1 and v2
- Updated the example images to embed the v4.3 workflow
What's new in v4.2?
This update contains bug fixes that address issues found after v4.0 was released.
Bug Fixes
- A recent change in ComfyUI conflicted with my implementation of inpainting, this is now fixed and inpainting should work again
New Features
- Support for FreeU has been added and is included in the v4.2 workflow
- Note: the images in the example folder are still embedding v4.1 of the workflow, to use FreeU load the new
workflow from the
.jsonfile in theworkflowfolder
What's new in v4.1?
This update contains bug fixes that address issues found after v4.0 was released.
Bug Fixes
- The high resolution latent detailer was not properly set up in the processing pipeline and did nothing
- The debug printer node was broken - I didn't notice that because it was not connected in any of the v4.0 workflows
- A bug related to generating with batch sizes larger than 1 has been fixed, it's now working properly
Other Changes
- The images in the
examplesfolder have been updated to embed the v4.1 workflow
What's new in v4.0?
This is the first release with the v4.x architecture of the custom node extension.
Major Highlights
- A complete re-write of the custom node extension and the SDXL workflow
- Highly optimized processing pipeline, now up to 20% faster than in older workflow versions
- Support for Controlnet and Revision, up to 5 can be applied together
- Multi-LoRA support with up to 5 LoRA's at once
- Better Image Quality in many cases, some improvements to the SDXL sampler were made that can produce images with higher quality
- Improved High Resolution modes that replace the old "Hi-Res Fix" and should generate better images
Smaller Changes and Additions
- Workflows created with this extension and metadata embeddings in generated images are forward-compatible with future updates of this project
- The custom node extension included in this project is backward-compatible with every workflow since version v3.3
- A text file can be saved next to generated images that contains all the settings used to generate the images
What is missing in v4.0?
Some features that were originally in v3.4 or planned for v4.x were not included in the v4.0 release, they are now planned for a future version. This was decided to get this new version released earlier and the missing features should not be important for 99% of users.
So, what is actually missing?
- Prompt Styling - (new) the ability to load styles from a template file and apply them to prompts
- Prompting Modes - (from v3.4) More advanced prompting modes, the modes from v3.4 will be re-implemented and a more flexible system to create custom prompting modes will be added on top of it
- Condition Mixing - (new) This was part of the prompting modes in v3.4 but in v4.x it will be exposed in a more flexible way as a separate module
<br><img src="docs/img/main_readme/ui-3.png" width="768">
(5 multi-purpose image inputs for revision and controlnet)
The Workflow File
The workflow is included as a .json file in the workflow folder.
After updating Searge SDXL, always make sure to load the latest version of the json file if you want to benefit from the latest features, updates, and bugfixes.
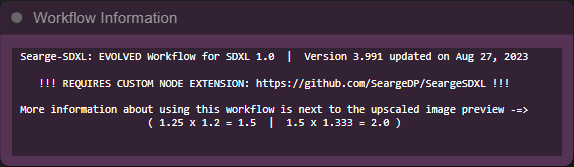
(you can check the version of the workflow that you are using by looking at the workflow information box)
Documentation
Click this link to see the documentation
<img src="docs/img/main_readme/ui-1.png" width="768">(the main UI of the workflow)
Workflow Details
The EVOLVED v4.x workflow is a new workflow, created from scratch. It requires the latest additions to the SeargeSDXL custom node extension, because it makes use of some new node types.
The interface for using this new workflow is also designed in a different way, with all parameters that are usually tweaked to generate images tightly packed together. This should make it easier to have every important element on the screen at the same time without scrolling.
<img src="docs/img/main_readme/ui-2.png" width="768">(more advanced UI elements right next to the main UI)
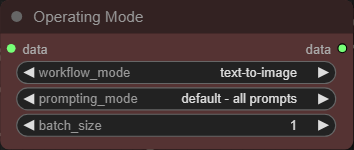
Operating Modes
Text to Image Mode
In this mode you can generate images from text descriptions. The source image and the mask (next to the prompt inputs) are not used in this mode.
<img src="docs/img/main_readme/ui_txt2img.png" width="768">(example of using text-to-image in the workflow)
<br> <img src="docs/img/main_readme/result_txt2img.png" width="512">(result of the text-to-image example)
Image to Image Mode
In this mode you can generate images from text descriptions and a source image. The mask (next to the prompt inputs) is not used in this mode.
<img src="docs/img/main_readme/ui_img2img.png" width="768">(example of using image-to-image in the workflow)
<br> <img src="docs/img/main_readme/result_img2img.png" width="512">(result of the image-to-image example)
Inpainting Mode
In this mode you can generate images from text descriptions and a source image. Both, the source image and the mask (next to the prompt inputs) are used in this mode.
This is similar to the image to image mode, but it also lets you define a mask for selective changes of only parts of the image.
<img src="docs/img/main_readme/ui_inpainting.png" width="768">(example of using inpainting in the workflow)
<br> <img src="docs/img/main_readme/result_inpainting.png" width="512">(result of the inpainting example)
More Example Images
A small collection of example images (with embedded workflow) can be found in the examples folder. Here is an
overview of the included images.