ComfyUI Extension: Step Audio EditX TTS
Run ComfyUI workflows without the setup
No installs, no CUDA version roulette, no GPU sitting idle on your bill. Bring a workflow and run it in the browser.
Professional voice cloning and audio editing node for ComfyUI using Step Audio EditX
Looking for a different extension?
Custom Nodes (0)
README
| Clone node | Edit node |
|-------------|------------|
|  |
|  |
|
Native ComfyUI nodes for Step Audio EditX - State-of-the-art zero-shot voice cloning and audio editing with emotion, style, speed control, and more.
🎯 Key Features
- 🎤 Zero-Shot Voice Cloning: Clone any voice from just 3-30 seconds of reference audio
- 🎭 Advanced Audio Editing: Edit emotion, speaking style, speed, add paralinguistic effects, and denoise
- ⚡ Native ComfyUI Integration: Pure Python implementation - no JavaScript required
- 🧩 Modular Workflow Design: Separate nodes for cloning and editing workflows
- 🎛️ Advanced Controls: Full model configuration, generation parameters, and VRAM management
- 📊 Longform Support: Smart chunking for unlimited text length with seamless stitching
- 🔄 Iterative Editing: Multi-iteration editing for stronger, more pronounced effects
Requirements
- FFmpeg must be installed on your system (not just the Python package)
- Windows: Download from https://ffmpeg.org/download.html and add to PATH
- Linux:
sudo apt install ffmpeg - Mac:
brew install ffmpeg
- Python dependencies will be installed automatically
📦 Installation
Method 1: ComfyUI Manager (Recommended)
- Open ComfyUI Manager
- Search for "Step Audio EditX TTS"
- Click Install
- Restart ComfyUI
Method 2: Manual Installation
cd ComfyUI/custom_nodes
git clone https://github.com/Saganaki22/ComfyUI-Step_Audio_EditX_TTS
cd ComfyUI-Step_Audio_TTS
pip install -r requirements.txt
📥 Download Models
Download both the Step-Audio-EditX model and Step-Audio-Tokenizer. They must be in the correct folder structure:
cd ComfyUI/models
mkdir -p Step-Audio-EditX
cd Step-Audio-EditX

# Download BOTH repositories from HuggingFace
git clone https://huggingface.co/stepfun-ai/Step-Audio-EditX
git clone https://huggingface.co/stepfun-ai/Step-Audio-Tokenizer
Required Folder Structure:
ComfyUI/
└── models/
    └── Step-Audio-EditX/
        ├── Step-Audio-EditX/       ← Main model
        └── Step-Audio-Tokenizer/   ← Tokenizer (required)
Or download manually from:
- https://huggingface.co/stepfun-ai/Step-Audio-EditX
- https://huggingface.co/stepfun-ai/Step-Audio-Tokenizer
💻 VRAM Requirements
| Node | Precision | Quantization | VRAM Usage | |------|-----------|--------------|------------| | Clone | bfloat16 | none | ~11-14GB | | Edit | bfloat16 | none | ~14-18GB | | Clone | float16 | int8 | ~9-11GB | | Edit | float16 | int8 | ~10-12GB |
Note: Edit node uses more VRAM than clone node. We are waiting for optimized quantized models from the Step AI research team and will implement them for lower VRAM usage when available.
Recommendations:
- RTX 4090/A6000+: Use bfloat16 + no quantization for best quality
- RTX 3090/4080: Use bfloat16 + int8 quantization
- Lower VRAM: Use int4 quantization (quality trade-off)
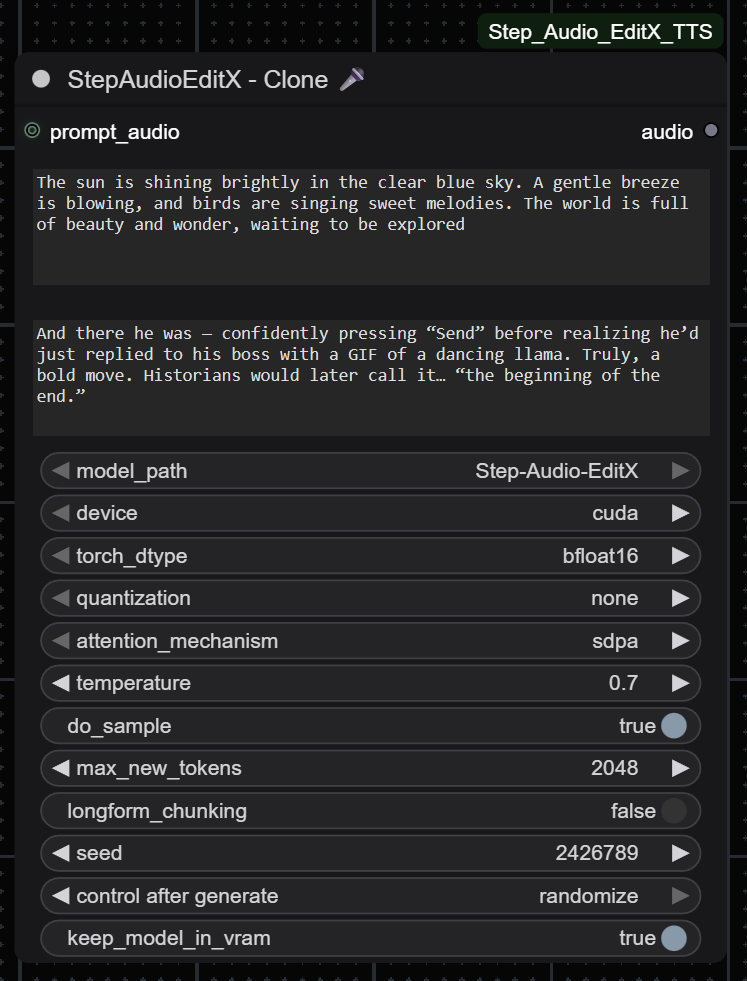
🎤 Clone Node
Overview
Zero-shot voice cloning from reference audio. The AI analyzes a 3-30 second voice sample and generates new speech in that voice with any text you provide.
Use Cases:
- Character voice generation for games and animations
- Narration and professional voiceovers
- Voice consistency across long-form content
- Multilingual voice cloning
Parameters
Text Inputs
- prompt_text: Exact transcript of reference audio (must match perfectly for best results)
- target_text: New text to speak in cloned voice
Model Configuration
- model_path: Path to Step-Audio-EditX model
- device:
cuda(GPU, fast) orcpu(slow, fallback) - torch_dtype:
bfloat16(best),float16(good),float32(max quality),auto - quantization:
none(best),int8(balanced),int4(lower VRAM),int4_awq(optimized int4) - attention_mechanism:
sdpa(default),eager,flash_attn,sage_attn
Generation Parameters
- temperature: Voice variation (0.6-0.8 recommended for natural speech)
- do_sample: Keep
Truefor natural-sounding voices - max_new_tokens: Audio tokens to generate (4096 ≈ 20s, 8192 ≈ 40s)
- longform_chunking: Enable for text >2000 words (auto-splits and stitches seamlessly)
Advanced
- seed: 0 for random, or fixed number for reproducibility
- keep_model_in_vram: Keep loaded for speed or unload to free ~8-11GB VRAM
Optional Input
- prompt_audio: Reference voice audio (3-30s recommended, 0.5-30s supported)
Example Settings
High Quality, Long Content:
temperature: 0.7
do_sample: True
max_new_tokens: 8192
longform_chunking: True
torch_dtype: bfloat16
quantization: none
Fast, Lower VRAM:
temperature: 0.7
do_sample: True
max_new_tokens: 4096
longform_chunking: False
torch_dtype: float16
quantization: int8
Consistent Results:
temperature: 0.5
do_sample: True
seed: 42
max_new_tokens: 4096
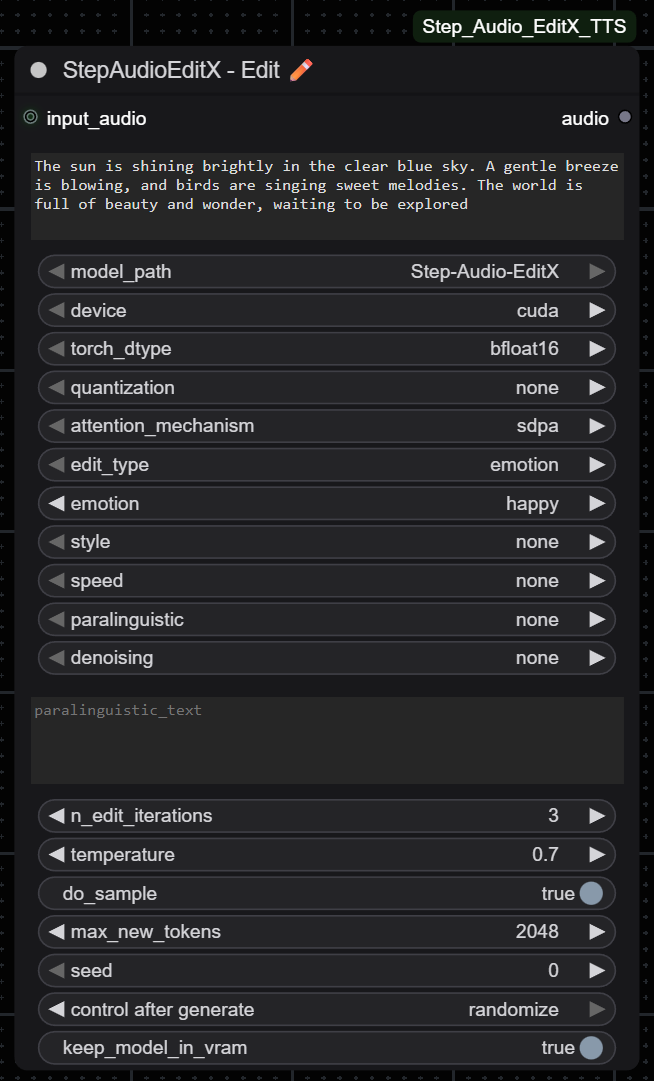
🎭 Edit Node
Overview
Edit existing audio with emotion, style, speed, paralinguistic effects, or denoising while preserving voice identity.
⚠️ IMPORTANT LIMITATION: The Edit node does not work with audio longer than 30 seconds. Audio must be between 0.5-30 seconds in length. For longer audio, you must split it into smaller segments before editing.
Edit Types:
- Emotion: happy, sad, angry, excited, calm, fearful, surprised, disgusted
- Style: whisper, gentle, serious, casual, formal, friendly
- Speed: faster (1.2x), slower (0.8x), more faster (1.5x), more slower (0.6x)
- Paralinguistic: [Laughter], [Breathing], [Sigh], [Gasp], [Cough]
- Denoising: denoise (remove background noise), vad (remove silence)
Parameters
Text & Audio Inputs
- audio_text: Exact transcript of input audio
- input_audio: Audio to edit (MUST be 0.5-30 seconds - longer audio will not work)
Model Configuration
Same as Clone Node (model_path, device, torch_dtype, quantization, attention_mechanism)
Edit Configuration
- edit_type: Select category (emotion/style/speed/paralinguistic/denoising)
- emotion: Target emotion (only if edit_type=emotion)
- style: Speaking style (only if edit_type=style)
- speed: Speed adjustment (only if edit_type=speed)
- paralinguistic: Sound effect (only if edit_type=paralinguistic)
- denoising: Noise removal (only if edit_type=denoising)
- paralinguistic_text: Where to insert effect (leave empty to auto-append to end)
- n_edit_iterations: Edit strength (1=subtle, 2-3=moderate, 4-5=strong)
Generation Parameters
- temperature: Hardcoded to 0.7 (parameter has no effect)
- do_sample: Hardcoded to True (parameter has no effect)
- max_new_tokens: Hardcoded to 8192 (parameter has no effect)
Advanced
- seed: 0 for random, or fixed number for reproducibility
- keep_model_in_vram: Keep loaded or unload to free VRAM
Example Settings
Add Emotion (Angry):
edit_type: emotion
emotion: angry
n_edit_iterations: 2
Change Speaking Style (Whisper):
edit_type: style
style: whisper
n_edit_iterations: 3
Speed Adjustment:
edit_type: speed
speed: faster
n_edit_iterations: 1
Add Laughter Effect:
edit_type: paralinguistic
paralinguistic: [Laughter]
paralinguistic_text: (empty for auto-append to end)
n_edit_iterations: 1
Clean Audio:
edit_type: denoising
denoising: denoise
n_edit_iterations: 1
🎨 Workflow Examples
Basic Voice Cloning
- Load reference audio (3-30s of clear voice sample)
- Add Step Audio Clone Node
- Connect reference audio to
prompt_audio - Enter exact transcript in
prompt_text - Enter new text in
target_text - Set temperature to 0.7
- Generate!
Long-Form Content with Chunking
- Add Step Audio Clone Node
- Enable
longform_chunking: True - Set
max_new_tokens: 8192 - Enter long text (>2000 words) in
target_text - Node will auto-split at sentence boundaries, generate chunks, and stitch seamlessly
Edit Audio Emotion
- Load source audio to edit (ensure it's under 30 seconds)
- Add Step Audio Edit Node
- Connect audio to
input_audio - Enter exact transcript in
audio_text - Set
edit_type: emotion - Choose emotion (e.g.,
happy) - Set
n_edit_iterations: 2for moderate strength - Generate!
Clone + Edit Pipeline
- Use Clone Node to generate speech in target voice
- If the cloned audio is longer than 30 seconds, you must split it into smaller segments first
- Connect clone output to Edit Node input (ensure segment is ≤30s)
- Apply emotion/style edits to the cloned voice
- Fine-tune with multiple iterations for stronger effects
⚙️ Model Configuration Guide
Precision (torch_dtype)
- bfloat16: Best quality, stable training format, recommended for RTX 40xx+
- float16: Good quality, compatible with most modern GPUs
- float32: Maximum quality, requires 16GB+ VRAM, overkill for most use cases
- auto: Automatically selects best precision for your GPU
Quantization
- none: Best quality, highest VRAM usage (~11-14GB)
- int8: Good quality, medium VRAM (~9-11GB), recommended for VRAM-constrained systems
- int4: Acceptable quality, low VRAM, noticeable quality loss
- int4_awq: Optimized int4 quantization, slightly better than standard int4
Attention Mechanism
- sdpa: Scaled Dot Product Attention (default, fastest, good VRAM efficiency)
- eager: Slowest but most stable, use for debugging
- flash_attn: Fastest option, requires RTX 30xx+ with Flash Attention support
- sage_attn: Best VRAM efficiency, slightly slower than sdpa
🐛 Troubleshooting
Garbled or Distorted Speech
This is often caused by dependency version mismatches. Try these solutions:
-
Update transformers to the correct version:
pip install transformers==4.53.3 -
Ensure required audio dependencies are installed:
pip install librosa hyperpyyaml -
Verify all dependencies are up to date:
cd ComfyUI/custom_nodes/ComfyUI-Step_Audio_TTS pip install -r requirements.txt --upgrade -
Check for conflicting installations:
- Uninstall and reinstall the node if issues persist
- Clear ComfyUI's cache and restart
Out of Memory (CUDA OOM)
- Enable quantization (
int8orint4) - Lower
max_new_tokens(try 4096 instead of 8192) - Disable
keep_model_in_vramafter each generation - Use
float16instead ofbfloat16 - Close other GPU applications
- Try
sage_attnattention mechanism for better VRAM efficiency
Poor Voice Quality
- Ensure
prompt_textexactly matches reference audio transcript - Use higher quality reference audio (clean, minimal background noise, 3-30s)
- Increase
temperature(0.7-0.8) for more natural variation - Disable quantization for best quality
- Use
bfloat16precision - Verify reference audio is clear and well-recorded
Edit Not Strong Enough
- Increase
n_edit_iterations(try 3-4 for stronger effects) - Ensure
audio_textmatches input audio transcript exactly - Verify you selected correct edit category option (not "none")
- Try combining multiple edit passes for cumulative effects
Edit Node Not Working / Errors
- Check audio length: The Edit node requires audio between 0.5-30 seconds. Audio longer than 30 seconds will fail.
- Split longer audio into smaller segments before editing
- Ensure
audio_textmatches input audio transcript exactly - Verify the correct edit type is selected
Model Not Loading
- Check model path:
ComfyUI/models/Step-Audio-EditX/ - Ensure both Step-Audio-EditX and Step-Audio-Tokenizer are downloaded
- Verify folder structure matches the required layout
- Ensure sufficient disk space (models are ~10GB)
- Check ComfyUI console for detailed error messages
- Try re-downloading models if files are corrupted
Slow Generation Speed
- Use
flash_attnattention mechanism if your GPU supports it - Enable
keep_model_in_vramto avoid reload overhead - Use quantization (int8) for faster inference
- Ensure you're using CUDA (not CPU)
- Close background applications using GPU resources
📚 Credits & License
Model: Step-Audio-EditX by StepFun AI
ComfyUI Integration: This custom node implementation
License: MIT
🤝 Contributing
Contributions welcome! Please open issues for bugs or feature requests on our GitHub repository.
📝 Changelog
Recent Updates
- ✅ Migrated to
max_new_tokensfor consistency across nodes - ✅ Added paralinguistic auto-fill (auto-appends effect to end when text empty)
- ✅ Comprehensive tooltips for all parameters
- ✅ Fixed progress bar support (clone mode only)
- ✅ Enhanced VRAM management and caching
- ✅ Improved error handling and debugging messages
🔗 Links
💡 Tips for Best Results
- Reference Audio: Use clean, clear recordings without background noise
- Transcripts: Always match transcripts exactly - punctuation and spacing matter
- Temperature: Start with 0.7 and adjust based on results
- Iterations: For edits, start with 2 iterations and increase if needed
- VRAM: Monitor usage and adjust quantization settings accordingly
- Long Content: Enable chunking for texts over 2000 words for best results
- Edit Node Audio Length: Keep audio under 30 seconds for the Edit node - split longer audio into segments first
Run ComfyUI workflows without the setup
No installs, no CUDA version roulette, no GPU sitting idle on your bill. Bring a workflow and run it in the browser.