Extensions/RedNode Studio
ComfyUI Extension

RedNode Studio

A studio rig for ComfyUI: a tabbed workspace panel, painting with auto masks, wireless control panels, LoRA management, grading and prompt tooling, plus Krea 2 moodboard and identity editing.

By RedNodeAI·Created about a month ago·Updated a day ago· 4
RedNodeAI/ComfyUI-RedNodeStudio
Nodes59
On cloudLocal install
CategoryRedNode/Krea 2, RedNode/Studio
Stars4
Updateda day ago

Nodes (59)

Krea2 Edit Source Chain

Adding a third reference to a Krea 2 edit (and when not to)

RedNode/Krea 2
Krea 2 Identity Edit

Keep the face, change everything else

RedNode/Krea 2
Krea 2 Moodboard

Turn reference images into vibe, not content

RedNode/Krea 2
Krea 2 Moodboard Encode (packed)

Moodboard Encode

RedNode/Krea 2
Krea 2 Moodboard + Identity Fusion

Krea 2 Moodboard + Identity Fusion

RedNode/Krea 2
Krea 2 Conditioning Rebalance

The 12-layer tap that decides your detail

RedNode/Krea 2
RedNode Studio (Krea 2)

Krea 2 RedNode, moodboard + identity in one node

RedNode/Studio
RedNode Studio Preset Load

Load a saved Krea 2 look like a config file, not a lucky guess

RedNode/Studio
RedNode Studio Preset Save

Freeze a Krea 2 look you love, before the next run erases it

RedNode/Studio
RedNode Studio Settings (Advanced)

Every Krea 2 RedNode dial, named in plain English

RedNode/Studio
RedNode Camera LoRAs

Camera sliders that follow your stage, so zoom and height stay in sync by themselves

RedNode/Prompt
RedNode Camera Multi-Angle

Re-shoot an existing photo from another viewpoint, driven by the same stage you planned the original with

RedNode/Prompt
RedNode Camera Studio

A camera you drag on a map, instead of words you hope the model obeys

RedNode/Prompt
RedNode Channel Convert

The type converter you didn't know you needed, for when a string must become a number

RedNode/Channels
RedNode Combo Control

Drive another node's dropdown without a single wire

RedNode/Control
RedNode Control Panel

Every dropdown on your graph, on one node, with not a wire in sight

RedNode/Control
RedNode Describe To Boxes

Turn a reference picture into a full prompt, section by section, with a local model

RedNode/Prompt
RedNode Free VRAM

The node that unloads your first model so the second one actually fits

RedNode/Control
RedNode Group Control

Switch whole workflow groups on and off from one panel, then save the combinations

RedNode/Control
RedNode Group Modes

One dropdown that decides which groups run and which get bypassed

RedNode/Control
RedNode Group Rules

A prototype that tells you which groups will run before you waste a queue on it

RedNode/Control
RedNode Image Review

The preview that doesn't forget your last ten runs

RedNode/Image
RedNode Live Preview

Watch the render form instead of squinting at a colour smear

RedNode/Image
RedNode LoRA Stack

The LoRA stack that knows your trigger words and rolls random strengths

RedNode/Studio
RedNode LoRA Stack Save

Save the LoRA stack you just dialed in, before you lose it

RedNode/Studio
RedNode Note

A glowing signpost for your workflow, not another widget to wire

RedNode/Control
RedNode Note Panel

Restyle every note on your graph from one place, no hunting

RedNode/Control
RedNode Paint In (composite back)

The node that stitches your painted fix back in, feather and all

RedNode/Image
RedNode Paint Out (to any renderer)

Paint with any renderer you like, not just the one that ships with the tab

RedNode/Image
RedNode Paint Render

Renders only the region you painted — the rest of the image never moves

RedNode/Image
RedNode Palette

Route your whole graph by color, not by a wall of boolean gates

RedNode/Control
RedNode Pass (colour trigger)

A wire that flips your routing colors as the data goes through it

RedNode/Control
RedNode Post FX (standalone)

Grade images in physical camera order, with zero extra diffusion passes

RedNode/Image
RedNode Post Process

The Workspace's grading chain, pulled out into your graph

RedNode/Image
RedNode Prompt Box

The prompt box that highlights tokens and rolls its own wildcards

RedNode/Prompt
RedNode Prompt Combine

Gluing prompts together without rewiring

RedNode/Prompt
RedNode Prompt Frame

A framing dial that stops your subject dissolving into the wide shot

RedNode/Prompt
RedNode Prompt Keywords

The shared @keyword library every RedNode prompt box reads

RedNode/Prompt
RedNode Prompt Converter

A caption converter that swaps her→his without mangling 'there'

RedNode/Prompt
RedNode Refine Crop

Cut a face out at real resolution and refine it with any sampler

RedNode/Image
RedNode Refine Paste

Put the refined crop back so only the masked region changed

RedNode/Image
RedNode Report

A graph sign that tells you what value just ran through it

RedNode/Control
RedNode Rig In

The front door your external engine's render walks back in through

RedNode/Studio
RedNode Rig Out

Hand NovelAI its prompt, seed and sampler numbers without touching its UI

RedNode/Studio
RedNode Router (advanced switch)

A colour-driven switch where the losing branches never even run

RedNode/Control
RedNode Router Control

One switchboard for every colour-driven Router in your workflow

RedNode/Control
RedNode Sampler Config (auto turbo)

Stops you re-typing steps and CFG every time you switch checkpoints

RedNode/Studio
RedNode Save

A save node that files your images and writes the prompt down beside them

RedNode/Image
RedNode Save Video

Turn a batch of frames into mp4, webm, gif or webp, filed like your stills

RedNode/Video
RedNode Selector

A dropdown of your own choices that outputs the picked string

RedNode/Prompt
RedNode Stage Tap

Photograph any point in the graph so you can compare runs later

RedNode/Image
RedNode Stage View

Compare any two points of the last run with a drag-across wipe

RedNode/Image
RedNode Studio Advanced

The post-render passes as a visual list — sampler refines and face detailers with zero wires between them

RedNode/Studio
RedNode Studio Workspace

The whole studio input rig in one tabbed panel, wired by a single bundle

RedNode/Studio
RedNode Grabber

Pull values out of a subgraph by name, with no wires through the boundary

RedNode/Channels
RedNode Sender

Push values into a subgraph by name, spliced into real wires before the run

RedNode/Channels
RedNode Switch

The switch that doesn't run what you didn't choose

RedNode/Control
RedNode Text Combine

Assembling prompts from parts with RedNode Text Combine

RedNode/Prompt
RedNode Video Review

RedNode Video Review plays your clip in the node

RedNode/Video
Readme

RedNode Studio

One panel that runs the whole picture, and the nodes around it. The Studio Workspace holds the models, the prompts, the camera, the LoRAs, the references, the canvas, the painting and the grading in one tabbed node, samples the render itself, and hands the result to a Detailer that lists its passes instead of wiring them. Everything else in the pack, the routing, the review, the saving, the stage comparison, exists to keep the canvas small around that.

The whole rig: one Workspace, a Detailer, live previews, the post chain and Save

59 nodes · No pip dependencies · Advanced Krea 2 tools included

  • Build and control complex workflows without filling the canvas with utility wires.
  • Paint, compare, grade and review images without leaving the workspace panel.
  • Run moodboard and identity-preserving Krea 2 workflows from one interface.
  • Watch every step of a render as it forms, decoded by the small VAE.

Search RedNode Studio in ComfyUI Manager, or clone it:

git clone https://github.com/RedNodeAI/ComfyUI-RedNodeStudio.git ComfyUI/custom_nodes/ComfyUI-RedNodeStudio

Install

Search for RedNode Studio in ComfyUI Manager, or clone it with the line above.

Restart ComfyUI. Everything registers under the krea2 and RedNode categories in the node menu.

Python 3.10 or newer. No pip dependencies beyond what ComfyUI already installs.

Quick start

Open the template browser and load RedNode Studio, or open example_workflows/RedNodeStudio_V1.3.json directly. It is the whole rig wired up, and it reads left to right. It pulls in a few other packs, and ComfyUI Manager offers them when you open it.

If you would rather build it yourself, the graph is short:

  1. Add RedNode Studio Workspace. On its Models tab, make a rig: the model, its CLIP, its VAE, and the sampler numbers. Choose Built-in sampler and the node renders on its own.
  2. Write the prompt on the Prompts tab, and put a reference on the Subject tab if there is a face to keep.
  3. Wire the workspace's image output into RedNode Studio Detailer, then into RedNode Post FX, then into RedNode Save and RedNode Image Review. Add a RedNode Live Preview on the same output to watch the render form.

That is one node doing the work and four watching it. The External sampler setting is the other route: the workspace then hands out the model, the conditioning and the latent as sockets, and your own KSampler does the sampling, which is exactly what every workflow did before the built-in one existed.

The Workspace

Fourteen tabs, in four groups. The strip sits on the panel and the panel sits on the node; press the full screen button and the same panel takes the whole window. The socket tuck, the plug on the row above the tabs, parks unwired sockets as dots along the node's bottom edge, so a node with forty sockets is no taller than its panel.

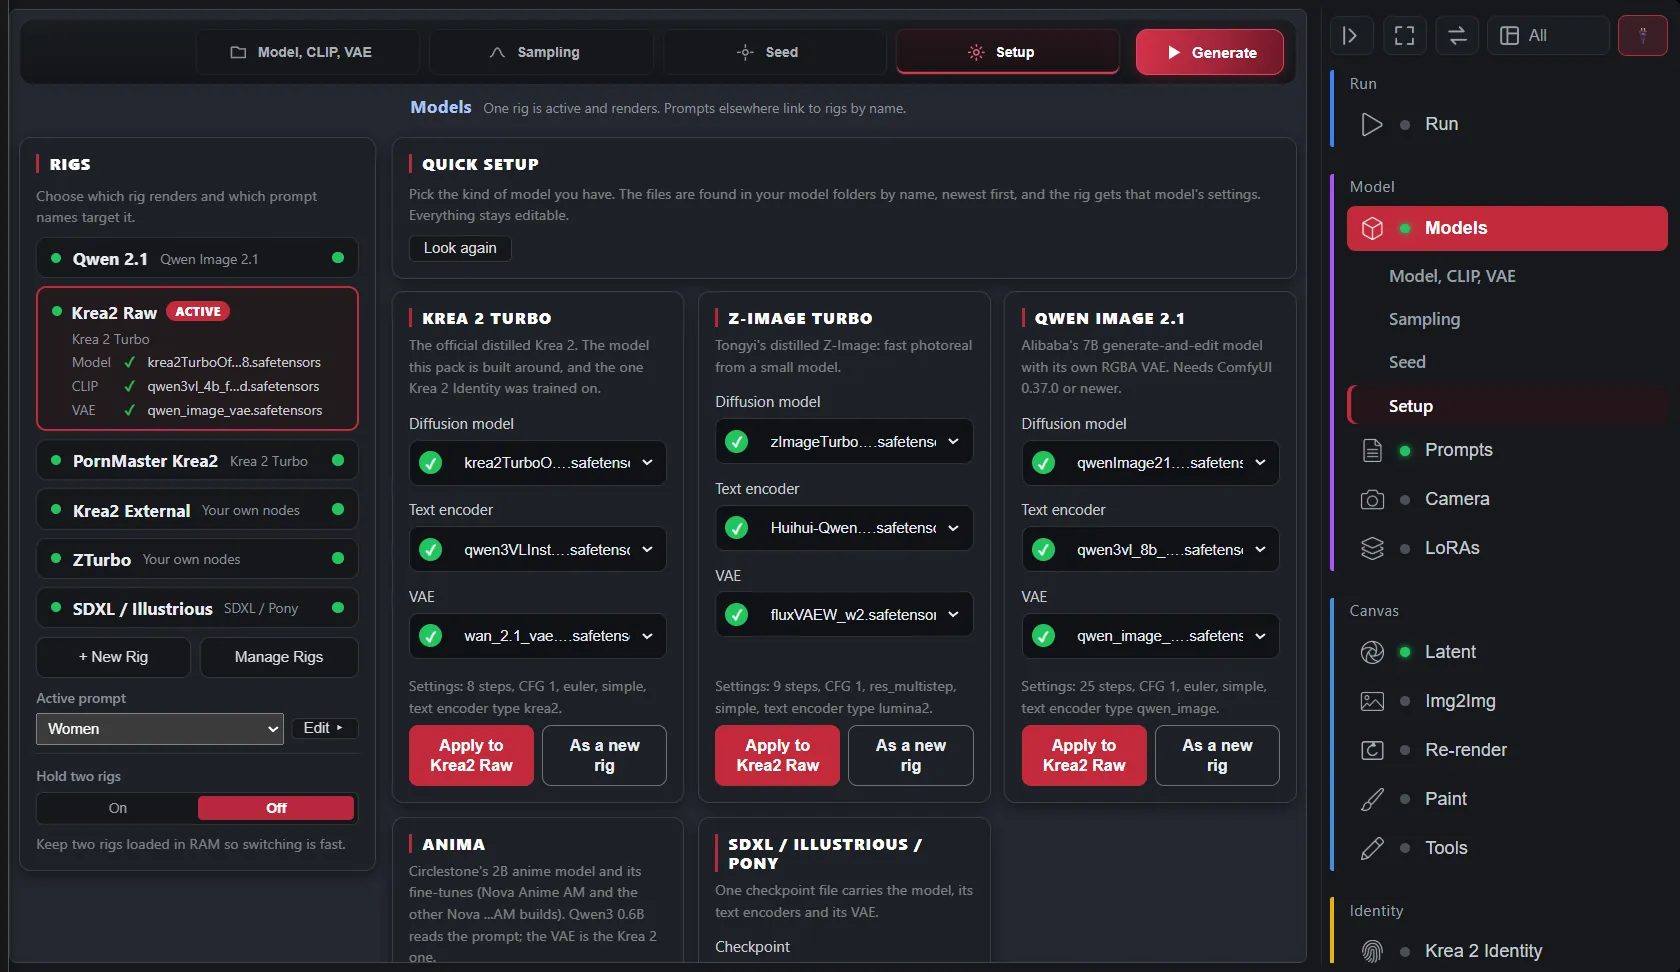
The Models tab: two rigs, the sampler numbers, the built-in sampler chosen

Models. A rig is a model with its CLIP and VAE, its sampler numbers, its detailer steps, a second sampler pair for image to image runs, and which LoRA set it carries. Keep several and switch the active one; a Detailer pass can name any of them, so a face can be detailed by a different model from the one that rendered the frame. The same tab chooses between the built-in sampler and an external one, holds the seed, and can keep two rigs in RAM at once so a two-rig chain stops reloading. The footer carries the UI scale, the resize long edge, the studio preset and the VRAM tier, which clamps the expensive dials for a smaller card.

Prompts. Rows, each linked to one or more rigs, so a rig renders its own words. A row is either the Krea 2 frame editor, Subject and Surroundings with the framing dial between them, or a plain box for any other model. The auto prompt captions the references through a local vision model, with a length budget, a converter for gender and style swaps, and a saved prompts button. Wildcards and @keyword macros resolve on the run's seed.

Camera. The stage from the camera section below, on its own tab, with a master switch. It has two studios: the one behind the prompt, whose camera writes the paragraph and drives the camera LoRAs, and a separate one for the Img2Img tab's re-angle.

The LoRAs tab: Main and a named set, grouped slots, a random range, the row menu

LoRAs. The main stack, plus named sets on their own sub-tabs. Rows drag by their grip, switch off by their eye, and group under titles; a strength can be a random range with the roll shown after the run. A rig picks its set by name, and so can a Detailer pass or a paint pass. The Paint tab has a stack of its own.

The Latent tab: the canvas, and two refine passes with a denoise and a scale each

Latent. The canvas size, with aspect presets, a random size, and an auto latent that follows the camera's frame at a pixel budget. Refine passes run on the blank canvas: pass 1 generates, and every pass after it treats what pass 1 made as its source, at a Refine dial or a denoise and a scale per pass with a Ramp, so a draft-small-then-climb run needs no second node.

The Img2Img tab: source, pass, RE-ANGLE, SWAP and the auto prompt

Img2Img. A source picture, the pass over it, and two stages that run before the pass. Denoise is a full-width bar, and with several passes each one can have its own denoise and its own scale. RE-ANGLE re-shoots the source from another viewpoint with the multi-angle edit model, from three bands or from the Camera tab's studio, and a switch stops after the re-shot so the rig never enters VRAM beside the edit model. SWAP puts the Subject's face, head or whole person onto the picture before the pass finishes it.

The Paint tab in full screen: the mask, the result, and the paint settings

Paint. Mask a region, set the denoise, queue. It composites back by itself, and it runs on whichever renderer you point it at: a rig from the Models tab, the pack's own Paint Render, or an outside chain through Paint Out and Paint In. Auto-mask the subject or the background rather than painting by hand, paint in colour to steer the fill, and run the low-denoise chain as passes in one Generate. While it samples, the picture forms over the result pane, step by step, at a frame size the tab chooses. Every result stays in a history, and one click sends the keeper through the post chain and into the save tree.

The Subject tab, with references and the identity dials

Moodboard, Subject, People, Scene. Galleries per role, with the fidelity and identity dials under them and captioning built in. Subject is the face to keep; People are the extra subjects; Scene is a place rebuilt as in-context latents; Moodboard batches several pictures into one style signal. Right-click a picture for the gallery menu.

Masks. The subject boost mask, which rides into the identity edit and is sized against the Subject picture, and the edit mask that confines the pass.

The Post tab: saved looks, the effect cards, the Depth card

Post. The grading chain, fifteen effects in physical camera order, with looks you can save and random ranges on any dial. Depth of field and haze make their own depth map; the Depth card picks the estimator, the checkpoint and the resolution. RedNode Post Process finds these settings by itself when it sits at the end of the graph.

The Advanced tab: workspace preferences and the studio settings

Advanced. The workspace's preferences for this install rather than this workflow: the paint layout, the mask overlay, whether prompts echo to the console, and a button to unload the caption models.

The Detailer

The Detailer: two sampler passes, a face detailer and an upscale, with a Live Preview watching

RedNode Studio Detailer is the post-render work as a list, read top to bottom, with no wires between the passes. Each pass is a card: what it is, which rig runs it, what it aims at, and three boxes under that. Sampling holds steps, CFG, sampler, scheduler and a start and end step window, where anything left empty inherits the rig's own numbers. Strength holds Scale and Denoise as bars and the Repeat count, and a repeat above one offers a denoise and a scale per round with a Ramp. Prompt holds the LoRA stack switch and its set, the four Krea 2 references, a LoRA for this pass only, which Prompts-tab row it reads, and a box that wins over all of that when it has words.

Three kinds of pass:

  • Sampler: the whole frame refined at a denoise, an image to image over what arrived. Its scale sticks, so 0.5 then 2.0 across two passes is the shrink-and-regrow chain.
  • Detailer: SAM3 segments a target, face, hair, hands, eyes, clothes or background, the crop renders at a working resolution, and goes back under a feathered mask. The SAM file and its precision are picked once on the node.
  • Upscale: SeedVR2 at a size, 720p, 1080p, 2K, 1440p or 4K as a pixel budget, with the short edge worked out from the frame's own aspect. The loader dials sit on the card.

Duplicate a pass with the button beside its delete and nudge one number, which is how a chain gets built. Group titles fold and switch a set of passes at once. Premade layouts ship, the face identity chain among them, and your own save by name. Taps record the input, every pass and the output into a Stage View strip, so a chain can be read step by step.

Watching a render

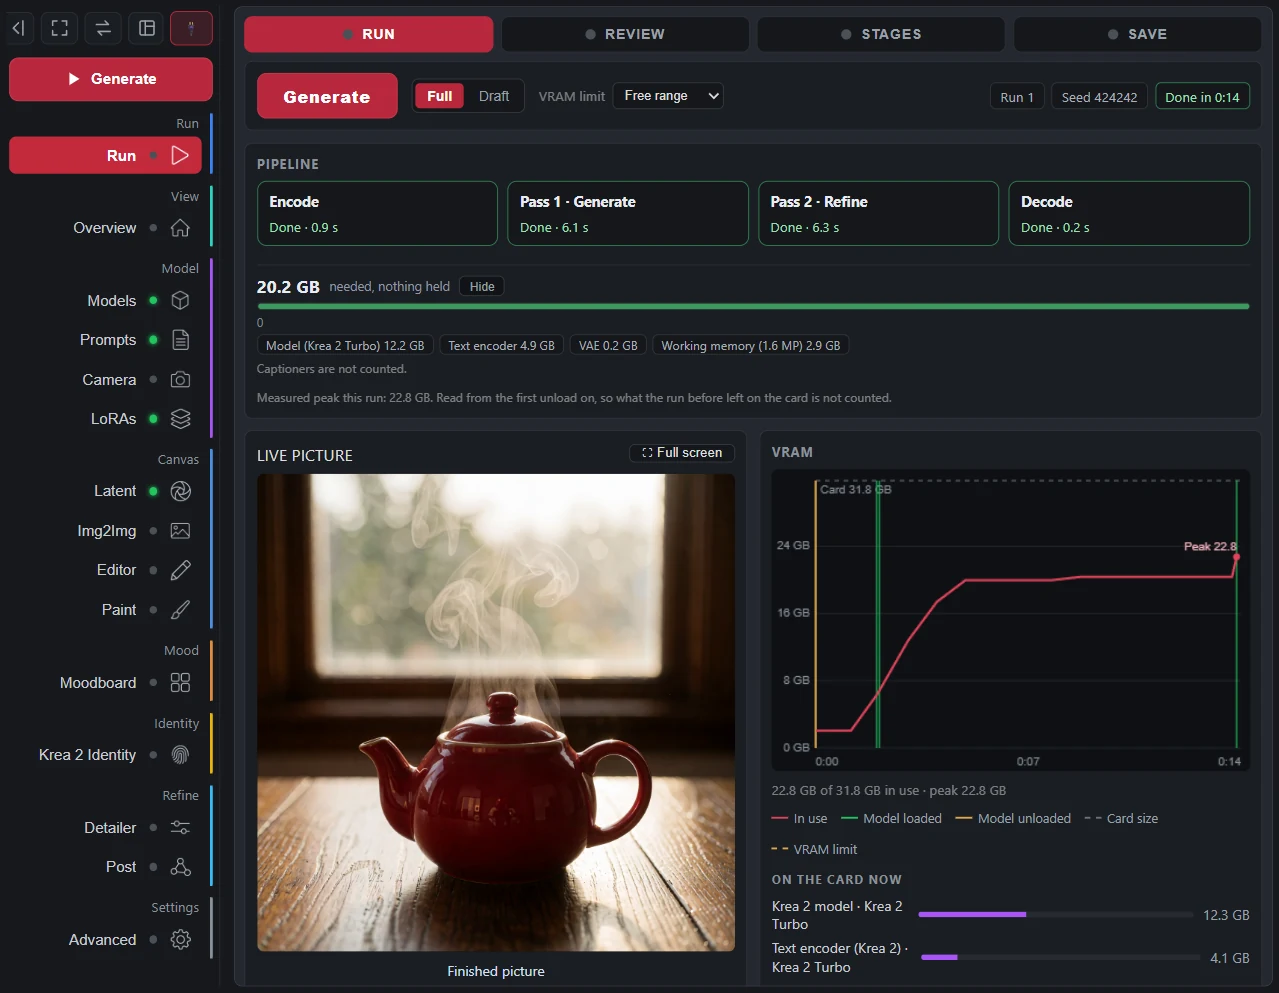
A Live Preview mid-render: pass 1 of 2, step 3 of 8

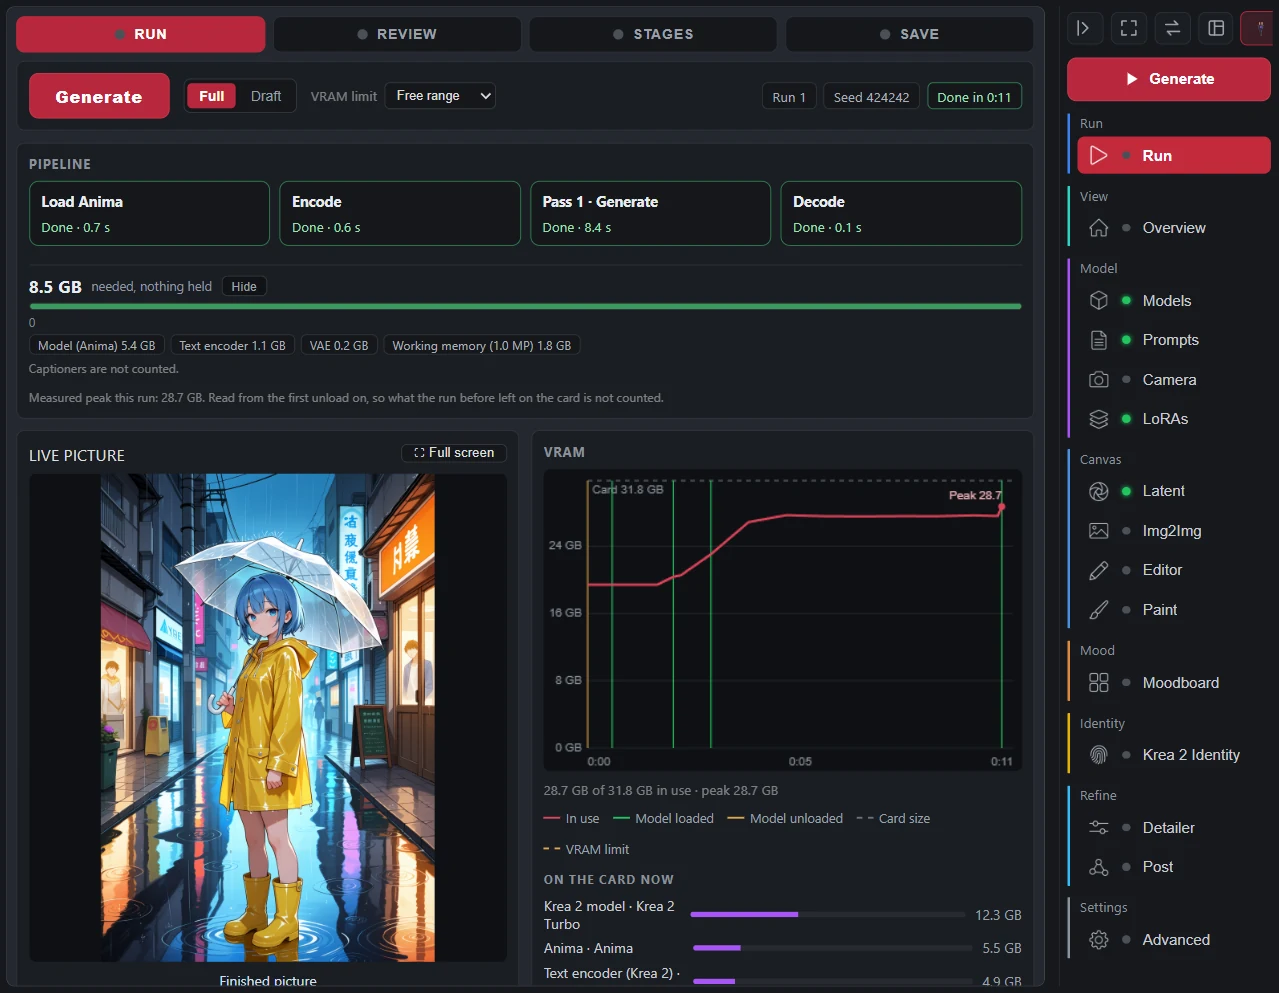
RedNode Live Preview shows the picture forming. Wire an image output into it and every step of that node's render lands on it, decoded by the small VAE, with a bar and the pass it belongs to, then the finished frame. Both the workspace's built-in sampler and the Detailer's passes stream, whatever ComfyUI's own preview setting is. For Krea 2 the sharp version needs lighttaew2_1.safetensors in models/vae_approx; without it the frames are the colour smear.

RedNode Image Review is a preview that remembers: the newest picture on top and the runs before it in a strip, right-click for Copy, Keep, Name and Rerun with the same seed or fresh ones. Double click the picture for a full screen room where the wheel zooms and a drag pans. A run that made several pictures, a camera path or a batch, shows them in a column beside the big one.

The Image Review's full screen room, the history strip along the bottom

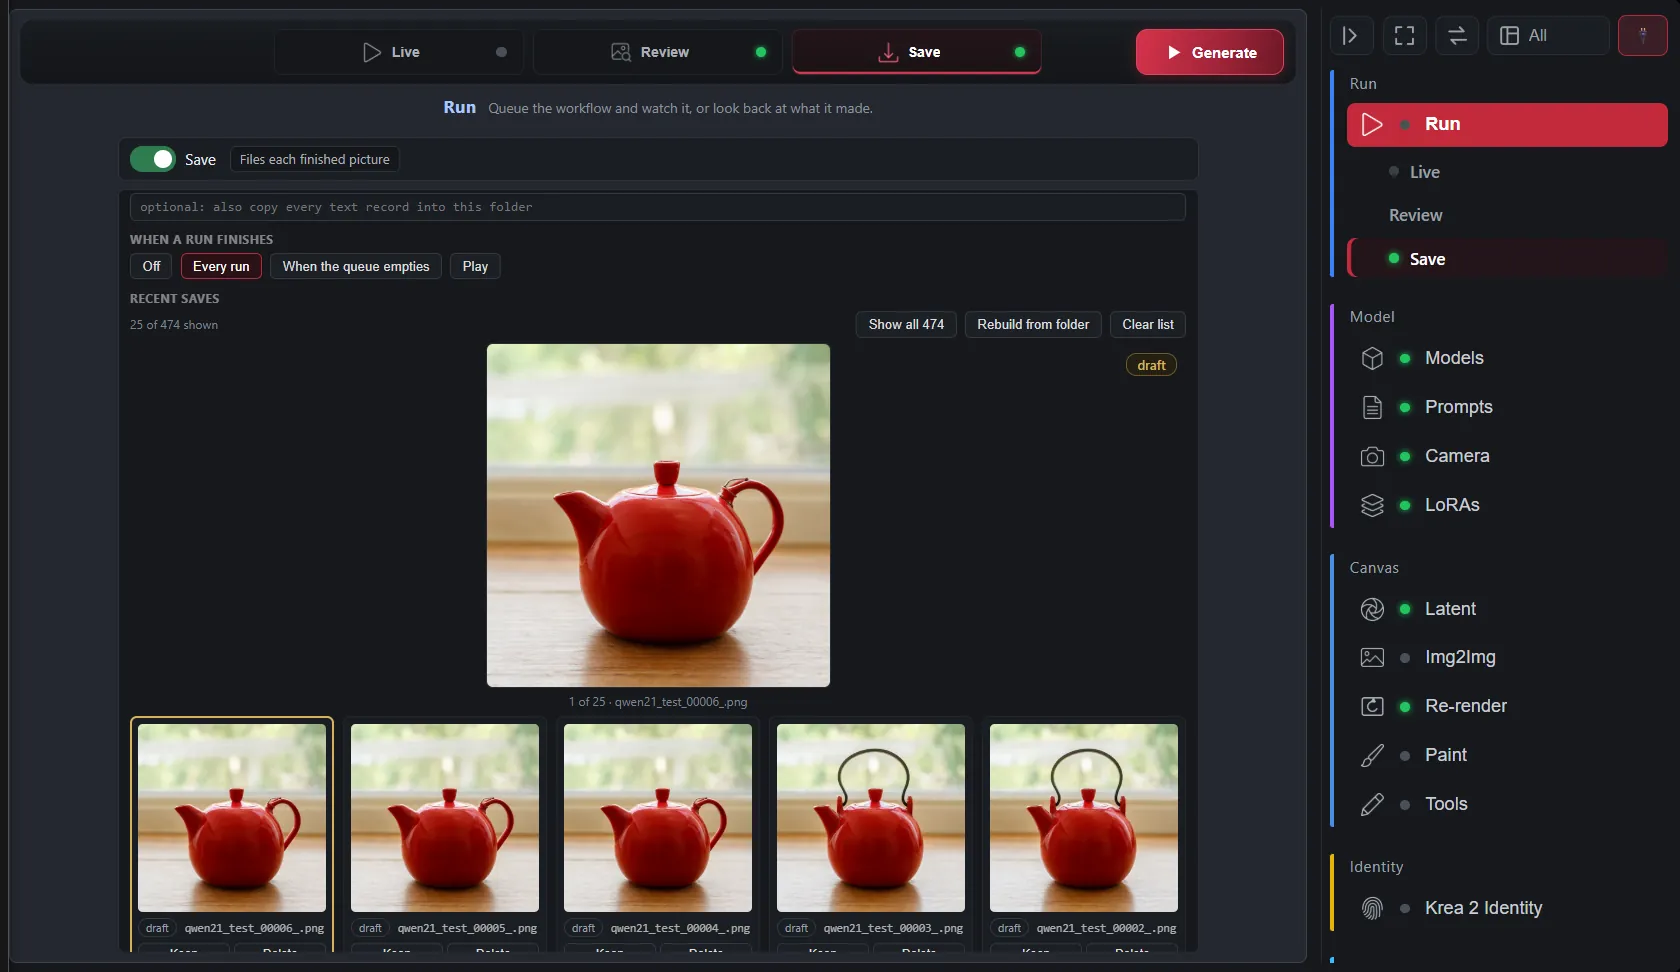
The Save node: the naming pattern, drafts and keepers, recent saves

RedNode Save files by date, preset, seed, model or size, splits drafts from keepers, and keeps a browser to cull a session without leaving the graph. The Review and the Save node share the run's id, so keeping the picture you are looking at needs no wire.

Comparing two stages of a run with a wipe

RedNode Stage Tap and Stage View photograph any point in the graph and compare two of them with a wipe. The Detailer's Taps feed the same strip.

Keeping the canvas small

A full pipeline, grouped by stage

Stages live in subgraphs and groups, so the canvas stays this small however much is in it. Group Control switches groups on and off from one panel, Group Modes names whole configurations, and branches you did not pick never execute.

One panel driving nodes with no wires, including into a subgraph

Control Panel drives other nodes' dropdowns, sliders and toggles from one node, including nodes inside subgraphs. Palette and Router route the graph by colour. Sender and Grabber replace a canvas of Get and Set nodes with named channels. The wires that are not there are the point.

The camera stage

The stage from above: two subjects, the camera, its path, and the sets and camera controls beside it

RedNode Camera Studio is a stage seen from above. Put the subjects on it, drag the walls out to the size of the room, then move the camera. What comes out of it is not "wide shot": it is the physical camera language the model already answers to, a lens length, a height, a distance and an angle, worked out from where you actually put things. The tab has its own switch like the others, so the whole camera leaves the prompt in one click when you want the words to do the framing instead.

Fifteen setups ship with it, and a set carries the whole stage at once: camera, subjects, room size, path and lights. Load one and adjust, rather than building a room from nothing every time. A camera path renders one image per shot, so an orbit from -60 to +60 is a single queue and one scene from six viewpoints. That holds on the built-in sampler and on an engine rig; an external sampler gets one conditioning, and the tab says so when a path meets one.

The lights: key and rim, each with size, height, exposure and colour, the light rigs, and the paragraph the stage writes

Lights sit on the same stage, each with a size and a distance, and both of those do work. Illuminance falls off with the square of the distance, and how hard a shadow reads is really the light's angular size from where the subject is standing, so a wide source close in and a small one across the room come out as different words. Those words describe light and never fixtures: name a lamp in a prompt and you get a lamp in the picture, so the wording stays on what the light is doing to the scene. Exposure runs in stops either side of a centred zero, darker one way and brighter the other, and colour runs in mireds either side of neutral daylight, warm one way and cool the other.

RedNode Camera LoRAs turns that same geometry into slider strengths. Four camera sliders, zoom, height, orbit and back, each one off, auto or manual. On auto the slider follows the stage, so pushing the camera in moves zoom with it and there is no second number to keep in sync. The two lighting sliders work the same way off the exposure and colour dials. Every slot is empty until you pick a file, and the node is happy with none of them.

Three of the sliders are mine, trained for Krea 2, and they are attached to the v1.2.0 release: camera_height_krea2_rednode, camera_orbit_krea2_rednode and camera_back_krea2_rednode. Free to use and share, just not to sell. The zoom slider and the colour temperature slider are Loraholic's, on Civitai: zoom and colour temperature. The brightness slider is PornMaster Krea2 Light Slider, also on Civitai. They all go in models/loras.

The prompt frame

The frame editor: Style, Subject, Surroundings, Light and colour, the framing dial, and the preview it writes

Word order sets the framing. Open a prompt with the person and you get a close shot. Put the room first and the camera pulls back, same words. That is most of what "wide" and "close" actually mean to the model, and it is the first thing to go once a prompt is long enough to be useful.

RedNode Prompt Frame splits the writing into Subject and Surroundings and puts a framing dial between them. Portrait, Half body, Balanced, Full scene, Roomscale. The two tight steps lead with the subject and open it with "A close view of" or "A three-quarter view of". Balanced and wider lead with the surroundings and set the subject inside them, then add a scale cue at the two widest steps, "seen full length" and "small in the distance". Your wording is never rewritten. Only the order and the joining words change.

At Full scene and Roomscale a subject with nowhere to stand can drop out of the picture entirely. Two dropdowns build a placement, "beside the doorway", or type your own and it overrides both.

Style blocks, twenty lighting setups and a brightness ramp slot in around that text at fixed positions. The second output is a notice line, and it does real work: it says when the style already lights its own scene and the lighting dropdown will fight it, when a wide framing has no placement, when the prompt has run past the 90 to 150 word working range, and when Portrait framing carries surroundings long enough to pull the camera back on their own. Wildcards and @keywords resolve in the finished text, seeded, the same as the Prompt Box.

The panel builds its preview by asking the node, so what it shows on the canvas is what renders. The same editor is what a Krea 2 prompt row on the Workspace's Prompts tab is.

RedNode Describe To Boxes fills those boxes from a picture. It sends the image to a local Ollama vision model, asks for five labelled sections, and hands back Subject, Surroundings and Light and colour on separate outputs, with the raw reply on a fourth in case the split came back malformed. Ollama is the only engine verified so far. The vision model is released from VRAM as soon as the reply lands, so it does not sit on top of your checkpoint for the rest of the queue.

The Krea 2 system

The workspace works with any model. This section is about the part that only applies to Krea 2.

Stock ComfyUI runs Krea 2 text-to-image perfectly well. These nodes exist for what the stock nodes cannot do with reference images.

Stock image-reference encodes (the qwen-edit style nodes) pass references through the encoder as semantic description only, using QwenImage's template rather than Krea 2's. The model learns what is in your reference, with no control over which aspect transfers, no strength dial, and multi-reference inputs that can collapse into grid or collage outputs. Core's ReferenceLatent attaches latents that Krea 2's stock model ignores, because there is no in-context pixel path, so no true identity preservation and no edit-LoRA support.

This pack adds both halves on top of the stock implementation: the moodboard controls (strength, style against subject extraction, crops, indirect mode, grid-safe packed spans) and the full identity-edit recipe (in-context source latents at RoPE frames 1 to N, Krea 2 template grounded instruction and grounded negative, v1.2 fit geometry, ref_boost). Every patch is additive. Leave the nodes unused and each patched path is bit-identical to stock ComfyUI.

To use it you need:

  • ComfyUI with native Krea 2 support
  • The qwen3vl_4b text encoder with vision weights, loaded through CLIPLoader with type krea2
  • qwen_image_vae
  • For editing, a krea2_edit LoRA at strength 1.0 through LoraLoaderModelOnly

The Workspace folds the studio in: a Krea 2 rig encodes through the identity system with the tab images loaded, so the references never need a wire. RedNode Studio (Krea 2) is the same encode as a node of its own, for a classic graph: it replaces the positive CLIPTextEncode, takes the references on sockets, and outputs a matched positive and negative pair.

Companion to the Forge Neo version, same algorithms and same knobs.

The nodes

Studio and workspace

| Node | What it does | |---|---| | RedNode Studio Workspace | The whole input rig in one tabbed panel, wired to the studio by a single bundle. The Latent tab runs refine passes on a blank canvas, the Img2Img tab's RE-ANGLE can stop after the re-shot so the rig stays out of VRAM, a rig can name a second sampler pair for image to image runs, and a camera path renders one image per shot on the built-in sampler and on an engine rig. | | RedNode Studio Detailer | The post-render passes as a visual list: sampler refines and SAM3 face detailers in order, each with its own rig, steps, CFG, sampler, step window and scale ratio, no wires between them. A pass can repeat with a denoise and a scale per round, pick which Prompts-tab row it reads, and a SeedVR2 upscale pass (720p to 4K) sits in the same list; the SAM file and precision are picked on the node. | | RedNode Studio (Krea 2) | Moodboard and identity edit in one node, with a matched grounded negative. The studio the Workspace folds in, for a classic graph. | | RedNode Studio Settings (Advanced) | Every dial in plain language, for when a preset is not enough. |

RedNode Studio Preset Save and Preset Load still ship and still work, but the Workspace covers what they did. Treat them as legacy.

Routing and control

| Node | What it does | |---|---| | RedNode Palette | The colours that drive every Router. Switch a colour, re-route the graph. | | RedNode Router (advanced switch) | Each branch passes when its colours are on. Losing branches never run. | | RedNode Router Control | Counts every Router and turns their unique colour combinations into one non-stacking switchboard. | | RedNode Switch | Pass one of several inputs through, chosen by name. | | RedNode Pass (colour trigger) | Passes anything through and flips Palette colours as it goes. | | RedNode Free VRAM | Unloads models at this exact point in the chain, so a second big model can run on a card that cannot hold both. | | RedNode Control Panel | Many other nodes' dropdowns and toggles on one node, no wires. | | RedNode Combo Control | The single-row version of the same idea. | | RedNode Group Control | Turn workflow groups on and off, with saved scenes. | | RedNode Group Modes | Named modes that enable one set of groups and bypass the rest. | | RedNode Rig Out / Rig In | Hand a Models-tab rig's prompt, seed and sampler numbers to an outside engine, then bring its picture back into the chain. |

Camera

| Node | What it does | |---|---| | RedNode Camera Studio | A top-view stage: place the subjects, the walls and the lights, move the camera, and the geometry is written as the physical-camera language Krea 2 obeys. Camera paths render one image per shot. | | RedNode Camera LoRAs | Applies the camera slider LoRAs (zoom, height, orbit, back) from the studio's own geometry, off / auto / manual per slider. | | RedNode Camera Multi-Angle | Turns the studio's camera into a Qwen-Image-Edit Multiple-Angles prompt, for re-shooting an existing photo from another viewpoint. |

Images, painting and review

| Node | What it does | |---|---| | RedNode Save | Files images by date, preset and seed, and splits drafts from keepers. | | RedNode Save Video | Files a batch of frames as mp4, webm, gif or animated webp, into the same tree, tokens and drafts or keepers split RedNode Save uses. | | RedNode Paint Render | Renders only the region you painted, then composites it back. | | RedNode Paint Out / Paint In | Hand the painted region to any other renderer, then composite the result back. | | RedNode Refine Crop / Refine Paste | Cut a masked region out for refinement by any sampler, then put it back. | | RedNode Image Review | A preview that remembers, with a browsable strip of previous runs. Double-click the picture for a full screen view where the wheel zooms and a drag pans. A run that made several pictures shows them in a column beside the big one; click to view any of them. | | RedNode Live Preview | Shows the picture forming step by step while the node wired into it renders, then the finished frame. The workspace and the Detailer decode every step with the small VAE (lighttaew2_1 in models/vae_approx for Krea 2) and stream it here, whatever ComfyUI's own preview setting is. | | RedNode Video Review | The same for a sequence: it plays in the node, with sound, and the last few runs stay in the strip. Wire frames to preview them, or the path from RedNode Save Video to play the file that was actually filed. | | RedNode Stage Tap / Stage View | Photograph any point in the graph, then compare stages with a wipe. |

LoRAs and sampling

| Node | What it does | |---|---| | RedNode LoRA Stack | Multi-LoRA loader with per-slot strength, random ranges, trigger words and presets. | | RedNode LoRA Stack Save | Saves a stack under a name. Keep it muted unless you are saving. | | RedNode Sampler Config (auto turbo) | Detects a turbo distill from the loader's filename and outputs matching settings. |

Prompting

| Node | What it does | |---|---| | RedNode Prompt Box | Prompt editor with highlighting, @keyword macros and a seeded wildcard engine. | | RedNode Prompt Frame | Subject and Surroundings in their own boxes, emitted in the order that sets the framing. Five steps from Portrait to Roomscale, plus placement, style, lighting and a warnings output. | | RedNode Describe To Boxes | Reads a picture into Subject, Surroundings and Light and colour, ready to wire into the Frame. Runs on a local Ollama vision model. | | RedNode Prompt Combine | Prompt pieces joined in the order you drag them, typed, wired, or pulled wholesale from a channel. | | RedNode Text Combine | The plain string joiner: same rows, no prompt flag. | | RedNode Prompt Converter | Word-boundary gender and style swaps for captions. | | RedNode Prompt Keywords | The global @keyword library that every Prompt Box reads. | | RedNode Selector | A dropdown of your own choices, output as a string. | | RedNode Note | A canvas label with big glowing text, a colour and a font. Unselected it is just the sign, with no title bar and no settings. | | RedNode Note Panel | Every RedNode Note in the workflow in one list, with its size, font, colour and glow. Drives them live, and can restyle all of them at once. | | RedNode Report | A sign whose words come from the run: wire a value through it and it reports what went past, in the same styling. Passes the value straight on. |

Post processing

| Node | What it does | |---|---| | RedNode Post Process | The Workspace Post tab's grading chain. Image in, graded image out. | | RedNode Post FX (standalone) | The same chain with its own panel, for any image, no workspace needed. Depth of field and haze make their own depth map; the Depth card on the panel picks the estimator, the Depth Anything V2 checkpoint and the working resolution. |

Moodboard and identity

| Node | What it does | |---|---| | Krea 2 Moodboard | One-node vibe transfer. Prompt and references in, conditioning out. | | Krea 2 Moodboard Encode (packed) | Same, with every reference packed into one vision span. | | Krea 2 Identity Edit | In-context identity preservation with the edit LoRA. | | Krea 2 Moodboard + Identity Fusion | Both of the above fused into a single encode. | | Krea2 Edit Source Chain | Chains extra reference images for multi-reference editing. | | Krea 2 Conditioning Rebalance | Per-layer reweighting of the Qwen3-VL conditioning stack. |

Prototypes

Unfinished, and marked so on the node.

| Node | What it does | |---|---| | RedNode Group Rules | Rules between groups, and a panel showing what a queue will run before it runs. | | RedNode Sender / Grabber | Named channels replacing a canvas of Get and Set nodes. One reader lists everything on a channel. They work anywhere, subgraph or not. | | RedNode Channel Convert | Converts between string, int, float and boolean. Placed automatically when a channel row asks for it. |

Example workflows

In example_workflows/, and in ComfyUI's own template browser once the pack is installed.

  • RedNodeStudio_V1.3.json is the full rig and the one to start with: a single workspace panel drives the models, the prompts and the sampler, with painting, identity edit, the Detailer's passes and its SeedVR2 upscale, and the grading chain around it. The rigs and the Prompts tab are options rather than requirements, so a graph wired the old way keeps working. It pulls in a few other packs and ComfyUI Manager offers them when you open it: SeedVR2 Video Upscaler, pysssss custom-scripts, easy-use, comfyui-krea-moodboards and Krea2-BBOX-Prompter. Manager installs packs but not models, so the upscaler's two files are yours to fetch: seedvr2_ema_7b_fp8_e4m3fn_mixed_block35_fp16.safetensors and ema_vae_fp16.safetensors.
  • RedNode_MultiAngle.json re-shoots an existing photo from another viewpoint: the Camera Studio's geometry becomes a Multiple-Angles prompt for Qwen-Image-Edit-2511, and Krea 2 finishes the frame.

Two optional packs matter to the STUDIO itself rather than to a workflow. ComfyUI-Easy-Sam3 gives the Detailer its face, hair and hands masks (it wants sam3.pt in models/sam3). Without it the pack runs fine and a detailer pass says so and passes the picture through untouched, rather than failing. ComfyUI-SeedVR2_VideoUpscaler is what the Detailer's upscale pass runs on, and an upscale pass without it passes the picture through the same way.

Baked-in settings worth knowing: ModelSamplingAuraFlow shift 1.15 (ComfyUI's stock Krea 2 default, the node is there as a handle), Euler with the simple scheduler, turbo at 8 steps and CFG 1. With the v1.2 LoRA, 8 steps gets composition and 12 gets face detail. Generate at 2MP or under. Matching output aspect to the source is no longer required once target_latent is connected, though staying close still looks best.

Downloads

Everything the pack needs beyond ComfyUI and the image models themselves, with where each file goes. ComfyUI Manager installs the packs; the files are yours to fetch.

Krea 2

| File | Goes in | Where from | |---|---|---| | qwen3vl_4b_fp8_scaled.safetensors (or the bf16) | models/text_encoders | Comfy-Org/Krea-2 | | qwen_image_vae.safetensors | models/vae | Comfy-Org/Krea-2 | | krea2_identity_edit_v1_2.safetensors, the identity edit LoRA | models/loras | conradlocke/krea2-identity-edit |

Camera and light sliders

| File | Goes in | Where from | |---|---|---| | camera_height_krea2_rednode.safetensors | models/loras | v1.2.0 release | | camera_orbit_krea2_rednode.safetensors | models/loras | v1.2.0 release | | camera_back_krea2_rednode.safetensors | models/loras | v1.2.0 release | | Zoom slider, Loraholic's | models/loras | Civitai | | Colour temperature slider, Loraholic's | models/loras | Civitai |

The three camera files are mine: free to use and share, not to sell. The two Loraholic sliders are theirs and are only ever linked. Every slider slot is optional; the Camera LoRAs card is happy with none of them, and the brightness slot takes whichever light slider you pick.

The Detailer

| File | Goes in | Where from | |---|---|---| | ComfyUI-Easy-Sam3, the pack | Manager | the face, hair and hands masks | | sam3.pt | models/sam3 | facebook/sam3, gated: request access on the page, then download | | ComfyUI-SeedVR2_VideoUpscaler, the pack | Manager | the upscale pass | | seedvr2_ema_7b_fp8_e4m3fn_mixed_block35_fp16.safetensors | models/SEEDVR2 | AInVFX/SeedVR2_comfyUI | | ema_vae_fp16.safetensors | models/SEEDVR2 | numz/SeedVR2_comfyUI |

The SeedVR2 loaders also fetch their files on first use when the folder is empty, so the two rows above are for anyone who would rather place them by hand. The 3B model is smaller and its loader's default; the 7B is what the example workflow runs.

Live preview and depth

| File | Goes in | Where from | |---|---|---| | lighttaew2_1.safetensors, the small VAE for Krea 2 frames | models/vae_approx | lightx2v/Autoencoders | | comfyui_controlnet_aux, the pack | Manager | the Post FX Depth card's estimators; each fetches its own weights on first use |

Without the small VAE the live frames still stream, as the colour smear rather than a decode.

Re-angle and swap

The Img2Img tab's RE-ANGLE and the multi-angle workflow run on Qwen-Image-Edit-2511; the SWAP stage and the Detailer's swap presets run on the BFS files.

| File | Goes in | Where from | |---|---|---| | qwen_image_edit_2511_fp8mixed.safetensors | models/diffusion_models | Comfy-Org/Qwen-Image-Edit_ComfyUI | | qwen_2.5_vl_7b_fp8_scaled.safetensors | models/text_encoders | Comfy-Org/Qwen-Image_ComfyUI | | qwen_image_vae.safetensors | models/vae | the same file as the Krea 2 one above | | qwen-image-edit-2511-multiple-angles-lora.safetensors | models/loras | fal/Qwen-Image-Edit-2511-Multiple-Angles-LoRA | | Qwen-Image-Edit-2511-Lightning-4steps-V1.0-bf16.safetensors | models/loras | lightx2v/Qwen-Image-Edit-2511-Lightning | | bfs_head_swap_v1.1_krea2.safetensors and the body swap file | models/loras | Alissonerdx/BFS-Best-Face-Swap |

Performance

Measured on a 5090. A classic single KSampler pass runs about 17 seconds. A full chain, meaning a second pass, a face detailer and a 4K upscale, lands between 45 and 60 seconds depending on how much fits in VRAM at once. Mid-range cards land at roughly double, so a full quality chain can pass a minute and a half per image. Krea 2 is a quality-first model rather than a fast one.

For low VRAM: set resize to 1024, keep to one reference where you can, turn the fidelity dials off or set boost blocks to all, leave the captioner unload default on, and use smaller Ollama models. The Workspace has a VRAM tier button in its footer that clamps the expensive dials for you.

RedNode Free VRAM is the other half of that. Put it in the chain before a second big model loads, and the first one is unloaded at that exact point rather than when the driver runs out of room. On a card that cannot hold two models at once, that is the difference between a pass running normally and a pass running an order of magnitude slower while it spills into system memory.

The example workflow ships with three, all switchable from the panel. Two sit in the Low VRAM Options group, before the face detailer and before the upscale, and are on by default. The third is on the Z Turbo detailer branch and is off, because that branch only needs it when the detailer runs a different model from the main pass.

Settings and stored data

Global preferences live in ComfyUI's own settings dialog, under RedNode: whether captions are remembered between runs and how many, whether Looks store a thumbnail, how many runs the Review strip keeps, how many saved images the index remembers, and a button to clear the regenerable caches. Anything that belongs to a single workflow, the grading chain, the paint strokes, which images are on a tab, stays on its node instead.

What the pack keeps on disk, measured rather than estimated:

| Where | Size | What | |---|---|---| | user/default/rednode-krea2/ | about 456 KB | presets, scenes, the keyword library, the saved index, and roughly 200 KB of regenerable LoRA caches | | inside a workflow file | about 65 KB on a large graph | each node's own settings, mostly the Workspace's galleries, dials and strokes | | beside a saved image | a few KB | the text record, and the JSON one if you asked for it |

Clearing the caches never touches a preset, a record or an image. Those are your work; the caches rebuild themselves.

License

PolyForm Noncommercial 1.0.0. Free for personal use, hobby projects, research, study and noncommercial organizations. Commercial use needs my permission, so get in touch. Full terms in LICENSE.

In plain language: use it, modify it, learn from it, share it, all fine. Selling it or building it into something you sell is not, unless you have arranged that with me separately.

ComfyUI itself is GPL-3.0 and is a separate work. Releases up to and including v1.4 were published under GPL-3.0 and stay available under those terms. The license change applies from v2.0 onward.

How it works

Small additive patches at import time: packed list-spans in Qwen3-VL preprocessing, moodboard effects inside Krea 2's encode_token_weights, and the in-context ref-latents branch on the Krea 2 DiT, following the same reference_latents conditioning contract that QwenImage and Flux edit models use. A patch guard checks each one at startup and reports what it found. With the nodes unused, every patched path returns exactly what stock ComfyUI returns.

Credits

ComfyUI. lbouaraba/ComfyUI-Krea2Edit, Apache-2.0, the identity-edit dual-conditioning recipe this reimplements. nova452/ComfyUI-ConditioningKrea2Rebalance and huwhitememes/comfyui-krea2-conditioning, Apache-2.0, the per-layer rebalance mechanic and its RMS-renormalized variant. no8d/ComfyUI-NO8D-controls, MIT, the LoRA-stack row-list UI that inspired RedNode LoRA Stack, implemented independently here. skatardude10/ComfyUI-Optical-Realism, which I read as a survey of which optical effects were worth having while building the grading chain. Loraholic for the Krea 2 zoom and colour temperature sliders the Camera LoRAs card drives. ethanfel and ostris for the Krea 2 vision-conditioning recipes. Krea.ai for Krea 2, under the Krea Community License.

Not affiliated with Krea.ai.