
Polyhedron Suite
The Polyhedron Suite for ComfyUI. Group-aware LoRA management: stack 10-25 LoRAs with per-group merge modes (SEQ/CONCAT/DARE), per-row decoupled CLIP strength, Trim & Resolve cleanup switches against multi-LoRA interference, thumbnails, trigger words, Civitai fetch, a dedicated Accelerator engine and a passive Merge Analyzer. Plus media I/O: a pinned-folder Media Loader (images, video, audio, batch modes) and a unified Save node for stills, video and audio. Plus sampling: a classic-wiring Sampler with a live preview decoder and a CLIP Text Encode that shares the Token Counter's count. Plus the Cine Timeline: a whole MiniMax H3 film as shots on a time axis, rendered clips as editable tracks.
Nodes (52)
Where your speed LoRAs live, so they don't wreck the creative stack
The switch that keeps the expensive branch cold until you pick it
Switch Inverse — one input, several doors, and only the one you pick opens
The ControlNet your video model doesn't know it has
The attention-backend switcher that only offers what your machine can actually run
Keep the soundtrack in step when you slow the picture down
Packing pose, canny and depth into one control video
Cine Timeline Builds the MiniMax H3 Prompt For You
One prompt node that replaces the string-of-CLIP-nodes chain
Making a stock clip obey your model's frame grid
One node, every conditioning map your union wants
One empty latent node that knows what every model family actually wants
The no-diffusion upscaler that keeps its mask in step
One-node color grading, and the preview actually shows the grade
Hi-res fix for MiniMax H3 video
One frame out of a batch — the one that converges cleanest
The passive node that catches your missing trigger words
An integer with a memory for what it means
The RIFE interpolator that fixes the lies in the incumbent
One text-encoder loader for one to four encoders — and it checks the family before loading
Six models in one loader — pick the one, the node loads it
An upscale-model loader that tells you which one is which
The VAE loader that names the family before your image comes out grey
Stop typing the dimensions — read them out of the batch
One input node for images, video and audio, straight off your disk
Making MiniMax H3 cut the picture to your track
Joining two H3 clips without the seam
Keep the motion, change the look
Pinning the first and last frame of an H3 clip
<Picture i> reference conditioning for MiniMax H3, with the sizing under your control
Keeping the join intact when you upscale a continued scene
Six models in one dropdown, swapped without a reload
Negative prompts at CFG 1 — NAG brings them back on Wan
A note that belongs to the graph, not the chat window
A tiled upscaler that speaks the dual-expert language of Wan 2.2
MiniMax H3 reference video has 15 slots — don't manage them with loose wires
The passive node that shows what your LoRA merge is actually doing
One sampler for the boring setups and the two-expert ones
The output node that writes stills, video, audio and masks from one place
One seed for the whole graph — plus the noise it actually denoises
Your LoRA report is just a string — here's how to actually read it
When a model ships a trained sigma grid, stop guessing the scheduler
How close is your prompt to the 512-token wall? This one counts.
Did your clip move, or did it just fade?
A sigma schedule you can actually see, for any model family
VAE encode, decode, and the round-trip test that tells you what the VAE eats
The type bridge that lets kijai's Wan nodes talk to core nodes
The bridge that turns a kijai Wan model back into a plain MODEL
Bump one latent frame up to seventeen
The old sigma node, kept alive for your saved workflows
The dual-pass schedule generator
The node for the 15-LoRA workflow nobody else handles well
⬡ Polyhedron Suite
One pack: media in and out, group-aware LoRA management, prompt encoding and sampling.
| Part | Nodes | | --- | --- | | Media I/O | ⬡ Polyhedron Media Loader · ⬡ Polyhedron Save | | LoRA Stack | ⬡ Polyhedron LoRA Stack · LoRA Engine · LoRA Inspector · Token Counter · Select Model Switch · Merge Analyzer · Wan Frame Inflate · Pick Frame · Sigma Curves · Sigma List · Wan Bridge | | CLIP Text Encode | ⬡ Polyhedron CLIP Text Encode | | Sampler | ⬡ Polyhedron Sampler | | Upscale & Interpolate | ⬡ Polyhedron Power Upscale · ⬡ Polyhedron Fast Upscale · ⬡ Polyhedron Interpolate | | Cine Timeline | ⬡ Polyhedron Cine Timeline | | Control & checks | ⬡ Control Fit · ⬡ Control Map · ⬡ Apply Control · ⬡ Polyhedron Blend · ⬡ Transition Check | | Workflow essentials | ⬡ Load Model · ⬡ Load CLIP · ⬡ Load VAE · ⬡ Load Upscale Model · ⬡ VAE Codec · ⬡ Seed · ⬡ Int · ⬡ Empty Latent · ⬡ Switch · ⬡ Switch Inverse · ⬡ Media Info · ⬡ MiniMax Reference · ⬡ Reference Board · ⬡ Note · ⬡ Show Text | | Attention & grading | ⬡ Polyhedron Attention · ⬡ Polyhedron NAG · ⬡ Polyhedron Filter · ⬡ Polyhedron Audio Stretch |
Installed as one custom-node pack — the node names, the package id
(polyhedron-lora-stack) and every saved workflow are unchanged.
Handbook:
docs/Polyhedron_Suite_Documentation_v397.pdf-- every node, with model notes for MiniMax H3, WAN 2.2 and the other families.
⬡ Polyhedron Media Loader & ⬡ Polyhedron Save
The Media Loader is the pack's one-stop input node: images, image batches, videos and audio from any folder on your machine, with a visual tile browser, single-file and batch modes, video/audio trimming and a mask-aware image path. The Save node is its counterpart on the way out: one node for stills, image sequences, videos (with muxed audio) and masks, with presets, metadata embedding and date-based file naming.
They are built to work as a pair — what Save writes, the Loader reads back, including masks.
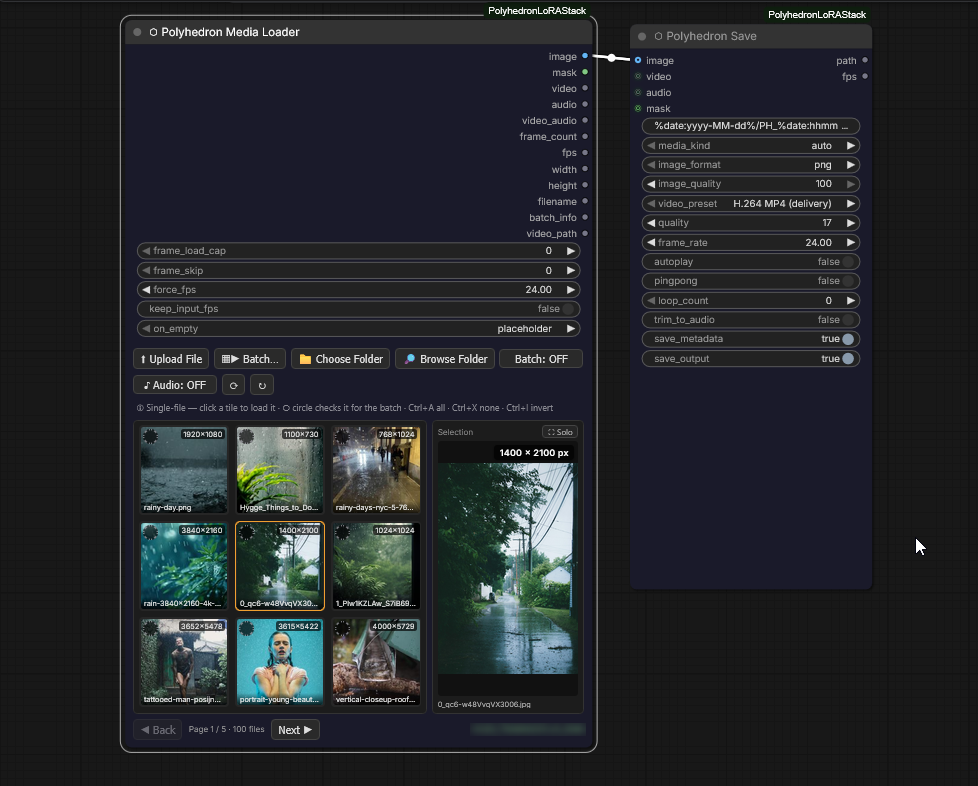
At a glance — every output pin
| Pin | Type | Carries |
| --- | --- | --- |
| image | IMAGE [N,H,W,3] | The decoded frames — N = 1 for a still, the frame count for a video or batch. An audio-only pick emits a small placeholder frame so the graph keeps running. |
| mask | MASK [N,H,W] | The still's alpha (opaque → 0, like core LoadImage). A grayscale still without alpha carries its luminance as the mask, white → 1 — that is what makes a saved mask load back as the same mask. Plain video: blank; alpha-bearing video (VP9-alpha WEBM, ProRes 4444, transparent GIF): a real per-frame mask. Details in section 6. |
| video | VIDEO | A single video file losslessly with its own audio; a trimmed video is re-encoded from the sliced frames with its sound cut to the same window; an image batch or a still-with-audio becomes a synthesized clip. None only when there are no frames. |
| audio | AUDIO | The paired audio, decoded and trimmed (section 4). None when nothing is paired. |
| video_audio | VIDEO | The visual's frames muxed with the paired audio — wire it into a video save for an mp4 with a sound track. None when nothing is paired. |
| frame_count | INT | 1 for a still. |
| fps | FLOAT | 0.0 for a still; native or forced for a video. |
| width / height | INT | The decoded frame size. |
| filename | STRING | The loaded file's name; empty in sequence mode. |
| batch_info | STRING | The live batch counter (section 5): Batch 0023 / 1334 per firing, Batch 1334 frames (one pass), or Single: <name>. |
| video_path | STRING | The loaded file's full path — feeds the Batch Pipeline Source; empty in modes without a single source file. |
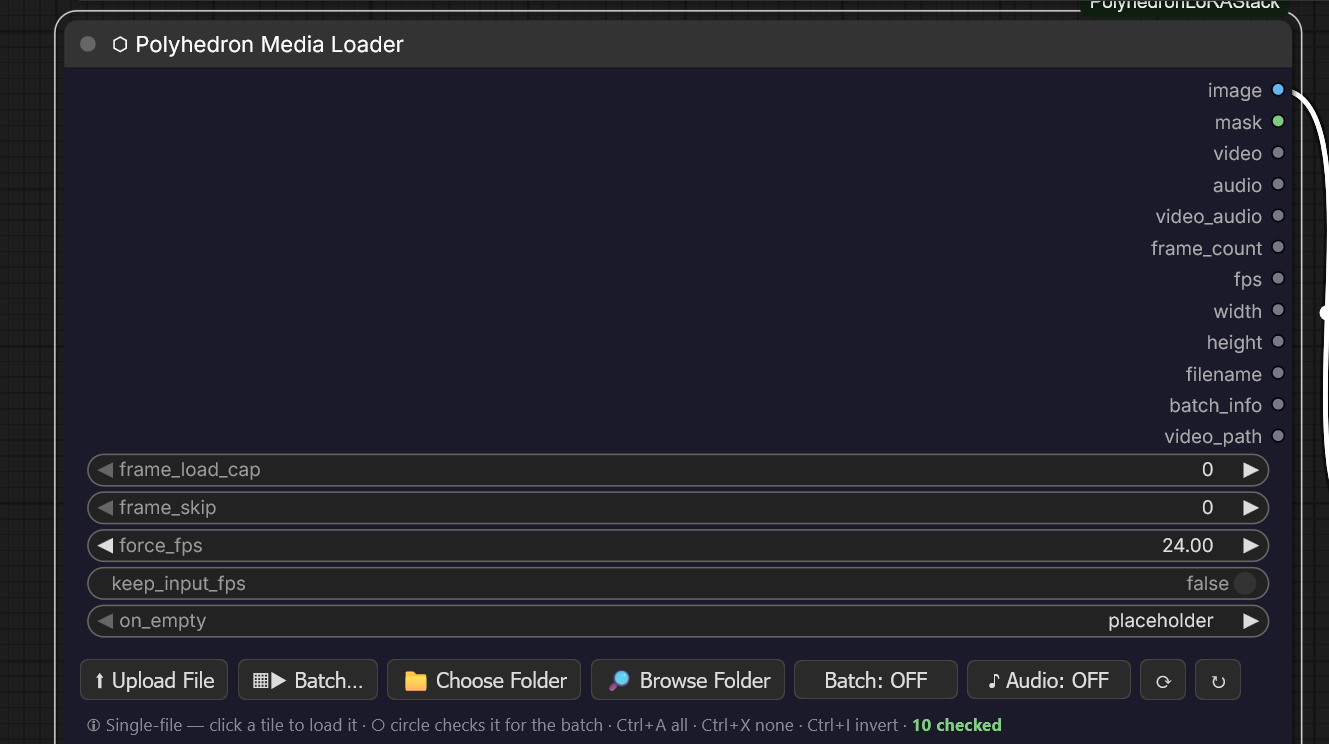
The five widget rows below the pins are the video levers
(frame_load_cap, frame_skip, force_fps, keep_input_fps — section
3) and the empty-state switch (on_empty — section 3).
1. Folders & files (Media Loader)
The loader reads from a pinned folder — any folder on the machine running ComfyUI, not just the ComfyUI input directory. The current pin is shown at the bottom right of the node.
Picking a folder
📁 Choose Folder opens the in-canvas picker:
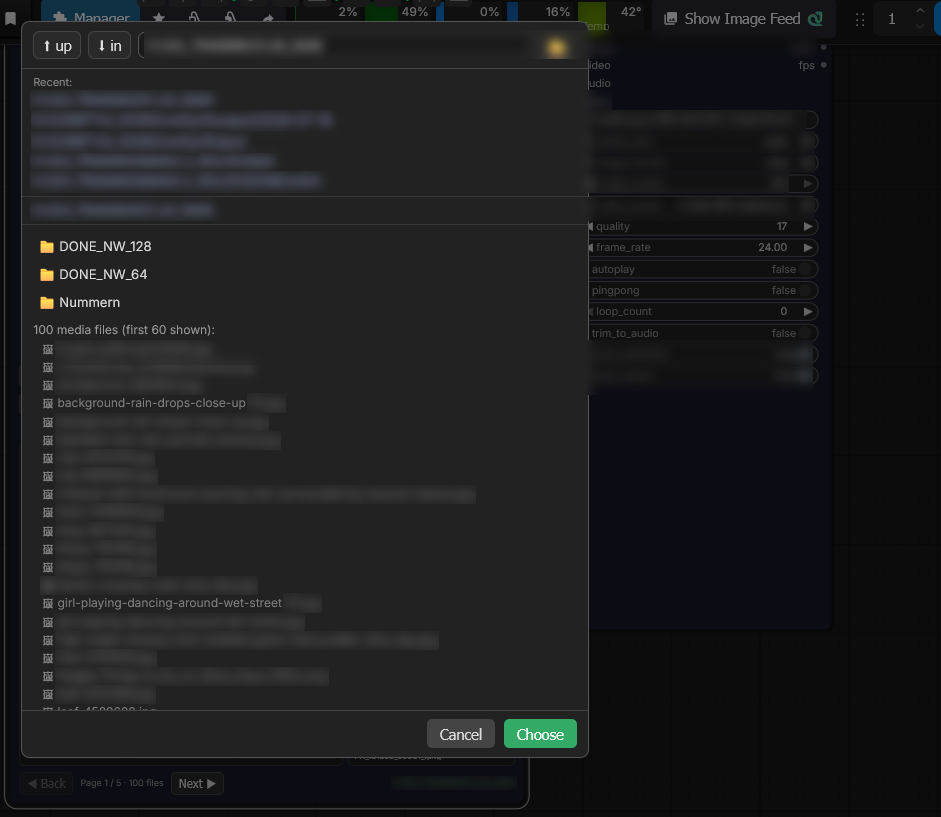
When the current folder has no subfolders, the picker says so — Choose then pins the folder you are looking at:
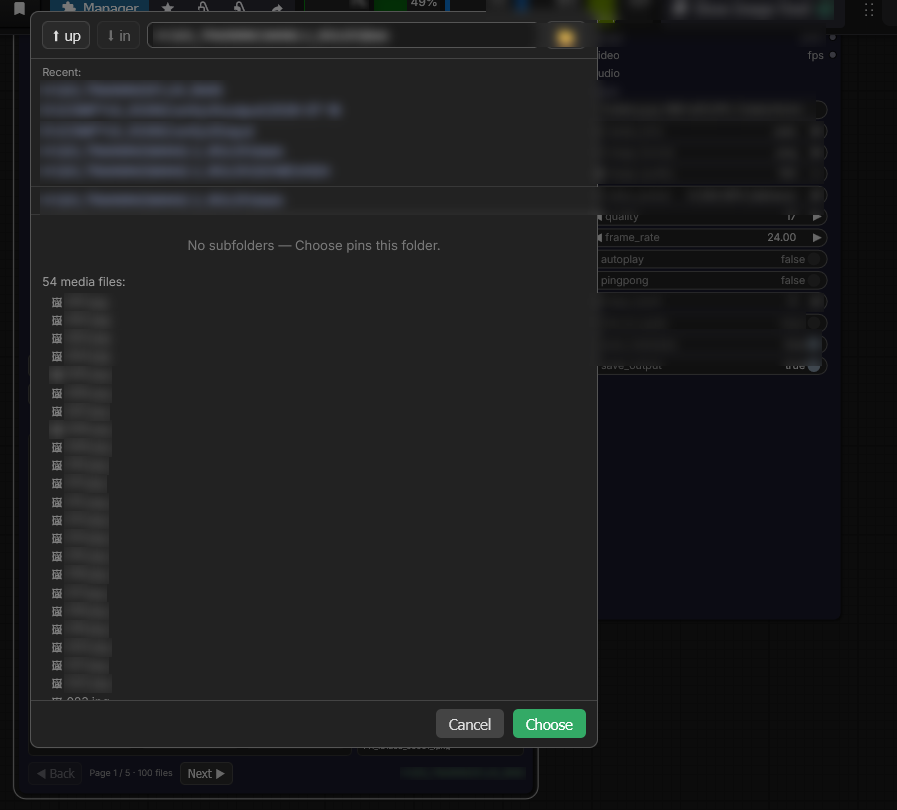
- Navigate with ⬆ up / ⬇ in, the subfolder list, or the recents.
- The picker peeks into the current folder: below the subfolders it lists the folder's own media files (count + sorted names with kind icons), so you can see what a pin would load before you commit.
- The address bar is live: type or paste a full path and hit Choose — the typed path is validated and pinned directly, no Enter-then-click detour. Unreadable paths say so and keep the picker open.
- The yellow folder button inside the picker opens the native Windows dialog — as a file dialog: you see the folder's contents like in Explorer, click any file inside your target folder, and that file's folder gets pinned and the file itself is selected and loaded right away. The dialog's OK is the confirmation; the pick applies immediately. (Windows cannot show files in its folder-pick mode — that's an OS limit, which is exactly why the dialog works file-first.)
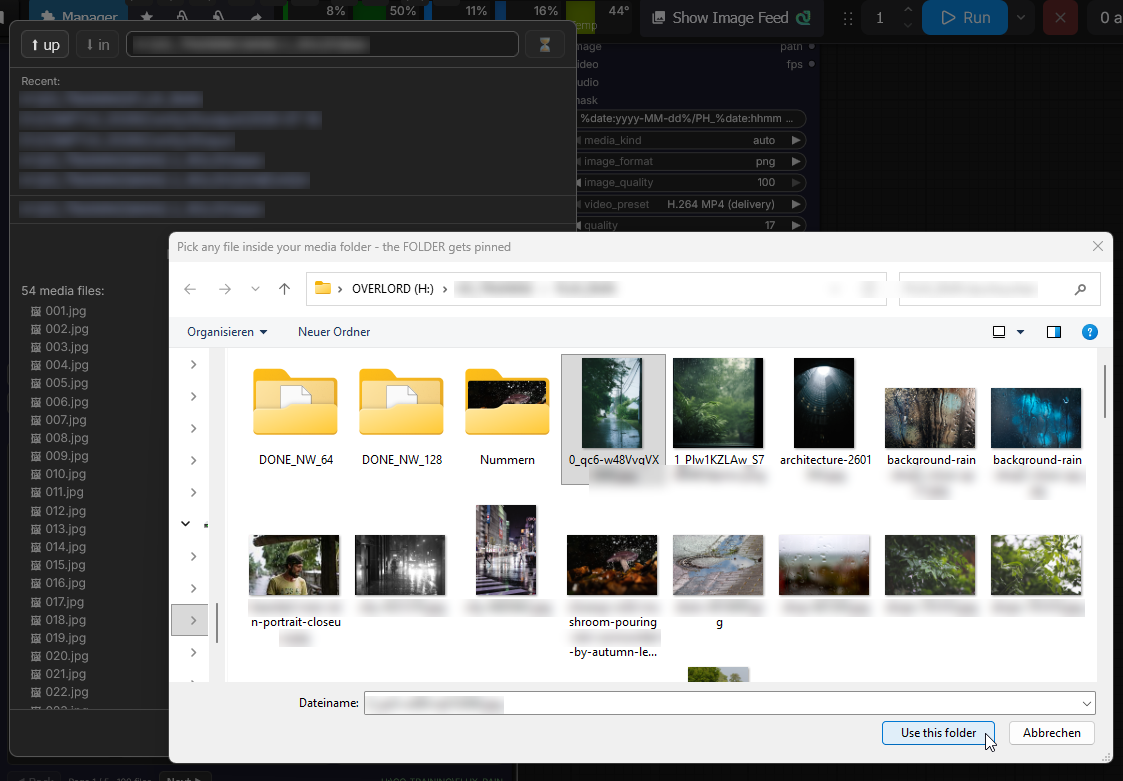
🔎 Browse Folder opens the large, filterable list view for visually hunting through long folders — see Live preview on hover in section 2.
Staying fresh
- ⟳ Re-read re-reads the pinned folder from disk — new files appear, your current page and checkmarks stay.
- Silent auto-refresh: when the ComfyUI window regains focus (a render finished, you copied files in from Explorer), the loader probes the folder in the background and re-renders only if something actually changed. No flicker, no clicks.
- ↻ Reset jumps back to the ComfyUI input folder.
Getting files in
- ⬆ Upload File uploads into the ComfyUI input folder.
- Drag & drop raises two drop zones over the node — aiming at one is the choice, nothing needs to be known or held down:
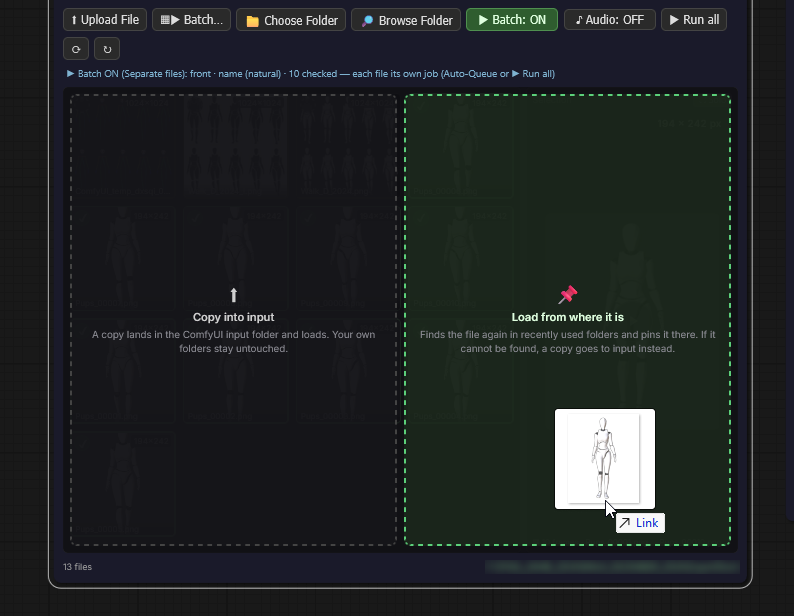
- ⬆ Copy into input (left): a copy lands in the ComfyUI input folder and loads. Your own folders are never written to.
- 📌 Load from where it is (right): selects the file and pins the
folder it already lives in — the whole folder appears in the grid,
nothing is copied. When the drag carries the file's path (a dropped
path text, a
file:///URI, or the desktop client) that path is used directly; otherwise the file is found again by name, size and timestamp in recently used folders. If it cannot be found, the folder picker opens instead (its 📁 button is the native dialog) — nothing is copied.
The zones exist only while a drag is in flight; the node gains no permanent buttons. The zone under the pointer lights up, so the aim is confirmed before release. A multi-file drop copies every file and loads the first — the status line names the count.
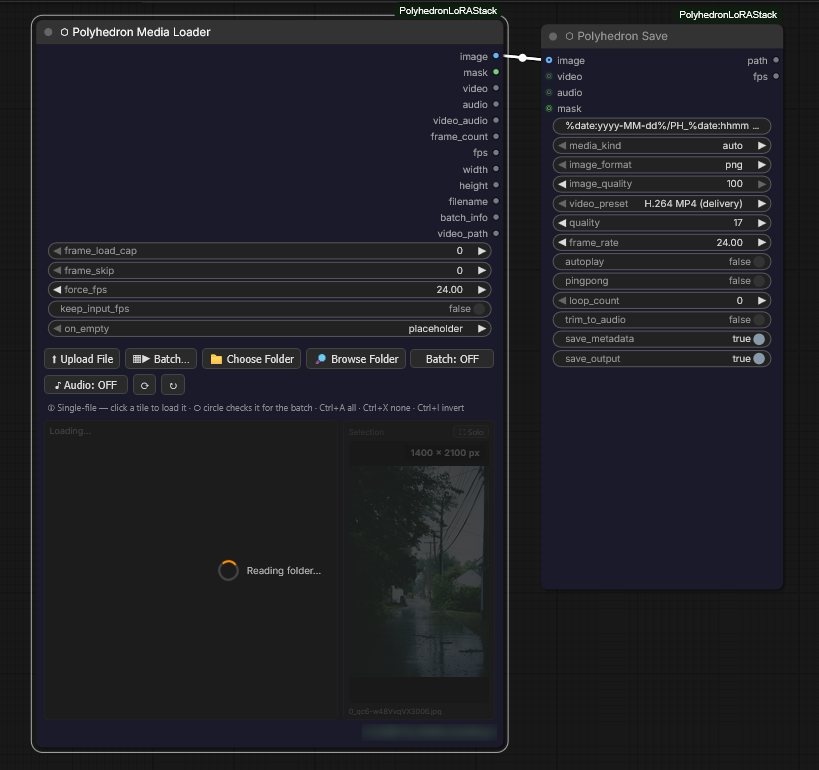
- A busy ring with a phase label ("Uploading…", "Reading folder…") covers the node while slow operations run — visible in every view, including Solo.
2. Selection & views
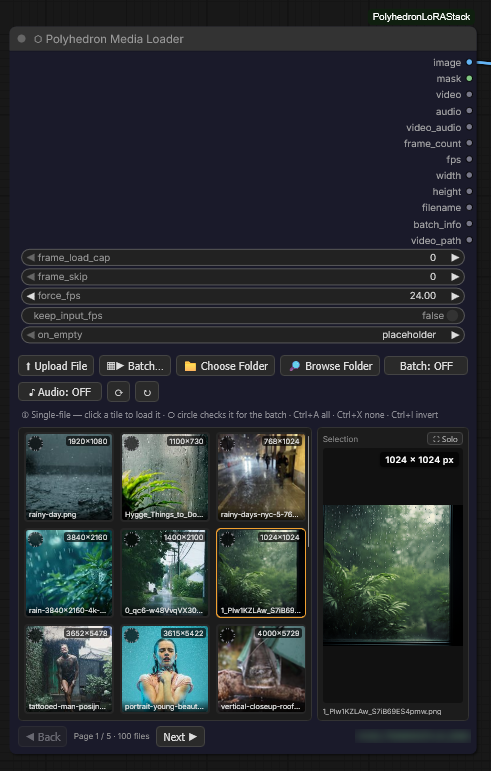
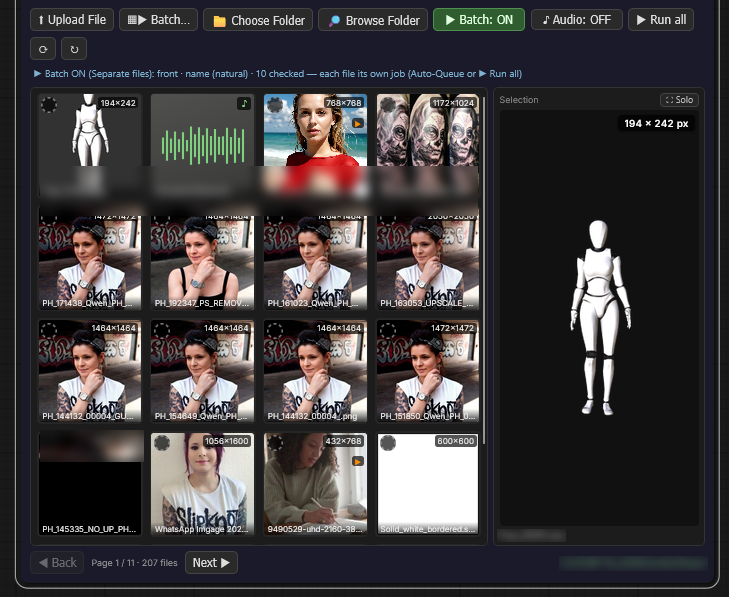
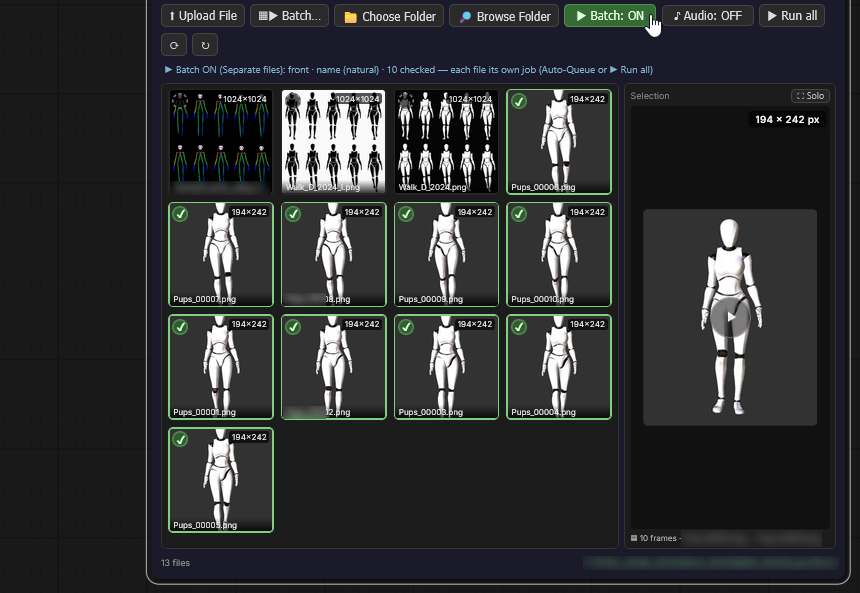
The lower half of the node is the tile grid: one thumbnail per media file in the pinned folder, each with a resolution badge (width × height), a kind icon and the file name. Large folders are split into pages — the pager at the bottom shows the current page and the total file count, ◀ Back / Next ▶ flip through.
Single-file mode
Click a tile and that file is loaded immediately — it becomes the node's output and appears in the Selection panel on the right, with a large preview, the pixel dimensions and the file name. This is the everyday mode: one file in, one file out.
Live preview on hover
Nothing has to be loaded to be judged — pointing at it is enough:
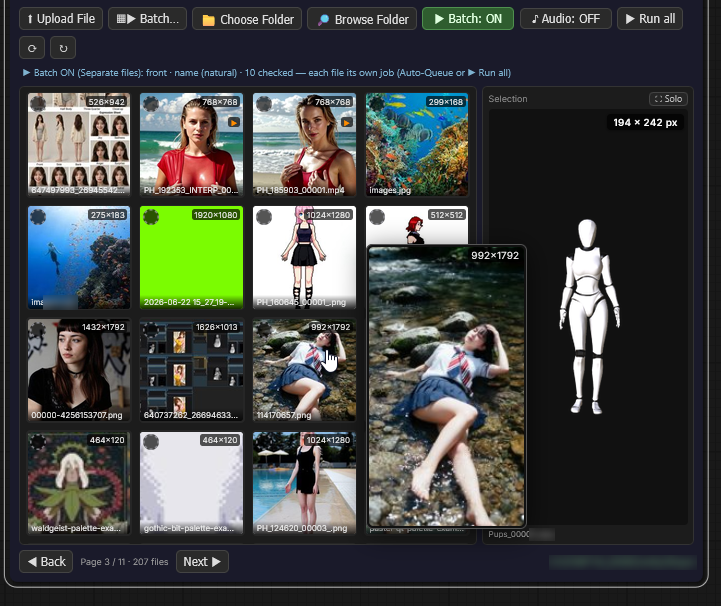
- Images pop a large preview over the node, with the pixel size as a badge. Move off the tile and it vanishes.
- Videos play right inside their tile — muted, looping, starting the moment the pointer arrives and stopping the moment it leaves. The ▶ badge marks them in the grid.
- Audio plays on hover — one clip at a time; a new hover, leaving the tile, or clicking anywhere stops the previous one. (The very first play on a fresh page may need one click first — that is the browser's autoplay policy, not the node.)
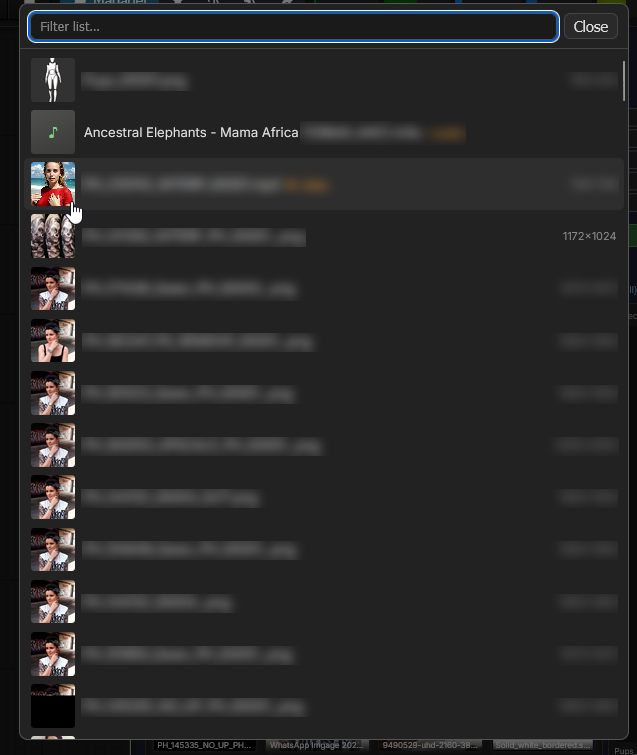
The same rules follow into 🔎 Browse Folder, the large list view for hunting through long folders: every row carries a thumbnail, name, kind tag and pixel size, the filter box narrows the list as you type, and hovering a row animates its video or plays its audio just like the grid.
Batch checkmarks
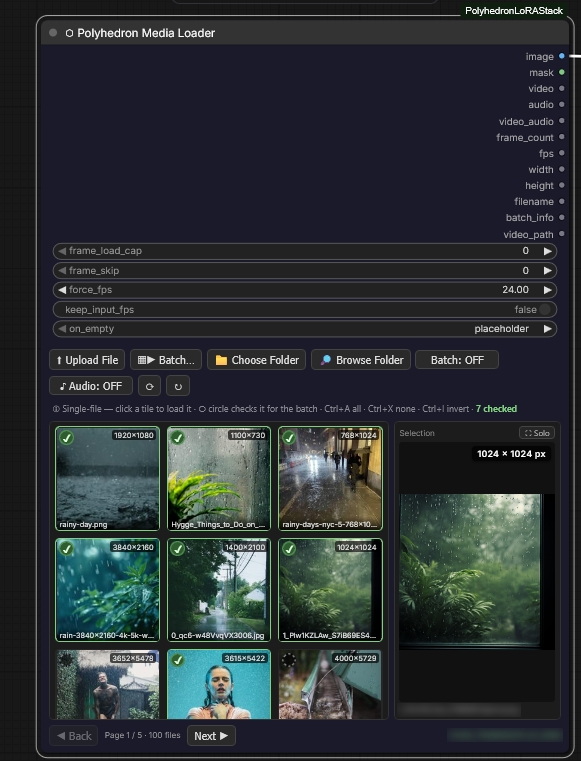
Every tile also carries a circle checkmark. Checking circles collects files for batch mode (see section 5) without changing the currently loaded file — the Selection panel stays where it was. The count is shown at the end of the hint line above the grid. Keyboard shortcuts work on the whole folder:
- Ctrl+A — check all
- Ctrl+X — uncheck all
- Ctrl+I — invert the checks
⛶ Solo view
⛶ Solo on the Selection panel hides the tile grid and lets the selection fill the whole node, like a plain load node — for judging a file properly before committing to it. The node size is remembered per mode, so you can keep Solo large and the tile view compact. The button turns into ⬛ Tiles to bring the grid back.
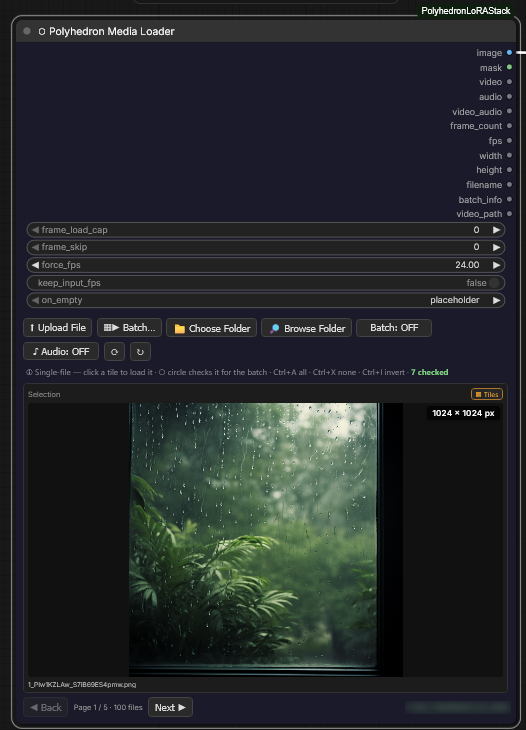
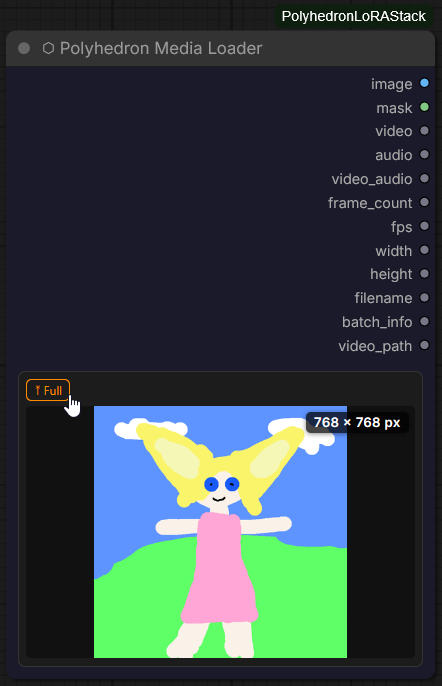
⤓ Mini — the ultra-short node
The button at the left of the Selection header folds the node down to the essentials. ⤓ Mini collapses it; the same button, now ⤒ Full, brings everything back.
Mini hides the button bar, the batch status line, the tile grid, the footer with its page controls and folder path, and — where they apply — the video trim strip, the caption line and the audio bar. What stays is the picture: the Selection preview keeps the whole width of the node, so a loader parked in a finished graph still shows what it is feeding downstream.
Five widgets travel with the fold — frame_load_cap, frame_skip,
force_fps, keep_input_fps and on_empty. They are hidden, not reset.
The node drops to its minimum height on the way in and returns to its previous height on the way out. The state is stored on the node itself, so it survives saving the workflow and is carried along when you copy the node. Mini is a display state and nothing else — nothing is disconnected, no value changes, and a run behaves exactly as it would with the node fully open.
3. Video
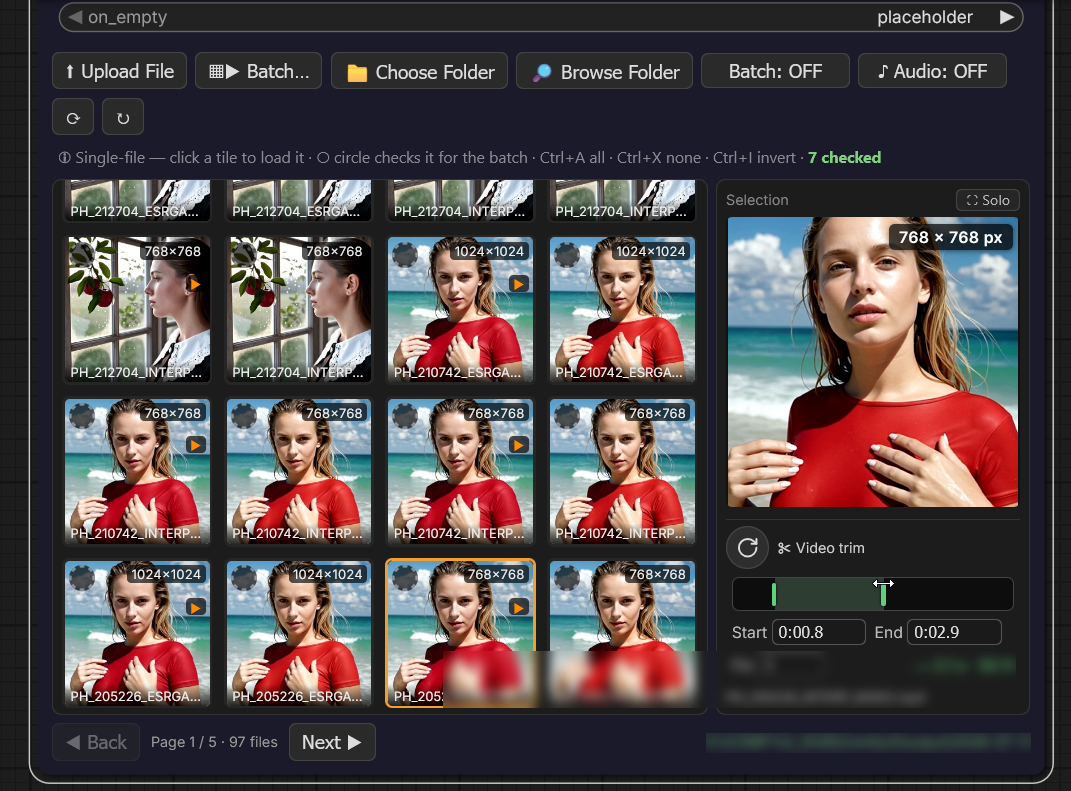
Pick a video tile and the Selection panel turns into a video preview
with a trim pane underneath. The video output carries the trimmed clip;
frame_count, fps, width and height describe what actually comes
out.
Trimming
The pane below the preview is headed ✂ Video trim:
- The track represents the whole clip. Drag the two handles to set the kept range — the kept zone stays lit, the trimmed-away parts dim out.
- Start and End are editable timecode fields (
0:00.8); typing and dragging drive each other, so you can dial an exact in-point and then nudge the out-point by hand. - The round button left of the label plays the selection on a loop, following the handles live while you drag them.
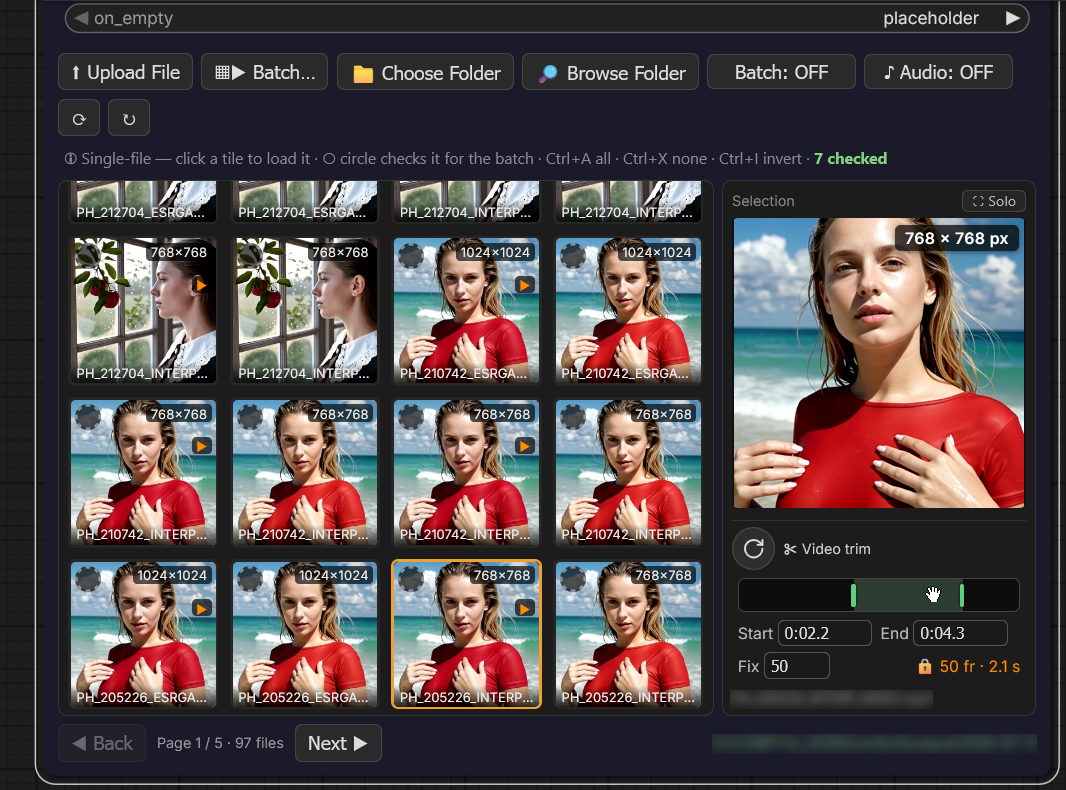
- The length readout on the right shows the kept range in both
currencies — seconds and frames (
-> 2.1 s · 50 fr).
Trim positions snap to real frame boundaries — the grid is 1/native fps, the very cut the backend makes, so the preview shows what the node hands on.
Fixed-length windows
Click the length readout and the window locks: the readout turns
amber and shows a padlock. From then on the length is the law —
dragging a handle or the kept zone slides the window through the clip
instead of resizing it, and the window always stays fully inside the
clip. The Fix field next to Start/End sets the locked length
numerically, in frames (fr). Click the readout again to unlock.
This is the tool for cutting many clips to the exact same length: pin a folder, click through the videos, slide the fixed window to the good part of each.
Frame knobs
Four widgets on the node body decide how the video reaches the graph:
| Widget | Effect |
| --- | --- |
| frame_load_cap | Video only: maximum number of frames to load. 0 = all (with a safety cap). |
| frame_skip | Video only: skip this many frames at the start. |
| force_fps | Output fps, default 24. 0 = the file's native fps. Sets the play rate — and the frame count when a still is expanded to the length of trimmed audio. |
| keep_input_fps | On: ignore force_fps and use the source's native fps (a still or sequence falls back to 24). Off: force_fps applies. |
When there is nothing to load
on_empty decides what happens when there is genuinely nothing to hand
on — no selection, an empty or empty-filtered folder, a file that
vanished from disk:
placeholder(default) emits a built-in placeholder frame, so a half-built graph keeps running.errorstops the run instead.
Misconfiguration and decode failures always error, in both settings.
4. Audio
Audio is a third media kind in the grid: audio files show up as tiles, are selectable and previewable, right next to images and videos.
Pairing
Clicking an audio tile pairs that file with your current visual and arms the ♪ Audio button. Audio is not an exclusive mode — the visual stays loaded, the audio rides along:
- ♪ Audio: ON reveals the audio companion pane in the Selection: the file name, the folder it came from, a waveform, a small transport (play button with the running time and a volume control) and the trim strip. An ✕ button drops the pairing. Turning it on jumps the grid to the audio's folder, where it shows marked — the visual selection is marked in orange, the audio selection in green, so you can see both slots at once. Audio tiles carry a waveform thumbnail and a ♪ badge, so a music folder reads at a glance.
- ♪ Audio: OFF sets the companion aside. The pairing is remembered, so you can hide it and bring it back without picking again.
- When the audio lives in a different folder than the one you are browsing, a 📁 button in the pane jumps the grid over to it.
- Selecting a video arms its own embedded track, labelled
· from videoin the pane. No separate file needed to keep a clip's sound.
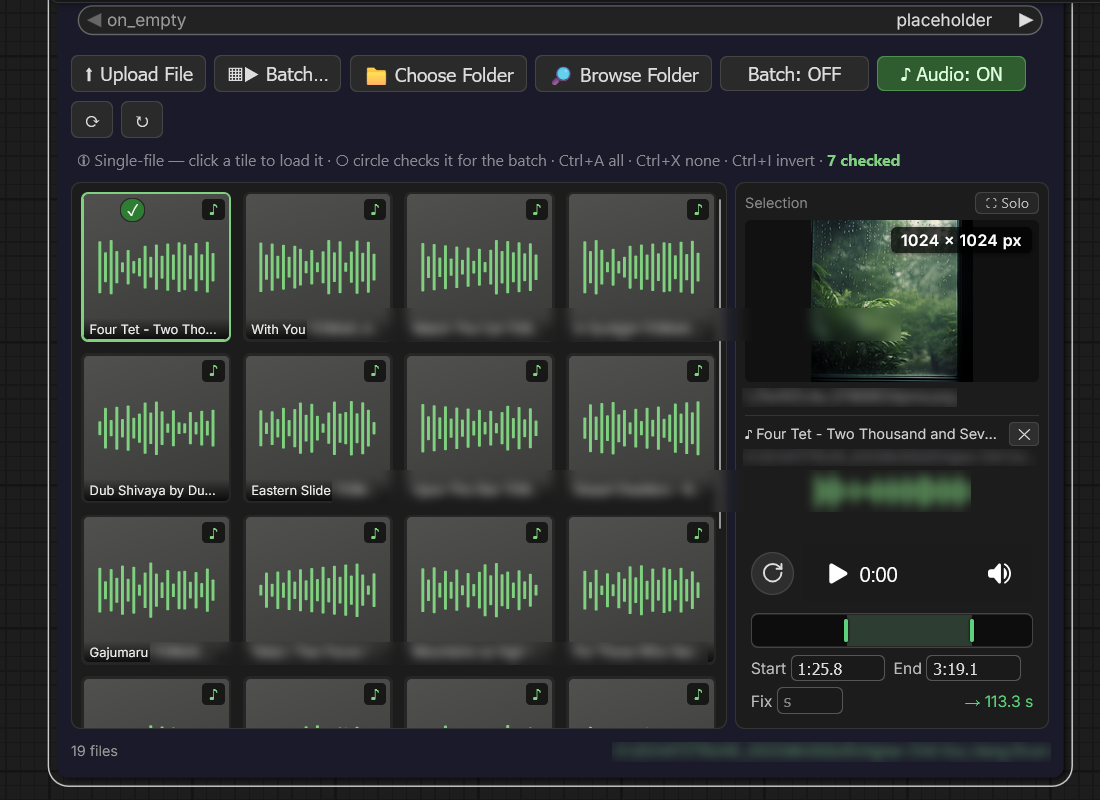
Trimming audio
The companion pane carries the same trim strip as the video pane: track, two handles, editable in/out fields, loop play and the length readout. Two differences:
- Audio snaps to tenths of a second instead of frame boundaries, and
its Fix field is in seconds (
s) where the video's is in frames (fr). - The fixed-length window works exactly as it does for video — click the readout to lock, then slide the window through the track.
Pair audio with a video and both panes stack under the preview: the video trim on top, the audio companion below, each with its own handles, fields and readout. Trimming one does not disturb the other.
The video and audio trim handles follow the same window rules, so a clip and its sound stay in agreement.
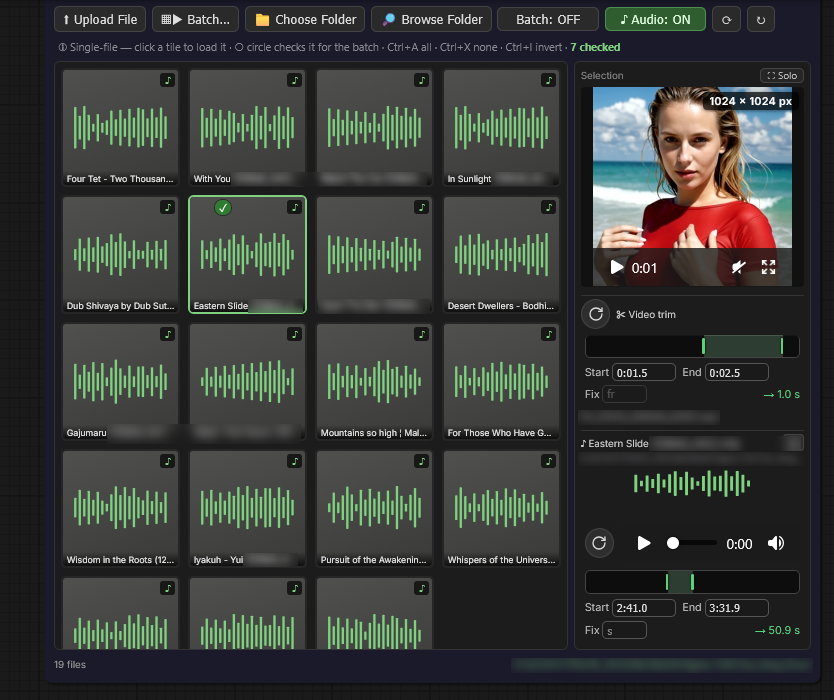
Who has the upper hand
When a visual and an audio are paired, one of them sets the length. The rule is not "whichever is shorter" — it depends on what the visual is:
| Pairing | Who wins | What happens |
| --- | --- | --- |
| Visual only, no audio | — | Nothing is re-timed. A still stays one frame, a video keeps its frames. |
| Still + audio | the audio | The audio is the law: the still expands into a real clip of the trimmed audio's length. force_fps sets the rate, and the audio is fitted to the exact frame count so the two end together. A very long track is cut at a hard frame cap — the console says so and asks you to trim shorter. |
| Video + audio | the video | The video is the law: its frames are kept untouched and the audio is capped or silence-padded to the video's duration. A short track is padded with silence to the end, a long one is cut. |
So a still bends to the sound, and sound bends to a real video. The picture never gets stretched or dropped to fit a track.
Which trim drives which output
The two trim panes are independent while you work, but they do not feed the outputs in the same way:
audioalways carries its own trim window — the one you set in the audio pane. It stays independent no matter what the video does.videocarries the video trim. When a video is trimmed, the clip is re-encoded from the sliced frames and takes the file's own sound track, cut to the same window, so it stays self-contained and in sync.video_audio(the muxed clip) follows the video trim as master: the paired audio is sliced to the same window the frames use and fitted to the trimmed duration. Your separate audio-trim handles do not shift the muxed clip out of sync. In every other case — still, untrimmed video, image batch — the muxed clip simply takes the trimmed paired audio.
Short version: the video trim is the master lever for the muxed clip, and the audio trim owns the standalone audio output.
What comes out
audiohands on the decoded, trimmed audio. Decoding goes through PyAV — the same path ComfyUI's own audio loader uses — so m4a, aac and opus work without backend gaps.video_audiohands on the visual's frames muxed with the paired audio: wire it into a video save node for an mp4 with a sound track. It isNonewhen nothing is paired.
An audio-only selection still emits a small placeholder frame on the
image output, so a graph that expects an image keeps running.
5. Batch
Batch mode answers two questions in order: which files run, and how they run.
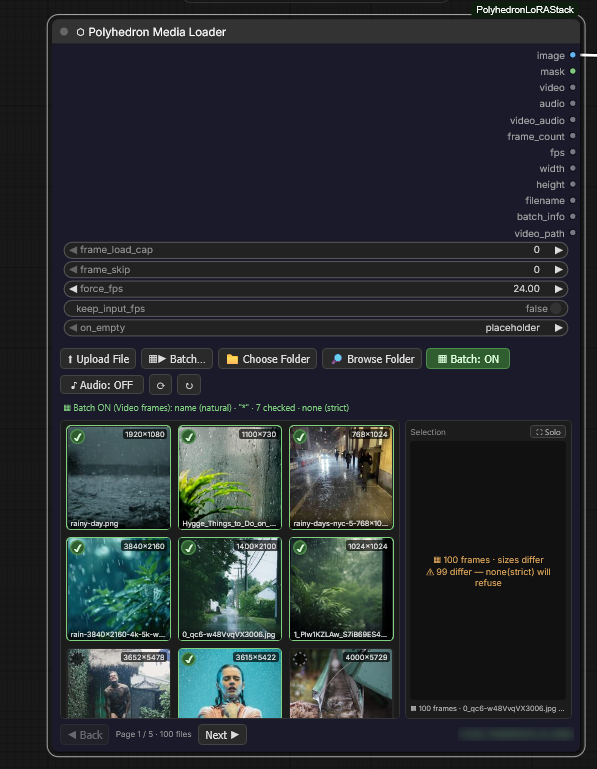
Which — the circle checkmarks from section 2. Checks are remembered in the workflow. How — the ▦▶ Batch… button opens the batch panel; Apply arms it, and the Batch button on the node turns it on and off afterwards without losing the checks. While it is armed, a status line above the grid spells the whole configuration out.
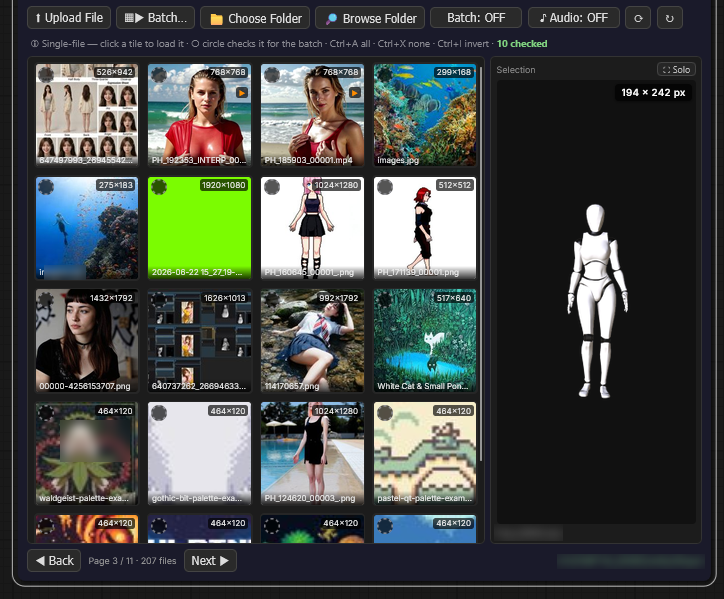
The batch remembers — even while you are somewhere else
The checked set and the source folder are not tied to what you are
currently browsing. You can turn the batch OFF, wander into a
completely different folder, load other files — the hint line keeps
showing the count (e.g. 10 checked) the whole time, because those
checks still exist and still belong to their source folder.
Click Batch: ON and the grid jumps straight back to the source folder, with the checked frames marked — you are looking at exactly what will run, no matter where you were a moment ago. Turning it off returns you to browsing without touching the checks.
So the mental model is: the checks live with their folder, not with your current view. The count in the hint line is a reminder that a prepared batch is waiting, and the Batch button is the way back to it.
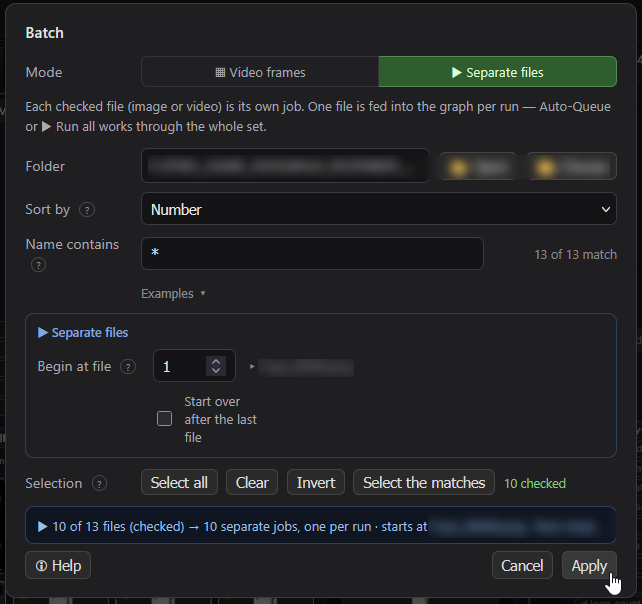
The two modes
| Mode | What it does | | --- | --- | | ▦ Video frames | The checked images are the frames of one video and load as a single batch, after a size check. | | ▶ Separate files | Each checked file — image or video — is its own job, fed in one per run. Auto-Queue or the ▶ Run all button sweeps through them. |
Picking the set
- Folder — the batch source, with buttons to open it in the file manager or choose a different one. This is a pin of its own: it does not follow the folder you are browsing in the grid. Point it at the folder you want to batch, or the panel keeps running on whatever it was set to last.
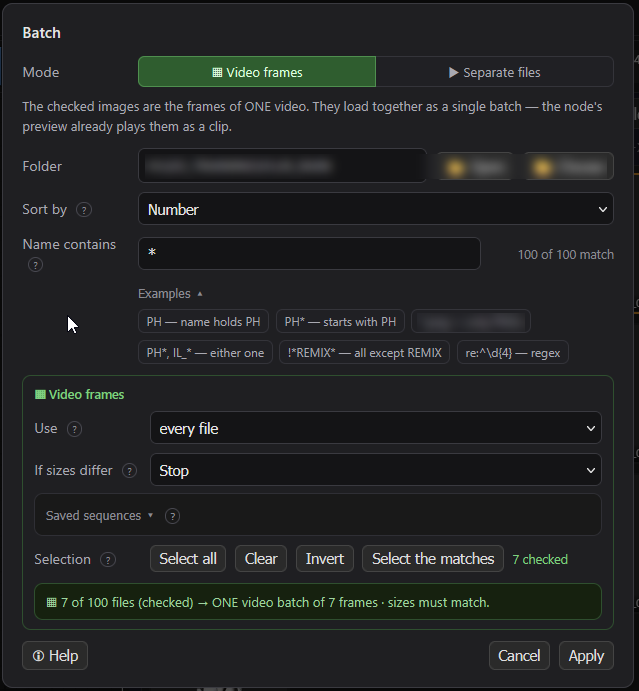
- Sort by — Number (natural order, so
img2comes beforeimg10), A–Z (literal character order), Date modified or Date created, oldest first. - Name contains — plain text matches any name holding it,
*means all files. The Examples row fills in the richer syntax:PH*(starts with),*.png(only PNGs),PH*, IL_*(either),!*REMIX*(exclude),re:^\d{4}(regex). Select the matches checks exactly the files the filter finds.
▦ Video frames options
- Use every Nth file — thin the batch out: every 2nd halves it, every 3rd thirds it, or set a custom N.
- If sizes differ — what to do with mismatched frames: Stop (refuses to run and names the odd one out), Stretch (resize everything to the first frame's size), Letterbox (pad with bars, nothing squashed) or Crop center.
- Saved sequences — build the current batch into a renumbered copy
under
output\PLS_sequencesand load it as the active batch. Your original files are never touched. Saved sequences can be re-loaded or deleted from the same row.
▶ Separate files options
- Begin at file — which file of the set goes first; Apply sends the cursor back to it.
- Start over after the last file — on, the cursor wraps around to the first file; off, it stays parked on the last one.
Running the set — one press vs. ▶ Run all
The part that is easy to misread: in Separate-files mode one queue press = one file. Each normal ComfyUI queue run feeds exactly the file under the cursor into the graph and then advances the cursor — pressing queue once and seeing a single output is the mode working as designed, not a stall.
To work through the whole set in one go, use ▶ Run all — the button
appears in the node's toolbar only while the batch is armed (Batch: ON).
One press queues every remaining file as its own run.

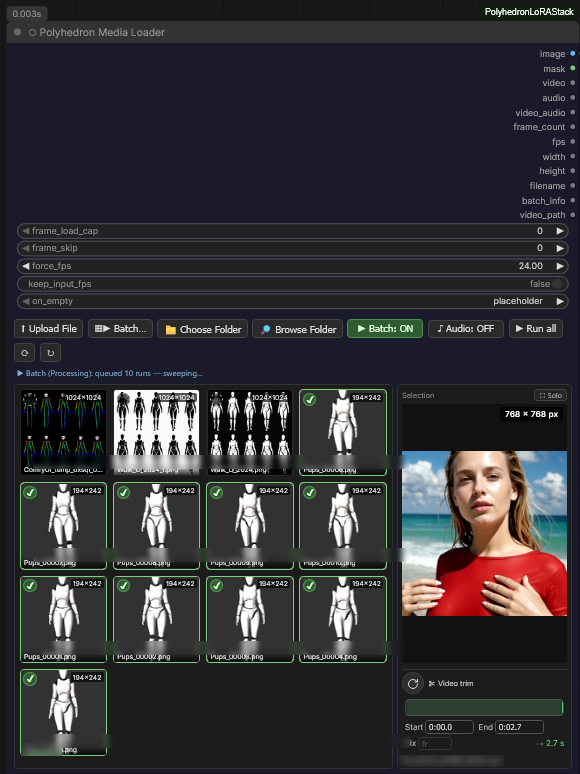
Note the difference between the two batch modes here: a Video frames batch is ONE clip and runs through ComfyUI's own Run/Queue button like any other graph execution — there is nothing extra to press on the node. The Separate-files sweep is not started from ComfyUI's Run button; it is started from the node's own ▶ Run all. While the sweep is going, the node's hint line counts along:
▶ Batch (Processing): queued 10 runs — sweeping…
That line is the confirmation that the set is actually being worked through. When the sweep finishes, the cursor parks after the last file — or wraps back to the first, if Start over is on.
What the graph sees
batch_infois a live counter for a wired text node:Batch 0023 / 1334per firing in Separate-files mode,Batch 1334 frames (one pass)for an image batch, andSingle: <name>outside batch mode.video_pathhands on the full path of the source file — the Batch Pipeline Source node consumes it. It is empty in modes without a single source file (image batch, sequence).
A synthesized image-batch video has no native frame rate. With
force_fps at 0 it falls back to 16 fps, matching the WAN
text-to-video convention this pack is built around.
6. Outputs & masks
The full pin table lives up front in At a glance — every output pin. This section covers the part that is genuinely this pack's own: the mask conventions and the round trip.
The mask rules
- Alpha convention (matching core LoadImage): opaque → 0, transparent → 1. A still with a real alpha channel carries it as the mask.
- A grayscale still IS a mask: a mode-L image without alpha carries its luminance as the mask, white → 1. That is deliberately the inverse reading — a saved mask is white-on-black, and this rule makes it survive the round trip (below).
- Video: a plain video gets a blank (all-zero) mask. An alpha-bearing video — VP9-alpha WEBM, ProRes 4444, transparent GIF — is decoded through PyAV so the alpha becomes a real per-frame mask; without PyAV the node says clearly what to install instead of failing obscurely.
The Save → Load round trip
The Save node closes the loop:
- Wire only a mask into Save and the mask itself is written as grayscale stills (mode L, white = mask on) — one file per batch entry, with the same naming, metadata and preview machinery as normal images.
- Load such a file back and the grayscale rule above turns it into the identical MASK again. What Save writes, the Loader reads back — masks included.
The two-loader idiom
Because a saved mask is just a file, guided background removal becomes a folder workflow: one loader carries the images, a second loader carries the masks (the grayscale stills Save wrote), and the removal node takes both. Edit a mask in any painting tool, drop it back into the mask folder, ⟳ re-read — the correction flows through without any in-graph mask surgery.
7. Polyhedron Save
One output node for stills, image sequences, videos (with muxed audio) and masks. It picks the writer from what is actually wired to it, embeds the workflow so the file can be dragged back into ComfyUI — and when it writes a clip it drops a still frame beside it as a control image, because an .mp4 cannot carry a workflow but a PNG can.
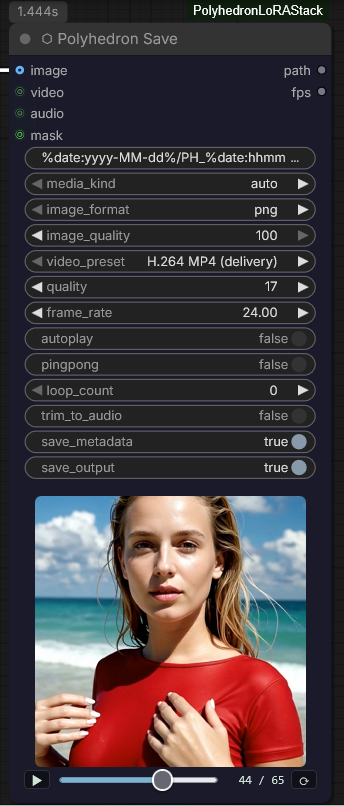
Inputs and outputs
| Pin | Direction | Carries |
| --- | --- | --- |
| image | in | Still(s) or video frames [N,H,W,3\|4]. |
| video | in | A native VIDEO — frames, audio and fps ride through. Takes the loader's video or video_audio output alike: a video_audio wire carries its trimmed companion track along, muxed into the written clip. |
| audio | in | Optional: muxed with image frames, or replaces a wired video's audio. |
| mask | in | Optional alpha [N,H,W] (opaque → 0) for png/webp stills and alpha-capable presets (ProRes 4444). Wired alone, the mask itself is saved as grayscale stills (section 6). |
| path | out | The full path of the written file. |
| fps | out | The rate the clip was written at. |
What gets written — media_kind
auto infers from the wiring: a VIDEO input → video; IMAGE +
audio (or an fps) → video; IMAGE alone → image; AUDIO alone →
audio; MASK alone → grayscale mask stills. Or force image /
video.
Naming files and folders — the token table
filename_prefix is a path, not just a name: every / creates a
subfolder under ComfyUI/output/, and tokens are expanded before the
path is built. All the pieces:
| Piece | Writes | Example |
| --- | --- | --- |
| plain text | itself | Polyhedron → Polyhedron_00001_.png |
| / | a subfolder level | renders/test → output/renders/test_00001_.png |
| %date:yyyy% | 4-digit year | 2026 |
| %date:yy% | 2-digit year | 26 |
| %date:MM% | month (01–12) | 07 |
| %date:dd% | day (01–31) | 19 |
| %date:hh% | hour (00–23) | 10 |
| %date:mm% | minute | 29 |
| %date:ss% | second | 36 |
| %width% / %height% | frame size in pixels | 1024 |
| %Node.widget% | another node's widget value (expanded by ComfyUI core) | %KSampler.seed% |
Date letters combine freely inside one token — %date:yyyy-MM-dd% gives
2026-07-19, %date:hhmm% gives 1029. Uppercase MM is the month,
lowercase mm the minute. A counter (_00001_) is always appended,
so files never overwrite each other.
Put together, patterns like these sort themselves:
| Pattern | Result |
| --- | --- |
| %date:yyyy-MM-dd%/PH_%date:hhmmss% | one folder per day, files stamped to the second: output/2026-07-19/PH_102936_00001_.png |
| runs/%width%x%height%/frame | grouped by resolution: output/runs/1024x1024/frame_00001_.png |
| %date:yyyy%/%date:MM%/clip | year/month tree: output/2026/07/clip_00001_.mp4 |
Illegal path characters are stripped per segment (a stray : can never
break the path on Windows), traversal segments (..) are dropped, and
an empty result falls back to Polyhedron.
Stills
image_format— png (lossless, embedded workflow, drag back to reload), webp (smaller;image_quality100 = lossless), jpg (no alpha).image_quality— webp/jpg only; png is always losslessly compressed.
Video presets
| Preset | Container | For |
| --- | --- | --- |
| H.264 MP4 (delivery) | .mp4 | Small, universal — ComfyUI's own tested writer. |
| H.265 MP4 (delivery, grain) | .mp4 | 10-bit HEVC, grain-tuned so particles and gradients are not smeared by HEVC's default in-loop filters. |
| ProRes 422 HQ (master) | .mov | 10-bit edit/archive master, intra (every frame a keyframe). |
| ProRes 4444 (master + alpha) | .mov | The alpha-capable master — the wired mask rides along. |
| FFV1 (lossless archive) | .mkv | Mathematically lossless, FLAC audio. |
| WebM VP9 | .webm | Web delivery, Opus audio. |
| Animated WebP / GIF | .webp / .gif | Loops; loop_count (0 = forever). |
The masters encode through bundled PyAV with a 16-bit intermediate, so
the diffusion float precision reaches the encoder — less banding.
quality is crf-style for the lossy presets (~17–20 is visually
lossless); ProRes/FFV1 ignore it.
The remaining levers
| Widget | Effect |
| --- | --- |
| frame_rate | fps when a video is built from an IMAGE batch; a wired VIDEO keeps its own rate. Convertible to an input — wire Interpolate's fps output here. |
| autoplay | In-node preview: off = first frame with play controls; on = plays automatically, muted. |
| pingpong | Appends the reversed frames for a seamless boomerang loop. |
| loop_count | GIF / animated-WebP loops, 0 = forever. |
| trim_to_audio | Cuts the longer of clip and audio so both end together. |
| save_metadata | Embeds workflow + prompt (PNG text / MP4 metadata). |
| save_output | On: write to ComfyUI/output/. Off: temp dir — preview only, keeps output/ clean while iterating. |
⬡ Polyhedron LoRA Stack
Group-aware LoRA management for ComfyUI — built for workflows that run 10–25 LoRAs at once.
Most LoRA loaders are fine for two or three LoRAs. Stack fifteen and you get the familiar multi-LoRA interference: washed-out detail, concepts cancelling each other, no way to see what is even active. Polyhedron LoRA Stack treats a big LoRA stack like a total-conversion mod for your model — organised in semantic groups, applied in a defined order, with per-group merge modes and two cleanup switches that fight that interference directly.
Model-agnostic backend: WAN 2.1 / 2.2, FLUX, SDXL, SD 1.5 — no model-specific assumptions.
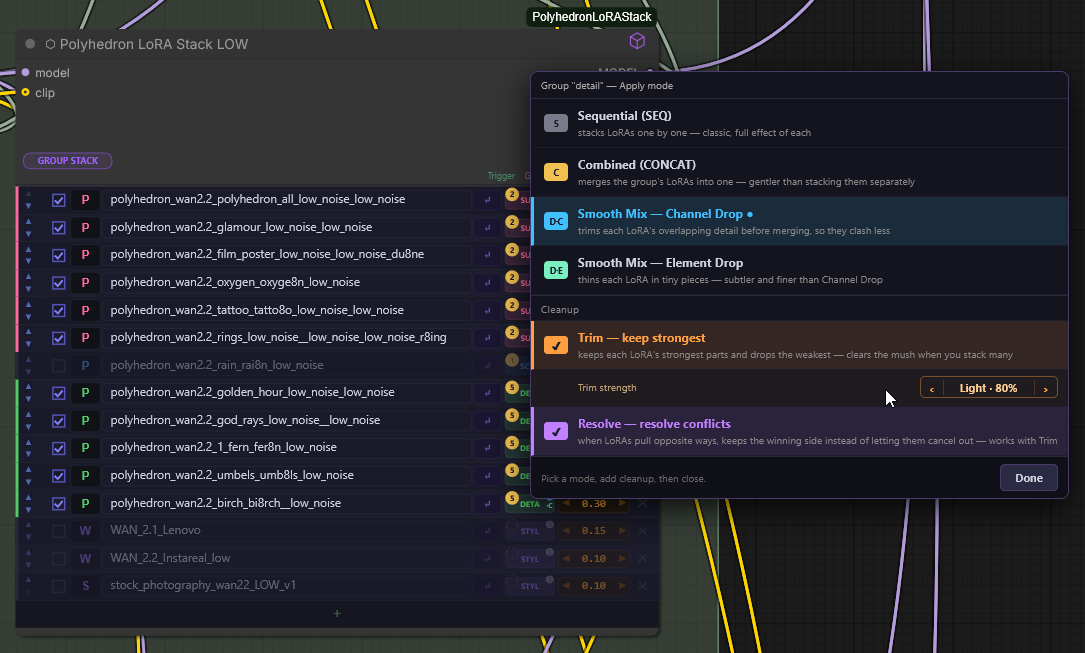
Highlights
- Group system —
acc → style → scene → motion → subject → detail → custom, applied broad-to-specific, with optional per-group ordering - Per-group merge modes — Sequential (SEQ), Combined (CONCAT), Smooth Mix (DARE) with Channel-Drop and Element-Drop variants; deterministic seeds, reproducible runs
- Cleanup switches: Trim & Resolve — magnitude-based channel pruning and TIES sign-election against multi-LoRA interference (see below)
- ⬡ Merge Analyzer — a passive node that shows what is actually being merged and measures the Resolve repack fidelity (energy, cosine, amplitude)
- Thumbnails & previews — hover popups with image/video, Civitai hash-based fetch (SFW-strict), editable metadata
- Trigger-word management — read from
.uls-meta.json,.txtor the safetensors header, one-click insert into your prompt node - Quality-of-life — Token Counter for WAN's 512-token limit, trigger Inspector, central Model Switch, dual HIGH/LOW workflow support, fast cancel via ComfyUI's red ✕
- Persistent settings — group assignments, modes and cleanup toggles are serialized into the workflow and survive reloads and full ComfyUI restarts
The nodes
| Node | Purpose | |---|---| | ⬡ Polyhedron LoRA Stack | Main node: group-organised LoRA rows, per-group merge modes, cleanup switches | | ⬡ Polyhedron LoRA Engine | Companion for acceleration LoRAs (Lightning, FusionX, CausVid, LightX2V) — flat list, one global mode | | ⬡ Polyhedron Merge Analyzer | Passive: live overview of the configured merge + Resolve fidelity measurement | | ⬡ Polyhedron LoRA Inspector | Passive: checks the trigger words of all active LoRAs against your prompt | | ⬡ Polyhedron Token Counter | UMT5-XXL token estimate vs. WAN's hard 512-token limit, with actionable report | | ⬡ Polyhedron Select Model Switch | Central model selector (6 slots), docks onto any COMBO loader input | | ⬡ Polyhedron Wan Bridge (→ / ←) | Type bridges MODEL ↔ WANVIDEOMODEL for kijai's WanVideoWrapper | | ⬡ Polyhedron Wan Frame Inflate / Pick Frame | Workaround for kijai issue #1827 (T2I LoRAs without effect) | | ⬡ Polyhedron Sigma Curve / Dual Sigma Curve | Model-agnostic SIGMAS generators; Dual = HIGH/LOW split with exact handoff. The node draws its curve, computed by the same code the run uses. | | ⬡ Polyhedron Sigma List | An explicit SIGMAS grid -- a trained schedule from a preset, or your own list -- with shift and terminal zero; the node draws the grid the run will use and shows a typo as the run's own refusal. | | ⬡ Polyhedron Noise Schedule | Deprecated original sigma node, kept for backwards compatibility |
Merge modes (per group)
- Sequential (SEQ) — classic stacking via ComfyUI's native cached loader. Default, always works.
- Combined (CONCAT) — rank concatenation; mathematically identical to SEQ, gentler float path.
- Smooth Mix (DARE) — CONCAT plus a Bernoulli mask. Channel Drop removes whole rank channels (LoRA-aware), Element Drop removes single tensor elements (classic DARE paper). Density auto-scales with group size; the seed is derived deterministically from LoRA names and weights, so the same workflow always produces the same merge.
Cleanup switches — Trim & Resolve
Two independent modifiers on top of CONCAT/DARE (greyed out under SEQ, where they cannot apply):
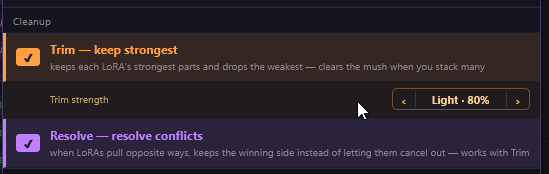
- Trim — keep strongest. Deterministically drops each LoRA's weakest rank channels
(by contribution magnitude) before merging. This is the direct counter to the
"many quiet LoRAs → grey fog" effect. Strength is adjustable per group
(
Auto · Gentle 90% · Light 80% · Medium 70% · Strong 60% · Max 50%). - Resolve — resolve conflicts. TIES sign-election across competing LoRAs: per weight, the majority direction wins and only agreeing LoRAs are averaged, then the result is repacked to low-rank via truncated SVD so it hits the same hand-off path.
Recommended Trim working range: 70–80 % (Medium/Light).
Max · 50%cuts into the mid/quiet rank channels where a concept's distinguishing features live — the known failure mode is concept → silhouette, with the base model filling the gap with its own prior. Use Max only on extreme stacks (15+) and check the output visually. The Merge Analyzer warns about this in its report when Trim is active.
All toggle states and the Trim strength persist: they are saved into the workflow and restored after reload and full ComfyUI restarts.
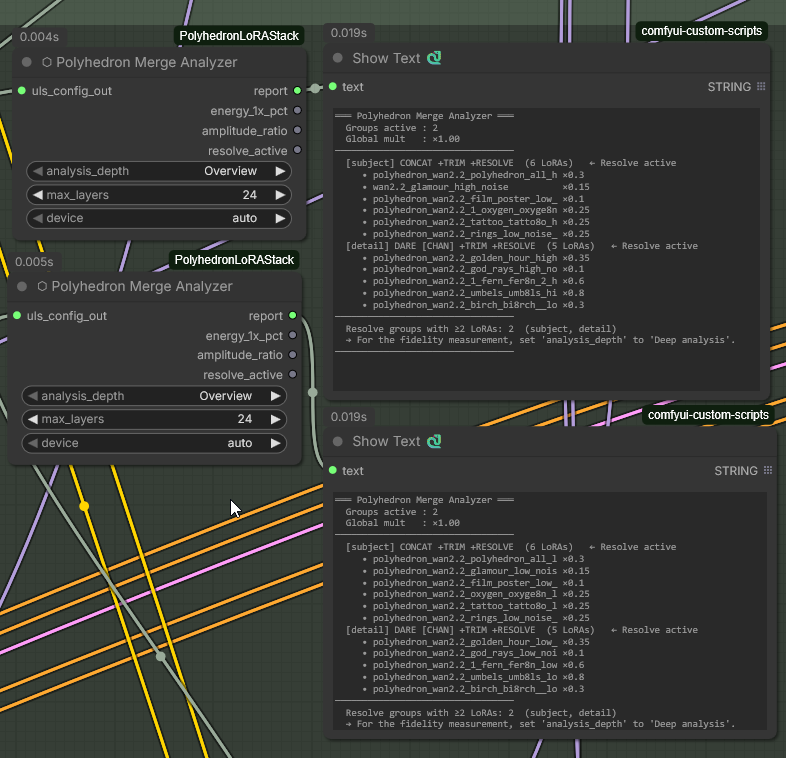
⬡ Merge Analyzer
A passive measurement node — connect uls_config_out, no model patching. Overview is
instant (groups, LoRAs, weights, modes, cleanup status); Deep analysis loads the LoRAs
and measures the Resolve repack per layer (energy at 1×/2×/4× rank, cosine, amplitude ratio),
with live progress in the console. Use one Analyzer per Stack (HIGH + LOW).
Per-row CLIP strength
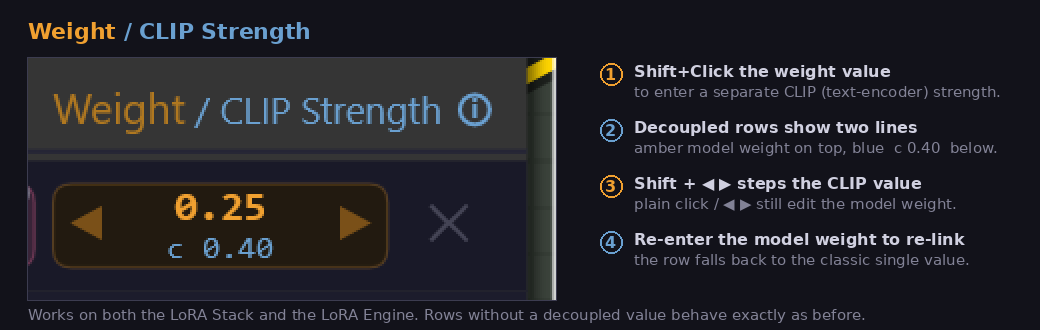
By default a row's CLIP (text-encoder) strength follows its model weight — exactly as before. To decouple them:
- Shift-click the weight value and enter a separate CLIP strength.
- The cell switches to two lines: the amber model weight on top, the blue
CLIP strength (
c 0.40) below. - Shift + ◀ ▶ steps the CLIP strength; a plain click / ◀ ▶ still edits the model weight.
- Entering the model weight again re-links the row to the classic single value.
Hover the Weight / CLIP Strength column header for an in-node reminder.
This works identically on the LoRA Stack and the LoRA Engine. Only relevant for models whose LoRAs carry text-encoder keys (SDXL,
SD 1.5, …) — WAN LoRAs have none, so WAN workflows are unaffected. In merged
modes (CONCAT/DARE) the text-encoder layers are scaled with the CLIP strength
inside the same one-pass merge; DARE/RESOLVE seeds stay derived from the model
weights, so existing results are bit-identical until you actually decouple a
row.
Compatibility
Renderer: every node in this package works under both of ComfyUI's renderers — the classic LiteGraph canvas and the Vue renderer ("Modern Node Design" / Nodes 2.0, on by default in new Desktop and Cloud installs since frontend 1.41). The Stack, Engine, CLIP Text Encode, Filter, Int and the three Load nodes carry a dedicated Nodes 2.0 view that mirrors the painted node (group colours, Apply pill, order arrows, trigger words, word band, status line); the painted preview surfaces (Sampler live preview, Seed noise field, Power Upscale process view) render there too. Nodes 2.0 lays widgets out taller than LiteGraph (about 4 px per row, 28 px per pin row), so a workflow saved for the classic canvas can overlap slightly under Nodes 2.0 — nothing is lost, only the boxes are larger. If you prefer the denser classic look, disable Modern Node Design in Settings; nothing in this package depends on either renderer, and a workflow saved under one opens unchanged under the other.
Installation
ComfyUI-Manager (recommended): open the Manager, search for "Polyhedron Suite"
(the package id stays polyhedron-lora-stack, so an existing install updates in
place) and install. Missing-node detection in shared workflows resolves through the
Comfy Registry entry as well.
comfy-cli:
comfy node install polyhedron-lora-stack
Manual:
cd ComfyUI/custom_nodes
git clone https://github.com/PolyhedronAI/ComfyUI-PolyhedronLoRAStack.git
# Restart ComfyUI
Dependencies: none. The nodes run on what ComfyUI already ships. OpenCV adds video
thumbnails in the Media Loader where it is present; the Cine Timeline uses ffmpeg (on the
PATH, or the one imageio-ffmpeg brings).
Dual-noise workflow pattern (WAN 2.2)
Use two Stack nodes side by side — one per noise path — and configure both identically:
[UNet HIGH] → [Engine HIGH] → [Stack HIGH] → [Sampler HIGH]
[UNet LOW]  → [Engine LOW]  → [Stack LOW]  → [Sampler LOW]
The same single-line pattern works for FLUX, SDXL and SD 1.5.
Example workflows
Eleven ready-to-load starter workflows ship in
example_workflows/ and appear in ComfyUI's template
browser (Workflow → Browse Templates) under this pack's name once it is
installed:
| Template | Sampler path | Accelerator engine |
|---|---|---|
| polyhedron_lora_stack_ksampler_base | native KSampler (Advanced), dual HIGH/LOW | off |
| polyhedron_lora_stack_ksampler_lightning | native KSampler (Advanced), dual HIGH/LOW | Wan2.2-Lightning v1.1, 8-step preset (4/4 split, CFG 1, shift 5) |
| polyhedron_lora_stack_wanvideo_base | WanVideoWrapper (kijai), dual HIGH/LOW | off |
| polyhedron_lora_stack_wanvideo_accelerator | WanVideoWrapper (kijai), dual HIGH/LOW | on |
| polyhedron_minimax_h3_fox_t2v | Cine Timeline, text only, three shots, one run | as the fox below; Universal Neutral upscale, interpolation with the timeline's cuts |
| polyhedron_minimax_h3_fox_refs | Cine Timeline + MiniMax Reference, three pictures as @image_1..3 | as above (ref2va) |
| polyhedron_minimax_h3_fox_keyframes | Cine Timeline + MiniMax Keyframes, a first frame and two guides through MiniMax Continue | as above |
| polyhedron_minimax_h3_fox_continue | Cine Timeline, two scenes in one press; scene 2 continues scene 1 (motion carry) | as above |
| polyhedron_minimax_h3_fox_continue_refs | as CONTINUE, with three reference pictures in both scenes (ref2va) | as above |
| polyhedron_minimax_h3_flf_sitdown | Cine Timeline + MiniMax Keyframes, a first and a last frame, plus pose, depth and canny from one video blended to one control (Control Fit → Control Map → Blend → Apply Control), Transition Check | as the fox |
| polyhedron_minimax_h3_text_to_video | Cine Timeline → Polyhedron Sampler, MiniMax H3 (video and audio), upscale and interpolation branches | H3 fl2v turbo 8-step + HyperFlow 8-step on, with the matching Sigma List preset |
Compact WAN 2.2 dual-noise graphs built around the Stack: a grouped canvas
(models → HIGH/LOW LoRA lanes → prompts → sampling → output, passive
diagnostics below), neutral prompts, fixed seeds. Stack and Engine rows ship
as disabled examples with showcase group modes pre-set — point them at
your local files or add your own. External packs needed: ComfyUI-KJNodes and
ComfyUI-Custom-Scripts (text display); the wanvideo variants additionally
need ComfyUI-WanVideoWrapper (use Manager → Install Missing Custom Nodes
after loading). The native variants load fp8 checkpoints through the core
UNETLoader — GGUF users swap in their GGUF loader. The wanvideo variants
point at GGUF Q8 files; the kijai #1827 single-frame workaround is
documented in-canvas (Frame Inflate ships bypassed for the GGUF default).
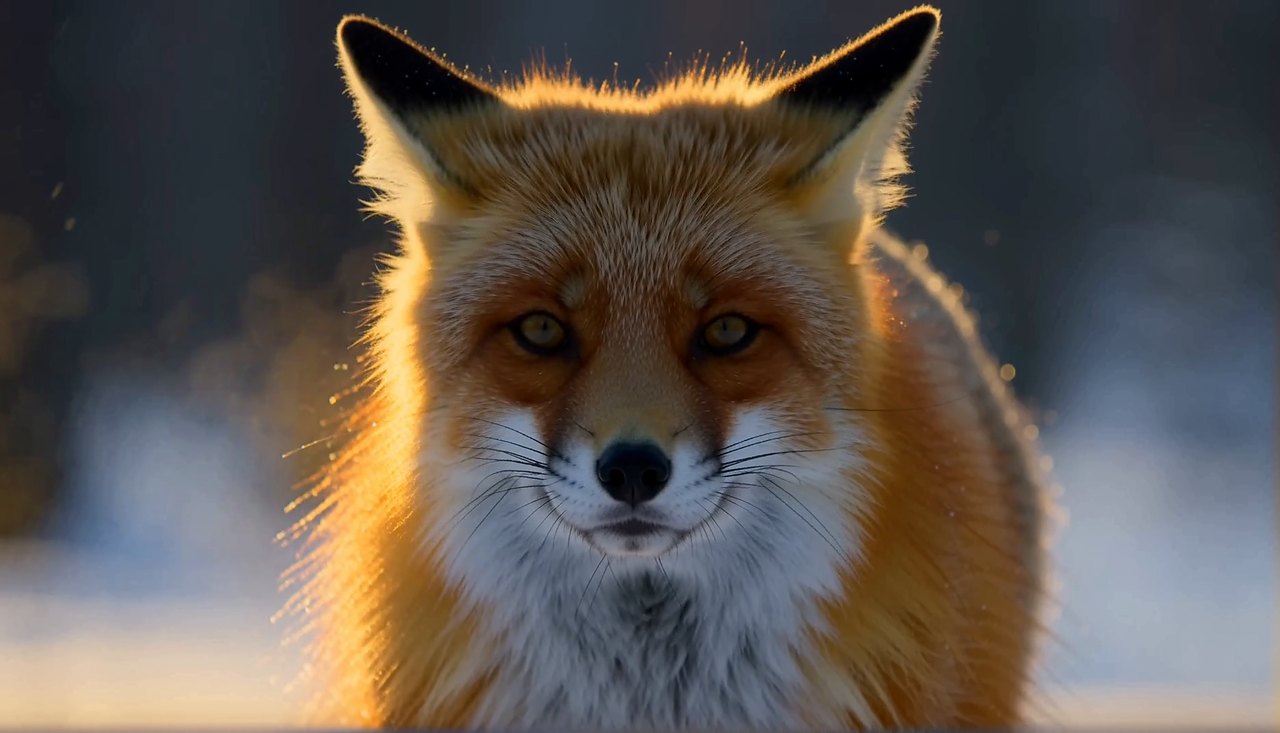
polyhedron_minimax_h3_text_to_video — the fox — is the odd one out, and
deliberately so: it is built only from this pack, no other node pack at
all, and it is a complete H3 film workflow rather than a minimal graph. A red
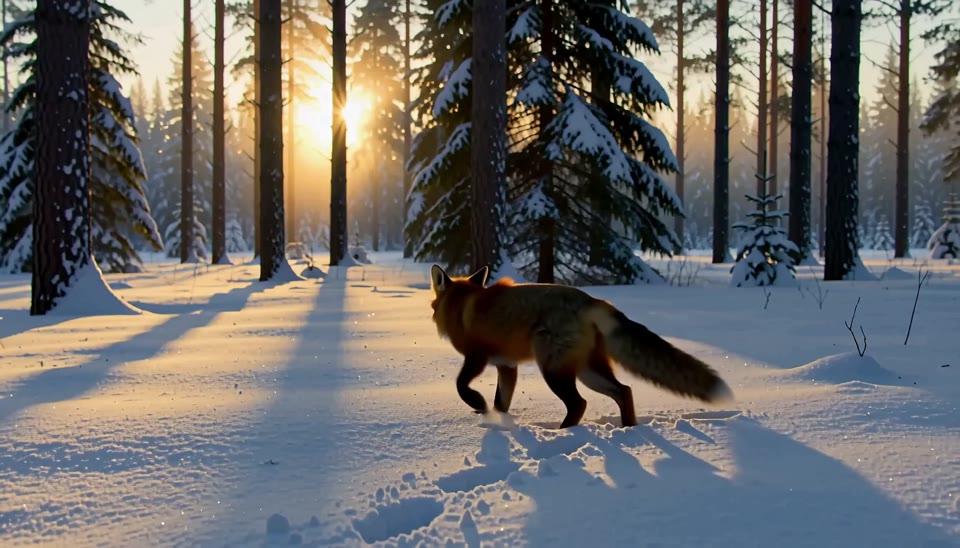
fox in a snowy forest clearing at golden hour, three shots in 5.875 s (wide
shot, close-up, the fox trotting off), with its soundscape. This is what the
template renders, as it ships, in one run (click for the film, picture and
sound; drop the .mp4 on the canvas and the workflow loads from it):
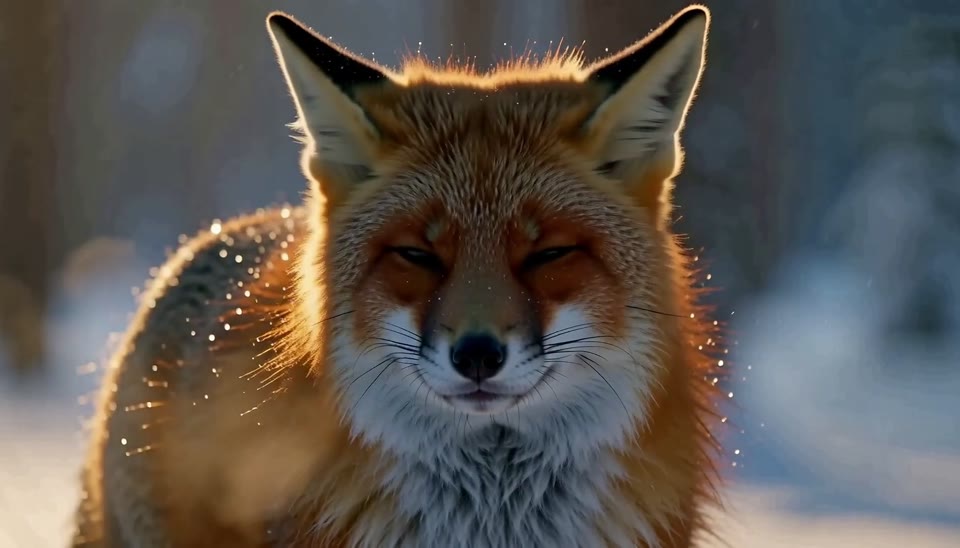
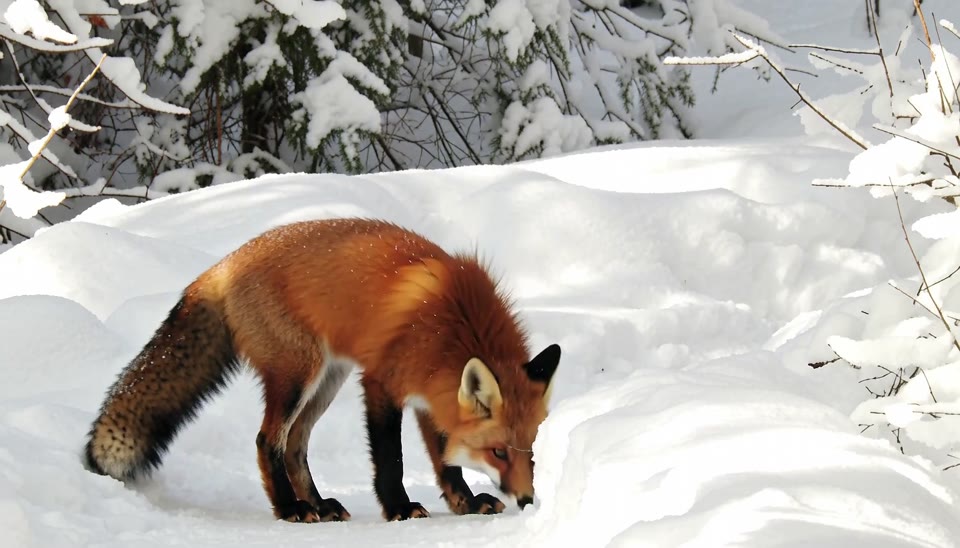
The five Cine Timeline templates from the table above, each as it rendered in
one run (click a picture for the clip with sound; every clip carries its
template, so dropping the .mp4 on the canvas loads the workflow):
| T2V | REFS | KEYFRAMES |
|---|---|---|
|  |
|  |
|  |
| CONTINUE (the film, both scenes) | CONTINUE_REFS (scene 2) | |
|
|
| CONTINUE (the film, both scenes) | CONTINUE_REFS (scene 2) | |
|  |
|  | |
| |
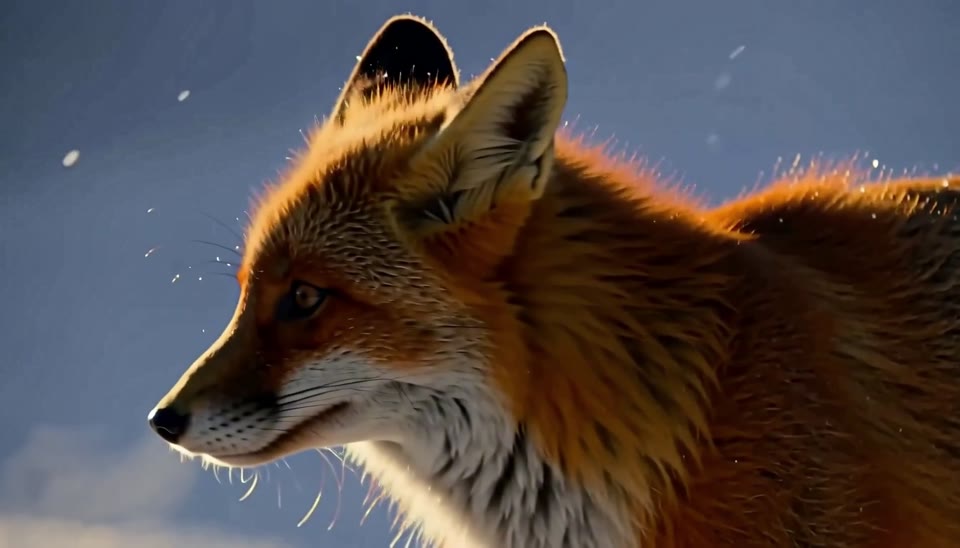
Reference photos used by REFS, KEYFRAMES and CONTINUE_REFS (Wikimedia Commons):
"Vulpes vulpes ssp fulvus 26568101" by Joanne Redwood (CC0); "Vulpes Vulpes,
Island Beach State Park, NJ 04" by peggycadigan (CC BY 2.0); "Vulpes vulpes
(32846612491)" by xulescu_g (CC BY-SA 2.0). The photos are not shipped; links
and licences in docs/third_party/fox_reference_photos.md.
First → last frame: she sits down — polyhedron_minimax_h3_flf_sitdown. A first
frame (she stands in front of the chair) and a last frame (she has sat down), one shot
of 4.46 s; the way between them follows a real one: pose, depth and canny drawn from
the same video, blended to one control. Everything it loads ships in
assets/flf_sitdown/ — the two keyframes, the pose video
(the sit-down at real speed) and the original clip it was cut from. Copy the three
files the in-canvas note names into your input folder. In the middle: this
template's run as it ships, upscaled and interpolated to 48 fps (click for the clip;
it carries the template).
| First frame (flf_A_stand.png) | The run (click for the clip) | Last frame (flf_B_sit.png) |
|:---:|:---:|:---:|
| <img src="assets/flf_sitdown_first.jpg" width="260" alt="First frame: she stands in front of the chair"> | <a href="assets/flf_sitdown_run.mp4"><img src="assets/flf_sitdown_run.jpg" width="260" alt="A frame of the run: she is sitting down"></a> | <img src="assets/flf_sitdown_last.jpg" width="260" alt="Last frame: she has sat down"> |
Source: Pexels video 11066122 (pexels.com/video/11066122),
Pexels licence; details in docs/third_party/flf_sitdown_media.md.
- ⓪ Cine Timeline holds the film. The fixed parts of the prompt sit in the
CLIP Text Encode (segment 1: triggers, look, scene, light; segment 2: subject,
mood); the timeline carries
{pos_1}{pos_2}and the camera and motion of each shot (external_mode = fill {pos_N}). Itssecondsdrive the Empty Latent, itsclip_prefixthe interpolated Save — every run lands in today's folder and on the timeline's tracks. - ① – ⑦ Load Model (three H3 slots; slot 2, the fl2va checkpoint, is the text-to-video path) → Load CLIP (qwen3vl, type minimax) → two VAEs (H3 writes picture and sound) → LoRA Engine (fl2v turbo 8-step + HyperFlow 8-step) → LoRA Stack (ships empty — add your own) → Attention → MiniMax Reference (no pictures wired = text to video; wire the two bypassed Media Loaders and pick the ref2va slot for image-to-video) → Sampler on the Sigma List's HyperFlow grid → VAE decode → Filter (bypassed, ready for a grade) → Save.
- Switches pick the branches: no upscale or a Power Upscale (two ESRGAN models), an old clip from a Media Loader instead of the new render, and RIFE interpolation with its own Save and Filter.
- Token Counter and LoRA Inspector show what the run sends; the Merge Analyzer sits beside them, bypassed until you want it.
H3 runs at CFG 1, so the negative prompt is a kept list, not a lever — the in-canvas note says why, and why this template has no NAG node.
Preview images and trigger words
Place files alongside your .safetensors:
| File | Purpose | Notes |
|---|---|---|
| mylora.jpg / mylora.preview.png/.mp4/.gif | Preview | Shown as thumbnail / hover popup |
| mylora.txt | Trigger words | One per line or comma-separated. Read-only. |
| mylora.uls-meta.json | Editable metadata | Created automatically when editing in the UI |
Trigger-word resolution priority:
.uls-meta.json (user-curated) → .txt → safetensors header → filename fallback.
"Fetch from Civitai" reads the sshs_model_hash from the safetensors header and pulls the
preview image and trigger words from the Civitai API (SFW-strict filtering, capped downloads).
Local API routes
| Route | Purpose |
|---|---|
| GET /uls/list | All LoRAs with preview flags |
| GET /uls/metadata?lora=<name> | Per-LoRA metadata as JSON |
| GET /uls/preview/image / …/video | Preview bytes (video with range support) |
| GET/POST /uls/groups | Group assignments |
| POST /uls/triggers | Save trigger words (writes .uls-meta.json) |
| GET/POST /uls/group_modes | Per-group merge modes |
| POST /uls/civitai_fetch | Hash-based Civitai preview + trigger download |
| GET /uls/noise/preview | The Seed node's noise field, computed by the generator the sampler uses |
| GET/POST /pls/latent_presets | The Empty Latent's presets (built-in + yours, kept in the user folder) |
| GET /pls/weights/status · POST /pls/weights/install | Interpolate's RIFE checkpoints: what is on disk, and the one-click, sha256-checked download |
| /pls/cine/* | The Cine Timeline (see its chapter) |
Running with
--listen? The Media Loader's browse/upload routes are locked (403) while ComfyUI is bound beyond localhost, so LAN clients cannot read arbitrary folders on the host. SetULS_ALLOW_LAN_BROWSE=1to open them deliberately. On a normal localhost setup nothing changes.
⬡ Polyhedron CLIP Text Encode
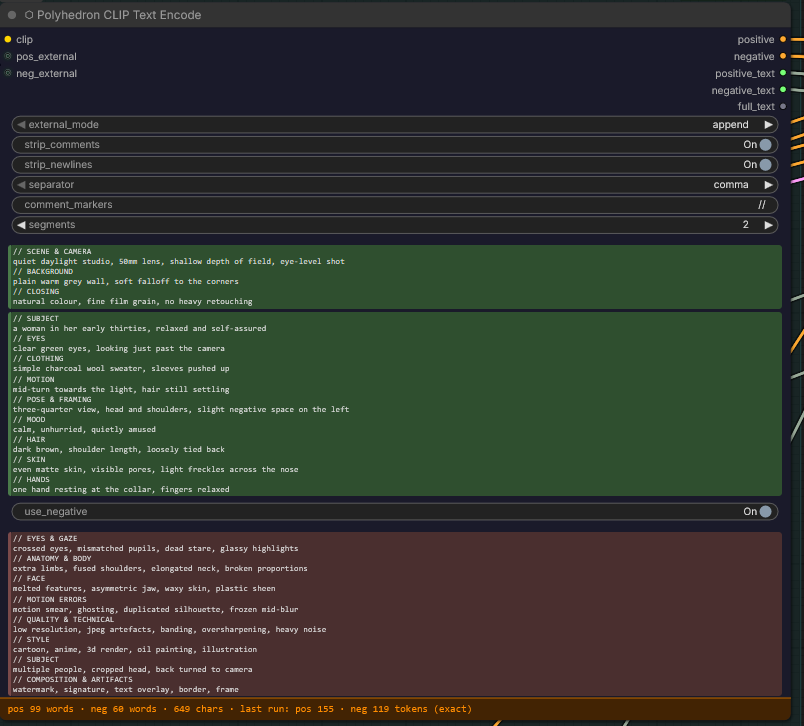
One node in place of a small chain. The positive prompt is assembled from several fields instead of one wall of text, so a trigger block, the subject and a style block can be edited without hunting through a paragraph. A negative prompt sits in the same node and can be switched off. Both are encoded through ComfyUI's own encoder — reused, never re-implemented — and the composed strings come back out as text, so what the encoder saw is what you can read.
Inputs and outputs
| Pin | Direction | Carries |
| --- | --- | --- |
| clip | in | The CLIP / text encoder — the same pin as the core node. |
| pos_external | in | Optional text from elsewhere: a captioner, a Stack's trigger words, any STRING source. |
| neg_external | in | Optional external text for the negative prompt. |
| positive | out | The encoded positive conditioning. |
| negative | out | The encoded negative conditioning — valid even when the negative is switched off. |
| positive_text | out | The composed positive prompt, exactly as encoded. |
| negative_text | out | The composed negative prompt, exactly as encoded. |
| full_text | out | Both prompts in one string — for logging, or a Save node's metadata. |
Search
A search row sits under segments: type a word, a half sentence or a whole
paragraph and every hit is marked live in every visible prompt field (the
positive segments, then the negative). Enter / ▶ jumps to the next hit,
Shift+Enter / ◀ to the previous one, Esc / ✕ clears. Ctrl+F inside a prompt
field opens this search with the selected text instead of the browser's find
bar. Matching is literal and case-insensitive, and any run of whitespace
matches any run of whitespace, so a pasted passage is found across line
breaks. The marks are drawn over the field; the text itself is never touched.
Segments
segments decides how many positive fields take part. Turn it up and another
empty field appears; turn it down and the field disappears from the node.
Hiding is not deleting. The text of a hidden segment stays with the node, survives saving and comes back untouched when you turn the count up again. But while it is hidden it is also out of the prompt — the encoder only ever sees the fields that are showing. Park a block of styling in segment 3, turn the count down to 2, and you have switched it off without losing a word.
separator decides how the fields are joined: comma puts , between them,
newline keeps them on separate lines, space runs them together, none
concatenates with nothing in between.
The boxes grow with the text — each visible field sizes itself to its content and the node follows, so a long prompt is readable without scrolling inside a two-line window.
Comments — headings that cost nothing
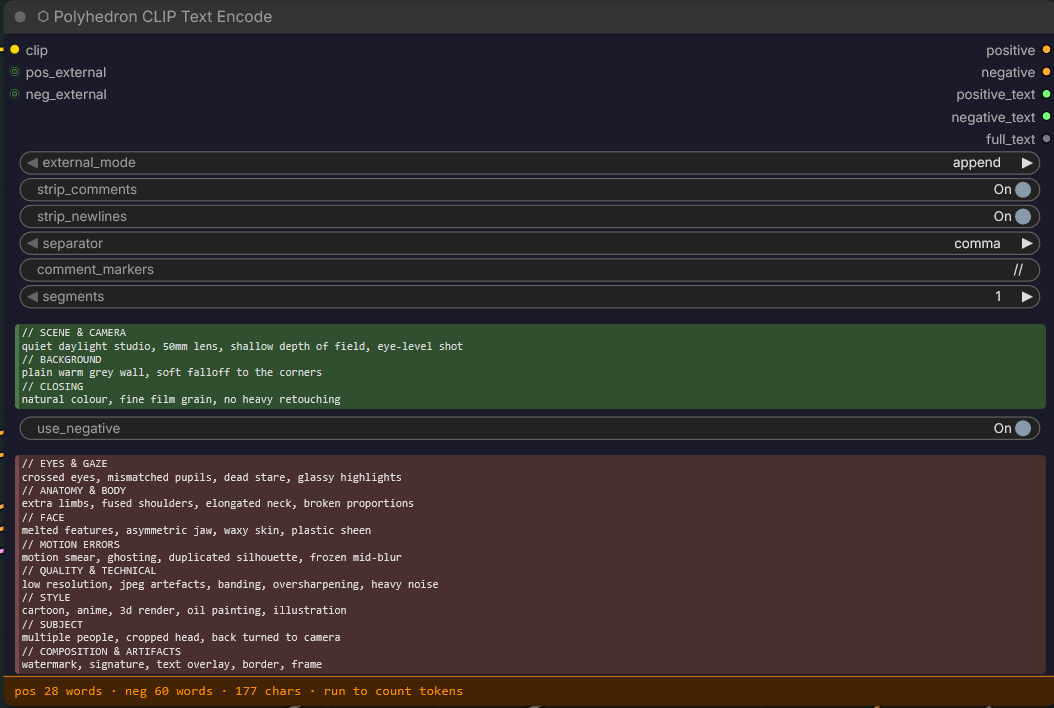
strip_comments lets you keep section headings in the box that never reach the
model: everything from a comment marker to the end of that line is removed
before encoding.
What you write:
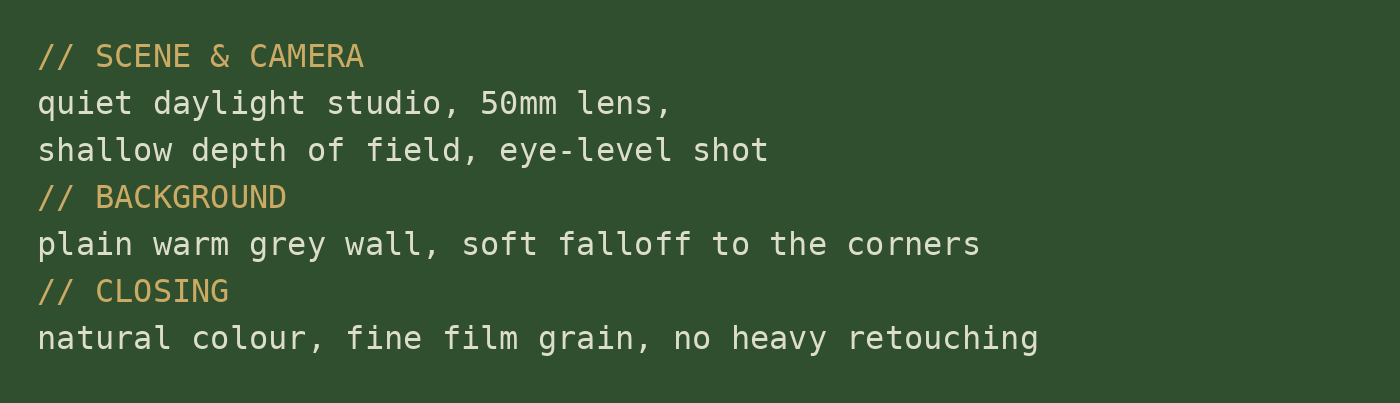
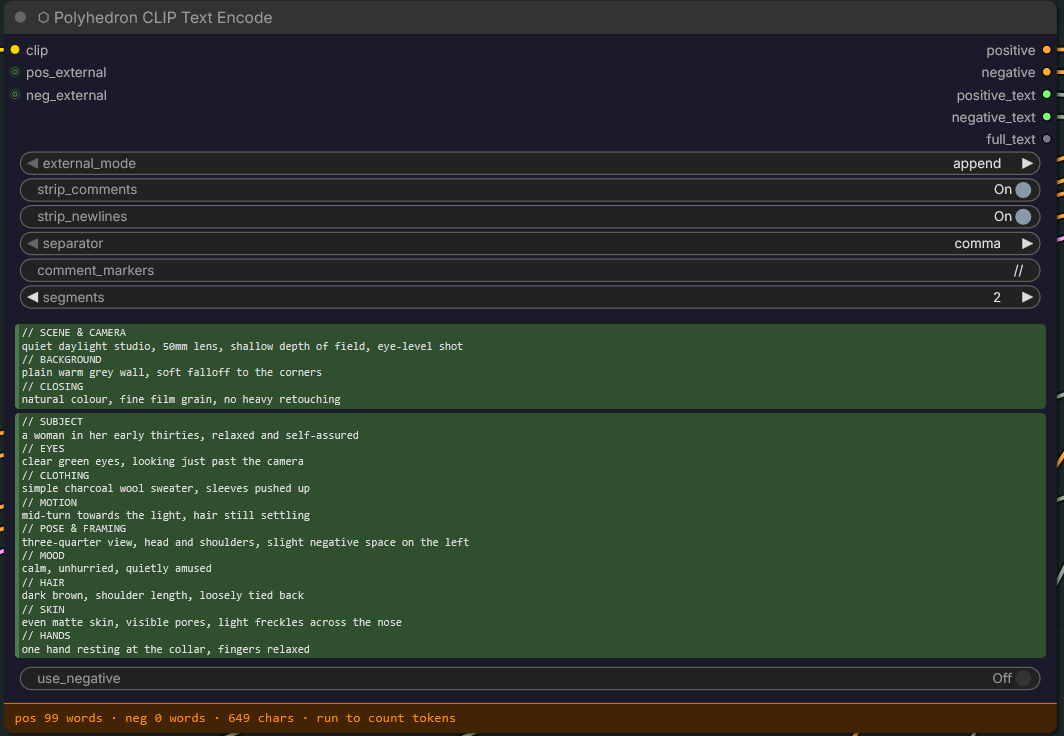
What the encoder receives:

Every marked line is gone and what is left is joined by the separator. Nothing else was touched — and nothing you wrote for yourself became a token.
That serves two purposes. Structure — // SCENE & CAMERA, // SUBJECT,
// HANDS give a long prompt a table of contents, so you scroll to the section
you want instead of re-reading a paragraph. And notes to yourself — the
seed that worked, the LoRA this wording was written for, a line you took out but
might want back. They travel with the workflow and cost nothing at generation
time.
This is not cosmetic: every word in the prompt competes for the encoder's
attention. A heading like SUBJECT or a stray TODO: try 0.8 left in the text
is read as content.
comment_markers decides what counts as a marker. The default is //. Enter a
space-separated list to use several — // # *** gives you three. A marker
counts at the start of a line or after a space, which is why
https://example.com survives untouched; an empty field strips nothing. A
comment always runs to the end of its line — there is no block comment.
Comments are removed before strip_newlines flattens the remaining line
breaks. The order matters: flatten first and a heading would swallow the line
that follows it.
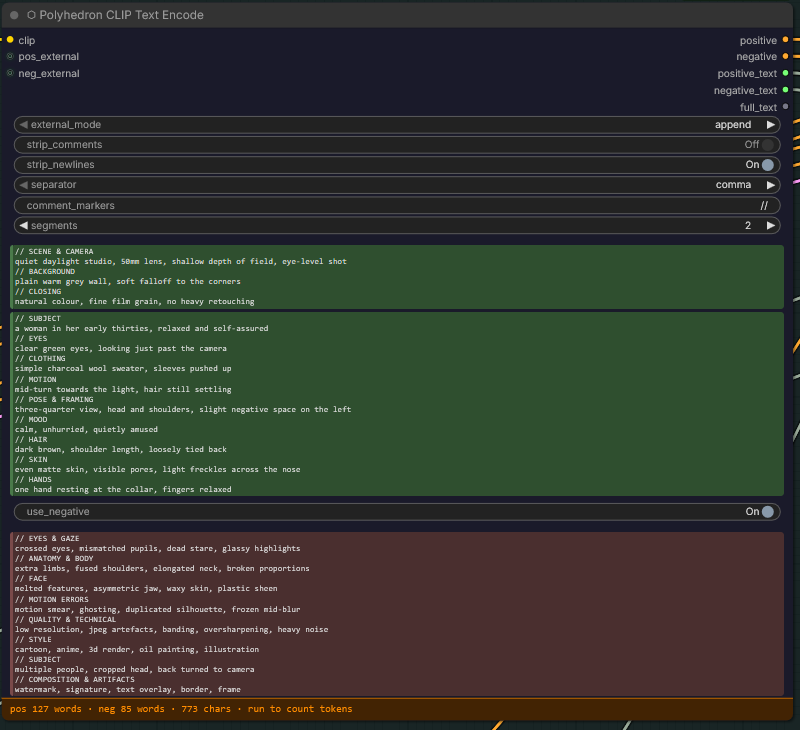
The negative
use_negative switches the negative prompt off. The box disappears and the
footer drops to zero words — but the negative output still carries a valid
conditioning (an encoding of an empty prompt), so anything wired to it keeps
working. Useful for distilled and Lightning setups that want an empty negative
and CFG at 1.0.
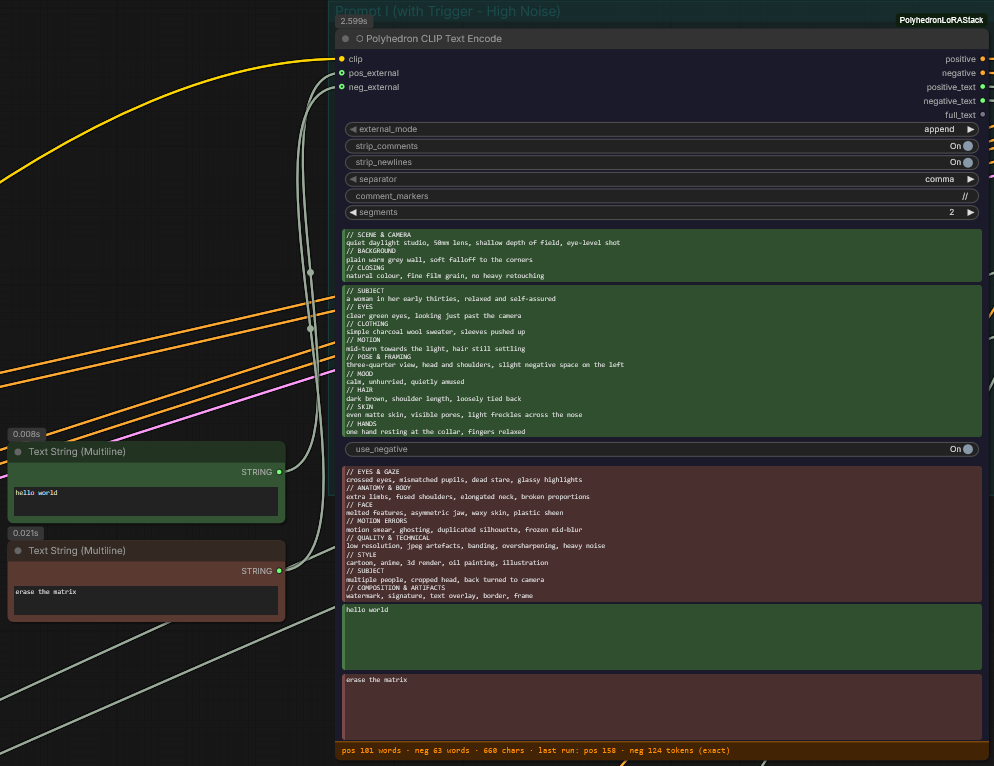
External text
pos_external and neg_external take text from other nodes — anything with a
STRING output. The obvious source is a prompt fragment kept elsewhere; the
more interesting one is a node that writes the text for you. A captioner
such as Florence2 looks at an image and returns a description of it; wire
that into pos_external and it becomes part of the prompt without typing a
word. The same works for WD14-style taggers, LLM nodes that expand a sketch into
a full prompt, or a node reading a caption sidecar.
external_mode decides where it lands:
| Mode | Result |
| --- | --- |
| append | Behind your segments — your wording sets the frame, the description follows. The usual choice for image-to-image and style transfer. |
| prepend | In front — useful for trigger words a LoRA wants to see early. |
| replace | It takes over entirely. The segments stay in the node, untouched, but the prompt is the external text alone — batch work over a folder. |
| fill {pos_N} | The wired text is a form: every {pos_1} … {pos_6} in it is replaced by that segment as you typed it, {prompt} by all shown segments. The filled text is what gets encoded. This is how the Cine Timeline works with the encoder: the fixed parts of a prompt (triggers, look, scene, subject) stay in the segments, the timeline carries the placeholders where they belong plus everything that changes per shot. A wired text without any placeholder gets the segments first, the text after. |
Wire an input and a field for it appears in the node; after the first run it
shows the text that actually arrived, and the footer counts it. Note:
neg_external only works while the negative is switched on — with
use_negative off the negative prompt is not assembled at all.
The footer
The strip along the bottom is the honest account of what will be encoded:
pos 99 words · neg 60 words · 649 chars · last run: pos 155 · neg 119 tokens (exact).
Words and characters are counted as you type and already respect your
cleanup settings. The token figure comes from the last run, because only the
tokenizer belonging to your text encoder can count tokens and it lives in the
backend — so after every edit the field falls back to run to count tokens.
The count comes from the same function behind the Token Counter, so the two
never disagree.
⬡ Polyhedron Sampler
One node for both sampling architectures. In Single it is a superset of
KSampler and KSampler (Advanced): a real denoise field alongside
start_at_step / end_at_step and return_with_leftover_noise, the full
sampler and scheduler lists, and add_noise. Switch the Mode pill to
High + Low and the same node runs a noise-split two-expert denoise — the
architecture Wan 2.2 ships. Nothing is rebuilt in between: what does not apply
goes dim, everything else stays where your eye expects it.
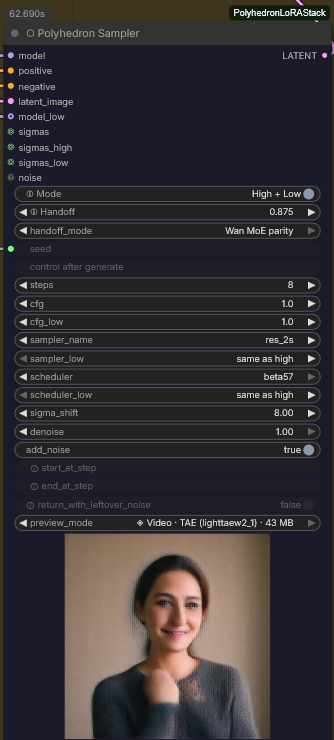
Inputs and outputs
| Pin | Direction | Carries |
| --- | --- | --- |
| model | in | The model. In High + Low this is the high-noise expert. |
| positive / negative | in | Conditioning to include and to exclude. |
| latent_image | in | The latent to denoise — image or video. |
| model_low | in | Optional. The low-noise expert. |
| sigmas / sigmas_high / sigmas_low | in | Optional external schedules; they override the built-in one. |
| noise | in | Optional external noise source. |
| LATENT | out | The denoised latent. |
Single
seed, steps, cfg, sampler_name, scheduler and denoise work as you
know them. add_noise decides whether the run starts by adding noise at all;
start_at_step and end_at_step cut a window out of the schedule;
return_with_leftover_noise hands the latent on unfinished on purpose, for a
second sampler to complete.
sigma_shift applies a flow-matching shift to the model before the schedule is
built. 0.00 means off — correct when an upstream ModelSamplingSD3 node
or the model itself already provides one. Wan 2.2 needs a shift: 8.0 matches
the Wan MoE KSampler, and without it a short run leaves residual noise as fine
RGB speckle. A positive value here overrides rather than adds. In High + Low
the shift applies to both experts — unless sigma_shift_low gives the low
expert its own value.
sigma_shift_low is the low expert's twin, sitting directly underneath.
Its default of −1 means same as high: the low expert simply follows
sigma_shift, and existing workflows behave exactly as before. Set 0 to
leave the low expert untouched, or a positive value to give it its own
shift — sigma_shift 8.0 with sigma_shift_low 5.0 replaces a graph that
fed the two experts through two separate ModelSamplingSD3 nodes. Like
scheduler_low, it only bites in Wan MoE parity, where the low
segment's schedule is built from the low expert; in Continuous both
experts share one schedule and the widget greys out.
High + Low
Some model families ship as a pair: one expert for the loud, early part of
the denoise, one for the quiet, detailed end. Wan 2.2 is the prominent example.
model becomes the high-noise expert, model_low takes the second one.
The Handoff is the one number that matters. It is a noise level, not a step count: every step whose sigma is at or above it runs on the high expert, the rest on the low one. There is no automatic value — the Wan 2.2 conventions are 0.875 for text-to-video and 0.900 for image-to-video.
cfg_low gives the second expert its own guidance value (distilled and
Lightning LoRAs typically run the low pass at 1.0); sampler_low and
scheduler_low do the same for sampler and schedule and default to same as
high.
handoff_mode decides what happens at the seam. Continuous runs both
experts as one unbroken denoise — the high expert stops while leftover noise is
still present and the low expert picks it straight up. Wan MoE parity
reproduces the Wan MoE KSampler exactly: the switch happens one step earlier,
the high expert finishes on a clean estimate, and the low expert re-noises it
with the same seed noise before denoising to the end.
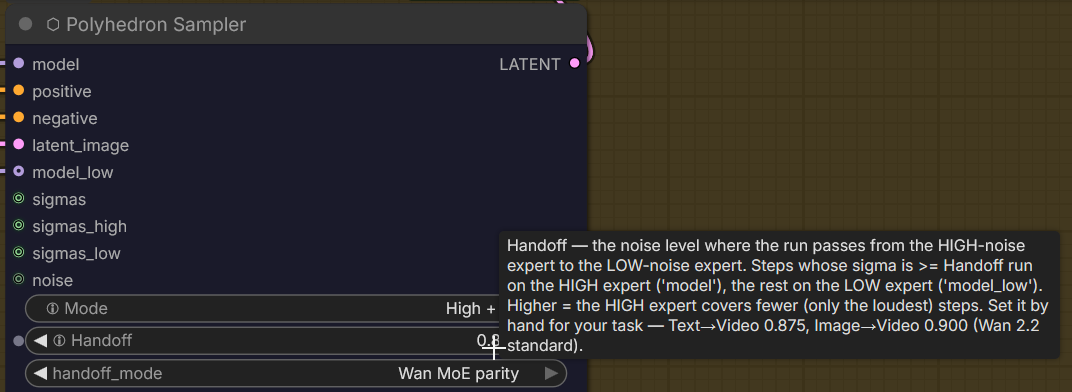
Live preview
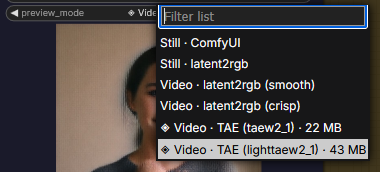
preview_mode picks the decoder for the picture inside the node —
visualisation only, the output latent is identical whatever you choose.
Still · shows a single frame that refreshes each step, as the KSampler does.
Video · animates every frame of the predicted latent, so on a video you
watch the motion settle long before the run ends. The two Video · TAE modes
decode through a small approximate decoder: slower per step, far closer to the
finished picture. They carry their download size in the label because they are
files that have to be on disk; pick a missing one and the node offers to fetch
it through the pack's one download door (staged, checksum-verified, atomic).
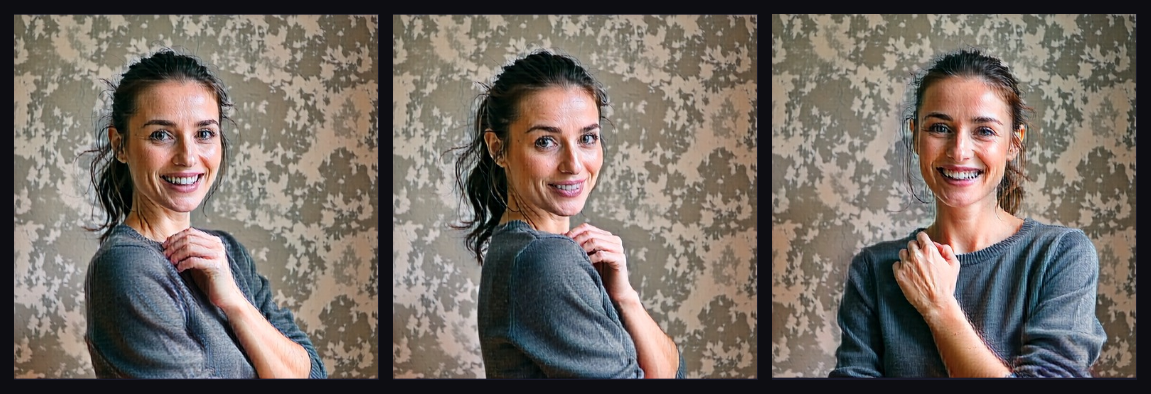
The mode can be changed while a render is running — the change is picked up on the next step.
⬡ Polyhedron Power Upscale
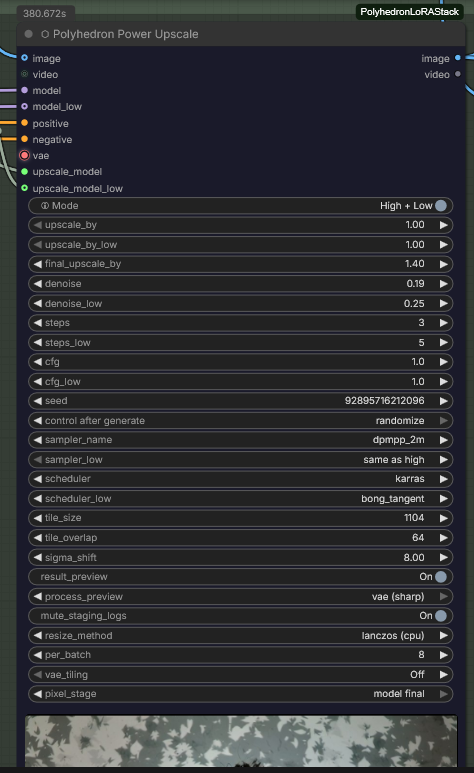
A tiled upscaler that knows about two-expert models. It cuts the image into overlapping tiles, upscales and re-samples each one, and blends them back with a clean-room tile geometry whose weights are guard-proved to sum to exactly 1 — so no seam is brighter or darker than its surroundings.
The ESRGAN pass, the sampling loop and the Wan sigma shift are delegated to ComfyUI core and to this pack's own Sampler rather than re-implemented, which is why the node follows core's behaviour when core changes.
Dual MoE. With dual_moe on, the node carries a full second parameter set
(upscale_by_low, denoise_low, steps_low, cfg_low, sampler_low,
scheduler_low, sigma_shift_low), so the high-noise and low-noise experts
each get their own refine — the same split the Sampler makes.
The low expert's own sigma shift. sigma_shift_low sits directly under
sigma_shift and works exactly like its twin in the Sampler. -1 means
same as high: stage L follows sigma_shift, which is what this node did
before, so existing workflows behave as they always did. 0 switches the
shift off for stage L alone, even while stage H is shifted. Any positive value
gives stage L its own — sigma_shift 8.0 with sigma_shift_low 5.0, for
instance.
Two details worth knowing. Unlike the Sampler, this value is always
honoured: there is no continuous-handoff mode here in which one schedule
serves both experts, because the stages are independent runs. And it works
with or without a wired model_low — without one, stage L falls back to
the model input and is given its own shifted copy of it rather than
inheriting the high expert's.
A word of caution if you have calibrated denoise_low by eye: the shift
changes where on the noise scale a given denoise fraction lands, so moving
sigma_shift_low away from -1 changes what your proven denoise_low number
means. Re-check the two together, not one at a time.
Working through long clips. Tiles are processed in batches so a long video
does not have to fit in VRAM at once. Progress is reported per tile: the node
pushes a polyhedron.pu_tile event and the panel draws the tile grid filling
in. That reporting needs no server route — it rides on the event channel
ComfyUI already has.
Where the refine sits. refine_order: after pixel (default -- ESRGAN and
the fit first, then the refine on that canvas), before pixel (the refine
first, the pixel model behind the last decode, where its detail reaches the
file untouched; on a video+audio model such as MiniMax H3 the refine then runs
over the whole clip at the input size) or off.
Restore. restore_model runs a restoration model (Core's SeedVR2 family:
one step, conditioned on the picture itself, no prompt) as a stage of its own,
before or after the refine (restore_order). The node loads it with its own
VAE; the Download on the node's line offers the files from Comfy-Org's repack
(3B int8 for a 16 GB card, 3B fp16, 7B sharp int8, the SeedVR2 VAE). off by
default. pixel_speed picks how the ESRGAN pass runs (eager, channels_last,
torch.compile) -- same picture, compare the ms/frame.
A curve on sigmas. With a Sigma List or Sigma Curve wired, the refine
reads neither steps nor scheduler: it starts at sigma = denoise and runs
every curve point below it. The two dials hide and denoise names the steps
it buys (on the H3 HyperFlow curve: 0.25 -> 1, 0.5 -> 2, 0.7 -> 3).
⬡ Polyhedron Fast Upscale
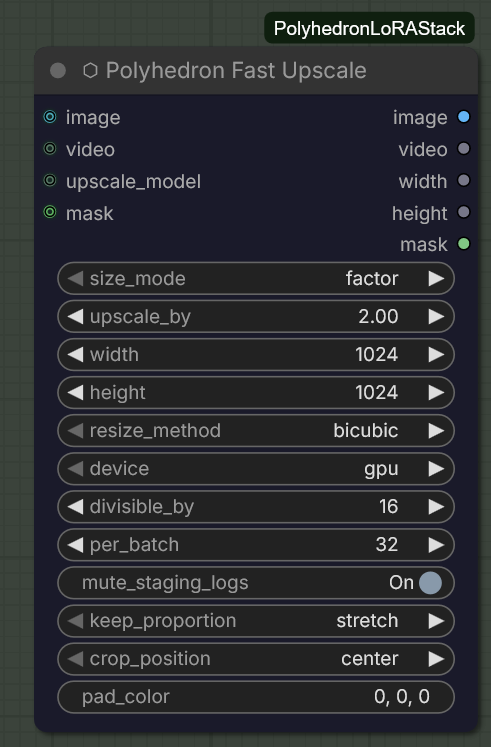
The fast path beside Power Upscale: optional ESRGAN model, then a resize. No diffusion refine — a 65-frame clip finishes in seconds rather than minutes. Use it when you want size and clean edges, not new detail.
It handles IMAGE, VIDEO and MASK together, and the mask follows the image instead of drifting out of register — the one thing that most often goes wrong when an upscale and a mask are done by separate nodes.
resize_methodcovers the usual filters.lanczosruns on the CPU (it is a PIL path) and is labelledlanczos (cpu); asking it for a GPU device fails loudly instead of quietly ignoring you.divisible_bysnaps the result to the divisor the samplers downstream expect.per_batchworks through long batches in chunks, so VRAM is not the limit.- NVIDIA Maxine VideoSuperRes is available where the
nvvfxlibrary is installed; when it is missing the node says so plainly.
Its helpers are imported from Power Upscale rather than copied, so the two nodes cannot drift apart.
⬡ Polyhedron Interpolate
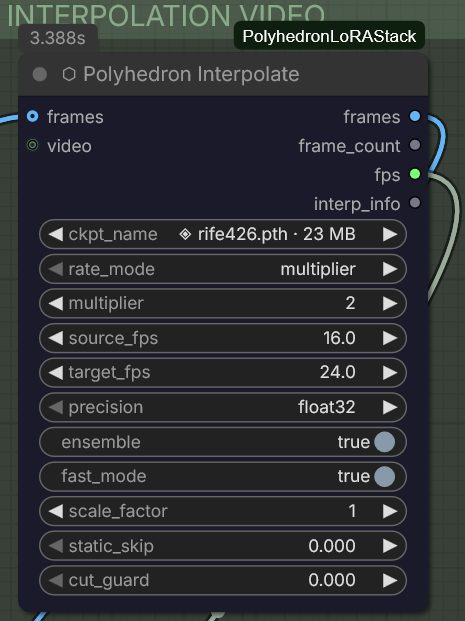
Frame interpolation: it invents intermediate frames to raise a clip's frame rate, or to smooth motion at the same rate.
Set a rate either as a multiplier (2×, 4×) or by naming source_fps and
target_fps and letting the node work out the ratio. ensemble and
scale_factor trade time against quality; fast_mode favours speed;
static_skip leaves near-identical frames alone instead of spending work on
them; cut_guard stops the interpolator from inventing a smooth transition
across a hard cut, which is the artefact that gives machine interpolation
away most quickly. It is on by default (0.1: a pair that differs by more is
held). With a Cine Timeline, wire its cuts output into the cuts pin: the
node then looks around each cut the prompt asked for (+-0.25 s) for the one
pair where the picture really jumps and holds it -- the model paints a cut
close to its time, not on the frame -- while fast motion and a painted
dissolve are left alone. interp_info says where each cut was found. With the
pin wired the cut_guard threshold is off (also when the shot has no cut at
all): a fast camera move reaches 0.10–0.15 per frame and would otherwise be held
pair by pair — the clip would play at the source rate in the move. Without the
pin the threshold works as described.
On the engine. nodes/vfi/rife_arch.py is the MIT-licensed IFNet from
Practical-RIFE (hzwer), by way of
ComfyUI-Frame-Interpolation
(Fannovel16), copied byte-for-byte on purpose — see
nodes/vfi/NOTICE.md. It is not ours and it is not
modified: every correction this pack makes lives outside the engine, in
nodes/ph_interpolate.py, where it can be guarded.
The checkpoints. A run never downloads anything. When the chosen RIFE
checkpoint is not on disk, the node says so and offers a Download button;
one click fetches the file over https into models/vfi, checks its size and
its sha256 against the pinned values, and only then puts it in place (routes
GET /pls/weights/status, POST /pls/weights/install). Files you already
have are found in any configured model folder.
⬡ Polyhedron Cine Timeline
One node that holds a whole short film for MiniMax H3: the shots on a time
axis, the prompt they make, and — once rendered — the clips, laid out as
tracks you can cut, heal, slow down and export. The template
polyhedron_minimax_h3_text_to_video (the fox) is built around it.
The form. At the top: the mode (Text = prompt only, Keyframes =
first/last-frame anchors, Reference = pictures by tag), the length (H3's
17k+5 frame grid, shown as frames and seconds), the project name and what the
next run renders — the whole timeline in one run, one scene, or (from two
scenes on) all scenes, one run each. Below it the shots: each has its start
(at) and its text, written in // rubrics like the CLIP Text Encode;
overall_soundscape and non_diegetic_music sit beside them. Render
queues the run.
The prompt, exactly. The timeline writes the official H3 form ([Shot 1],
[Shot N] At MM:SS.mmm, …). Wire its prompt output into a Polyhedron CLIP
Text Encode with external_mode = fill {pos_N}: the parts that never change
(triggers, look, scene, light, subject) stay in the encoder's segments, the
timeline carries {pos_1} {pos_2} where they belong and what changes per
shot (camera, motion). "→ CTE" moves the fixed parts of Shot 1 into the
segments for you; "prompt the run will produce" shows the text the encoder
will receive, byte for byte. The chip at the foot estimates the tokens.
First → last frame: motion, not a dissolve. In Keyframes mode a picture
on the first frame and one on the last frame pin the clip's ends (MiniMax
Keyframes); pictures in between are guides (MiniMax Continue). The model paints
the way between them, and it does that well only when the two pictures share
camera, light and background — make the last picture from the first (an image
edit of it), else the model fades one into the other. The timeline's info
says so whenever a run has both keyframes: describe the way, not the two
pictures (first state → what visibly changes → last state), keep it to one
shot, and for each guide say in the text what is seen at that moment. It warns
when an anchor sits within the last quarter second — that is a guide, not the
last frame — and names the second that is the last frame. For a motion that
has to follow a real one, add a pose video (Control);
Transition Check then measures whether the run moved or dissolved. The
handbook (Part X, chapter 6) walks through one such run with measurements.
The tracks. After a run, its clip lands on V1 / A1 — picture and sound — read from where the Save wrote it. new render → picks what a further run does: new track (the default) opens a track on top (V2, V3 …) at V1's height and V1 keeps its clip; replace puts the new run in V1 in place of the clip of its scene (the old files stay on disk). A V1 clip that replaced an earlier run carries a small green NEW. takes → tracks turns the older runs into tracks too. Each track shows its real frames and its waveform.
Scenes, ticked. From two scenes on, every scene has a tick on the Scenes row: render ticked scenes queues only the ticked ones, in order — e.g. scenes 2–5 in one go after a change. A scene that carries starts on the last frame of the newest clip of the scene before, so in one go each ticked scene starts on the one that was just rendered.
The monitor takes the shape of the clip (a portrait clip is shown portrait, never squeezed) and follows the node's width; Space plays and pauses while the timeline node is selected (never while you type in a field). The node keeps a floor width of 760 px when you narrow it; the columns shrink instead of spilling out.
| On a track | What it does | |---|---| | click a piece | select it (delete empties it, the tracks below show through) | | cut / heal | split at the playhead / join a cut again (double-click the line) | | drag a piece, a cut line, the end line | move it, trim the cut, play more or less of the clip; a cut inside a repeated head is held at its end — Alt places it there on purpose | | the amber diamond | the piece's speed (picture and sound, pitch kept); double-click = 100 % | | the bracket at the left | picture and sound linked or unlinked — unlinked, the sound drags alone (J/L cuts) | | the head | lock, show/hide, up/down, reset, ⇤ snap this track to the scenes, remove, height S–XL, mute, solo | | snap to scenes (toolbar) | V1 and every track back on the scene boundaries (see Scenes that continue) |
V/A by type switches between pairs (V2 over A2) and the classic layout (all
pictures above, all sounds below). Drop a video on the dashed row to open a
track with it (upper half: copied into input/cine_media, lower half: read
where it lies; refused while ComfyUI is bound beyond localhost, see
ULS_ALLOW_LAN_BROWSE). export renders the film from the tracks with ffmpeg;
exact preview plays that render, live plays the tracks directly.
Where files go. Wire clip_prefix into the Save's filename prefix: the
run then writes output/<date>/PH_<time>_<project>_whole_*.mp4 (or _scene_k),
one folder per day, never a project folder of its own. The list of a
project's clips lives in input/cine_media/<project>/stack/.
Scenes that continue. Tick begins on the last frame of scene k on a
scene's first shot and it starts where the newest clip of the scene before
ended. carry_mode decides how: pin (the frame pinned through MiniMax
Reference's first_frame), keyframe (the first keyframe through MiniMax
Keyframes, with the official alignment line) or motion (the last 5 / 22 /
39 frames and their sound as the scene's held head, through tail /
tail_audio into MiniMax Continue -- needs ComfyUI master). The template
polyhedron_minimax_h3_fox_continue renders two scenes in one press.
The scenes of such a film share frames (the held head repeats the end of the
scene before). The cut list keeps them out of the film, also when you edit it:
a cut inside a repeated head is held at its end (hold Alt to place it there
on purpose), the carry continues from where your cut ends the scene before, and a
new take or another scene count is caught and named. An anchor that sits on
a scene boundary can be ticked both scenes in its row: the last frame of the
one scene and the first of the next — two clips that meet on one picture.
snap to scenes (toolbar, and the arrow in every track head) puts everything
back: V1 cuts where the prompt cuts, and every clip whose name says its scene
(_scene_<k>_, _whole_) returns to the start of its scene.
Outputs. prompt (to the encoder), first_frame / last_frame (the
Keyframes mode's anchors, for MiniMax Keyframes), anchors, seconds (to the
Empty Latent's duration), frames, info, clip_prefix, scene, tail /
tail_audio (the end of the scene before, for MiniMax Continue) and cuts
(where the shots change, for the Interpolate).
Inputs: refs from a Reference Board (pictures by @tag), up to nine images
(pins appear as you wire them), and an optional storyboard text.
Routes: POST /pls/cine/timeline (the prompt preview — computed by the same
code as the run), GET /pls/cine/scenes, POST /pls/cine/register,
/edit, /export, /probe, /to_form, /assemble, GET /pls/cine/media_dir.
Needs ffmpeg for the film strips, waveforms and the export — on the PATH,
or the one imageio-ffmpeg brings. Clips are read with PyAV (av).
⬡ Control, Blend & Transition Check
Five nodes for steering a video (or a picture) by another one, and for checking what a first -> last frame run made.
Control Fit brings any clip or picture to the run: its length (the video latent grid, 17n+5), its size (fill / fit / stretch, a multiple of 32), its frame rate, a start and a window. A shorter clip holds its last frame or loops.
Control Map turns the fitted frames into a control: pose (SDPose,
whole body with hands), depth (Depth Anything 3), canny, gray,
scribble, soft edges, or keypoints drawn as a skeleton. The keypoints
output carries the pose as OpenPose data. With preview on the node plays the
map itself; any Save node keeps it.
Apply Control puts a Fun ControlNet Union on the model: strength, start
and end (as a share of the steps -- an end of 0.6 leaves the last 40 % free
for detail), pick for one frame of a clip. The control and first/last frame
keyframes share one run. Needs a current ComfyUI (master).
Models through the download door. The three files these nodes read -- the Fun ControlNet Union (models/model_patches), the SDPose checkpoint (models/checkpoints) and Depth Anything 3 (models/geometry_estimation) -- are listed in the combos with their size; a missing one turns the node's line orange and offers the Download of exactly that file (https, sha256-checked, from huggingface.co). A run never downloads. Files placed by hand are listed too.
Polyhedron Blend stacks up to three layers on a base, each with its own
mode and opacity: the Photoshop set (normal, multiply, screen, overlay, soft
light, difference, hue / color / luminosity ...) plus over (black = clear)
for lines and skeletons on black. Pictures and clips mix freely -- a single
picture lies over every frame, a shorter clip holds or loops. Typical use:
depth as the base, the pose over, canny as difference -> ONE control video.
(A blended map is common practice, not a documented input of the union
models -- compare it with chained Apply Controls.)
Transition Check reads a rendered first -> last frame clip: the pair (how far apart the two keyframes are), the clip (MOTION, DISSOLVE, SNAP -- does something move through, or is A faded into B?), where half of the way falls, and how close the clip's ends came to the keyframes. A report picture plots it.
Save + keypoints. Polyhedron Save takes a keypoints input: the pose
frames are written as <name>_keypoints.json (OpenPose format) beside the
frames, or alone.
The Media Loader's placeholder is refused. When a loader finds no file it
sends a placeholder frame (on_empty placeholder); the Cine Timeline, MiniMax
Keyframes, Reference, Continue and Control Fit now stop on it by name instead
of rendering a checkerboard.
⬡ Workflow essentials
Fifteen small nodes that the rest of the suite is wired from. None of them opens a server route, none needs a model download of its own, and each one is registered behind its own guard flag, so a changed ComfyUI Core API can take one of them out without touching the others.
Loading
| Node | What it does | | --- | --- | | ⬡ Polyhedron Load Model | Diffusion model loader with progressive slots — a second slot appears only once the first is filled, so the node stays as small as the job. | | ⬡ Polyhedron Load CLIP | The same idea for text encoders, including multi-encoder setups; the header names what it recognised. | | ⬡ Polyhedron Load VAE | VAE loader, sized — the list shows how big each file is before you pick it. | | ⬡ Polyhedron Load Upscale Model | ESRGAN-family loader, with the same model card the Power Upscale node shows. | | ⬡ Polyhedron VAE Codec | Encode and decode in one node, so a round trip does not need two. |
Values and flow
| Node | What it does |
| --- | --- |
| ⬡ Polyhedron Seed | Seed source with a live noise preview, roll-and-keep and a reuse-last button. |
| ⬡ Polyhedron Int | An integer with presets — click, arrows, drag or keyboard. |
| ⬡ Polyhedron Empty Latent | Empty latent for whichever model family you are on, rather than one node per family. |
| ⬡ Polyhedron Switch and Switch Inverse | One input picked from several, or one input steered to one of several outputs. Unused branches are blocked rather than run. |
| ⬡ Polyhedron Media Info | Reads the numbers out of whatever media is passing through. |
| ⬡ Polyhedron MiniMax Reference | Builds the reference conditioning a MiniMax H3 ref2v graph expects: up to 9 images (<Picture i>), 3 videos (<Video k>, with their soundtracks) and 3 audios (<Audio j>), each image with its own megapixel budget. Name references in the prompt as @fox instead of numbers (tags line: fox = image_2); the node writes the live <Picture n> in before the encode and checks the prompt (unknown tags stop the run by name). Optional first_frame pins frame 0. Pins grow with what is wired. |
| ⬡ Polyhedron MiniMax Keyframes | First / last frame (fl2va) conditioning for H3 with the latent from a wire; pins the first frame at 0 and the last at the final frame, stretch or cover, and reports every frame whose aspect does not match. Without an image it is a plain text run. |
| ⬡ Polyhedron MiniMax Continue | Continues clip n into clip n+1: its end as a guide at frame 0, with its sound on the same time axis, plus optional anchors anywhere in the new clip (the Cine Timeline's guides). Needs ComfyUI master. |
| ⬡ Polyhedron MiniMax Audio Lock | Holds a given sound in the sound stream of an H3 latent, so the picture is generated to it -- a music video, a voice to follow. |
| ⬡ Polyhedron MiniMax Drift Control | For a continued scene: the motion of the scene before carries on, the look may change. Patches the model. |
| ⬡ Polyhedron H3 Latent Upscale | The learned H3 latent upscaler: sample small, lift the latent here, then a short second pass at the target size. Weights (LBH-123-AI, MIT) offered by the node's Download. |
| ⬡ Polyhedron MiniMax Second Pass Hold | The second pass of a continued scene: puts the carried head back at full size and holds it. Between H3 Latent Upscale and the second sampler. |
| ⬡ Polyhedron Show Text | Shows any text that reaches it (an info output, a resolved prompt) on the canvas, sized to its content, with the Note's colour row. |
| ⬡ Polyhedron Reference Board | Up to 9 images, 3 videos and 3 audios as cards in one node -- tag, role, retention, budget -- instead of loose wires. Its refs output fills MiniMax Reference's free slots; definitions drafts the official subject/retention lines. Files go through ComfyUI's own upload. |
Notes
⬡ Polyhedron Note is a coloured card that belongs to the graph: a heading, a body, and a colour row on the node itself. The row sets exactly the same colours as ComfyUI's own right-click › Colors menu — ten choices including "none" — so the two can never disagree, and each swatch is painted with the colour the node will actually take. Fold the row away with the chevron when you do not want it. The note has no inputs and no outputs: it is never executed and costs nothing when you queue a prompt.
⬡ Polyhedron Attention
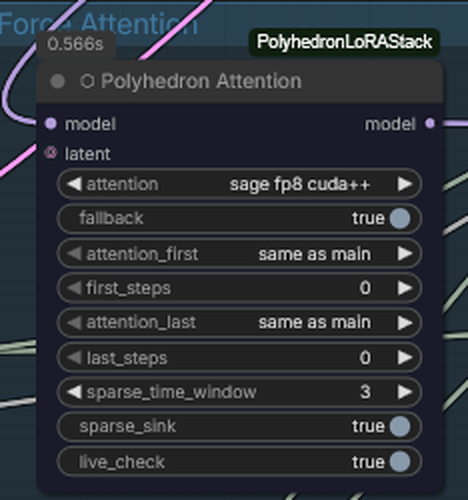
Swaps the attention backend the model runs on, and — the part that is easy to miss — it can swap it per step range. The dropdown only ever offers what is really installed and really loadable on this machine: a mode whose kernel imports but cannot run at scale is not offered, because an option you can pick and then watch fail is worse than one that was never there.
| Widget | What it does |
| --- | --- |
| attention | The backend for the whole run — PyTorch SDPA in four flavours, the SageAttention family, comfy kitchen int8, and whatever else the machine can actually load. |
| fallback | Where to land when a kernel refuses a particular call. same as main keeps it simple. |
| attention_first / first_steps | A different backend for the opening steps, where composition is decided. |
| attention_last / last_steps | And for the closing steps, where detail lands. |
| live_check | Probes the chosen kernel before the run instead of failing inside it. |
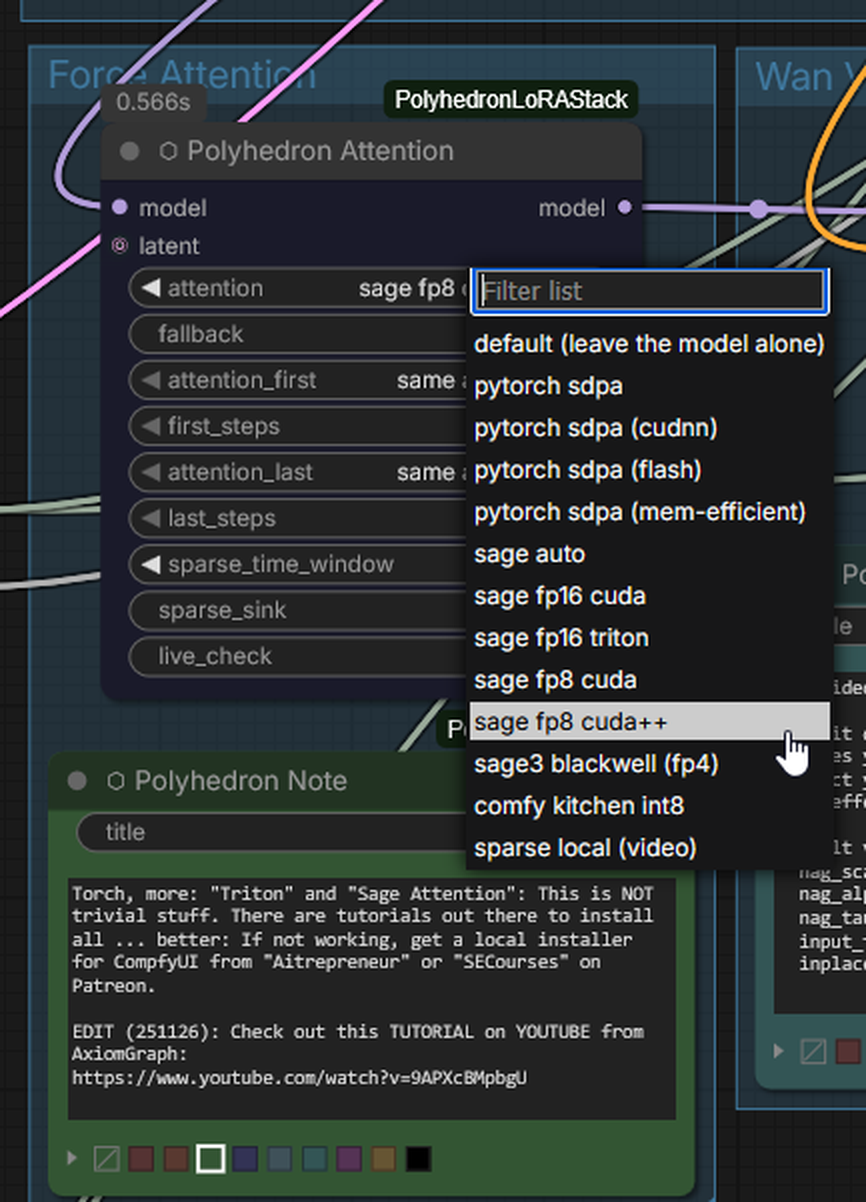
The split matters because the fast quantised kernels are not lossless on every model. Running the exact backend for the first and last few steps and the fast one in between is usually indistinguishable from full precision and still buys most of the time. A cross-attention call, a masked call or an unfamiliar sequence length is handed straight back to the model's own backend rather than being forced through — no warning, because it is not an error.
⬡ Polyhedron NAG
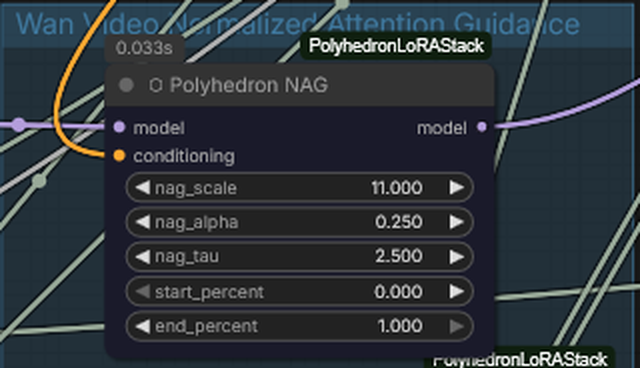
Normalized Attention Guidance on a conditioning. Where CFG pushes the whole prediction away from the negative, NAG works inside attention and stays useful where CFG has been turned down or off — which is exactly where distilled and few-step models live.
| Widget | What it does |
| --- | --- |
| nag_scale | How hard to push. 0 disables it; the useful range starts well above 1. |
| nag_alpha | How much of the guided result to blend back in. |
| nag_tau | The clamp that keeps the push from running away on individual tokens. |
| start_percent / end_percent | The slice of the run it applies to. |
It takes a model and a conditioning and returns a patched model, so it sits in the graph like any other model patch — before the sampler, after the LoRAs.
⬡ Polyhedron Filter
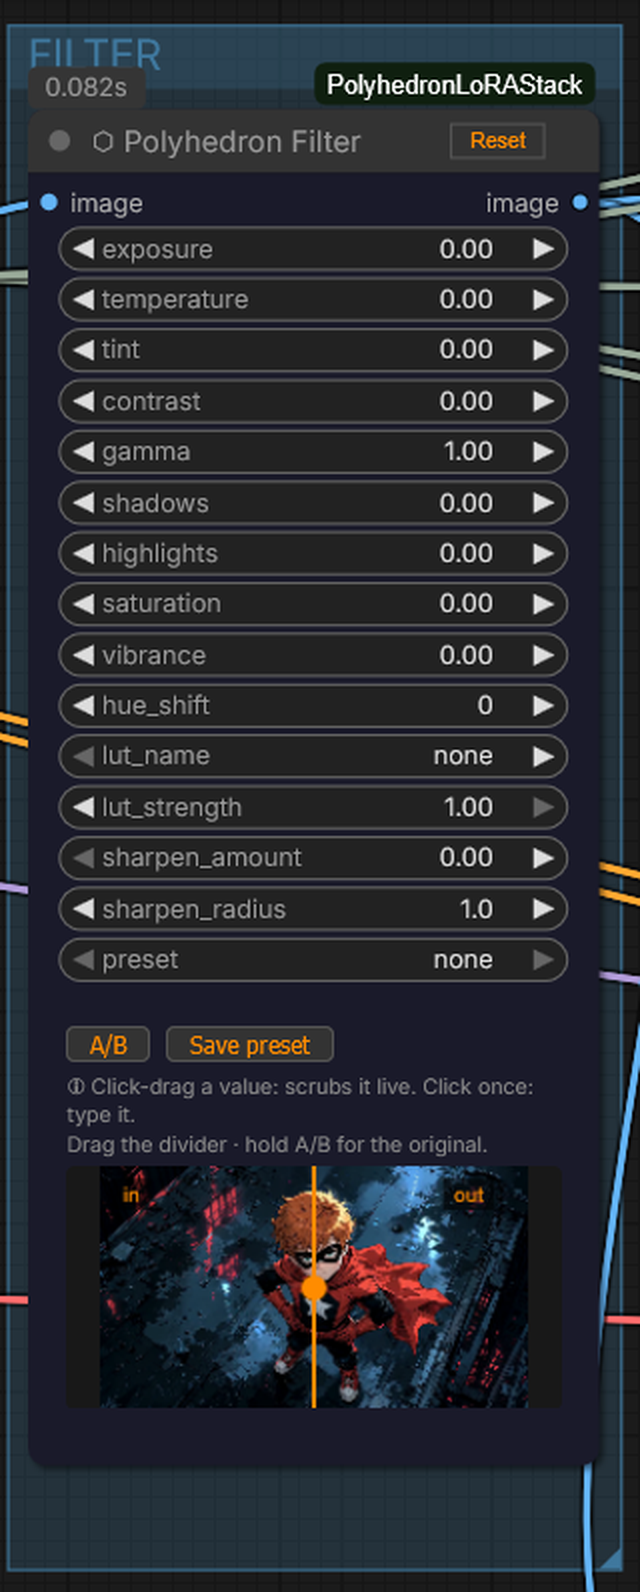
Colour grading with a preview that is actually the grade. The browser applies the same LUT file the backend will, read through this pack's own route, so what you set is what you render — not an approximation that drifts once the graph runs.
Exposure, temperature, tint, contrast, gamma, saturation, vibrance, highlights,
shadows, black point and a sharpen pass, plus .cube LUT support with its own
strength. Looks are saved and loaded as presets from the pack's presets/
folder; both directions run through one whitelist, so a hand-edited or
downloaded preset can never push unknown keys into the node.
This is the one node in this release that opens server routes — three of them,
in their own module nodes/ph_filter_routes.py. Both folders it serves are
fixed and derived from the pack's own location, and the caller supplies nothing
but a bare filename.
⬡ Polyhedron Audio Stretch
Retimes a soundtrack to a target it measures itself, so a slowed or sped-up
video keeps its audio in step. It shares its machinery with the Interpolate
node's audio_mode — one implementation, two ways to reach it, so the two can
never drift apart. Speech survives the stretch better than a naive resample
because the tempo change is done without moving the pitch.
Links
- Civitai: https://civitai.red/user/Polyhedron_AI
- Patreon: https://patreon.com/c/polyhedron_ai
License
Code: MIT.