
Stylebook
700+ visual styles for ComfyUI, every one with a rendered preview you can browse before you commit. Each ships a written description, a keyword list and a matching negative prompt. Plus 1050+ artists with descriptors that work even when your model does not know the name, and previewed modifiers for lighting, colour, era, period dress, finish and mood. Offline, zero dependencies.
Nodes (5)
Artists your model has never heard of, described so it still works
Two styles, one prompt, and a ratio that actually does something
Lighting, colour grade, era, finish or mood
One subject, forty styles, one run — the contact sheet node
600 styles with previews, so you stop gambling on the prompt
Stylebook
700+ visual styles for ComfyUI, every one with a rendered preview you can browse before you commit.
Stop guessing whether "wet plate collodion" or "risograph" will do what you want. Open the gallery, look at it, click it.
Browse every style in your browser → — all of them, with the preview each one ships and the exact prompt text it emits. No install needed.
Two companion references, same deal: the artist reference lists every name with its written descriptor, and the modifier gallery shows every lighting, colour, era, finish and mood tilt with its rendered tile and its verbatim text. All three pages link to each other.
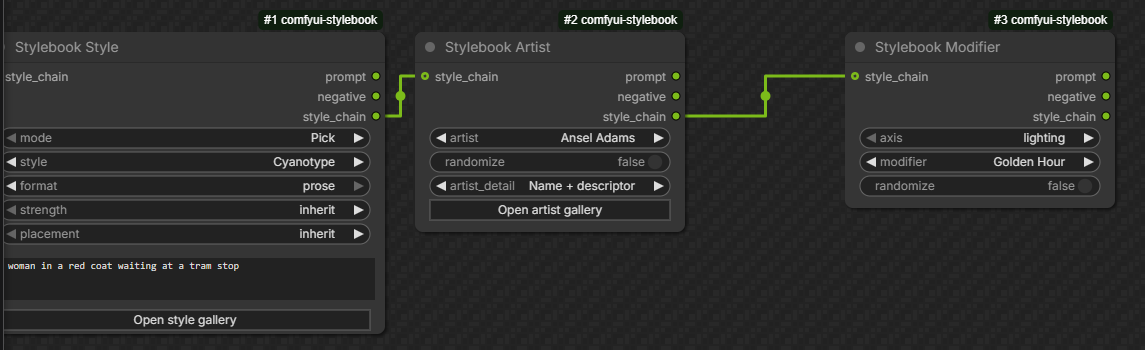
That chain, run as-is: subject a woman in a red coat waiting at a tram stop, style Cyanotype, artist Ansel Adams as descriptor only,
Golden Hour lighting. The coat stays red through a monochrome
process because the subject leads the prompt and the style trails it.
Every style ships four things: a written description, a keyword list, a matching negative prompt, and a preview image. 1050+ artists ship a written descriptor each, so the look still lands when the name means nothing to your model. No dependencies, no downloads, no network calls, no API keys.
Install
In ComfyUI Manager, search for Stylebook. Or:
cd ComfyUI/custom_nodes
git clone https://github.com/EnragedAntelope/comfyui-stylebook.git
Restart ComfyUI. The nodes are under conditioning/stylebook.
Quick start
- Add Stylebook Style. It defaults to Random, so it produces a style the moment you hit Run.
- Type your subject into
user_prompt, for examplea woman in a red coat waiting at a tram stop. - Click Open style gallery and pick something you like the look of.
- Wire
promptinto a CLIPTextEncode andnegativeinto a second one. - Chain Artist and Modifier after it if you want more.
Style, Artist and Modifier all read the same way: a mode widget on top
set to Pick, Random or Cycle, then the picker, then the filters that
narrow what Random and Cycle draw from. Only the widgets the current mode
actually uses stay on the node.
Every node names what it resolved on its own face — including on Random,
where there used to be no way to tell what you got without reading the
final rendered prompt. Right-click a node for two more: Copy resolved
prompt puts the full, untruncated text on your clipboard, and Pin this
pick (Style, Artist and Modifier) writes a Random or Cycle result into
that node's own picker and switches it to Pick — the fast way to keep
something you landed on without setting up a user_styles.json.
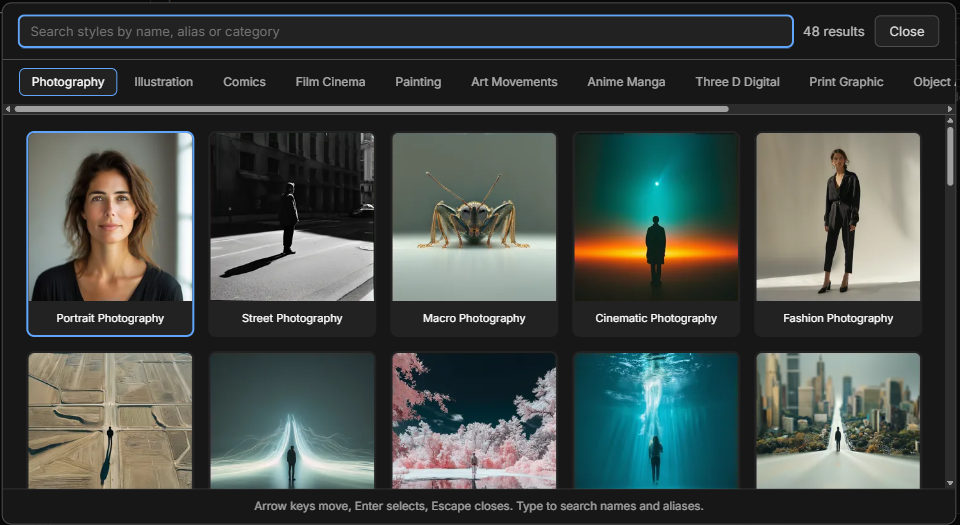
Finding what changed
Six hundred tiles is a lot to rescan when a release lands, so the gallery knows when each entry arrived. Every picker has a New in x.y.z tab holding what the latest release to add entries brought in (a fix-only release keeps showing the one before it), a new ribbon on those tiles, and a sort control that switches between A-Z and Newest first. The tab only appears where that release actually added something, so an empty one never trains you to ignore it. Your sort choice is remembered between openings. The public gallery has the same filter and sort.
Where a style is named after a real person — Sirkian Melodrama, Ozu Tatami Shot — the tooltip names them, and that person is always findable in the Artist reference. The pack refuses to ship a style that promises an artist it does not have.
The five nodes
| Node | What it does | |---|---| | Style | The medium. Pick from the gallery, draw a seeded Random from a filtered pool, or Cycle a whole category by index. Exclusive: a second Style node replaces the first. | | Artist | Layers one artist. Chain up to five; an artist already in the chain is skipped with a warning rather than doubled. Pick, Random or Cycle, same as Style. Search 1050+ artists by name, movement, category, or by what their work actually looks like. | | Modifier | Tilts one axis: lighting, colour grade, era, period dress, finish or mood. 140+ modifiers, every one with a description you can browse and a rendered thumbnail beside it, so you can see Bleach Bypass rather than read about it. One per axis. Era tilts how the image is rendered — palette, light, surface, finish — and puts nothing new in the frame, so it is safe on any subject; Period Dress is the axis that adds the period wardrobe. Pair them, or use Era alone. | | Blend | Mixes two styles at a ratio that genuinely shifts the balance, not just the endpoints. | | Sheet | One subject rendered across many styles as a batch. Choose them yourself from the gallery, or leave the list empty and let a seeded draw fill it. |
Best practices
Chain in this order: Style, Artist, Modifier.
Style -> Artist -> Modifier -> CLIPTextEncode -> sampler
Style carries your subject through the chain, so it goes first. Artists stack, so they sit in the middle where you can add or drop one freely. Modifiers are the finishing pass.
You can read prompt off any node in the chain. Each one re-renders
the whole prompt from scratch, so tapping the middle gives you a correct
partial result.
Pick the format your model likes. prose writes the style as a plain
sentence. tags writes it as a comma-separated keyword list. Every style
ships both, so switching costs nothing and takes one click. If your model
responds better to keyword lists than to sentences, use tags.
placement defaults to append, which is what prose wants. Your
subject leads and the style follows it. That ordering matters more than
it sounds: leading with a paragraph about film grain and naming your
subject last is the easiest way to get the style honoured and the subject
ignored. Switch to prepend when you are using tags, because a keyword
list weights its leading terms most.
In prose, the style is introduced rather than just appended. A style described as a noun phrase, tacked on bare, reads as another thing in the picture: chain a subject description into the View-Master Slide style and you get a View-Master in the image instead of an image that looks like one. So prose output marks the boundary explicitly.
A woman in a red coat waiting at a tram stop. Rendered as a View-Master
stereo slide with a cardboard mount holding a plastic film strip, twin
image frames, by Harry Clarke, intricate stained-glass inspired ink
drawings with jewelled colour.
With prepend the same boundary is marked from the other side, so the
style leads and The image shows ... introduces your subject. Keyword
lists get no connective, because a keyword list has no grammar to
confuse.
Wire the negative output if your workflow uses one. Every style
ships a hand-written negative saying what it is not.
Tested on Ligne Claire at one seed: with the negative, clean uniform line and flat unmodulated colour. Without it, the line quality survives but the flat colour and absence of shading do not. The positive carries the affirmative properties; the negative carries the exclusions.
If you run at CFG 1, where no negative applies at all, styles defined by what they exclude will read softer. Most styles are unaffected.
A style can shape the scene, not just the render. Some name their own
subject because the subject is the style: Ikebana is an arrangement of
flowers, Bonsai is a tree, the Tarantino trunk shot needs a car. Those
will assert themselves over your prompt, by design. Genre styles behave
the same way. If you want a style's look without its subject, drop
strength to subtle, which keeps only the defining phrase.
If your model does not know an artist's name, set artist_detail to
Descriptor only. The name drops out and the written description does the
work. This is the whole reason every artist has one.
Two or three artists, not five. The cap is five, but descriptors start
blending together past three. Names + lead descriptor keeps stacked
artists distinct.
Do not fight a style that already owns an axis. A Cyanotype fixes its own colour grade, so a Sepia modifier fights it. The node tells you when this happens instead of quietly producing mud.
Finding things
tag_filter is comma-separated and every term must match, so ink, flat
finds styles that are both. It searches tags, descriptions, names and
aliases, which means an old name still finds the style that absorbed it:
searching reverse harem finds Otome Game.
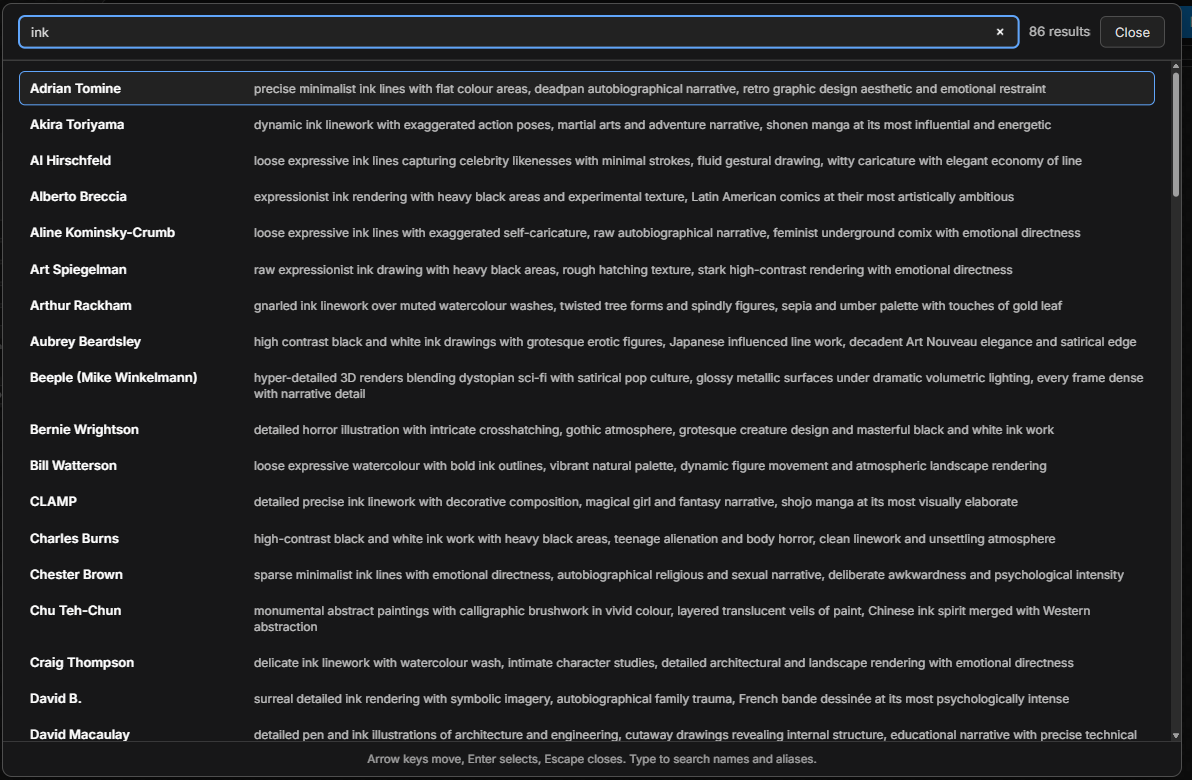
The artist picker searches descriptions too, so you can find someone by
what their work looks like rather than needing to know who they are.
Searching ink turns up dozens of them.
A few styles carry a scene or an adds badge. Almost every style only
changes how your subject is drawn. A handful do more, because that is what
they are, and the gallery says which before you spend a render.
A scene badge means the style decides where your subject is: Liminal Space is a transitional place emptied of people, and the tooltip spells it out — "Places your subject in a deserted transitional interior" — so you know rather than wondering why your portrait moved into a corridor.
An adds badge means the style brings a specific object into the frame whatever subject you give it: Fashion Photography is not relocating you, but it is definitely dressing you, and Magical Girl Transformation brings a costume to a picture of a mountain. The tooltip names it — "Adds an elaborate transformation costume to the frame".
The two are independent, and a style can carry both: Vanitas declares an arranged tabletop still life and a skull, a guttering candle and an hourglass. Everything unbadged leaves your subject alone.
Random keeps its meaning across updates. Cycle does not, by design.
A seed does not index into a sorted list, because adding one new artist would shift every later index and silently change what every saved workflow produces. Each candidate is scored against the seed independently, so shipping a new entry only changes the seeds where the newcomer happens to score highest: roughly one seed in N rather than all of them, which at this size is a fraction of a percent. Reordering the data changes nothing at all.
Cycle is the opposite and is meant to be. It steps the filtered pool by
index and wraps at the end, which is how you sweep a category
systematically, but an index is a position in an alphabetical list, so
adding entries shifts what any given index returns. Use Cycle to explore
and Random to reproduce.
With Auto-advance on, each queued run takes the next entry, so raising
Batch count renders a sweep from a single click.
Stylebook Sheet emits one prompt per style as a real list, so a
batched sampler renders the whole contact sheet in a single run. Its
style_names output tells you which style produced which image, in the
same order. Anything on its style_chain input applies to every entry,
so you can pin an artist and a lighting modifier and then sweep forty
mediums against them.
Click Choose styles to pick exactly which ones and in what order; the
gallery stays open and numbers each pick as you go. While that list has
anything in it, it wins outright and count, category and tag_filter
are ignored, because a list you typed out should not be silently trimmed.
Clear the list and the seeded draw takes over again.
You can type into that box directly, one name per line or comma
separated, and aliases work: Ukiyo-e finds Woodblock Print. A name that
matches nothing is skipped and said so, and an alias claimed by two
styles comes back naming both rather than guessing between them.
Categories
Photography, Film & Cinema, Illustration, Painting, Art Movements, Anime & Manga, Comics, 3D & Digital, Print & Graphic, Object & Artifact, Craft & Material, Collage & Mixed.
Custom styles
Drop a user_styles.json in the pack root; copy user_styles.example.json
to start. Styles, artists and modifiers all merge over the built-ins and
survive a git pull. It is parsed as plain JSON, and no code is executed.
Custom entries show up in the gallery under a Yours tab, alongside their
real category like any built-in. A bad entry is skipped with a reason
printed to the console rather than breaking the rest of the file. See
docs/custom-styles.md for the full field
reference, what a rejection message means, and how to keep the file outside
the pack directory.
If what you have is worth everyone getting, a PR is better than a private JSON file — see Bug reports and suggestions welcome below.
Using Stylebook with Identity Forge
Identity Forge
describes the subject. Stylebook describes the rendering. Connect
Identity Forge's prose output into Stylebook's user_prompt and chain
Stylebook downstream.
The split is by what each pack is describing, not by which one got there first:
- Identity Forge owns the subject. Who or what is in the picture, and also where the camera is: framing, shot type, composition, pose, expression, eye contact. Stylebook never touches composition.
- Stylebook owns the rendering. What process produced the image, plus the lighting, colour grade, era, finish and mood it was rendered with.
So set Identity Forge's lighting and mood to None and leave its
shot type alone. See examples/stylebook_with_identity_forge.json for a
ready-to-run workflow, built against Identity Forge 0.85.0 — if your
Identity Forge is newer and the example fails to load, right-click its
node and choose Fix node (recreate).
About the previews
Each thumbnail is one model's reading of one style, on one subject, at one seed. Styles are written to be portable, but nothing reads identically everywhere. Treat the gallery as a guide, not a guarantee.
Modifier thumbnails work the same way, with one difference worth knowing: every one on an axis is the same base render with only the modifier changed, so they are comparable with each other. The modifier gallery shows that base render on its own at the head of every axis, because a modifier thumbnail means little without the thing it is a deviation from.
Since 0.15.0 every modifier has one, on all six axes. The picker shows them as rows — thumbnail, name, description — on every tab and in search results. If you used the 0.14.0 grid of lighting tiles, the picture is now 128px rather than 168px, and it has the description beside it.
Bug reports and suggestions welcome
This is actively developed and feedback is genuinely wanted. Please open an issue for any of it:
- Something is broken or behaves oddly. Include your ComfyUI version and, if the browser console printed anything, paste it. Frontend bugs here have a habit of passing every test while being visibly wrong, so a screenshot is worth a lot.
- A style does not look like its name. Say which style, which model, and what you got instead. Style text is written to be portable, but nothing reads identically on every model and that is exactly the sort of thing worth knowing about.
- A style, artist or modifier is missing. Name it and, if you can, say what its look actually consists of. Artists in particular are more useful with a description than with a name.
- A descriptor is wrong or unfair. These are one-line summaries of real people's work and some of them will be clumsy. Tell us.
Pull requests are welcome too. ARCHITECTURE.md covers the layout, the
chain protocol and how to add a style. Run
python scripts/pre_commit_check.py before opening one.
License
MIT