
ComfyUI-InpaintCanvas
A ComfyUI extension with 6 custom nodes.
Nodes (6)
The Krita-style mask editor that stops inpainting from fighting the graph
The loader that reads ComfyUI's own file references
When a mask has to get back inside the editor
Turning 'every object in this image' into a hover-to-select map
Putting the inpaint back without a seam, as its own node
The node that mails a string back into your canvas editor
ComfyUI-InpaintCanvas
Inpainting with layers, without leaving ComfyUI. One node holds the image, the layers, the selection and the prompt. The selected region goes out as a crop, any inpaint chain works on it, and the result is wired straight back into the same node, where it lands as a new layer. Select the next spot, generate again.
Also as a desktop app: Scumble. The same editor runs standalone, with tabs, documents and PSD / ORA export. It renders through your own ComfyUI (with this node pack installed there) or through API providers with your own keys. Windows: Microsoft Store or GitHub releases; more on denrakeiw.com/scumble.
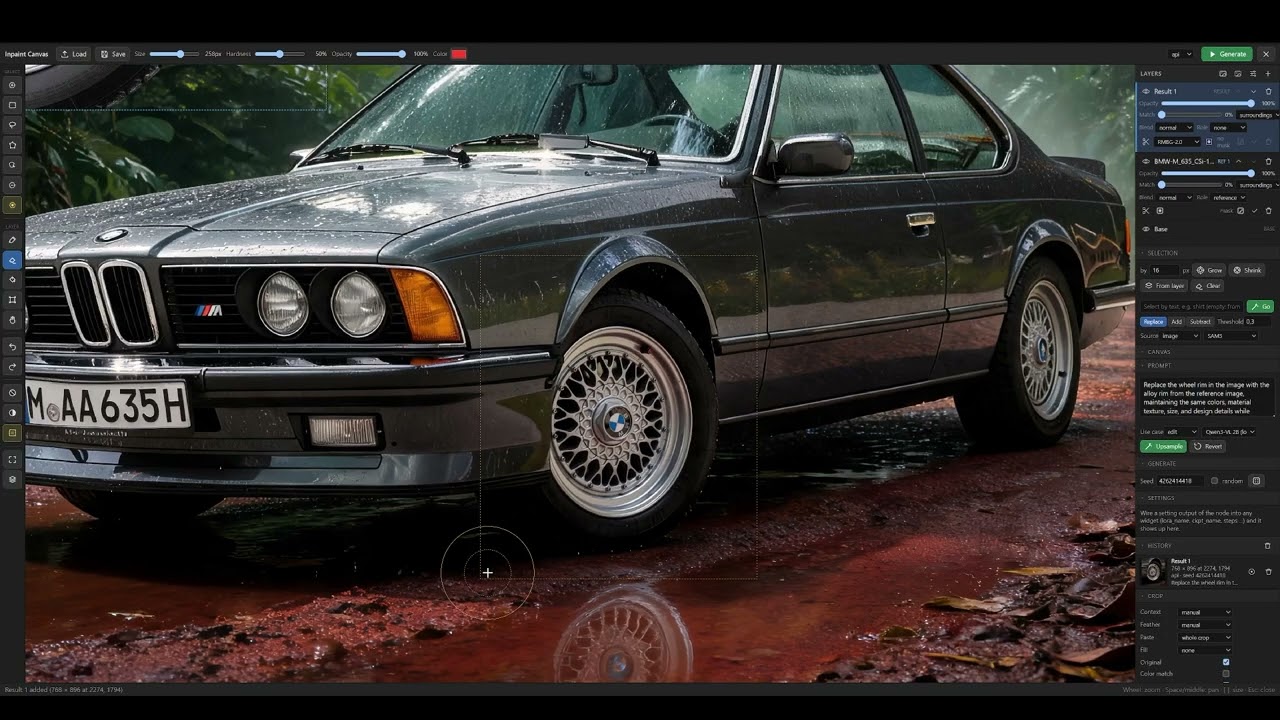
Video tutorial (3 min): swapping the wheels on a BMW 635 CSi with a reference image, prompt upsampling and a film grain finish.
Highlights
- Selection like a paint program: brush with loop closing, rectangle, ellipse, lasso, polygon, magic wand, object selection by hovering (SAM2), select by text (SAM3 or GroundingDINO + SAM), quick mask, grow / shrink / feather, saved selections, marching ants.
- Layers: thumbnails, rename, drag to reorder, duplicate, merge down, lock and alpha lock, solo, blend modes, per-layer colour match, masks and cutouts with the installed RMBG nodes, Ctrl+click picks the layer under the cursor, everything undoable.
- Painting and retouch: soft brush and eraser, pen pressure, straight lines, eyedropper, bucket, gradient, smudge, clone stamp and healing brush, text layers with 17 bundled open-source fonts (or your own) edited right on the canvas.
- Transform: move, scale, rotate at the corners, distort, warp, numeric fields, flip, 90°, snapping to edges, centre and guides; a canvas tool that extends (outpainting) or crops by dragging the frame; resize the image.
- Filter layers to finish the picture: film grain with 46 stock presets and real grain plates, sharpen, blur, levels, curves, brightness / contrast, hue / saturation, colour balance, black & white, LUT (.cube) and vignette, non-destructive, with masks and undo.
- Reference layers for Flux.2 / Kontext multi-reference editing: drop
images onto the canvas, switch a layer to reference and it travels with
crop_imageas an extra batch image. - Prompt upsampling with a local vision-language model (Qwen3-VL) or Gemini, tuned per use case: an edit instruction for Flux.2 / Kontext by default, or fill, add, remove, outpaint descriptions.
- View: rulers with guides, grid, before / after, side-by-side compare of two results, rotate the view, 100 % zoom; a tool column with grouped tools and flyouts.
- Export: PNG with the workflow embedded, JPEG, WebP, and layered PSD or ORA (Krita / GIMP), plus the active layer or the selection mask as PNG; cleanup of the node's working files from inside the editor.
- The round trip: auto context and auto feather from the selection size, fill modes for the masked area, colour matching and alignment when the result is stitched back, an API / Local switch with two result inputs so a paid API node stays idle while you work locally, denoise, seed, negative prompt and up to eight editor-driven setting outputs, helper prompts that never trigger your generation chain.
A compact English manual for a Note node or a text display lives in GUIDE.md.
Installation
Install it from the ComfyUI Manager by searching for Inpaint Canvas, or clone
the repository into ComfyUI's custom_nodes folder:
cd ComfyUI/custom_nodes
git clone https://github.com/DenRakEiw/ComfyUI-InpaintCanvas
Restart ComfyUI. The node itself has no extra Python dependencies beyond what
ComfyUI ships (OpenCV is used for the border fill when available). To update
later, run git pull in that folder and restart.
The package on the Comfy Registry (what comfy node install and a versioned
install from the Manager fetch) holds the node and the editor only; the MCP
server (mcp/), the tests and the development notes are in the git repository.
Optional node packs, each enabling one editor feature:
| Feature | Node pack | Models |
| ------------------------- | ----------------------------------------------------------- | ------------------------------------------------------------- |
| Select by text (default) | comfyui-rmbg (SAM3) | models/sam3/sam3.pt (downloaded by the node on first use) |
| Select by text (fallback) | comfyui_segment_anything | GroundingDINO SwinT + SAM in models/grounding-dino, models/sams |
| Object selection (hover) | ComfyUI-segment-anything-2 | sam2_hiera_base_plus.safetensors in models/sam2 |
| Prompt upsampling | ComfyUI-QwenVL or ComfyUI's Gemini API node | Qwen3-VL 2B in models/LLM/Qwen-VL (downloaded on first use) |
| Layer cutouts | comfyui-rmbg (RMBG-2.0, BiRefNet, BEN2) or ComfyUI-BRIA_AI-RMBG | models/RMBG/<model> (downloaded on first use); BRIA ships its weights |
The editor lists only the backends whose nodes are installed. Filter layers, reference layers, masks, save and cleanup need nothing beyond the node.
Run on RunPod
Ready-made pod templates with ComfyUI, Inpaint Canvas and the optional node packs (RMBG, segment-anything-2, QwenVL) preinstalled. Pick the one matching your GPU:
| Template | GPUs | | --- | --- | | comfyui-inpaintcanvas_cuda12.8 | RTX 4090, L40S, A40, A100 and older | | comfyui-inpaintcanvas_cuda13.0 | Blackwell: RTX 5090, RTX PRO 4500 / 6000 |
Set JUPYTER_PASSWORD and FILEBROWSER_PASSWORD when you deploy. HF_TOKEN plus
COMFY_MODEL_PRESET=flux2-klein downloads the models of the local Flux.2 Klein example on
first boot. Image source and details:
DenRakEiw/inpaint_canvas_runpod.
Quick start
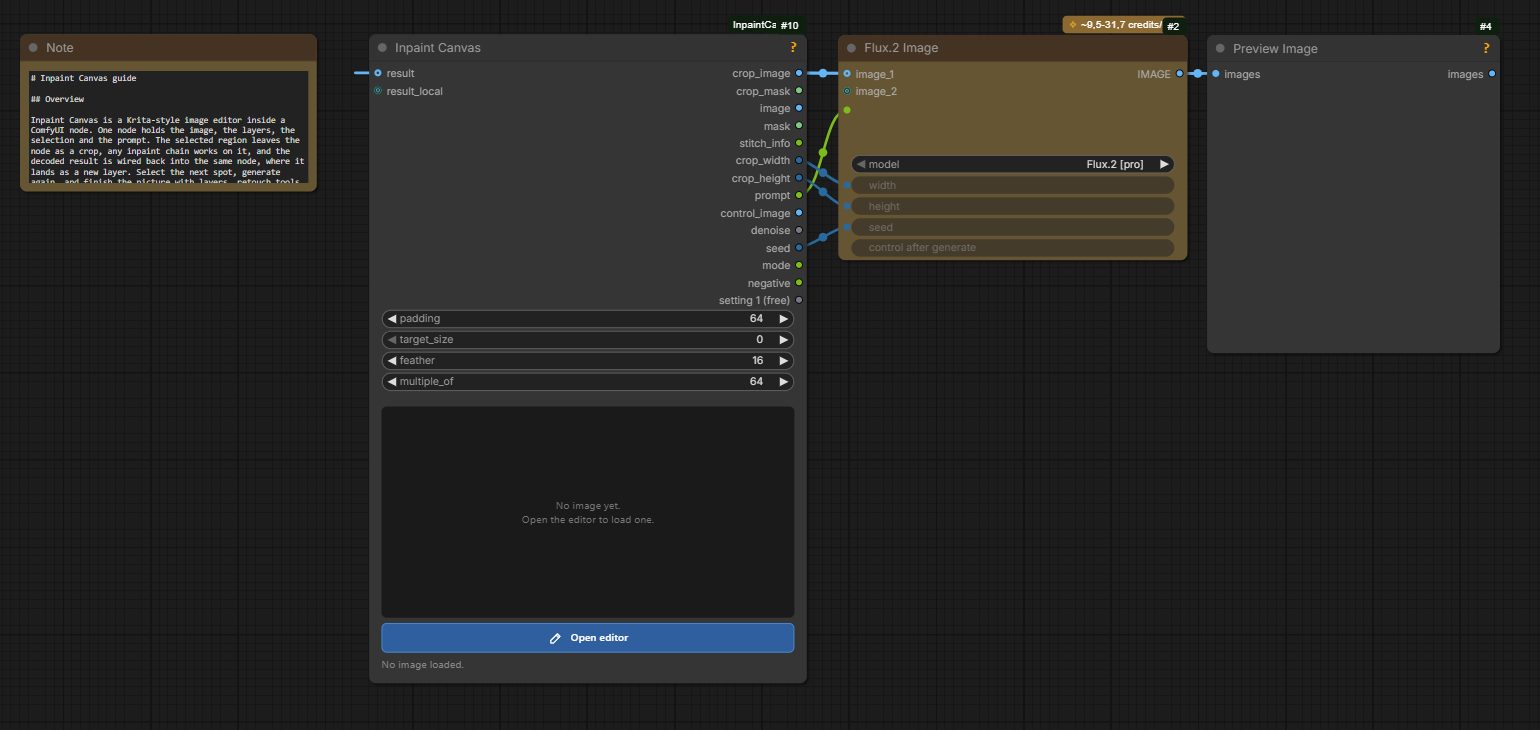
- Add Inpaint Canvas, click Open editor, load an image (button, Ctrl+V or drag and drop) or start with New, an empty white canvas of the size you type (everything in the editor is discarded, it asks first).
- Wire
crop_image(andcrop_mask,prompt,crop_width/crop_heightas your chain needs them) into your inpaint chain, and the decoded result back intoresult(API chain) orresult_local(local chain). - Paint or pick a selection, type a prompt, press Generate (Ctrl+Enter).
- The result comes back as a new layer. Compare, discard, refine, select the next region.
Minimal local chain:
Inpaint Canvas ─crop_image──▶ VAE Encode (for Inpainting) ─▶ KSampler ─▶ VAE Decode ─┐
               ─crop_mask───▶                              ▲ seed, denoise            │
               ◀─────────────────────────── result_local ◀────────────────────────────┘
With an API node (Flux.2 for example) wire crop_image, prompt,
crop_width and crop_height into it and its image output into result.
The stitch accepts any size and RGBA; a different aspect ratio is
center-cropped, never distorted.
Example workflows
Two ready-made graphs are in examples/: drop the file onto
ComfyUI, open the editor, load an image and press Generate.
-
inpaint_canvas_flux2_api.json: the API chain.crop_image,prompt,crop_widthandcrop_heightgo into ComfyUI's Flux.2 Image API node, its image comes back intoresult. Reference layers ride along incrop_imageand the API node reads them as extra reference images. Needs ComfyUI API credits, no local model.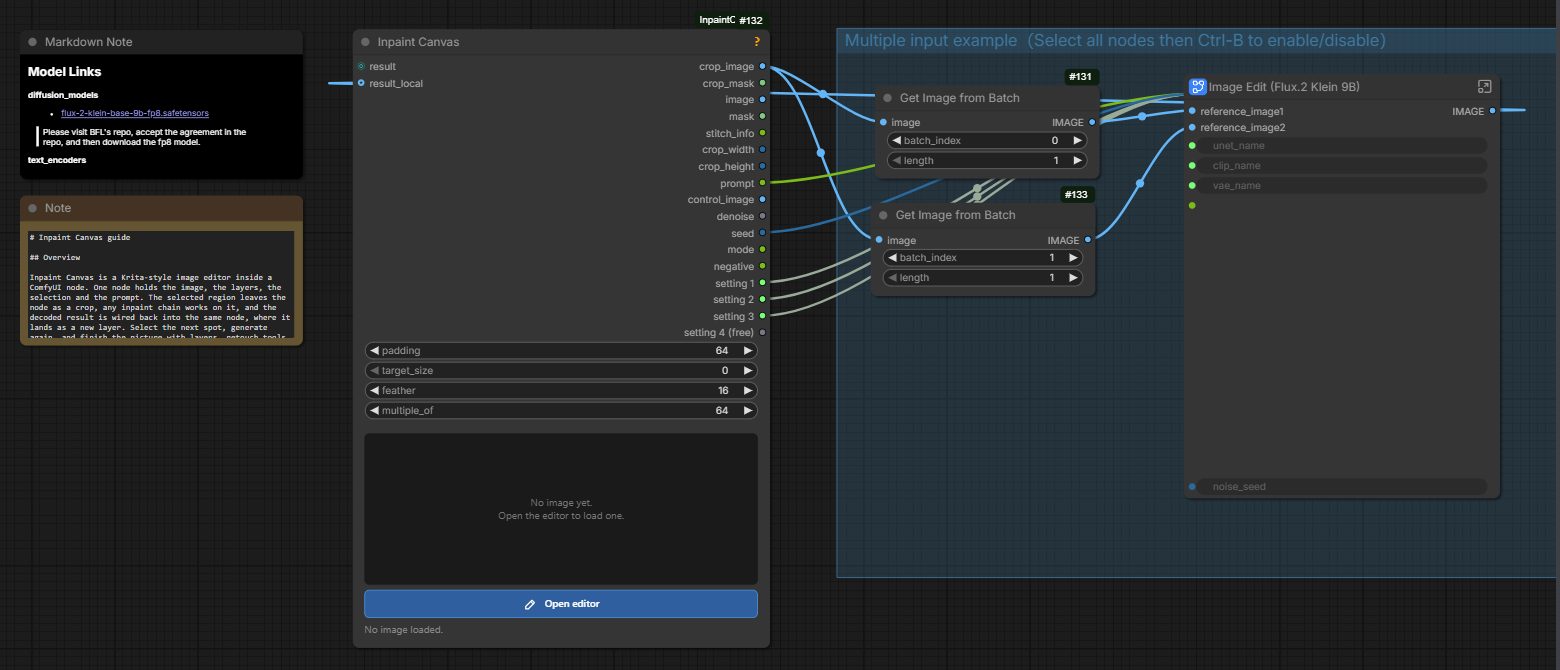
-
inpaint_canvas_flux2_klein_local.json: a local chain with Flux.2 Klein 9B in a subgraph (UNET, Qwen3 8B text encoder, Flux.2 VAE, ReferenceLatent, SamplerCustomAdvanced). Two Image From Batch nodes split thecrop_imagebatch: index 0 is the crop that is edited, index 1 the first reference layer, which goes into ReferenceLatent. The result returns intoresult_local; switch the editor to Local. A note in the graph lists the model downloads (flux-2-klein-base-9b-fp8,qwen_3_8b_fp8mixed, the Flux.2 VAE). On a 32 GB card see the VRAM notes under Generate below: the helper models are freed before a local run. -
inpaint_canvas_flux3_boxes.json: boxes for FLUX 3 (see Boxes for FLUX 3 below):box_promptgoes into the prompt of ComfyUI's Flux 3 Image API node,crop_imagewhole into its first image (images.image_1),aspect_ratioon auto, and the image comes back intoresult. Needs ComfyUI API credits. Not yet loaded in a real ComfyUI: check the links after dropping it in.
The graphs carry the guide as a note. The editor state in the examples is empty, so the node shows "No image" until you load one.
The editor
Selecting
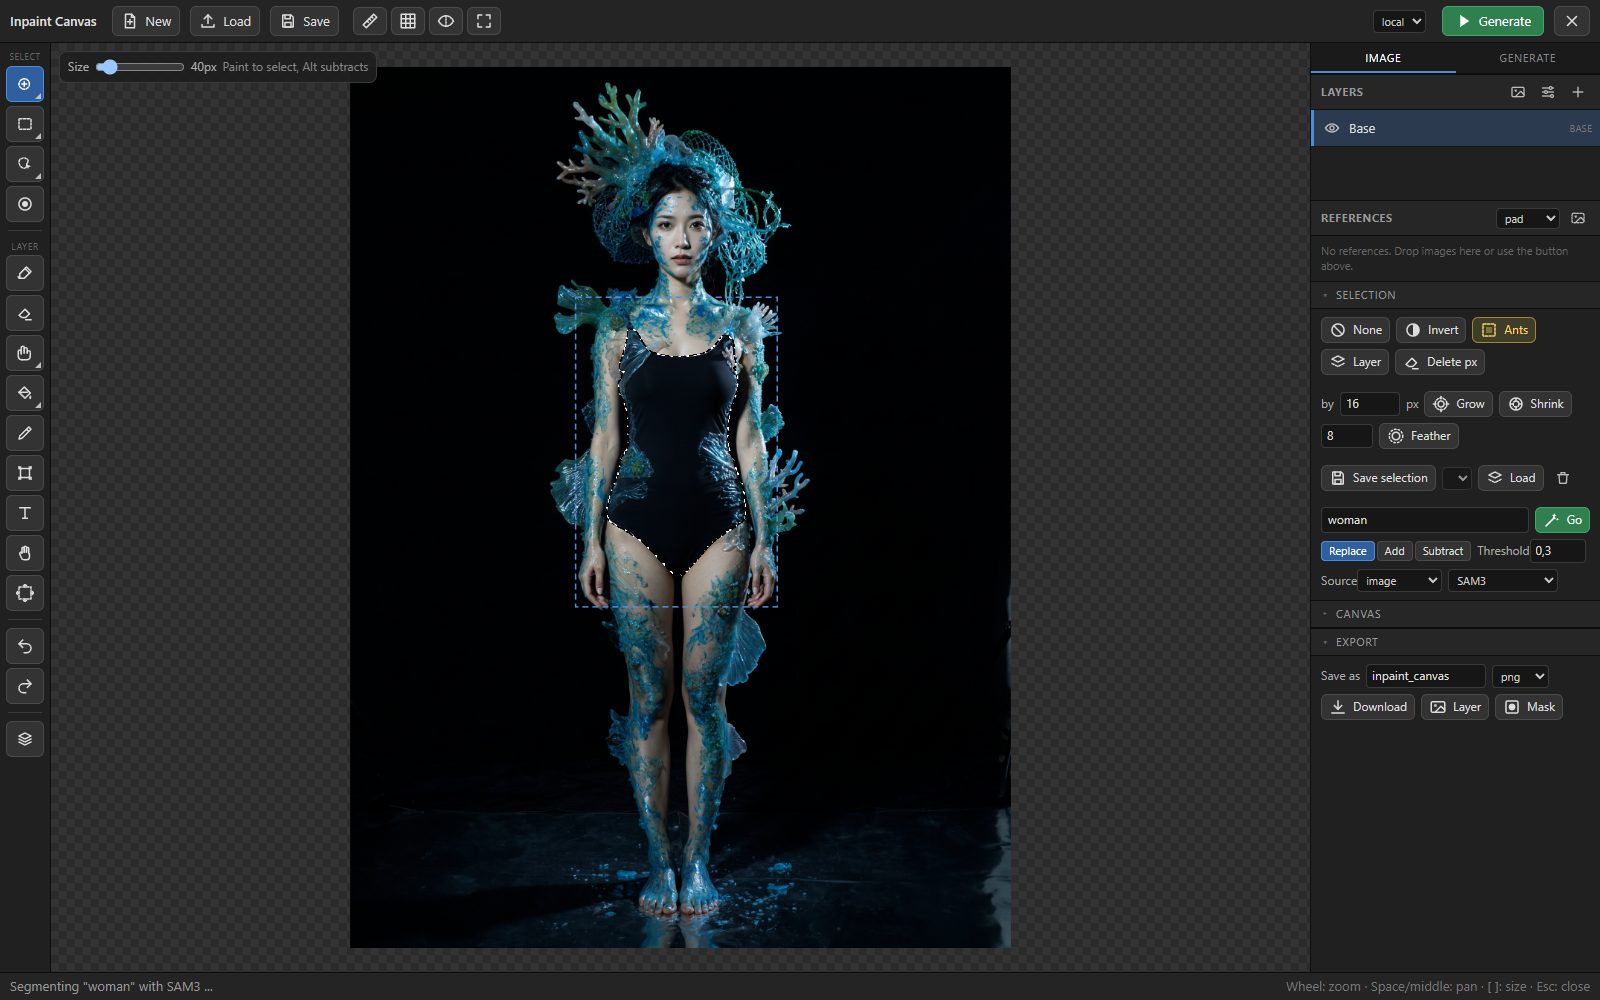
The selection is shown as a marching-ants outline; the dashed-square button in the toolbar switches to a red tint (useful to see a soft or grown selection as an area). The blue dashed rectangle is the crop that leaves the node, not the selection.
Rectangle and lasso replace the selection; hold Shift to add, Alt to subtract. The brush adds, with Alt it subtracts.
The tool column on the left groups related tools: a button shows the group's current tool and a small triangle. Left-click picks that tool; right-click, holding the button or clicking the triangle opens the group (selection brushes, marquees, smart selection, brushes, retouch, fill), and the shortcuts pick any tool directly. The bar above the canvas shows the options of the active tool (brush size, hardness, opacity and colour for the brushes; tolerance, strength, gradient type and so on for the others). The side panel has two tabs: Image (layers, selection, canvas, export) and Generate (prompt, generation settings, history, crop). In the layer list only the active layer shows its controls; the others are one line each.
Tools: brush (B), rectangle (R) and ellipse (Shift+R; Ctrl keeps
them square or round, dragging inside an existing selection moves its
outline), lasso (L), polygon (Shift+L: click point by point, click the first
point, double-click or Enter to close, Backspace removes the last point, Esc
cancels), magic wand (W: similar colour under the cursor, tolerance and
contiguous in the bar above the canvas), object selection (O), deselect brush
(D). Quick mask (Q) turns the paint and erase tools into selection
brushes and the bucket into a wand, with the selection shown as a red tint.
The Selection section grows, shrinks and feathers the selection (soft
edge, respected by painting, filling and the mask that is sent along), takes
it from a layer, and saves selections with the workflow to load them again
later (Shift+click adds, Alt+click subtracts). [ and ] change the brush size, the top bar holds
size, hardness, opacity and the paint colour.
-
Close loops (toggle under the selection tools): end a stroke where it started and the inside is filled as well. A small gap is bridged with a straight line, a loop against the image border counts, and the deselect brush cuts loops out the same way.
-
Object selection (O): on first use SAM2 finds every object in the image once (a few seconds). Then the object under the mouse lights up in cyan, click adds it, click again removes it, Shift always adds, Alt always subtracts. Small objects win over the large ones containing them, a face over the person. The map refreshes itself when the image changes.
-
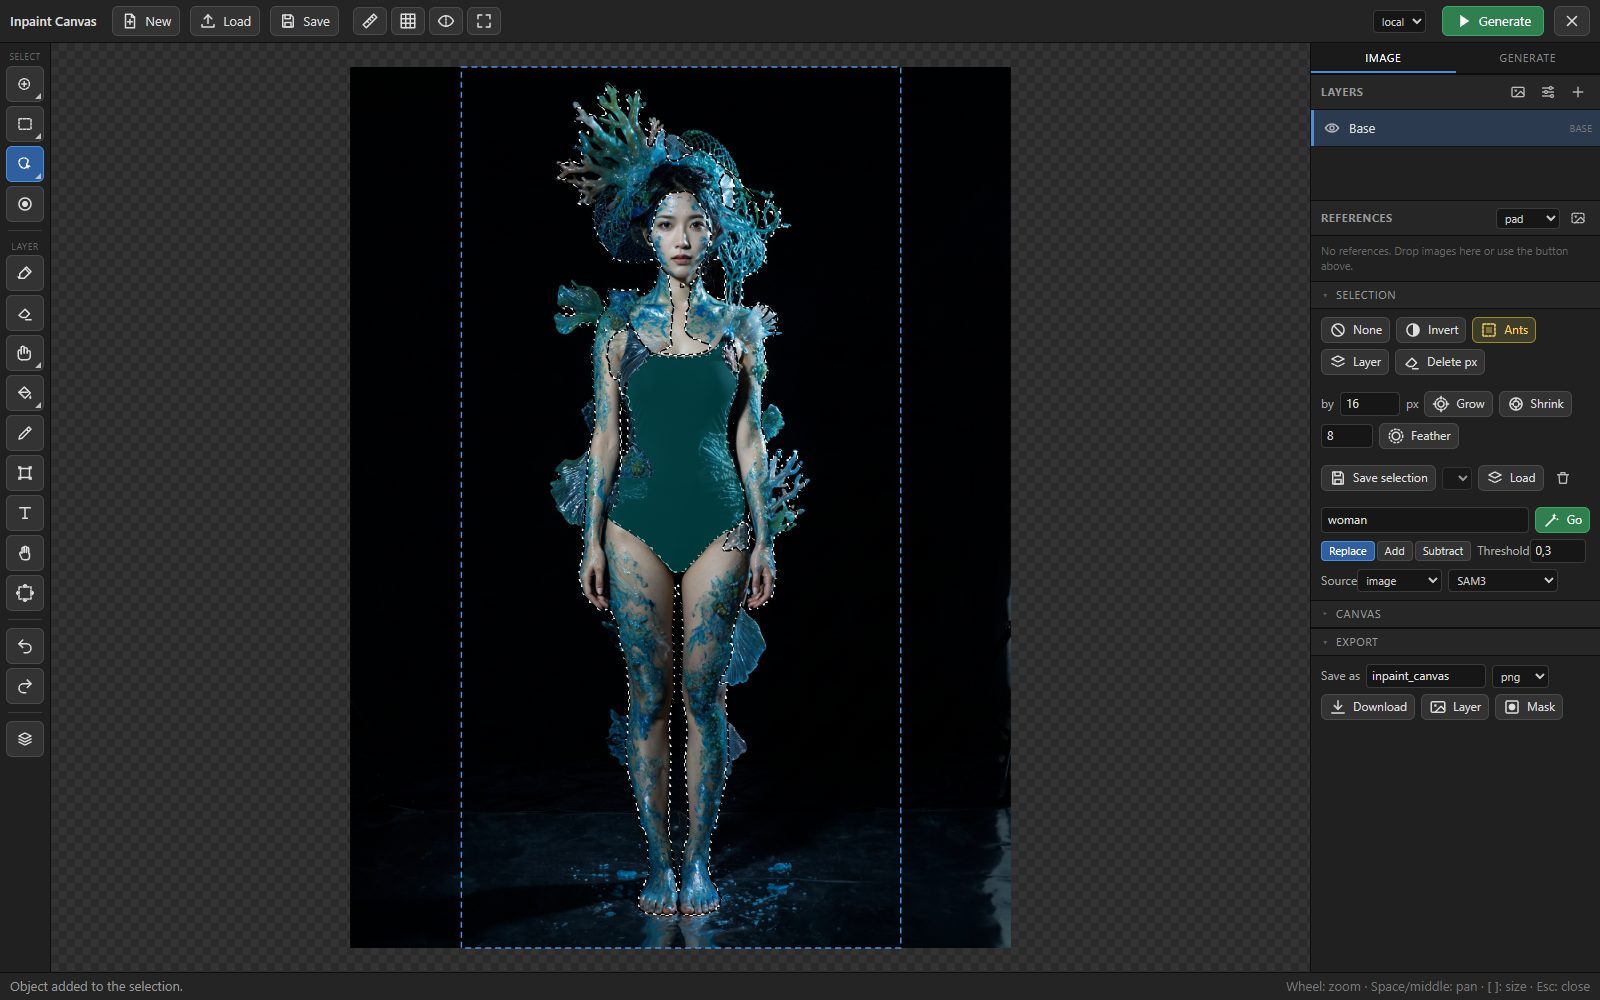
Select by text: type what you want ("shirt", "hair", "the red car"), press Go or Enter, and the mask comes back as the selection in the chosen mode (Replace, Add, Subtract). Leave the field empty and press Go with a prompt written below: the language model names the object the prompt is about ("roter Seiden-Badeanzug" gives "bathing suit"), that term is segmented and shown in the field. Threshold: lower finds more. HQ (GroundingDINO + SAM only) uses the large SAM model.
-
Source: what the segmentation models look at. image is the flattened visible layers, exactly what your chain sees. active layer shows the model only that layer on neutral grey and clips the result to its pixels, so you can pick objects inside a result or paint layer without the base interfering. Applies to both select by text and object selection.
-
Grow / Shrink by n pixels (exact distance transform), From layer takes the opaque area of the active layer. Clear the selection (Ctrl+D), invert it (Ctrl+I). Clear (Del) deletes the selected pixels of the active layer: select what you want to keep, invert, Del. Without a selection, Del deletes the active layer. Ctrl+C copies the selected pixels of the active layer (Ctrl+Shift+C from everything visible), Ctrl+X cuts them, Ctrl+V pastes them as a new layer at the same place. An image from the system clipboard becomes a new layer when a base is loaded, the base otherwise.
Layers
-
Paint (P) and erase (E) on the active layer; painting on the base creates a paint layer automatically, the base itself is never erased. Fill the selection with the colour (Shift+F). Soft brushes stamp radial dabs, opacity applies per stroke. With a selection present, brush and eraser only touch the selected area; clear the selection (Ctrl+D) to paint freely. The eraser has its own hardness, soft by default; the Hardness slider always shows and edits the active tool's value, both are remembered. Shift+click draws a straight line from where the last stroke on that layer ended; a pen's pressure scales the brush size.
-
Eyedropper (I), or Alt+click with the brush: picks the colour under the cursor from the visible image (or the active layer, bar above the canvas).
-
Bucket (G): fills the connected area of similar colour under the cursor on the active layer (a new paint layer on the base), within the selection. Tolerance, contiguous and the sample source (image or layer) are in the bar above the canvas. Gradient (Shift+G): drag to draw a linear or radial gradient from the colour to transparent, white or black.
-
Smudge (Shift+S): drags the pixels along the stroke like a finger in wet paint, with a strength slider; the tool of choice for a hard seam after inpainting. On the base it first adds a copy layer.
-
Clone stamp (S) and healing brush (J): Alt+click sets the source, then paint to copy from there onto the active layer (new paint layer on the base). The healing brush shifts the copied texture to the colour and brightness of where it lands. Aligned keeps the offset between strokes, Sample takes the visible image or the layer alone.
-
Transform (T) has four modes in the bar above the canvas. Scale: drag inside to move, corners scale proportionally (Shift for free aspect), edge handles scale one axis, arrow keys nudge (Shift: 10 px). Drag just outside a corner to rotate (Shift snaps to 15°); while the rotation is pending the handles still scale and the inside still moves, Enter bakes it. Rotate does the same from the bar with an angle field. Distort: drag the four corners (perspective). Warp: bend the layer with a 3 to 6 point grid. Rotate, distort and warp preview live and are baked with Enter or Apply, Esc cancels, undo restores the layer completely. The bar also has numeric X / Y / W / H fields, flip horizontal / vertical, rotate 90° either way and centre. While moving, the layer snaps to the canvas edges and centre (pink guide, Alt moves freely).
-
Text (Shift+T): click on the canvas to add a text layer. The layer panel holds the text (several lines), font, size, colour, bold / italic, alignment, line height, letter spacing and an outline. 17 open-source fonts come with the node (Roboto, Open Sans, Montserrat, Oswald, Bebas Neue, Anton, Abril Fatface, Bangers, Playfair Display, Lora, Cinzel, Lobster, Pacifico, Dancing Script, Caveat, Permanent Marker, Roboto Mono; OFL / Apache licensed, see
js/fonts/licenses). The + next to the font list uploads your own .ttf / .otf / .woff files toinput/inpaint_canvas/fonts, where they stay available. Text layers are ordinary pixel layers for everything else: move them with the text tool, scale and rotate with T, mask them, blend them; editing the text renders them again.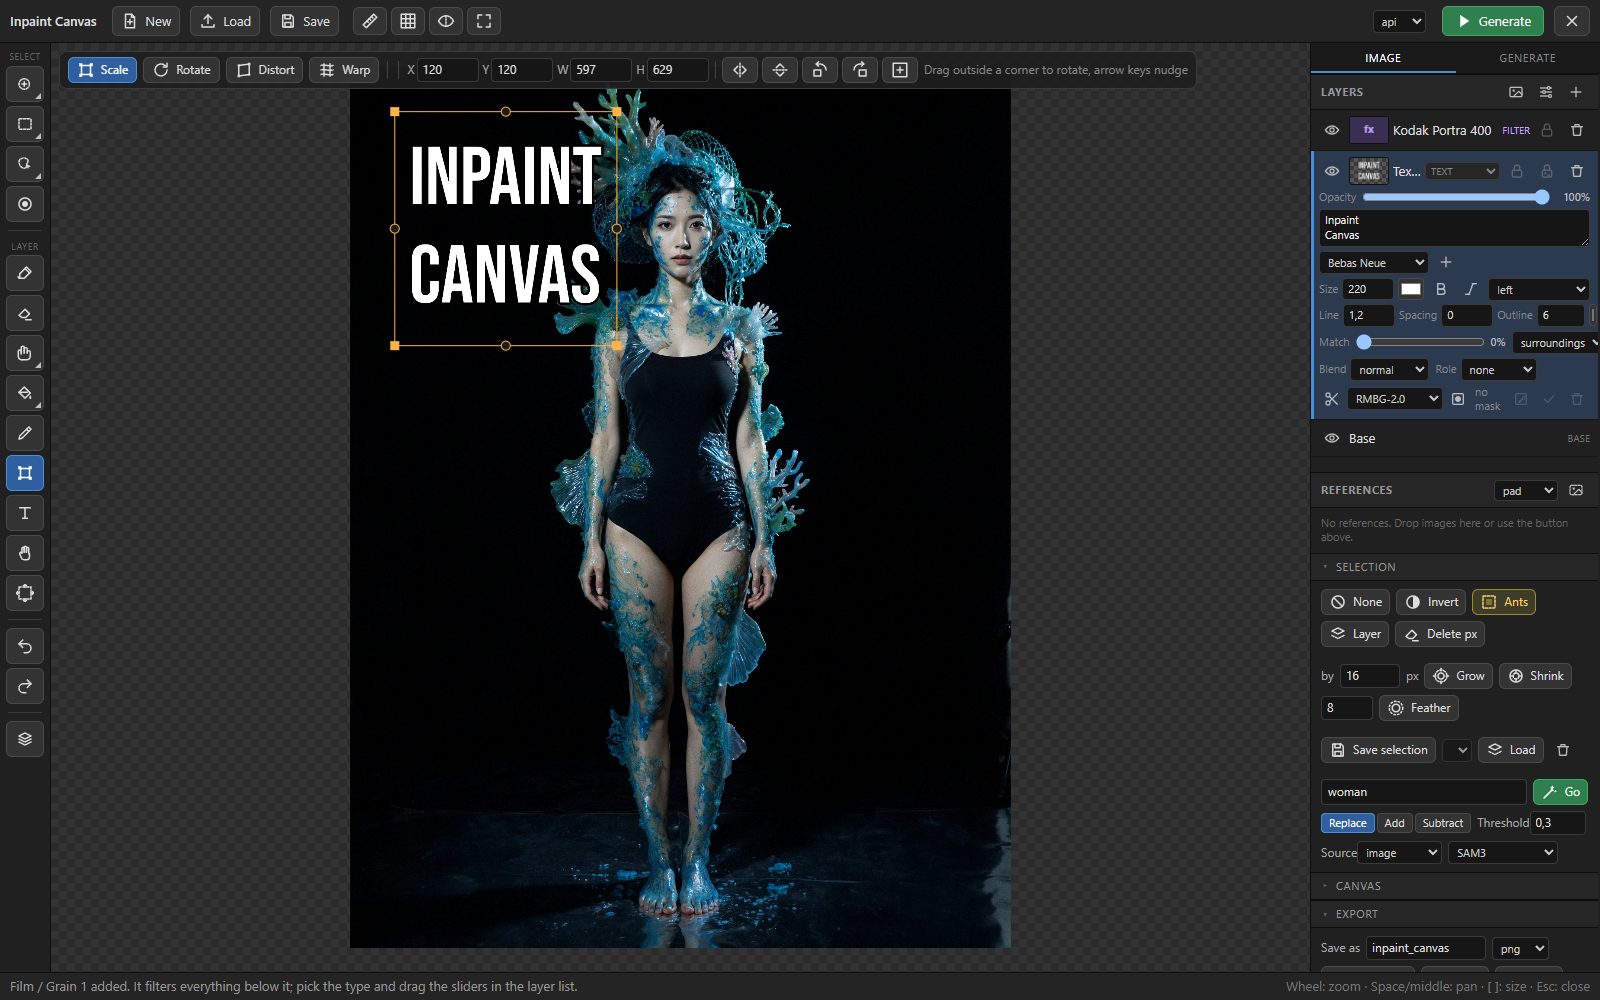
-
The layer list (right): click to activate, Ctrl+click on the canvas activates the topmost layer with a pixel under the cursor. Each row has a thumbnail, the eye (Alt+click: solo, again to restore), the name (double-click renames), a lock (no painting, moving, merging, deleting), an alpha lock (paint only lands on existing pixels), opacity, blend mode (multiply, screen, overlay, ...) and delete (Delete key). Drag a row's header to reorder, or Ctrl+] / Ctrl+[ ; Ctrl+J duplicates, Ctrl+E merges the layer into the one below (the bottom layer into the base), the plus button adds an empty paint layer (Ctrl+Shift+N). Flatten bakes all visible layers into the base. Deleting, reordering, merging and duplicating are undoable.
-
Match (per layer, non-destructive): shifts the layer's colours and contrast towards the image below it, per channel by mean and spread like the stitch's colour match, dosed by the slider. Source surroundings measures a ring around the layer's opaque area, underneath the pixels the layer covers (for results that replace what was there). Fixes a result generated without colour match, a pasted cutout in a new scene or an imported photo with a different white balance; applied in the preview, in flatten, in the run and when saving.
-
Control layers: give a layer a role (scribble, lineart, depth, pose, canny, other). Such layers are left out of the image your chain sees and instead composited on black into the
control_imageoutput, cropped and scaled exactly likecrop_image. Feed it to ControlNet. -
Image layers: drag an image onto the canvas and it opens as a new layer centred on the drop point, at native size (fitted to the canvas when larger); several files cascade from there. The image button in the Layers header and dropping onto the layer list do the same at the origin, and an image pasted from the system clipboard lands as a layer too. Ctrl+drop replaces the base image instead; with no image loaded a drop loads the base.
-
Reference layers (Flux.2 / Kontext multi-reference editing) have their own References list under the layers: the button in its header or a drop on the list uploads files (Shift+drop on the canvas does the same), the fit select in the header says how they are brought to the crop's size, the header counts how many are sent. Hidden references are not sent. A reference is shown on the canvas with a cyan frame and its batch number, but it is not part of the image your chain sees. Instead they are appended to the
crop_imagebatch, top of the list first, fitted to the crop's size (cutout masks applied, transparency on white). The Flux.2 API nodes flatten batches into their image inputs, so the one link you already have carries the crop and all references; without reference layerscrop_imagestays a single image and nothing downstream changes. Any layer can be turned into a reference through its role select, a hidden reference layer is left out. References in the Canvas section chooses how a reference is fitted to the crop size: pad with the image's border colour, crop to cover, or stretch. Not for chains that VAE-encodecrop_image, they would encode the references too. -
Filter layers: see the section below.
-
Layer masks and cutouts: every layer row has a mask row. Cutout runs one of the installed background removal nodes on the layer (comfyui-rmbg's RMBG-2.0, BiRefNet or BEN2, or BRIA RMBG 1.4; the model select shows up on the active layer) and turns the result into a transparency mask, so a product shot or a pasted photo becomes a cutout without touching its pixels. Mask from selection keeps only the selected part visible. With a mask present, the pencil toggle switches the paint (reveal) and erase (hide) tools onto the mask, Shift+F reveals the selection; the check applies the mask to the pixels, the trash removes it. Masks are undoable, survive a reload, and are respected by From layer, the segmentation source active layer, the reference batch and the run image.
Filter layers
The fx button in the Layers header adds a layer without pixels that filters everything below it. Opacity, blend mode and a transparency mask work like on any layer, so mask from selection limits a sharpen or a grain to the inpainted patch. Sliders preview at reduced resolution while you drag and render in full when you let go; every drag is one undo step. Filters are baked into the image your chain sees and into flatten, extend and save. Filter layers have no pixels of their own, so painting, transforming and cutout are not available on them (mask editing is).
- Film / Grain. Film-like grain, strongest in the midtones, with a colour share. Its distribution follows what real grain scans measure: skewed, bright specks on a darker ground, set by the Speckle slider. The Film select holds about fifty stocks in groups: colour negative from Ektar and Portra to Gold, UltraMax and Superia; slide films such as Ektachrome, Kodachrome, Velvia and Provia; black-and-white from Pan F to Tri-X, Delta 3200, Ortho and infrared; cine stocks such as Vision3 and CineStill; and special films such as LomoChrome Purple, Turquoise and Metropolis, Aerochrome, redscale, cross-processing, expired and instant film. A preset sets the grain and a parametric colour character whose strength the Look slider controls. These are approximations of how the stocks are described, not measurements; a real film LUT below the grain layer stays the faithful route for colour. With Plate you load a real grain plate, a scan of uniformly exposed film such as the fotokorn.de packs, which then replaces the synthetic grain at the chosen scale.
- Sharpen: unsharp mask with amount, radius and threshold.
- Gaussian blur: radius in image pixels (0–64). The edges blur into a mirrored copy of the picture, so nothing goes dark or transparent at the border.
- Levels: input black and white point, gamma, output black and white.
- Curves: a curve editor in the layer row with a master (RGB) curve and one per channel. Click adds a point, drag moves it, dragging it out of the box or double-clicking removes it, the end points move only vertically. The curve is a smooth monotone spline (no overshoot), the master curve is applied first, then the channel curves; a luma histogram of what the layer sees is drawn behind the curve. Reset straightens the current channel, Shift+Reset all four.
- Brightness / Contrast: brightness lifts or lowers with the ends protected (white stays white, black stays black); contrast pivots around mid grey, the classic control (+100 is nearly a threshold, −100 flat grey).
- Hue / Saturation: hue rotation (±180°), saturation (−100 = grey, +100 doubles) and lightness (blends towards white or black), applied to all colours at once.
- Colour balance: cyan–red, magenta–green and yellow–blue for shadows, midtones and highlights each, with Preserve luminosity (on by default) keeping the brightness where it was.
- Black & white: channel weights for red, green and blue (30/59/11 by default; only their ratio matters), plus a tint hue and strength for sepia and split-tone looks.
- Invert: negative of the image below (no parameters).
- LUT: load any 3D
.cubewith a strength slider; the LUT is stored with the workflow. - Vignette: amount, size and softness.
Prompt and upsampling
The prompt field is stored with the workflow and leaves the node on the
prompt output. Upsample (Ctrl+U) lets a vision-language model rewrite a
short request (any language) into a proper English prompt. It sees the crop
with the selection outlined in magenta (solid green when Fill is green) and
writes for the chosen use case:
| Use case | What it writes | | ---------- | --------------------------------------------------------------------------- | | fill | what the area should show, matching materials, lighting and perspective | | add | a new object with scale, contact shadows and the scene's lighting | | remove | only the background that should appear, never naming the object | | edit | one verb-first instruction for editing models (Flux.2, Kontext, Klein): the requested change with its exact colours and materials, then what stays unchanged | | outpaint | the scene continued beyond the border | | auto | outpaint when the selection touches the border, edit otherwise |
When the selection came from select by text, the model is also told what the outline contains. Revert brings the previous prompt back. Backends: Qwen3-VL 2B locally (short English requests are the most reliable; German requests occasionally lose a word, so read the result), Qwen3-VL 4B (downloaded on first use, about 8 GB, better at remove and at translating), or Gemini through ComfyUI's API node.
Boxes for FLUX 3
FLUX 3 reads boxes in the prompt: where a new element goes, which element
stays, moves or goes, and which reference picture (or a part of it) is placed
where. Draw them with the Boxes tool (X): drag to draw a box, click to
select it, double-click to describe it, drag to move, the handles resize;
Delete removes the selected box, D duplicates it, the arrows nudge it (Shift
10 px), Alt+click picks a box under another. The Boxes section of the
Generate pane lists them: each row has the box's id (the name the prompt can
use as <id>), its kind and its description.
| Kind | What it says | | -------------- | ---------------------------------------------------------------- | | New | what the description says goes in the box | | Text | the words are rendered in the box (the description: how they look) | | Keep | the element in the box stays where it is | | Move | the element moves from its source box to this one | | Remove | the element is taken out, the background filled | | From reference | a reference layer (or a part of it) is placed in the box |
The Boxes switch under the prompt sends them; the first box turns it on.
With the switch on and no box, the selection goes as one box described by the
prompt. The node writes them into its box_prompt output: the prompt, a
sentence per box saying what goes where (named as <id>), then FLUX 3's JSON
rows, measured in the crop it actually sends. Wire box_prompt into the prompt
of a FLUX 3 node and crop_image whole into its first image: the crop is
ref_image_0, the untouched crop (Original) the next picture when it goes, then
the reference layers. A box outside the crop, a reference that did not load or
a prompt over 15000 characters is left out or reported: the notes show in the
editor's status line and in ComfyUI's console. With the Boxes switch off
box_prompt is the plain prompt; with it on and no box, the selection goes as
one box, so switch it off before box_prompt feeds a model that reads no boxes.
An @img1 in a description or the prompt (the editor's label of a reference
layer) becomes the name FLUX 3 reads for that picture, "image 2" and so on.
elements carries the New and Text boxes as bounding-box elements for a
Flux 3 Image node's bounding_boxes input on a new image, a Create Bounding
Boxes preview or a JSON prompt builder. On an edit wire box_prompt instead,
never both into one node: the rows would go twice. Copy rows puts the rows,
measured against the whole picture, on the clipboard (a page served over plain
http from another machine has no clipboard: wire box_prompt there).
Generate: API or local, denoise, seed, refine
VRAM and the helper models. Select by text, object selection, cutouts
and prompt upsampling run Qwen-VL, SAM3, SAM2 or RMBG through helper
prompts; those nodes keep their weights loaded for the next call, outside
ComfyUI's model management. In API mode that is fine, they stay resident.
In local mode a big model such as Flux.2 needs the whole card, so before
a local run the editor frees them (ComfyUI's /free) whenever a helper was
used since the last run; the next upsample or segmentation reloads its model
in a few seconds. Free VRAM in the Generate section does it by hand.
- The api / local switch next to Generate says which chain the result
comes back from: api uses the
resultinput, local theresult_localinput. Only the chain wired to the selected input runs. When only one of the two inputs is wired, that one is used whatever the mode says, and the Crop panel says so ("only input wired"); it warns when nothing is wired at all. - Denoise (a slider, local mode: 1.0 repaints the selection, lower
values refine what is there) and Seed with a random toggle and a dice
button leave the node on the
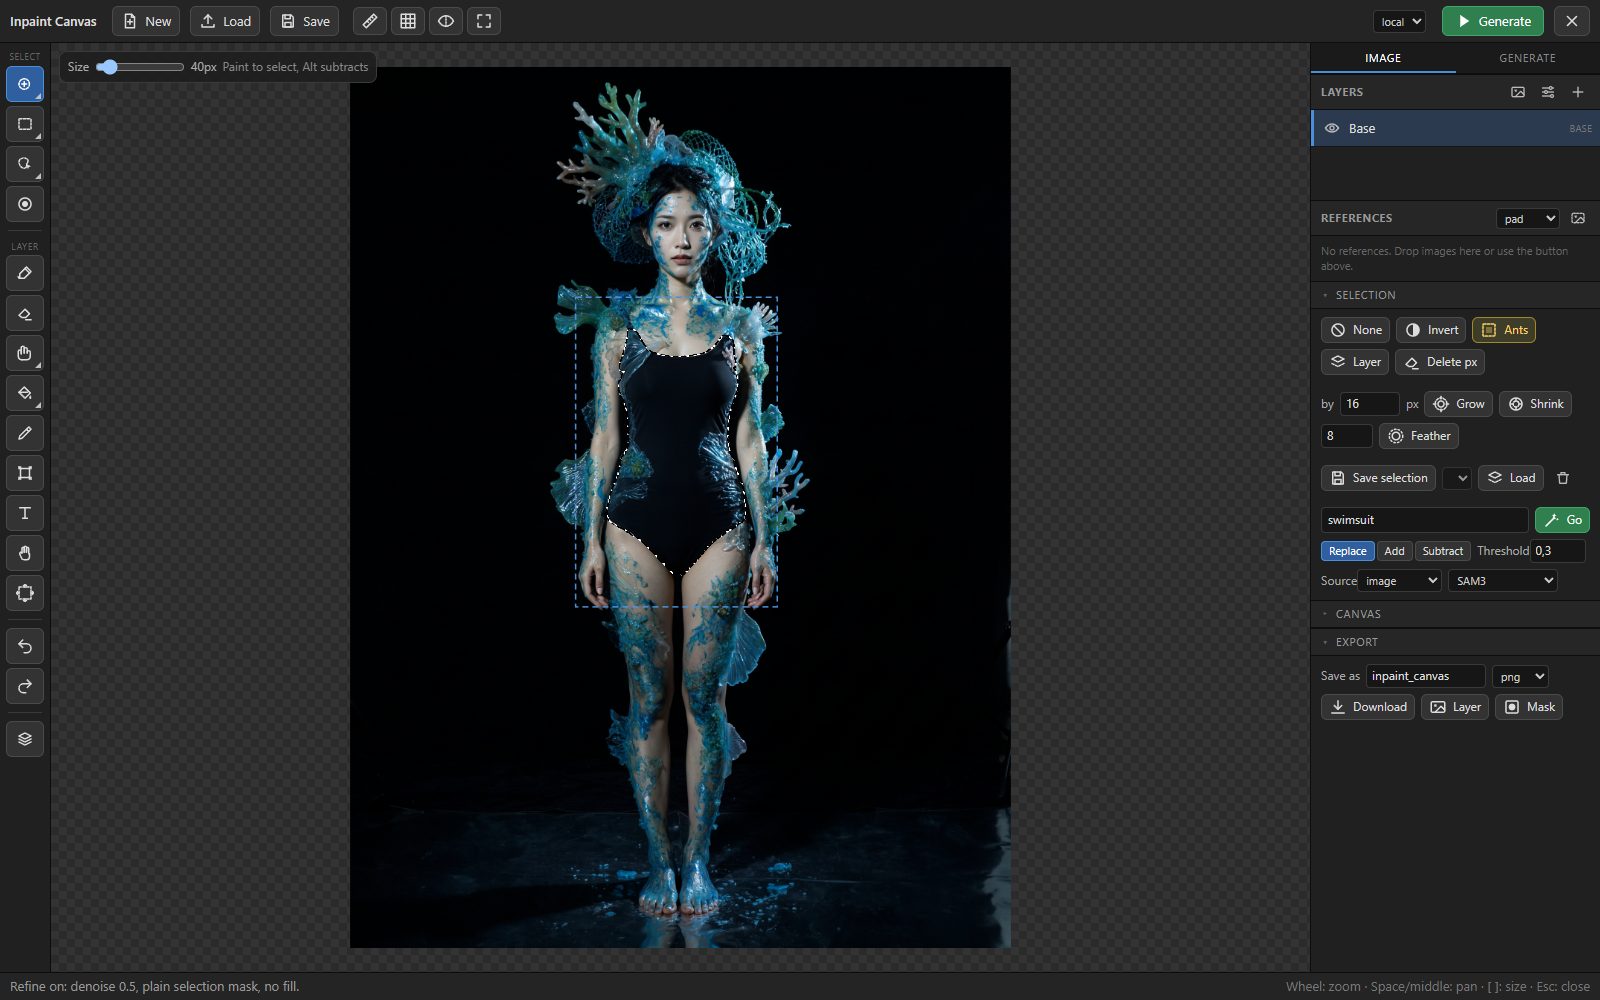
denoiseandseedoutputs. Wire them into your sampler. - Local mode adds Refine: the selection goes to the sampler as a plain, unfeathered mask without fill, the seam still blends softly when stitching. Switching it on drops denoise to 0.5 if it was at 1. The auto feather also scales with denoise in local mode, so a gentle refine gets a narrower transition than a full repaint.
- Local mode shows a negative prompt field under the prompt (
negativeoutput, for SDXL-class models).
Settings driven from the editor
The node ends with setting 1 (free). Wire it into any widget input of
another node, a LoRA loader's lora_name, a checkpoint name, steps, cfg,
a sampler name, and the next free setting output appears, up to eight. The
editor's Settings section shows a matching control for each connected one: a
drop-down with the model list, a number field, a checkbox or a text field. It
starts from the value the widget had when you connected it, so nothing changes
until you touch it, and edits are pushed to the widget right away. The values
travel with the canvas in the workflow.
Crop settings
The dashed rectangle on the canvas is the crop that will be emitted: the selection's bounding box plus context. The Crop panel shows its size, the size that actually leaves the node, and four settings stored with the canvas:
- Context auto sizes the context from the selection (6 % of the
selection diagonal plus the feather plus 4 px) and never emits a crop
smaller than 512 px on a side when the image allows it. Small fixes get a
tight crop, large selections get room. manual uses the
paddingwidget. - Feather auto derives the mask edge from the selection size: feather 10 % of the diagonal (at least 32 px), a
4 px hard grow plus half the feather, a blend of at most 25 px for the
composite.
crop_maskis then the grown and feathered mask, and the stitch keeps the result fully opaque inside your selection with a soft transition outside it. manual emits the raw selection and blurs the edge by thefeatherwidget at stitch time. - Fill changes what the model sees inside the selection in
crop_image(the canvas itself is untouched): neutral the average colour of the surroundings, blur the surroundings smeared into the area, border an OpenCV border fill plus smear, green pure green with a hard edge for edit models that are told to "fill the green area". Use one of these when the model keeps the old content instead of replacing it. - Original (with a fill mode) sends the untouched crop along:
crop_imagebecomes a batch of two, the filled crop first, the original second. An edit model that only gets a green head sees hair from behind and paints the back of a head; with the original next to it, it knows what is under the green. The Flux.2 API node flattens the batch into two input images. Not meant for VAE Encode chains, which would encode both. - Paste decides what of the result lands on the canvas: selection keeps only the selected area with a soft edge along the selection, whole crop pastes the entire returned rectangle with a soft border at its edge. Edit models such as Flux.2 re-render the crop as a whole and it is consistent in itself; pasting only the selection meets the original along the selection border, and where that border crosses a contour the two can disagree, which shows as doubled lines. Whole crop keeps the model's result intact.
- Align registers the result to the unchanged surroundings before it is stitched (an affine fit on the ring around the selection, applied only when it measurably improves the match). Edit models often shift or slightly rescale the content; without alignment every contour the selection border crosses shows up doubled. Rounding the emitted size to the multiple can also change the aspect ratio by a few percent; the Crop info warns about it, and the stitch stretches such a result back exactly.
- Color match matches the result's colours and brightness to the ring around the selection when it is stitched back, so results that come back with a colour shift leave no visible seam.
Workflows saved before these settings existed load with manual context, manual feather, no fill and no colour match, so nothing changes for them.
Outpainting
The canvas tool (C) shows the canvas as a frame: drag its edges or corners outward to extend, inward to crop; the new size and the pixels per side are shown while you drag, and releasing applies it (8 px steps, Alt for single pixels); Ctrl+Z takes it back. Cropping keeps every layer's pixels, they just shift. The Canvas section does the same with numbers (negative crops) and the Apply button, and Resize scales the whole image with its layers and selection to a new size. When extending, the visible image is baked into the new base and the border becomes the selection. Border chooses what fills it before the model sees it: the image's average colour (default), neutral grey, green for edit models, black, random noise for latent models, or stretched edge pixels. Press Generate to fill it; the outpaint use case of the upsampler writes the matching prompt. Control and reference layers survive the extension.
Saving the finished image
Save in the top bar (Ctrl+S) writes the visible image, filters applied,
control and reference layers left out, into ComfyUI's output folder. Name
and format are set in the Export section of the side panel: PNG carries the workflow and the
canvas prompt as metadata like SaveImage does, so the file can be dropped
onto ComfyUI to bring the workflow back; JPEG and WebP are smaller. PSD
(Photoshop) and ORA (OpenRaster, the native layered format of Krita and
GIMP) keep the layers: the base as Background, every pixel layer with its
name, position, opacity, visibility and blend mode (control and reference
layers hidden), plus the merged image. Filter layers cannot be represented
in either format and are only part of the merged image. Download saves
and hands the file to the browser as well. Layer saves the active layer
alone as a PNG with transparency, Mask the selection as a black and
white PNG. Saving the same image twice does
not create a second file, a changed image gets a counter appended. The
node's image output is the same picture for chains that want to save or
post-process it with nodes.
Large images
Images above ComfyUI's upload limit (--max-upload-size, 100 MB by default; a
10k PNG is easily 150 MB) go through the node's own upload route, which streams
the file to disk without that limit. Nothing to configure; the editor switches
routes by file size and falls back to it on a 413. The backend accepts images up
to 20000 × 20000 pixels (Pillow's default stops at about 9500 × 9500). What
remains is the browser: every full-size layer costs 4 bytes per pixel, so a
70-megapixel image needs a few gigabytes of RAM with a handful of layers, and
flatten, export and the base upload before a run take seconds instead of
milliseconds. Work on a copy at half size when you only need the detail in a
region.
Cleaning up files
Uploads, results and helper masks accumulate in input/inpaint_canvas,
output/inpaint_canvas and temp/inpaint_canvas. Clean up files in the
Canvas section deletes the node's own working files (n<id>_..._<hash>.png)
that nothing uses any more; images you loaded under their own name and
images you saved are never touched. Kept are files referenced by an open
editor, an open workflow tab, the browser's stored workflows or any saved
workflow (every .json under ComfyUI's user directory) are kept, and so is
anything younger than two minutes. You see the counts and sizes and confirm
before anything is deleted. Discarded history results whose files are gone
can no longer be restored. Helper results in temp/inpaint_canvas older than
an hour are pruned automatically on the next helper run.
History
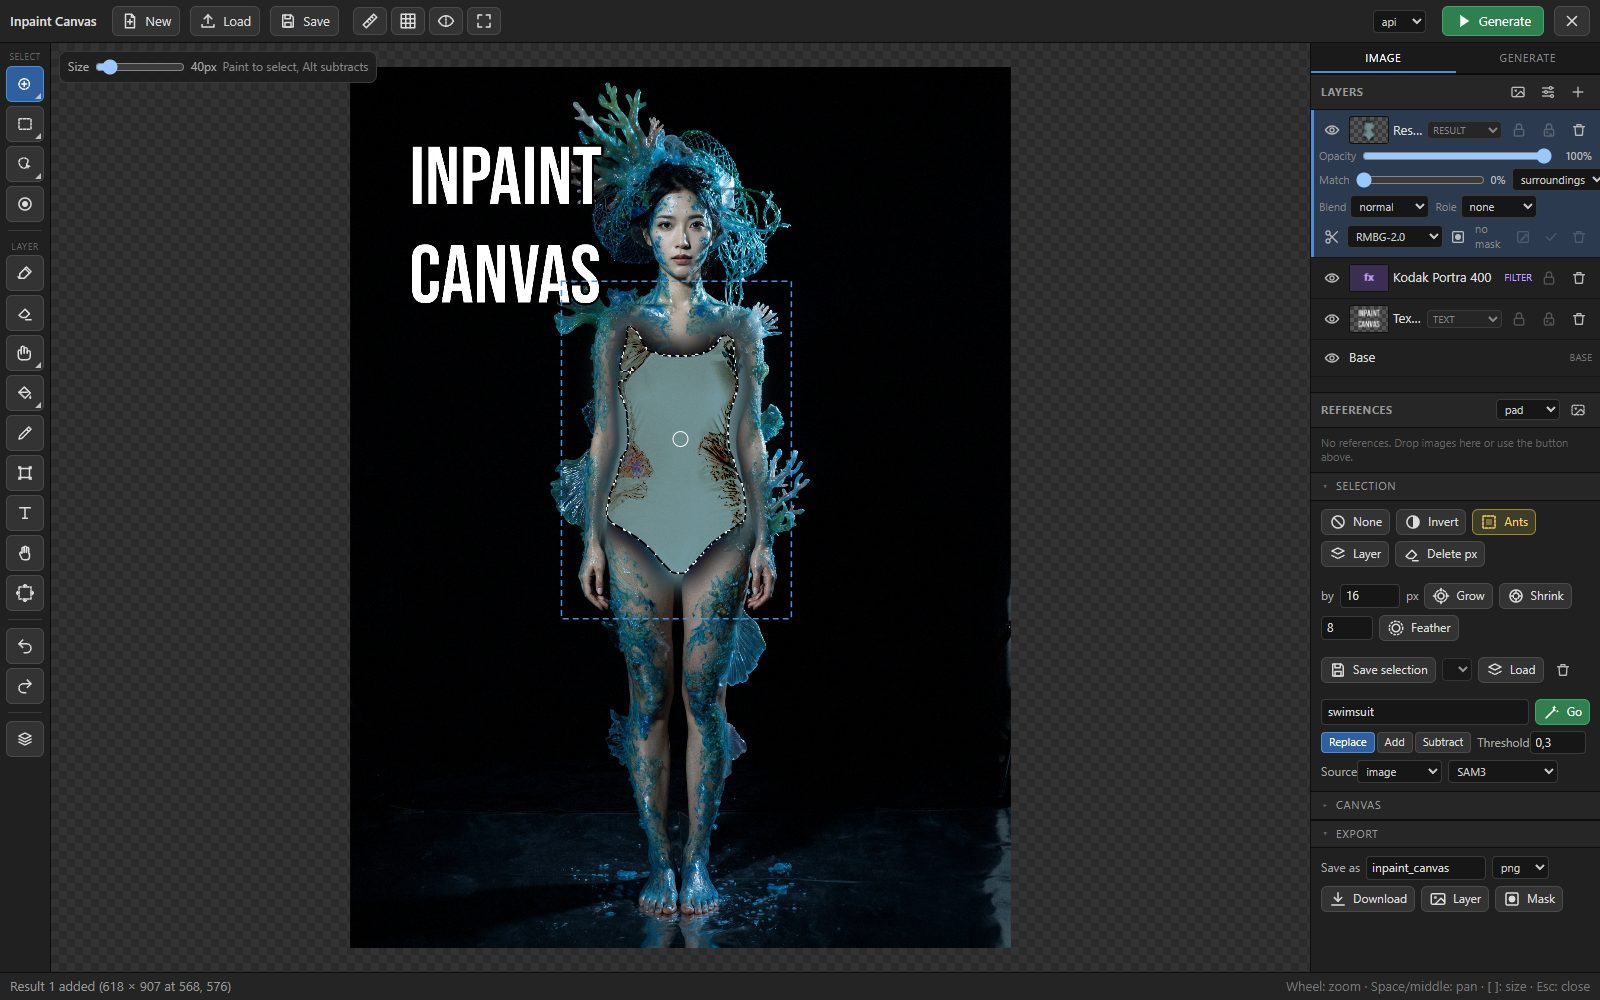
Every result is listed with a preview, the prompt it was made with, the mode and the seed. Click a preview (or the solo button) to show only that result, discard one to remove its layer, restore a discarded one later, click the seed line to reuse that seed. The trash icon in the header clears the list; layers and files stay.
Keyboard
| Keys | Action |
| ---------------------------- | ---------------------------------------- |
| B, R, Shift+R, L, Shift+L | selection brush, rectangle, ellipse, lasso, polygon |
| W, O, D, Q | magic wand, object, deselect brush, quick mask |
| P, E, T, H | paint, erase, transform, hand |
| I, G, Shift+G | eyedropper, bucket, gradient |
| Shift+S, S, J | smudge, clone stamp, healing brush |
| 1, F, 4 / 6, 5 | zoom 100 %, fit, rotate the view, reset |
| Ctrl+Shift+R, Ctrl+Shift+G | rulers, grid |
| \ (hold) | before / after: the base without layers |
| Shift+T, C | text tool, canvas tool |
| X | Boxes tool (FLUX 3's box prompt); on a selected box Delete removes it, D duplicates it, the arrows nudge it |
| [ ] | brush size |
| Ctrl+Z, Ctrl+Shift+Z, Ctrl+Y | undo, redo |
| Ctrl+D, Ctrl+I | clear, invert selection |
| Shift+F | fill selection with colour |
| Ctrl+Shift+N | new paint layer |
| Ctrl+J, Ctrl+E | duplicate layer, merge down |
| Ctrl+], Ctrl+[ | move layer up / down |
| Ctrl+click on the canvas | select the layer under the cursor |
| Ctrl+C, Ctrl+Shift+C, Ctrl+X, Ctrl+V | copy selection (from layer / merged), cut, paste as new layer |
| Delete | clear the selected pixels of the active layer; without a selection delete the layer |
| Ctrl+U | upsample prompt |
| Ctrl+S | save the finished image |
| Ctrl+Enter | generate |
| Space / middle mouse / right mouse | pan (wheel zooms) |
| Esc | cancel transform / text edit / compare / flyout, then close the editor |
While the editor is open all shortcuts belong to it: Ctrl+Z undoes the last editor step, not the workflow.
View
Zoom with the wheel, pan with Space, the middle mouse or H; F fits, 1 shows 100 % (one image pixel per screen pixel), 4 / 6 rotate the view by 15° and 5 resets it. The view buttons in the top bar toggle rulers (Ctrl+Shift+R; drag a guide out of a ruler, drag it back to remove it, double-click a ruler clears them, layers snap to guides), the grid (Ctrl+Shift+G, 64 px) and before / after (hold \ or click: the base image without any layer). Compare in the History header shows two results side by side with a draggable divider: the two newest, or Ctrl+click a history thumbnail for A and Shift+click for B; Esc ends it. Double-click a text layer with the text tool to edit the text right on the canvas (Enter applies, Shift+Enter is a new line, Esc cancels). Edited layers are uploaded automatically 15 s after the last change, so a browser crash loses at most that much; the workflow itself is saved by ComfyUI.
Driving the editor from an agent (MCP)
mcp/inpaint_canvas_mcp.py is a local MCP server:
Claude Code, Claude Desktop, Cursor or any MCP client can load an image, select by
rectangle or by text, set the prompt, generate, look at the result, blend it with
colour match, add filters and text and export, all in the editor that is open in your
browser tab, step by step and undoable. Setup, the tool list and how it works are in
mcp/README.md. It needs pip install mcp in the Python that runs the
server and only answers requests from localhost. The server is part of the git
repository, not of the registry package: after a registry install, take the
mcp folder from a git clone.
Node reference
Inpaint Canvas (InpaintCanvas)
Widgets
| Widget | Meaning |
| ------------- | --------------------------------------------------------------------------- |
| padding | Context pixels around the selection (Context = manual). |
| target_size | Longest side of the emitted crop. 0 keeps the native size. |
| feather | Blur radius of the selection edge at stitch time (Feather = manual). |
| multiple_of | Crop width and height are made a multiple of this. Flux wants 64. |
With target_size set, the scaled crop is rounded to the multiple. With
target_size 0 the region itself is grown symmetrically until it is a multiple.
For API models that accept up to 2048 px, target_size 0 (or a value above
the region size) keeps the native resolution, so the result comes back as
sharp as the surroundings instead of being upscaled.
Inputs (both optional, both lazy)
result: the result of your API chain (editor mode api).result_local: the decoded result of your local chain (editor mode local).
Outputs
| Output | Content |
| ---------------------------- | ----------------------------------------------------------------------- |
| crop_image / crop_mask | the region to inpaint, scaled, with fill and grown / feathered mask applied when on. crop_image becomes a batch when there is more to send: the untouched crop (Original with a fill mode), then the visible reference layers fitted to the crop size |
| image / mask | the flattened canvas and the raw selection at full size |
| stitch_info | parameters for the standalone stitch node |
| crop_width / crop_height | size of crop_image, for generators that take an explicit size |
| prompt / negative | the editor's prompt fields |
| control_image | control layers on black, aligned with crop_image (black if none) |
| denoise / seed / mode | the Generate settings (mode is "api" or "local") |
| setting_1 ... setting_8 | wildcard outputs driven from the editor's Settings section |
| box_prompt | the prompt with FLUX 3's box sentences and JSON rows (Boxes for FLUX 3); the plain prompt while the Boxes switch is off |
| elements | the New and Text boxes as bounding-box elements (ARRAY, for a bounding_boxes input on a new image) |
Only ever appended, so saved workflows keep working. The node shows only the
connected setting slots plus one free one, then box_prompt and elements
(the frontend maps them to the backend's slots after setting_8). (A reference_images output
existed for a few hours on 2026-09-05; references now ride in crop_image,
and the old output is removed from loaded workflows.)
Inpaint Canvas Stitch (InpaintCanvasStitch)
The stitch step as an explicit node: result + stitch_info in, the stitched
full image out. You only need it when you do not want the back-link on the
canvas node. Its result is still delivered to the canvas as a layer.
Helper nodes
Used by the editor's helper prompts; you can also wire them yourself.
Inpaint Canvas Load Ref: loads an image by a{filename, subfolder, type}JSON reference.Inpaint Canvas Mask Out: hands a MASK back to the editor (optionallabeltext is echoed along; purposecutoutdelivers a layer mask).Inpaint Canvas Object Map: runs SAM2's automatic mask generator (model from Kijai'sDownloadAndLoadSAM2Modelwith segmentorautomaskgenerator) and hands the editor an object label map.Inpaint Canvas Text Out: hands a STRING back to the editor.
How the round trip works
ComfyUI rejects cycles, so the result links are never sent to the backend
as links. The frontend removes them from the prompt and passes the source
nodes as result_source / result_source_local. When the canvas node runs
it expands an ephemeral stitch node that reads from the source of the selected
mode; the other chain is not connected to anything and never executes. The
stitch's UI output is attributed to the canvas node, which is how the layer
arrives without a second visible node. Because the canvas node is an output
node, the chain runs even without a Save Image or Preview Image node.
The canvas node always re-executes: it cannot know whether the upstream chain changed, and the stitch only happens while it runs.
Files: uploads go to input/inpaint_canvas/, stitched patches to
output/inpaint_canvas/, helper-prompt results to temp/inpaint_canvas/.
The node reads and writes only inside ComfyUI's input, output and temp folders:
a file name with .., an absolute path, or a link that points elsewhere is
refused.
Edited layers are uploaded when the editor closes and before every run. The
workflow stores file references, the selection and the settings, not the
pixels of the layers.
Development
See DEVELOPMENT.md for the mechanisms, measurements, test recipes and the
invariants that must not be broken. The path tests run without ComfyUI:
python -m unittest discover -s tests -v from the repository root.
License
GPL-3.0, the same license as ComfyUI. See LICENSE. Free to use, modify and
redistribute, including commercially; forks and derived works must stay under
the GPL.