
ComfyUI-LoraBlockWeight
Per-block LoRA weighting for DiT models (FLUX.1, Qwen-Image, SD3.5 Large): scan every transformer block, sweep strengths, and render labeled comparison grids.
Nodes (13)
Your FLUX.1 LoRA is one giant dial. This node gives you 57.
The all-in-one FLUX.1 LoRA sweep
The manual gearbox for FLUX LoRAs
Sweep FLUX LoRA blocks in chunks, not one by one
Per-block LoRA weights for Qwen-Image, one block at a time
The all-in-one block sweep for Qwen-Image
All 60 Qwen-Image blocks, typed by hand
Stop guessing which Qwen-Image blocks matter — knock whole groups out
Turn a wall of sweep images into a labeled grid you can actually read
SD3.5 Large LoRAs get 38 dials instead of one
The 190-image block sweep that tells you what an SD3.5 LoRA is made of
Type 38 weights, stop guessing
Knock out SD3.5 block ranges and watch the LoRA style fall apart
ComfyUI-LoraBlockWeight
English | 简体中文






Got a LoRA that overpowers your prompt, bleeds style onto the wrong things, or fights with other LoRAs you stack on top? Per-block weighting lets you keep the blocks that carry the good parts and zero the blocks that misbehave — but you need to know which blocks. This finds out.
Per-block LoRA weighting for DiT models — FLUX.1 (19 double + 38 single = 57 blocks), Qwen-Image (60 transformer blocks) and SD3.5 Large (38 joint blocks). Sweep each block's strength independently and read the impact of every block straight off a labeled grid.
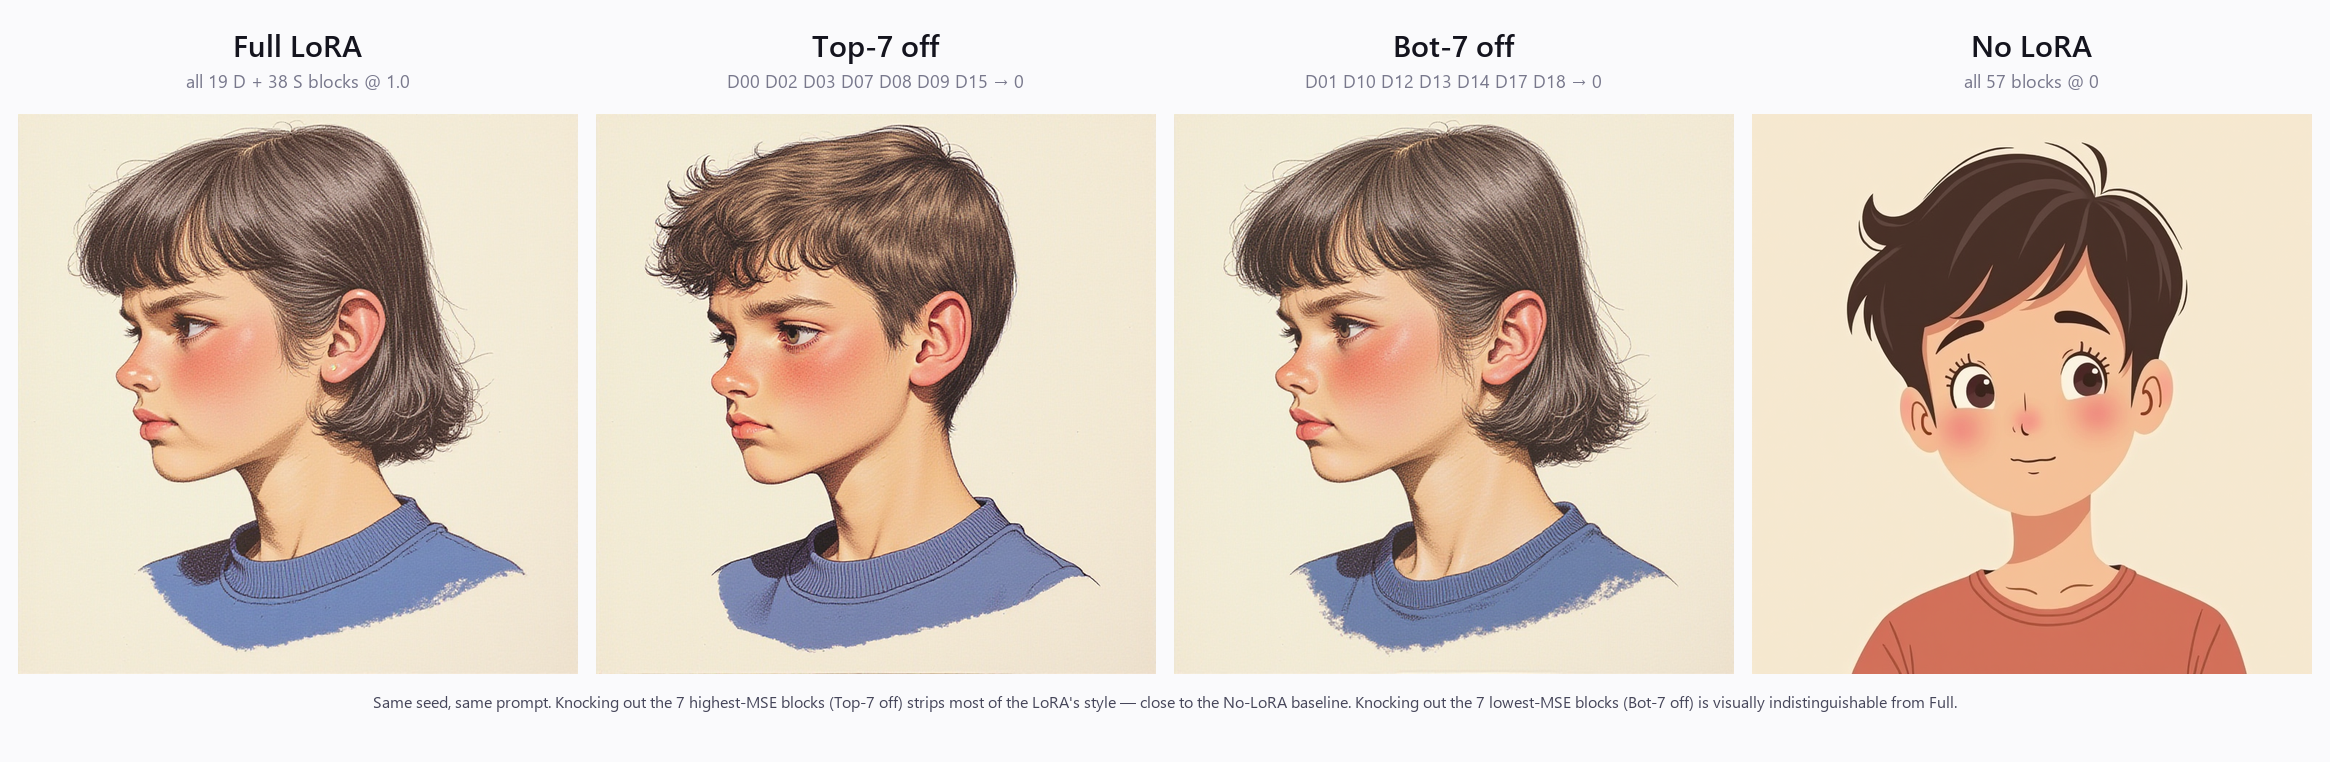
Same LoRA, same seed, same prompt. Knocking out the 7 highest-MSE blocks (Top-7 off) strips most of the LoRA's illustration style — the result is close to the No-LoRA baseline. Knocking out the 7 lowest-MSE blocks (Bot-7 off) is visually indistinguishable from Full. The other 12 blocks apparently do most of the work; those 7 are dead weight you can drop for compatibility / stacking / speed gains, with no visual cost. This node exists to find that split.
What it does
Most LoRA loaders take a single strength scalar that applies to the whole
adapter. Block-wise loaders for SD1.5/SDXL (LBW, Bobs Lora Loader) expose ~14
conceptual block groups. This exposes the DiT's actual transformer blocks
(57 for FLUX.1, 60 for Qwen-Image, 38 for SD3.5 Large), so a single-block sweep
gives you a clean per-layer signal — which blocks matter, which are near-dead
weight, which you can dial down without losing the style.
Pairs with Efficiency Nodes' XY Plot or runs standalone via the batch node — no external orchestration required.
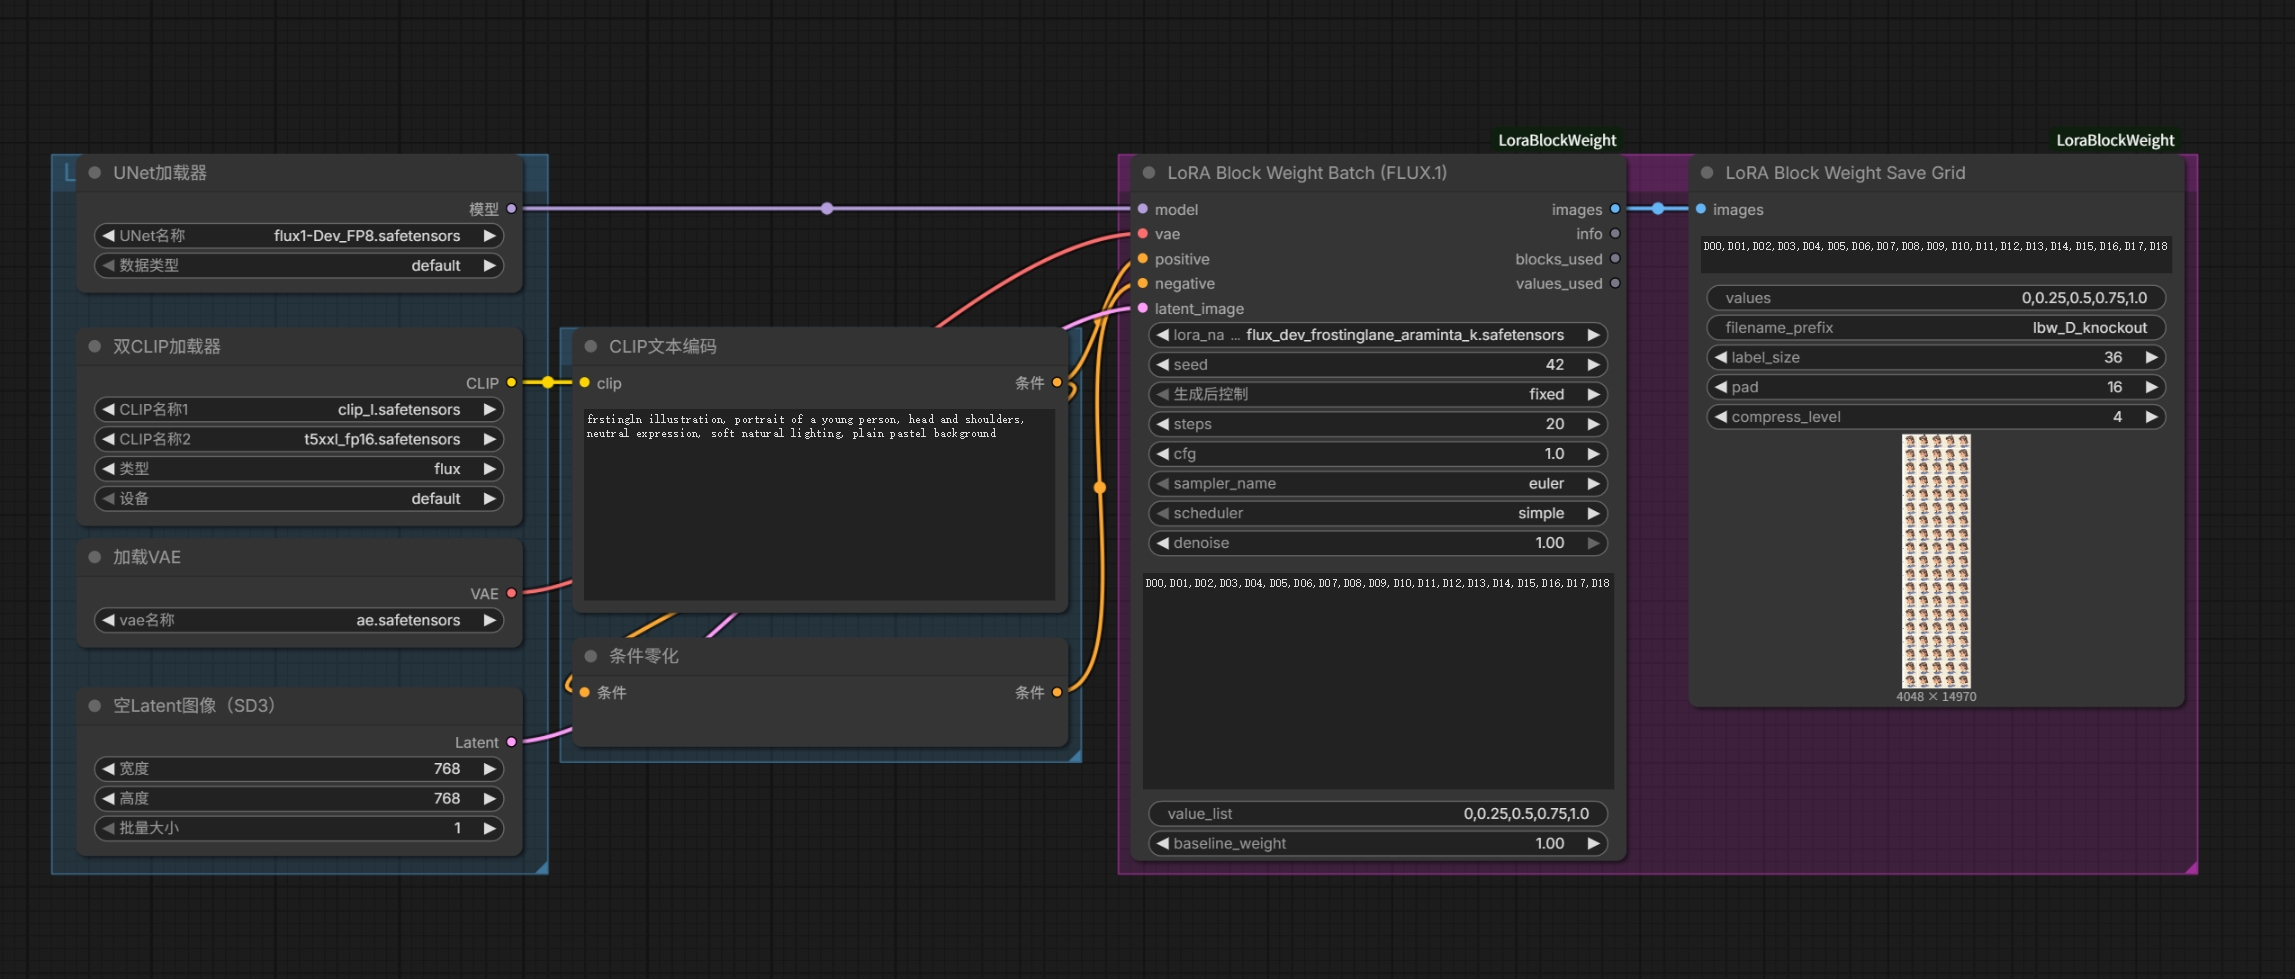
The all-in-one setup: load model / CLIP / VAE, encode the prompt, then feed
everything into the Batch node (it loops every (block, value) internally)
and render the result with Save Grid — no XY Plot needed. Drag
example_workflows/flux_batch_sweep.json
onto the ComfyUI canvas to load this exact graph.
Demo 1 — FLUX.1 with Frosting Lane
A two-stage experiment that builds the hero at the top of this README.
Stage 1 — per-block sweep. Sweep all 19 double blocks at weights
{0, 0.25, 0.5, 0.75, 1.0} while every other block stays at 1.0. That's
95 images. For each block I compute MSE between the weight=0 (knockout)
and weight=1.0 (full) result. The higher the MSE, the more that block
carries the LoRA's effect.
Stage 2 — group knockout. Take the 7 highest-MSE blocks and zero them together (Top-7 off); take the 7 lowest-MSE blocks and zero them together (Bot-7 off). Compare against Full LoRA and No LoRA — the four-up image above. The MSE ranking from Stage 1 turns out to predict the visual outcome of Stage 2 cleanly: kill the top 7, lose the style; kill the bottom 7, lose nothing.
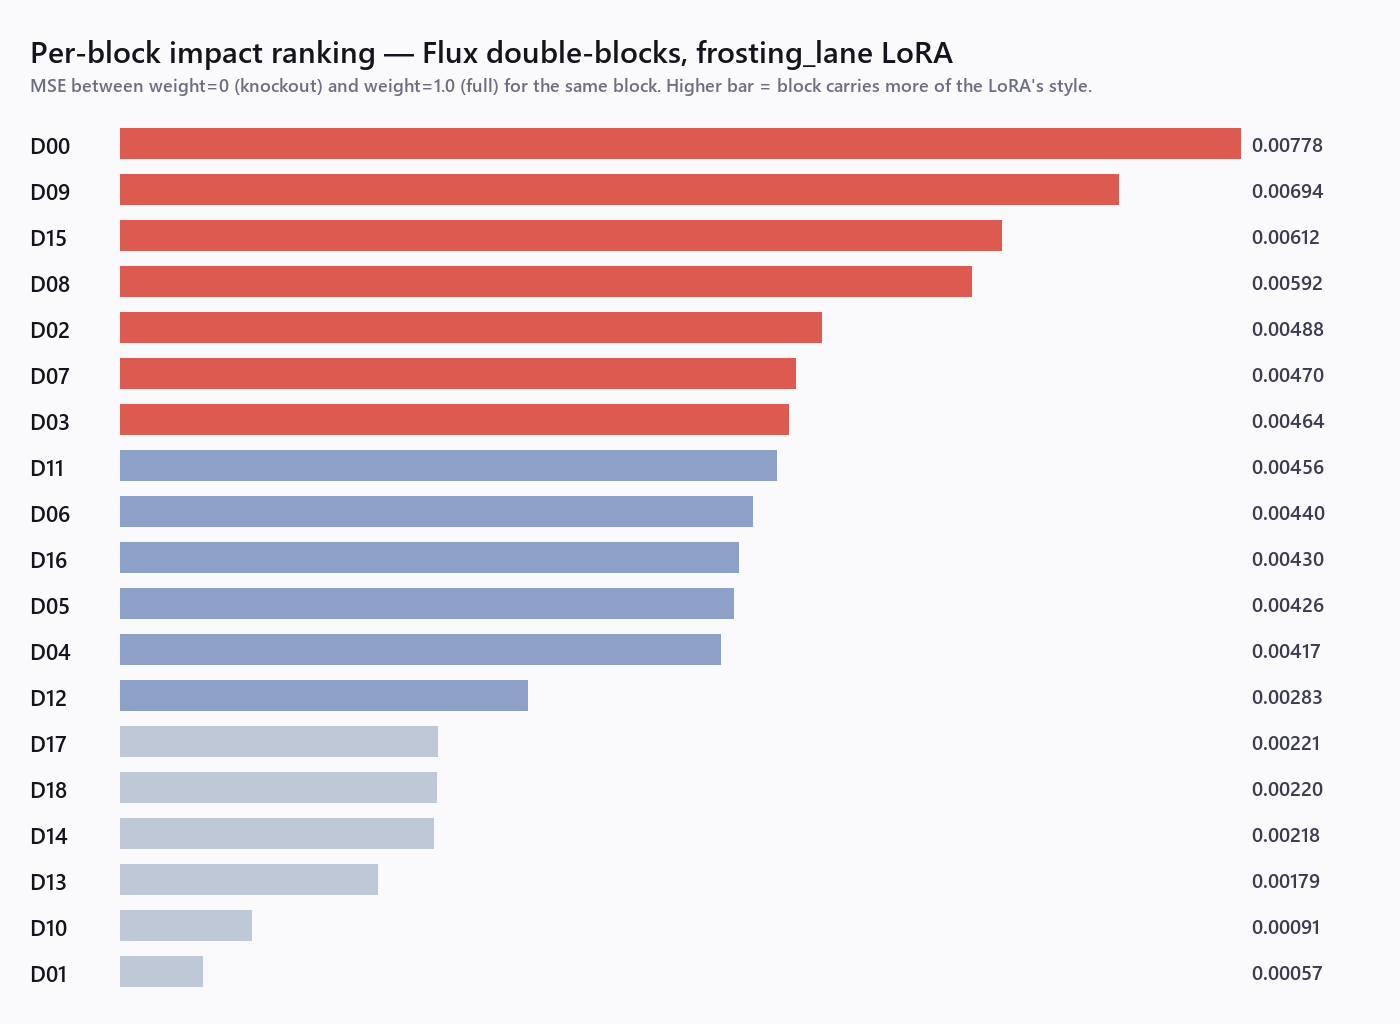
| | Block | MSE | |---------|-------|-----------| | Critical | D00 | 0.00778 | | | D09 | 0.00694 | | | D15 | 0.00612 | | | D08 | 0.00592 | | | D02 | 0.00488 | | | D07 | 0.00470 | | | D03 | 0.00464 | | Mid | D11 | 0.00456 | | | D06 | 0.00440 | | | D16 | 0.00430 | | | D05 | 0.00426 | | | D04 | 0.00417 | | | D12 | 0.00283 | | Negligible | D17 | 0.00221 | | | D18 | 0.00220 | | | D14 | 0.00218 | | | D13 | 0.00179 | | | D10 | 0.00091 | | | D01 | 0.00057 |
The 14× gap from D00 → D01 explains why the hero's Bot-7 off panel looks identical to Full: those bottom blocks barely contribute. The full 19×5 labeled grid lives in docs/grid_preview_d.png.

Reproduce:
_dev/full_sweep_D.json— Stage 1 API workflowpython _dev/fetch_and_analyze.py <prompt_id>— downloader + MSE ranking_dev/build_group_workflow.py— generate the Stage 2 workflowpython _dev/make_hero.py <prompt_id>— compose the 4-up hero
Demo 2 — Qwen-Image with Modern Anime
Same recipe, different DiT model, different LoRA — to show the technique isn't FLUX.1-specific.
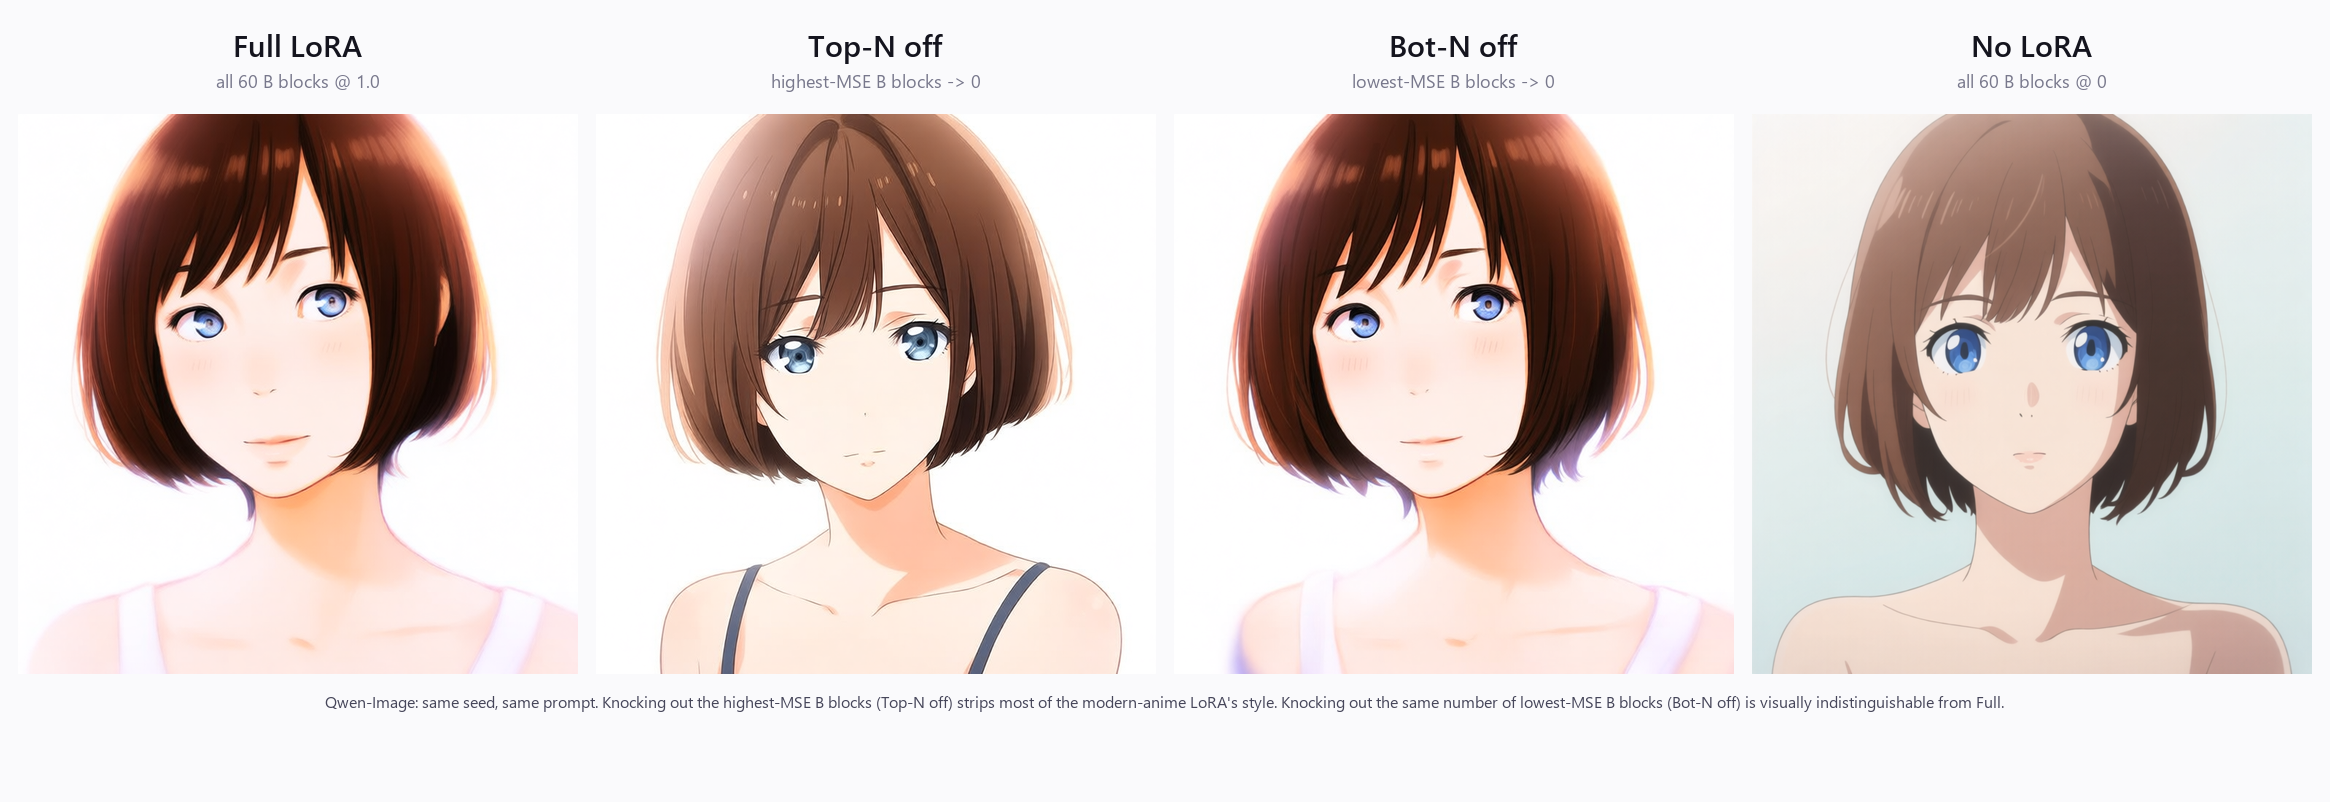
Qwen-Image has 60 transformer blocks. Knocking out the 12 highest-MSE blocks strips the LoRA's modern-anime style — the result falls back toward a photographic look. Knocking out the 12 lowest-MSE blocks is visually indistinguishable from Full LoRA. With more blocks Qwen spreads the LoRA signal further: top/bottom MSE ratio = 24× vs FLUX.1's 14×.
Stage 1. Sweep all 60 transformer blocks at {0, 0.25, 0.5, 0.75, 1.0},
others held at 1.0. 300 images, 768×768, fp8. MSE-rank knockout vs full.
Stage 2. Zero the top-12 vs bot-12 MSE blocks as two groups; compare against Full LoRA and No LoRA. Same prompt, same seed.
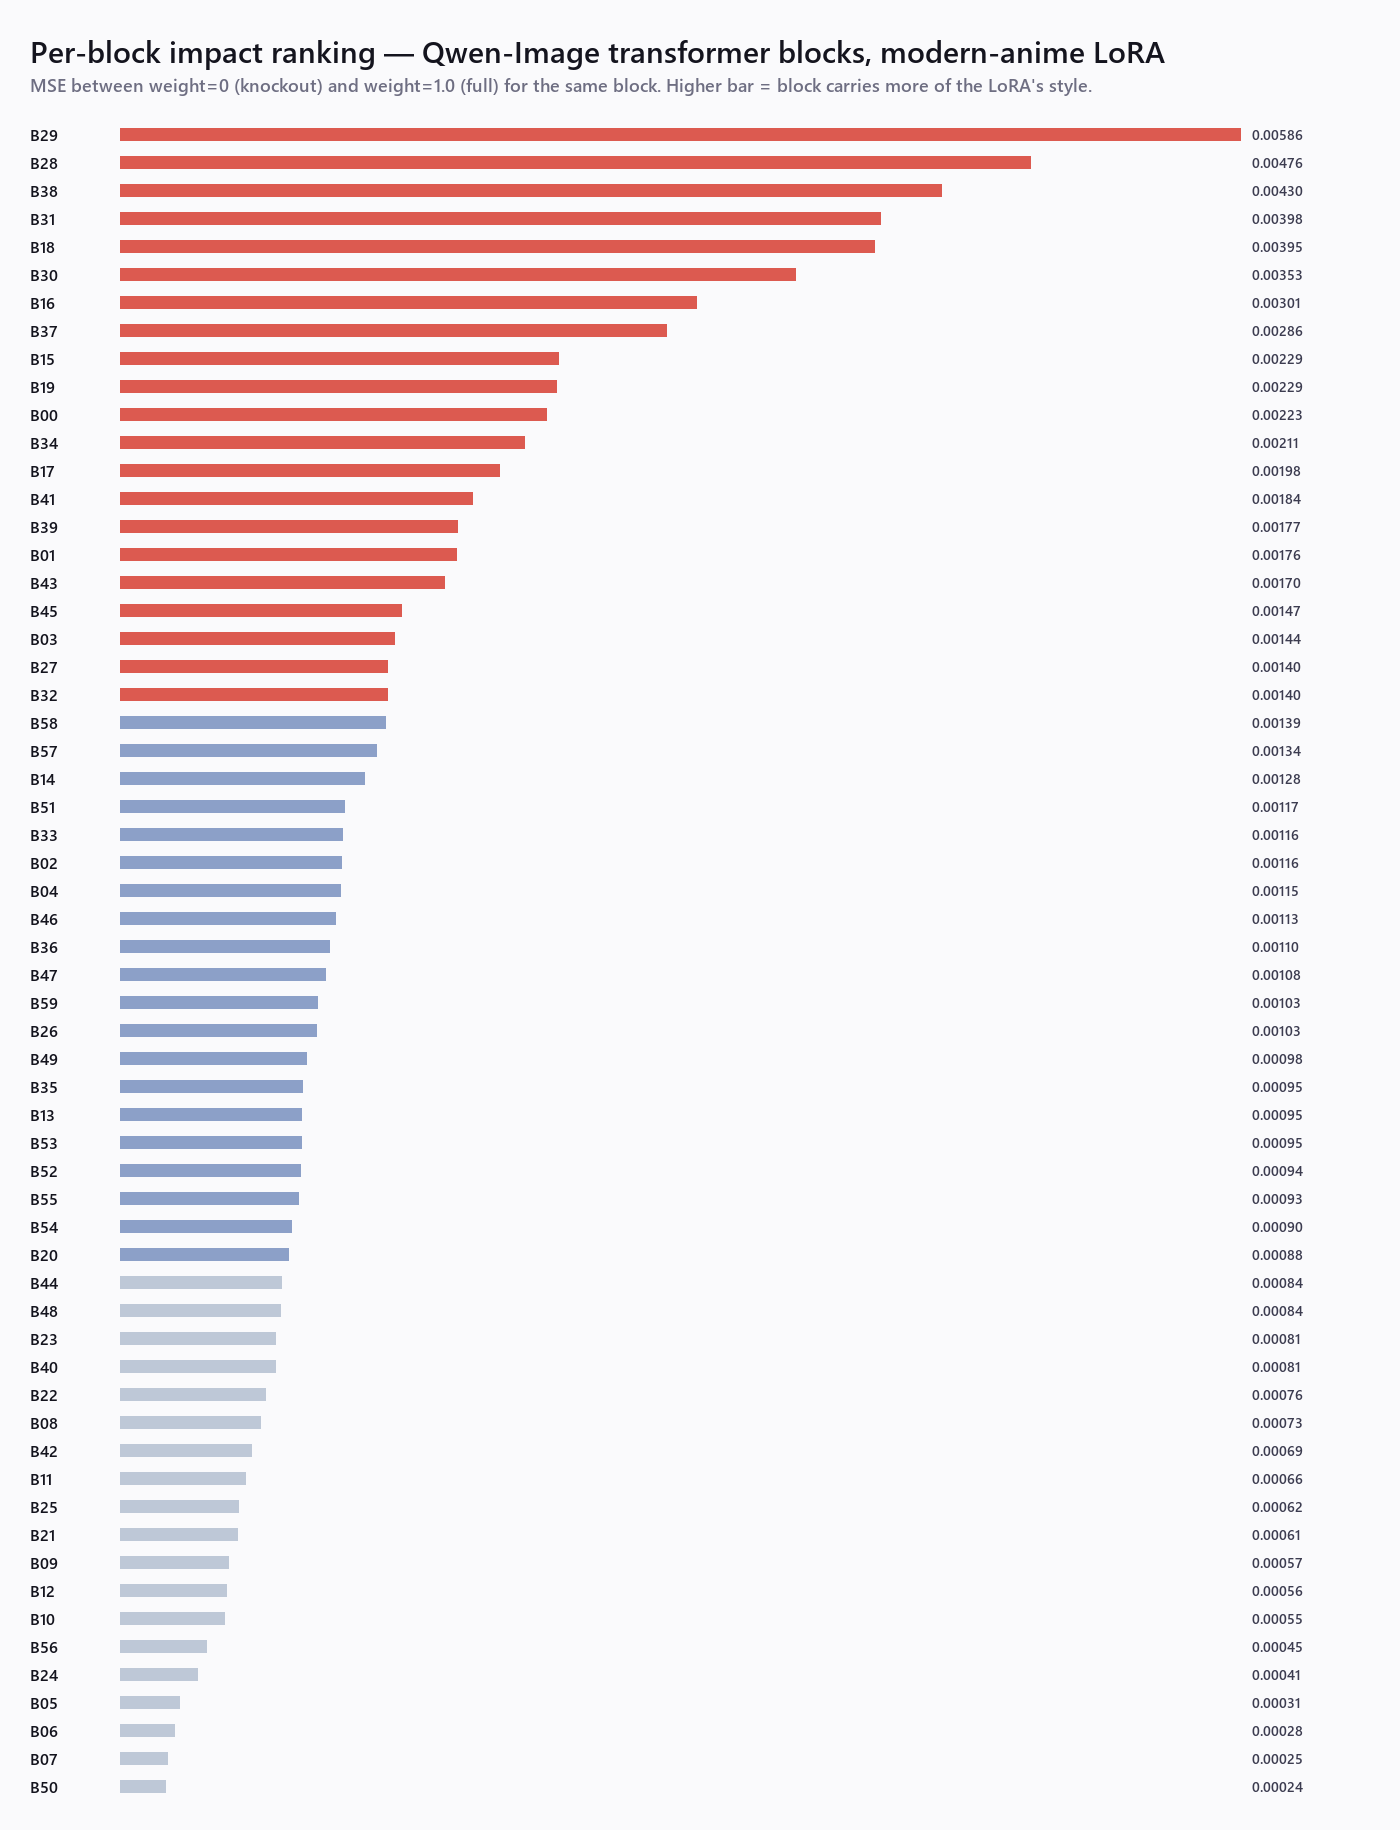
| | Block | MSE | |----------------|-------|-----------| | Critical | B29 | 0.00586 | | | B28 | 0.00476 | | | B38 | 0.00430 | | | B31 | 0.00398 | | | B18 | 0.00395 | | | B30 | 0.00353 | | | B16 | 0.00301 | | | B37 | 0.00286 | | | B15 | 0.00229 | | | B19 | 0.00229 | | | B00 | 0.00223 | | | B34 | 0.00211 | | Negligible | B11 | 0.00066 | | | B25 | 0.00062 | | | B21 | 0.00061 | | | B09 | 0.00057 | | | B12 | 0.00056 | | | B10 | 0.00055 | | | B56 | 0.00045 | | | B24 | 0.00041 | | | B05 | 0.00031 | | | B06 | 0.00028 | | | B07 | 0.00025 | | | B50 | 0.00024 |
Full 60-row ranking: docs/impact_ranking_b.txt. Full 60×5 labeled grid (~950 KB JPEG): docs/grid_preview_b.jpg.

Reproduce (Qwen variant):
_dev/full_sweep_B.json— Stage 1 API workflowpython _dev/fetch_and_analyze.py <prompt_id> --model qwen— downloader + MSE ranking_dev/build_group_workflow_qwen.py— generate the Stage 2 workflowpython _dev/make_hero.py <prompt_id> --model qwen— compose the 4-up hero
Demo 3 — SD3.5 Large with Anime LoRA
Third DiT, third architecture — SD3.5 Large's 38 MMDiT joint_blocks (each
with context_block for text and x_block for image, sharing joint
attention).
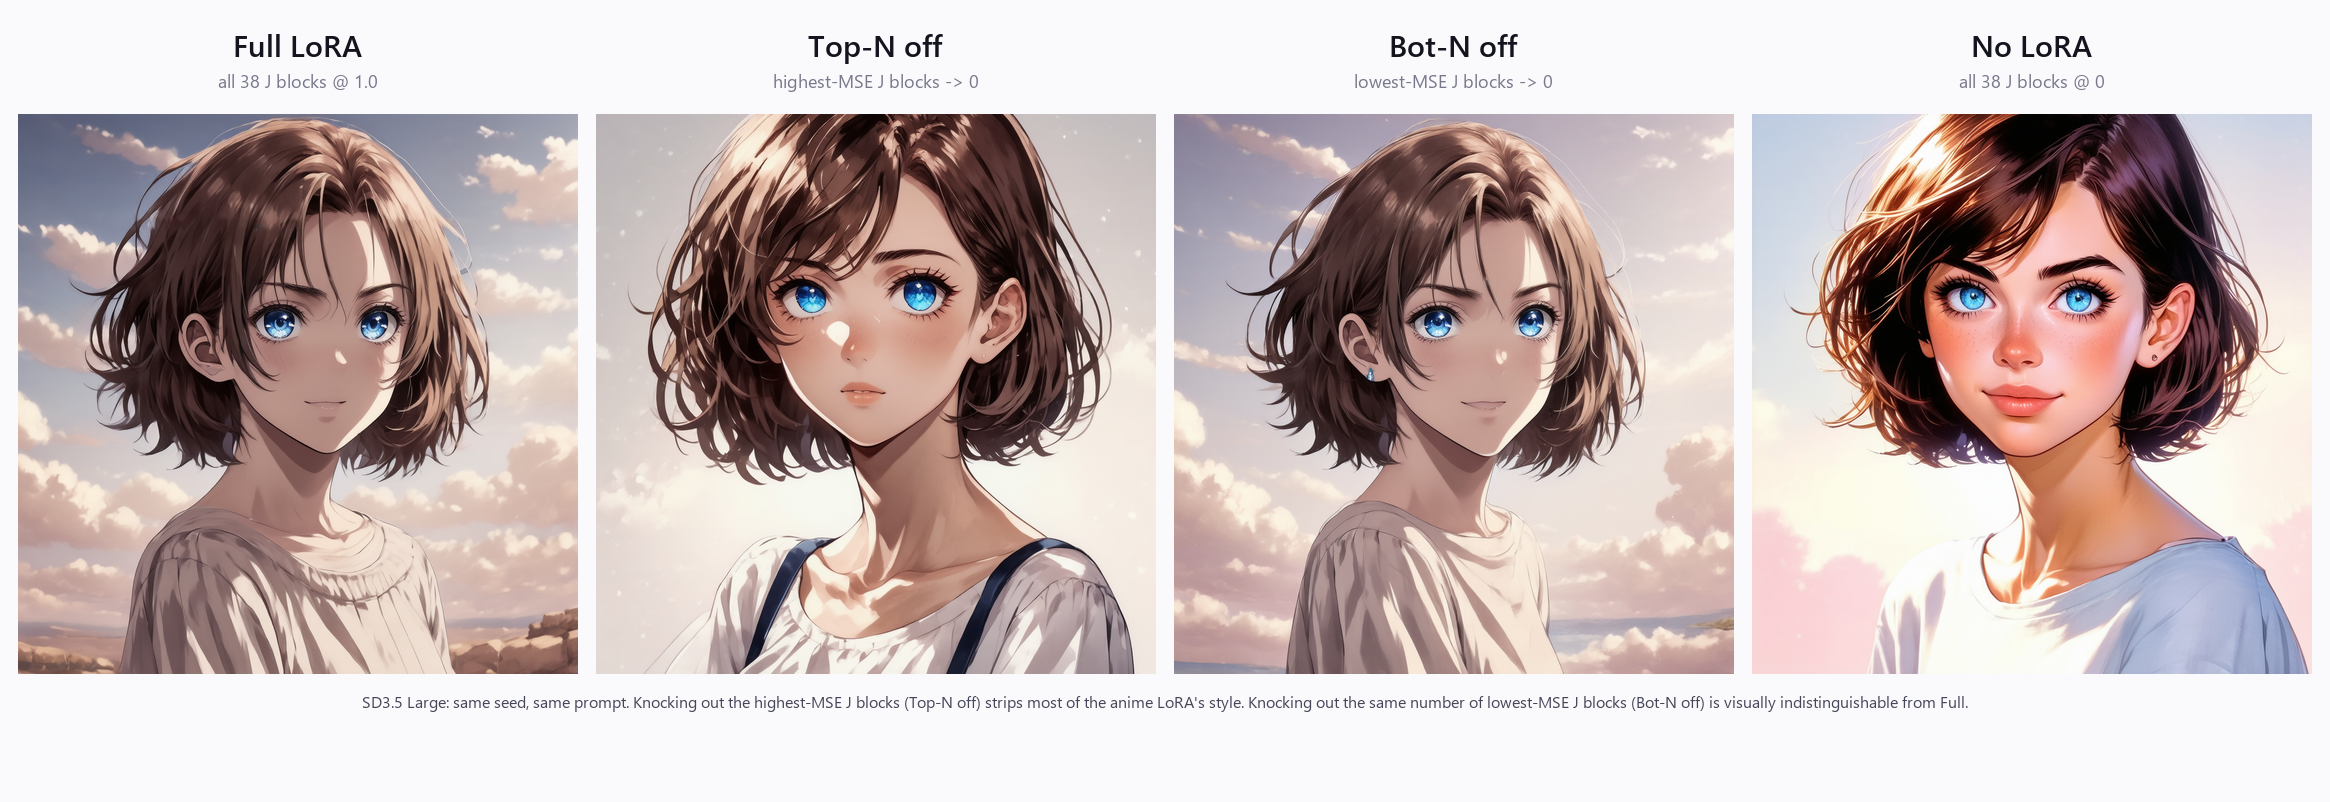
Same recipe. Knocking out the 12 lowest-MSE blocks (Bot-12 off) is visually indistinguishable from Full LoRA — 12 dead-weight blocks confirmed. Knocking out the 12 highest-MSE blocks (Top-12 off) shifts the result noticeably — composition collapses (the outdoor cloud scene flattens to a plain background) and the style softens — but doesn't fully revert to the No-LoRA look. SD3.5's joint blocks carry the LoRA signal more redundantly than FLUX.1's double-stream stack: a single top group isn't enough to strip the style. Top/bottom MSE ratio = 47×, the most extreme of the three demos.
Stage 1. Sweep all 38 joint blocks at {0, 0.25, 0.5, 0.75, 1.0}, others
held at 1.0. 190 images, 1024×1024. MSE-rank knockout vs full.
Stage 2. Zero the top-12 vs bot-12 MSE blocks as two groups; compare against Full LoRA and No LoRA. Same prompt, same seed.
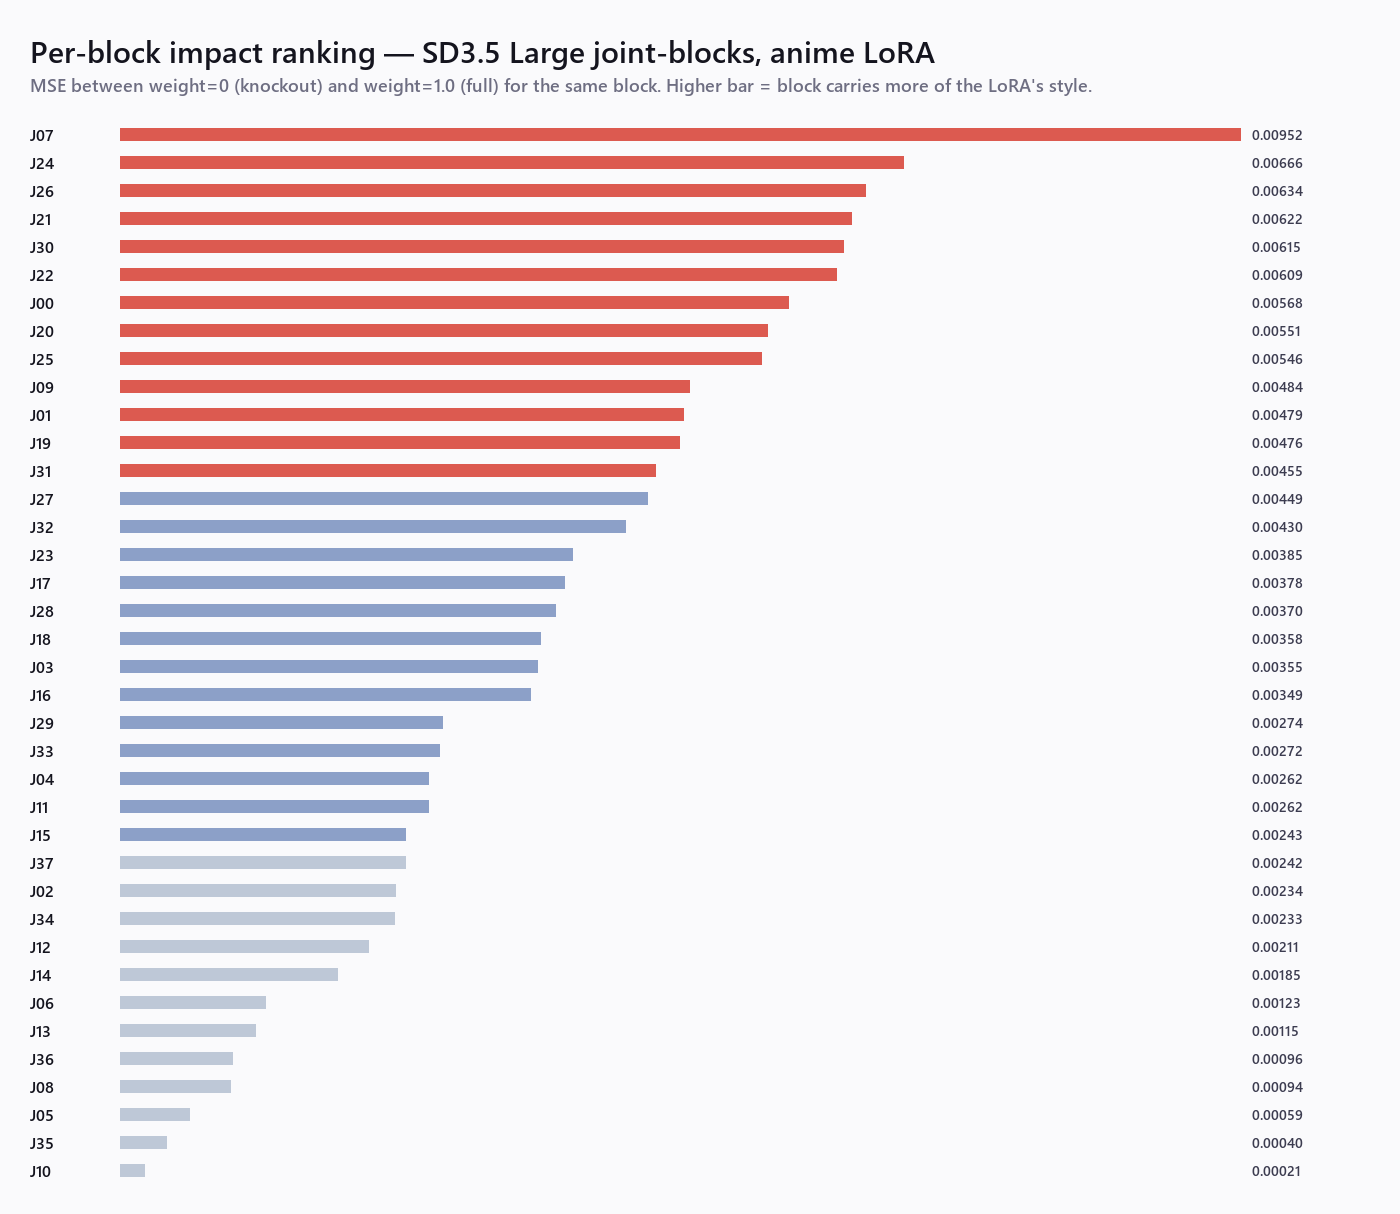
| | Block | MSE | |----------------|-------|----------| | Critical | J07 | 0.00952 | | | J24 | 0.00666 | | | J26 | 0.00634 | | | J21 | 0.00622 | | | J30 | 0.00615 | | | J22 | 0.00609 | | | J00 | 0.00568 | | | J20 | 0.00551 | | | J25 | 0.00546 | | | J09 | 0.00484 | | | J01 | 0.00479 | | | J19 | 0.00476 | | Negligible | J37 | 0.00242 | | | J02 | 0.00234 | | | J34 | 0.00233 | | | J12 | 0.00211 | | | J14 | 0.00185 | | | J06 | 0.00123 | | | J13 | 0.00115 | | | J36 | 0.00096 | | | J08 | 0.00094 | | | J05 | 0.00059 | | | J35 | 0.00040 | | | J10 | 0.00021 |
Full 38-row ranking: docs/impact_ranking_j.txt. Full 38×5 labeled grid (~950 KB JPEG): docs/grid_preview_j.jpg.

Reproduce (SD3.5 variant):
_dev/full_sweep_J.json— Stage 1 API workflowpython _dev/fetch_and_analyze.py <prompt_id> --model sd35— downloader + MSE ranking_dev/build_group_workflow_sd35.py— generate the Stage 2 workflowpython _dev/make_hero.py <prompt_id> --model sd35— compose the 4-up hero
Recommended workflow
Three passes take a LoRA from "black-box scalar strength" to "tuned per-block recipe":
-
Scan and rank. Run a full sweep with the Batch node (or XY plot) at
baseline_weight = 1.0. Feed the result to_dev/fetch_and_analyze.pyto MSE-rank every block. You now have a Critical / Mid / Negligible split like the tables in the demos above. -
Drop the dead weight. Open the Custom node and set every Negligible block to
0. These blocks contribute almost nothing visually — zeroing them reduces interference when stacking with other LoRAs, frees capacity for prompt adherence, and slightly cheapens inference. Lowest-risk, highest-ROI edit. -
Tune the middle. Critical blocks stay at
1.0(or your preferred global strength). Mid blocks are the dial — try0.5via the Custom node and compare against Full. If the LoRA still leaks style onto unwanted subjects, walk Mid blocks lower. If you want more of the LoRA look, push Mid blocks past1.0.
For a faster first pass, skip step 1's full sweep and use the per-model "first-round recipes" in USAGE.md — a sparse 10–12 block subset that surfaces the active neighbourhood in 50–95 images instead of 190–300.
Read the ranking as experiment-specific. MSE here is a pixel-level delta for one prompt, seed, resolution and sampler — a proxy for visual impact, not a universal measure of a block's worth. A block that ranks Negligible in one run isn't proven useless everywhere; re-check on a couple of prompts before treating a zeroed block as a permanent prune.
When not to use this
- You just want a LoRA to look good at full strength. Use a normal LoRA loader — this is a diagnostic microscope, not a one-click enhancer.
- You're tight on time or VRAM. A full sweep is 190–300 images. Start from the sparse first-round recipes in USAGE.md, or skip it.
- You need the LoRA's text-encoder (CLIP-side) effect. The Batch node patches the UNet/transformer only (prompts are encoded upstream). For CLIP-side LoRA, use a regular loader + the single-block node with XY Plot.
- The LoRA is light and already behaves. Per-block surgery pays off on LoRAs that overpower prompts, bleed style, or fight when stacked — less so on well-scoped ones.
Install
Via ComfyUI-Manager (when listed): search "LoraBlockWeight" → Install.
Manual:
cd <ComfyUI>/custom_nodes
git clone https://github.com/Baldwinzc/ComfyUI-LoraBlockWeight.git
Restart ComfyUI.
Dependencies (numpy, Pillow, torch) are already pulled in by ComfyUI.
Works with current ComfyUI builds — the same ones that load FLUX.1 /
Qwen-Image / SD3.5. It relies on stable comfy.lora / comfy.sample
internals; if a future ComfyUI refactor breaks loading, please
open an issue.
Nodes
| Node | Use when |
|------|----------|
| LoRA Block Weight (FLUX.1) / (Qwen-Image) / (SD3.5 Large) | Drop-in LoraLoader replacement, one block × one value. Wire to Efficiency XY Plot for grid sweeps. |
| LoRA Block Weight Batch (FLUX.1) / (Qwen-Image) / (SD3.5 Large) | All-in-one: loops over (block, value) internally, samples each, returns a batched IMAGE. No XY plot needed. Used in the demos above. |
| LoRA Block Weight Group (FLUX.1) / (Qwen-Image) / (SD3.5 Large) | Sweep grouped blocks (e.g. D00-D06, B10-B19, J00-J09) once you've narrowed down where the action is. |
| LoRA Block Weight Custom (FLUX.1) / (Qwen-Image) / (SD3.5 Large) | Final pass: set every block individually via a comma-separated list (57 for FLUX.1, 60 for Qwen-Image, 38 for SD3.5). |
| LoRA Block Weight Save Grid | Renders the batched IMAGE output into a labeled grid PNG (block names on Y axis, weights on X axis). Model-agnostic. |
Block tags:
- FLUX.1:
D00..D18(double-stream) +S00..S37(single-stream) = 57 blocks - Qwen-Image:
B00..B59= 60 transformer blocks - SD3.5 Large:
J00..J37= 38 joint blocks (MMDiT context + image halves)
baseline_weight flips the experiment mode:
1.0→ Knock-out: every other block at full; target varies. "What breaks when this block is removed?"0.0→ Solo: every other block at zero; target alone. "What does this block contribute by itself?"
Input/output layers (img_in / txt_in / time_in / vector_in /
guidance_in / final_layer) always follow baseline_weight and are never
sweep targets — they don't have block indices.
See USAGE.md for full workflow recipes.
Why per-model adapters?
Each DiT model lays its transformer blocks out differently, and block-wise LoRA loaders built for SDXL's U-Net don't map cleanly:
- FLUX.1: 19 double-stream blocks (
double_blocks.{N}) then 38 single-stream blocks (single_blocks.{N}). TagsD00..D18andS00..S37. - Qwen-Image: 60 single-stream MMDiT blocks (
transformer_blocks.{N}) with joint image+text attention inside each block. TagsB00..B59. - SD3.5 Large: 38 MMDiT joint blocks (
joint_blocks.{N}), each split into acontext_block(text) half and anx_block(image) half that share joint attention. TagsJ00..J37.
This node groups LoRA keys by the model's actual block index via per-model
regex on the state-dict keys, so the weights you set match the transformer
the model actually runs. Adding a new DiT model means writing one small
BlockSpec and four thin subclasses — see lora_block_weight/_sd35.py for
the smallest template.
Citation / inspiration
Block-wise LoRA weighting as a technique comes from hako-mikan/sd-webui-lora-block-weight (SD1.5/SDXL, A1111). This node ports the idea to ComfyUI and adapts it to FLUX.1's transformer layout.
License
MIT — see LICENSE.
Contributing
Bug reports and LoRA-specific findings welcome via Issues — if you sweep a popular LoRA and find an interesting block ranking, share it.