
ae-in-workflow
In-workflow Nodes for ComfyUI - Heavy interaction and streaming capabilities
Nodes (5)
Every Crop in Your Batch Comes Out a Different Size. This Fixes That
Pick your dataset images by eye, straight from the queue
The Node That Stretches a Value Ramp
Hand-edit OpenPose keypoints and hand the pose to ControlNet
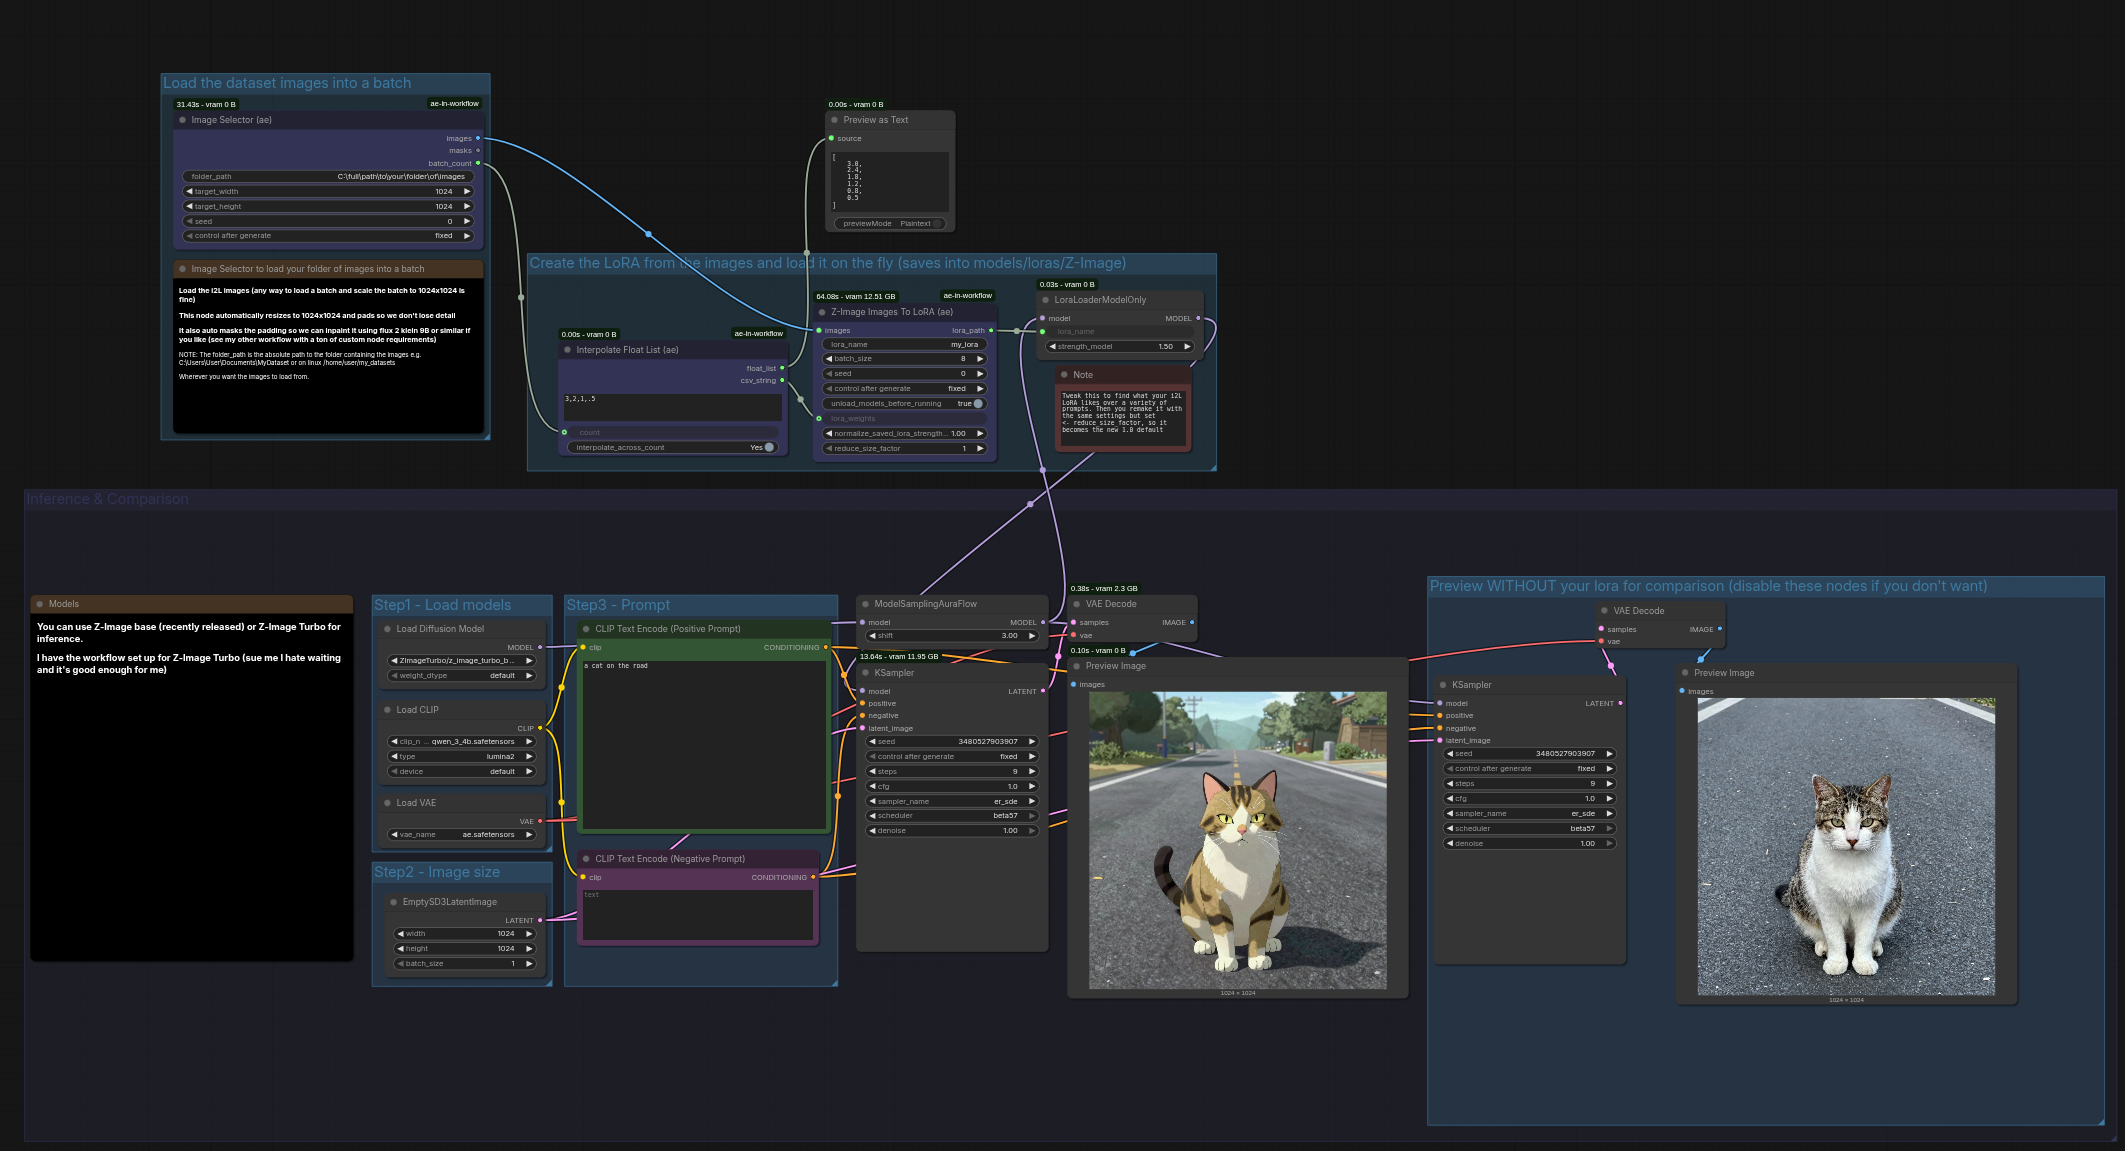
The lazy way to make a Z-Image style LoRA without leaving the graph
In-workflow Nodes for ComfyUI


A collection of interactive nodes that provide convenient workflow tools for ComfyUI.
NOTE:
I'm not sure if this is a normal way to do things, but rather than validation I simply use seed to trigger running the node again with the same inputs if I require.
Most of the time you will want to set these to Fixed for the node to run once and not again unless the inputs change.
But if you need them to proc again, just change the seed value and it will run again with the same inputs.
🎯 NODES SO FAR:
Z-Image - Images To LoRA: Brings DiffSynth-Studio's Z-Image i2L pipeline into ComfyUI as a convenient single-node solution for converting image batches to LoRA models.
Image Selector: Interactive image selection from folders with thumbnail grid view, sorting, folder navigation, and asynchronous loading for enormous folders.
Crop Image Batch to Mask Bounds: Intelligent cropping of image batches based on mask boundaries with consistent output dimensions.
Interactive Pose Editor: Pose manipulation with multi-person support, hierarchical editing, undo/redo, and caching.
🔧 OTHER UTILS
Interpolate Float List: Process and interpolate comma-separated float lists.
Crop Image Batch to Mask Bounds: Per image-mask pair mask-based cropping with optional forced output dimensions.
🚀 Key Features
✨ Z-Image - Images To LoRA
- 🎯 Convenient LoRA Creation: Turn image batches into LoRA models using DiffSynth-Studio's pipeline
- 🧠 Memory Efficient: Includes VRAM management optimizations
- 📦 Batch Processing: Handle large image sets with configurable batch sizes
- 🔢 Auto-Versioning: Automatic version numbering to avoid overwrites
- 🔗 Direct Integration: Accepts image batch input and outputs path that feeds directly into LoraLoaderModelOnly (you don't even need to refresh, it's single pass)
🎭 Professional Pose Editing
- ⚡ One-Click Editing: Click any keypoint and drag to move it instantly
- 🎯 Smart Person Selection: Automatically selects the person closest to your cursor
- 👥 Multi-Person Scenes: Add, remove, and manage multiple people in one scene
- 🔄 Pose Manipulation: Move, rotate, and scale entire poses or individual limbs
- 🦴 Limb Controls: Move keypoints with or without their "children" (connected joints)
- 🔄 Flip & Turn: Mirror poses horizontally or rotate them 180°
- ✨ Auto-Fix Missing Keypoints: Estimates missing joints using T-pose proportions
- 📐 Smart Spacing: Automatically prevents people from overlapping
- 🔄 Duplicate & Clone: Copy poses for creating variations quickly
- 🎬 Animation Chains: Link multiple nodes for frame-by-frame stop-motion style animation
- 💾 Smart Caching: Remembers your edits for instant loading next time
- 🖥️ Window Memory: Remembers window position and size between sessions
- 🌐 Cross-Platform: Works identically on Windows, macOS, and Linux
- 🎨 T-Pose Templates: Start fresh with clean T-poses when no input provided
📦 Installation
Quick Start (ComfyUI Manager - Recommended)
- Open ComfyUI Manager in ComfyUI
- Click "Install via Git URL"
- Paste:
https://github.com/by-ae/ae-in-workflow.git - Click "Install" and restart ComfyUI
- For Z-Image functionality, install DiffSynth-Studio (see below)
For Z-Image - Images To LoRA Node
This node requires DiffSynth-Studio. The other nodes work without it.
Installation steps:
- Activate your ComfyUI Python environment
- Run these commands:
git clone https://github.com/modelscope/DiffSynth-Studio.git
cd DiffSynth-Studio
pip install -e .
Environment-specific examples:
For portable ComfyUI (python_embedded):
git clone https://github.com/modelscope/DiffSynth-Studio.git
cd DiffSynth-Studio
C:\path\to\ComfyUI_Portable\python_embedded\python.exe -m pip install -e .
For .venv ComfyUI (Windows):
C:\path\to\ComfyUI\.venv\Scripts\activate.bat
git clone https://github.com/modelscope/DiffSynth-Studio.git
cd DiffSynth-Studio
pip install -e .
For .venv ComfyUI (Linux/Mac):
source /path/to/ComfyUI/.venv/bin/activate
git clone https://github.com/modelscope/DiffSynth-Studio.git
cd DiffSynth-Studio
pip install -e .
For conda/mamba:
conda activate your_comfyui_env
git clone https://github.com/modelscope/DiffSynth-Studio.git
cd DiffSynth-Studio
pip install -e .
Manual Installation (Alternative)
- Clone this repository into your ComfyUI
custom_nodesdirectory:cd ComfyUI/custom_nodes git clone https://github.com/by-ae/ae-in-workflow.git cd ae-in-workflow pip install -r requirements.txt - Restart ComfyUI
🔧 Requirements
Automatically installed by pip install -r requirements.txt:
pygame>=2.0.0          # Interactive pose editor UI
torch>=1.9.0           # PyTorch for ML operations
numpy>=1.19.0          # Numerical computing
Pillow>=8.0.0          # Image processing
safetensors>=0.4.0     # Safe tensor serialization
screeninfo>=0.8.0      # Optional: improves window positioning
Optional: For Z-Image - Images To LoRA, install DiffSynth-Studio separately (see installation steps above).
🎨 Nodes
Z-Image - Images To LoRA (ae)
Category: ae-in-workflow
Convert image batches to LoRA models using DiffSynth-Studio's pipeline, with direct integration for ComfyUI workflows.
Convert images to LoRA (Low-Rank Adaptation) using the Z-Image pipeline from DiffSynth-Studio. This node processes batches of images and generates LoRA files that can be used with LoraLoaderModelOnly nodes.
Powered by: DiffSynth-Studio
Key Features:
- 🎯 LoRA Creation: Convert image batches to LoRA models using DiffSynth-Studio's pipeline
- ⚖️ Weighted Averaging: Apply custom weights to each image for fine-tuned LoRA generation
- 🎚️ Strength Control: Adjust overall LoRA strength with multiplier factor
- 📏 Size Reduction: Compress LoRA size by averaging groups of similar images
- 🧠 Memory Efficient: Includes VRAM management with bfloat16 precision
- 📦 Batch Processing: Handle large image sets with configurable batch sizes
- 🔢 Auto-Versioning: Automatic version numbering to avoid overwrites
- 🔗 Direct Integration: Output paths work seamlessly with LoraLoaderModelOnly
Inputs:
- images (required): Batch of images as tensor (shape: B×H×W×3)
- lora_name (required): Dataset name for the LoRA (default: "my_lora")
- batch_size (optional): Images to process simultaneously (default: 8, higher = faster but more VRAM)
- lora_weights (optional): Comma-separated weights for each image (e.g., "1.0,2.0,0.5") - leave empty for equal weighting
- normalized_strength (optional): Target strength normalization for saved LoRA (default: 1.0)
- reduce_size_factor (optional): Batch size for averaging LoRAs (default: 1, higher = smaller final LoRA by averaging groups)
- seed (optional): Change to force re-execution with same inputs (default: 0)
Outputs:
- lora_path: Relative path to generated LoRA file (e.g., "Z-Image/ae/z-image_my_lora_v000.safetensors")
Usage Notes:
- LoRA files are saved to:
models/loras/Z-Image/ae/z-image_<name>_vXXX.safetensors - Connect the output directly to LoraLoaderModelOnly "lora_name" input
- Requires DiffSynth-Studio (install via instructions at https://github.com/modelscope/DiffSynth-Studio)
Image Selector (ae)
Category: ae-in-workflow
🎯 INTERACTIVE IMAGE BROWSER: Browse and select images from folders using an intuitive thumbnail grid interface with folder navigation and asynchronous loading. Perfect for curating datasets before processing with other nodes.
An interactive image selector that displays images from a folder in a scrollable grid view. Click to select/deselect images, navigate between folders instantly, and handle enormous folders without performance issues thanks to asynchronous loading.
Key Features:
- 🖼️ Thumbnail Grid View: Visual browsing of images in folders
- 📁 Folder Navigation: Tree panel for browsing subdirectories and parent folders
- 👆 Click Selection: Click thumbnails to select/deselect (maintains order)
- 📜 Smooth Scrolling: Navigate large image collections with optimized performance
- ⚡ Asynchronous Loading: Handles enormous folders without freezing UI
- 📐 Smart Resizing: Automatic aspect-ratio-preserving resizing with custom padding
- 🎨 Transparency Support: Handles images with alpha channels
- 📦 Batch Output: Ready-to-use IMAGE tensors for ComfyUI workflows
Controls:
Left Click: Select/deselect image or navigate folders
Ctrl+A: Select/deselect all images
Ctrl+S: Cycle through sort modes (Name/Size/Modified/Created/Dimensions)
Ctrl+D: Toggle sort direction (ascending/descending)
ESC/ENTER: Finish selection and close
Mouse Wheel: Scroll through images (right) or folders (left)
Inputs:
- folder_path (required): Path to folder containing images
- target_width (optional): Target width for resized images (0 = auto)
- target_height (optional): Target height for resized images (0 = auto)
- seed (optional): Change to force re-execution with same inputs (default: 0)
Outputs:
- images: Selected images as batched tensor (ComfyUI IMAGE format)
- masks: Alpha masks for images with transparency
- batch_count: Number of images in the batch
Usage Notes:
- Supported Formats: PNG, JPG, JPEG, BMP, TIFF, WebP
- Asynchronous Loading: Folders load in background with loading indicator - no UI freezing even with 1000+ images
- Lazy Loading: Images are loaded on-demand with intelligent caching for smooth scrolling
- Memory Management: Only visible images are kept in memory with automatic cleanup
- Folder Navigation: Tree panel allows instant navigation between folders with async loading
- Performance: Handles enormous folders efficiently with 1-image-per-frame loading limits
- Pre-padding: Optionally pad all images to consistent dimensions before mask processing
- Image Processing: Images are resized maintaining aspect ratio with custom padding color
- Mask Processing: Intelligent cropping based on mask bounds with aspect ratio preservation
- Sorting: Multiple sort options (Name, Size, Modified date, Created date, Dimensions) with persistent settings
- Selection: Click thumbnails to select/deselect, Ctrl+A to select/deselect all
- UI Enhancements: All text has black outlines for readability on dark backgrounds
- Batch Output: Selection order is preserved in the output tensor

Crop Image Batch to Mask Bounds (ae)
Category: ae-in-workflow
✂️ Intelligent Mask-Based Cropping: Crop image batches to mask boundaries with options for individual or combined cropping, ensuring consistent output dimensions.
This node crops images based on mask boundaries, with two modes for different use cases. Perfect for preparing masked objects or scenes for further processing while maintaining alignment between images and masks.
Key Features:
- 🎯 Mask-Based Cropping: Automatically finds and crops to mask boundaries
- 🔄 Two Cropping Modes: Individual object cropping or combined scene cropping
- 📐 Consistent Dimensions: All outputs have matching dimensions with intelligent scaling and padding
- 🎨 Custom Padding: Choose padding color for consistent backgrounds
- 🔄 Mask Alignment: Output masks are cropped/resized identically to maintain perfect alignment
Modes:
- mask_for_each: Crop each image to its individual mask bounds, scale UP to match combined bounds (maintaining aspect ratio), pad as needed
- sum_of_masks: Crop all images to the combined bounds of all masks (scene-level cropping)
Inputs:
- images (required): Batch of images to crop (B,H,W,C)
- masks (required): Corresponding masks defining crop boundaries (B,H,W)
- invert_mask (optional): Invert masks before finding bounds (default: False)
- mode (optional): Cropping mode - "mask_for_each" or "sum_of_masks" (default: "mask_for_each")
- padding_color (optional): Hex color for padding areas (default: "#000000")
- optional_padding (optional): Extra padding pixels around cropped areas (default: 0)
- optional_new_width (optional): Pad images to this width before processing (default: 0)
- optional_new_height (optional): Pad images to this height before processing (default: 0)
Outputs:
- images: Cropped and resized images with consistent dimensions
- masks: Corresponding masks cropped, resized, and padded to match images
Usage Notes:
- Empty Masks: Images with empty/invalid masks are cropped to full bounds
- Aspect Ratio: Cropped content maintains original proportions with padding
- Batch Consistency: All images in batch end up with identical dimensions
- Mask Alignment: Output masks perfectly align with their corresponding images
Interactive Pose Editor (ae)
Category: ae-in-workflow
🎭 Interactive Pose Editor: Pose manipulation with multi-person support, hierarchical editing, undo/redo, and caching.
An interactive pose editor that allows users to manipulate OpenPose keypoints with full control.
Inputs:
- pose_data (optional): OpenPose format pose data. If None, creates a default T-pose
- Format:
[{"people": [{"pose_keypoints_2d": [x1, y1, conf1, x2, y2, conf2, ...]}]}] - Each person has 18 keypoints (nose, neck, shoulders, elbows, wrists, hips, knees, ankles, eyes, ears)
- Confidence values: 0.0 = missing/hidden, > 0.0 = visible
- Format:
- padding (optional): Padding in pixels around the pose in output image (default: 100)
- x, y, w, h (optional): Initial window position and size (default: 20, 20, 1024, 1024)
- reset_cached_window_position (optional): Reset window position to defaults (default: False)
Outputs:
- image: Rendered pose as tensor (1, H, W, 3) cropped to pose bounds with padding
- pose_data: Updated pose data in same format as input, ready for saving/caching
Key Features:
- Smart Caching: Automatically caches your edits based on input pose hash - next time you load the same pose, your edits are restored
- Multi-Person Support: Add (Ctrl+N), duplicate (Ctrl+D), delete (Ctrl+X) people in the scene
- Auto-Fix: Press Ctrl+F to estimate missing keypoints using T-pose proportions
- Undo/Redo: Full undo/redo support (Ctrl+Z, Ctrl+Shift+Z/Ctrl+Y)
- Reset: Press Ctrl+O to reset to original input pose
- Window Memory: Window position and size are remembered between sessions
Usage Notes:
- Initial Input: Can accept pose from OpenPose preprocessor, ControlNet, or start from scratch (None = T-pose)
- Validation: Input pose data is validated - returns None if malformed (empty people, missing fields, wrong format)
- Coordinate System: Uses standard OpenPose 18-keypoint format (BODY_25 subset)
- Confidence Values: Only keypoints with confidence > 0.0 are visible and editable
- Output Format: Compatible with ControlNet and other pose-processing nodes
Usage Examples
✂️ Mask-Based Image Cropping
- Generate Masks: Use segmentation models to create masks for objects/scenes
- Connect Inputs: Feed image batch and corresponding mask batch to Crop node
- Choose Mode:
- Use "mask_for_each" for individual objects (each cropped to its own bounds, then resized to match)
- Use "sum_of_masks" for scenes (all cropped to combined bounds)
- Adjust Settings: Set padding color and optional padding as needed
- Consistent Output: All images now have identical dimensions, ready for batch processing
🎯 Image Selection: Curate Your Dataset
- Set Folder Path: Point to a folder containing your images
- Launch Selector: Click queue to open the interactive browser
- Browse & Select: Scroll through thumbnails, click images to select/deselect
- Finish Selection: Press ESC or ENTER when done
- Auto Processing: Images are automatically resized and batched
- Connect to Next: Feed the batched images directly to other nodes
Pro Tip: Set target dimensions if you need consistent sizes, otherwise it auto-sizes based on your largest selected image.
🎭 Basic Pose Editing
- Load pose data from OpenPose detection or ControlNet
- Connect to the Pose Editor node
- Click "Queue" to launch the interactive editor
- Edit poses using mouse and keyboard controls
- Close the editor to get the modified pose data
👥 Multi-Person Scene Creation
- Start with a single person pose (or no input for default T-pose)
- Use Ctrl+N to add more T-pose people
- Position and edit each person individually
- Use Ctrl+D to duplicate poses for variations
- Export the complete multi-person scene
🎬 Animation Chains & Iterative Refinement
- Edit a pose and save it
- Next time you load the same pose data, it starts with your previous edits
- Use Ctrl+Z to reset to the original if needed
- Link multiple Pose Editor nodes for frame-by-frame animation
- Chain Z-Image nodes with different image batches for style variations
🤝 Contributing
Contributions are welcome! Please feel free to submit issues, feature requests, or pull requests.
📄 License
This project is licensed under the MIT License - see the LICENSE file for details.
🙏 Acknowledgments
- Built for the ComfyUI community
- Inspired by the need for more interactive workflow tools
- Thanks to the OpenPose project for the pose format standard
- Thanks to the DiffSynth-Studio team for the Z-Image i2L pipeline.
📞 Support
If you encounter any issues or have questions:
Go to the one of my things on civitai and ask me there please.
I'll try help out when I have some spare time.
Made with ❤️ by-ae