
ComfyUI-SimpleChat
Simple, no-nonsense LLM chat nodes for ComfyUI. Support OpenAI, Claude, Gemini and NoASS Roleplay.
Nodes (20)
Edit an image by describing the change — no inpainting mask math
Ask Gemini to draw the image, right inside ComfyUI
Let the LLM draft, then you override and lock whatever it keeps changing
Turn one Anima JSON prompt into a whole artist × background sweep
One API key, three providers, any OpenAI-compatible endpoint
Ask an LLM what's actually in your image
Stitch a batch into a contact sheet when you don't need labels
Split your LLM's JSON into strings without writing a line of code
Same JSON parsing, twice the ports
Any JSON becomes {{mustache}} variables, flat or nested
Read your LLM's reply the way it was meant to be read
Render {{vars}} in any text, no chat call required
Define one {{variable}} and pipe it through every prompt
A roleplay node that tells the model exactly how to start its reply
One JSON from the LLM, everything your sampler needs on the other side
A chat node that just talks to your API
A plain text box that outputs plain text — that's the whole node
Turn a pasted list of artists into a batch ComfyUI can sweep
Give every cell of your XY test its own filename
A labelled grid for your XY tests — stop squinting at the raw batch
ComfyUI-SimpleChat
Simple, no-nonsense LLM chat nodes for ComfyUI. Connect to OpenAI, Claude, Gemini, and local LLMs with ease.
Features
- All-in-One Configuration: Single, powerful config node for all providers.
- Dynamic Model Fetching: Click one button to fetch the actual list of models available to your API key. No hardcoded lists!
- Universal Compatibility: Works with official APIs and any OpenAI-compatible proxy/local endpoint.
- Multimodal Support: Chat with images using vision-capable models.
- NoASS Roleplay Mode (Exp): Experimental Hardcore roleplay node with Assistant Prefill support.
- Gemini Native Features: Dedicated nodes for Gemini's image generation and editing capabilities.
- Template Variables (Mustache): Write
{{var}}in any prompt/system field and inject values via a node. - JSON Field Extractor: Parse JSON and split values into multiple outputs (fixed 8 ports).
- Markdown Preview: Render markdown output in a safe, sanitized popup.
Wiki (GitHub Native)
- Wiki Home:
https://github.com/Moeblack/ComfyUI-SimpleChat/wiki - Source of truth:
docs/wiki/(auto-published by GitHub Actions) - Note: Ensure Wiki is enabled in your repo Settings -> Features -> Wiki
Installation
- Clone this repository into your
ComfyUI/custom_nodesfolder:
git clone https://github.com/Moeblack/ComfyUI-SimpleChat.git
- Restart ComfyUI.
Usage Guide
1. API Configuration (The Core)
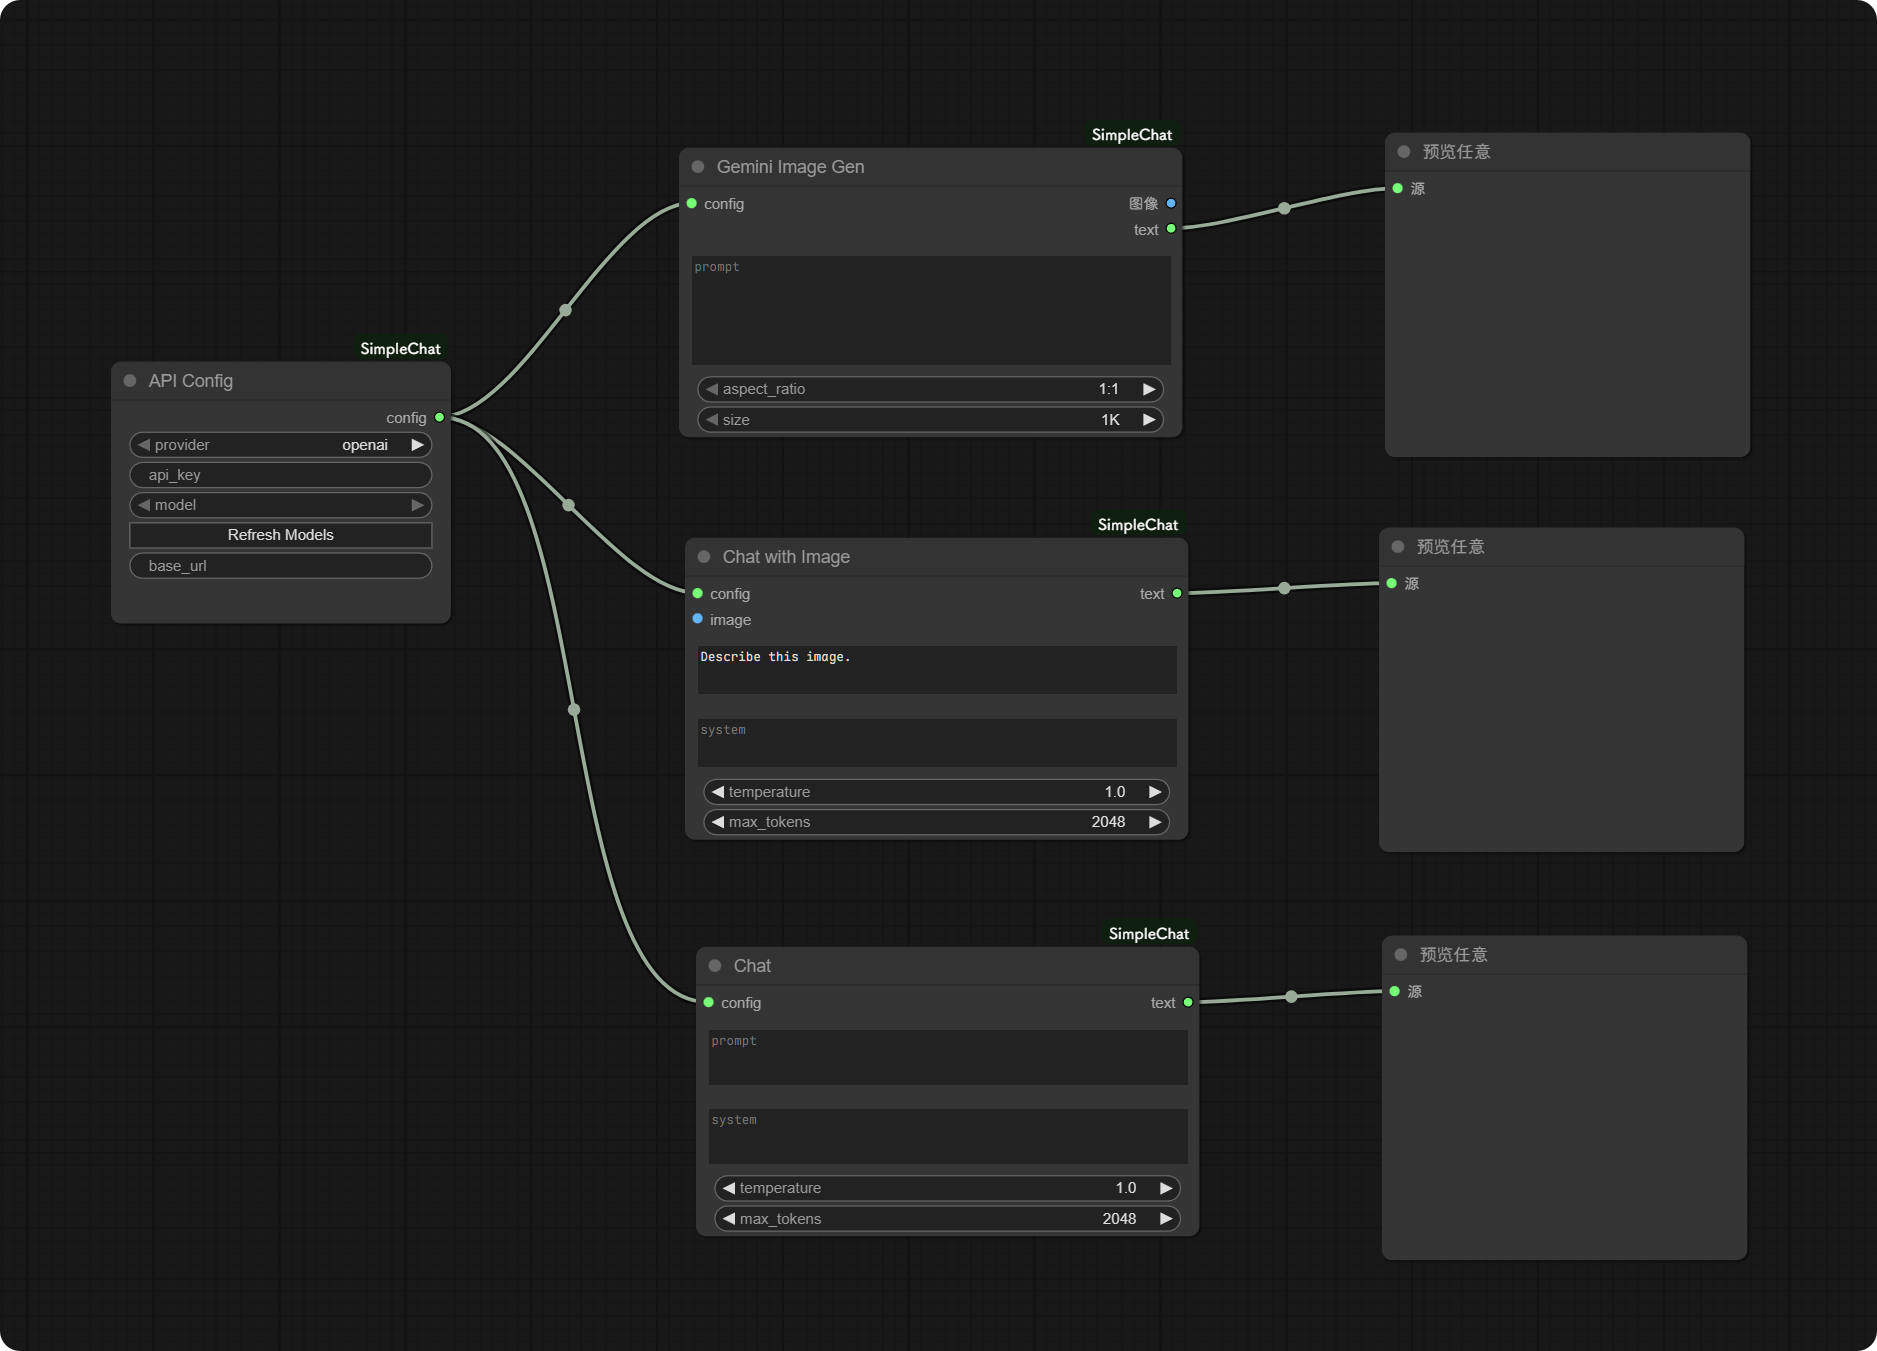
Everything starts with the API Config node.
- Add Node: Right-click ->
SimpleChat->API Config. - Select Provider: Choose
openai,claude, orgemini. - Enter API Key: Paste your secret key.
- OpenAI:
sk-... - Claude:
sk-ant-... - Gemini: Your Google AI Studio key.
- OpenAI:
- Base URL (Optional):
- Strongly recommended to leave empty unless you are using a proxy or local model.
- The plugin has built-in default official API addresses:
- OpenAI:
https://api.openai.com/v1 - Claude:
https://api.anthropic.com/v1 - Gemini:
https://generativelanguage.googleapis.com/v1beta
- OpenAI:
- If you use a proxy service (like DeepSeek, OneAPI, etc.), you usually need to fill in the full path including
/v1, e.g.,https://api.deepseek.com/v1.
- Select Model:
- Click the "Refresh Models" button.
- The node will connect to the API and fetch the real-time list of models you can use.
- Select your desired model from the dropdown.
2. Basic Chat
Use this for standard text generation or Q&A.
- Node:
Chat - Connection: Connect
configfrom API Config toconfigon Chat. - Input: Enter your prompt in
text. - Output: Returns the AI's response as a string.
- Template vars (optional): Connect
Mustache VaroutputvarstoChatinputvars, then you can use{{var}}inprompt/systemand it will be replaced.
3. Chat with Images
Use this to have the AI analyze or describe an image.
- Node:
Chat with Image - Connection:
- Connect
configfrom API Config. - Connect an image (from
Load Imagenode) to theimageinput.
- Connect
- Input: Enter a prompt (e.g., "Describe this image").
4. NoASS Chat (Experimental)
The "No Assistant" (NoASS) node is an experimental feature designed for hardcore roleplay and creative writing. It forces the AI to break character restrictions by pre-filling its response start.
- Node:
Chat NoASS (Exp) - Inputs:
- Scenario Instructions: (User Message) Define the world, characters, and rules. This sets the stage.
- User Action: Your current turn or dialogue.
- Prefill Start (Optional): Force the first few words of the AI's response. The AI must continue from here. Great for steering the tone.
- History: Connect output
historyto the next node's inputhistoryto maintain conversation context.
5. Gemini Image Generation
Generate images using Google's Gemini models.
- Node:
Gemini Image Gen - Requirement: Must use
geminiprovider in API Config. - Output: Generates a standard ComfyUI IMAGE.
6. Gemini Image Editing
Modify existing images using text instructions.
- Node:
Gemini Image Edit - Input: Source image + Mask image + Prompt.
7. JSON Parse
Parse an LLM-produced JSON string and extract up to 8 fields.
- Node:
JSON Parse - Inputs:
json_text: JSON string (can auto-extract fromjson ...fences)path1..path8: dot/bracket paths likea.b.coritems[0].name
- Outputs:
out1..out8+obj(the full parsed object)
7.1 Prompt JSON Unpack (recommended)
If your LLM outputs a fixed JSON schema (positive/negative/width/height/steps/cfg/sampler/seed/notes), use this node to unpack everything with proper typed outputs (INT/FLOAT/SAMPLER) so you can wire directly into ComfyUI nodes without manual paths or casting.
- Node:
Prompt JSON Unpack - Input:
json_text(can auto-extract fromjson ...fences) - Outputs:
positive/negative(STRING)width/height/steps/seed(INT)cfg(FLOAT)sampler(SAMPLER)notes(STRING)vars(SIMPLECHAT_VARS mapping for Mustache:{{positive}},{{width}}, etc.)
8. Markdown Preview
Preview markdown content in a popup (sanitized).
- Node:
Markdown Preview - Usage: Connect any text output to
text, execute to open the preview popup.
9. Anima prompt template (docs)
If you use SimpleChat to have an LLM generate Anima prompts, see:
docs/anima_prompt.mddocs/anima_scheme.md(JSON fields + built-in Mustache vars scheme)
(Optional) Example workflow:
assets/AnimaPromptScheme.json
FAQ
Q: I don't see my model in the list. A: Make sure you entered your API Key and Base URL correctly, then click Refresh Models. If the API supports listing models, they will appear. If not, you can try typing the model name directly (if the UI allows) or checking your provider's documentation.
Q: Can I use local models?
A: Yes! Select openai as the provider, set the Base URL to your local server address (e.g., http://127.0.0.1:1234/v1), and click Refresh.
Q: My dropdown is empty. A: Check your internet connection and API Key. If the API Key is invalid, the list will not populate.
License
MIT